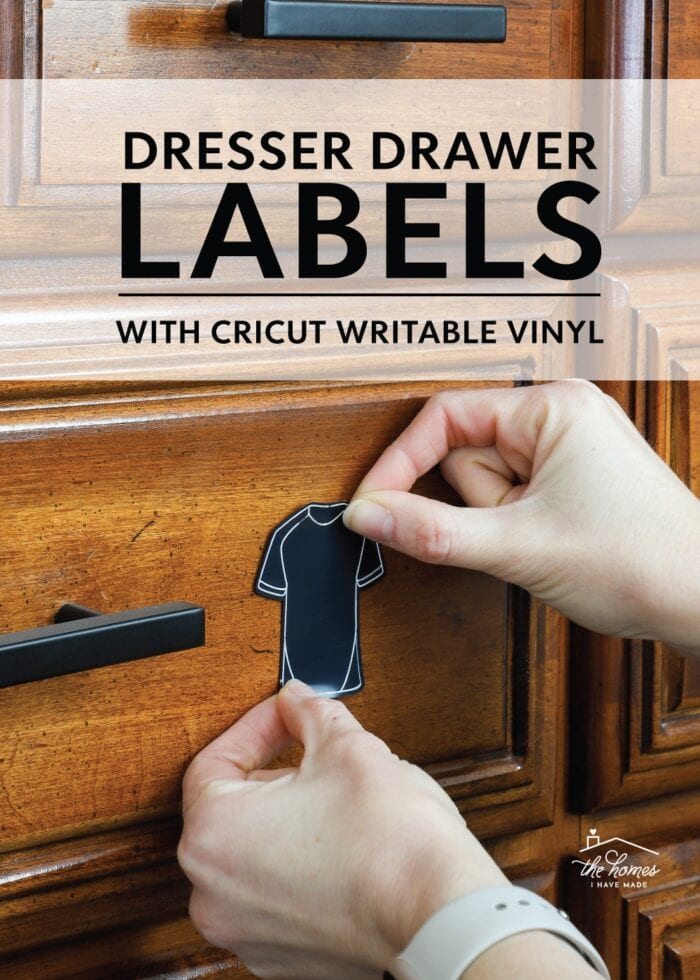
DIY Dresser Drawer Labels with a Cricut
I love using picture labels in kid spaces to help them easily find items and put them away. While I’ve typically only used them for toys and art supplies, I recently added picture labels to my sons’ clothing dressers. These DIY Dresser Drawer Labels are a quick-and-easy project thanks to Cricut’s writable vinyl. Let me teach you how they come together!
A huge “thank you” to Cricut for providing the supplies for this project. I only work with brands and products I fully support and that make sense for my home, my family, and this blog. All opinions are 100% my own.
Why Label Kids’ Dresser Drawers?
As much as I love labeling (and I love labeling), it never really occurred to me to put labels on my oldest son’s dresser until he was in elementary school. It was then that he started putting his own laundry away, but he would typically just stuff everything into one drawer.
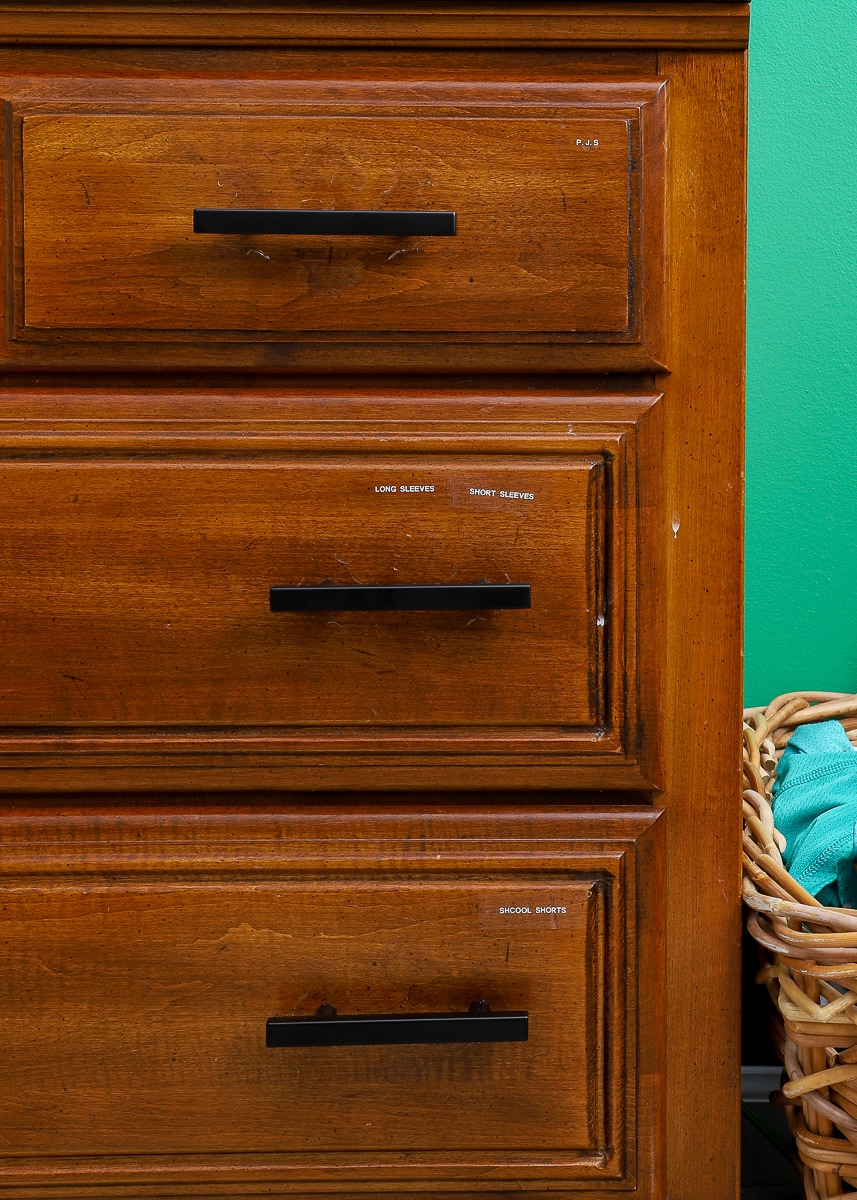
On a whim, I grabbed our label maker and punched out some quick text labels (since he could read) for his drawers. And it was an instant game changer. Although he didn’t need labels to find his clothes, they were oh-so-useful in helping him put his clothes away in the right spots (and therefore, make his drawers easier to open/close).
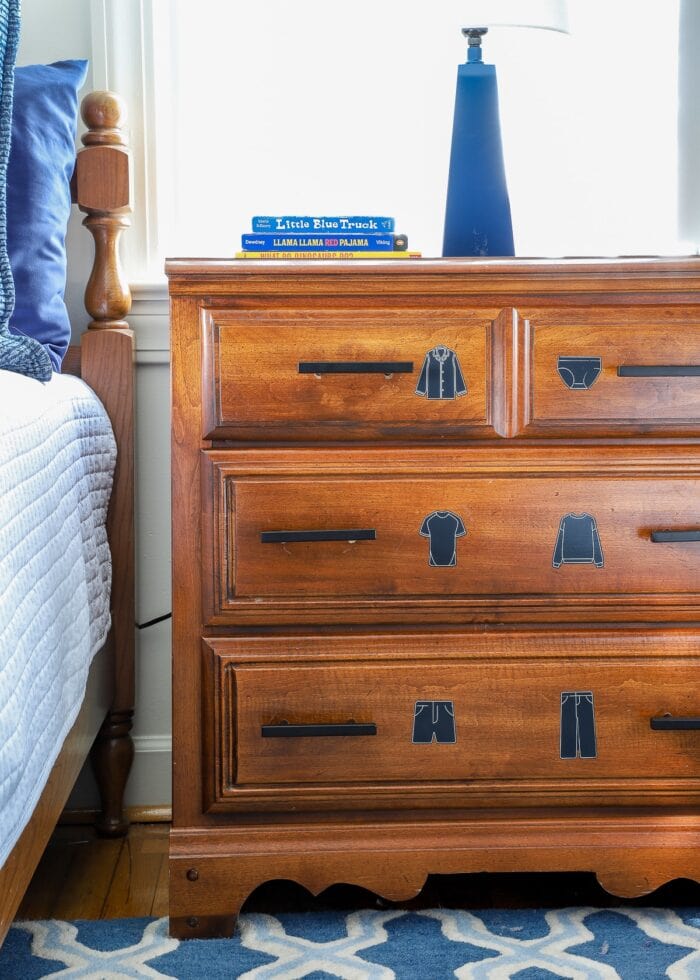
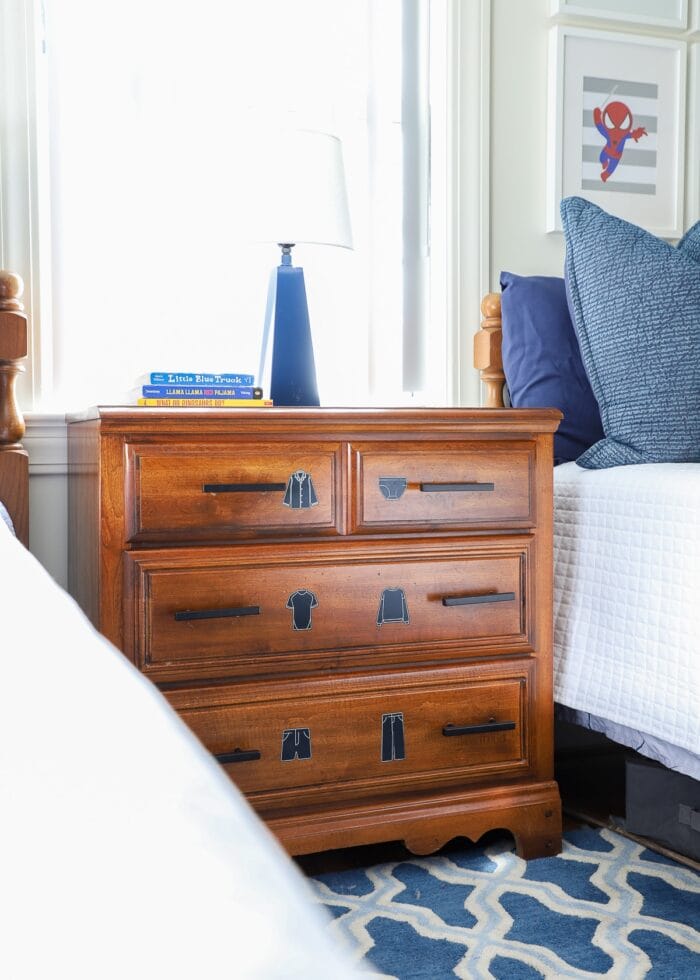
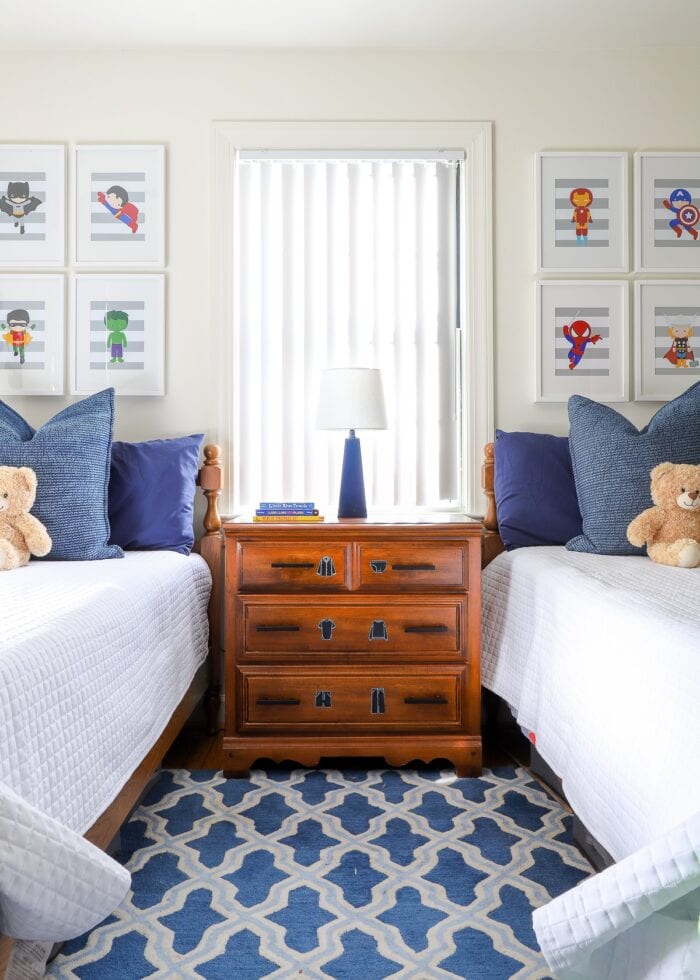
Now, my young children (ages 3 and 6) are getting to an age where they can be helpful with the laundry, but neither are readers quite yet. So I set out to make some fun picture dresser drawer labels using my Cricut and writable vinyl.
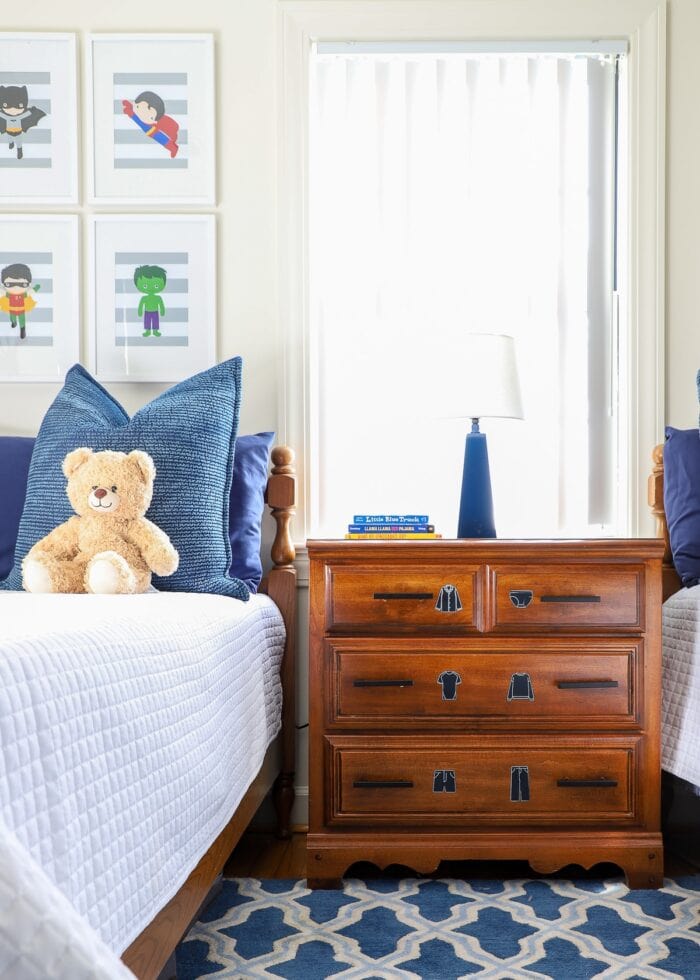
Yet again, my kiddos are not only getting dressed a little easier in the morning (especially the 3 year old, who I dispatch to get his own clothes while I’m making breakfasts/lunches), but they can easily tell what goes where as we put laundry away as a family.
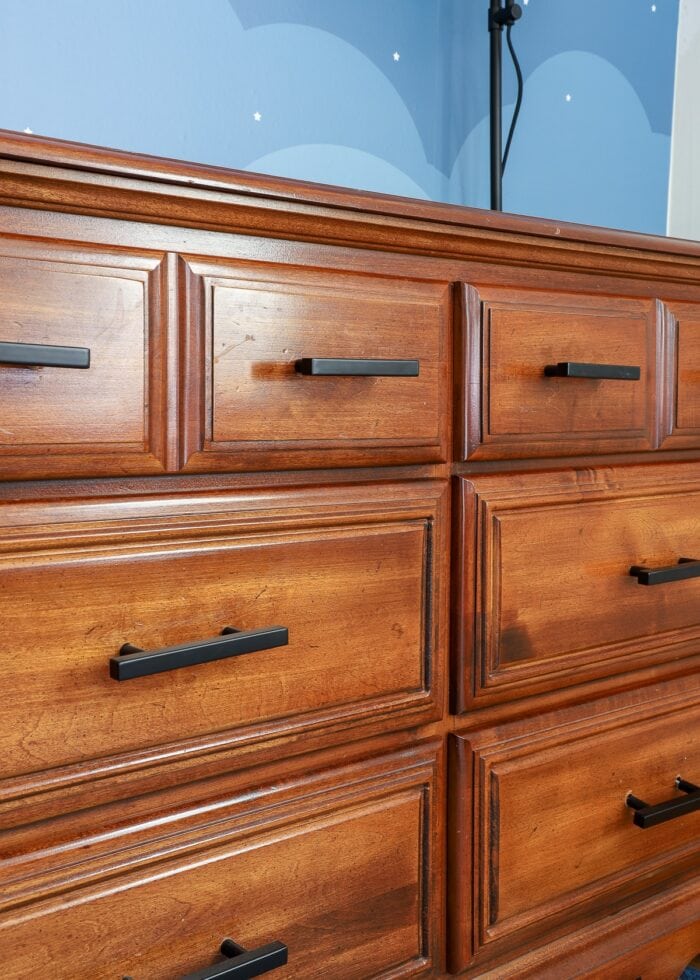
And admittedly…the dresser drawer labels are a fun and whimsical touch in this kid-friendly bedroom, playing off the matte black handles and modernizing the dated wooden dressers just enough!
Supplies Needed
Thanks to Cricut’s writable vinyl, this project really does come together quite quickly! Here is what you need:
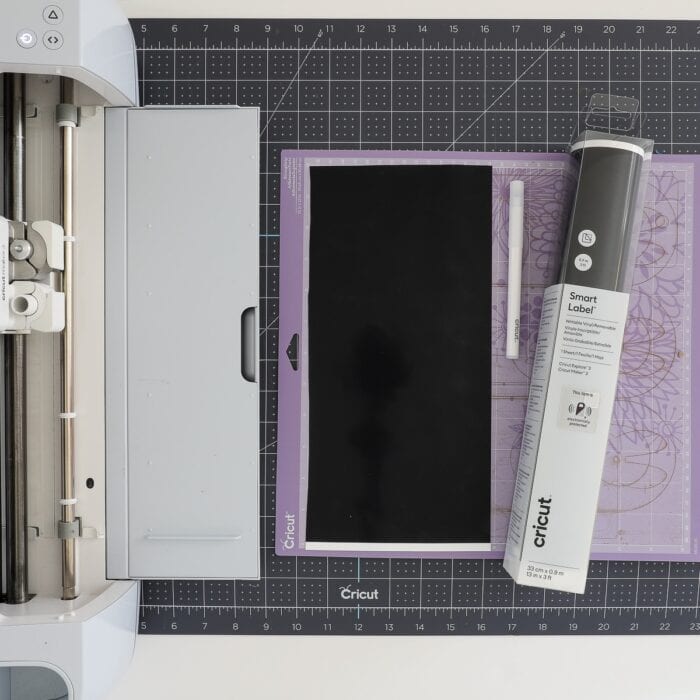
- Cricut Machine – Any Cricut machine can make this project (Cricut Explore | Cricut Maker | Cricut Joy)
- Cutting Mat – Especially if using a Cricut Explore Air 2 or original Cricut Maker, but see my notes below for all machines.
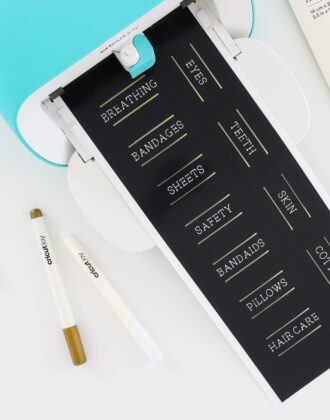
- Cricut Smart Label Writable Vinyl – Now available in black, white, and clear for all machine sizes. Pick a color that will show up best on your drawer fronts.
- Cricut Pens – I prefer Fine Point Pens (0.4 weight) for writable vinyl. Pick a color that has good contrast with the vinyl color you choose.
- Weeding Tool
- Dresser Drawers
NOTE: All writable vinyls are “Smart,” which means they can feed into the Cricut Explore 3, Cricut Maker 3, and Cricut Joy without a mat. However, I have found that the wider 13″ rolls work better when placed onto a mat. So if you are making these labels with a full size machine, consider cutting your material down and using a mat for this project.
Why Use Smart Label Writable Vinyl?
Just recently, I taught you my preferred way to make picture labels for a playroom using standard adhesive vinyl. So you might be wondering why I didn’t use the same approach for these labels.
Technically, yes, you can make dresser drawer labels by cutting out decals from standard adhesive vinyl and sticking them directly to your drawer fronts.
But this method has a few “cons,” such as:
- Weeding vinyl picture labels can be a bit more intricate and tedious.
- You usually need to use transfer tape for the application.
- Vinyl picture labels aren’t easily moved/removed once put in place.
- Finding solid color clothing icons that are easily interpreted can be quite difficult.
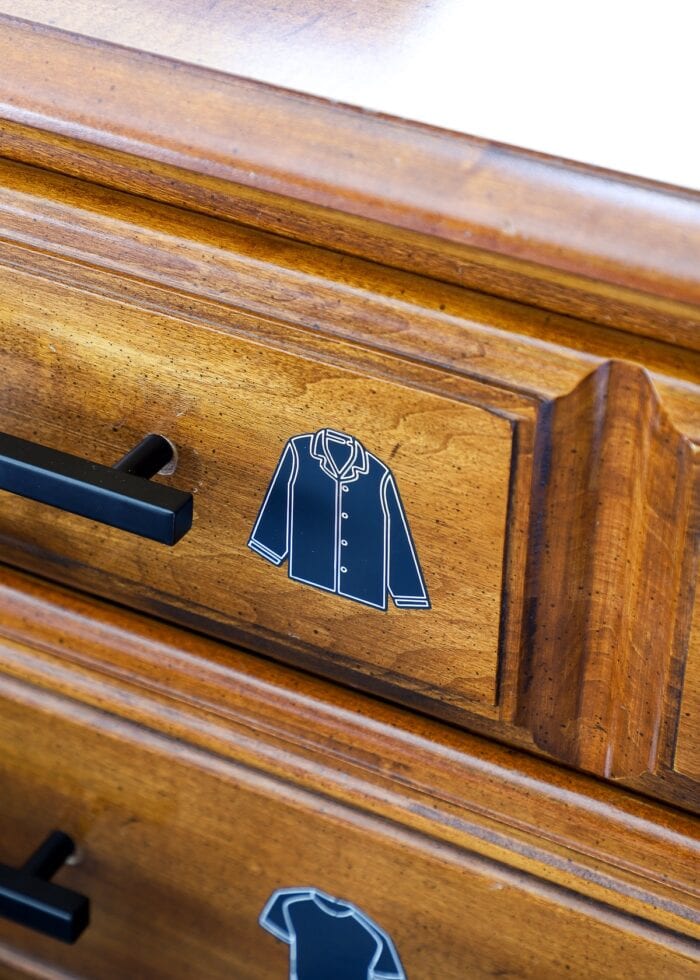
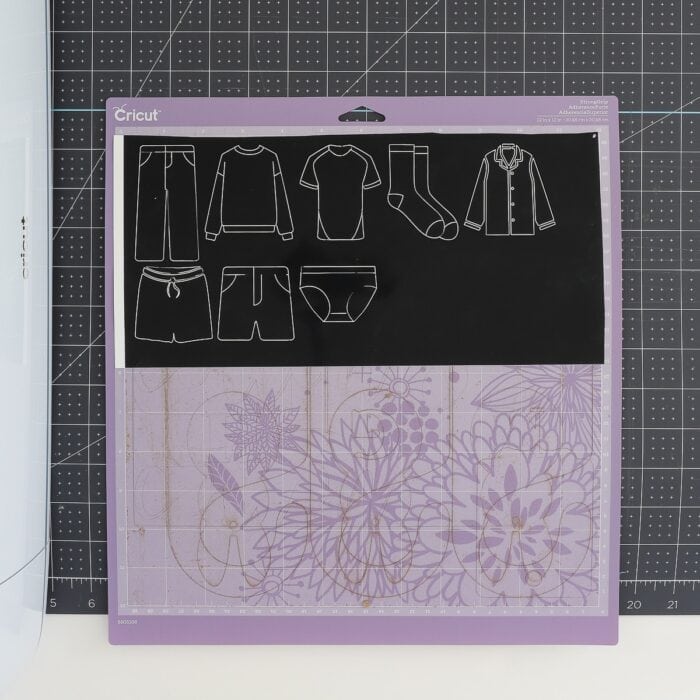
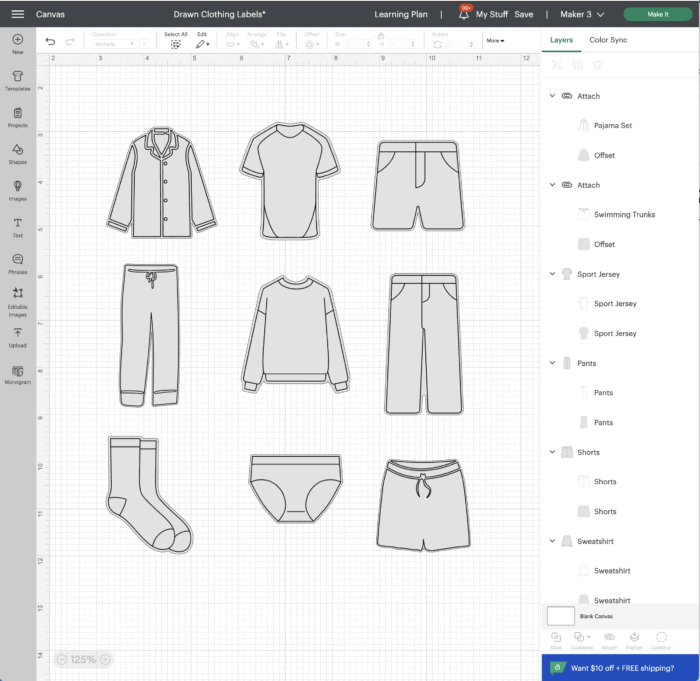
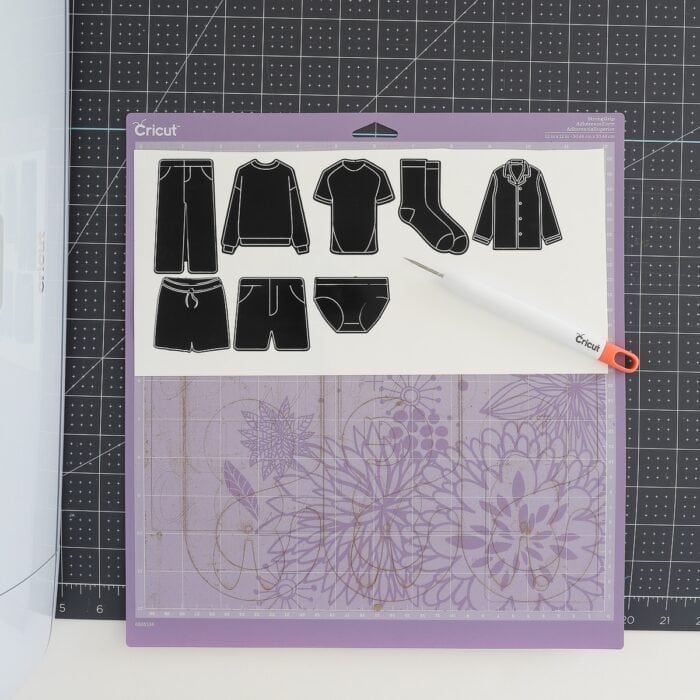
When I was looking for images to use on my dresser drawer labels, I noticed that the drawn/pen details on the “Drawn Basic Clothing Icons” set of images within the Cricut Design Space Library really improved their “intelligibility” (i.e., you could easily understand what the image meant).
Plus, since writable vinyl requires very little weeding (all the tiny details are made with pens instead) and doesn’t need transfer tape for application, this really is the quickest and easiest approach to take! (Plus, they look so cute!)
So yes, while you can technically make dresser drawer labels using this method instead; I highly recommend using Smart Label Writable Vinyl with Cricut Pens if your machine supports it!
If you’ve never worked with Cricut Smart Label Writable Vinyl, make sure to check out my comprehensive get-started guide: Everything You Need to Know About Cricut Writable Vinyl
How to Make DIY Dresser Drawer Labels with a Cricut
Step 1 – Design Labels in Cricut Design Space
Like any project, you will need to first design your dresser drawer labels in Cricut Design Space.
Thankfully, Cricut already has several sets of clothing icons within the Cricut Design Space Library that have the pen outlines included. As such, you can just search for any “Draw + Cut” clothing icons you like. (If you’d prefer to use my exact set of labels, you can access it HERE.)
If you are trying to upload/make your own clothing icons, you can add your own pen detail on any uploaded icon as follows:
- Upload clothing icon to Cricut Design Space. (Find great icons to use HERE).
- Use the Offset Tool to create an outline layer behind your original icon. If you need help, see my full tutorial: How to Use the Cricut Offset Tool
- Change the original image to a “Draw/Pen” operation (instead of cut). This will create the pen/drawn outline on top of the offset layer!
Finally, before you send your labels to your Cricut machine, do these final checks:
- Measure your drawer fronts and size the labels accordingly.
- Ensure all Pen layers are the same color on each label (or else you will be prompted to change out the pen unnecessarily.)
- “Attach” the Pen layer to the Cut layer on each label individually. Learn why here: How (& Why!) to Use Attach In Cricut Design Space.
When you’re ready, click the green “Make It” button to send the dresser drawer labels to your Cricut.
Step 2 – Load Machine & Materials
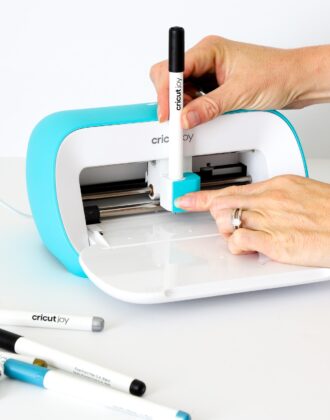
Next, set up your Cricut machine to execute this labeling project:
- Place your preferred Cricut Pen into the machine.
- Place your preferred Smart Label Writable Vinyl onto a mat and/or load it directly into the machine.
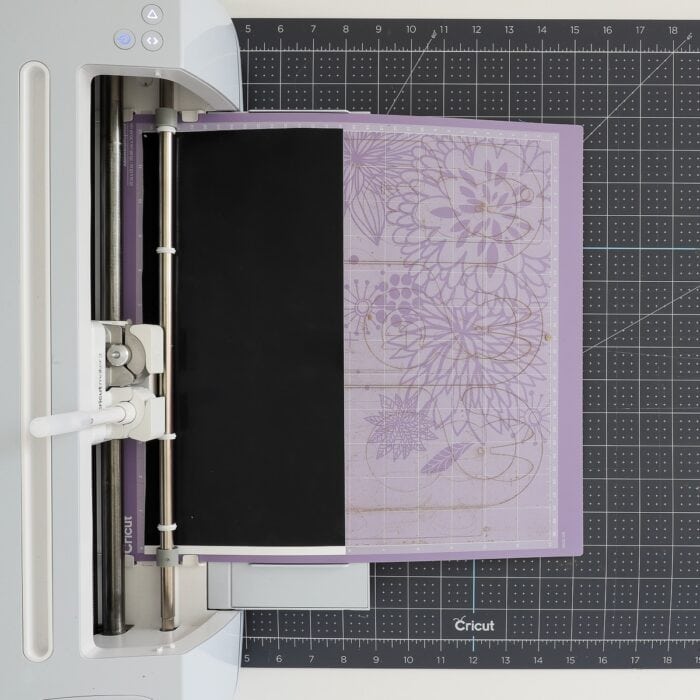
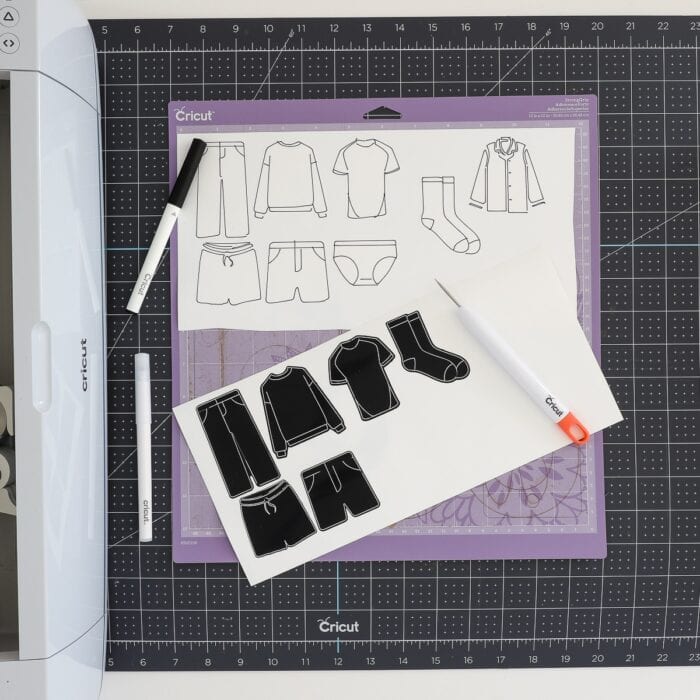
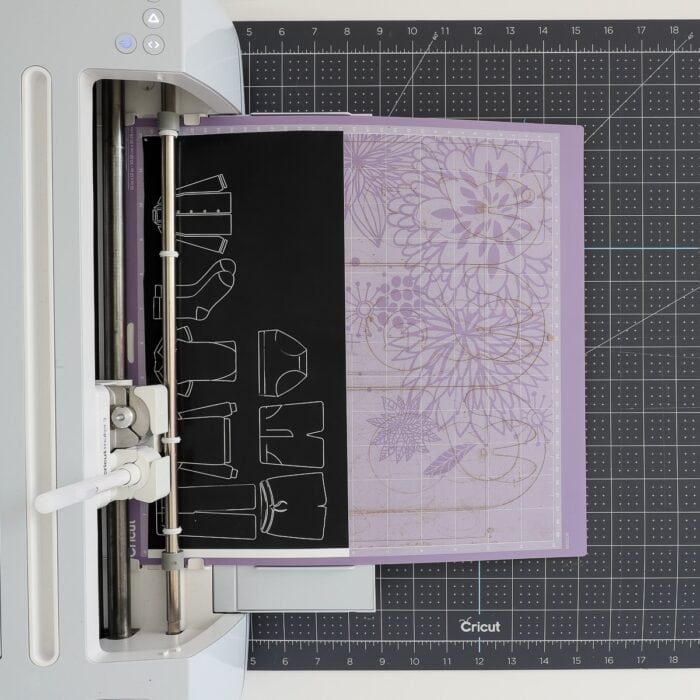
Step 3 – Draw & Cut the Labels
Follow the on-screen prompts within Cricut Design Space to have the machine first draw all the pen details, then cut out the clothing labels.
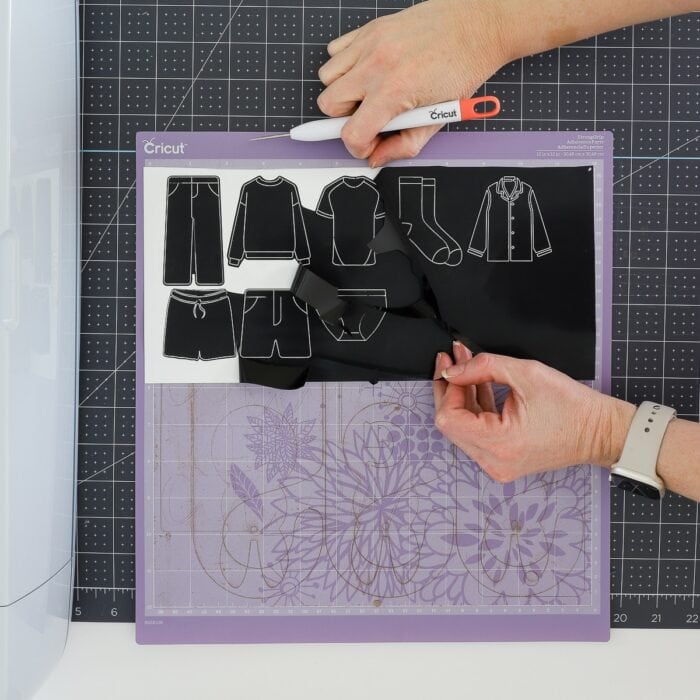
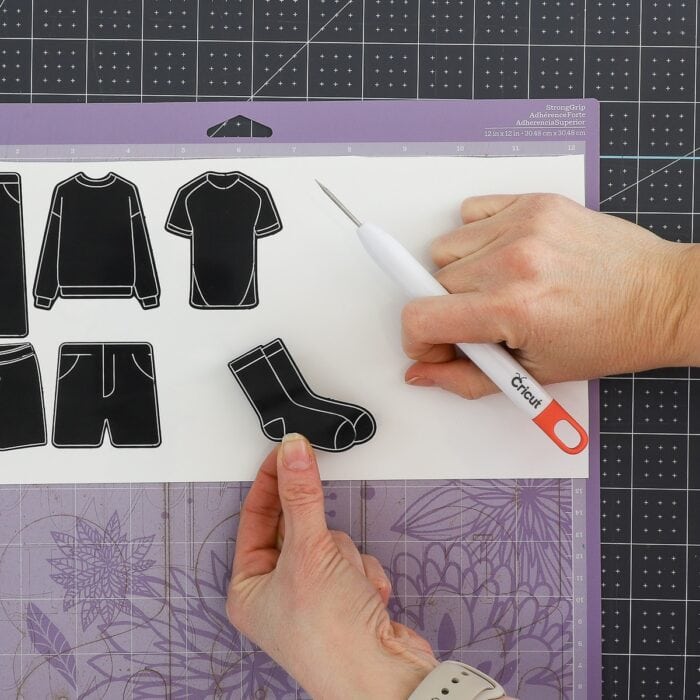
Step 4 – Weed Labels
Once the machine is done working, unload the mat/material from the machine. Then use a weeding tool to peel away all the excess vinyl from around the clothing label shapes. Work slowly to avoid ripping any labels.
And just like that, your labels are ready to be put on your drawers!
Want to save this post?
Step 5 – Place Labels Onto Dresser
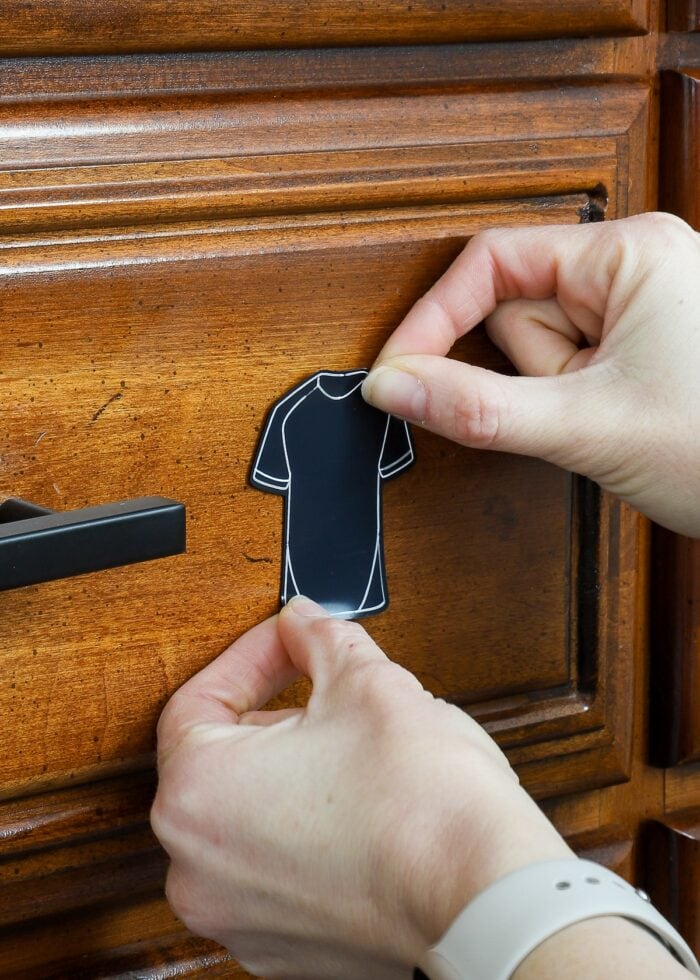
For optimum adhesion, quickly wipe down your drawer surfaces to remove any dust, smudges, grease, dirt, etc.
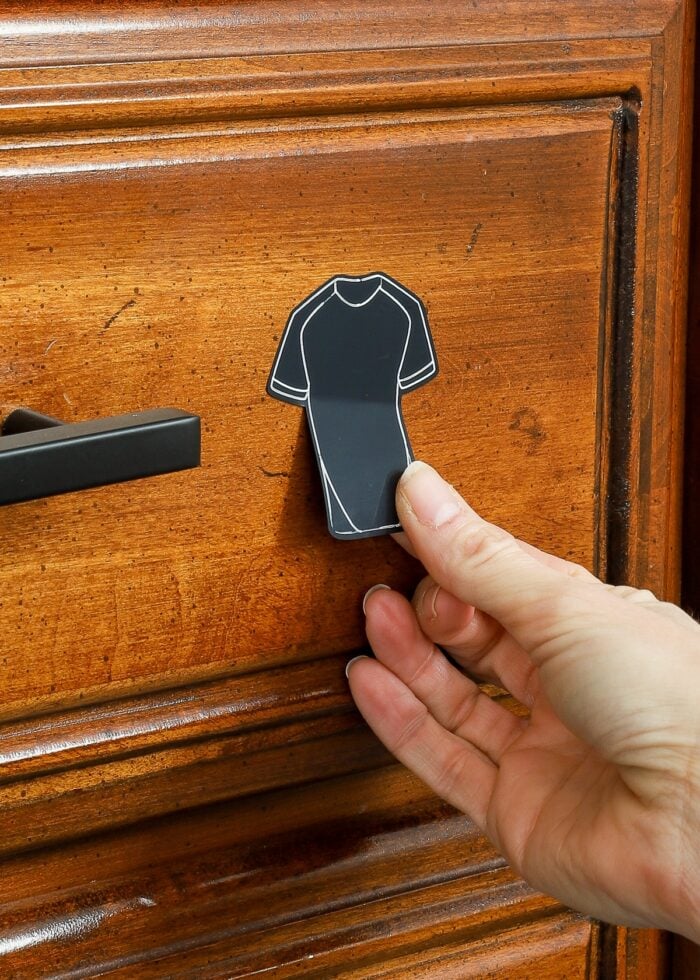
One of my favorite things about working with Cricut’s writable vinyl is that it doesn’t require transfer tape. So once the drawer fronts are clean and dry, you can simply peel up one of the dresser drawer labels (I find a weeding tool is helpful to lift up a leading corner)…
…and place it directly onto the drawer front just like stickers!
Admittedly, you might have to play around with different placements until you find the right spot on your set of drawers.
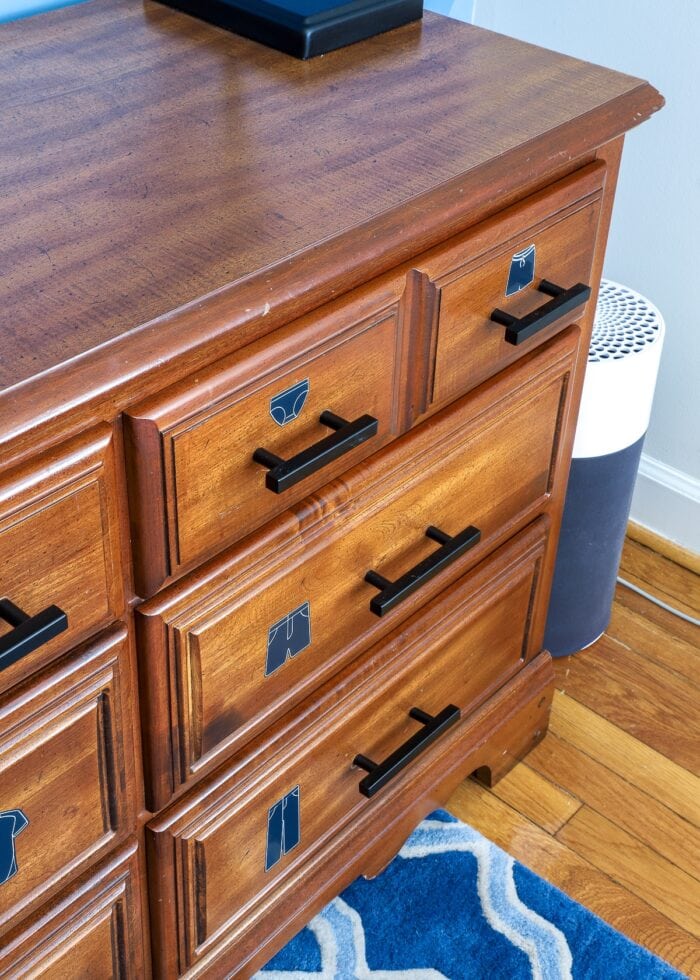
For our smaller dresser, the labels looked good down the center of the drawers.
But our bigger dresser had smaller drawers along the top row and the labels didn’t fit nicely. As such, I sized these labels down and placed them directly above the handles instead.

Thankfully, if you need to move around a label, peeling them off is super easy! Writable vinyl comes off cleanly and doesn’t warp or rip, so you can peel them up and place them right back down!
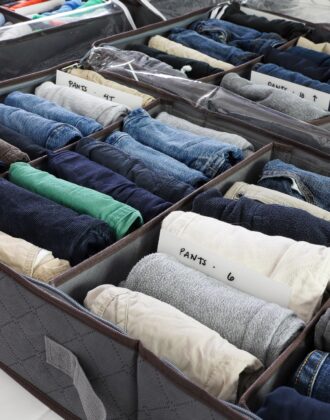
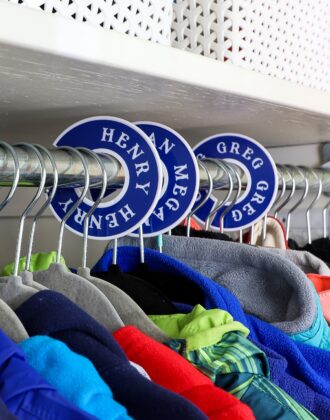
TIP! These clothing labels don’t have to be put directly onto drawers. You can easily stick them to any smooth surface, including label holders, nursery bins, or even onto hanging closet dividers!
More Great Cricut Labeling Projects
Ready to label even more with your Cricut machine? Check out these other awesome projects:- Make Vinyl Labels with a Cricut
- Make Labels Using Cricut Pens
- Make Labels with Cricut Print Then Cut
- Make Waterproof Labels with a Cricut
- How to Label Fabric with Iron-On Vinyl
- Iron-On Clothing Labels with a Cricut
- Toy Bin Labels with a Cricut
- Pantry Labels with a Cricut
- Dresser Drawer Labels with a Cricut
- Luggage Tags with a Cricut
- Return Address Labels with a Cricut
- Fast Labels with the Cricut Joy App
- Make Easy Round Closet Dividers with Cricut Vinyl
- Label Drawstring Backpacks with Cricut Iron-On
- How to Make Vinyl+Wood Labels
Funny story: I originally only made these labels for my 3 year old’s dresser…assuming my 6 year old knew where all his clothes were/went. Once he saw the labels though, he immediately asked for his own. He said “You know Mom, sometimes I forget where everything is!” Ha! Love knowing that my labeling pursuits really do help my family out after all 😉

I think my favorite thing about these kids’ clothing dresser drawer labels though, is how cute they are. They look really complicated, detailed, and time-consuming, but actually…your Cricut does ALL the work for you!
By combining pen details with easy-to-peel and stick vinyl, these labels come together in a snap and really can help your kids maintain some tidiness in the bedroom. I hope you give them a try!
Megan