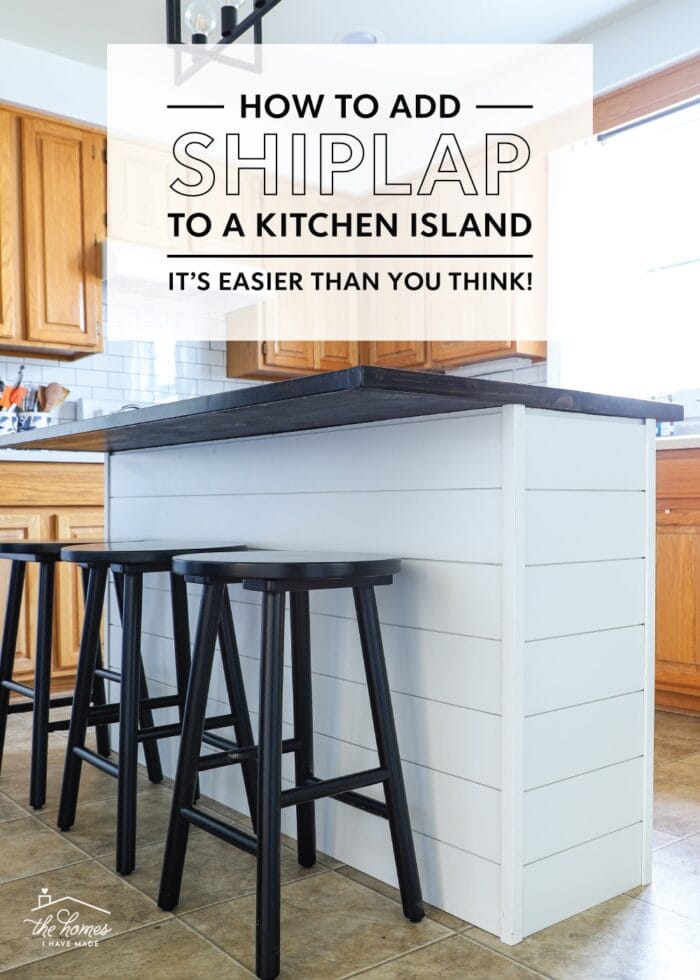
How to Shiplap a Kitchen Island with Command Strips
Adding shiplap to a kitchen island is a modern and trendy update that can completely transform even the ugliest kitchen. But as renters, I didn’t want to risk damaging our existing cabinets. So I turned to one of my favorite renter-friendly products: Command Strips; and even I was shocked how well it worked! Let me show you how easy it is to shiplap a kitchen island with Command Strips for the ultimate renter-friendly upgrade!
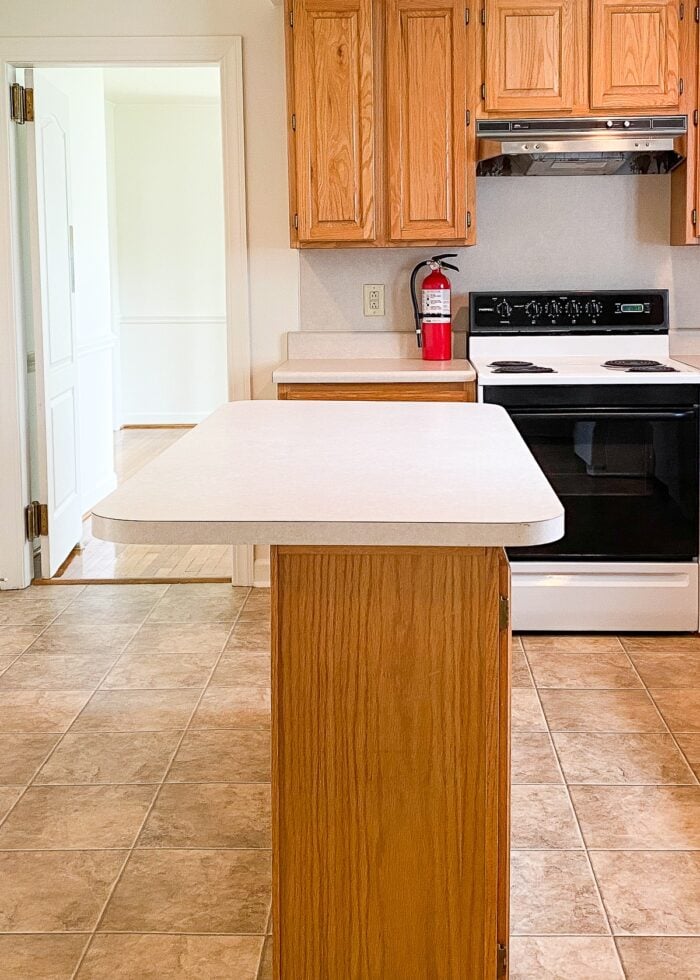
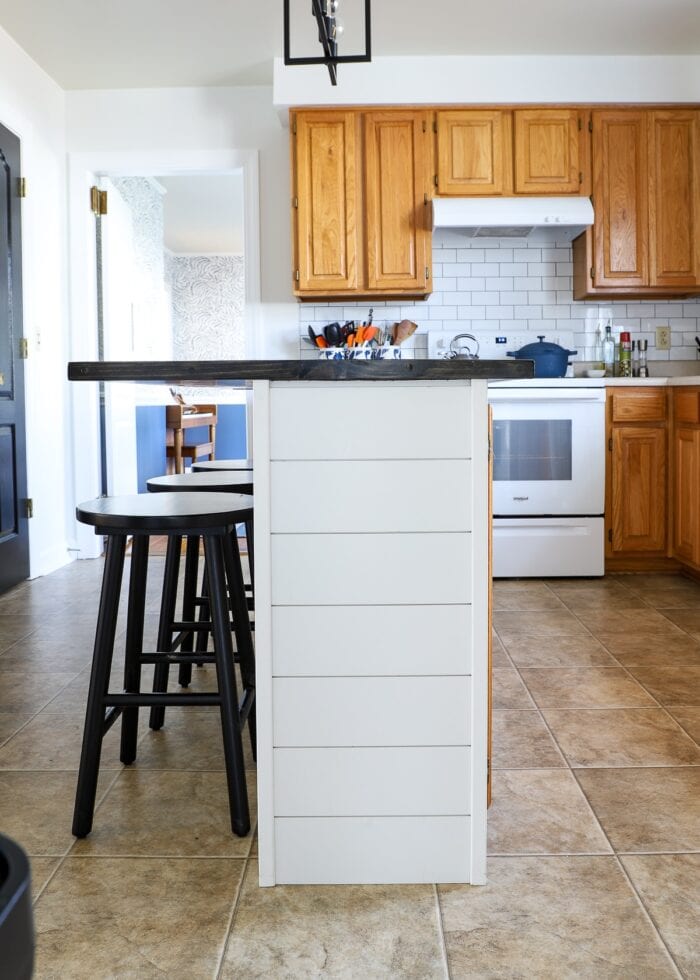
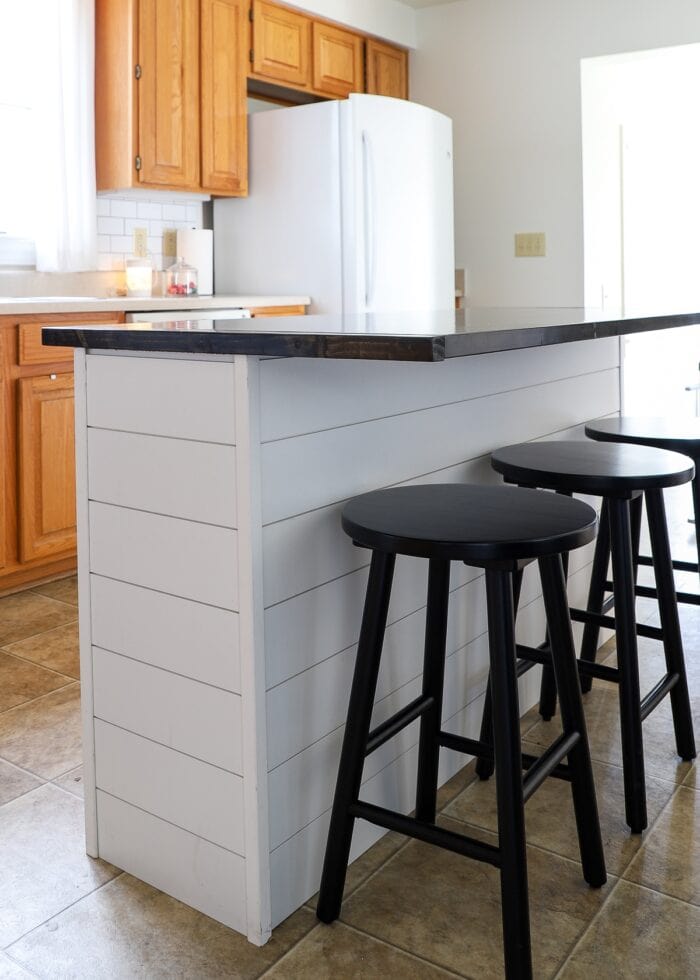
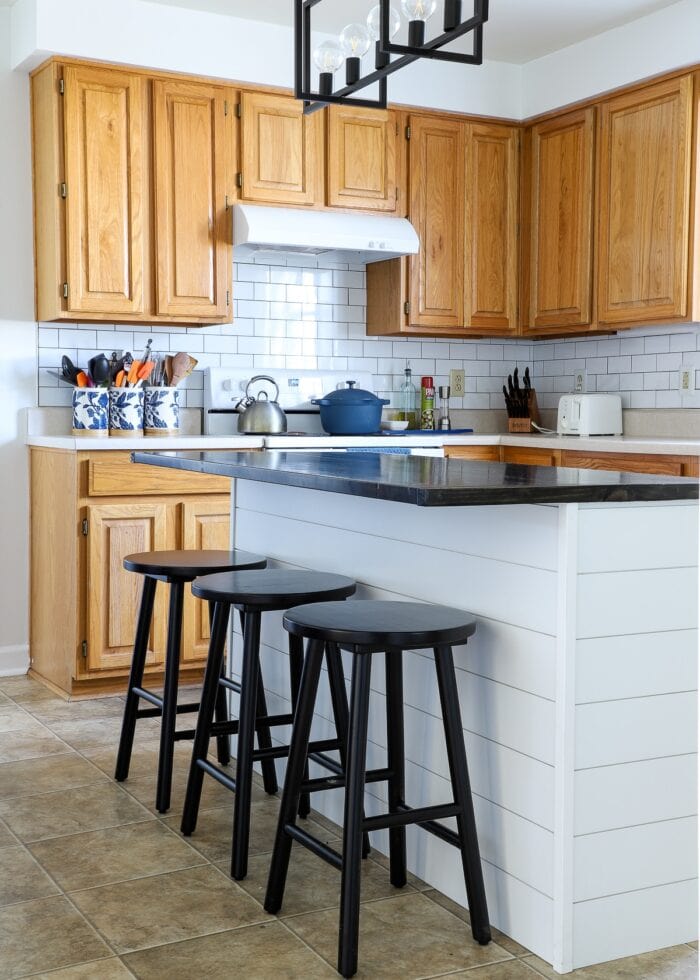
Our Rental Kitchen Island | Before & After
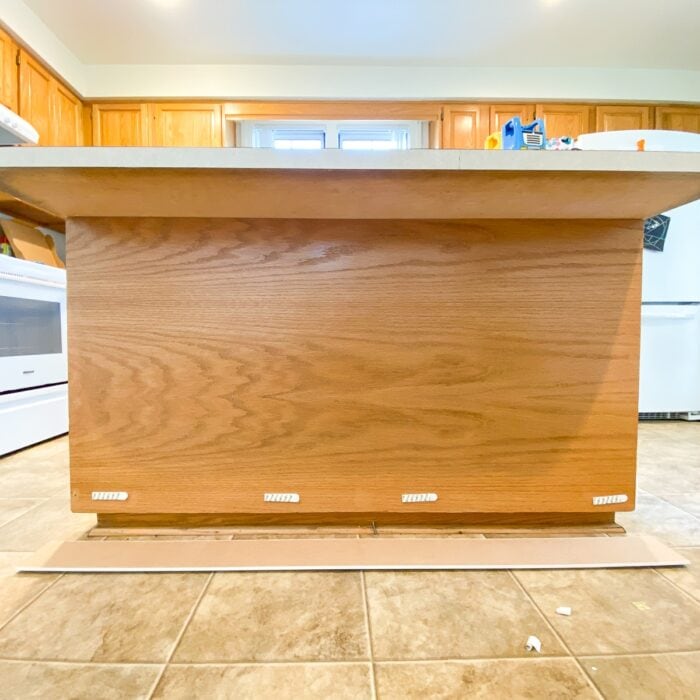
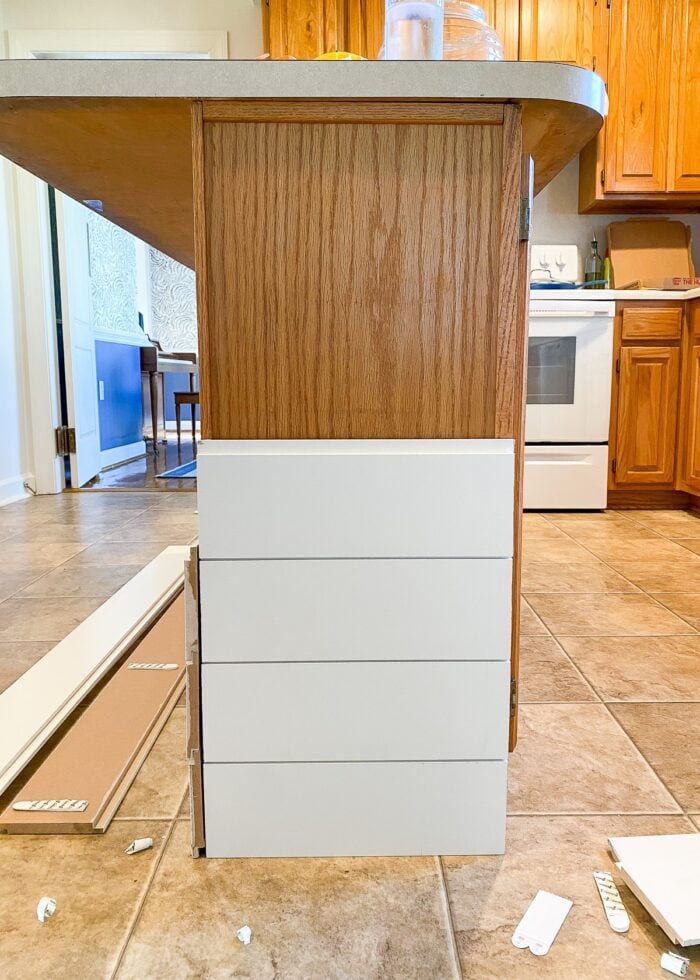
Below is our current rental kitchen the day we moved in. It is quite literally the definition of a “builder basic” kitchen complete with honey oak cabinets, formica countertops, vertical blinds, vinyl flooring, and dated appliances.

Honey oak cabinetry is not my favorite, so I’ve spent a lot of time analyzing how to downplay its prominence in this space. And I quickly honed in on the kitchen island as the key.
Not only is the island a large, prominent part of the kitchen (both physically and visually), but it also has a wide, flat, outlet-free surface that could easily be updated with something. I had a hunch that covering up all that oak in the center of the kitchen would dramatically change the kitchen as a whole.
Peel and stick wallpaper is an obvious solution for a kitchen island (and you can certainly get the shiplap “look for less” using wallpaper). But I’ve long been wanting to “test” if real shiplap could be hung with Command Strips; and this seemed like the perfect spot to figure it out.
And figure it out I did!
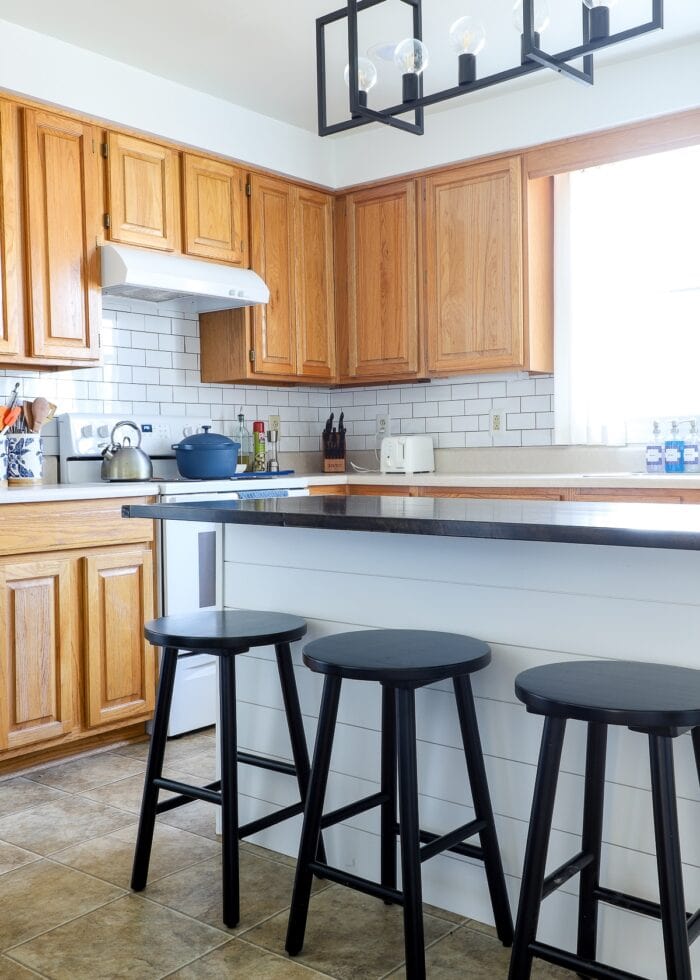
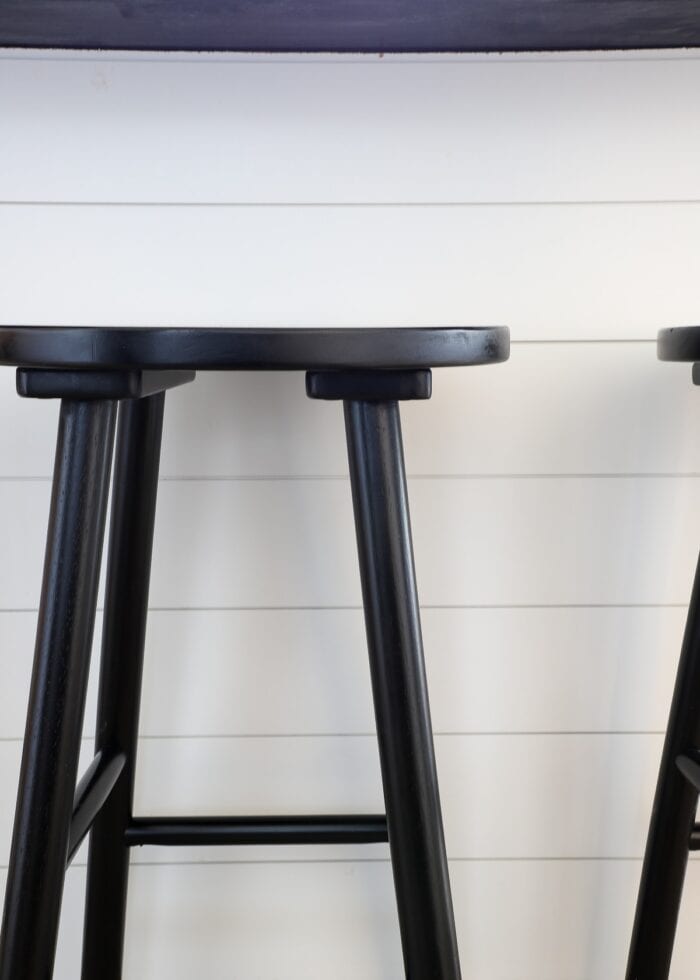
Black Shaker Counter Stools | DIY Butcher Block Island Countertop
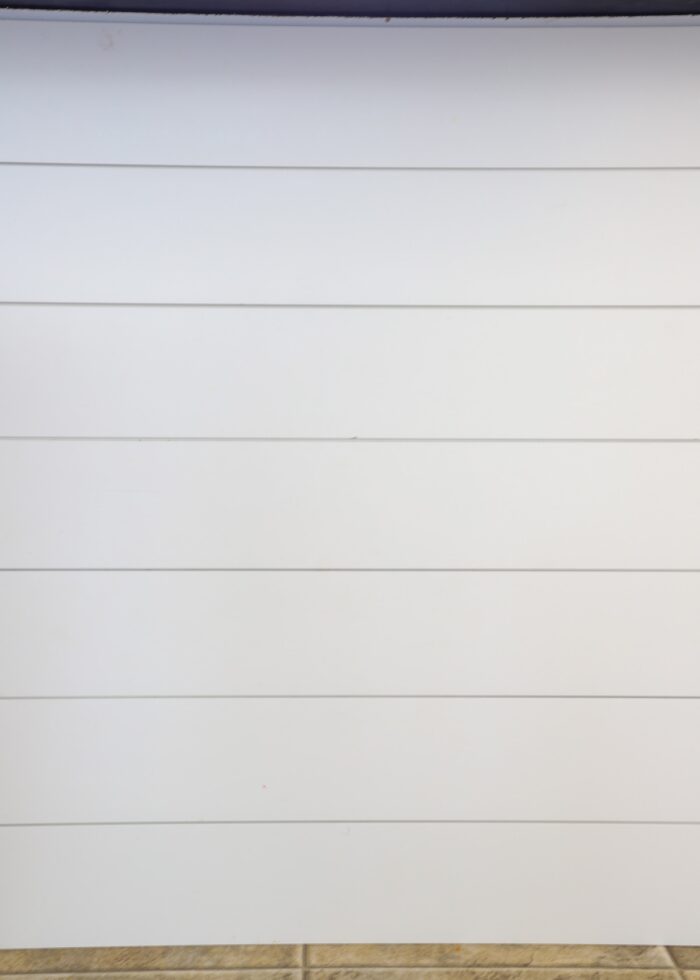
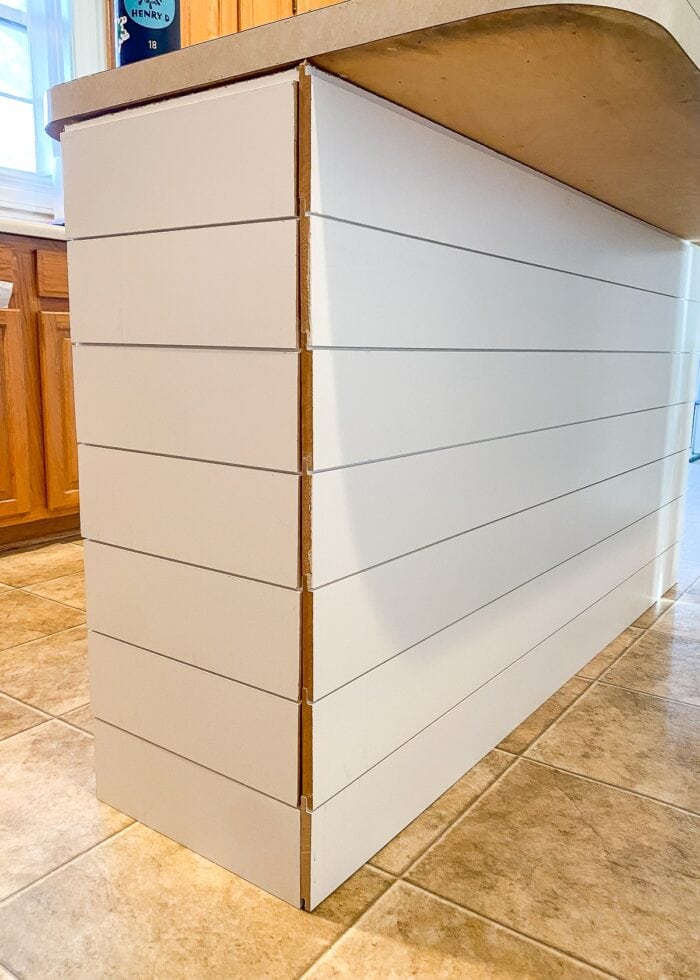
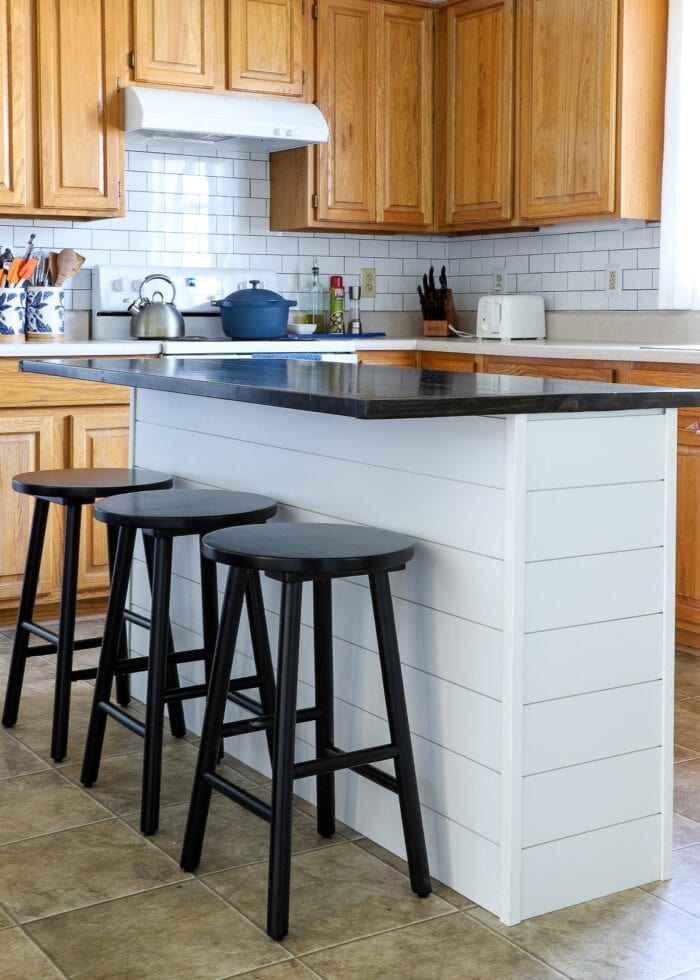
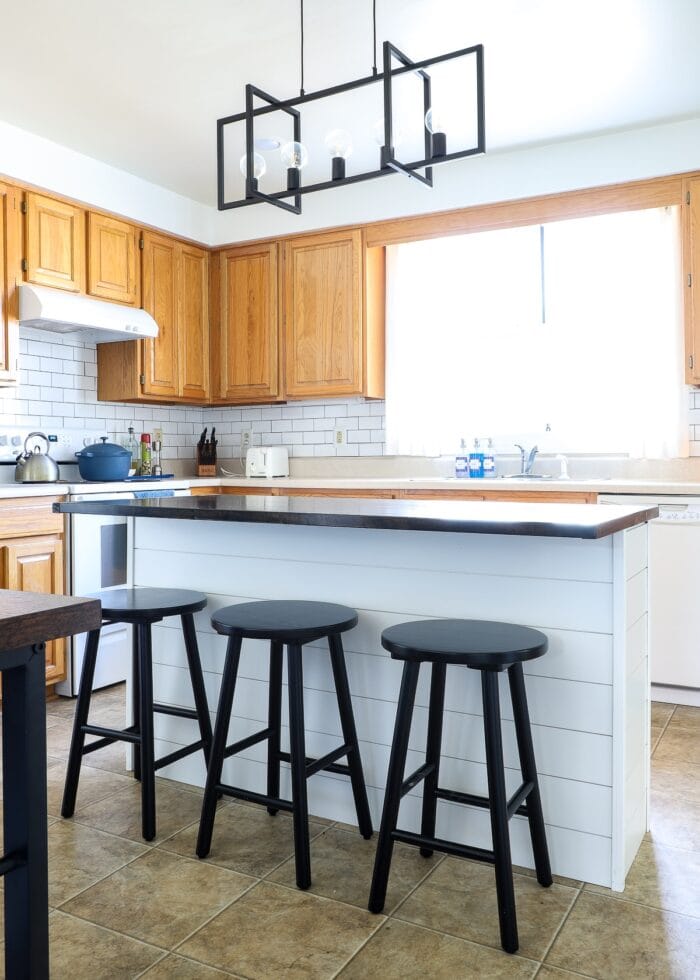
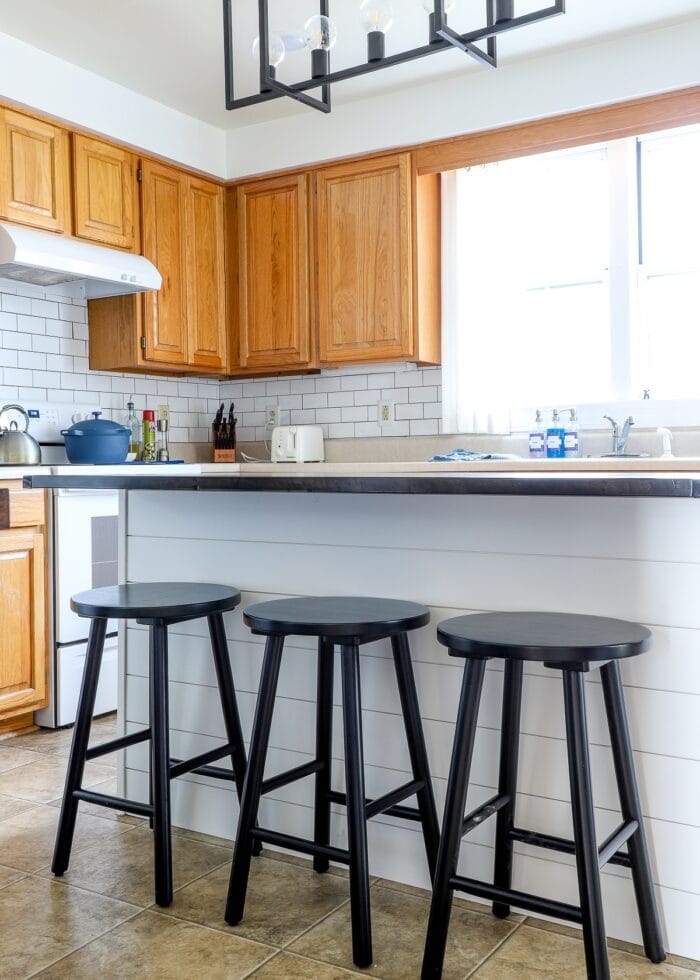
What you see below is actual solid wood shiplap applied to our kitchen island cabinets completely with Command Strips. Zero nails or glues came in contact with the cabinets themselves; and yet the entire installation is sturdy, stylish…and real! (And a total stunner, if I may add!)
We wrapped the wide front and two short sides of the island in the white shiplap boards and finished off the raw edges with corner guard molding. All the supplies came painted bright white, so I didn’t even need to give them a fresh coat of paint.
All told, this project took us just an afternoon (about 2-3 hours) and didn’t have a single hiccup. Sometimes I head into projects having no idea if they will even work or how long and complicated they will be; and I still can’t believe how seamlessly this new look came together.
Supplies Needed
Here is what you need to shiplap a kitchen island with Command Strips:
- Shiplap Wall Planks
- White – These white MDF boards are what I used; they are painted bright white and didn’t need any touching up. If you want white shiplap, these will save you the painting step.
- Unfinished – These pine boards are exactly the same but come unfinished. If you plan on painting your shiplap a color such as navy, black, or grey, I’d save the few dollars per board with this option.
- Solid Wood Outside Corner Guard – These also comes in both finish options:
- Large Command Strips
- Wood Saw – You will need some way to cut the boards down to size. Options include a hand saw, table saw, jig saw, miter saw, circular saw, or asking the workers at the hardware store to do it for you.
- Measuring
- Tape Measure
- Carpenter Square
- Adhesive – Such as Liquid Nails, Gorilla Glue, caulk, or even a hot glue gun.
What Is Shiplap?
As much as I love watching Fixer Upper, I didn’t really have a “true” understanding of how shiplap worked until this project. While I suspect the shiplap look can be achieved with a wide variety of products (e.g., plywood) and installation methods (e.g., nail gun), I was on the hunt for something fairly quick, easy, and foolproof.
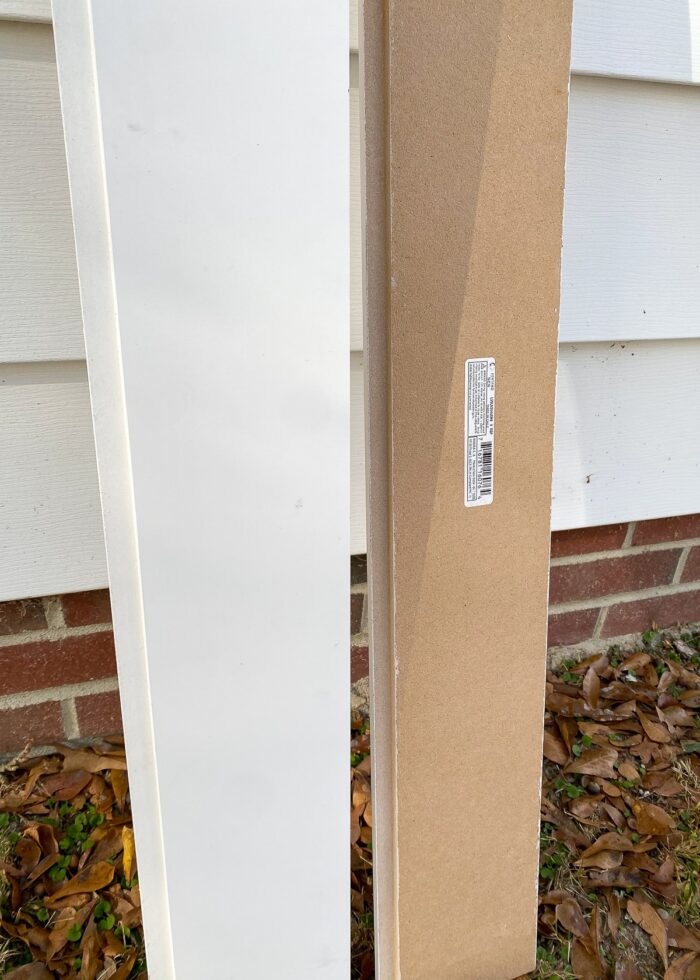
I was quite excited to find that Lowes now carries these “pre-grooved” shiplap boards right on their shelves! Below is the (white) painted front and the (brown) unfinished back of these boards.
Notice how the boards have a groove along both the front and back. These allow you to essentially “link” the boards together in the stacking fashion shown below. When stacked on top of each other, the grooves are sized just right to create the quintessential shiplap “gap” between each board (no spacers needed!)

So while these boards may cost a little bit more than a standard length of pine, I loved that I could easily achieve the shiplap effect without a ton of measuring, spacing, etc. We literally just had to cut the boards down to the right size and stick them to our cabinets, ensuring the grooves lined up together just right!
If you can cut wood down to a specific size, you can do this DIY! Let me show you!
How to Shiplap a Kitchen Island with Command Strips
Step 1 – Measure the Front & Sides of Your Kitchen Island
Start by measuring the front and sides of your kitchen island. This will not only help you determine how many shiplap boards you need to purchase, but also what lengths you need to cut them down to.
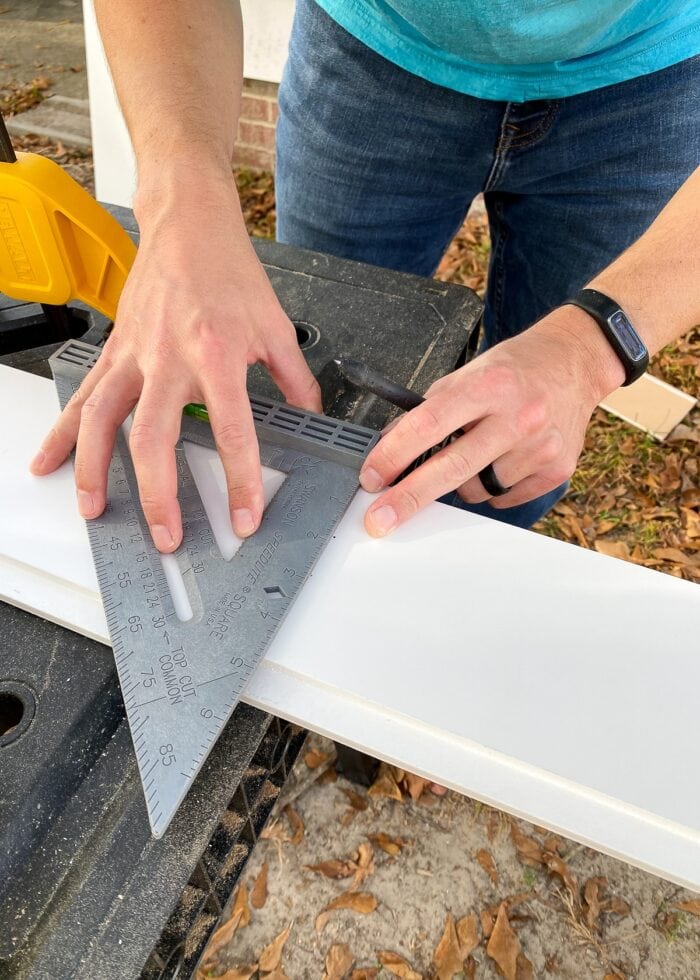
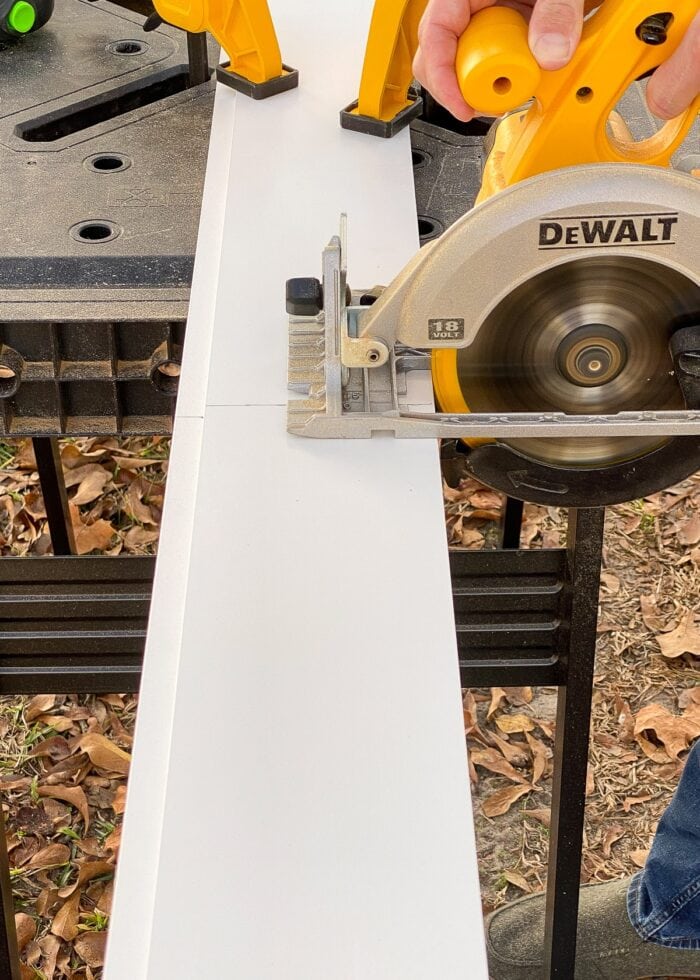
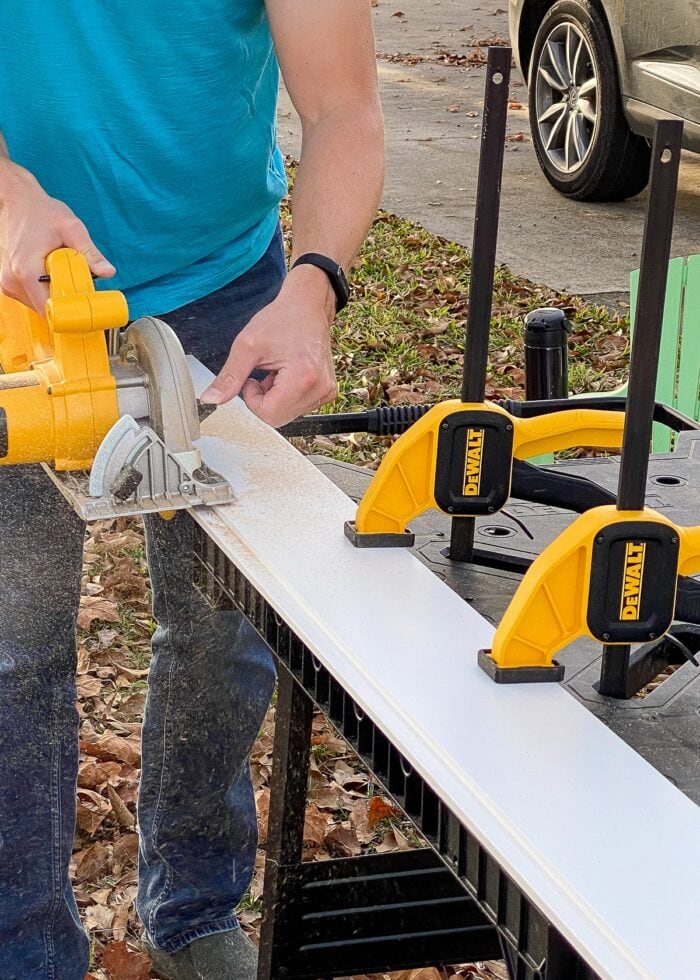
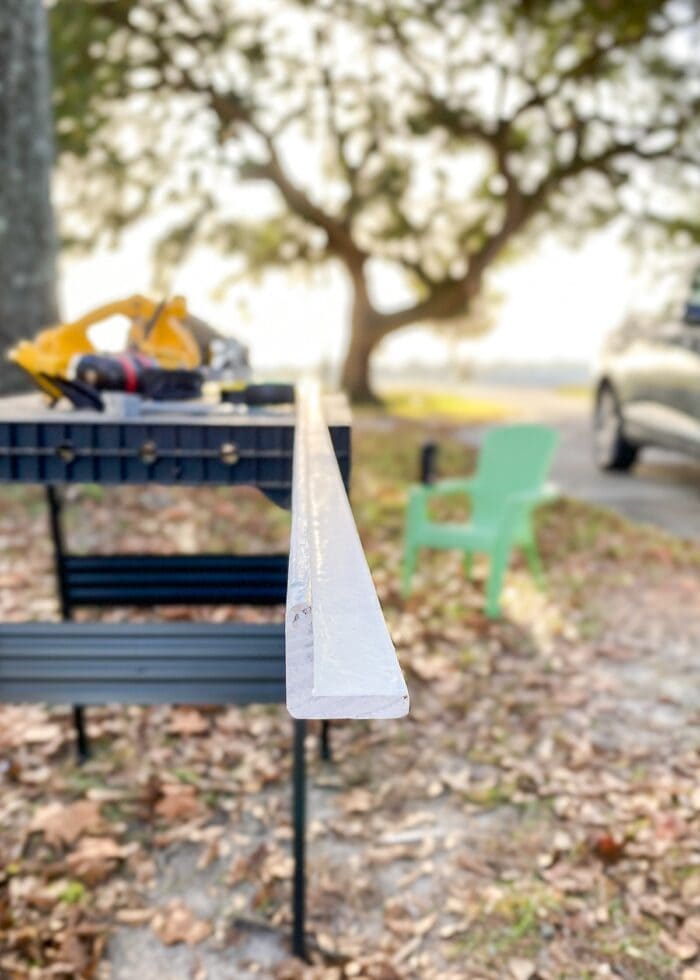
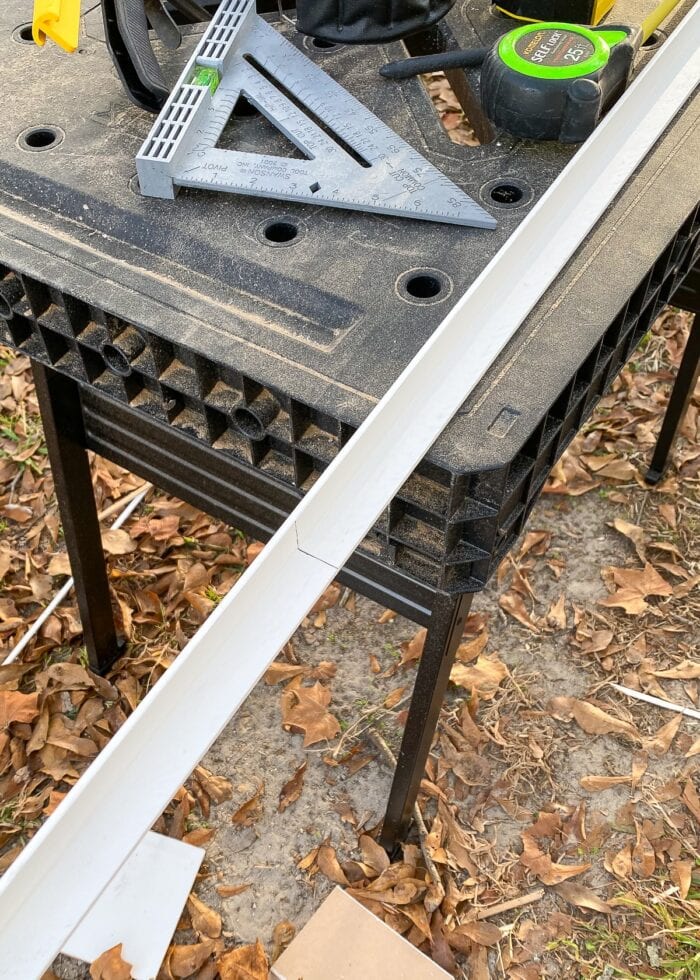
Step 2 – Cut Shiplap Boards
Next, use a saw to cut the shiplap boards down to the correct dimensions. For our boards, Greg first used a Carpenter Square and pencil to create a cut line…
…then cut the boards apart using a circular saw.
TIP! I recommend testing your first/bottom row of boards on your kitchen island before cutting all your boards apart. Once you’re certain you have the dimensions right, you can then cut the rest down at once to make the remaining installation more efficient.
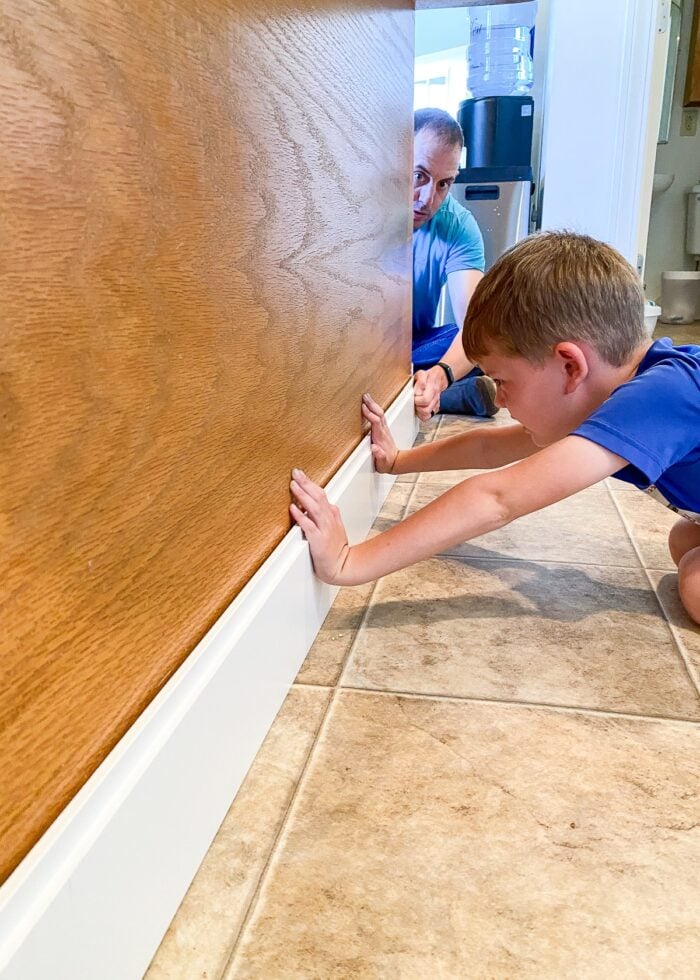
Step 3 – Secure First Shiplap Board
To secure the first shiplap board to your kitchen island, apply some Command Strips directly to the cabinets according to the package directions. For the front of the island, we used four Large Command Strips…
For the island end caps, we sliced a Large Command Strip in half (vertically) and placed them onto the existing trim work of the cabinets.
When placing your first length of shiplap, you have a choice to put the grooved or non-grooved side down on the floor. I didn’t want a tiny gap that would just catch dust and crumbs, so we placed the flat side of the shiplap on the floor and then pressed the board onto the sticky Command Strips.
NOTE: Notice that we didn’t bother with a level for our initial board placement. This house is old and our floors are not even. But we didn’t want to have a gap between the lowest board and the floor just to make everything perfectly level. We opted to make our boards level with the floor and hide any discrepancy up under the countertop (of which there really wasn’t any).
With the first shiplap boards on the two sides of the island, next secure a longer length across the front of the island using the same method. Make sure you really press everywhere the plank and Command Strips come into contact.
We opted to cut our front board long enough to cover the “returns” of the side boards. However, in hindsight, the corner guards covered the corners entirely, so we might have been able to get away with cutting them an 1″ or so shorter.
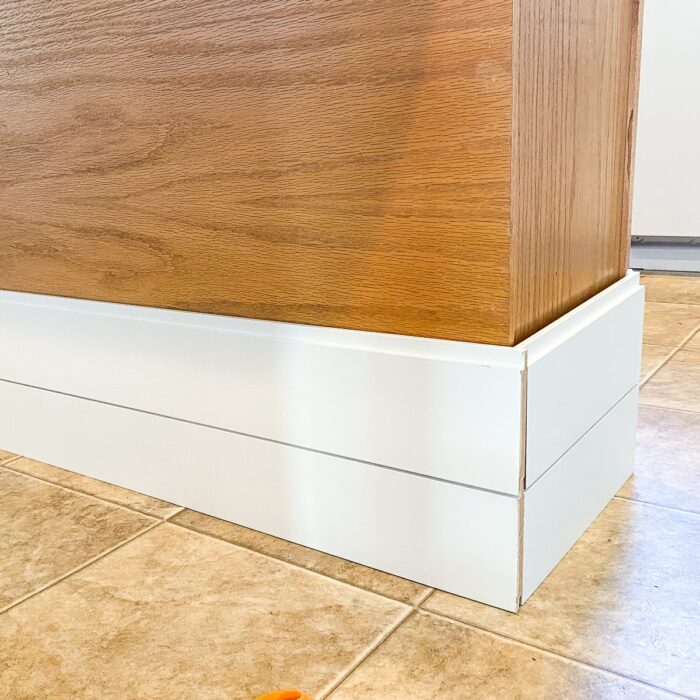
Step 4 – Work Upwards to Cover the Kitchen Island
With your first layer in place, you will essentially repeat the exact same process working all the way up the island.
- Place the Command Strips onto the kitchen island cabinets.
- Secure the next board to the strips, ensuring it sits into the groove of the previous board.
- Press firmly to ensure the Command Strips tightly hold the cabinet and back of your shiplap board together.
- As you work from the sides to the front, try to (generally) line up the grooves horizontally. If they don’t match up perfectly, don’t stress! The corner guards cover a lot of imperfections!
Want to save this post?
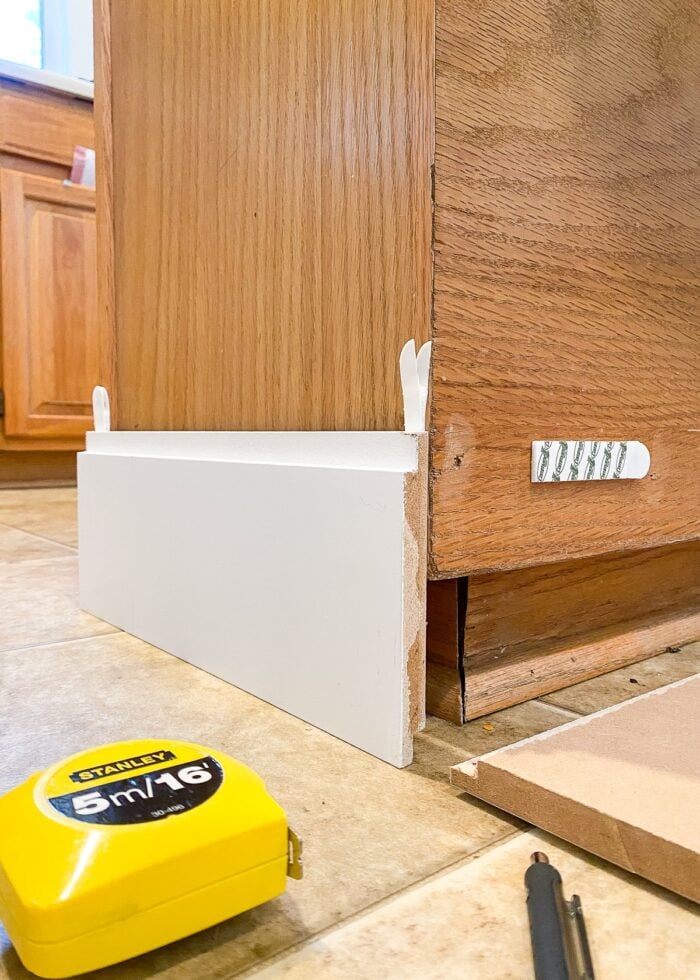
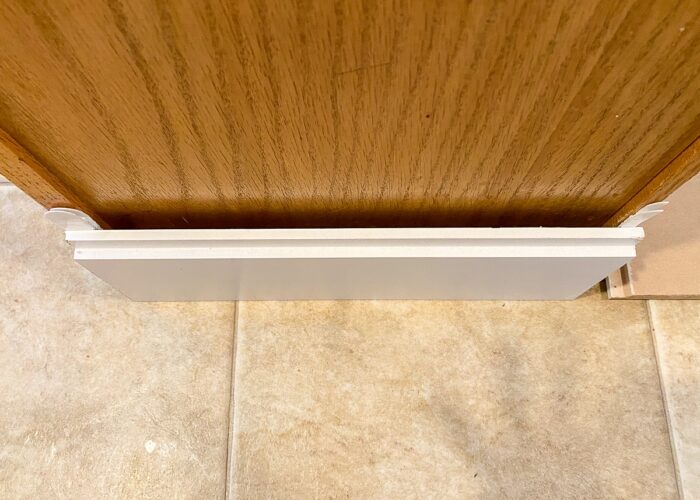
Step 5 – Cutting the Top Board
If you’re lucky, you might be able to get 7 full boards to fit perfectly under your island countertop (depending on the height of your island). Our final board was a 1/2″ too tall so it needed to be trimmed down.
If this is the case for your island too, simply determine the correct height for your final board and use a saw down the length of the board to trim off the excess.
With that 1/2″ cut off, we were able to secure the final plank right under the countertop just like all the other boards.
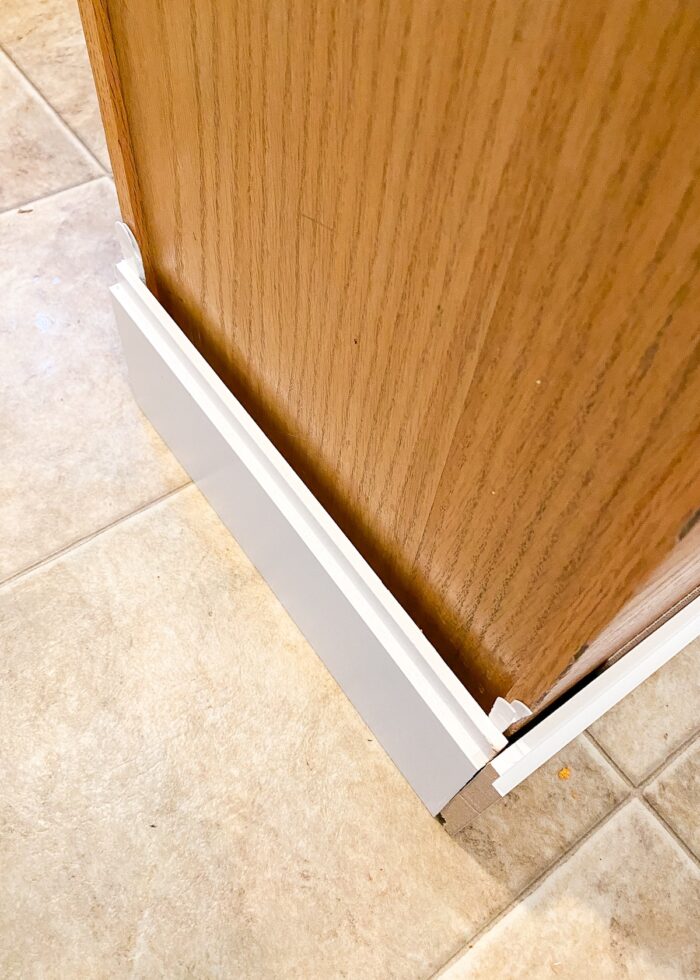
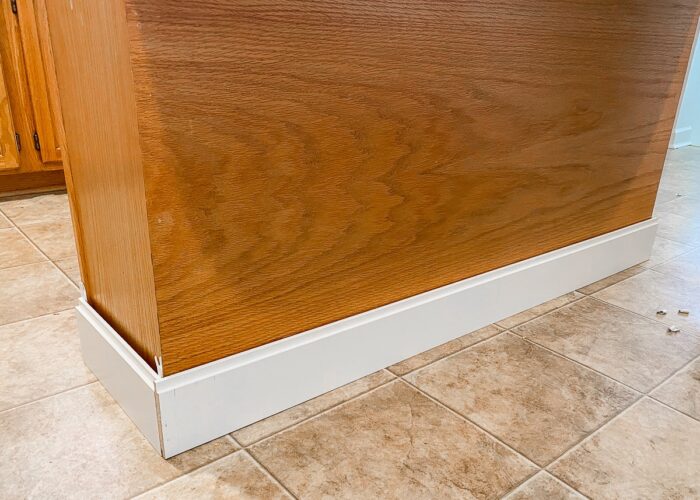
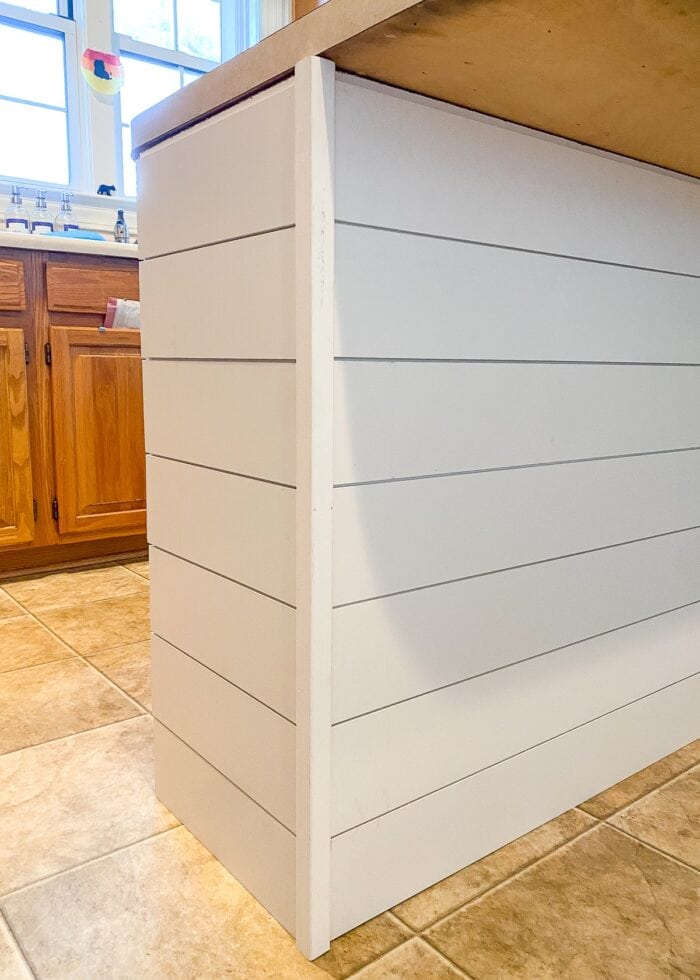
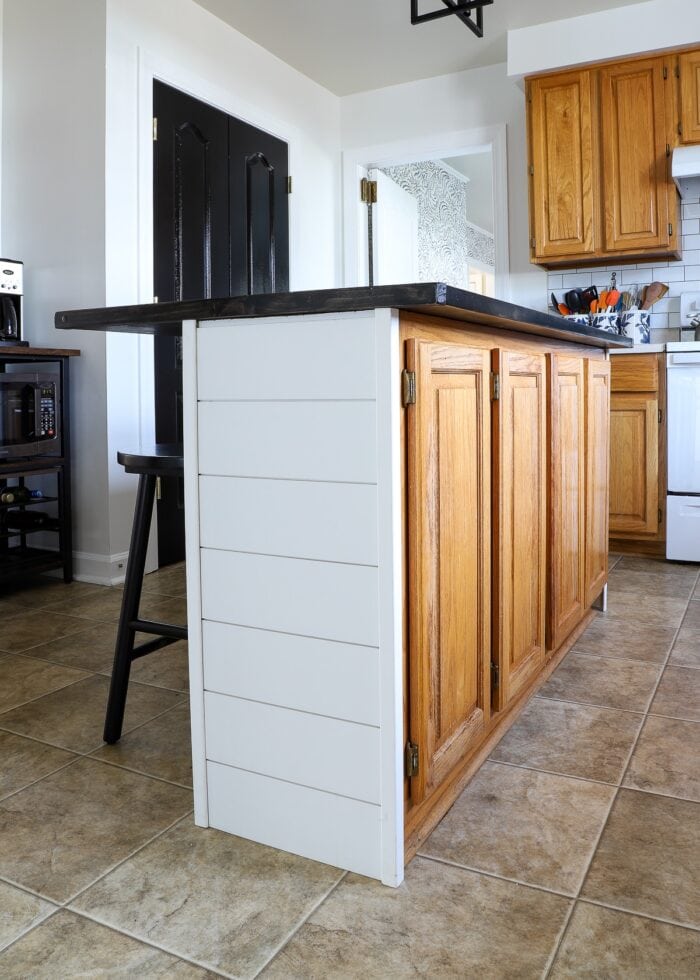
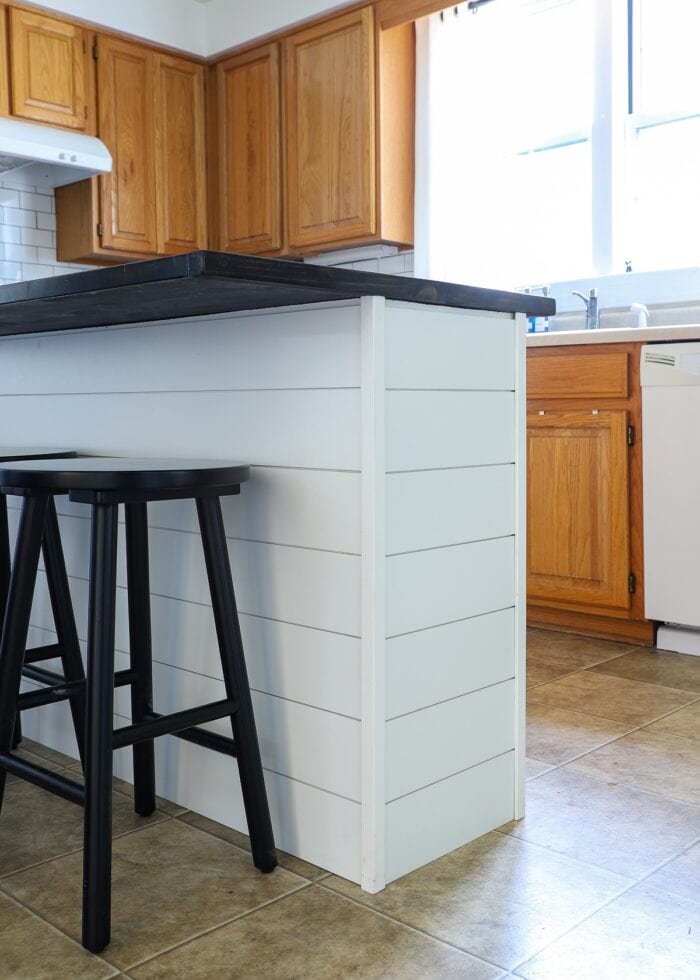
Step 6 – Cover the Vertical Edges
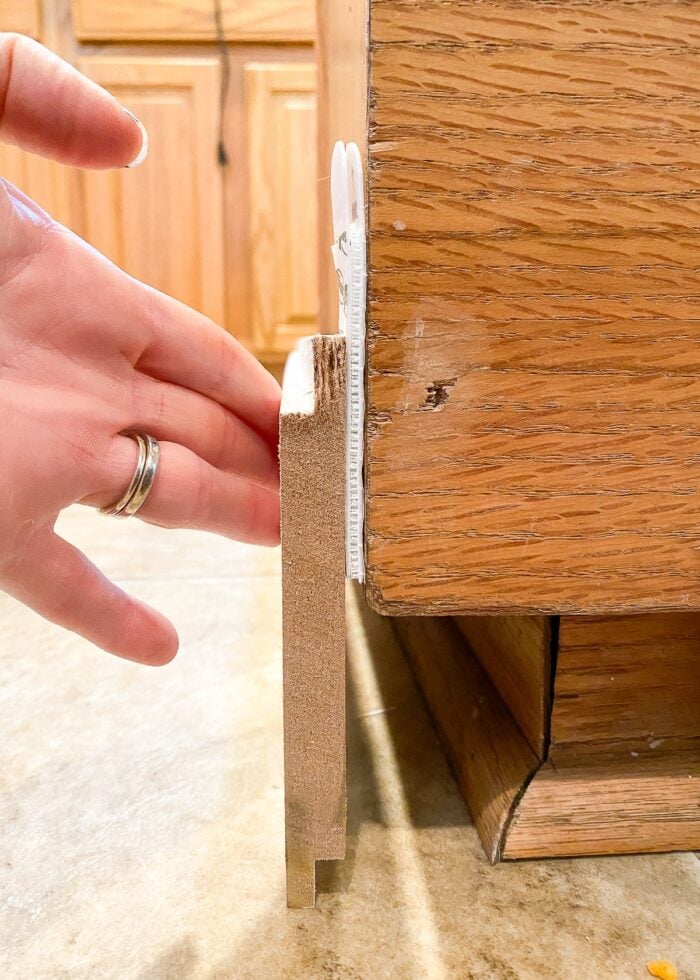
With all the horizontal shiplap boards in place, you’ll next need to cover up the raw, unfinished edges of the boards at each corner.
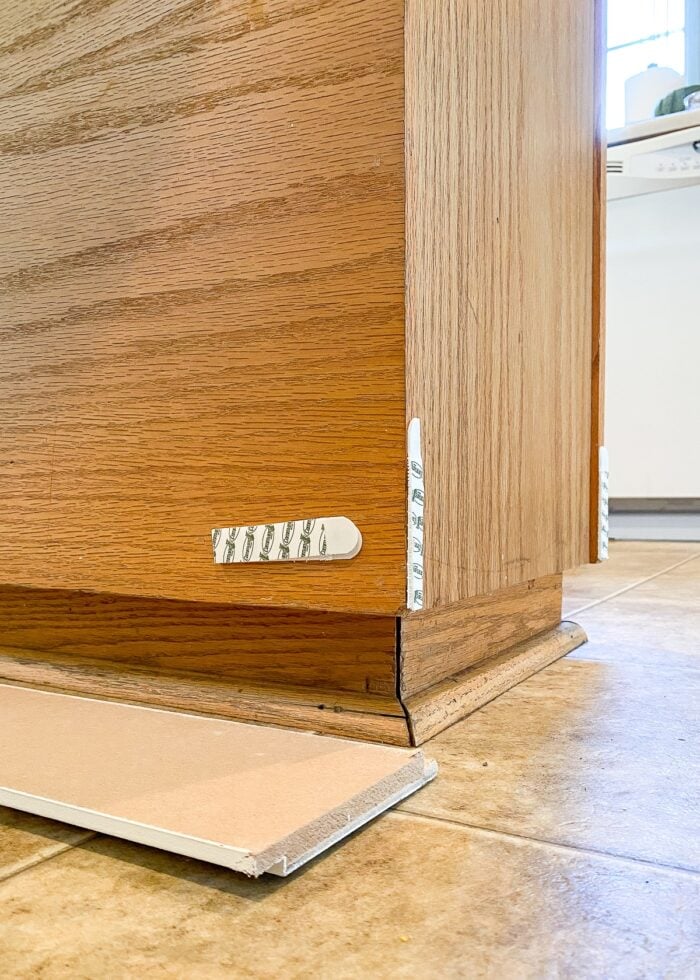
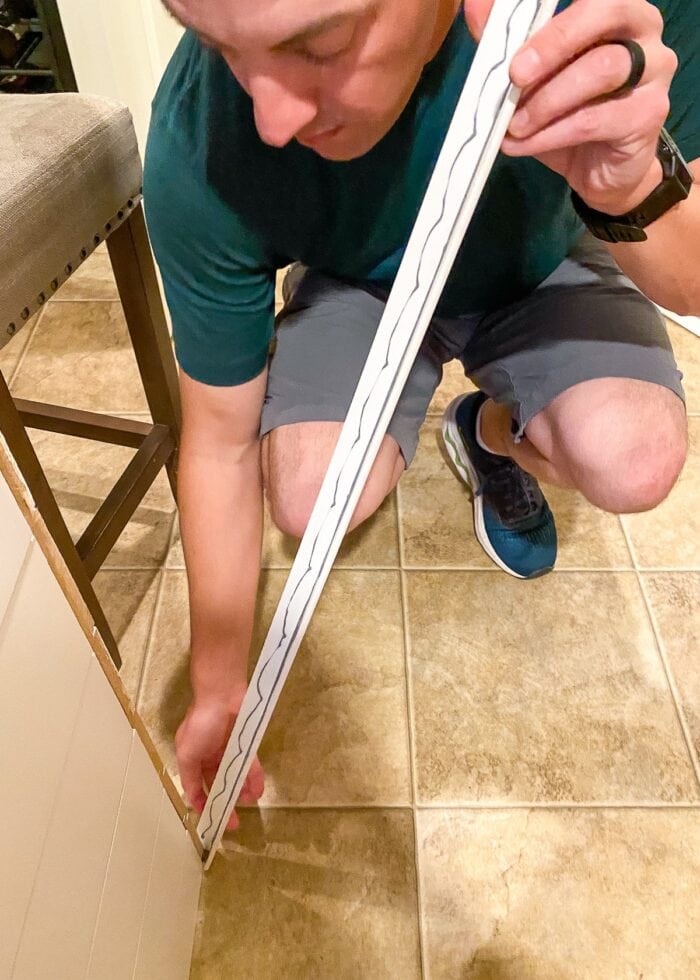
This 1.125″ outside corner guard can be found in the trim and molding section of the hardware store and is the perfect finishing detail for those raw corners!
Simply measure the height between the floor to right under your countertop and cut it down to size.
Secure the corner guard on top of the shiplap wood using your preferred adhesive. We used Liquid Nails because we had some on-hand, but you can easily use Gorilla Glue, wood glue, caulk, or even hot glue.
TIP! I wouldn’t use more Command Strips here because they have a thickness to them that will prevent the corner guard from sitting flush against your shiplap.
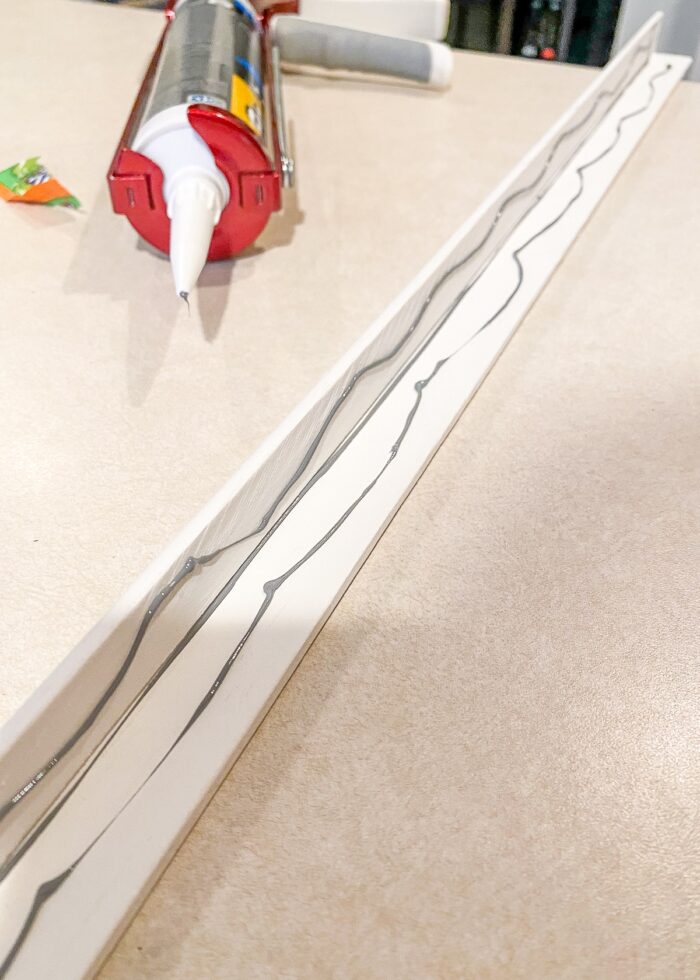
It’s important to note here that zero adhesive came into contact with our kitchen cabinets. 100% of our cabinets are wrapped in the shiplap, so this adhesive is sticking to the planks and not our cabinets.
And just by adding those corner guards, your shiplap project transforms from rough and unfinished to totally complete!
No nail holes to fill, no seams to caulk, no wood putty to sand, no painting with a foam roller. By paying a little more for ready-to-use products right off the shelf…this kitchen island shiplap really is a quick and mess-free project!
FAQs About Shiplapping a Kitchen Island
When Should You Paint Island Shiplap?
As mentioned above, we opted for the pre-painted white shiplap boards to keep this project as quick and simple as possible. Although we had to scrub off some scuffs, both the boards and the corner guards were bright white enough that we truly didn’t need to bother with touch-up paint.
That said, if you want to paint your shiplap, I have two suggestions:
- First, purchase the (cheaper) unfinished boards instead of the white ones. They will likely take paint better and will save you a few dollars per board.
- Second, paint the boards and corner guards before you install them on your counter. My hunch is that painting all those grooves and edges will be tricky, time-consuming, and maybe even messy. Paint everything while they are still flat, and then touch-up any areas as needed after installation.
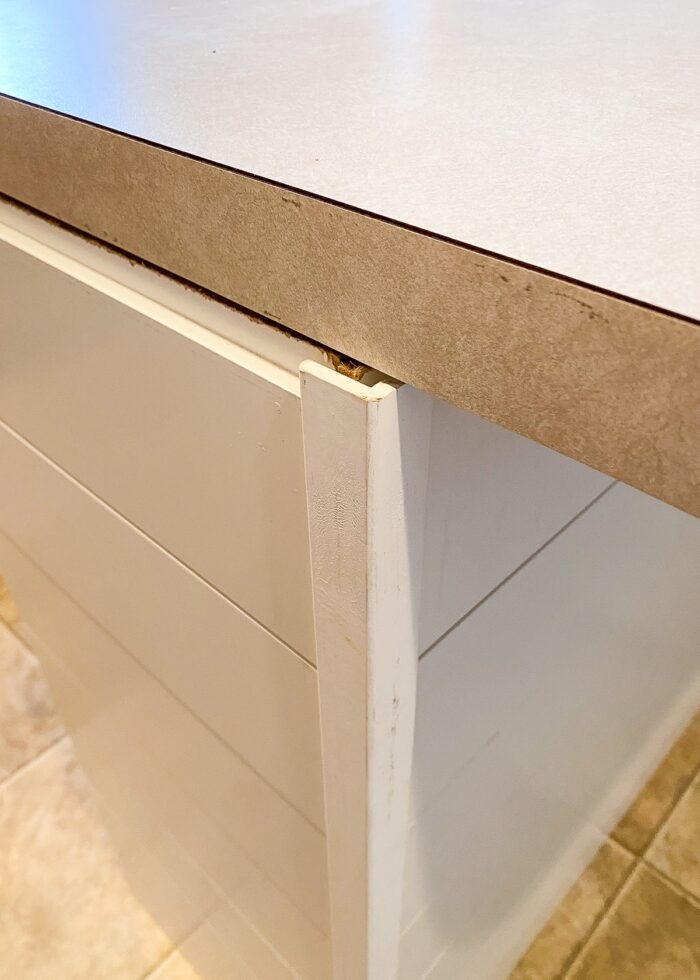
Does Adding Shiplap Affect Countertop Fit?
Quite possibly.
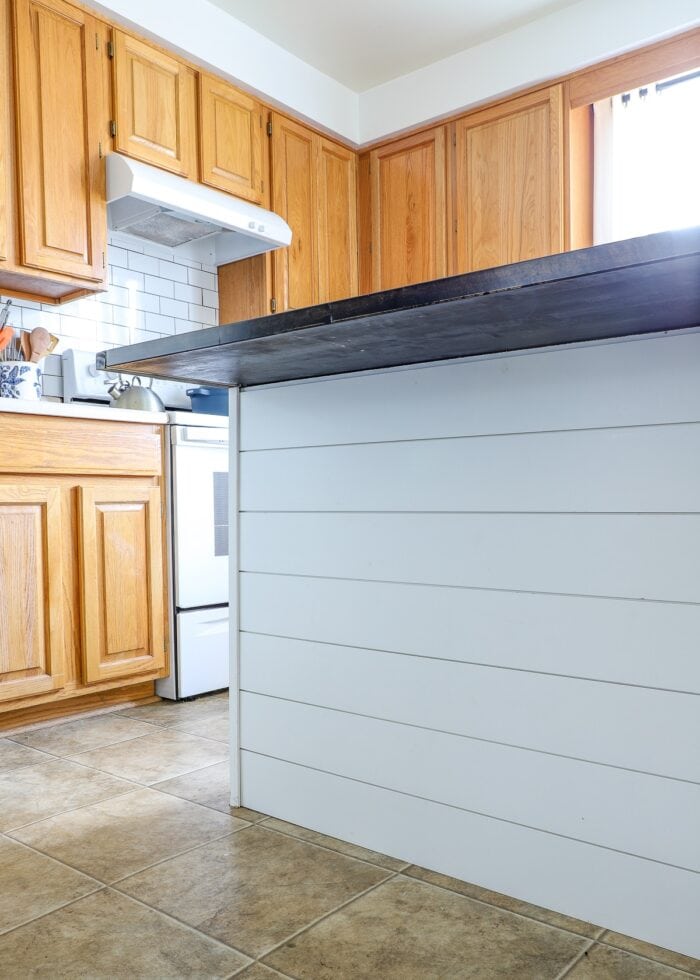
These shiplap boards are rather thick, measuring just over 1/2″ in depth. That means we added 1+” extra thickness to the total width of our kitchen island (one board on each end plus the thickness of Command Strips). This isn’t necessarily a huge deal, except that our existing kitchen counter only extended about 1/4″ over the original cabinets.
So as you can see below, our beige kitchen island countertop didn’t cover the newly added shiplap, leaving a really awkward and unsightly top edge very visible.
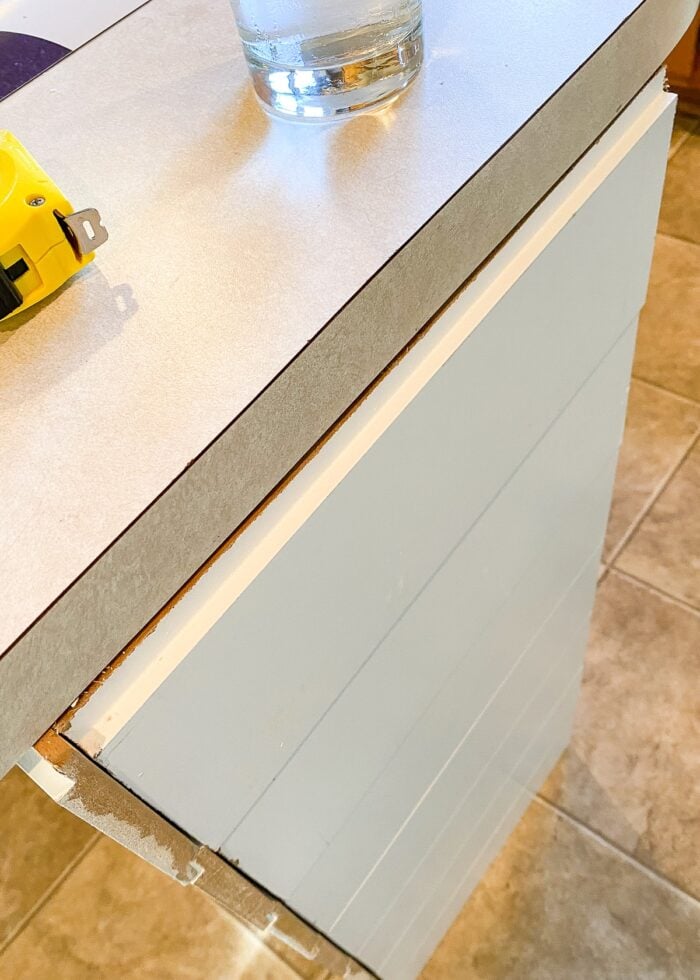
Thankfully, we already had plans in the works to adjust the size of our countertop (details on our DIY black butcher block countertop here!). But I bring this up only to make you aware that yes…adding shiplap to your island base could affect how well the countertop overhangs along the edges.
How Much Did the Shiplap Kitchen Island Cost?
The cost of this project is directly determined by the size of your island. Our kitchen island measures 62″ wide x 15″ deep x 34″ tall, and the cost broke down as follows:
- (8) White Shiplap Boards – $11.50/each
- (2) White Corner Guard – $23/each
- (1) Box of Large Command Strips – $25
Total cost with tax: $175
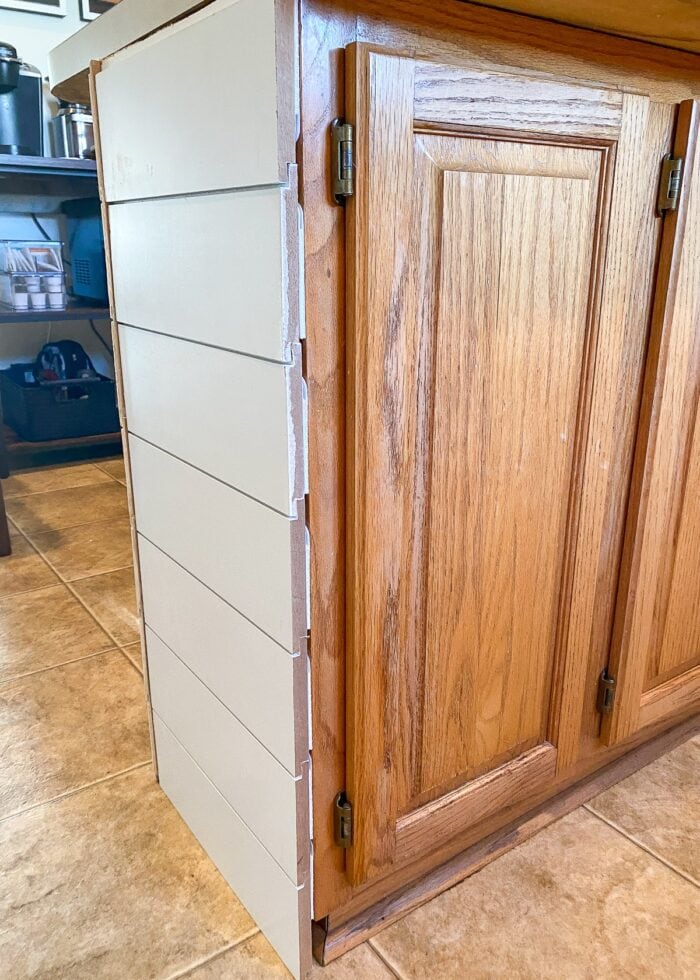
What About the Cabinet Doors on the Kitchen Island?
You’ve likely notice that this tutorial only shows how to shiplap the non-door side of a kitchen island. Indeed, the honey oak cabinet doors and cabinet boxes are still 100% visible (and still ugly).
It’s funny…there are some things in a home that really really bother me (like our non-white trim). But for some reason, the mis-matched doors don’t both me that much and I’d be inclined to just leave them. But you know who they bother? Greg…who is rarely bothered by anything!
Sooooo…I have another project in the works that will make the entire base of the kitchen island white (including the cabinet doors) in a totally temporary way, so stay tuned for that!
Does the Kitchen Island Shiplap Get Dirty?
Surprisingly, not really! And my three boys do a good bit of kicking it while they eat, do homework, etc. Sure, there are scuffs every now and then, but the crisp white paint cleans right up with a damp rag!
Can Command Strips Be Used to Hang Shiplap On a Wall?
I don’t see why not! Here’s why:
- Command Strips can actually hold a lot of weight; and using 3-4 across a board is more than enough to hold the shiplap’s weight firmly in place.
- Because the first board rests on the floor AND each follow-on board sits on the previous one, the overall weight of the installation is actually supported by the floor.
- And finally, the corner guards hold all the boards in place. So even if one Command Strip were to come lose, the entire arrangement is “locked in” at so many different points.
All that said, you will also need to consider the cost of a full wall installation. Presumably, if you’re using Command Strips, you’re looking for a temporary solution. This island cost about $175 and was much less square footage than a full wall.
If you will be in your home for a long time, the full wall investment might be worth it. But if you want to do a large wall on the cheap, using peel and stick wallpaper or even this Sharpie trick might be better approach instead!
I have been wanting to try a “renter friendly” shiplap project for ages, and I am so thrilled with these final results! Not only does it really look amazing in person thanks to the texture and contrast, but I love a project that comes together without any hassle too!
While I would much rather a kitchen full of bright white cabinets, this shiplap accent has gone a really, really long way in improving the look and feel of this whole space. If you too are looking to dramatically change the colors or look in your kitchen without paint or a renovation, this is definitely a great project to consider!
Psssst – This rental kitchen makeover is now complete! See the full reveal here: The Ultimate Renter Friendly Kitchen Makeover
Megan


11 Comments on “How to Shiplap a Kitchen Island with Command Strips”
Sorry to be critical, but Command strips only come off cleanly if you can grasp the tail and pull. You won’t be able to do that. Maybe since it’s finished wood and not paint it will be okay (and you could refinish the wood if necessary), but I certainly wouldn’t do it to just any surface.
Hi Chris!
No worries – I always welcome thoughts and questions, but on this one, I’m not sure what you mean?!?
We’ll be able to take the boards off the island, just like we do frames off the wall. We’ll then be able to pull the tails off the remain-behind Command Strips, just like we would on a wall.
Maybe you’re seeing something I’m not just yet but I’m fairly certain they’ll come right off just like wall art! Fingers crossed at least!
~Megan
I think the commentor did not realize you used the two part “velcro” strips, so there is a strip on the cabinet and one on the board and they easily separate to access the tail on the cabinet. I think they were thinking of the one-part Command strips used on hooks etc. This is a brilliant idea!
Really love this. I need people like you to help me see beautiful potential in “ugly” spaces; it’s hard for me to see past that!
Ha! Well thank you, but don’t feel bad. Sometimes it takes me a while to figure out a direction to go because I too can get stuck on what’s sitting right in front of me. The bathroom right off the kitchen has been plaguing me for MONTHS but I think I finally (just today!) figured out what I can to do!
It looks really good!! I have dreadful oak cabinets too, so I feel your pain. The shiplapped island helped to elevate the space. Can’t wait to see more projects.
It looks so nice, it looks like the oak cabinets fit right in! You have such a vision for spaces. Glad housing updated the hood and stove- the original one from the before picture looked like it had been there awhile.
Eeeek, so excited to get the full details soon on the black counter (and hopefully the backsplash too!) IT LOOKS SO GOOD!!!
It looks fantastic! I am amazed at how much the oak is camouflaged with this change in the island. I have all cherry cabinets in my kitchen that my husband has less than zero interest in changing. I really want to brighten up the space, and this has my wheels turning.
Wow! That’s beautiful! What an amazing idea!
Thank you so much’
I would love to try this shipboard even on a one wall in the kitchen my rental is not so attractive and neither are the cabinets. I wish I had a nice so to do the work but I do not even have a circular saw so I will look to home Depot to see if I can rent one. Your Island came out very beautiful. Your lucky you ever got to help you.!!