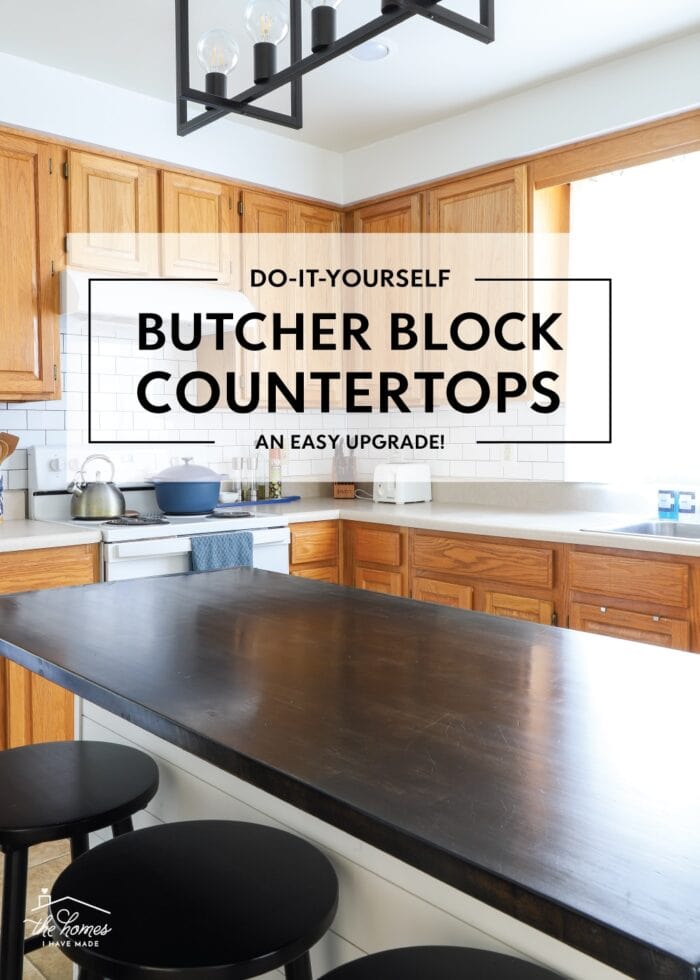
A DIY Butcher Block Island Countertop (Anyone Can Do!)
Swapping out kitchen counters is often perceived as a complicated, precise, expensive, and permanent endeavor. Which is probably why renters usually resort to peel-and-stick products to cover up unsightly counters instead. But swapping out a countertop…especially on an island…can (sometimes) be as easy as un-doing a few screws. Today, I’m breaking down exactly why and how we installed this butcher block island countertop to completely transform our dated, builder-basic rental kitchen!
Why We Swapped Our Rental Kitchen Island Countertop
In all of the renter-friendly hacks I’ve attempted over the years, I’ve never “made over” a countertop. And not because I haven’t wanted to.
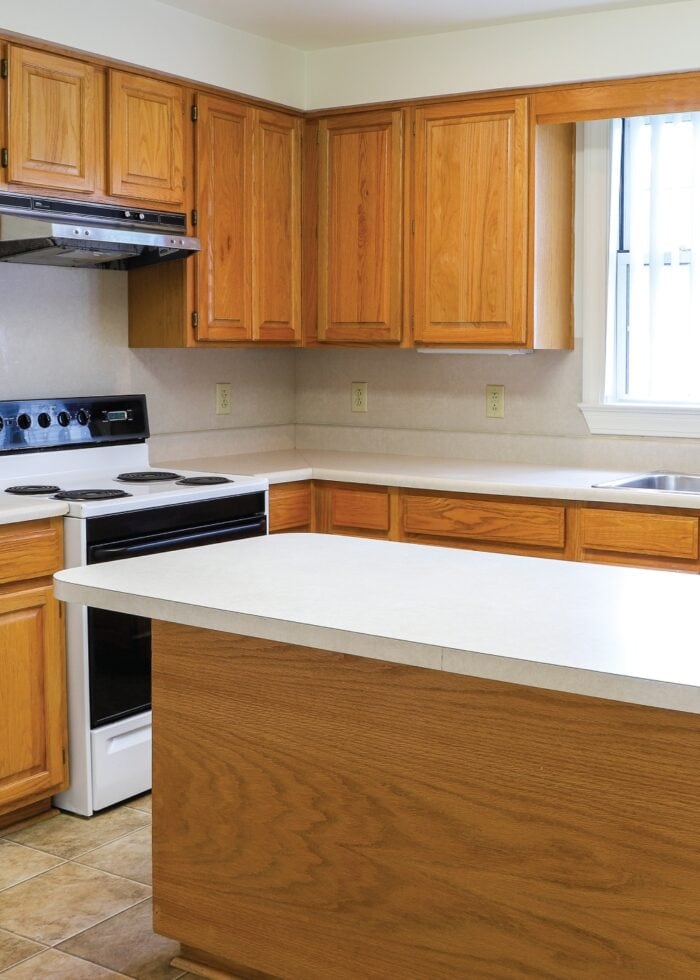
We’ve been plagued by dark, dated, and downright ugly countertops in most of our homes; but I’ve never been “sold” on covering them in contact paper or other peel-and-stick products. While the instant transformation is certainly tempting, I am suspect of the longterm usability of such a solution.
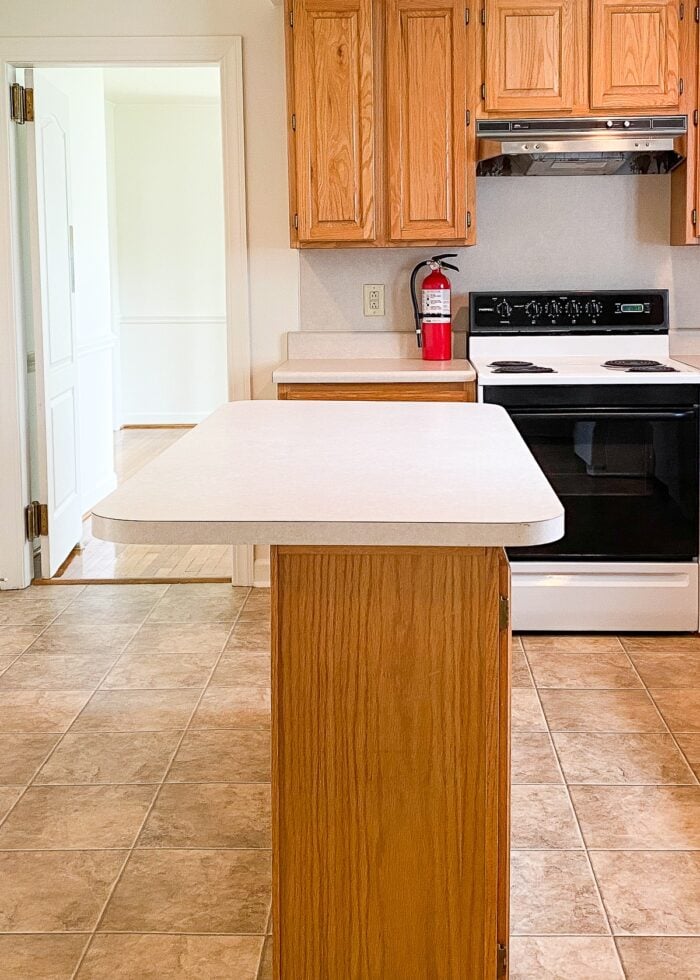
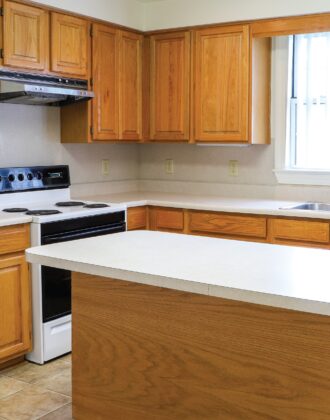
When moving into this home, I was not a fan of the pinky-beige laminate countertops that cover both the perimeter of the kitchen and the island.
And apparently, I wasn’t alone!
Many of my neighbors actually use solid wood “toppers” to cover up the island countertops and add some much-needed visual interest to these kitchens. (A local handyman essentially creates a wood cover that fits over the existing countertop…not only covering up the pink plastic counters but also expanding the countertop’s size to be more substantial.)
While I think this is a phenomenal and clever renter-friendly solution, I personally felt as though the island ended up bigger, taller, and bulkier than was comfortable in the small kitchen (since the cover goes on top of the existing counter).
So while I loved the idea of creating a contrasting countertop situation (and covering up at least some of that pinky beige!), I felt compelled to find an equally-renter-friendly alternative.
Why We Chose a Butcher Block Island Topper
Upon inspection of our kitchen island, we discovered the existing countertop was held on with nothing more than 4 basic wood screws (via the cabinets underneath). There was no glue, caulk, or adhesive holding our countertop in place. So we determined that swapping the countertop out (instead of covering it) was a just-as-safe solution (since we have the space to store the original countertop in the garage until we move out).
But once we determined we could swap instead of cover, we were still unsure of the most stylish, budget-friendly and practical replacement option. We’re obviously not going to invest in something expensive or custom for such a temporary residence. And finding stylish prefabricated island countertops isn’t exactly easy.
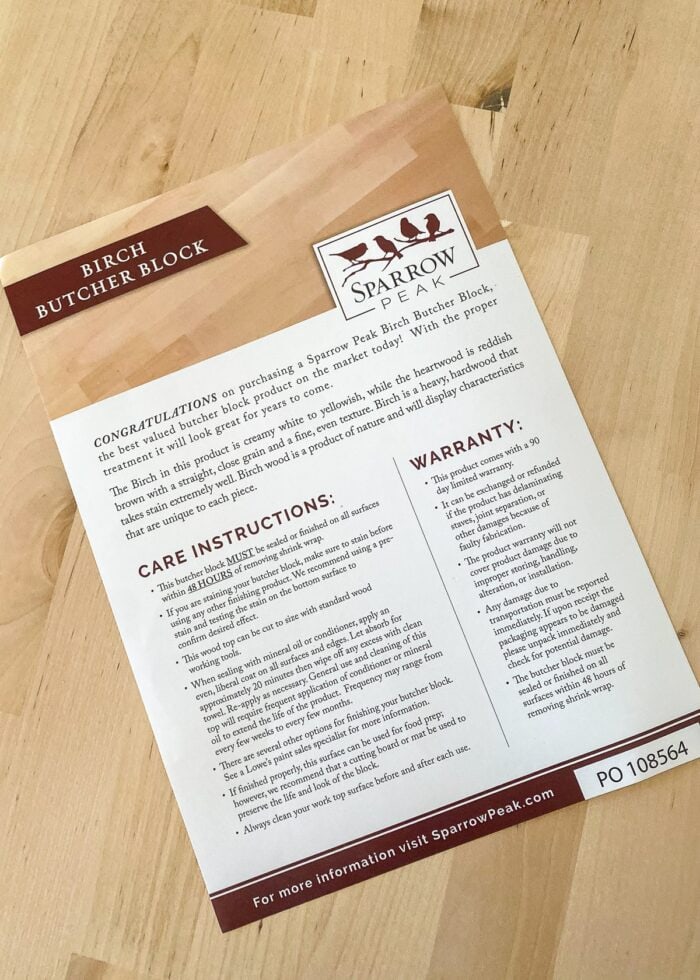
But after a lot of research and even more measuring, we determined these prefabricated-but-unfinished butcher block island countertops from Lowes were our best bet in terms of size, price, and style.
And I have to say, we couldn’t be happier with the result!
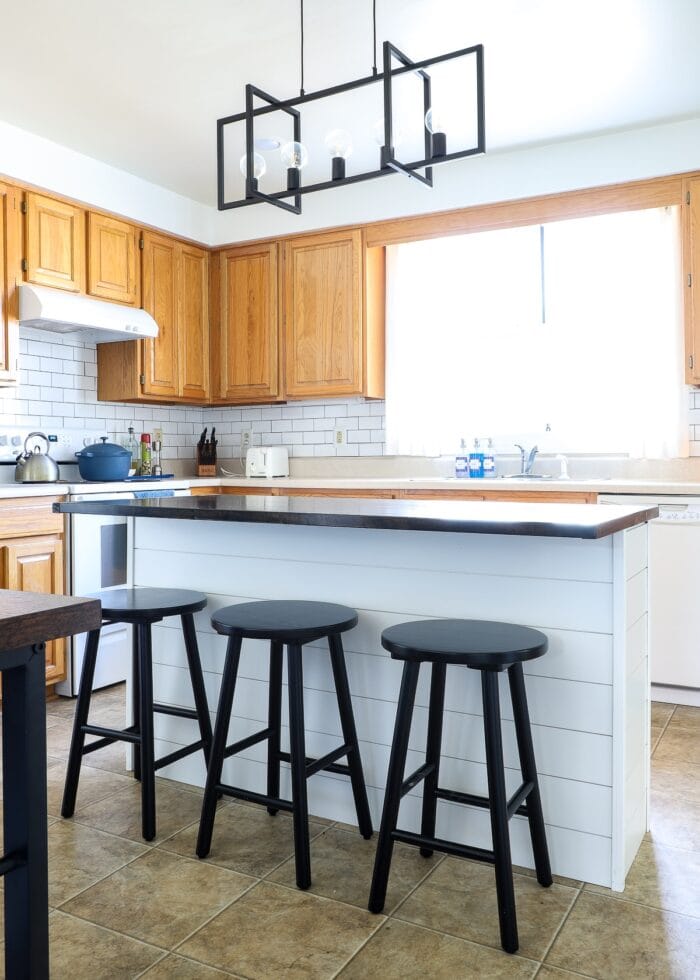
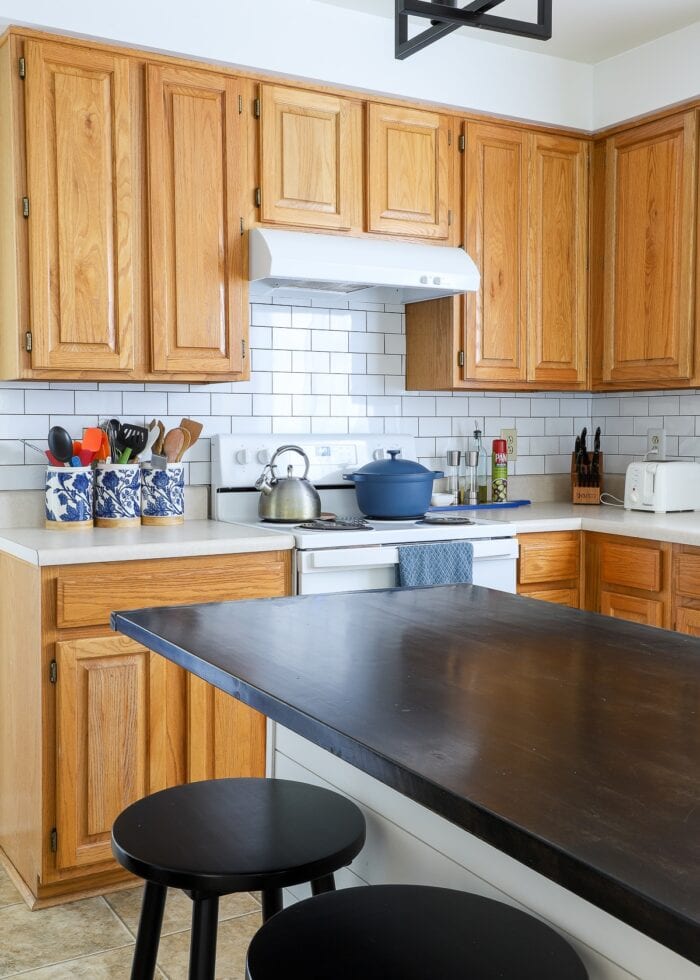
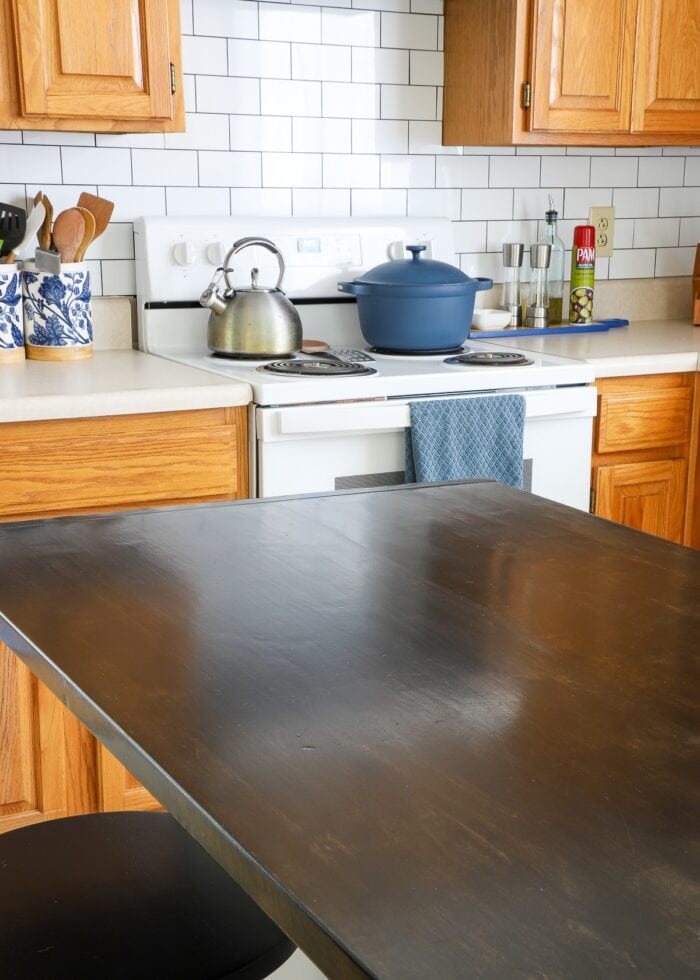
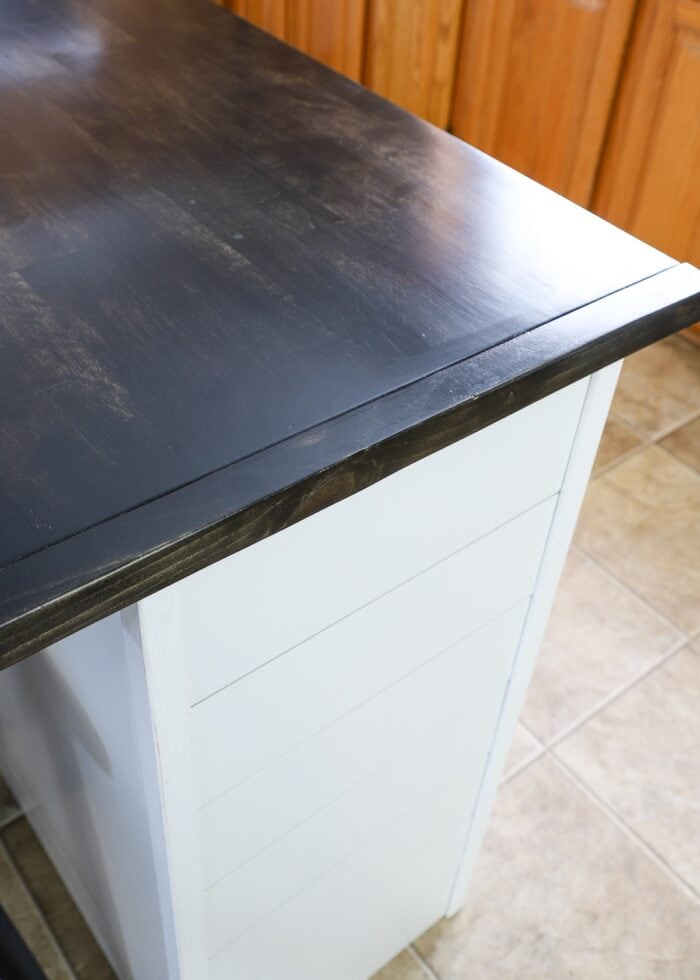
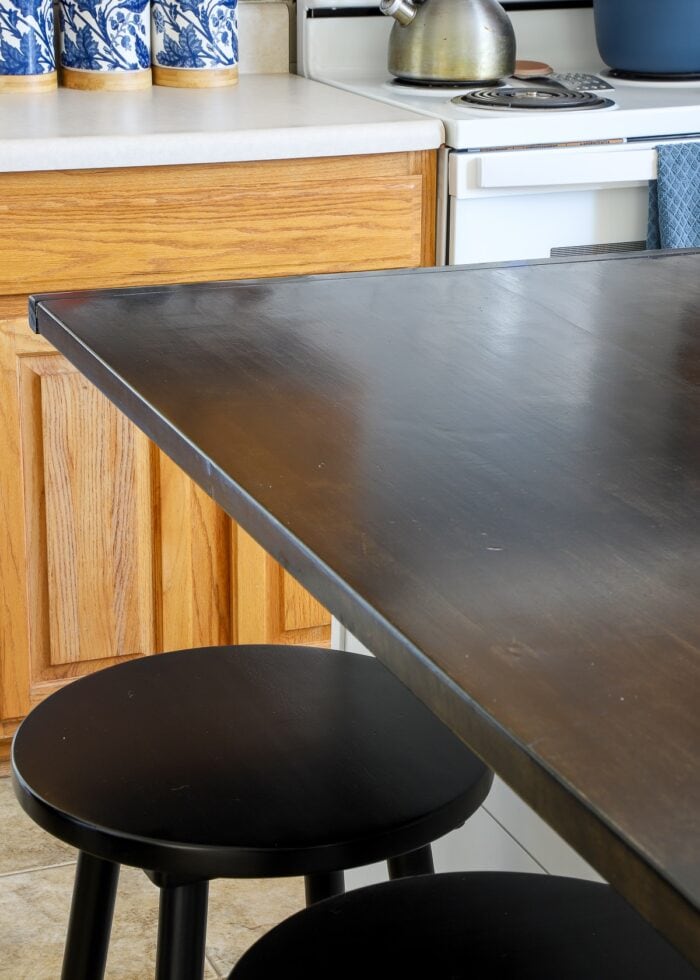
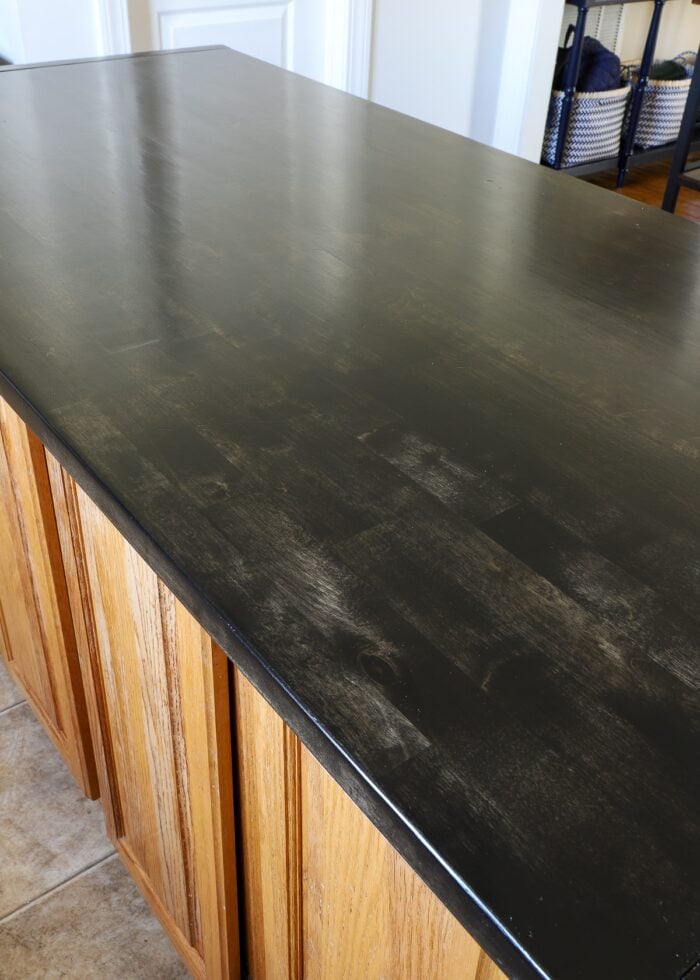
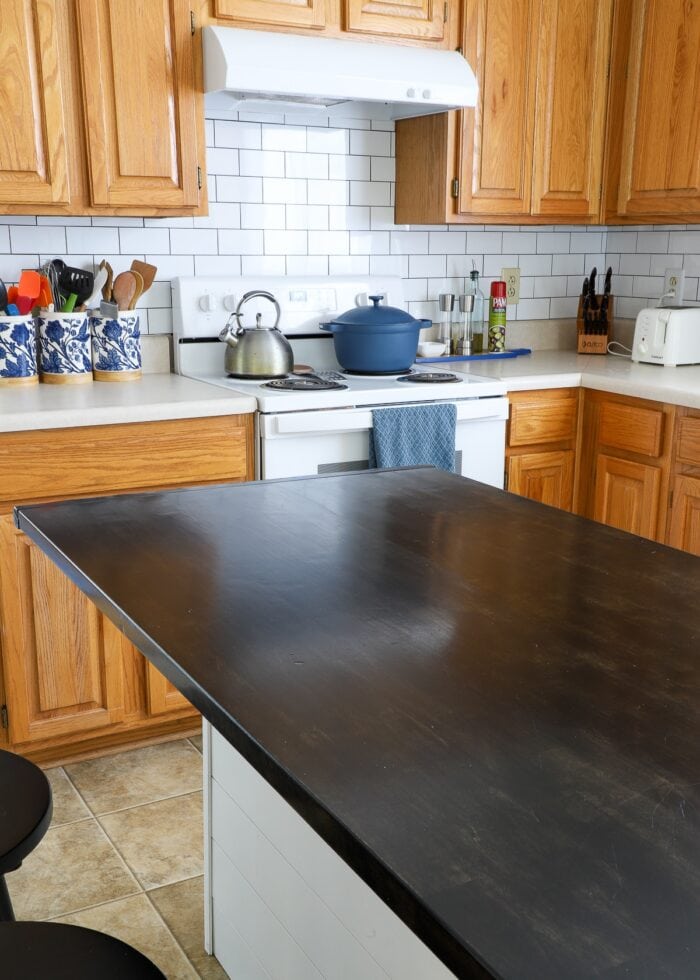
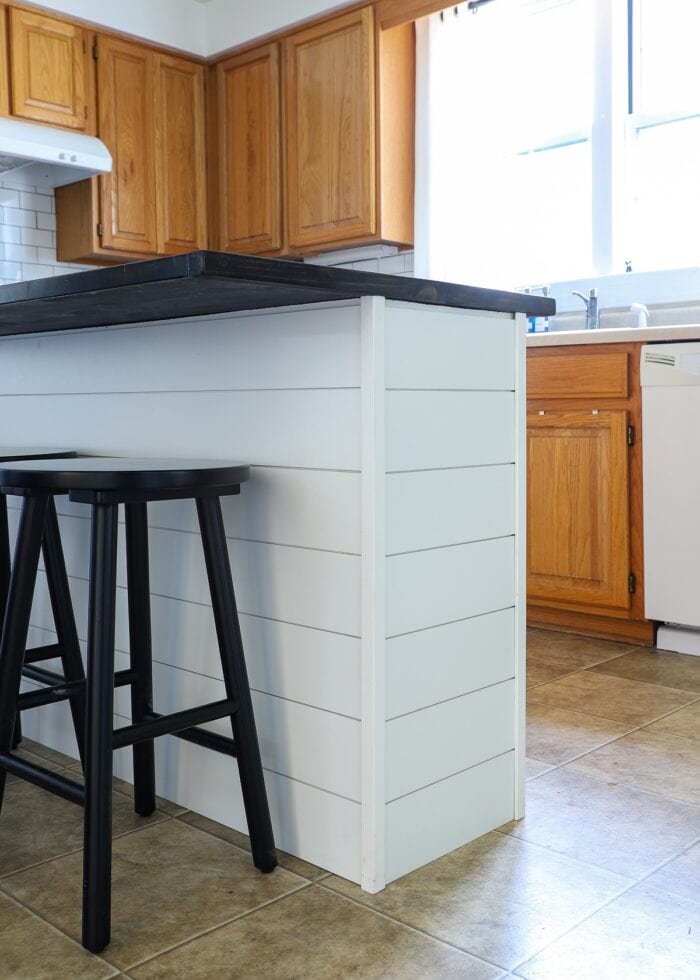
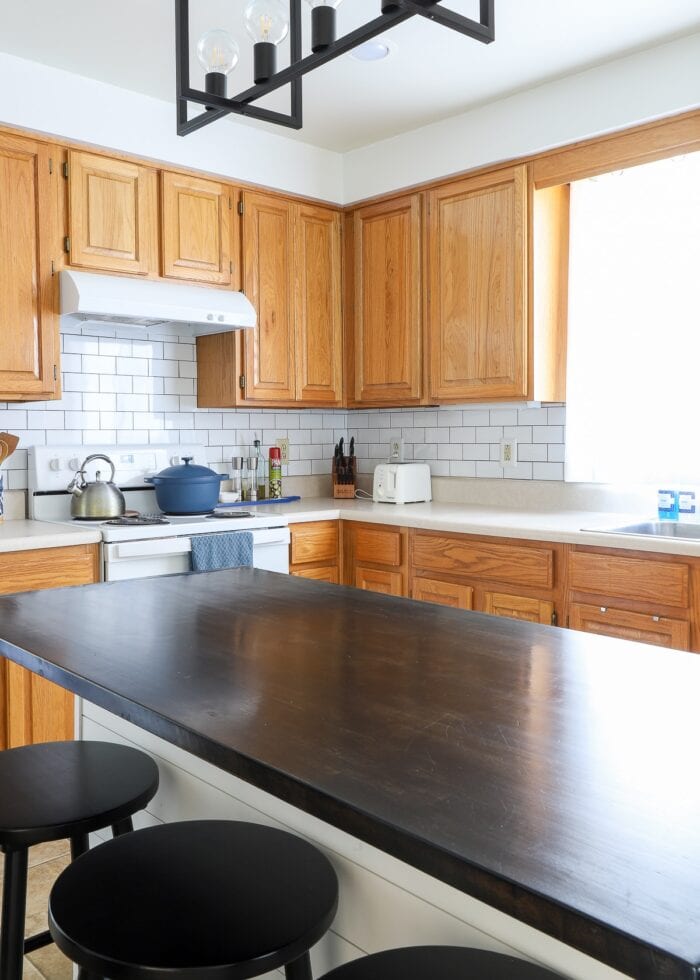
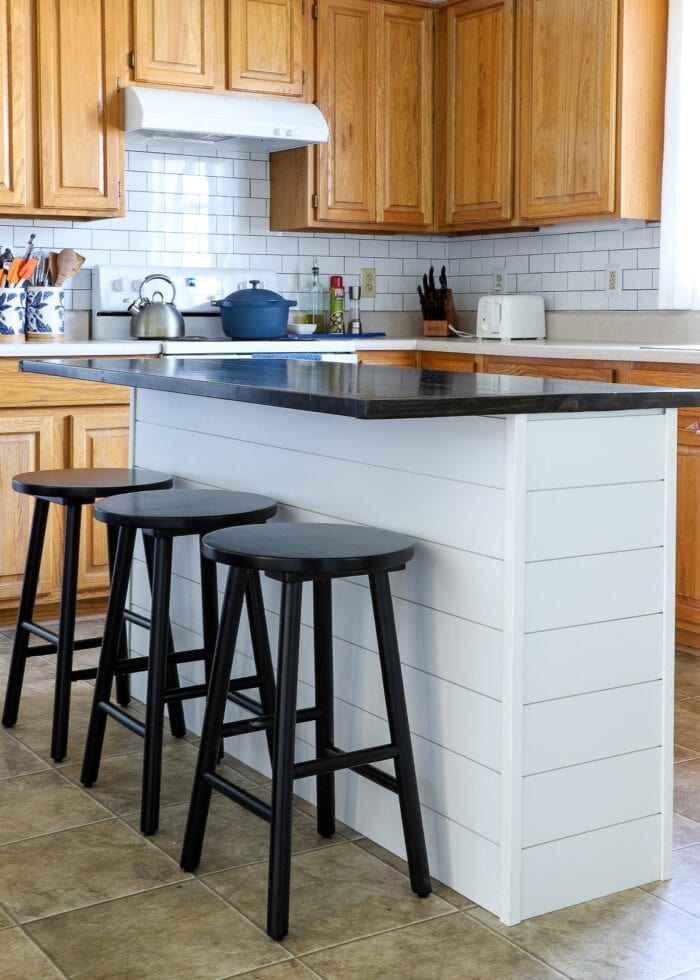
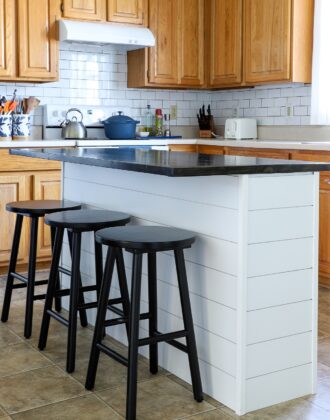
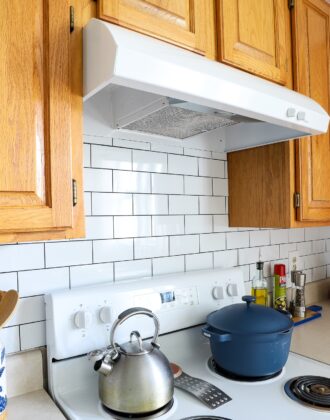
Stained so dark that it almost appears black, this butcher block counter looks absolutely stunning in person and certainly provides a contrast to the beige and honey oak throughout the rest of the kitchen.
And since it’s covered in an incredibly-strong oil-based polyurethane, it really is the durable countertop surface you want and need in a kitchen.
Although not particular challenging, staining, installing, and living with a butcher block island countertop was certainly a learning curve for us. So let me break it aaaaaaaall down for you!
Supplies Needed
Since these butcher block island toppers are sold ready for immediate stain and installation, this is a kitchen upgrade almost anyone can tackle!
Here is what you need:
- Unfinished Butcher Block Island Topper – in the dimensions you need for your particular island. Keep in mind that most island toppers should be 30″ deep at a minimum.
- We purchased this one in the 60″ length.
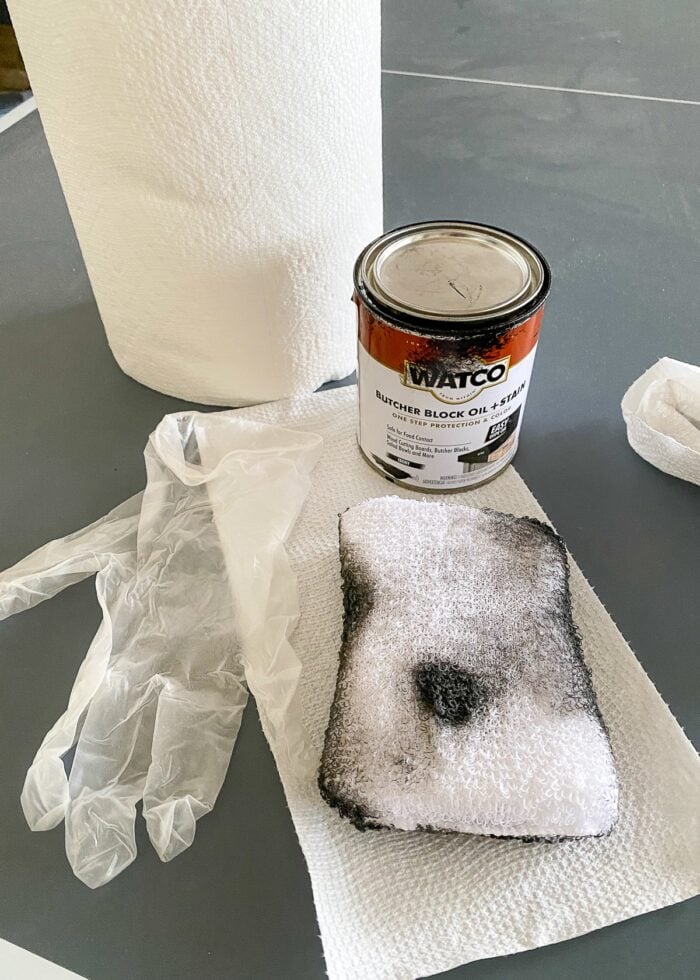
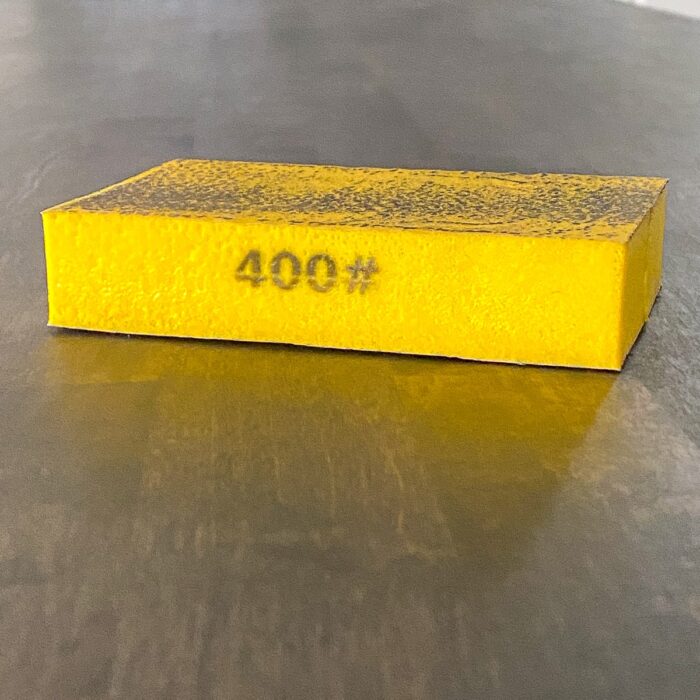
- Fine-Grit Sandpaper – I used a 400 Grit Sanding Sponge
- Stain – we used Watco Butcher Block Oil and Stain in Ebony
- Oil-Based Clear Polyurethane
NOTE: What I outline below may appear a little out of order. Again, this countertop was a learning process for us, so this is a case of “Do as I say, not how the pictures look!”
Part 1 – Determining If Your Countertop Is Removable
Technically, anything is removable with a hammer or power tools. But whether you’re a renter or you just aren’t up for anything close to a kitchen renovation, you can quickly and easily determine how “removable” your island countertop is.
Inspect both the inside and outside of the island base cabinets where it meets the countertop. Do you see screws, nails, lines of caulk, or adhesive?
If you see evidence of caulk or adhesive, your island countertop will not likely “lift” right off. However, if you just see screws from the inside of the base cabinets into the under-side of the countertop, there’s a good chance it will.
Simply unscrew all the visible wood screws. Does the island lift right up? If so, it’s safe to remove and store safely (as necessary). (This was the case with our island countertop.)
If you encounter resistance even after the screws are removed, you’ll need to further investigate what is holding the island topper in place and determine if it can indeed be removed (without damaging the counter or the base cabinetry).
Part 2 – Adjusting the Countertop Size
In a perfect world, the standard sizes of butcher block will work for your kitchen island; but there’s a very good chance they wont. So before you start staining, you’ll first want to make any necessary adjustments to your countertop size, which can involve either cutting the wood down or extending it.
Cutting the Butcher Block Island Down
Most prefabricated butcher block countertops can be cut down to size using power tools such as a circular saw or table saw.
If you do cut down the original slab of wood, know that you’ll need to sand down the raw edge grain to match the finish of the remaining sides.
Lengthening the Butcher Block Island
When I was first measuring the countertop for our island, I determined the 30Xx60″ size was spot-on perfect. But what I didn’t realize at the time was that the shiplap treatment we were putting around the island base would ultimately increase our island length by an inch+, ultimately causing our island topper to be too small.
How our countertop fit after installing the shiplap:
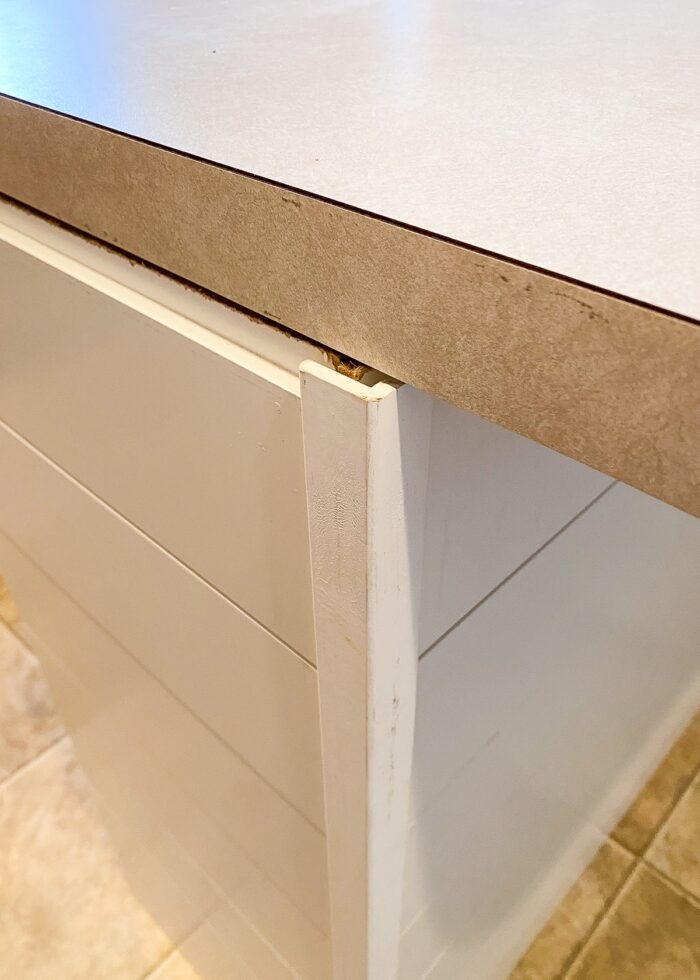
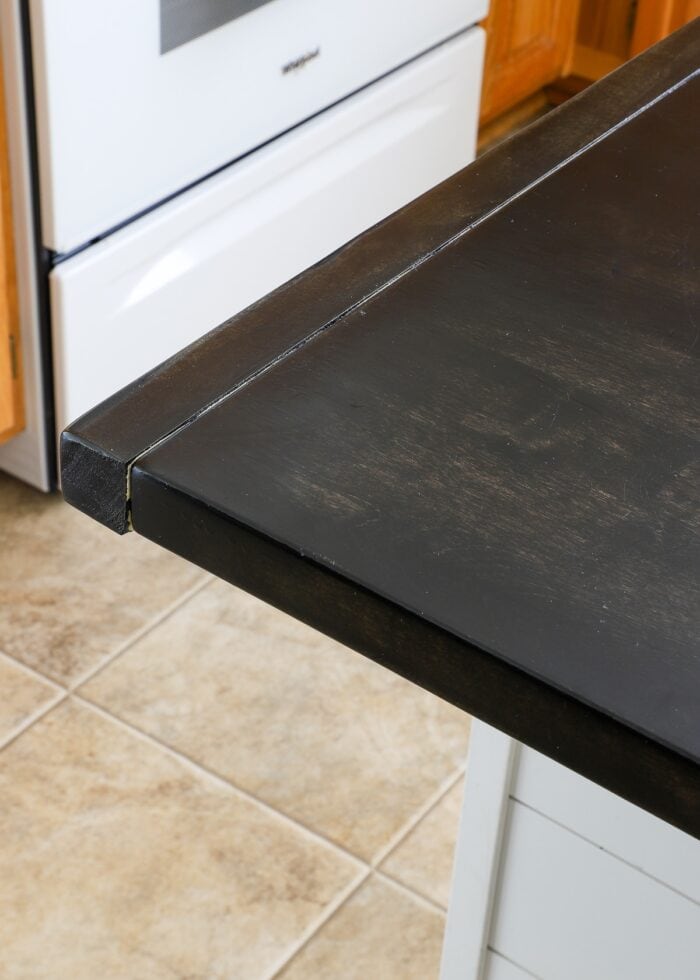
We did not want to purchase an additional full topper just to add a 2+ extra inches in length, so we opted to join unfinished stair railings that were (almost) the exact dimensions of our countertop to each end of the topper.
We ultimately screwed these “caps” on down the length of the banister (directly into the end of the countertop), then countersunk the screws and filled in the holes with wood putty before staining.
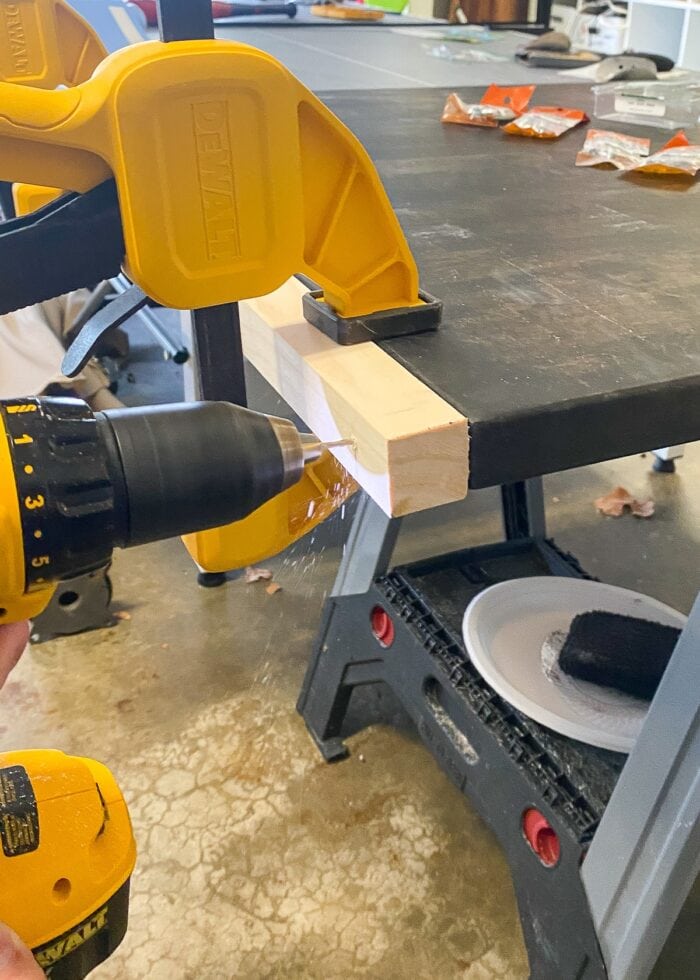
While this solution gave us the length we needed, it perhaps isn’t the “best” wood joining method. If you need to lengthen your countertop with additional sections of wood, I’d refer you to these instructions. (We just didn’t have all the necessary tools to do it the “right way.”)
Part 3 – Staining the Butcher Block Island Countertop
There are lots of options for staining and sealing unfinished butcher block, ranging from simple conditioning oil (to moisturize the wood) to food-safe “butcher block stain” in a variety of colors. And what you choose will very much depend on the look and function you need for your butcher block.
No matter what color you choose (even clear!), here are some tips to keep in mind!
- After experimenting with lots of different brushes, lint-free cloths, and towels, I ultimately found that these staining sponges were the best at laying down nice, even coats of stain and working it into the wood.
- Work all the way down the island board-by-board, ensuring you apply the same amount of stain to each as you go.
- Before the stain has a chance to set, wipe away any pools of build-up (or else these areas will remain darker than the rest of the wood). Pay attention to the ends of the countertop and ensure stain is carried evenly off the ends.
- Disposable plastic gloves are a must!
- Work in the daylight (if possible) or an area with really good, even lighting. I made the mistake of “slapping on” a coat as the sun was setting and was quite frustrated that my coverage was significantly uneven in the next morning’s light.
Staining Our Countertop
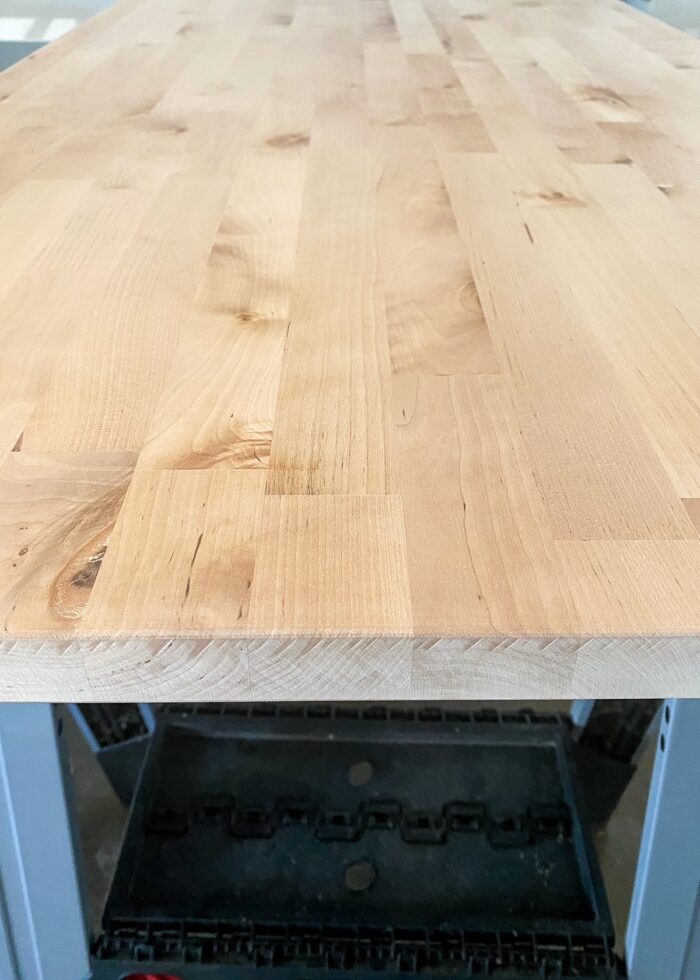
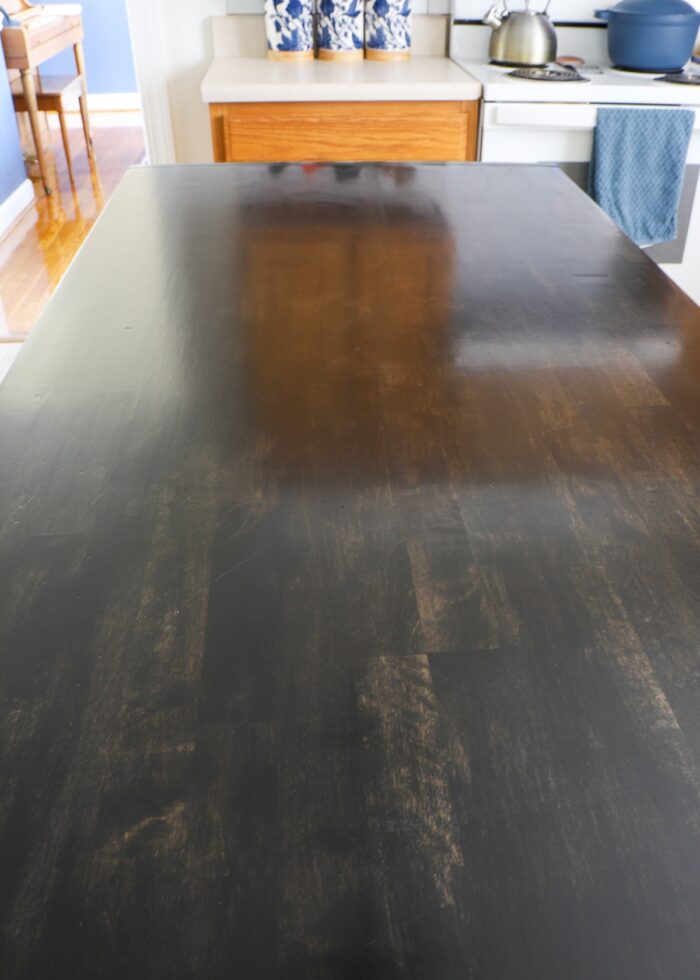
Having never worked with butcher block before, I was surprised at how challenging I found the staining step. Not because the staining itself was difficult. But rather, all the variation in color that butcher block is known for can be quite tricky to stain a uniform color.

Because I was trying to create a contrast with the pervasive honey oak cabinets throughout the kitchen, I opted for ebony (black) stain. However, after just a single coat of stain, there was still so much variation that looked “busy” and “unfinished” to me (above).
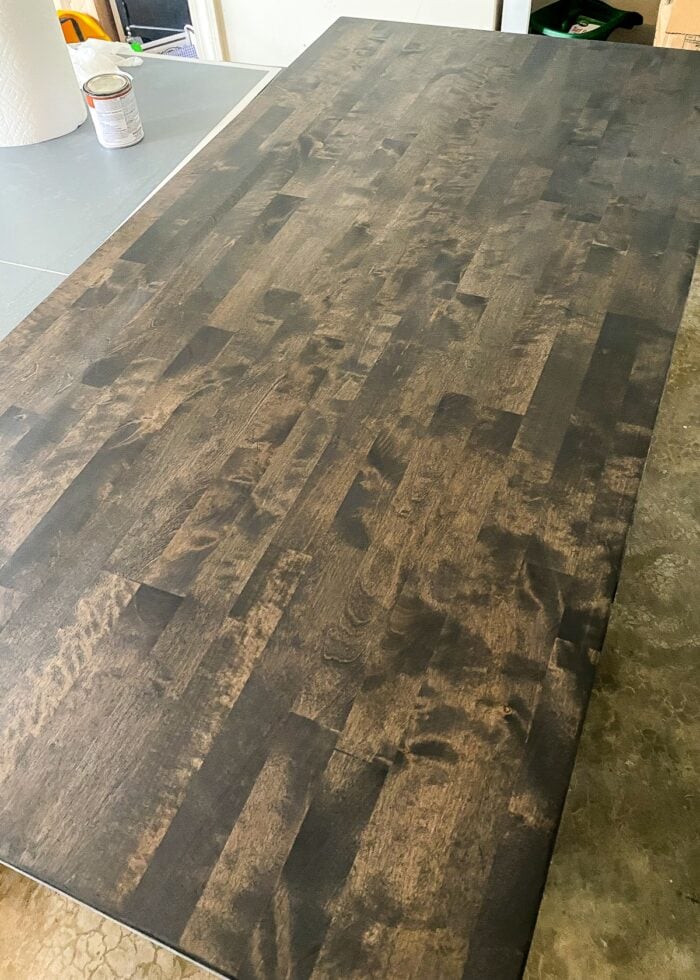
Even after the recommended 2 coats (above), I still wasn’t happy with the coverage. I ended up putting 4 coats of stain onto the butcher block (with light sanding between coats) in order to create mostly uniform color across the entire island topper.
While this amount of stain certainly downplays the “charm” of the butcher block wood grain, I was ultimately able to get a deep, rich, even color that “reads” black throughout the kitchen. In fact, it looks almost identical to our dining room table in the next room!
Want to save this post?
If you want to see the variation of color in your butcher block, one or two coats of stain will likely be sufficient. However, if you are going for a dark OR uniform color, prepare for several applications!
Part 4 – Sealing the Butcher Block Island Countertop
If you were to Google “How to seal butcher block countertops,” you will find all sorts of options. Just like variation in staining choices, you can choose anything from food-grade oils and sealers to polyurethane-like products.
Butcher Block Stain
We originally opted for “Butcher Block Stain” because it claimed to both stain AND seal the butcher block wood. I anticipated this product to produce a glossy, durable finish that would hold up to food prep, kids, entertaining, and more.
However, it does not.
The most important thing to know about butcher block stain is that it is designed to seal and protect the wood from moisture and food preparations, not necessarily wear-and-tear. Butcher block stain (without an additional topcoat) is best suited for functional cutting boards (and other serving items) where you simply need food-safe color.
Polyurethane
Even after four coats of the butcher block stain (to get the color saturated enough), I was suspect that the “raw wood” feel would hold up to daily life. I found myself reluctant to put a wet dish on the countertop much less hot items, open containers, or even my kids’ lunch plates.
Even though the countertop was technically “sealed,” I wanted something that had a more durable finish, so I turned to this oil-based clear polyurethane.
NOTE: I show “Gloss” below but I used “Semi-Gloss” on our countertop.
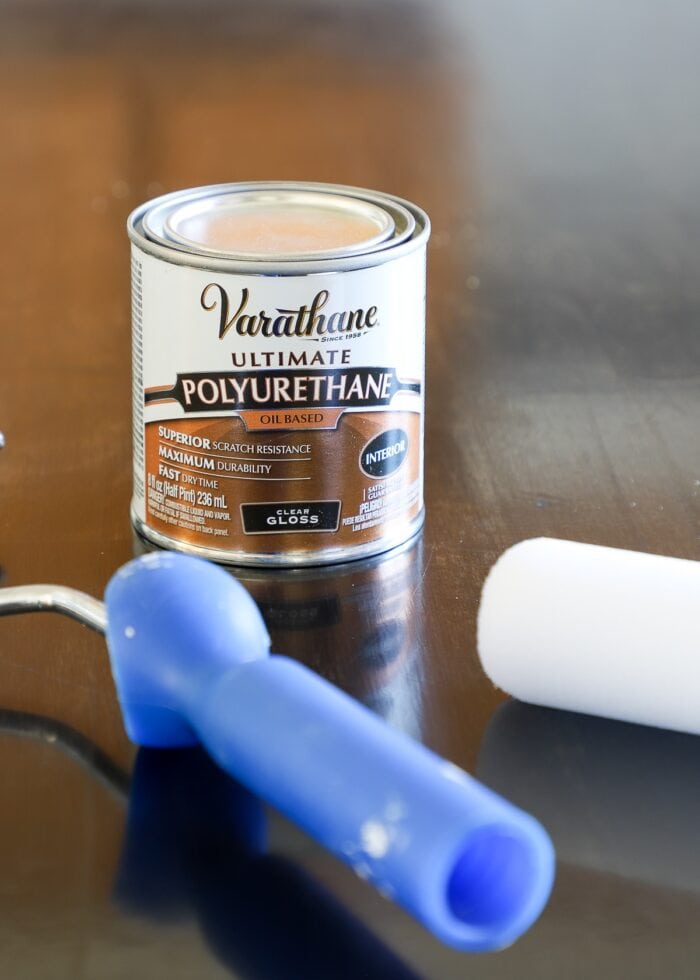
TIP! Oil-based polyurethane will always give you a harder, more durable finish compared to water-based products. But keep in mind that it can yellow over time, so it shouldn’t be applied to anything painted bright white. And it stinks like crazy so try to apply it in an outdoor or well-ventilated area.
Using a foam roller, I applied 5 coats of polyurethane, waiting the required 12 hours between each coat. This clear poly applied beautifully and dried super hard, resulting in a beautiful, uniform, shiny, durable finish.
I now have zero concerns about wiping this countertop clean with a wet rag, my kids spilling their milk, or raw foods coming into contact with and/or damaging the finish!
Bottom Line on Sealing
If you intend to use your butcher block surface as a cutting board, the butcher block stain is an excellent solution. However, if you are using butcher block as an all-purpose countertop, I highly recommend applying a polyurethane-based product for a smooth, durable finish.
Part 5 – (Re)Installing the Butcher Block Island Countertop
If you are replacing an existing counter with a new butcher block island countertop, you can most likely use the exact same screws and holes that were initially holding on the original countertop.
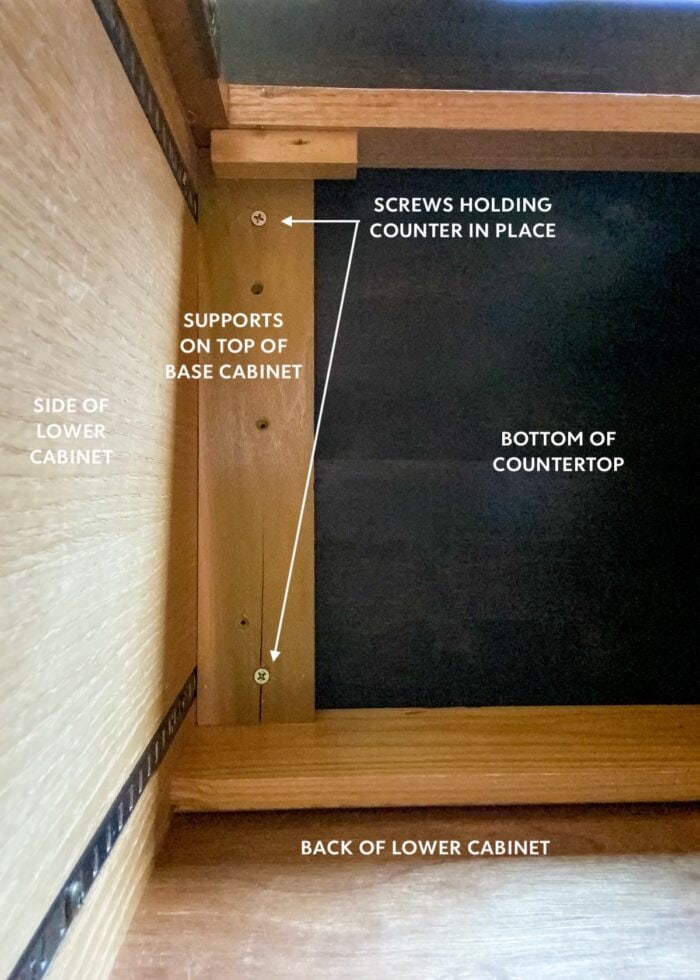
In general, an island countertop can be safely and securely attached by screwing through the tops of the base cabinets into the bottom side of the countertop. Just be sure to pick screws long enough to span the required distance, but not too long that they pop through the top of the counter.
FAQs About Our Butcher Block Island Countertop
Where to Buy Butcher Block Countertops
We purchased our butcher block countertop from Lowes because they carried prefabricated versions in the specific dimensions we needed.
However, The Home Depot, IKEA, and other home retailers also carry unfinished butcher block slabs you can use for countertops.
Can You Use Butcher Block Counters as a Cutting Surface?
As mentioned above, butcher block, even installed onto a countertop, can technically be used as a cutting board. In this case, you’d want to use food-safe oil to protect the wood and your food.
That said, keep in mind that…just like a stand-alone wood cutting board…butcher block is prone to germs, discoloration, and mold, which isn’t ideal for an expansive (fairly permanent) countertop.
As such, it is typically recommended that butcher block countertops NOT be used as cutting board, and you instead use a (washable, replaceable) cutting board for your food preparations.
How Do You Clean the Butcher Block Countertops?
For most spills and general cleaning, I use plain warm water with a soft cloth. When I need to disinfect the surface, I use vinegar or a basic all-purpose cleaner.
Thanks to the durable polyurethane, any liquid beads right up and we’ve experienced zero water damage to the underlying wood.
Are Butcher Block Countertops Hard to Maintain?
Had we left our countertop sealed with just the butcher block stain or another wood conditioner, I would say yes. Just like a wood cutting board, this type of surface requires regular maintenance (e.g., staining, sealing) to keep it clean and vibrant.
I feel more confident with our polyurethane-covered countertop. It’s been in place for about 4+ months without any significant damage or change in color. That said, it is prone to scratches or dings just like any other wood surface. Thankfully though, because it’s just wood, we can sand and re-seal it at any time if needed.
So while poly-sealed butcher block countertops are higher maintenance than formica/laminate, granite, soapstone, or other natural stone countertops, they will surely fair better than one that just has an oil finish.
Why Use Butcher Block For A Countertop Instead of Other Wood?
With a durable polyurethane finish, technically any wood could be used on a countertop. But butcher block’s hardwood has a few advantages:
- Thanks to its construction, it’s an incredibly hard surface that holds up nicely to plates, dishes, glasses, and other items that would typically be placed on a wood surface. Hence the reason it’s typically used for chopping, cutting, etc!
- The natural grain variety is quite beautiful, adding a natural warmth and texture to any kitchen space.
What Is the Downside of Using Butcher Block Countertops?
In our experience so far, I would consider the following as the biggest downsides to using butcher block wood for countertops:
- Wood is just not as durable as stone or laminate. As such, there is a higher likelihood it will get damaged or scratched over time.
- Butcher block wood only comes in finite sizes. So any really large or unusual surfaces will require several pieces to be joined together in order to create a large, solid surface.
Do Crumbs or Dust Get Into Those Cracks?
Yes, a bit.
Again, in hindsight, I would have taken a bit more care to create a more flush joint between the countertop and the end caps. That said, in 4+ months, we haven’t really had any “build-up” in those tiny crevices. Just like the countertop, poly was used in the cracks too, creating a barrier that is fairly easy to clean!
Do You Put Hot Pans On Butcher Block Countertop?
I don’t, primarily because I’m too scared to tempt it. Since we still have the heat-safe laminate on the perimeter of the kitchen, I’ve gotten in the habit of putting any hot pots and pans there instead of on the wood countertop.
Phew! Who knew I had so much to say about our butcher block countertop!
In all honesty, it was a fairly straightforward DIY project from an installation perspective. Just having never really worked with butcher block wood, there was a bit to learn along the way.
Is our butcher block countertop perfect? Nope. But is it a phenomenal temporary upgrade that is totally un-doable. Yep. And am I happy with my choice to stain it dark black? Absolutely! Although the white shiplap around the base plays a part, the darker island countertop has absolutely transformed this kitchen!
Psssst – this rental friendly kitchen makeover is now complete! See the full reveal here: The Ultimate Renter Friendly Kitchen Makeover
If you are looking for a budget-friendly, totally temporary, and absolutely do-able update to your kitchen island, this IS a DIY project you can take on.
I hope eveeeeerything I shared here helps you navigate some of the uncertainty of this kind of project and motivates you to try a new-to-you solution!
Megan

5 Comments on “A DIY Butcher Block Island Countertop (Anyone Can Do!)”
Not that I have any experience with this, but you might have had better coverage with your stain if you had first used a wood conditioner. I think the counter looks wonderful and I’m glad you found a way to enjoy your kitchen more. You do great work!
I’ve never taken a countertop on and off so much in my life. Glad we got it right in the end!
What a great idea to refresh your kitchen. I love the look of the ebony butcher block top with the honey oak cabinets.
The change it made to the kitchen is unbelievable! Love it so much!
It is fabulous, Megan; I love it!
When you move, chances are slim that you’ll have the same size island in your next home, but I’ll be curious to see how you repurpose this beautiful piece of wood. Maybe it would make a fantastic headboard?!