How to REALLY Store Outgrown Kid & Baby Clothes
If there is one request I get more than ANY other, it’s this one: “Please share tips for storing baby clothes!” For years, you all have asked and asked and asked; and truth be told, I never provided an answer because I just didn’t have a solution I loved. Sure, I had my three son’s clothes sorted into pretty little boxes with cute labels. But this system wasn’t really working when it actually came time to swap out clothes. So for months…seriously (months!), I have analyzed our kid clothes storage issue to come up with a system that didn’t just look good, but worked in real life. And by George, I think I’ve got it! Friends, it’s time to ditch the “bins by size” approach and organize kids clothes in a whole new way. Let me show you!
What If I Told You…
Storing kids clothes in bins, sorted out by size, doesn’t work.
Now, I am sure there are households where it does indeed work, so don’t send me any hate mail. But I’ve been at this Mom thing for over 10 years now. And for most of those years, storing baby clothes by size has not only proved bulky and inconvenient, but downright frustrating. And based on how many requests I get for ideas on how to store kids clothes, I have a hunch your “by size” bins aren’t working for you either.
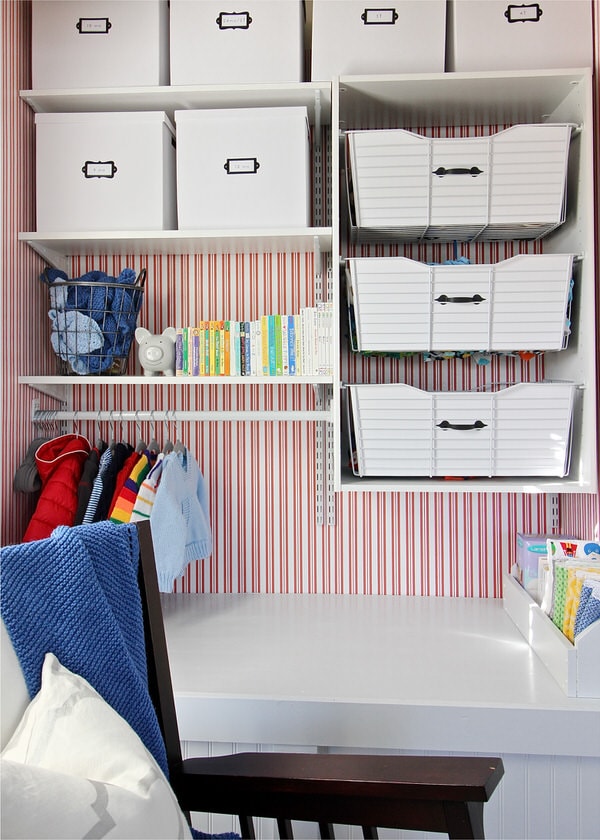
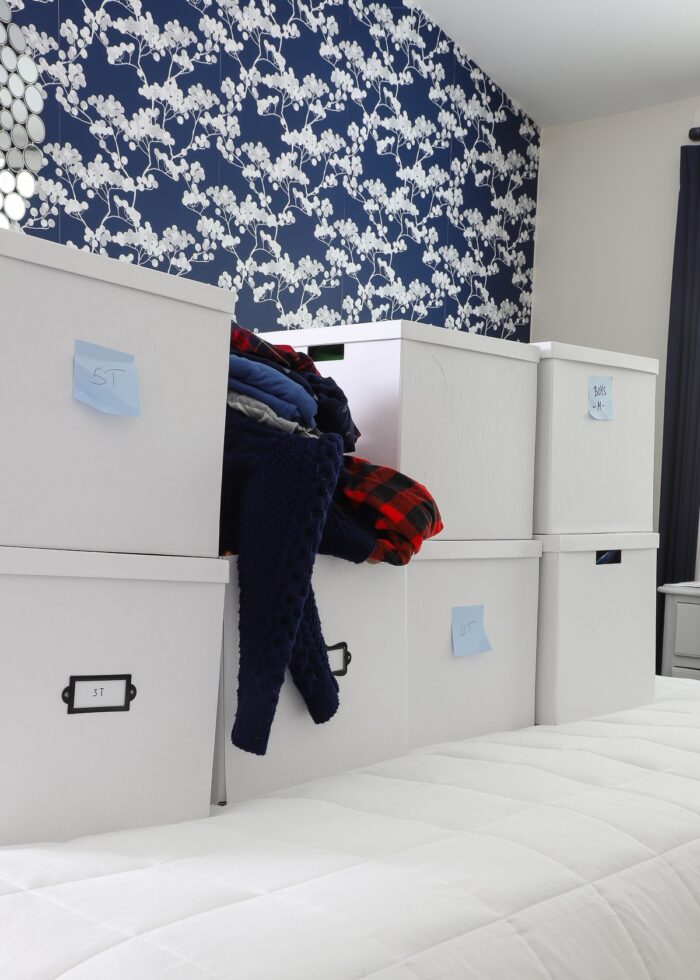
Once upon a time, storing baby clothes looked like this, until our collection grew and grew and grew…
My Three Sons
Before I dive into why size bins don’t work, let me quickly share our unique clothing situation. Because based on how many kids you have, how far apart they are, and their gender, your clothing situation may look a little different.
I now have three boys. But here’s the kicker: they range in age from 11 to 2. That means, at any given time, I am storing 5+ different sizes of little boy clothes, spanning from my oldest (who’s currently in Kids Large) to my youngest (who’s currently in 2T). Add in different seasons and different styles (e.g., casual, fancy, etc), and that’s a lot of clothes to sort and store.
When I had one child and was slowly accumulating new sizes of clothes, storing in sized bins worked fine. But as we added more kids (and more clothes) and they all started moving in and out of sizes differently, the bin-by-bin system quickly spiraled out of control.
Why Clothing Bins Don’t Work
So what’s my beef with storing kids clothes by size? It sure is easy and (seemingly) logical, after all. When Child B outgrows 3T and is ready for new clothes, common sense suggests that you just grab the 4T box, swap the clothes, and life is good. But it doesn’t really work that way, does it?
Here are just a few (real life!) examples to consider:
- Just because clothes say 3T, they don’t necessarily fit that way. Based on brand, shrinkage, etc, there isn’t really a “true” or “actual” size. So you go to box up the 3T clothes, but half of them still fit…then what? Do you box by what the label says or how they fit?
- Unboxing an entire size doesn’t account for season. So let’s say I want to unbox all of the 4T clothes (to keep them together and “vacate” a box for the next size). But it’s summer, and 2/3 of the clothes are winter. Do I put them in the drawer anyway? Do I leave them in the box? Will I remember to go grab the rest of the clothes as the seasons change, or assume I don’t have any winter clothes in that size?
- Let’s say you’re heading to the waterpark and Child B needs a bathing suit. You know you have some, but are they in the 3T box, 4T box, or 5T box? You’ll have to pull them all down to find out. This applies to other items too: pajamas, “formalwear,” the 100 Days of School shirt, etc.
- Maybe your child has a long torso but short legs. So she wears 4T pants but 3T shirts. Or maybe your child’s torso grows before their legs do, and you’re swapping some clothes but not others. Pulling out/putting away just some clothes from individual bins proves tedious and frustrating.
- Let’s say I empty the 4T bin and need to load in my oldest son’s “Medium” clothes that he just outgrew. But my fancy label says 4T. I’m too lazy to go re-make a cute label, so I just leave it or use a sticky note in place. Over time, nothing is really where it says it is, and I can’t find a darn thing.
My point is…storing clothes into individual bins by size creates categories that don’t really work with how kids wear and grow out of clothes. I’ve spent the past 5+ years (since my second was born) dreading the whole “swapping clothes” exercise because:
- I was constantly dragging bins up and down from the basement.
- I never knew what to do with clothes that were the right size but wrong season.
- I got frustrated every time I couldn’t locate an item I knew we had.
- I was tired of the kids drawers being cluttered with clothes for the wrong season, even though they “fit.”
- I wasted money re-buying clothes we actually had but couldn’t find because they were in a mis-marked bin.
The struggle is real, friends! So I said to myself: “What If I ditched the size bins entirely, and stored clothes by TYPE instead.”
Storing Baby & Kid Clothes By Type
Think about this for a minute:
- When your child’s pajamas start looking a little small (but the rest of his clothes are fine), wouldn’t it be nice to just go look at your collection of pajamas and find the next size that fits him?
- Let’s say you have family pictures coming up and need shirts for all the kids. Instead of opening a dozen different boxes or running to the store, what if you could pull out your collection of “Collared Shirts” and first see what you have in what sizes?
- The climate’s turned cold and Child B needs some jeans that fit. Instead of opening three different boxes to test three different sizes, what if you could pull out all the pants at once and find the right size…just like you could at the store.
Mind blown yet?!? Mine too!
Products Featured
If you really really want to store clothes by size, large plastic bins with lids are indeed your best bet. They hold a lot, stack nicely on shelves, and can be easily labeled.
But when you shift to storing clothes by type instead, big open bins no longer work. Because while putting all of one clothing type together is helpful, you still need a way to group items by size (or else you’ll spend forever fishing out the right size long-sleeve shirts from the “Long Sleeve Shirt Bin.”)
After exploring countless options and ideas, I finally landed on these shoe organizers and these clothing organizers:
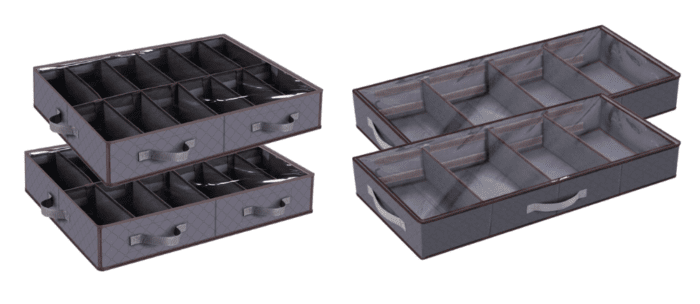
I like these two products for kid clothes for 3 specific reasons:
- The are large but dividable. This means you can easily get all of one clothing type into one organizer, but they can also be divided up to create sections and sturdiness as needed.
- They are highly customizable, which means you can make little compartments for baby clothes and big compartments for big kid clothes.
- The can fit under the bed. I’m going to talk about this more later on, but one of my biggest struggles with pulling out and putting away clothes was actually lugging the bins to/from our storage area (e.g., basements, attics, garages, etc). By having the clothes under the beds, it’s quick and easy to pull out something whenever you need it!

How to REALLY Organize & Store Outgrown Kids Clothes
I’m not sure you can fully appreciate how “huge” a shift this concept can be for storing baby clothes, so let me show you how this looks and works in real life!
Step 1: Gather All Your Kids Clothes
My hunch is you’re currently storing baby clothes in big plastic tubs. Go grab them…all of them. Also grab shoes, sweaters, jackets, etc. Leave all currently-fitting clothes in your kids’ dresser drawers and closets, but do a quick scan to grab anything and everything that no longer fits.
These cardboard boxes of clothes have been sitting down on our basement shelves, looking exactly like this, since first moving in 3 years ago.
TIP! I highly recommend working on a bed or dining room table because it’s going to take a while to sort and fold up all those clothes!
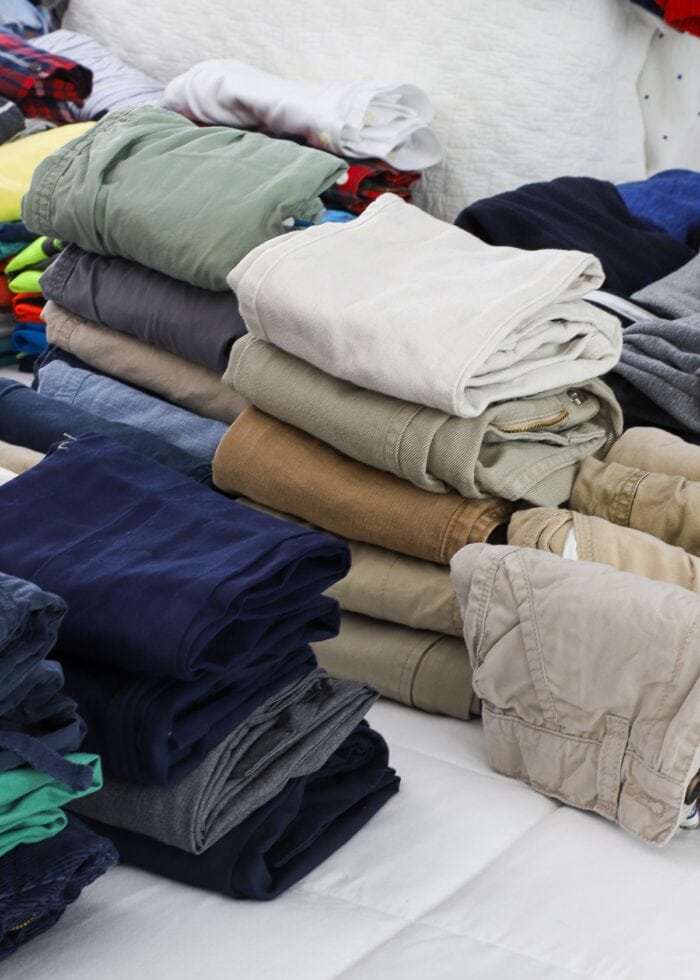
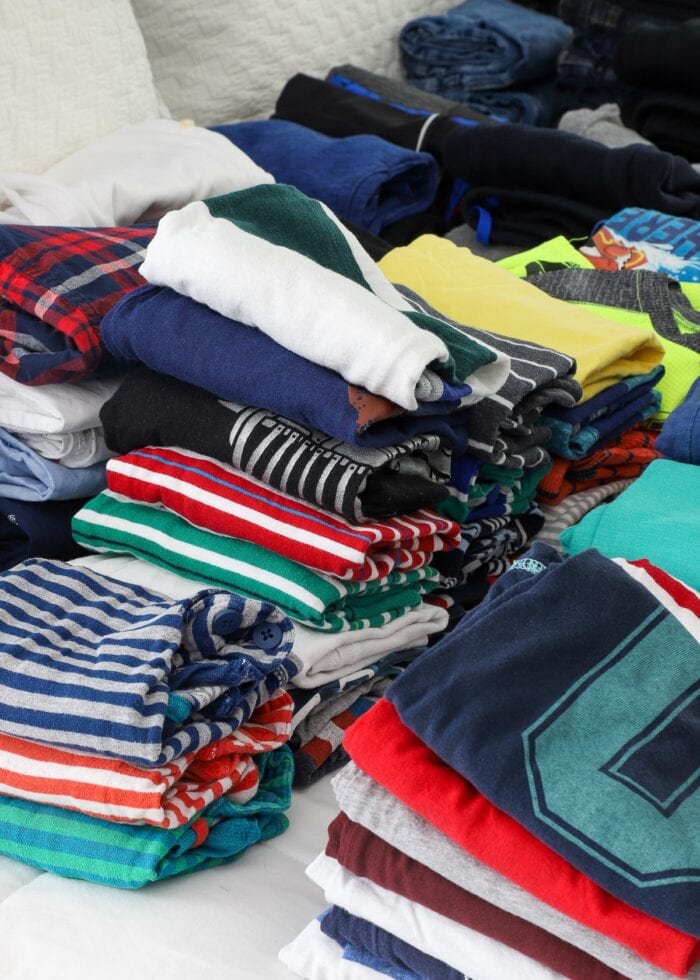
Step 2: Pile Clothes By Type
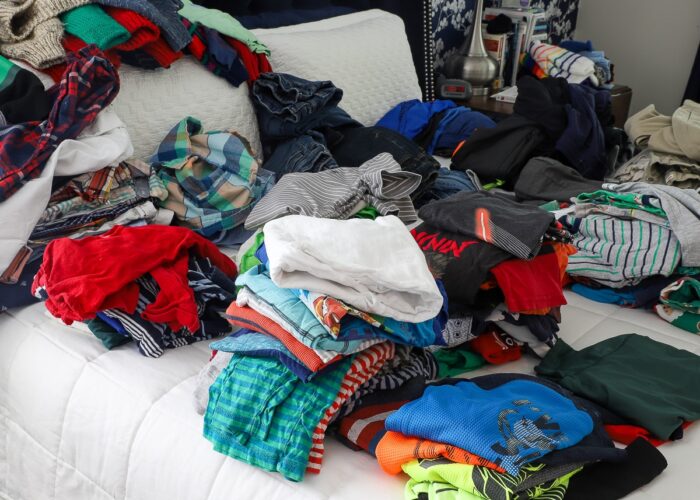
Okay, here we go! It’s time to ditch the size bins and re-sort all your kids’ clothes into categories instead. These categories may change based on your child’s specific wardrobe, but here are the categories I used for our boys:
- Short Sleeve Shirts
- Short Sleeve Shirts with Collars – Button-up and polo
- Long Sleeve Shirts
- Long Sleeve Shirts with Collars – Button-up and polo
- Shorts
- Pants
- Sweaters & Hoodies
- Underpants
- Socks – We don’t keep a majority of socks because they get worn and hole-y. But we do keep “sports socks” for soccer, basketball, baseball, etc.
- Pajamas
- Bathing Suits
- Formalwear
- Ties
- Shoes – Think about if you really need to keep shoes from one child to the next. We tend to buy each kid a single pair of tennis shoes and/or sandals whenever needed and then let them wear the shoes completely out. As such, we only keep/store shoes that don’t get fully worn through, such as:
- Hiking Boots
- Cleats (and other sports shoes)
- Dress Shoes
I no longer have babies and don’t have girls, but additional categories might also include:
- Onesies (Long/Short Sleeves)
- Cloth Diapers
- Dresses
- Skirts
- Tights
- Hair Bows & Headbands
- Hats
My number one tip here is to keep your categories simple AND think about how you typically go looking for clothes for your kids (e.g., we need shorts right now). Don’t get too bogged down in categorization. At first I was tempted to sort pants by Gym, Jeans, and Other. But the reality is, when my son needs pants that fit him, I’ll need them all at once.
TIP! As you sort clothing into categories, take the time to purge out anything really worn, faded, stained, “crunchy,” or you just don’t love. If you didn’t put something on your child the first time around, you likely aren’t going to put it on your next child either.
Step 3: Fold Clothes Compactly
With all the clothes sorted and purged, you’ll next need to settle in with a good movie, podcast, or audio book while you fold, fold, fold. Your goals are to:
- Fold all same-sized items into a similar shape
- Fold all items to a height that matches the height of the under-bed storage boxes.
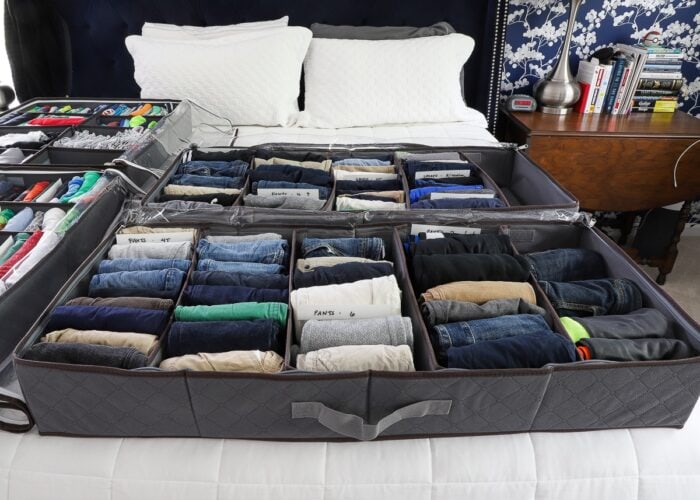
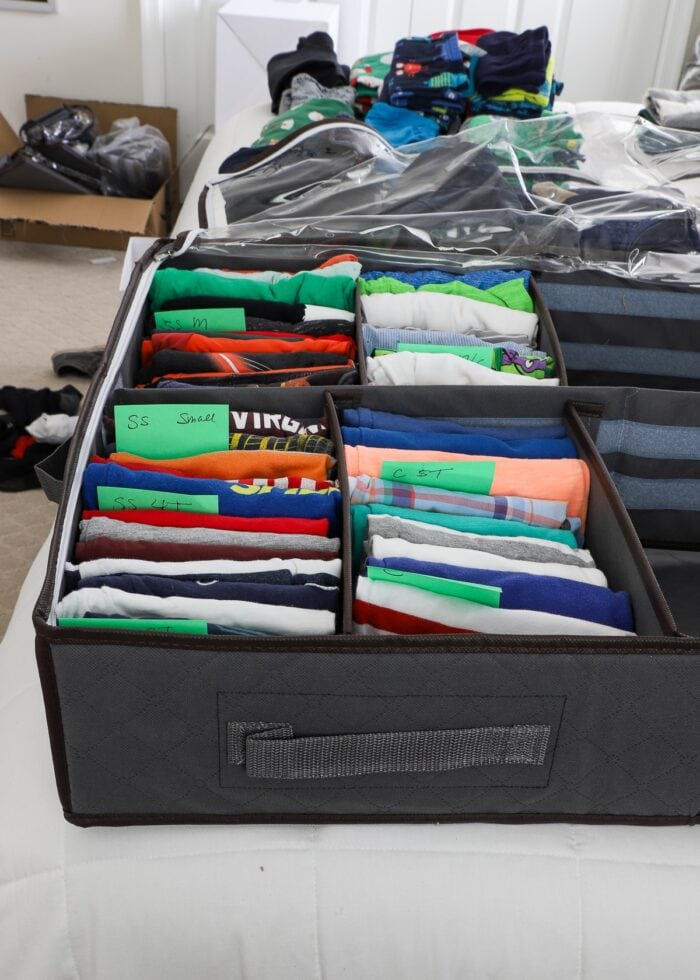
Step 4: “File” Clothes Into Organizers
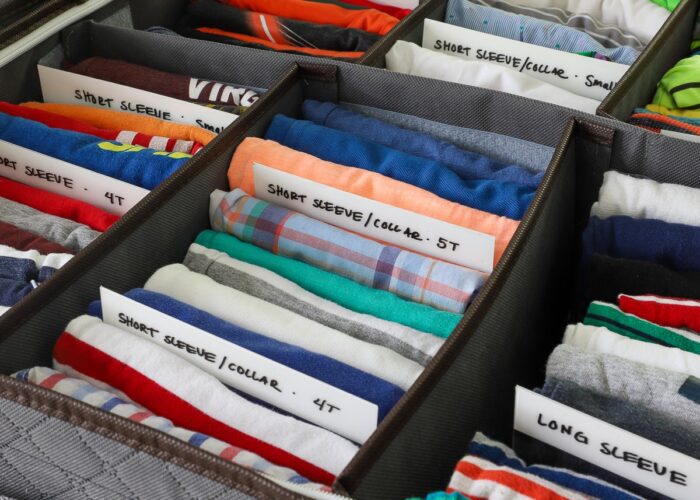
With everything folded, it’s time to “file” everything inside the storage totes BOTH by category AND size. Yes, you read that right! While organizing by type is truly a functional game changer, it’s still really valuable to have like sizes together. I recommend loading each category (e.g., Short Sleeve Shirts) in from smallest (in the front) to biggest (in the back).
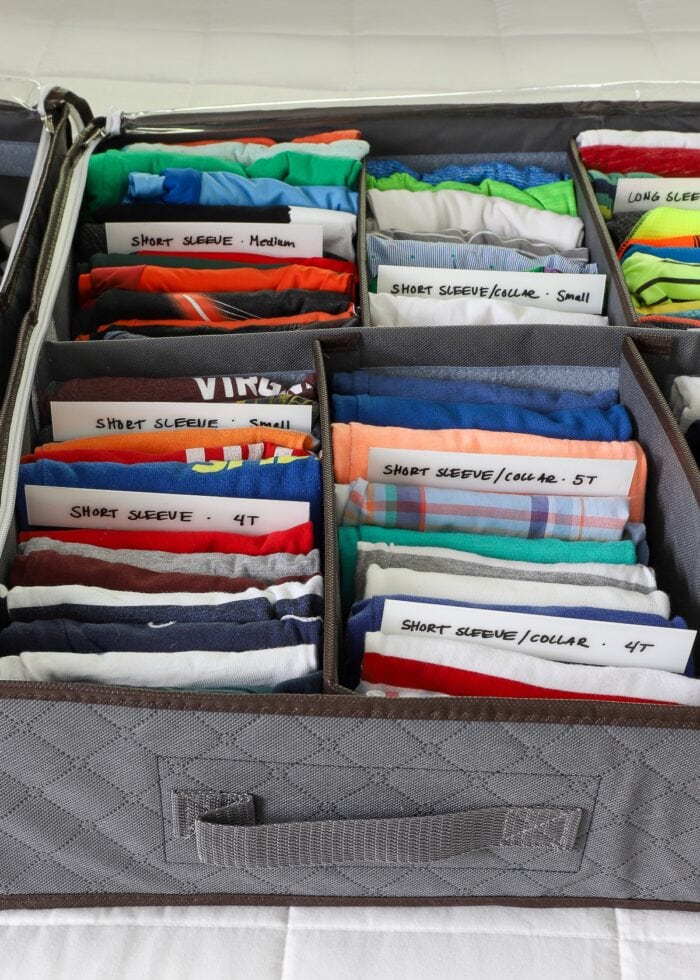
For example:
- In the far left-hand side of our “Shirts” tote, I have “Short Sleeve Shirts” ranging from 3T – Child Medium.
- The next column is “Short Sleeve Shirts with Collars,” ranging from 3T to Child Small.
- The next column is “Long Sleeve Shirts,” ranging from 3T to Child Medium.
- The final column is “Long Sleeve Shirts with Collars,” ranging from 3T to Child Medium.
I don’t recommend stacking clothes vertically. Filing clothes on their edge instead will allow you to not only store a lot of clothes really compactly, but also help you see everything at a glance (like when you suddenly need the “Cat In the Hat” shirt for Dr. Seuss’ birthday.) Use the dividers to create “custom” channels to fit each size/set of clothes.
Want to save this post?
TIP! As you file clothes, use scraps of paper or Post-It Notes to mark when one size transitions to another. Once everything is loaded in, it’s a total pain to pull items back out just to find the size breaks.
Step 5: Create Size Labels
At first, I really didn’t think labels were necessary. If the goal is just to find a set of shirts that fit Child B, it doesn’t really matter what the actual size is, right?
However, it quickly became apparent that having a size reference would be very helpful. Not only do sizes give you a place within the larger tote to start looking when it’s time to swap clothes, but it also helps you “re-file” newly out-grown clothes in a logical spot.
Labels can be made of anything you want…cardboard, scrapbook paper, anything! They don’t necessarily need to be pretty or even super sturdy, since their main goal is simply to separate each category of clothes. I chose to make mine out of thin plastic sheets for one very specific reason: I wanted them to be erasable.
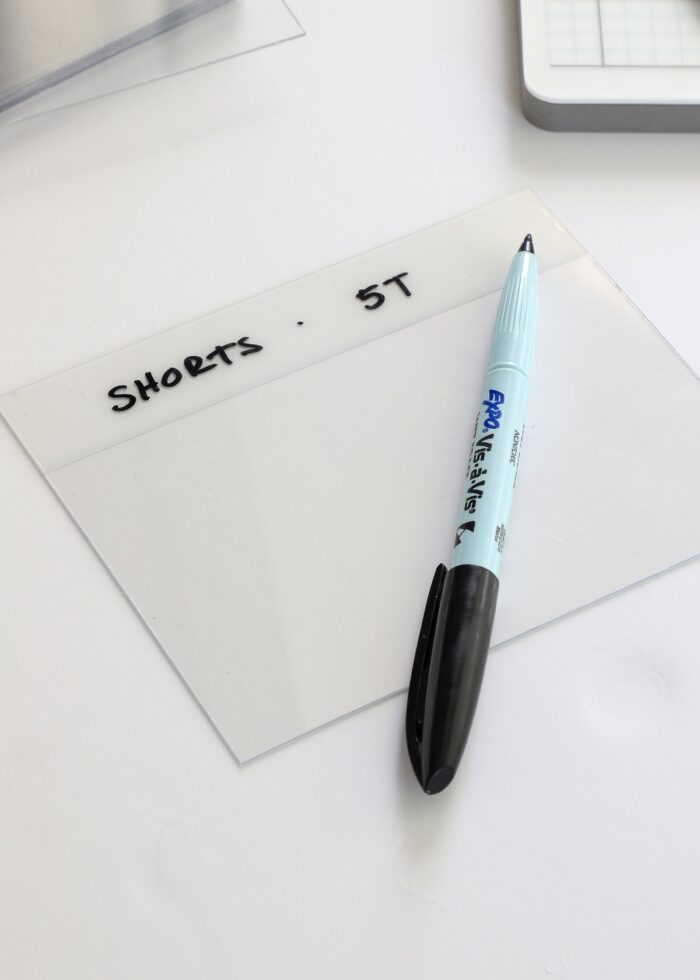
One of the biggest things I’ve learned over the years is that the labels need to be easily changeable. Kids clothes are a fluid item…you won’t always have 3T clothes in your boxes. Case in point, when the 3T clothes go out, I won’t need those labels, but I will eventually need labels for the 5T clothes currently in my middle son’s drawer. By making my labels easily changeable, I’ll be able to keep a better handle on what is really where at all times.
TIP! I recommend using a “Wet Erase” marker to avoid smudges getting on clothes!
Step 6: Inventory the Clothes (Optional)
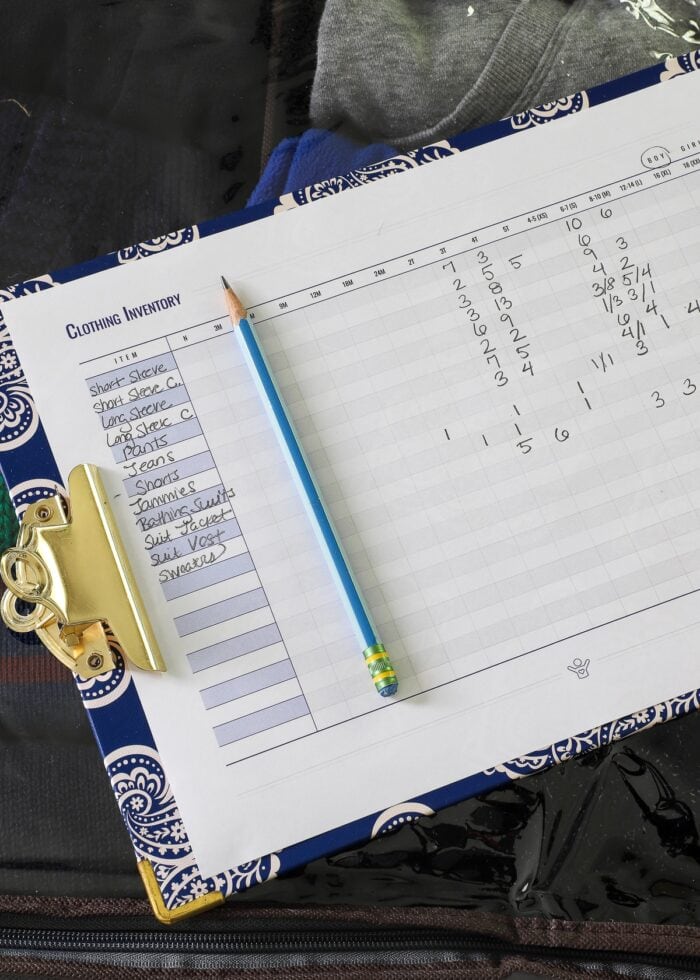
With all of your kid clothes now easily visible (both by category and size), you might consider creating a quick “Clothing Inventory.” All-too-often, I’ll stock up on something I think the boys need, only to come home and find three with tags still on them. Keeping an inventory in your purse (or a digital copy on your phone) can help you quickly and easily see what all you have so you can stock up and/or fill gaps appropriately. (My printable inventory is from The Family HUB.)
Step 7: Put Clothing Organizers Away
There are a lot of reasons I am super giddy about this clothing storage system, but one of the main ones is that it gets our outgrown kids clothes OUT of our basement/storage area and INTO the bedrooms where the kids are.
This might seem counterintuitive, but having boxes down in the basement made an already-hard task even harder. Having the boxes under the beds means that at any time, we can pull out the storage totes and grab whatever we need. Maybe we just need jammies, or maybe we just need pants, or maybe we need to swap all the shirts. No matter what it is, I can pull everything out and see everything we have…all at once.
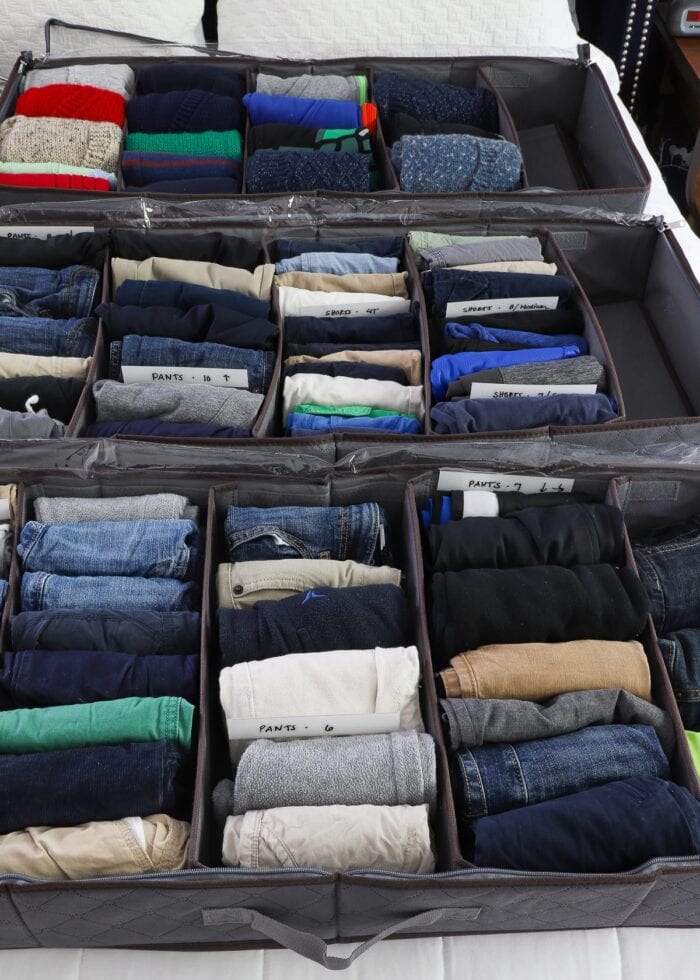
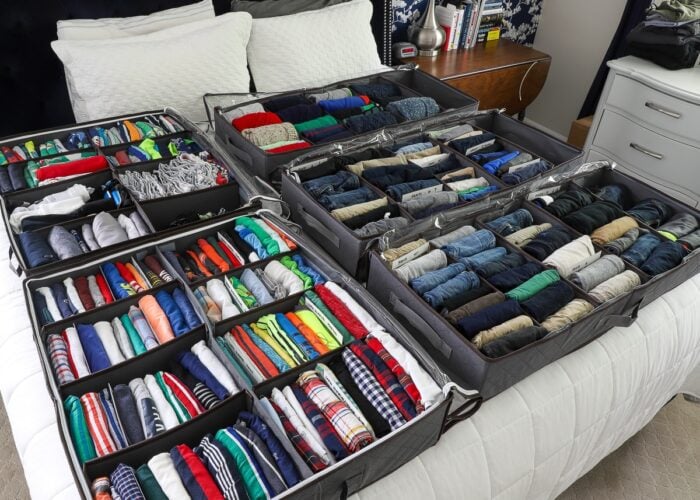
This is aalllll our little boy clothes with the exception of shoes!
TIP! I highly recommend considering how much under bed space you have when deciding how many and what size organizers to purchase. My two little boys are about to be in twin beds in the same room. One large tote and two skinny ones will fit nicely under each bed!
A Closer Look Inside Our Kids Clothing Totes
I ended up using 2 “shoe” under-bed organizers (1 set of 2) and 4 large long, skinny organizers (2 packs of 2) for our entire little boy clothing collection. This not only allowed me to categorize tote by tote, but also have some room for growth.
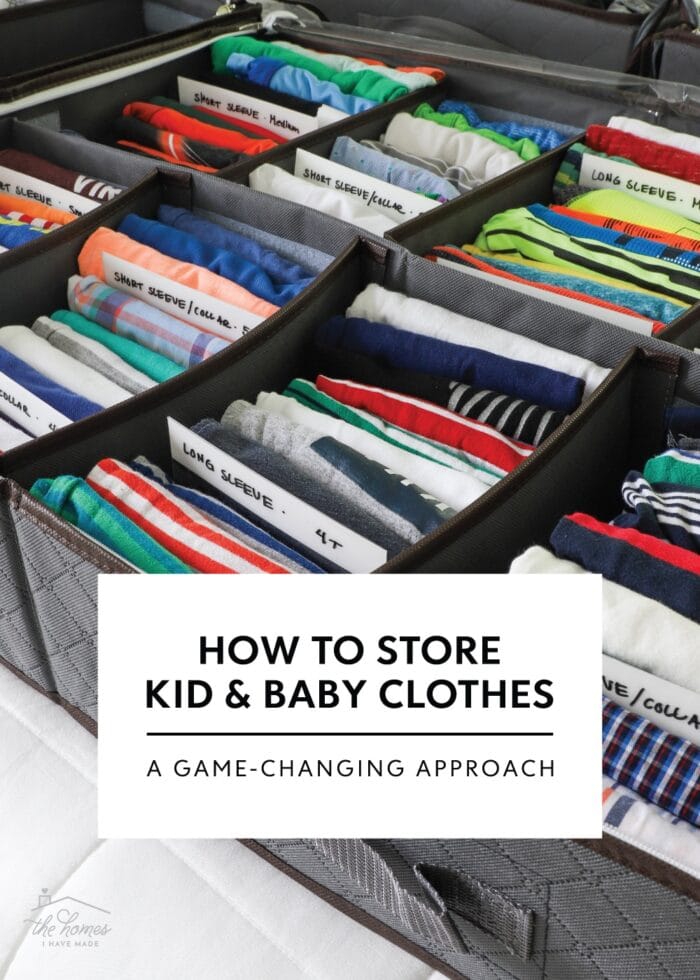
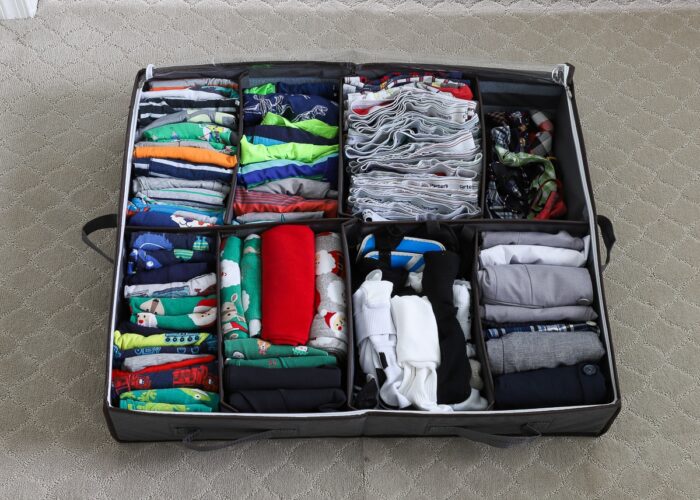
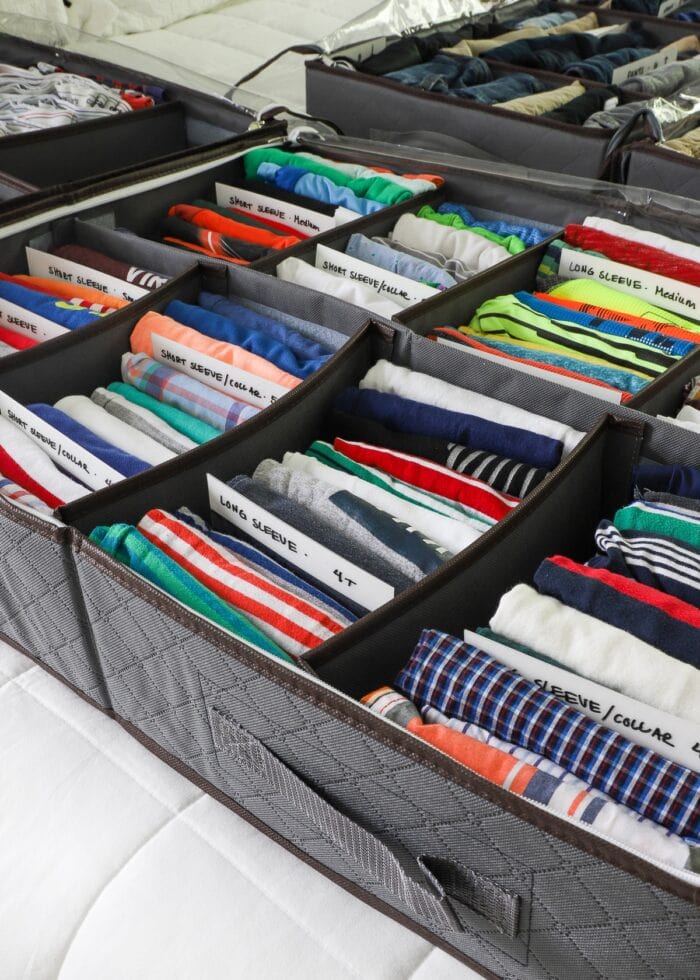
All Shirts
Inside one large “shoe” organizer, I have 100% of the boys’ shirts:
Short Sleeve Shirts | Short Sleeve Shirts with Collar | Long Sleeve Shirts | Long Sleeve Shirts with Collar
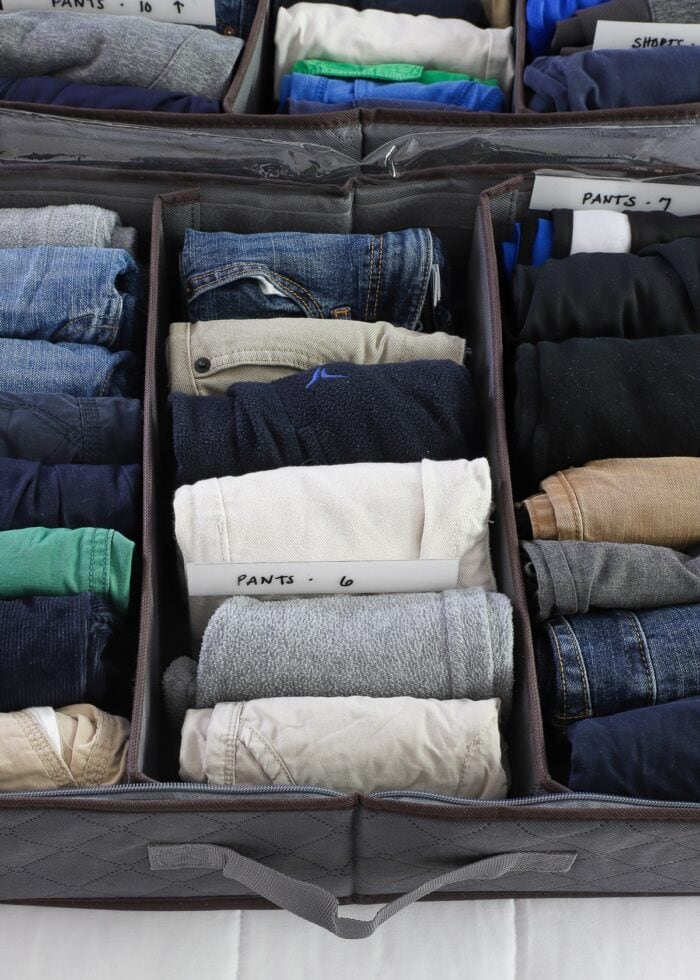
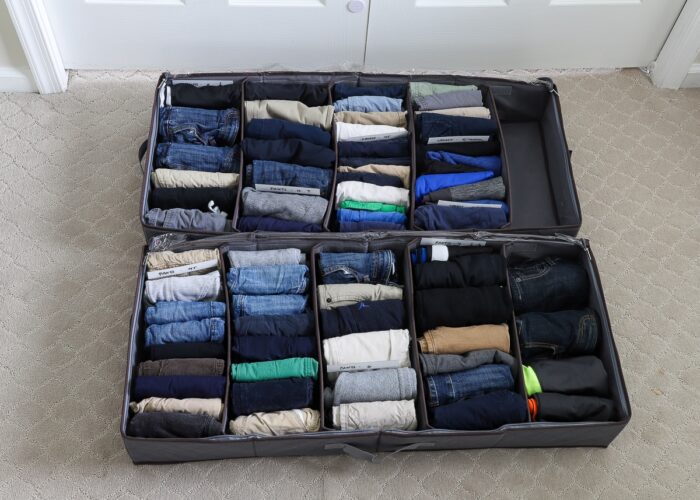
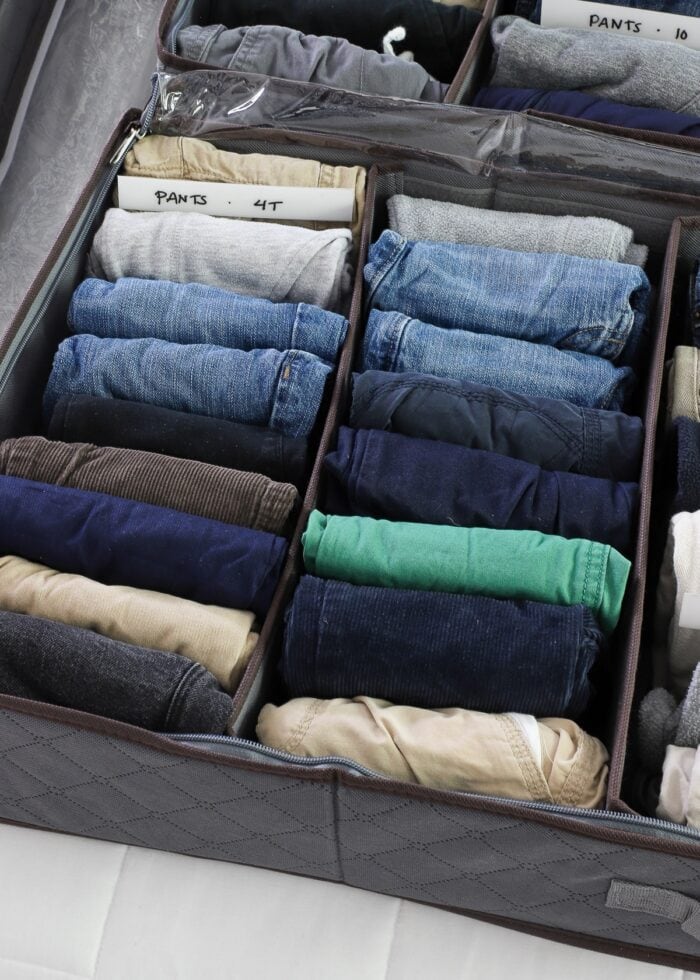
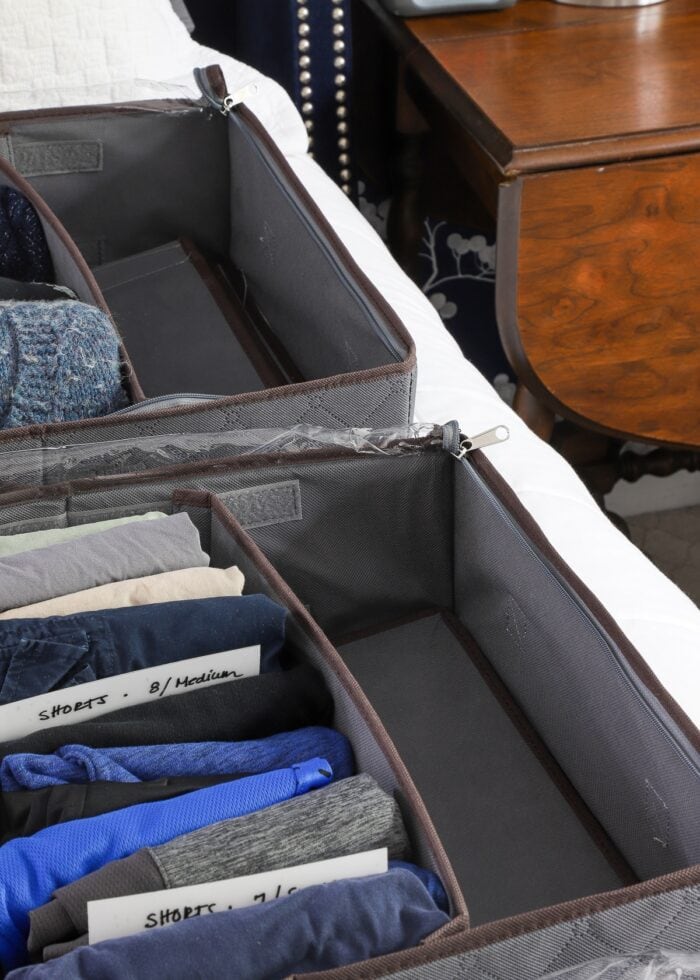
Pants & Shorts
In two long skinny totes, I have all pants and shorts organized by size:
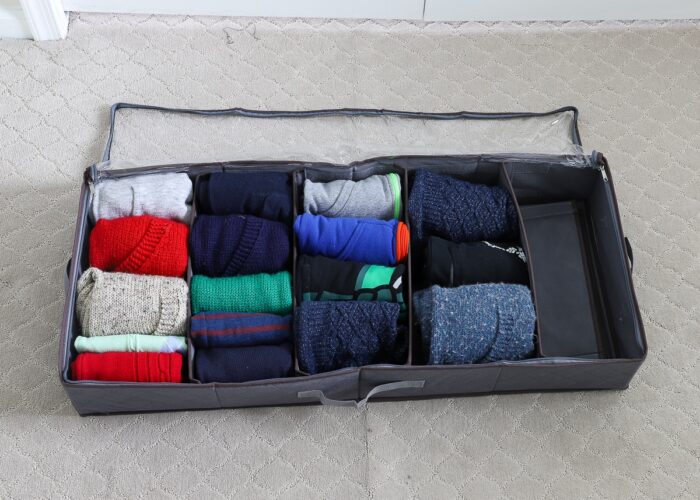
Sweaters & Sweatshirts
In one long skinny tote, I have all sweaters and sweatshirts organized by size:
Other Items
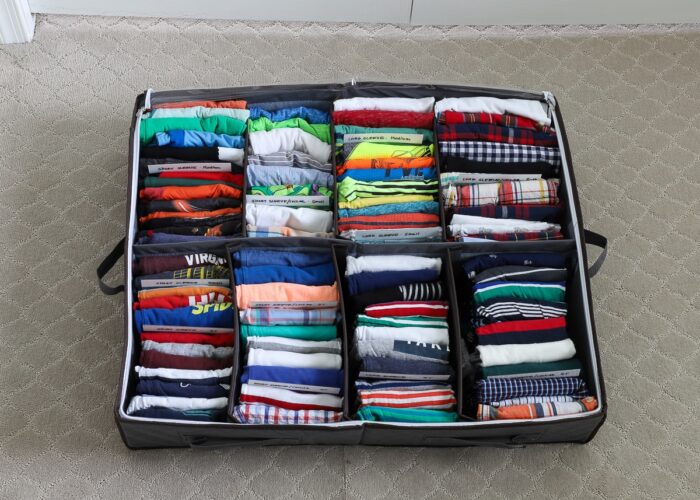
In the other large “shoe” organizer, I have a variety of things!
Pajamas | Bathing Suits | Sports Socks | Underpants | Suits/Jackets | Ties
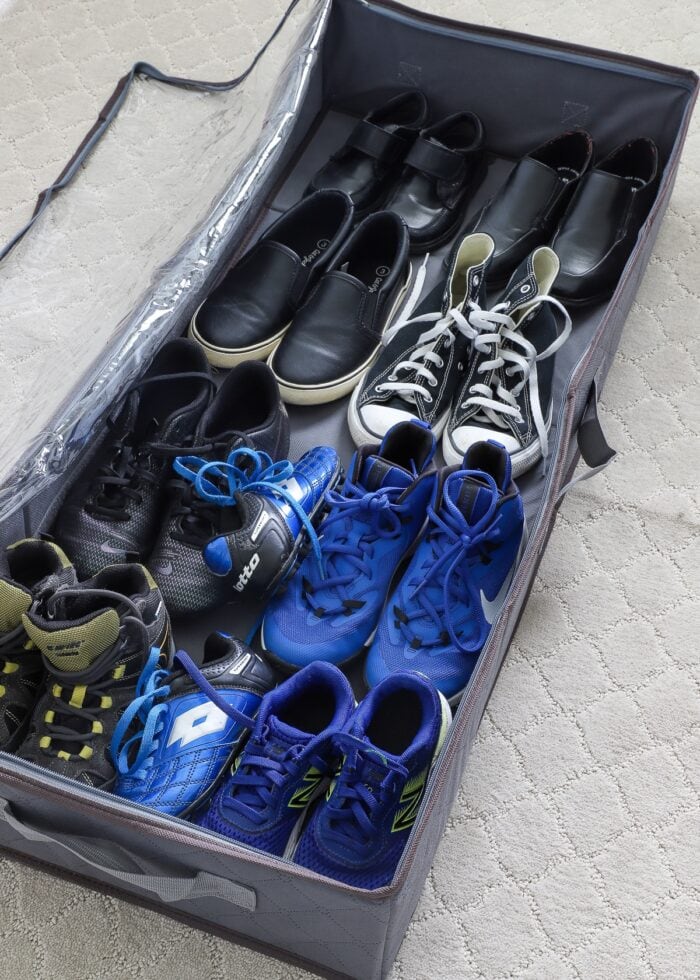
Shoes
In one final skinny tote, I have all our “keepable” shoes:
Using & Maintaining This System
Although I just implemented this system for storing baby clothes in our own household, I’ve spent a lot of time thinking about how this all works from a practical perspective. After all, it was how our size-by-size bins didn’t work that had me so frustrated (rather than how they looked, stacked, or stored).
Swapping Clothes
I’ve mentioned this a bit already, but here is how the dreaded “clothing swap” will now look with this new storage solution:
There is no longer the need to pull out a certain size bin, empty half of it, and re-store what doesn’t fit or isn’t in season. Instead, you can pull out your entire clothing stash at one time and only swap what isn’t currently fitting your child. You can pick short-sleeve shirts if it’s warm or the long-sleeve shirts if it’s cool. You also can easily fold up and re-store what is no longer fitting, no matter what child, size, or season it is!
Sizing Out
When assembling your clothing storage systems, make sure you only keep the sizes you need for the kids you have (or might have). More kids (or a wide age gap) will mean you’re storing a lot more clothes. However, once you’re done having kids, you’ll be able to maintain a “steady” state in terms of overall footprint.
Notice how we have nothing under 3T. When my youngest is ready for this next size, these clothes will never come back into these totes. However, the space the 3T clothes vacate will then be back-filled by the clothes my oldest is out-growing that we want to save for the younger two.
That said, as kids get older, their clothes get bigger, so it’s important that you build some “growing room” into your kids clothing storage system. While the movable dividers help accommodate larger folds, it’s also worth not “cramming” everything in too tight (or else you won’t have any space for incoming clothes). Keep some cubbies open or consider having an extra tote on hand to “grow into.”
Guys – I’ve seriously been on Cloud 9 since tackling this project. Our baby clothes storage situation has been a pain in my side for years. I can’t tell you how much time I have spent dreading, procrastinating, and loathing swapping them out a they grow.
After thinking critically about what all wasn’t working in our previous system, I was finally able to move away from the “standard” size-by-size bins approach and find a solution that will really, truly work. If you too have struggled with how best to store out-grown clothes so future kids can actually use them, I hope what I’ve shared here proves as life changing for you as it has for me!
Megan
36 Comments on “How to REALLY Store Outgrown Kid & Baby Clothes”
Where was this idea like 10 years ago? I so needed it when storing the kids clothes. Especially when they were little. Now mine are so big, and getting so picky, I just don’t dare save too much. 😁 But I will totally share this idea with all my friends who have littles!
Right?!? I can’t believe it took me all these years to figure this out! It’s interesting what you say about older kids. We do find we keep less and less as our big guy gets older…not only does he wear through stuff more but the pickiness is setting in!
Wish I had thought of this when my kids were small. Seems quite workable to me so looking forward to your comments after a season or two. I might even implement something similar for me. I seem to have a lot of clothing that needs storing from season to season.
One note though…. I had a friend who’s daughter spent a lot of “play” time playing dress up with all of her clothing…. I can just imagine what a treasure trove these bins would be to “Play Store”.
Ha! Yes, I have thought about the little boys pulling everything apart as “play time” without me knowing. Fingers crossed they are too heavy to pull out from under the beds!
Absolute brilliance!!! I love this whole system so much. Thank you-game changer!!!!
Yes!! 🙌🏻 I shouldn’t be this excited about clothing storage, but I so am! Hope it works out for you!
Wow, brilliant! Thanks for this idea! Now, i just need like 10 hours “kids-free” time to sort all of my boys (4, 3-11) clothes form the bins in this genious new system… :-).
Hooray – I hope it works for you!!! It took me about 5+ hours start to finish…from dragging the bins up from the basement to sliding the new totes under the bed. Good luck, and keep me posted how it goes!
This is brilliant. Seriously. I had four boys in a row. Often the two older boys wore the same size and the two younger ones wore the same size. (Until they were teens/adults.)
The littles at home now are just one boy and one girl. With moving, downsizing, not saving for younger siblings, I have everything in one “off size/off season” box for them. But this system you have? Just brilliant.
I didn’t notice the other comments before posting. . . But I am just laughing at how many of us have responded with the same “Brilliant!”
I cannot tell you how much I dread the clothing swap to the next size. It’s been the second worst kid “chore” that I have done (the first having to make kids school lunches every day!). You made this look so workable and easy!
My only child is grown and her only child just got married. But my daughter and I both saved out grown clothes for friends who were blessed with second babies of the opposite gender. I sorted just like you did, by category. I put onesies together and blanket sleepers together and later tees and shorts in same box etc.
Recently when I was extremely frustrated with my own stupid rainbow system for my clothes I rearranged just like you did. All sleeveless together. Then collared short sleeved and so forth. Now when I get dressed I ask Siri for the weather. Our weather is inconsistent so I will either choose a sleeveless popover plus a cardigan sweater or skip the sweater and pick a pullover sweater. One secret to this working is all my tops go with white jeans or blue jean. It sure makes getting dressed easy and nimble not pawing through tops like a frantic shopper at tjmaxx where there is no order at all just sorted by size. I’m glad you wrote this post because I’ve had friends with large blended families and a huge amount of kid clothing. I know how hard it was.
Genius! You are a genius! <3
Where was this when my oldest ones were littles?!
I cannot believe in 13 years with four boys and two girls I’ve never thought of doing this. The closest I came was realizing I should store all my Christmas pjs in one bin instead of by size. You’ve applied this to the extreme!!
Wondering if you have an update on how this has been working for you since you implemented it.
Thanks so much!
Hi Amanda!
I am so glad you found this post helpful. We have now been using it for a little over a year, and I have to say I still love it!
The struggle of getting the right size clothes out when you need them no longer exists. No doubt, when we need a new size, pulling out the bins and finding the right size right away is a total game changer.
I still struggle with making the time to put away my oldest outgrown clothes. His latest batch is currently sitting in a laundry basket, ready to be filed away into the underbed bins. But that is definitely more a testament to my laziness than the system itself!
Hope that helps a bit, let me know if you have any other questions!
Megan
I recently had my first child and I’m already frustrated with my “box by size” organization. Thank you so much! This will be a game changer!
Any suggestions on how to do this if I really don’t have the under bed space to store the containers? Thinking about regular totes that I make have layers somehow?
Thank you!! Finally a kids clothing storage solution that actually tackles my problems of the reality of how kids fit clothes! Now I am actually almost excited to sort and organize baby and kids clothes (boys and girls) for baby number 4!
Do you have a link for the organizers you used?
Hi there,
The two organizers are linked within the post, but here they are again:
ONE
TWO
Thanks!
Megan
Definitely an option to consider! Though I am still left trying to figure out how to store for boy/girl/gender neutral! Since we aren’t sure if there will be more kiddos down the road we don’t want to get rid of anything yet… Hmmmm…
I love this! Now where to find the time to complete said task haha. I only have 2 boys and don’t know if we will ever try for number 3 but they have soooo many clothes. How many totes would you anticipate we need?
I love this idea!! Can’t wait to start it:)
Just wondering how you got the plastic dividers to have that white stripe? Otherwise, the labels are not so clear…
Hi Hanna,
Yes, the clear dividers can be hard to read, which is why I put a strip of white tape/vinyl behind the divider’s top. That way, I can still have the dry-erase option on the front, but the text is still clearly visible.
Hope that helps!
Megan
just saw this.
yes
thanks so much!
Hey
Great idea. I’m so excited to try it:)
the link for the plastic dividers doesn’t have that white stripe on it. How do you get that?
This is genius. I’m going to try it out. I definitely would not have found this solution through ChatGPT. Thank you for answering every single pain point I had!
Hello! I stumbled across this blog post as I am expecting my first and am trying to plan out how to store and rearrange their clothes and I am absolutely blown away!!! Thank you so much for sharing all the little details of what went into your final setup. I loved reading about how thorough you were in all your considerations. This very much felt like an organizational lover’s dream post!! 😆
this was extremely helpful! one of the best mum blogs post ever! thank you 🙂
This is a brilliant idea! I realize you have boys, but any suggestions on how to best store girl dresses (the more full type). Also, what do you do for outerwear? Thanks!
This is amazing! Life changing honestly! What size acrylic sheets did you buy? Can you cut them to size?
Hi—what are your thoughts for storing this way when there are girls clothes plus a whole section of “neutral”? We also don’t have under bed space because it’s used up with other necessary things like sheets (hello old home with no closets!)….I’m determined to find a better way to store it all, but I’m curious your thoughts.
Hi Alison,
Thanks for your note.
I only have boys, so I don’t fully understand the particulars of girl clothes but I can’t imagine the system would be much different. Perhaps add extra categories for dresses, skirts, leggings, etc. The concept of storing by category (and not size) would still hold true regardless of what kind of clothes/colors they are.
We love having these totes under our beds for easy access but you could also put them in the attic, on the floor of closets, etc.
Hope that helps a bit,
Megan
Hi there, love this so much! What size plastic dividers did you buy for the bins? Thanks!!
Game-changer! I am expecting my first grandchild and pulled our baby clothes out to wash and share. I was looking for the best way to store them for my daughter, and was thinking bins by size and maybe dry ice…. And then I found your brilliant blog! Ditched the bins. Folded and sized and sorted by type. We have a granddaughter coming, so I lot of clothing is hanging but that also is by size and type. Wow! I have an adjustable shelf that will fit in her closet and the storage trays I got are a perfect fit and are stackable so 2/shelf. She and I can see exactly what she has and what she needs. I recharged desiccant packs I had saved (in a Dehydrator), and for my last step I plan to drop so in before I seal them up. Thank you! Thank you! Thank you!
Thank you for this! I have been struggling to keep my 3 kids’ clothes organized! This is perfect!