How (& Why!) to Use Attach In Cricut Design Space
One of the main questions I get from new Cricut users is how to get your design…as it appears on the design canvas in Cricut Design Space…to show up the same way on the cutting mat. All too often, the layout you painstakingly create disappears as soon as you hit the green “Make It” button. This seems like it should be an easy thing (and it is!), but it’s not an obvious or intuitive part of using Cricut Design Space. So in this tutorial, I am going to teach you how to master the Attach Tool in Cricut Design Space so you can skip the frustration and get your projects to turn out just right!
Getting Started with Cricut Design Space
Just getting started with your Cricut Joy, Cricut Maker or Cricut Explore?!? Be sure to check out these other beginner Cricut Design Space tutorials:
- How to Use Cricut Design Space | A Breakdown for Beginners
- How to Use the Attach Tool in Cricut Design Space – you are here!
- How to Use the Contour Tool in Cricut
- How to Use the Weld Tool in Cricut Design Space
- How to Use the Slice Tool in Cricut Design Space
- How to Use the Flatten Tool in Cricut Design Space
- How to Use the Offset Tool in Cricut Design Space
What Does the Attach Tool Do in Cricut Design Space?
The Attach Tool in Cricut Design Space is easily one of the most misunderstood and confusing tools in all of Cricut Design Space. Not necessarily because the concept of “attaching” is complicated OR that the actual steps are hard. Rather, understanding why and when you need to use this tool isn’t necessarily intuitive.
In a nutshell, the Attach Tool maintains the spacial relationship between two or more elements (e.g., text, graphic, shape, score line, letter-spacing, etc) for the purpose of cutting.
What does that mean? It is best understood in an example.
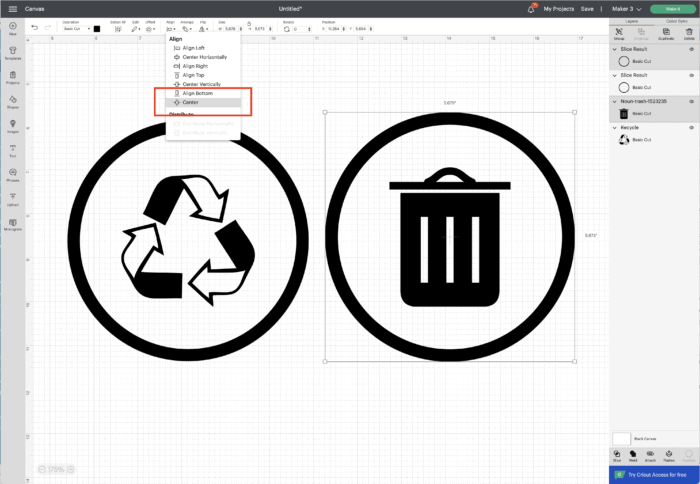
I was recently making some quick labels for our new kitchen trash cans. I picked out two symbols (trash and recycling), as well as two circle borders to go around each one. I then used the Align tools to center the symbols inside the circle frames.
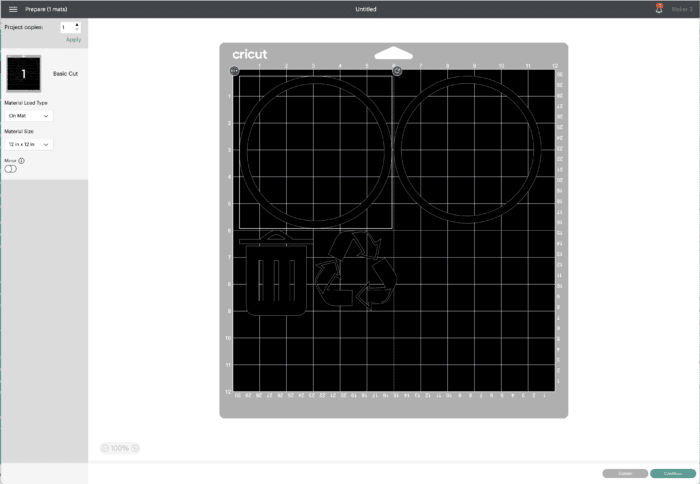
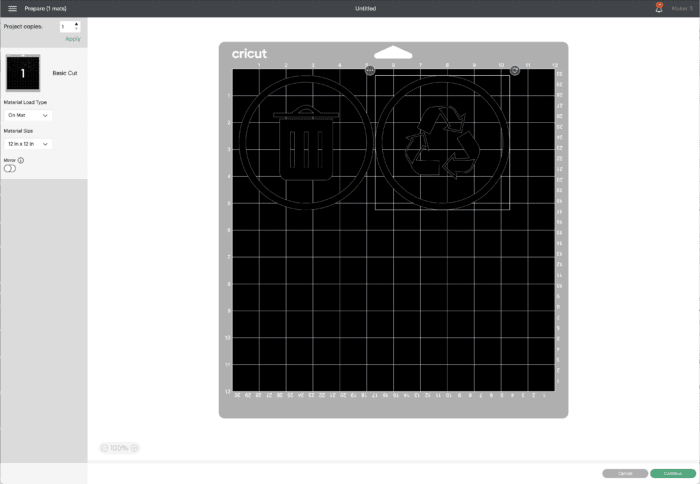
But when I click the “Make It” button to send the design to my machine…look what happens! All my precise spacing is completely undone. Instead, each element will be cut individually rather than as a single, cohesive design (which is preferable since it would conserve material and make for easier transferring).
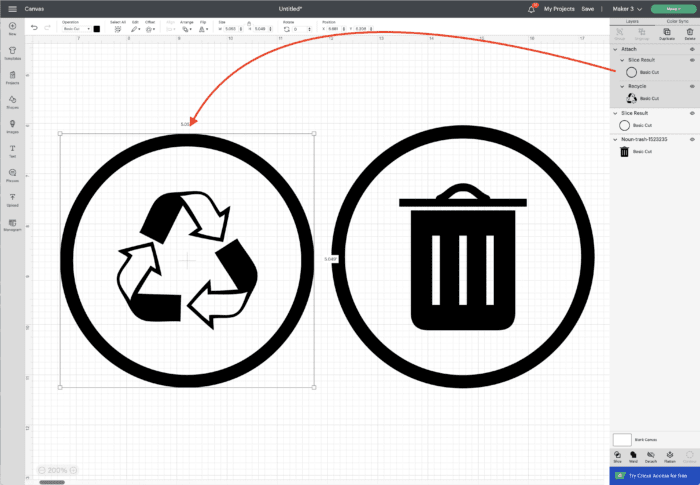
But…if back on the design canvas, I attach the shape and border together…
…my design will then be cut exactly as intended (with the circles around each icon).
If you have two (or more) separate design elements…text, shape, image, line, anything…and you want their spacing to be exactly replicated when cut, you must attach the elements together.
How is Attach Different Than Group In Cricut Design Space?
So you might be wondering: “Isn’t the attach function just like the group function?” Yes and no. In essence, yes…”attaching” is essentially grouping elements together. But the attach function primarily applies to how the elements are laid out for cutting.
The group/ungroup function is a tool that can be used on the Cricut Design Space canvas only to increase design ease and efficiency. You can group items (via the Group Tool) in order to make it a “unit” that can be sized, rotated, flipped, duplicated, and even re-colored all at once. But that group setting only applies during the design process on the design canvas.
Anything that is “grouped” will not present as such on the Cut Prepare screen unless the design elements are attached!
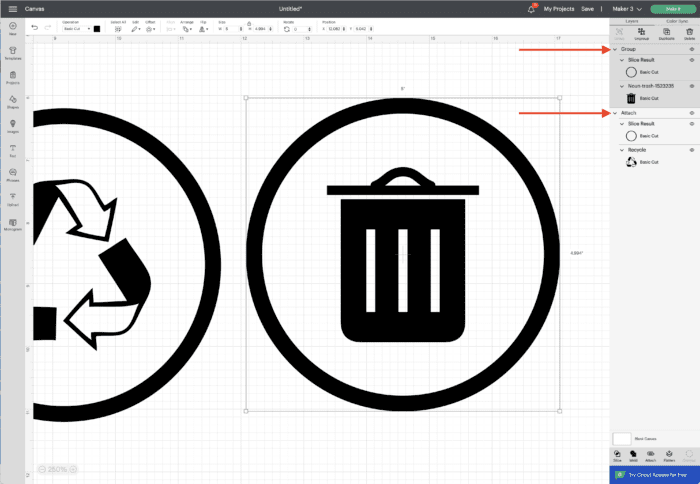
In the example below, notice how the trash label is grouped, but the recycling label is attached.
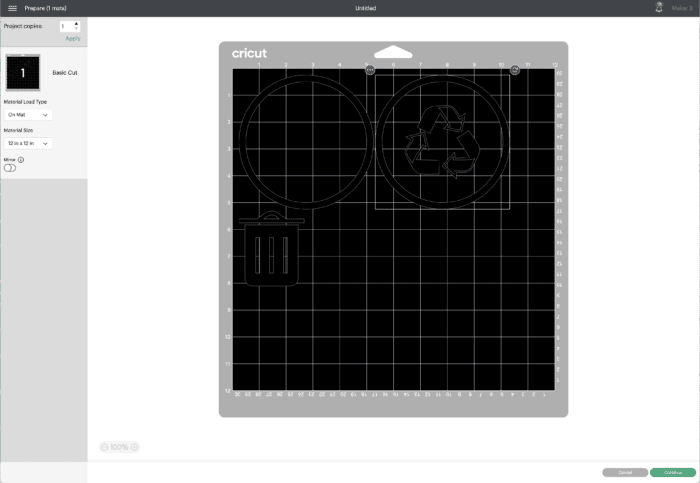
On the Cut Prepare Screen (which is essentially a preview of your final cut), notice the trash label isn’t laid out correctly, whereas the recycling label is…thanks to the Attach Tool!
What is the Difference Between Attach and Weld in Cricut Design Space?
Similarly, the functions of attach and weld also overlap and can be a bit confusing about when to use what.
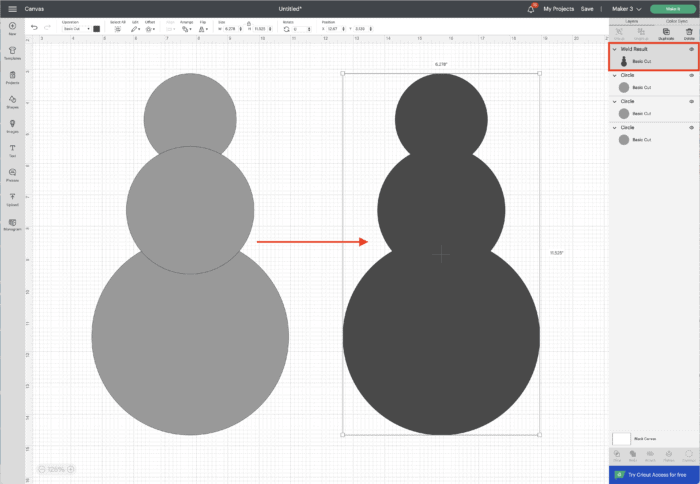
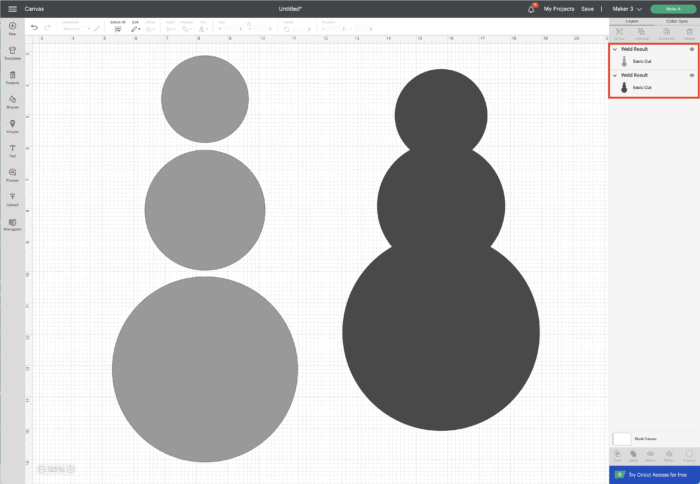
In general, the Weld Tool is used when you want to take two distinct design elements and merge them into one solid element. Below, I took three distinct circles and welded them into a single solid snowman.
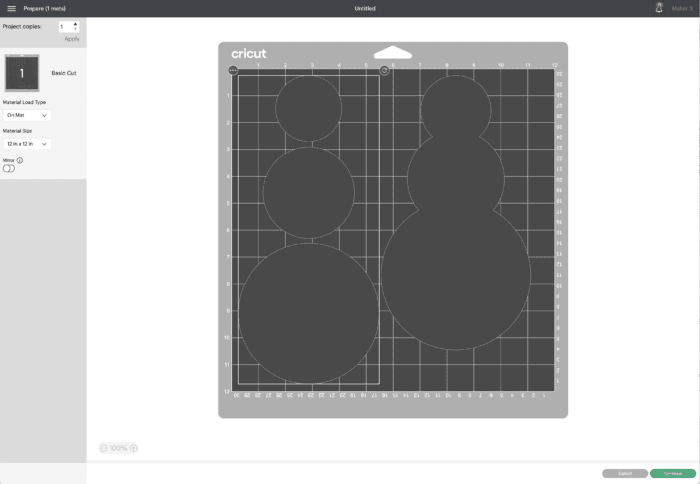
Interestingly though, you can use weld whether the elements overlap or not. So in the image below, I welded both sets of three circles…
…and they present on the Cut Prepare screen just as designed…without using the Attach Tool!
So yes, in this way, you CAN use both attach AND weld to maintain your layout on your cutting mat.
So then…why use attach? Two reasons actually!
- First, attach can be undone (via the Detach button). The Weld Tool creates a permanent change that cannot be un-done (unless you click the undo button immediately after performing the welding). But the attach function can be un-done and re-done over and over as needed, at any time.
- Second, the Weld Tool cannot be used on anything besides cut shapes. So you cannot use it to apply any specialty lines (e.g., score, deboss) or text onto shapes.
So while the Weld Tool can be used to maintain the precise layout of shapes, I recommend getting into the habit of mastering and using the Attach Tool for this purpose instead.
How To Use the Attach Function in Cricut Design Space
Now that you understand why to use the Attach Tool, actually using it isn’t hard at all:
- Select all the elements that you want attached (2 or more).
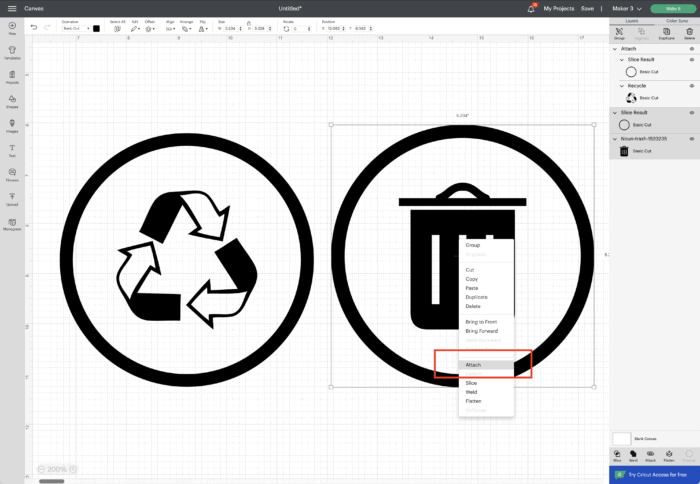
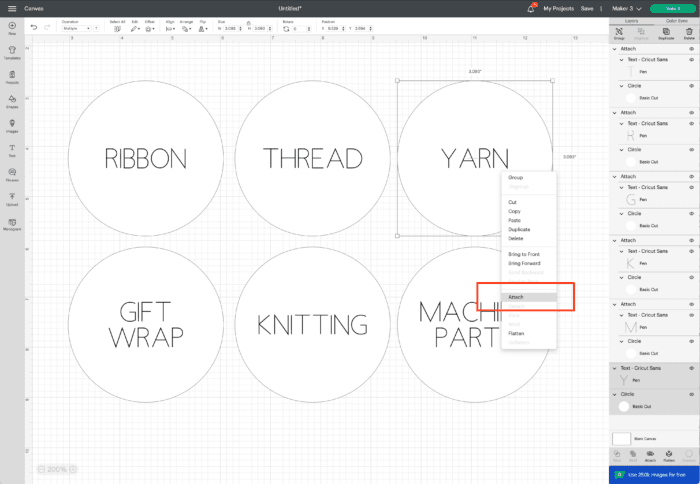
- Click Attach (paper clip icon) in the bottom right-hand toolbar OR right-click and select “Attach” from the available options.
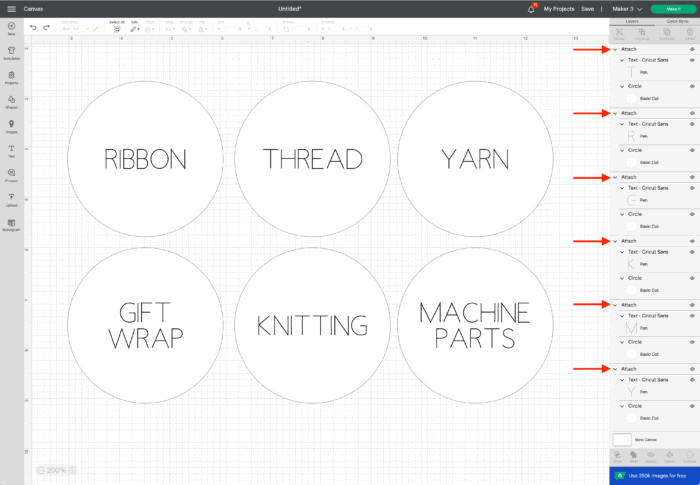
- Once the elements are attached, they will be notated as such in the right-hand layers panel as an “Attached” unit and the Attach button will toggle to “Detach.”
At any time, you can detach the elements by selecting the attached unit and clicking the Detach button back at the bottom of the layers panel.
When “Attaching” Is Necessary On Your Cricut Projects
To Maintain the Layout of a Group of Design Elements
As explained above, you will want to use the Attach Tool ANY time you want the layout of two or more design elements translated directly to your cutting mat.
Why is layout such a big deal? Sometimes it isn’t. If you just need a star decal and a circle decal, it doesn’t really matter how they are laid out on the mat.
But if you have a more intricate design (with specific spacing) and the elements are cut out separately, it will be up to you to transfer each one individually to your final project. Not only is this a bit more work (since you will be transferring one element at a time), but you’ll have to eye-ball your spacing . This can also use up extra material since the images are more spread out than they need to be.
On the other hand, if your design elements are attached and cut as a single unit, your perfect spacing remains in tact and you will be able to move your design to your final project all at once!
To Put Text Directly Onto Shapes
Without a doubt, the most common question I get from frustrated Cricut users is this one:
“When I design my project on the canvas, my text is on top of my shape. But when I send it to cut, the words are not on top of my cut layer any more! How do I get my Cricut to write the text on top of my shape?”
Any guess to the answer? Yep!!! You must attach the text to the shape!
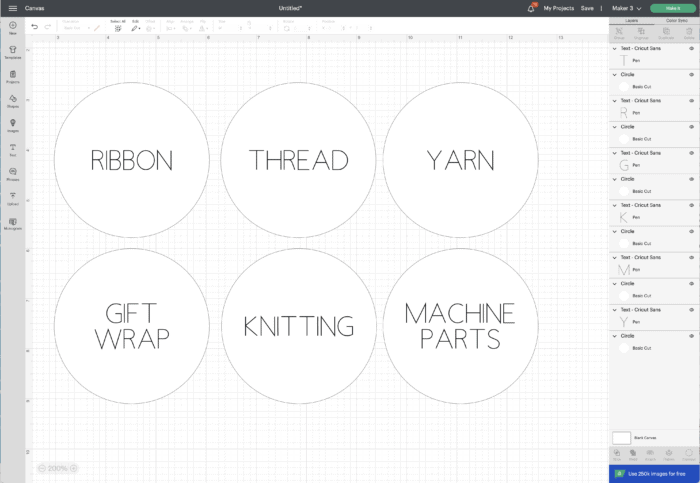
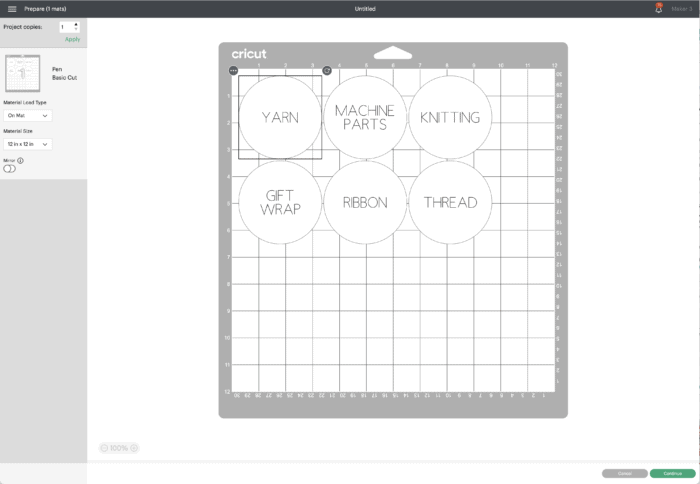
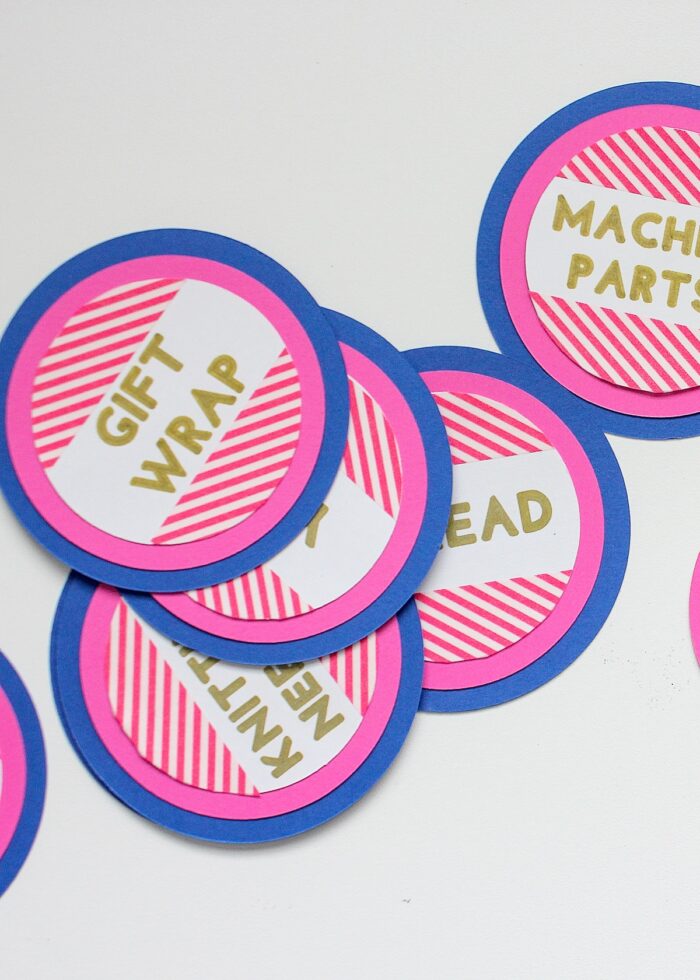
Below are some simple craft room labels. As you can see, I designed them so that the font would be drawn with Cricut Pens directly on top of the circle shapes.
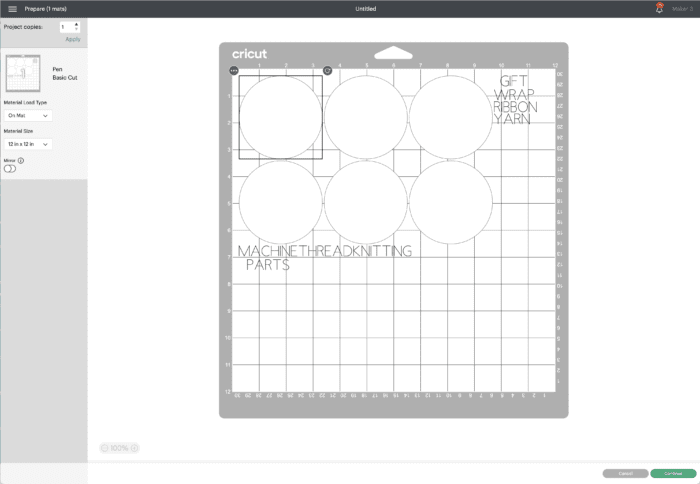
If I skip the attach step, notice that my draw layer (the words) are not on top of the cut circles, but rather drawn below.
However, if back on the canvas, I attach each word to each specific label…
…the machine will indeed write and cut the labels exactly as designed!
If you want to see how these labels come together, click HERE!
To Add Specialty Linetypes to Your Projects
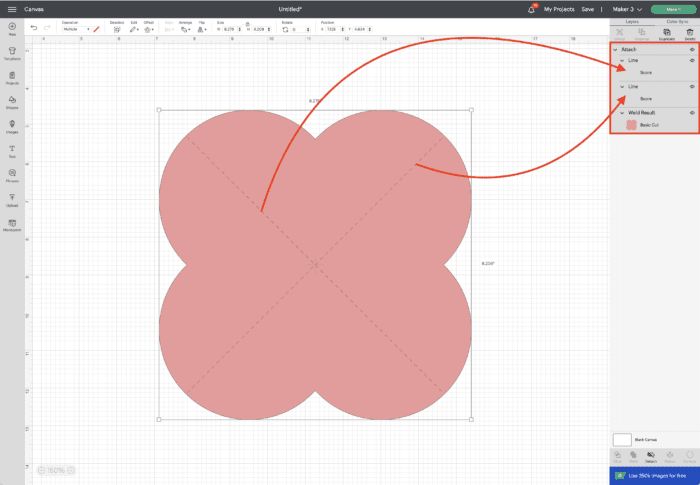
Just like adding a drawn layer on top of cut shapes, you will also need to use the Attach Tool if you want to add any other specialty linetypes to your projects such as a score line, engraved line, foil tip line, or debossed line.
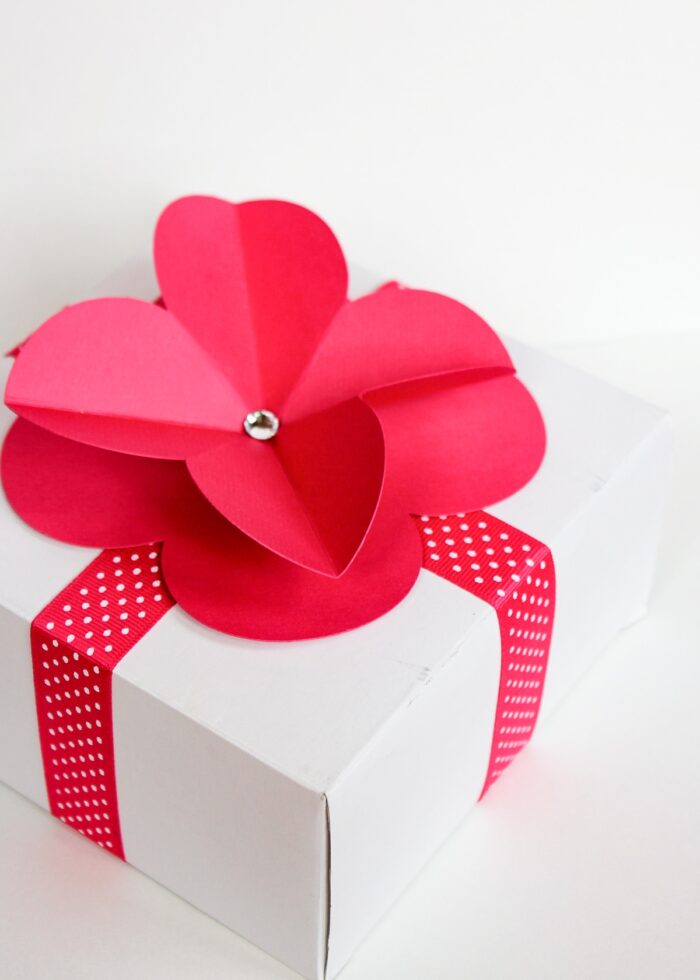
After selecting the correct operation for a particular layer (below, the score line onto the flower), select both it and its base shape and attach them together.
This signals to your machine to place the specialty line on top of the cut shape.
To Create Patterns
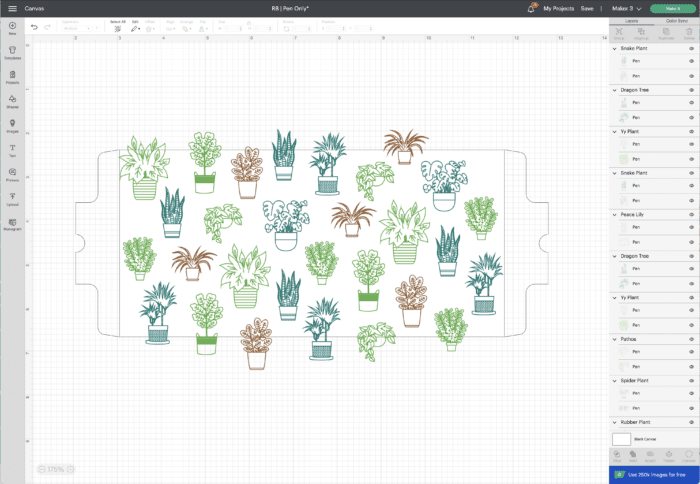
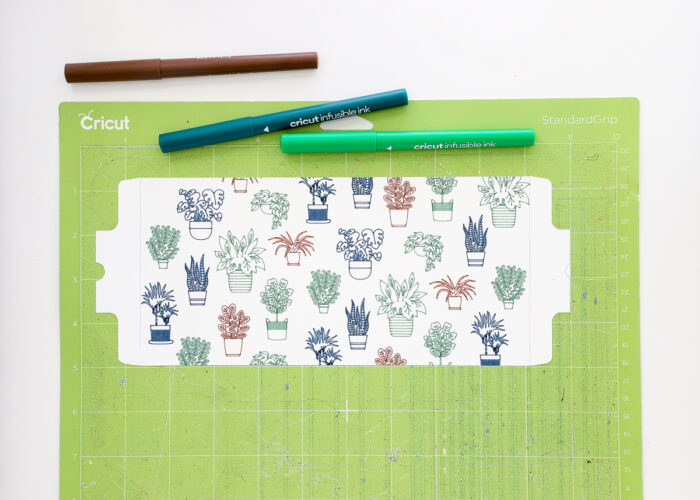
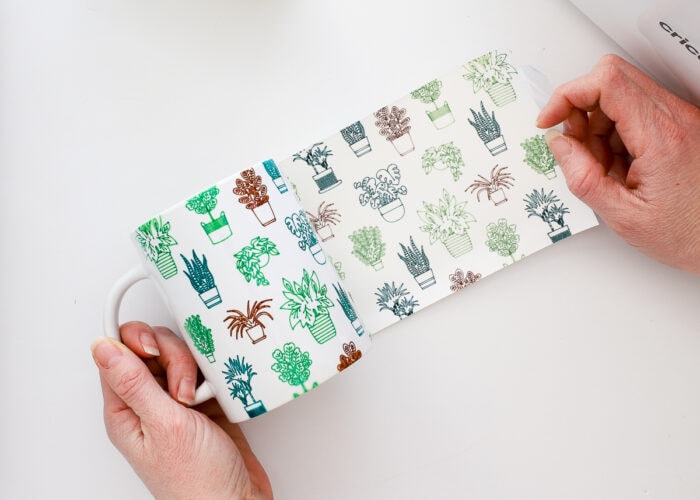
The attach function ultimately ensures that the spacing you set on the design canvas is translated to your final cut. This is especially helpful when trying to make precise patterns. Let’s say you want to apply this pattern to a mug:
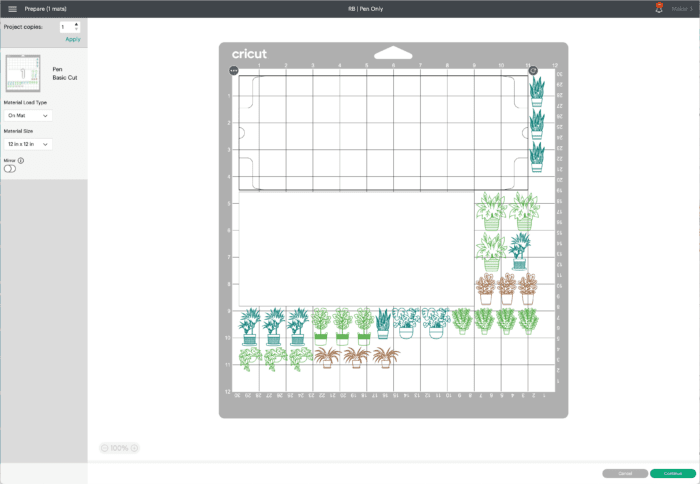
Even if you painstakingly figure out the spacing for every single element on the design canvas, the elements will still tighten up by default unless you attach them.
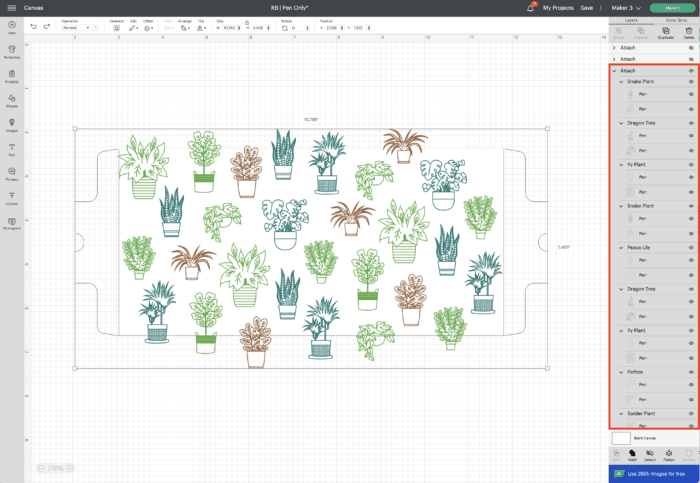
Below, I attached all the plants AND mug templates together, so when I click “Make It”…
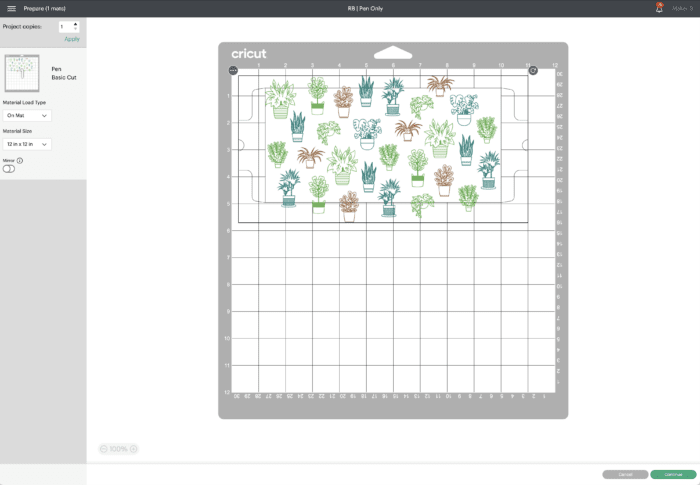
…the spacing translates to the cutting mat (and ultimately to your finished project).
To Get the Most Out of Your Material
Last but not least, the attach function also comes in handy when you want to use up every single inch of a particular material.
If you’ve ever sent anything to your Cricut machine, you know the “paper saver mode” is…well… not ideal. Almost every time, the default layout does not rotate or lay out the various design elements so that you use as little material as possible. While you can almost always nudge the different elements around on the Cut Prepare screen in order to scrunch everything up, this is often easier to do on the design canvas itself.
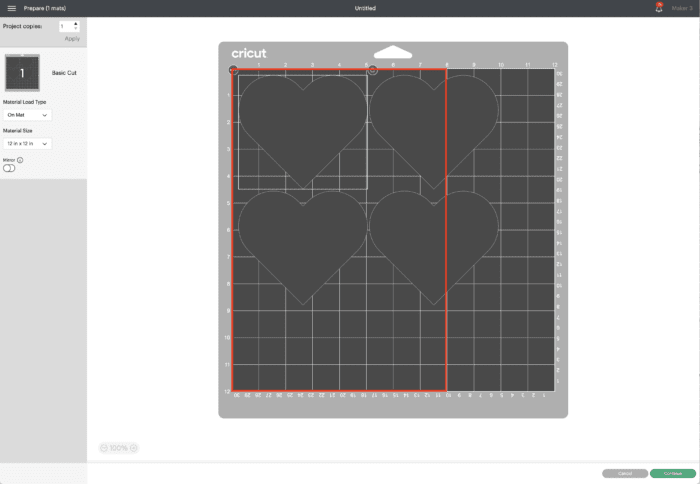
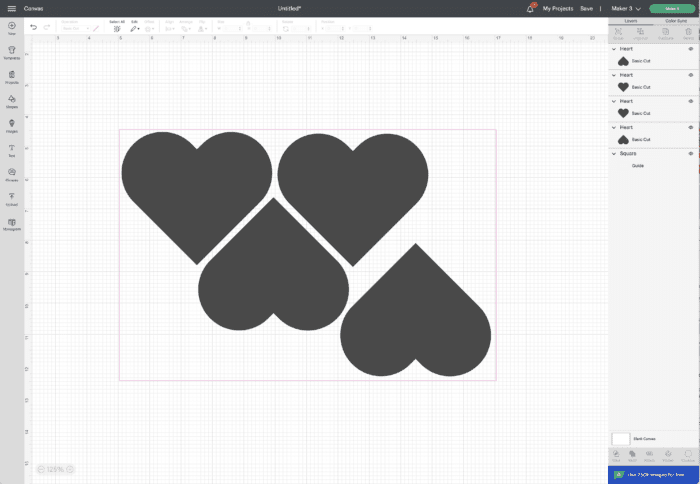
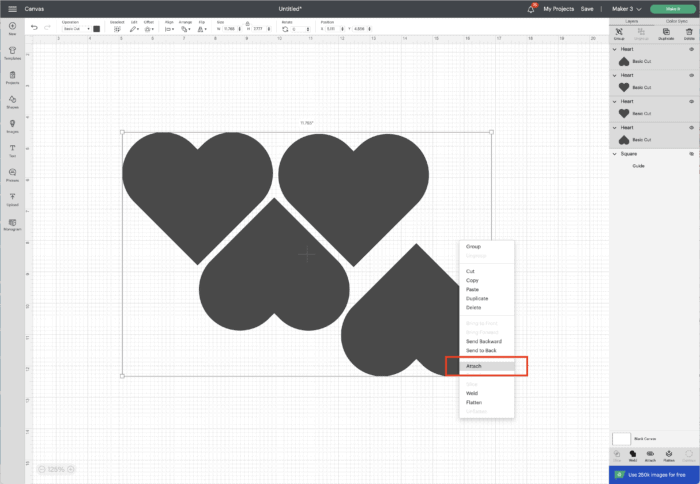
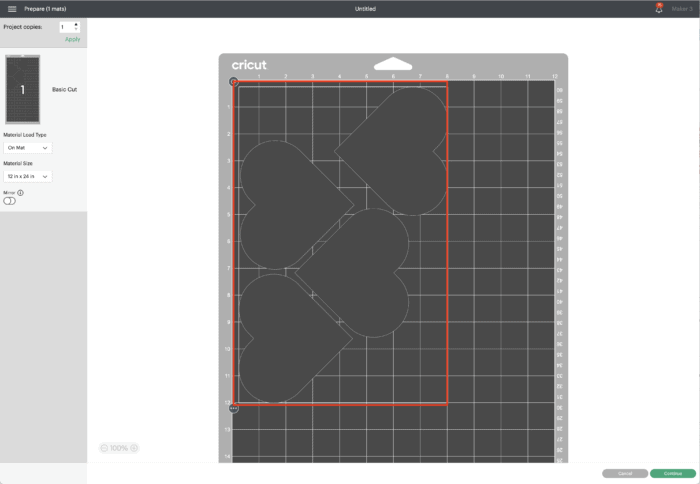
Let’s say you have a scrap piece of vinyl that is 12×8.” If you let Cricut Design Space determine your placement, you would not be able to cut the four hearts (shown below) on that piece of material.
But yes you can!
By creating a guide in the exact dimensions as your piece of vinyl, YOU can then decide how and where everything fits best. Just be sure that, once you determine your ideal layout, you attach everything together so that it translates to the Cut Prepare screen and in fact uses up every inch of your vinyl scrap!
More Helpful Cricut Design Space Tutorials
Cricut Design Space is a very powerful program, but it can have a steep learning curve for beginners. Check out my other comprehensive tutorials below:- How to Use Cricut Design Space | A Breakdown for Beginners
- 20 Cricut Design Space Tips & Tricks You Really Need to Know
- The Ultimate Guide to Cricut Terms & What They Mean
- How to Find Free Images to Use with Your Cricut Machine
- How to Use the Attach Tool in Cricut Design Space
- How to Use the Slice Tool in Cricut Design Space
- How to Use the Weld Tool in Cricut Design Space
- How to Use the Contour Tool in Cricut Design Space
- How to Use the Offset Tool in Cricut Design Space
- How to Use Print Then Cut in Cricut Design Space
- How to Design Monograms in Cricut Design Space
- How to Cut Really Big Designs on Your Cricut (The Off-the-Mat Technique)
- How to Design Mugs in Cricut Design Space
I hope this post clears up a very simple yet often-misunderstood function inside Cricut Design Space. Once you actually start making projects with the Attach Tool, I promise it will become more intuitive. In no time, you’ll start to learn when it’s absolutely necessary and when you can get by without it. No matter what you’re making, the Attach Tool is a powerful and capable tool that ensures your Cricut projects turn out exactly as you want them every time!
Megan



4 Comments on “How (& Why!) to Use Attach In Cricut Design Space”
Hi Megan,
Wow, your Circuit Explore work looks great in your house. You definitely have a knack for transforming a house into a home.
Dennis
Hello!
I am trying to use the writing feature on my Cricut for some invitations, so therefore the writing I have designed needs to be exactly where it’s placed in the design space. I made sure to attach it on the design space, but when I click
“Make it” it moves to the top left corner to save materials. I’m not sure what I’m doing incorrently? It’s only one layer.
Again a great explanation tutorial. I am learnig so much looking at your posts. Keep up the good work.
Thanks to the clarity and ease of your instructions, I was able to get into production mode super quickly after getting a Cricut Maker. As a newbie with massive teaching material projects, I’m eternally grateful.
Do you have any tips or blog links for two pervasive issues I’m having:
1) using 12 x12 sheets to cut on my mat. While I’ve found some workarounds, it’s often not an option on the pulldown menu for reasons I don’t understand.
2) why do I run into the resize image warning so often?
Many thanks!