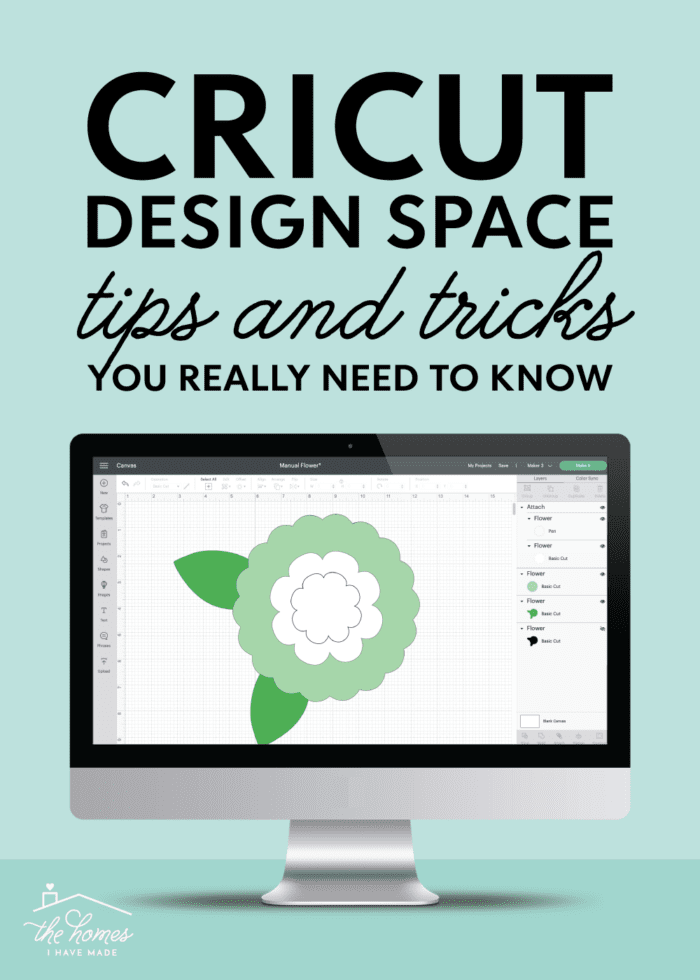
20 Cricut Design Space Tips & Tricks You Really Need to Know
Without a doubt, the steepest learning curve when getting started with a new Cricut machine is mastering the software, Cricut Design Space. Although it’s not difficult to use, some things are just not as intuitive as we’d like them to be. However, you will soon see that Cricut Design Space does in fact include everything you need to create amazing projects, AND that there are lots of great shortcuts to help you do so! This guide breaks down 20 of my favorite Cricut Design Space tricks. These tips come from spending HOURS in the program myself, and are sure to save you tons of time and stress so that you can create anything your heart desires with ultimate ease and confidence!
If you are brand new to owning and using your Cricut, I first suggest you start here: How to Use Cricut Design Space | A Breakdown for Beginners.
Then once you have the basics figured out, the tips and tricks I’m sharing here are “next level” to improve your efficiency and expertise. Everything here is applicable to all Cricut machines (Cricut Maker series | Cricut Explore series | Cricut Joy); and are broken down into two categories:
- For the Design Canvas – where you create your projects and edit/manipulate your designs.
- For the Cut Screen – the series of screens (after you send the project to your machine by clicking the green “Make It” button) that allow you to set cut settings.
NOTE: These tips and tricks are specific to the desktop/laptop version of Cricut Design Space. However, most will also apply to the iOS and Android Cricut Design Space apps should you be working on other devices such as an iPhone, iPad, or tablet.
Cricut Design Space Tips for the Design Canvas
1. Optimize for Your Machine

There are now several different Cricut machines available for purchase. And while many of the functionalities are the same across the various models, there are also some design nuances specific to each machine. In order to load the correct design tools within Cricut Design Space, make sure your machine is selected from the dropdown arrow in the upper right corner of Cricut Design Space.
TIP! If you ever see a “yield” sign next to a single layer in the right-hand Layers Panel, it is usually for one of three reasons:
- Your image is too big and you need to re-resize it.
- The selected “Operation” (e.g., Cut, Score, Draw, etc) isn’t supported by your machine and you need to change it to one that is.
- The selected “Pen” color or type isn’t supported by your machine and you need to change it to one that is.
2. Experiment with Your Search Terms
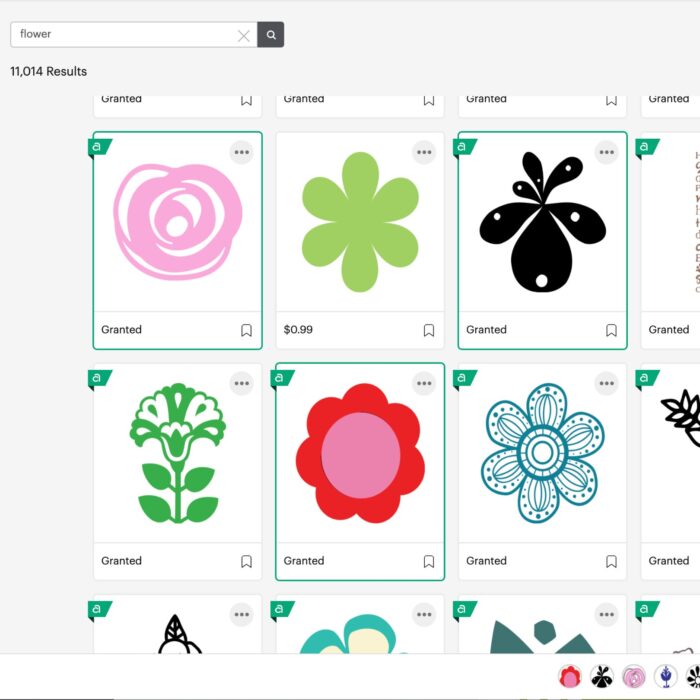
The search function in the Cricut Design Space Image Library can be a little…particular. A fairly generic term that should yield all sorts of images sometimes won’t. However, if you change a single word or letter, suddenly more images will populate. As such, I recommend playing around with a lot of different search terms in order to find exactly what you’re looking for.
Try these specific tricks:
- Leave off the “s.” If you type the word “Dots” into the search bar, it yields about 115 images. But if you type in the word “Dot,” it yields over 200 images. As a rule, leaving off the “s” in searches yields a lot more results.
- Search by synonym. To find as many options as possible, use various synonyms for each search. For example, if you are looking to cut labels, use label, tag, rectangle, circle, and square to find all possible images.
- Filter By Operation. If you need an image that will be cut, drawn, printed, etc, use the “Operation Type” filters to narrow down large searches results.
TIP! You can select as many images as you want across various searches. Any image you click will line up along the bottom row of the Image Library and can be placed on your canvas all at one time once you hit the green “Add to Canvas” button.
3. See More from the Same Image Set
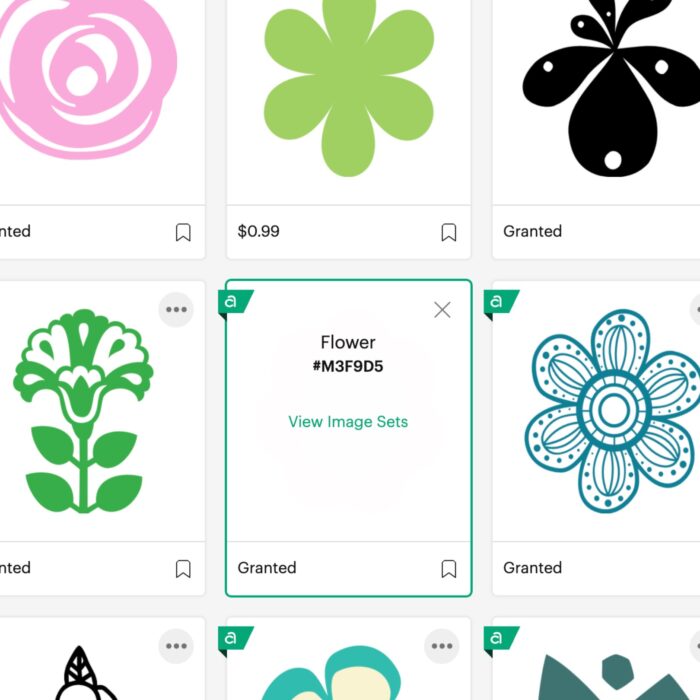
When you use the general search function, you may find one image you love amidst a whole variety of other images that you don’t. What do you do when you want to see more images similar to the one you like? The best place to start is with the “Image Set” it came from.
To quickly and easily access the Image Set:
- Click the small information icon (i) in the bottom right-hand corner of any image within the Cricut Design Space Image Library.
- Click the green “View Images Sets” text to see the full set of images.
TIP! Image Sets can also be searched by clicking the “All Images” button and then selecting “Image Sets” in the bottom left-hand column.
4. Utilize Free Images & Text
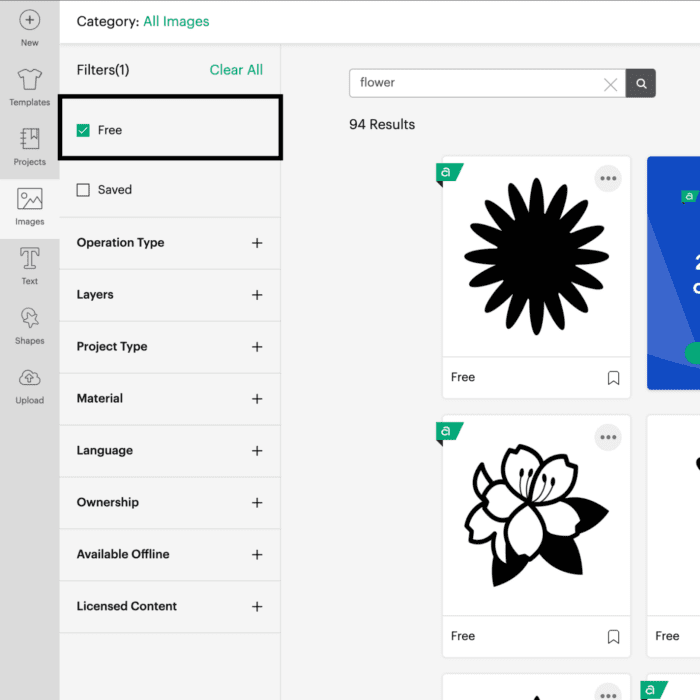
I am a HUUUGE fan of the Cricut Access memberships if you are a habitual crafter. However, I realize that many people, especially newbies, may not want to spend money just to practice cutting on their machines.
To keep your crafting costs to a minimum, be sure to utilize the FREE resources within Cricut Design Space. There are now hundreds of free images, shapes, and fonts you can use without a membership or additional charges.
- Free Images. Filter by “Free” at the top of the filters menu in the Cricut Design Space Image Library.
- Free Shapes. Click the “Shapes” button on the left side of the canvas to see a wide variety of basic shapes you can use for free.
- Free Fonts. Choose “My Fonts” from the font menu filter to see fonts you can use without charges.
Learn more:
- How to Find Free Images & Fonts to Use With Your Cricut Machine
- How to Upload Your Own Images (PNG, JPG, and SVG Files) into Cricut Design Space
5. Re-Color Quickly with the Color Sync Tool
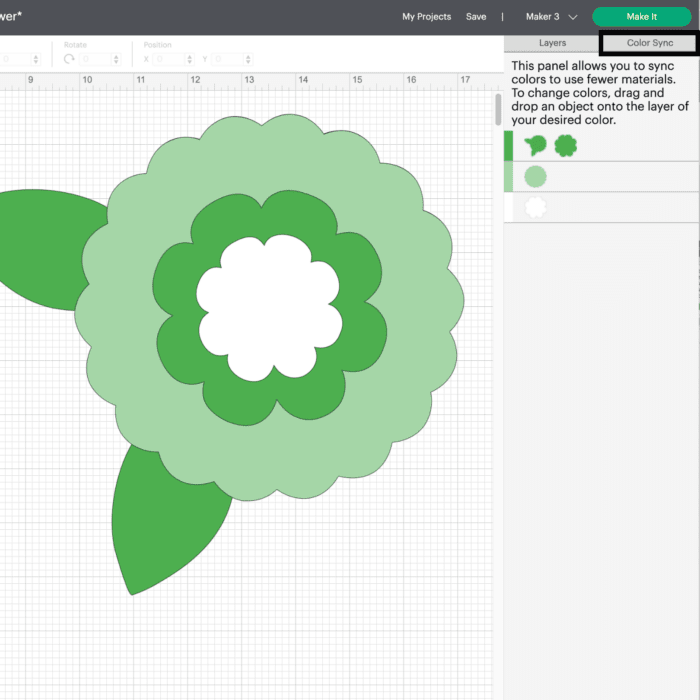
When you place several designs onto your blank canvas, you may end up with various shades of the same color (e.g., three different greens, four different blues, etc.) Whether you want consistent colors across your project or need to quickly change layers to a particular color, the Color Sync Tool is the quickest and easiest way to do it!
Navigate to the Color Sync Tool along the right-hand side of the design canvas. Here, you will see all the colors currently in use on your project, and you can simply drag-and-drop any layer into another color already represented.
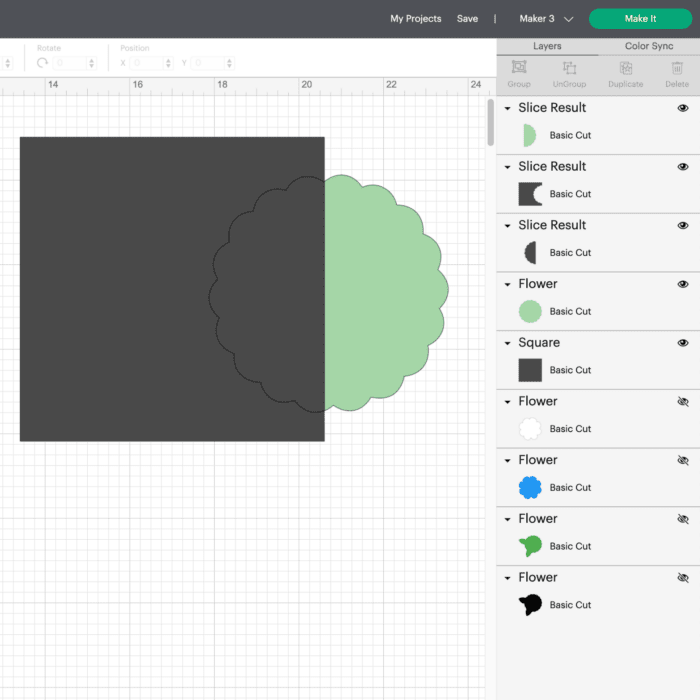
6. The Hide Tool
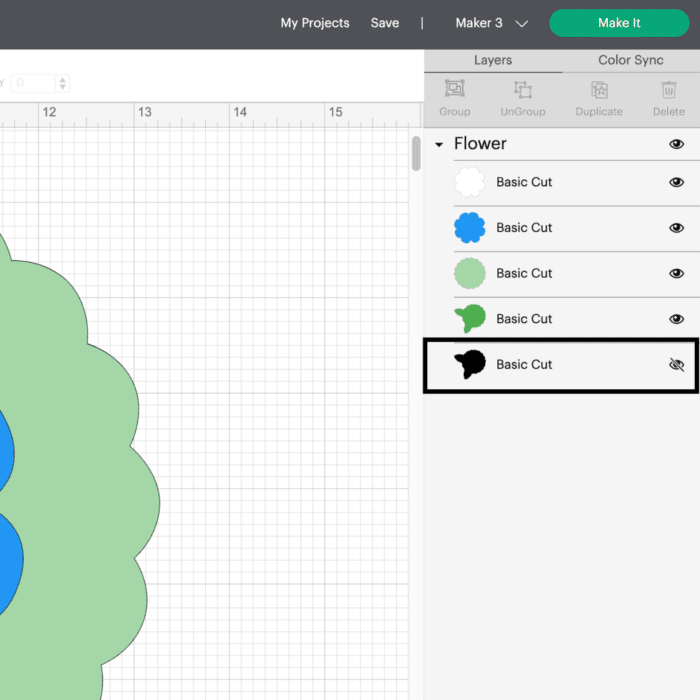
There will be times when you don’t need to cut everything on your canvas (e.g., if you need to recut a certain part of your latest t-shirt design). Instead of deleting items from your project, simply “hide” them by clicking the eye symbol next to the layer in the right-hand Layers Panel (notice how the black layer in the image above is “hidden”). Any image that is “hidden” is not removed from your canvas, but it will not be included when you send your project to be cut.
The “Hide” symbol toggles on/off, making it oh-so-simple to cut only what you need and/or keep your design canvas clutter-free without losing track of images you may still want to play with.
7. Operation Selection
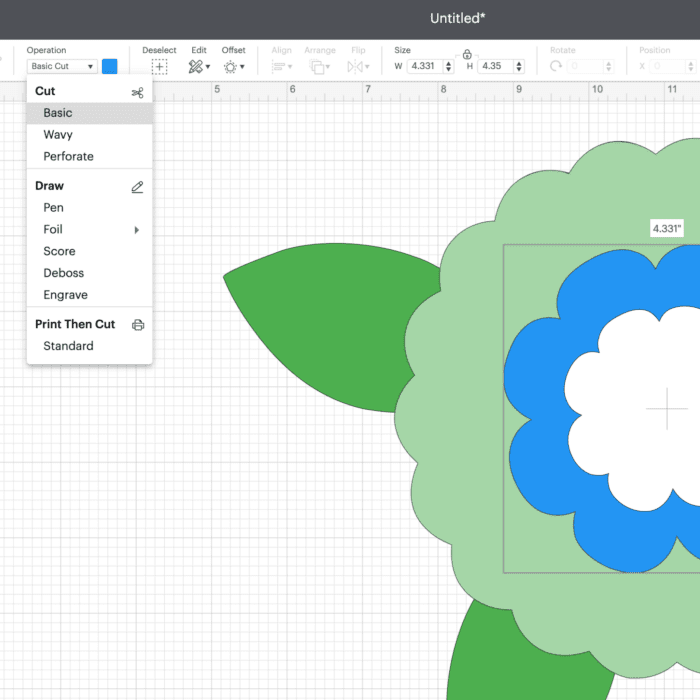
Most designs from the Cricut Design Space Image Library will populate on your canvas as “Cut” designs. However, this can be easily changed to a different operation such as Draw, Score, etc. “Operation” is the designation for how a particular image will be created. Options are dictated by your machine and include things like Cut | Draw | Score | Print Then Cut | Engrave | Perforate, etc.
To change the operation of any layer on your canvas:
- Select the layer.
- Navigate to the Operations menu along the top toolbar.
- Use the dropdown menu to select how you want that particular layer created on your project.
8. Manipulate Patterns
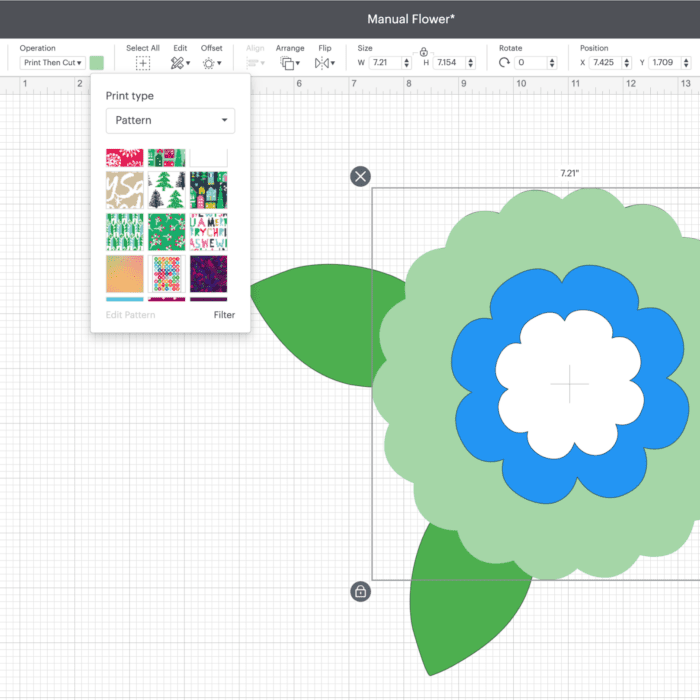
With an individual layer selected, you can easily swap the color by clicking the square Color button along the upper toolbar. Clicking “Advanced” will allow you to explore all colors beyond the standard 28 options. However, you can also fill any layer with fun patterns. (NOTE: This is for Print Then Cut Projects only.)
To fill a layer with pattern:
- With the layer selected, change the operation to “Print Then Cut.”
- Click the Color square next to the Operations menu and select “Pattern” from the dropdown menu.
- Choose from the countless pattern options.
- Click “Edit Pattern” to adjust the scale and layout of the pattern.
9. Use Keyboard Shortcuts

There are buttons on the Cricut Design Space canvas for almost every command you can think of (e.g., Duplicate, Delete, Copy, Cut, Paste, etc.) These buttons exist on the corner handles of the images themselves, the top toolbar, and in the right-hand Layers Panel. However, to save time, try using keyboard shortcuts that are standard in other computer programs.
Specifically, these shortcuts come in quite handy and can save you a lot of time when working on big projects:
- Copy – control C
- Paste – control V
- Delete – delete button
- Undo – control Z
*Control = Command for Mac users
Want to save this post?
10. Use Slice to Crop
One tool that may appear to be missing from Cricut Design Space is a cropping tool. Indeed…there is no tool that allows you to quickly and easily shave off parts of a design by sliding or dragging-and-dropping, as you can in many other programs.
However, you can use the Slice Tool in conjunction with free shapes to achieve what a typical cropping tool can do.
- Start with a layer you want to crop.
- Place a square from the Shapes menu on top, and then place it where you’d like to crop your original layer.
- Select both layers and click “Slice” from the bottom right-hand toolbar.
- Delete out the excess elements to reveal your cropped design.
New to manipulating images in Cricut Design Space? Check out these comprehensive tutorials:
- 4 Creative Uses for the Slice Tool in Cricut Design Space
- How to Use the Contour Tool
- Mastering the Attach Tool in Cricut Design Space
- Four Creative Uses for the Weld Tool in Cricut Design Space
Cricut Design Space Tips for the Cut Screen
Once you finish designing your project and send it to be cut via the green “Make It” button, you might think your ability to manipulate the project is through. However, there are LOTS of things you can do on the cut screen itself to not only save time but also save on materials. These 10 Cricut Design Space tips are some of the best things to know about Cricut Design Space, so let’s run through them!
11. Move Items Around on the Cutting Mat
When you send a project to your machine, Cricut Design Space will auto-populate your layers onto mats based on color and size. However, each layer’s location may not be exactly where you want it. Simply by dragging and dropping, you can move a layer anywhere on the mat and even rotate it using the handles on the upper right-hand corner.
This not only allows you to scrunch images up tighter than the software originally suggests, but it also ensures your cut is precisely where you want it to be (like if you are trying to use a scrap or oddly-shaped piece of material).
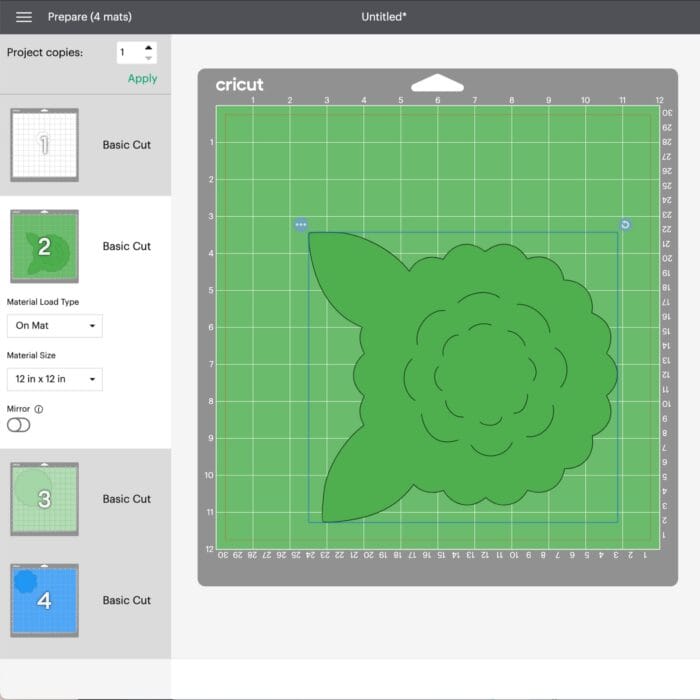
12. Move Images from One Mat to Another
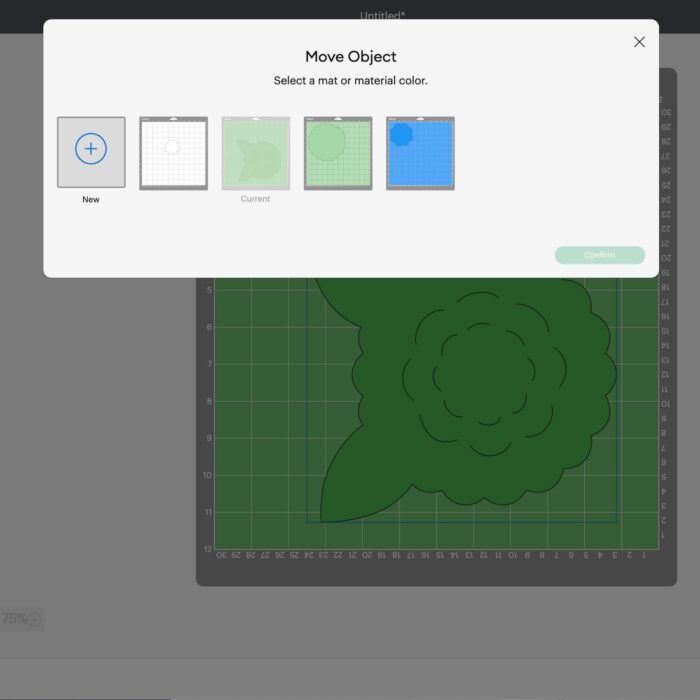
In addition to moving images around a single mat, you can also move any image from one mat to another (without having to go back to the canvas to change its color).
To move an image to another mat:
- Click on the 3 dots in the upper left-hand corner of any image on the cut mat.
- Select “Move to another mat.”
- Cricut Design Space will then allow you to choose another mat for that layer.
- The image will land on the upper-left corner of the new mat, so you will likely need to adjust its alignment so it doesn’t overlap other cuts.
This feature not only allows you to condense same-color images into fewer mats, but it’s also a great way to quickly change the color of any part of your design without having to exit out of the cut screen and change the color manually on your canvas.
13. Adjust Project Copies
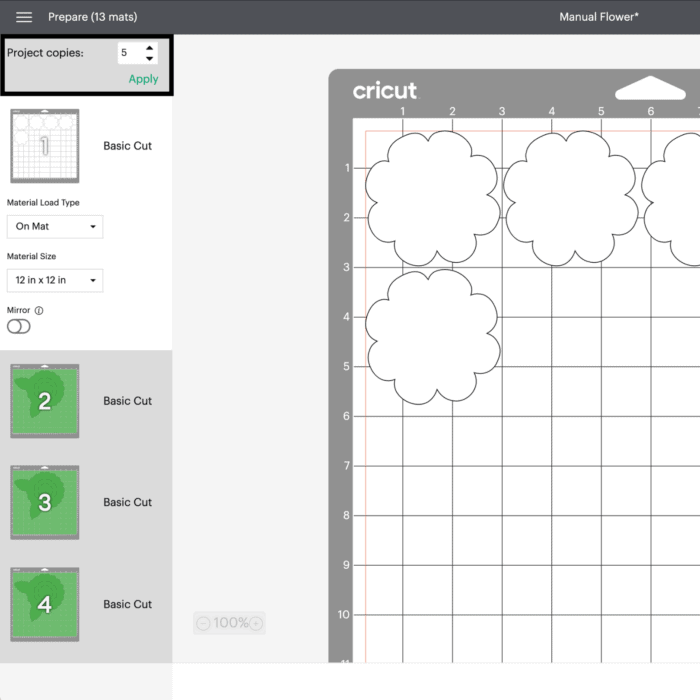
Let’s say you create a new project on your design canvas, but you need 18 copies of the same design. You do not need to duplicate your design 18 times on your canvas!
After you send your project to cut with the “Make It” button, there is a setting on the top left of the Cut Preview screen that says “Project Copies.” By increasing the “Project Copies” number, every layer of your project will duplicate that many times. The duplicates will then auto-populate on the correct color mats and be cut all at once.
TIP! A popular features from the (veeerry) old Cricut machines isn’t available anymore: Autofill. This single button on the Cricut Expressions machines allowed you to automatically fill an entire mat with the same image. Increasing the “Project Copies” until your mat is full is the best workaround I’ve found so far.
14. Set Mirror On the Cut Screen
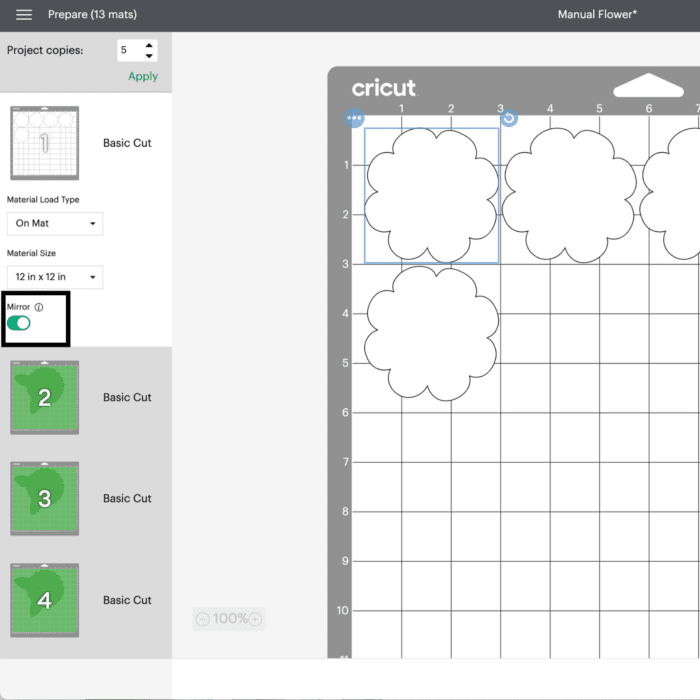
There will be times, especially when you are working with Iron-On or Infusible Ink, that you will need to cut your design in reverse (aka: Mirror). Although you can horizontally flip your design on the design canvas, there is a quicker and easier option to Mirror your designs on the Cut Preview screen instead.
Under each mat in the left-hand column, there is a “Mirror” toggle switch. Use this button to turn mirroring on/off for that particular mat.
NOTE: There is no “universal” Mirror button. You must mirror each mat separately.
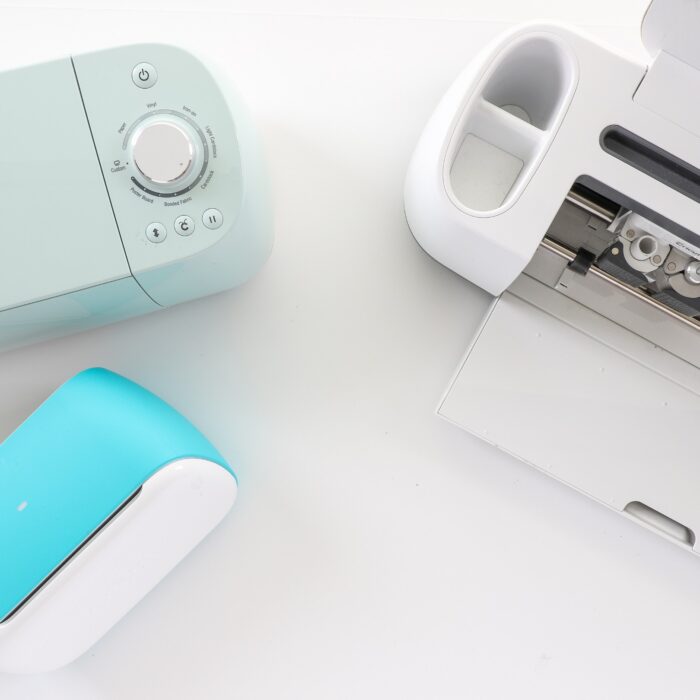
15. Using Several Machines
If you have more than one Cricut machine setup, you can connect both/all machines to your Cricut Design Space account at the same time via either Bluetooth or USB. And don’t worry about cutting the wrong design with the wrong machine. No matter how many machines you have connected, your very first step on the final cut screen is to select which machine you want to use from the top dropdown menu. In this way, you can always be sure you’re using the intended machine for your project!
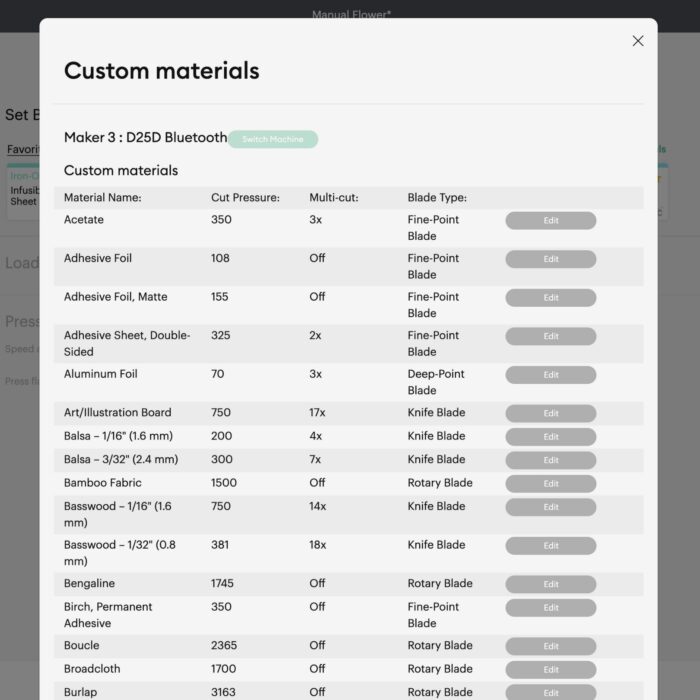
16. Save Your Most Commonly Used Cut Materials
Are you growing tired of searching through the 200+ custom material options to find the same Vinyl, Medium Cardstock, and Everyday Iron-On settings over and over again? Be sure you are utilizing the Materials “Favorites” function!
Once you locate a material you use frequently, click the star on the right-hand side of the row. This adds it to your Favorites tab under Material Selection. If you choose “Favorites” instead of “Popular” under Materials, you will see a mini menu of all the materials you cut the most often!
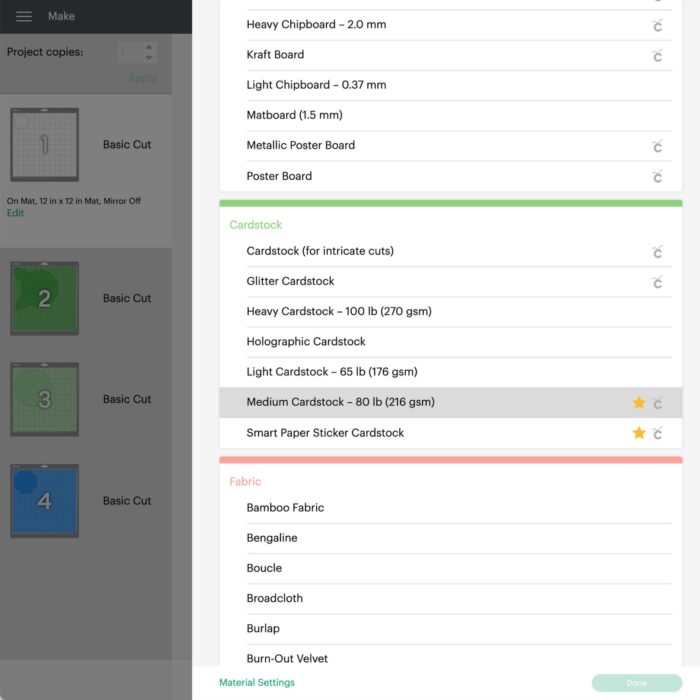
17. Edit Cut Settings for ANY Material
One of the most amazing things about Cricut technology is that the machine is pre-calibrated to perfectly cut a wide variety of materials. But every now and then, you might find that a particular material doesn’t cut quite right. In these instances, you can adjust the settings for ANY material (including depth, blade, and how many passes the machine will make) right from the Materials menu.
Here’s how you do it:
- On the final cut screen, select “Materials.”
- Select “Browse All Materials.”
- Down at the bottom, in small green letters, it says “Material Settings.”
- Select any material, adjust the settings, and then save your specifications for future projects.
18. Easily Adjust Cut Pressure
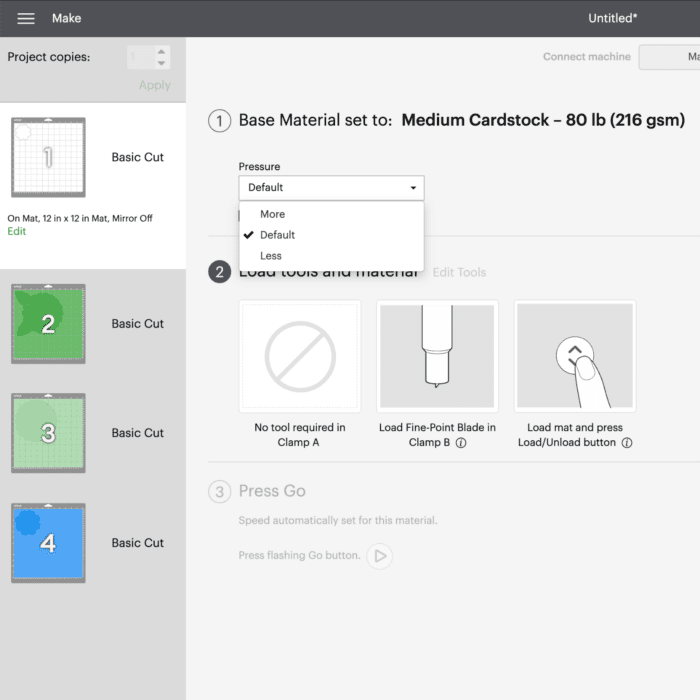
While it is awesome to be able to adjust specific settings of any material, sometimes you just need a little more or a little less pressure in order for your material to cut clean through. Using the “Pressure” menu is a great way to quickly and easily get your cutting depth right without having to fuss with custom settings.
- After you select your material on the final cut screen, you will see a Pressure dropdown menu.
- Default – current machine settings
- More – a little more pressure than the default
- Less – a little less pressure than the default
- You can permanently save these settings by clicking the “Remember materials setting” checkbox.
19. Skip and Repeat Mats
One of the nicest things about how Cricut Design Space works is that you don’t have to pay much attention once you send your design to cut. As long as you feed the right color material into your machine just as it’s shown on the cut screen, the right colors will cut at the right time.
However, you may find that you don’t want to work in the pre-designated order and would prefer to change what mat is cut next, repeat a mat, or skip a mat altogether. To manually select which mat cuts next, simply click on the mat on the left-hand side of the cut screen. The mat will highlight white to indicate it’s being cut next.
TIP! If you do skip around, always double-check that the color you’re loading into the machine matches the highlighted mat on the cut screen.
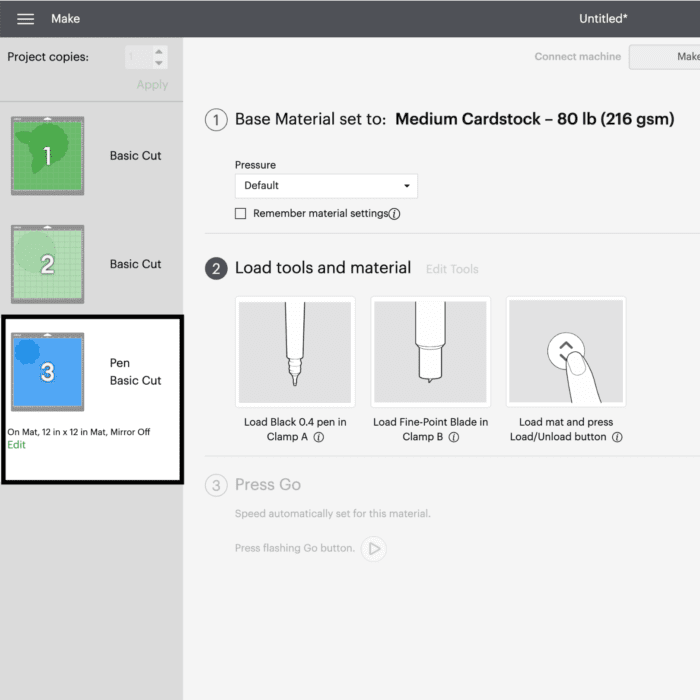
20. Fool-Proof Instructions
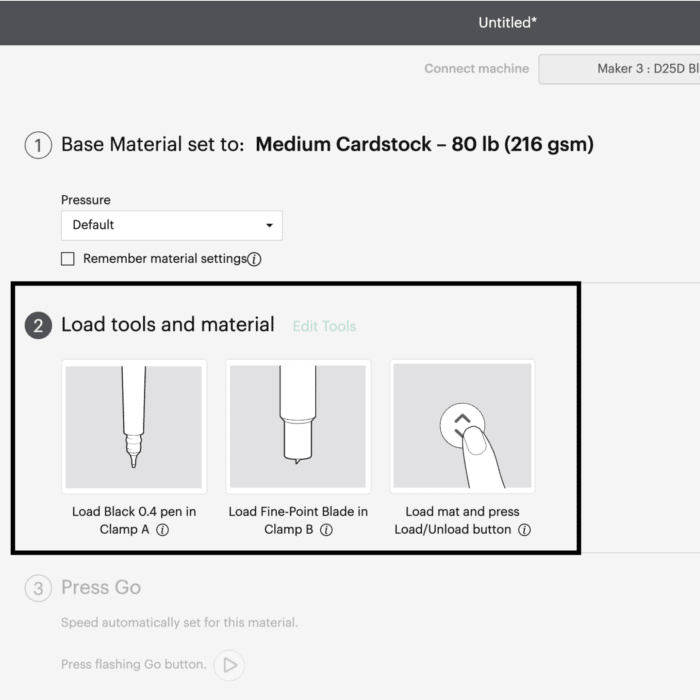
Once your project is designed, Cricut Design Space will automatically provide step-by-step instructions for executing your project. On the final cut screen, you will see a variety of reminders including what materials to prepare, what Cricut Pen to load, etc. The key here is not to overlook these subtle instructions because they can save you valuable time and materials!
For example:
- When you select “Iron-On,” you will be prompted to mirror your design and place the shiny side of your iron-on down onto the mat.
- When you select “Chipboard,” you will be prompted to insert the Knife Blade, secure your material to the mat with tape, etc.
More Helpful Cricut Design Space Tutorials
Cricut Design Space is a very powerful program, but it can have a steep learning curve for beginners. Check out my other comprehensive tutorials below:- How to Use Cricut Design Space | A Breakdown for Beginners
- 20 Cricut Design Space Tips & Tricks You Really Need to Know
- The Ultimate Guide to Cricut Terms & What They Mean
- How to Find Free Images to Use with Your Cricut Machine
- How to Use the Attach Tool in Cricut Design Space
- How to Use the Slice Tool in Cricut Design Space
- How to Use the Weld Tool in Cricut Design Space
- How to Use the Contour Tool in Cricut Design Space
- How to Use the Offset Tool in Cricut Design Space
- How to Use Print Then Cut in Cricut Design Space
- How to Design Monograms in Cricut Design Space
- How to Cut Really Big Designs on Your Cricut (The Off-the-Mat Technique)
- How to Design Mugs in Cricut Design Space
Whether you have a new machine or have been working in Cricut Design Space for years, I hope this post reveals some time- and sanity-saving tricks for you to try! Although these concepts aren’t hard, they can spell the difference between frustration and success on even the most basic projects. My best advice in working in Cricut’s design software, though?!? Simply get in there and play around. I promise the more you experiment, the more comfortable you will become with all of the design tools available to you!
Megan


42 Comments on “20 Cricut Design Space Tips & Tricks You Really Need to Know”
Hi Megan, thanks for sharing this blog post! I have a project I printed with complex graphics. I just want to have cut the outer
part and crease other parts. When I try to perform the cut via cricut 2 Scan and Cut, it cuts the outer, but then proceeds to cut the complex lines inside of the printout. I tried another method that almost worked better. I printed my project from the software I used, aligned the print to the cricut cutting matt, then uploaded just the cutting and folding lines to design space. The cuts and folds did not perfectly align to how my print was aligned. I would prefer to use the Scan and Cut method, but during the scan, cricut somehow reads the complex graphics as cuts. Is there a way to disable the complex graphics inside my print using the layers option in cricut design space and just enable the cuts and folds?
Hi Marizol,
When you say “Scan and Cut” do you mean that you Upload an image and then use it as a Print Then Cut design? If yes, that is what you mean…then you should be able to edit which lines are cut and which ones aren’t by using the Eraser tool as part of the Upload process. I don’t want to type out lengthy directions here if I am misunderstanding, so please let me know if you are Uploading an image and then trying to cut it out…and then I think I know how to help.
Thanks,
Megan
Hi Megan, to answer, I tried two methods: 1st Method: Uploaded SVG file. Issues: Graphic elements appeared thicker in design space/no option to erase elements after upload.
2nd Method: Print then Cut: Converted graphics into an image on my program. I uploaded the image (no eraser tool used afterwards as I wanted to print directly from canvas), and I uploaded the cut lines. Result: poor image quality, unaligned cuts.
I prefer the Scan n’ Cut method: I can print my non-image graphic files from my software for better quality prints, then scan my print with cricut. My challenge with this method cricut cutting out lines I wish to not have cut.
My new maker does not list heavy chipboard 2.00 ml how can I get to cut it. Bought knife blade and the chipboard and right mat but can not find the right material. I am connecting via Bluetooth I pad. Everything else seems fine.
Hi Gill!
Hmmmm…that sounds curious. Some readers have told me that the iPad version of Design Space isn’t an exact replica of the desktop version. I personally haven’t used the app, so I can’t say for sure.
A few things to try:
Look again…”Heavy Chipboard – 2.0 mm” is under the very first menu “Art Board”
Another thing to try is to pick something else/close and then adjust the settings (down on the bottom of the Custom Materials menu in green letters is an option to select Material Settings). The specific settings for Heavy Chipboard are:
Pressure: 650
MultiCut: 20x
Blade: Knife Blade
Finally, make sure the app doesn’t need to be updated 🙂
Hope that helps a bit! Good luck!
Megan
What is the easiest way to may seam allowances on my cricuit maker?Thanks for all your help. Looking forward to using the info maybe it wont be so confusing anymore.
Hi Margrett,
Thanks for writing and I am so sorry for the delay in getting back to you. Without knowing exactly what you’re trying to make/sew, I will do my best to help.
First, any sewing project that is already uploaded to the Cricut Design Space library SHOULD have seam allowances already built in.
If you are trying to create your own sewing pattern using (non-sewing) designs in Cricut Design Space, you may run into more problems. In general, you need to add an additional margin 1/4-5/8″ bigger than the current outline, but Design Space does not make that easy to do. If you are dealing with a straight line or perfect circle, you can try adding an additional rectangle/curve and weld to your original object. But if your design is more complicated than that, then I am unsure how you’d add a consistent seam allowance since Design Space doesn’t have an “offset” tool or function.
I am sorry I can’t be of more help here – if you have some specific examples you want to send along, I can look at it and see what I can figure out!
Good luck,
Megan
Thank you for your post. I’ve been using the Cricut Maker since April but still have so much to learn. Your post was very helpful.
Hi Megan!
Great Tips! Thank you! I especially appreciate the fonts found on your computer. Other sources have advise to buy the $5 fonts available through the DS. My daughter made some Christmas cards and wasn’t real happy with uploading an image of the text. SOOOO glad we found this post!
Thank you!
Megan, as a new user I have subscribed to a few different teachers. However, I can now confidently say and without hesitation, that you are THE BEST. you answer many questions that others dont even mention. Your advice is comprehensive and illustrated. All I can say is THANK YOU because I am addicted to my Cricut machine but it is not the easiest toy in the world! Thanks again and keep up the great work!!!
HI Deborah-Kay!
Well, thank you! This is one of the nicest comments I’ve received in a while, so thank you for taking the time to write it! I am thrilled to hear you find my content helpful – that’s my #1 goal!
Have fun working with your machine and I’ve got lots in store for 2020…lots more tutorials to come!
Megan
I just recently started re-reading your posts. Thanks for the detail…. Question: I am struggling with the selection of an item, then trying to right click on it. It keeps unselecting my selections. Am I clicking too quickly? In the wrong spot? It is especially difficult on laptop without an extra mouse plugged in… I have even tried getting way far down in the lower right corner with no luck. Suggestions?
Hi Elle!
I am so sorry I am just now getting to your email. I’m not what kind of computer you’re on, but I know on my Mac, I have to hold down the “Control” key while I select in order to bring up the “right click” options. Have you tried that? Keep in mind though, that most of the features in the “right click” menu are also along the toolbar.
Hope this helps a bit! Megan
Megan,
Thank God I found you! When I upgraded to a Cricut Explore Air last year, it sat until now because I was too intimidated to use it. Your tutorials are wonderful and now i am really excited to get started. Thanks again!
You are MOST welcome! I know the machine can feel really overwhelming, but I promise you once you get going, you’ll be amazing at how easy it really is!
Don’t hesitate to reach out with questions as you get up and running!Megan
Great suggestions, VERY helpful, thank you!
These tips were VERY helpful! I appreciate you taking the time to so thoroughly describe and illustrate. Thank you!
Hi Brenda,
I am so glad you found this post helpful! Design Space can be overwhelming, but you’ll get the hang of it in no time!Megan
Very helpful! In one minute of reading I found exactly the answer I needed. You hit the nail on the head when you said it is not as intuitive as it should be! I have endless frustration at the lack of common sense in the designers of this program. But when I finally do get it to work out, it works well. Thanks for sharing your tips. I could come up with a long checklist of things I would have them do if I were Queen of Cricut. But that is not today.
Hello Megan,
I just purchased a Cricut Maker and am very anxious to figure out how to use it. I downloaded your cheat sheets and find them very helpful. The problem I am having is that the machine will not cut my felt flower pattern. It just stays in the same place and does not actually cut the pattern. I am not sure if it is something I am doing or the machine itself. Probably me LOL. Could you guide me please.
Megan- I can’t thank you enough for your instructions. For a newbie like me this has saved me tons of time. I get so frustrated with each project I work on because I just don’t understand the Cricut language. Your shortcuts and tips will make my designs so much easier. I was doing things the hard way. Maybe now I can sail through a project.
Hello Megan, and thank you for all the Cricut Design Space Tips & Tricks. Is there a downloadable version we can print? Will be happy to pay for it.
Hi Barbara,
I am so glad you found this post helpful. At this time, I don’t have this information in a printable format (I’ll have to add them to my Cheat Sheets!). In the meantime, you can try copy-and-pasting the text into a Word document.
Sorry I don’t have a better solution at this time!
I cannot find the answer to my question anywhere on the internet! Why do I get the message “each color in this image will be an individual cut layer” when I import certain designs? I’ve managed to import fairly complicated files created in Adobe Illustrator with no issue, but it randomly won’t accept a design and instead separates all of the shapes. Any advice would be greatly appreciated!
Hello! If I buy pre-cut chipboard (bc I need a lot and don’t have time to cut them all myself), but I want to cover them with paper, how do I get the shape of my pre-cut piece into design space?
Thank you!
Hi Tara,
Thanks for this question and I am sorry for the delay in getting back to you.
If they are simple shapes like squares and circles, you can simply use those shapes from within Design Space and size them so they match perfectly.
If they are really unique shapes, your best bet would be to scan them in and then size them accordingly.
If you need more guidance here, let me know!
Thanks,
Megan
This helped me SOOOOO much! I really appreciate you. Thank you 🙂
You are most welcome!
Hi Megan, could you let me know how I can change the words to cut out on a ready-made project from Cricut Access please?
It is the Father’s Day toolkit and I want to change the cut-out from Happy Father’s Day to Happy Birthday Dad?
Thank you very much, Sharon.
PS I am very much enjoying your tuition emails.
Hi Sharon,
Customizing the Make It Now projects isn’t hard but it’s not intuitive either…especially when there is text involved.
When you click on a project you want to make, click on “Customize” instead of “Make It.”
Then find the text you want to change. Most likely, Cricut has the text as individual letters as opposed to Text box that you can just type into.
The easiest way around this is to remove all the text, and just use the Text Tool to add in your own.
Hope this helps a bit and let me know if something in there isn’t clear!
Thanks,
Megan
Wow, that’s a lot to absorb, thanks
Gary
Thank you SO much. Some of this I knew but most I didn’t. Your explanations are very clear and I love that!
You are most welcome, Patti! Glad you learned some new things from this post!
Have fun with your projects!Megan
Is there a way to keep the 4.25×5.5 size card as default setting for insert cards on thr Cricut Joy? I am primarily making cards and sometimes forget to change this setting to this size. Thanks so much!
HI there!
Right now, I don’t think there is a way to change the default on the card size. I think it auto-adjusts to your specific project, so if you’re using the Cricut cutout, they will auto-set to the 4.25×5.5 size. Until a feature like that is added, maybe a Post-In Note reminder on your machine will do the trick!
Thanks,Megan
Do you have issues with Cricut Design Space accepting/recognizing your system fonts? I have a Mac with Mac Monterey 12.2.1. Since sometime last fall Cricut Design Space has not let me use my system fonts. It only lets me use Cricut fonts. I have uninstalled and reinstalled Cricut, but it didn’t help. It is very frustrating to have to create words in fonts I like in Illustrator and Photoshop and then upload them. Any suggestions?
Hi Megan,
I am rarely impressed by tutorials, and yours is outstanding !!! I will be sure to stay connected. Thank you.
On another note…
I have heard many stories over my lifetime of military families suffering in their rental accommodation, not being able to decorate due to having to “return to original order”, what a wonderful example you are, not just to military families but homemakers everywhere of making it possible. Well done!!!
Thanks so much Megan for all your tips and techniques…do you have a book or hard copy of all these features . Look forward to receiving techniques/tutorials from you!
Hi PJ!
Yes – I actually have a PDF set of my main and most popular tutorials. You can snag it here!
Hope that helps!
Megan
Ty so much you are a life saver
You are most welcome!
~Megan
This information is so helpful! Thank you for putting it all together for us. I knew several of these tips having had my Cricut for a couple of years now, but I love finding out about other useful things I never knew about. Great post!!