Cricut Explore for Home Decor | Part 3: Importing Your Own Images
While we get settled into our new house (which is painfully taking longer than normal!), I want to pick back up with my Using the Cricut Explore for Home Decor series by sharing a tutorial for one of my favorite Explore function and uses: importing your own images! (By the way, you can catch up on this series here: Intro | The Essentials | Working with Vinyl). Part of the reason I am “Team Cricut” is because I love their vast collection of images (including trademarked images) in the Design Space library. And even though I have a Design Space subscription (which I personally think is worth every penny and talk more about HERE), I still find there are times when I just can’t find the “right” image for my project. It’s instances like these that instead of settling for one of Cricut’s images, I import something I make myself or find via Google images…and in a few simple steps, it can be sized and cut however I want. This process is easier than you might think, and I’m going to walk you through it today!
*affiliate links used

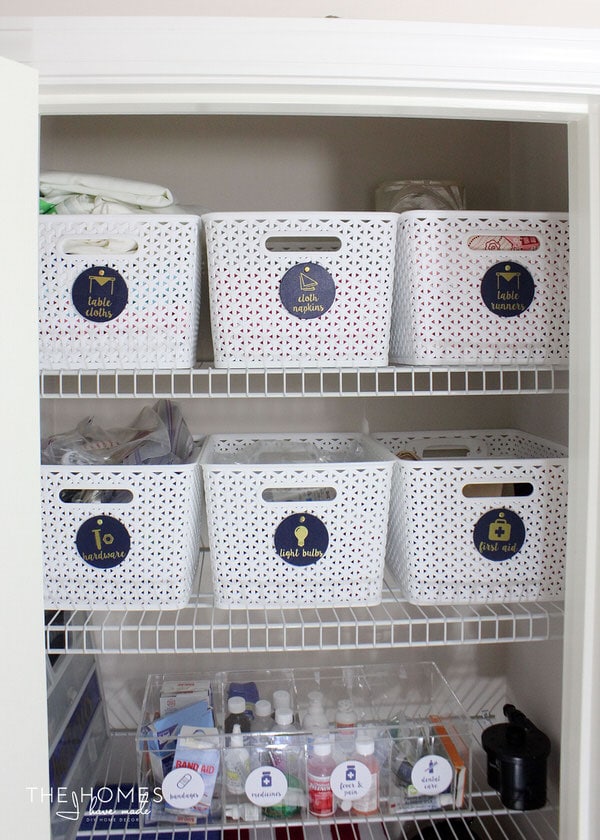
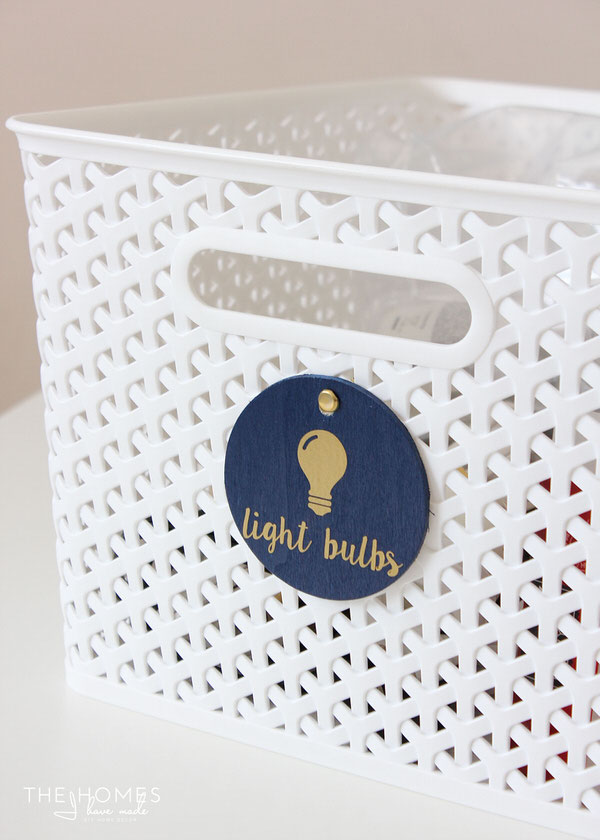
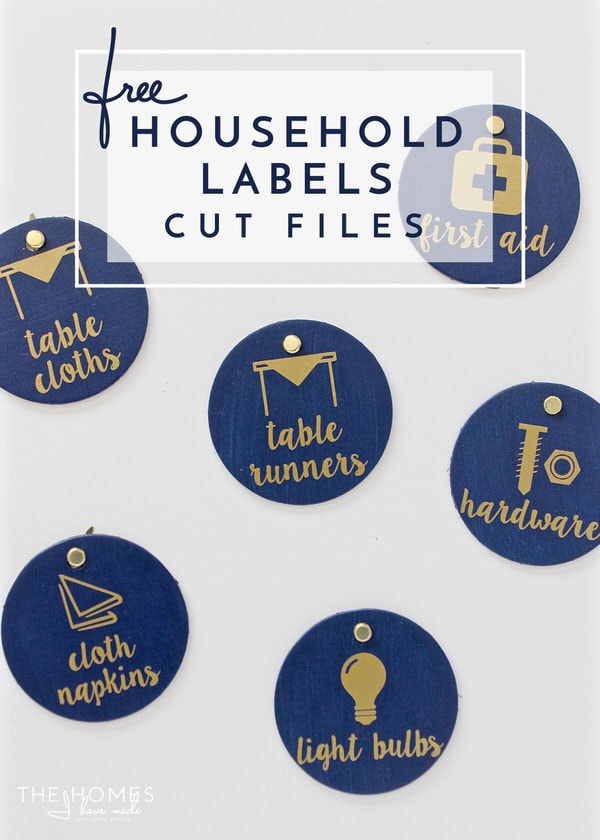
As an example for this tutorial, I am going to use the linen closet labels I made for our previous linen closet. You all might remember that I made and offered linen closet labels as a free printable a while back. But when I was putting my own linen closet together, I didn’t want to use printed versions (mainly because my baskets were white). Instead, I imported the same images and words into my e-cutter software (Cricut’s Design Space) and cut them from gold vinyl. The results were simple, easy-to-read and descriptive labels for our linen closet!
Finding Images to Cut
So let’s say you want to cut something you create yourself (like your own hand lettering) or something that wouldn’t be commonly found in an image library (like school/work/team logos or an image you find online). If you have a JPEG (or a PNG is even better!), you can most likely turn it into a pretty clean cut file. I will preface this tutorial by saying that I have the most experience with and best luck importing and cutting relatively simple and clean images. I find these by searching Google Images using words such as “clipart,” “icon,” and “symbol” (for example, I would search “light bulb clipart” to find a simple light bulb image). I then look for images that already have a clear background (here is an example), are a single color, and have good resolution. Once I find a good contender, I save it to my desktop and then open it Cricut Design Space.
Importing and Cutting Images with a Transparent Background
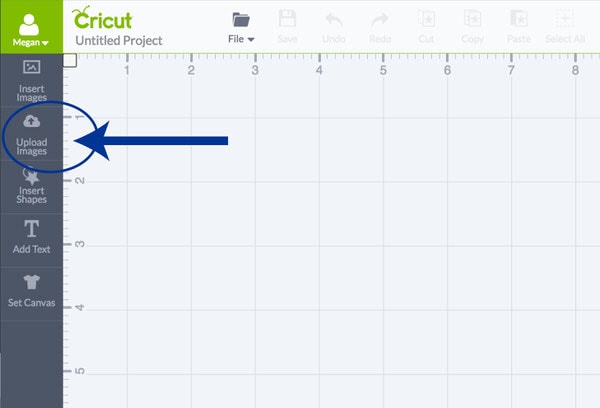
When you are creating and/or looking for images to cut, it is easiest to use PNG images, which often already have a transparent background. How do you know the background is transparent? You will usually see little boxes or lines in the background indicating it doesn’t have a solid background color (here is an example). Once you have a PNG with transparent background downloaded to your computer, open up a New Project in Cricut Design Space. Over on the lefthand column, click the button that says “Upload Images.”
Once you click that button, you will be given the option to select Image or Pattern Fill. Select “Image.”
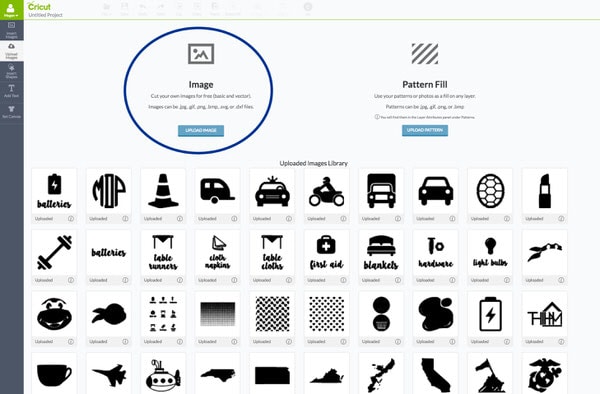
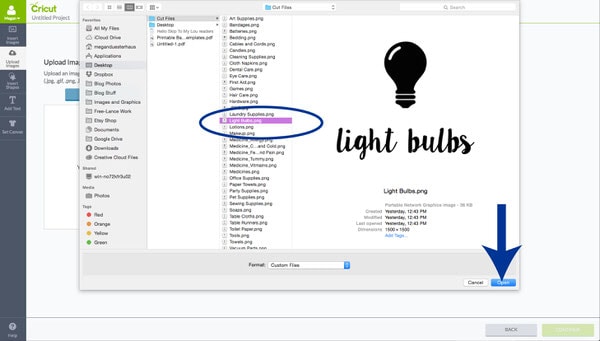
You will notice that you have the option to upload several file types: .jpg, .png, .gif, .bmp, .svg and .dxf. To upload your file, select “Browse.”
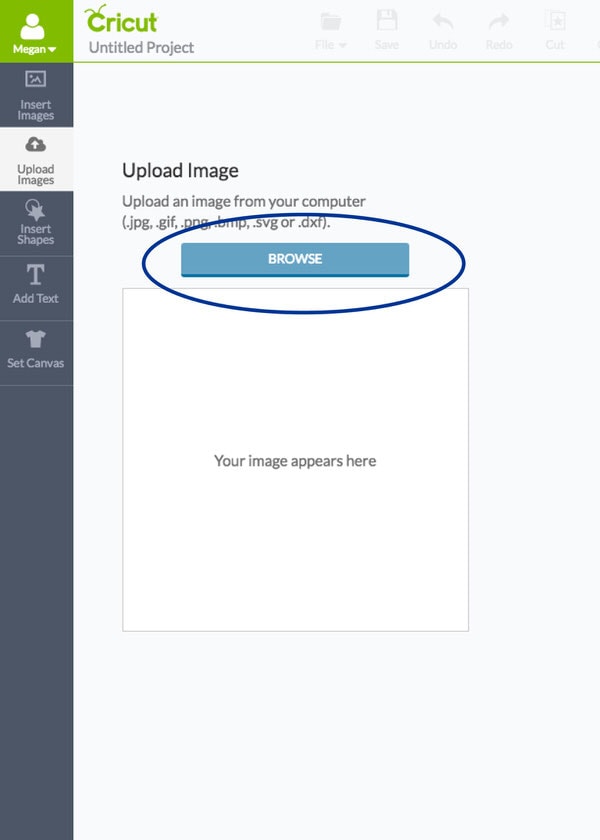
From there, find your downloaded file on your computer and select “Open.”
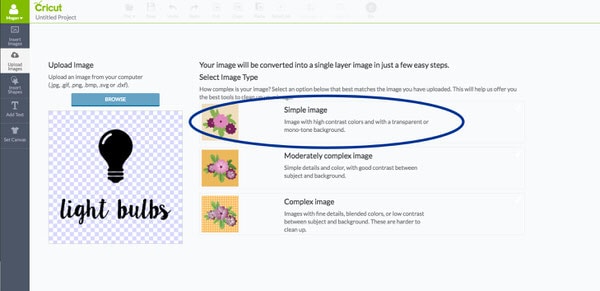
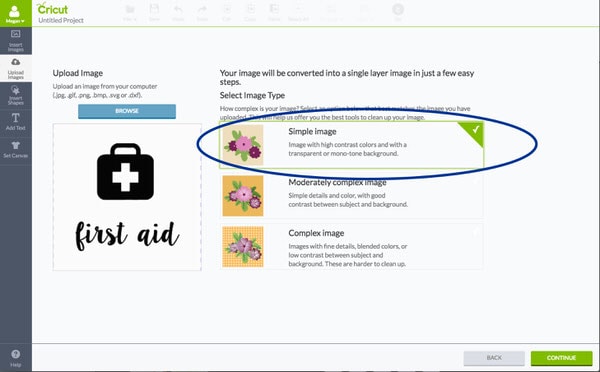
You will notice right away why importing PNG files is so easy…the background is already cleared away, leaving a pretty clear cut path. Once the image populates on the left-hand box, pick the right “type” of image it is. If you stick to single color images like I try to do, pick “Simple Image.”
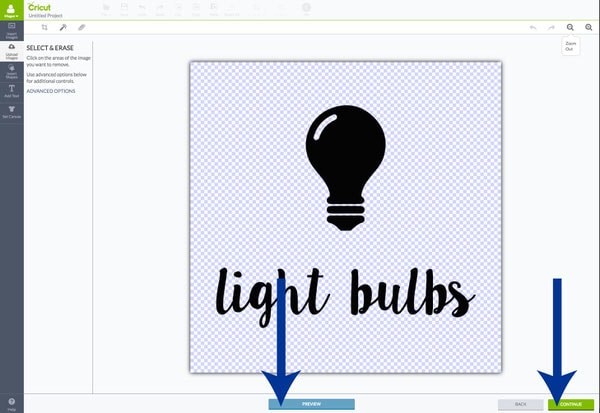
From here, you can clean up the image. You can erase any parts of the image you don’t want cut or clean up any fuzzy details. You can use the “Preview” button on the bottom center of the screen to see how the file will be cut. Because this image already had a clear background and good resolution, I just hit “Continue.”
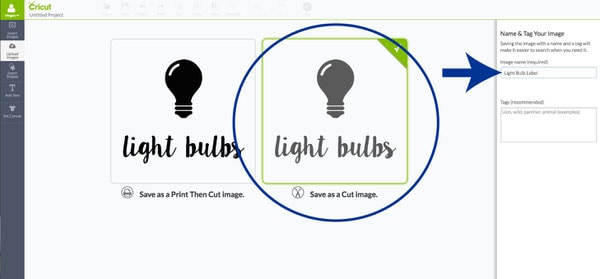
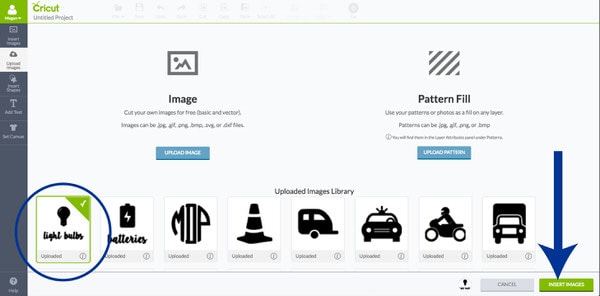
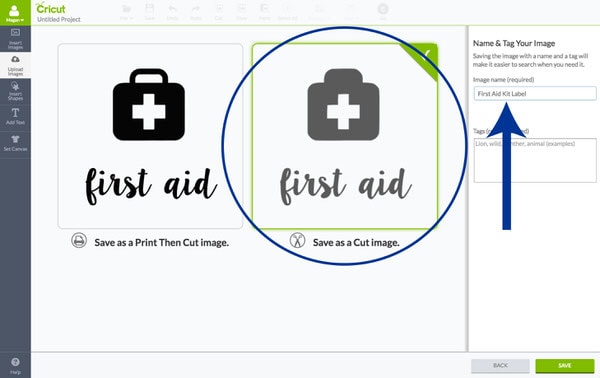
Here is the most important step if you are uploading an image TO BE CUT. Make sure you select the right-hand button that says “Save as a Cut Image.” Sometimes that box takes a second to show your file, but it will usually pop up eventually. I also suggest you label your uploaded images so they remain easy to find even after hundreds of uploads!
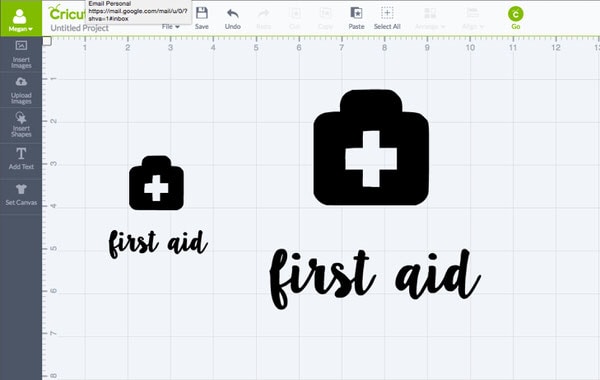
After you hit “Continue,” you will be taken back to the “Upload Image” screen, but this time you should see your newly-uploaded image in the Library below. Select your image and click the green “Insert Image” button.
Once inserted into your project, you can re-size, color, edit out areas even more, and use it in conjunction with other images and files just as you would one of Cricut’s pre-made images!
Want to save this post?
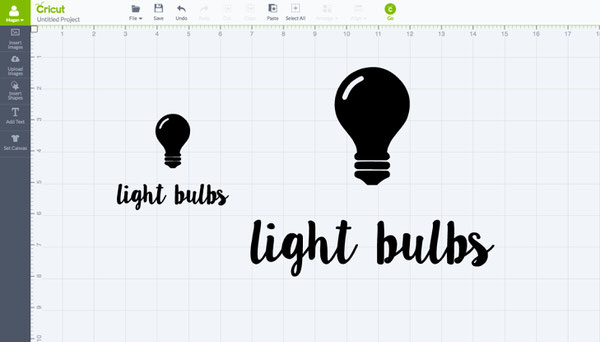
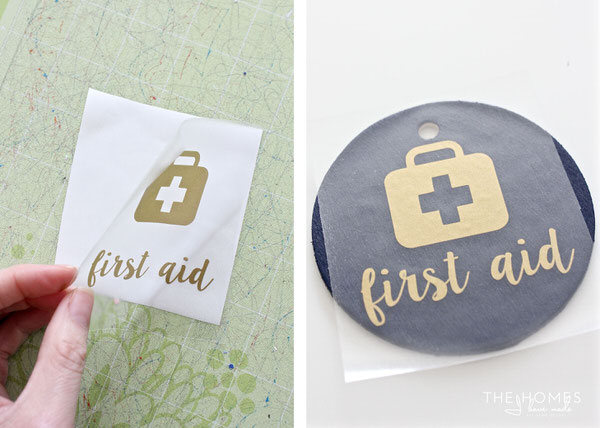
And as you can see, the precision at which this imported image was cut is perfect!
Importing and Cutting Images with a Solid Background
Admittedly, sometimes finding the right images with a transparent background is near impossible. Thankfully, editing out a solid background to reveal a clean and perfect cut path is also pretty easy!
Just as before, navigate to the “Upload Image” tab on the left of your screen in Design Space, select “Upload Image,” “Browse” for your file and click open. This time, I chose a JPEG file that had a solid white background, but still had pretty good resolution, a single color, and really clean lines. As such, I selected “Simple Image.”
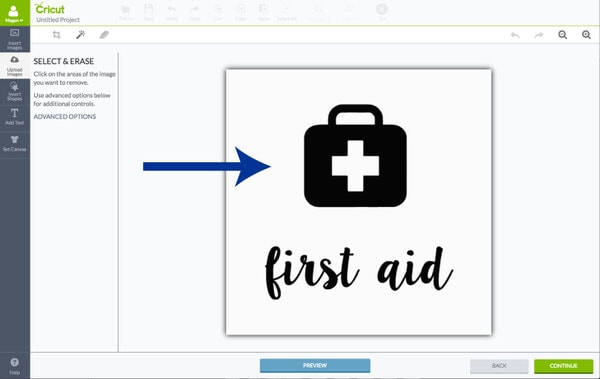
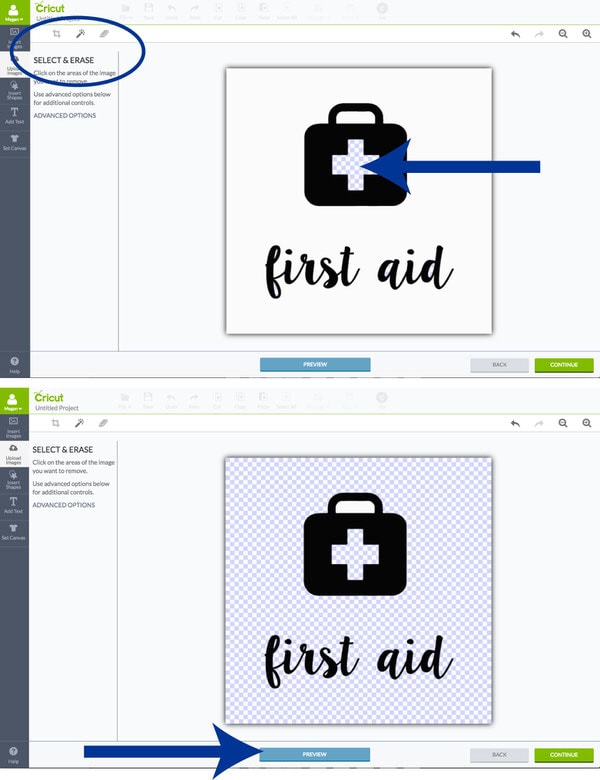
Unlike last time, notice this image doesn’t have the blue/white checkered background (indicating it’s transparent). If we were to preview this image, it would essentially cut the outside perimeter square and none of the first aid kit or words.
To clean up the image, play with the the three tools on the upper left toolbar. With the middle “wand” selected, work through your image clicking on any area that you would like to be transparent. Use the zoom buttons on the right if you need to get in close to clean up tiny details. And just like before, be sure to use the “Preview” button to make sure the image is fully cleaned up. This handy button will show you if you’ve forgotten to weed out the insides of letters of if you have a strange border that still needs cleaning up!
Cleaning up your image, depending on how complicated it is, can take a bit of time. But once you do, the process moving forward is exactly the same. Be sure to “Save as a Cut Image,” name your file, and then “Save” it to your library.
Once inserted into your project, you can size it, edit it, and color it specifically for your project!
With my images imported, I cut them all from vinyl and used THESE tips for transferring them over to my wooden rounds.
And with just those few easy steps, I had a slew of coordinated labels for our linen closet…all made from images I found via Google instead of paying for them through Cricut!

Cutting your own images is one of the BEST features of the Cricut Explore (at least in my opinion!). Importing your own images into Cricut Design Space truly allows you to make ANYTHING for your home, for gifts, and more! I still think having a Design Space subscription (which gives you access to thousands of images) is worth it, but also having the ability to import whatever you want keeps you from having to pay for even more cut files when what you want isn’t available!
Part of the reason I was able to put my labels together so quickly is that I was able to save all of my label images (that I shared here) into high-res PNG files. After putting this post together, it occurred to me that you all might like to have those files too (since you can’t really upload the PDF files I already shared into Design Space), so look for these (and more!) cut files coming next week! Up next on Thursday though, I’m sharing a very special announcement you won’t want to miss! See you then!
Pssssst – I now have these Household Label Cut Files ready for you! See more by clicking the photo below!
Megan
2 Comments on “Cricut Explore for Home Decor | Part 3: Importing Your Own Images”
Thank you so much for this series!! I have a Cricut Personal Cutter that I got years ago and always worked well. I love it. Then my husband gave me an Explore One for Christmas and to be honest I think I only used it a couple of times. I am not great with computers, but I think I am ok. It has been very confusing for me using this new machine. There were to instructions with it and even the videos on the website were not as detailed as your tutorials. One thing I am still struggling with is multiple images on one sheet. Can you consider making a post about it?
Thank you again!!
Thank you for taking the time to not only create excellent written instructions but also the step-by-step video & the free files. Based on your instructions, I finally got up enough courage to use my Cricut to create labels that quickly allow my husband to rush off with his electronic tablet instead of mine. They both just had the standard black covers and we were forever asking: “Are you sure you have your tablet”. Thank you!