4 Creative Uses for the Weld Tool In Cricut Design Space
As you might have guessed, I have spent some serious time in Cricut Design Space (Cricut’s online designing software to use with Cricut machines) in the last few months. And while I didn’t necessarily learn anything new (I’ve been working in this software for a loooong time), I really honed in on some creative, unusual, but oh-so-handy techniques that can really take your projects to the next level. I promise this won’t become a Cricut-focused blog, but I do want to spend some time in the coming months exploring the tools and techniques I use most frequently. Today I want to dive deep into the Weld tool in Cricut Design Space and show you not only how to use it, but also some creative uses for it you may not have tried!
What is the Weld Tool and Why Do I Need to Use It?
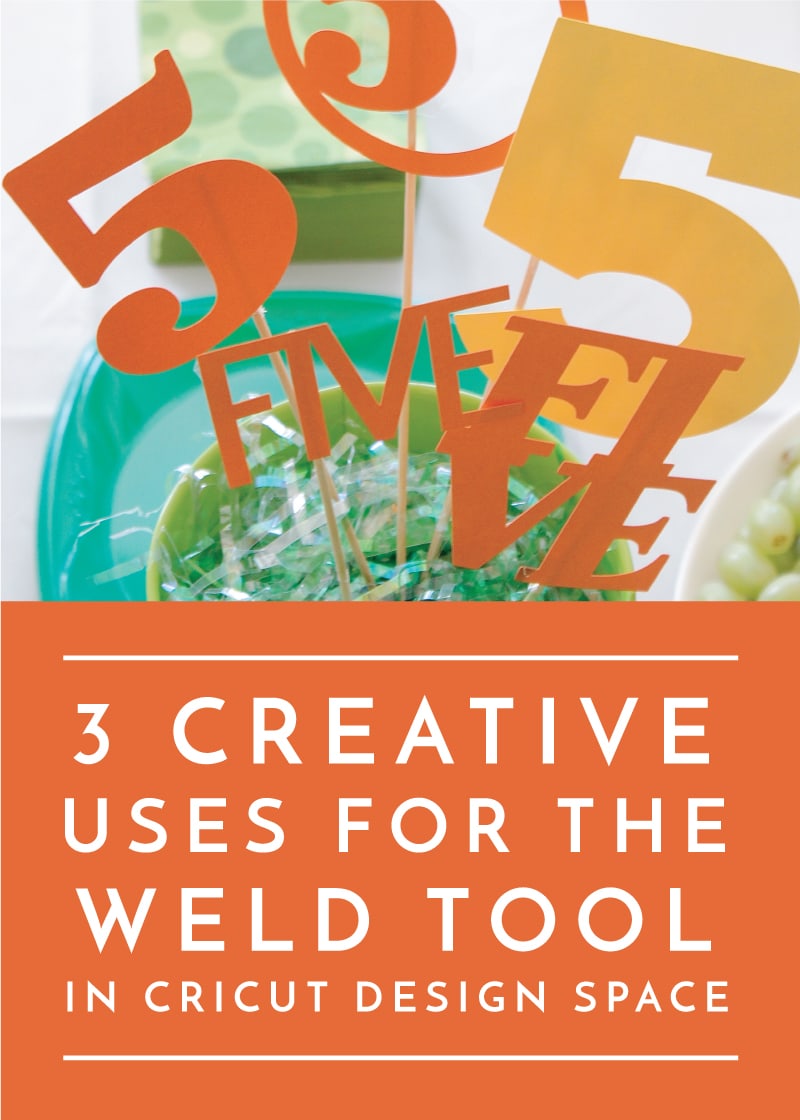
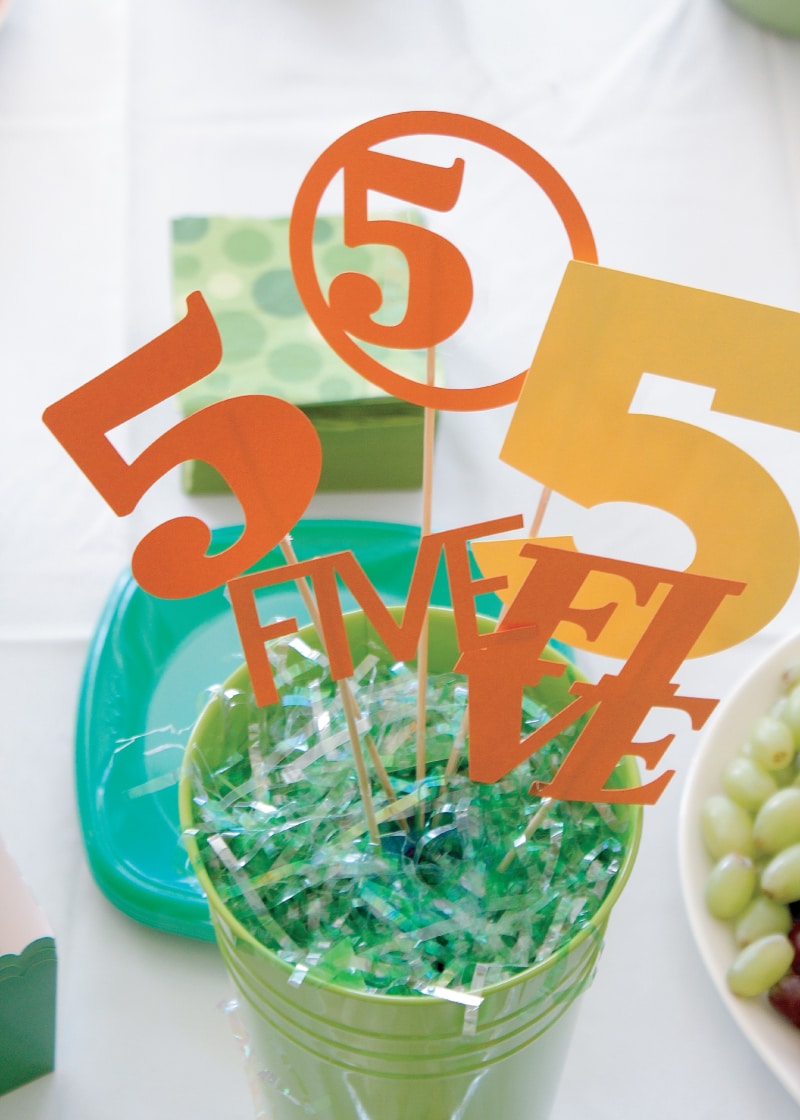
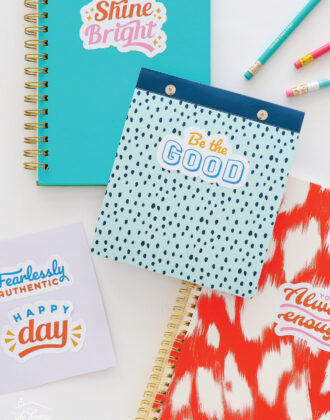
The Weld Tool in Cricut Design Space is exactly what it sounds like: a tool that allows you to take two completely distinct designs and weld them together into a single image with no remaining seam or cut line where the two designs initially intersected. Most obviously, this tool is handy for creating one, solid continuous cut so that you don’t have to glue or match various cuts together on your final project. Having multiple distinct cuts is not always a problem. But aside from the obvious convenience of a single cut, there are times when this kind of design may be necessary like for cake toppers, decorations (as shown below), gift tags, etc.
Many multi-element designs in the Design Space library are already welded together for you (like most of those shown above). However, if you’re trying to create your own unique designs or customize images you find in the library, the Weld button can be one of your handiest tools! Let me show you three creative ways you may not have thought to use it!
Use 1: Create Continuous Script Fonts
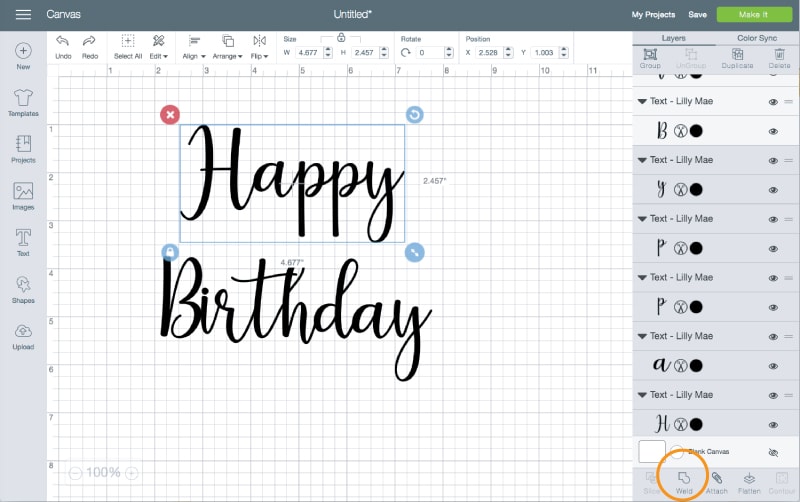
(I briefly discussed this trick here, but it’s worth repeating!) If you use some of the script-style fonts in the Design Space library (and especially if you use a font from your computer), you will notice that it does not automatically format to appear as a continues script font. For example when I type “Happy Birthday” in this gorgeous Lily Mae font, this is how it first appears (below).
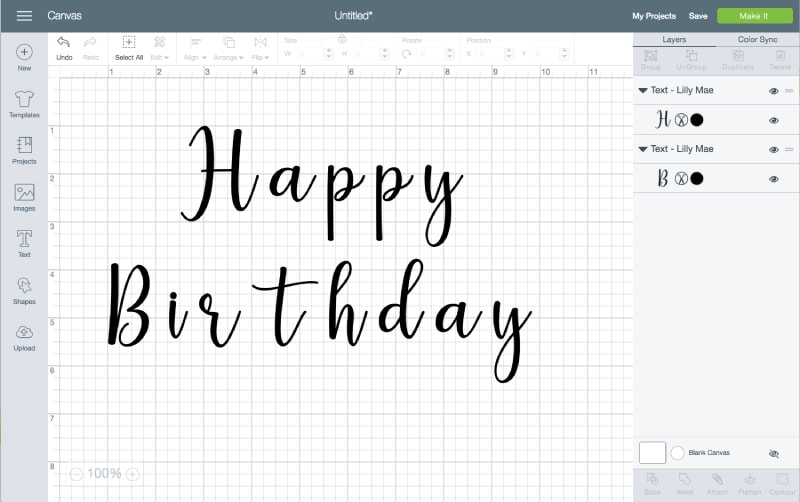
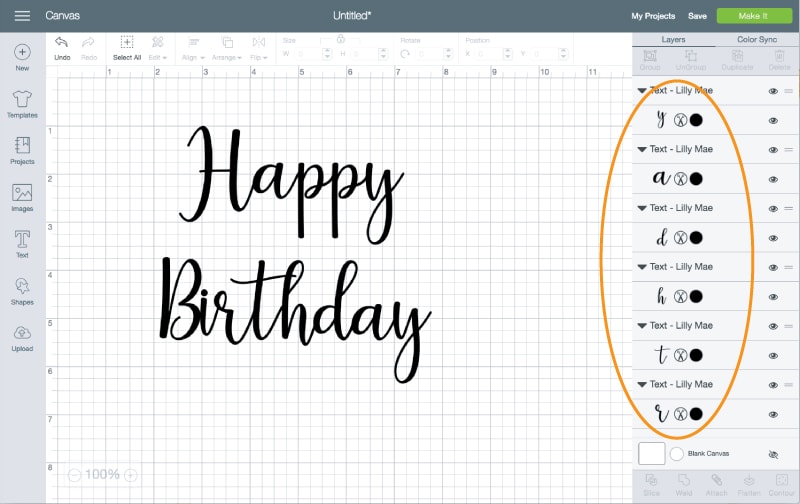
If I was making a cake topper or something similar, these indidivual cuts would be a problem. To fix the spacing, I’ve found it’s easiest to “Ungroup” the letters first, and then adjust the spacing so that each letter is touching. However, you will notice in the panel on the right, each and every letter is still an individual cut. So although these letters appear tight together, they will still be cut individually.
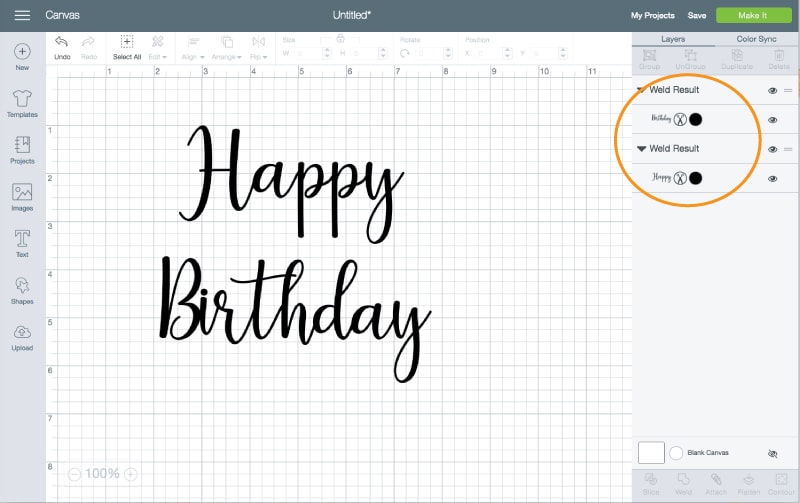
The Weld tool solves this problem. Simply ensure each letter is touching another, select them all (double check the design panel on the right to ensure you have everything selected) and then simply hit the illuminated Weld tool along the bottom panel.
After I repeated these steps with both “Happy” and “Birthday,” you can see they are now single, solid continuous cuts in the right-side panel.
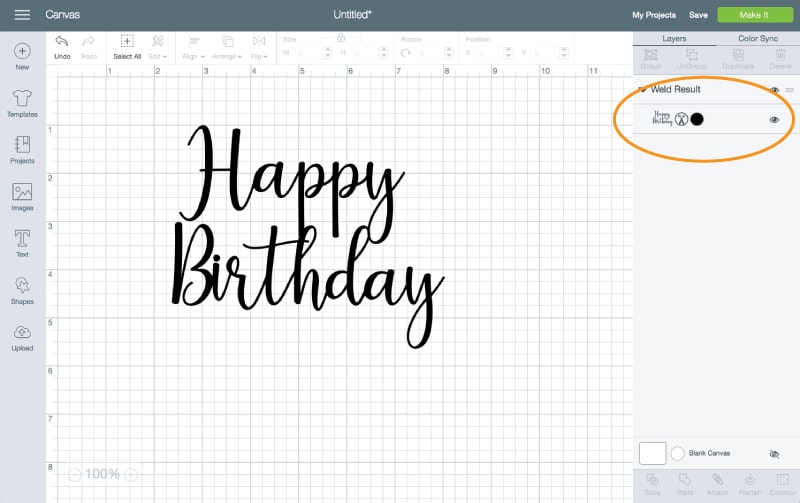
To make the entire design into a continuous cut, I simply repeat the process on the two words: ensure the designs overlap somewhere, select both, then hit Weld.
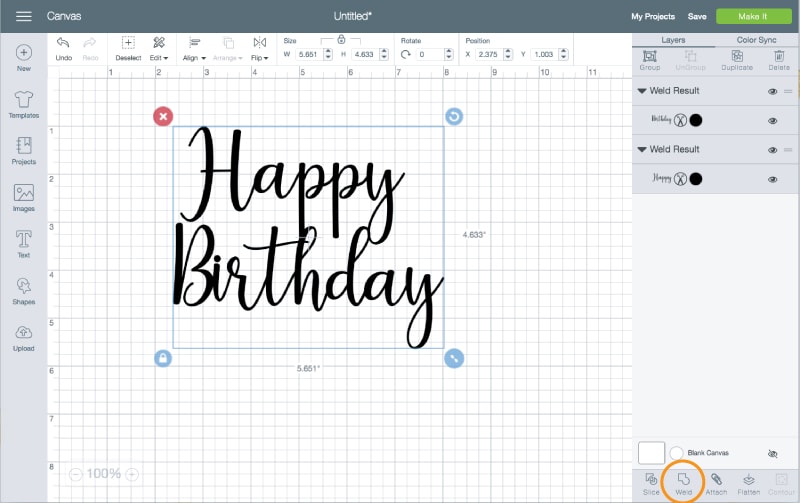
Now “Happy Birthday” is a single, solid cut that will requiring no glueing or taping together!
Quick Tip! I use this technique ALL the time when working with script fonts. Just a quick word of caution though: after you ungroup your letters and start welding them together, you can no longer go in and edit the text, so be sure your spelling and phraseology are correct before you get too far!
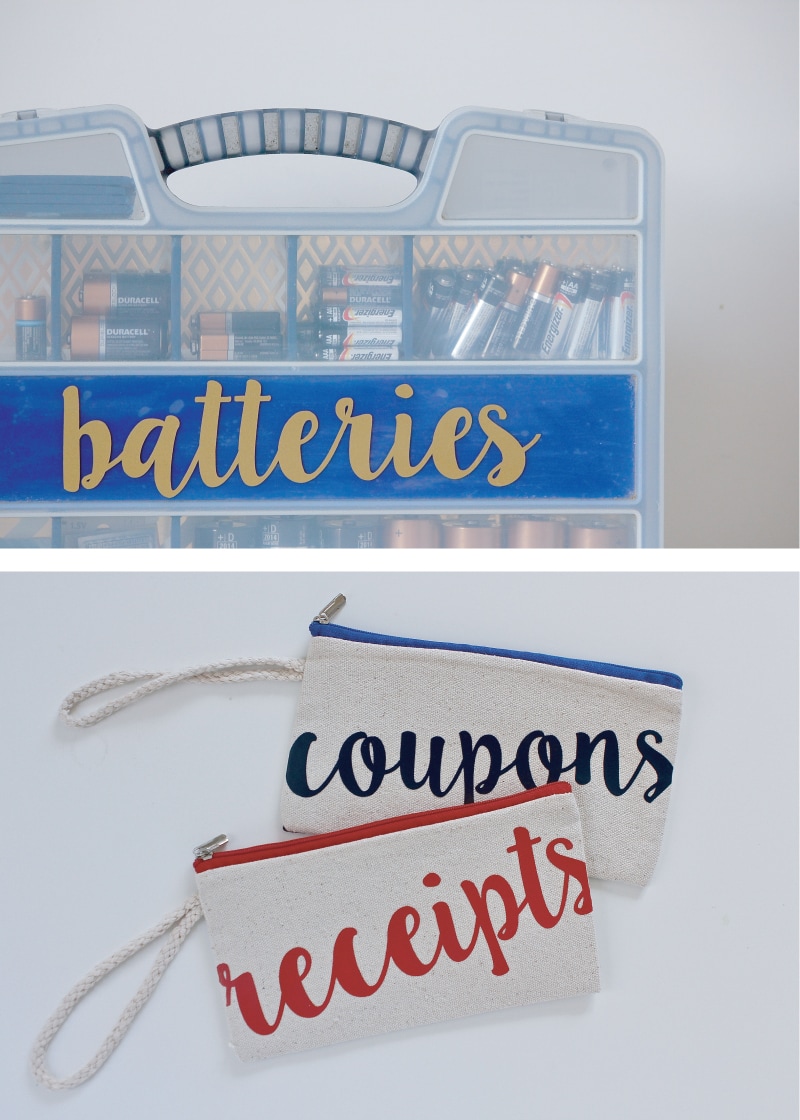
Battery Case | Purse Pouches
Use 2: Create Your Own Designs
I have a Design Space Subscription (you can read more about why I think it’s worth it here), so I can almost always find exactly the design I’m looking for. But every now and then, the image I really want to use is not part of the subscription #annoying. I refuse to buy additional graphics beyond what I am already paying for, so I will often use the Weld tool to make my own versions for free! Here’s a recent example for you. I went to make some tabbed dividers, and the image I really wanted to use was $0.99.
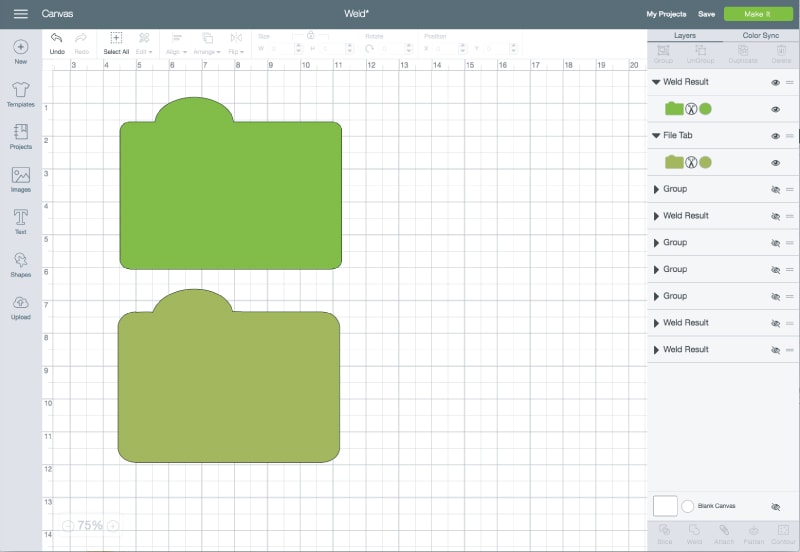
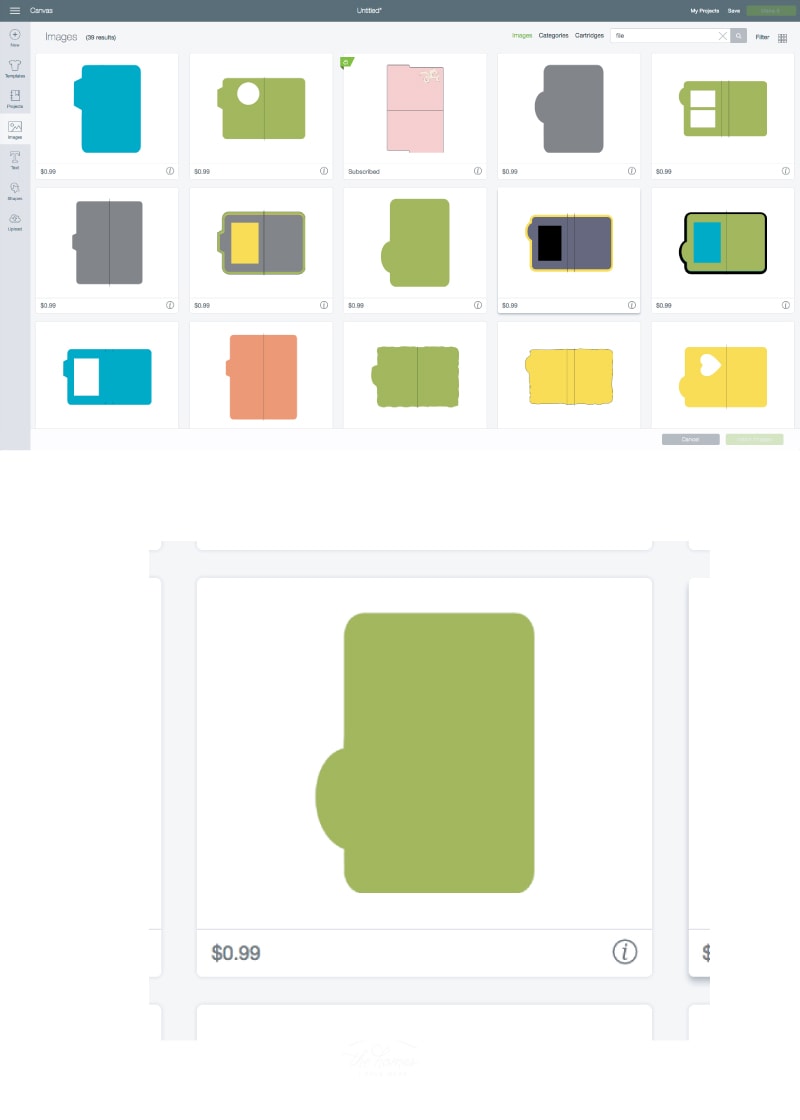 Sure, $0.99 isn’t a big deal, but look at that design: it’s a rounded rectangle with an oval sticking out of it. I have both of those images available in my subscription and through the Shapes toolbar on the left (which are all FREE!). I simply put the “inspiration” design on my canvas for reference, then used my free shapes to create a very similar version.
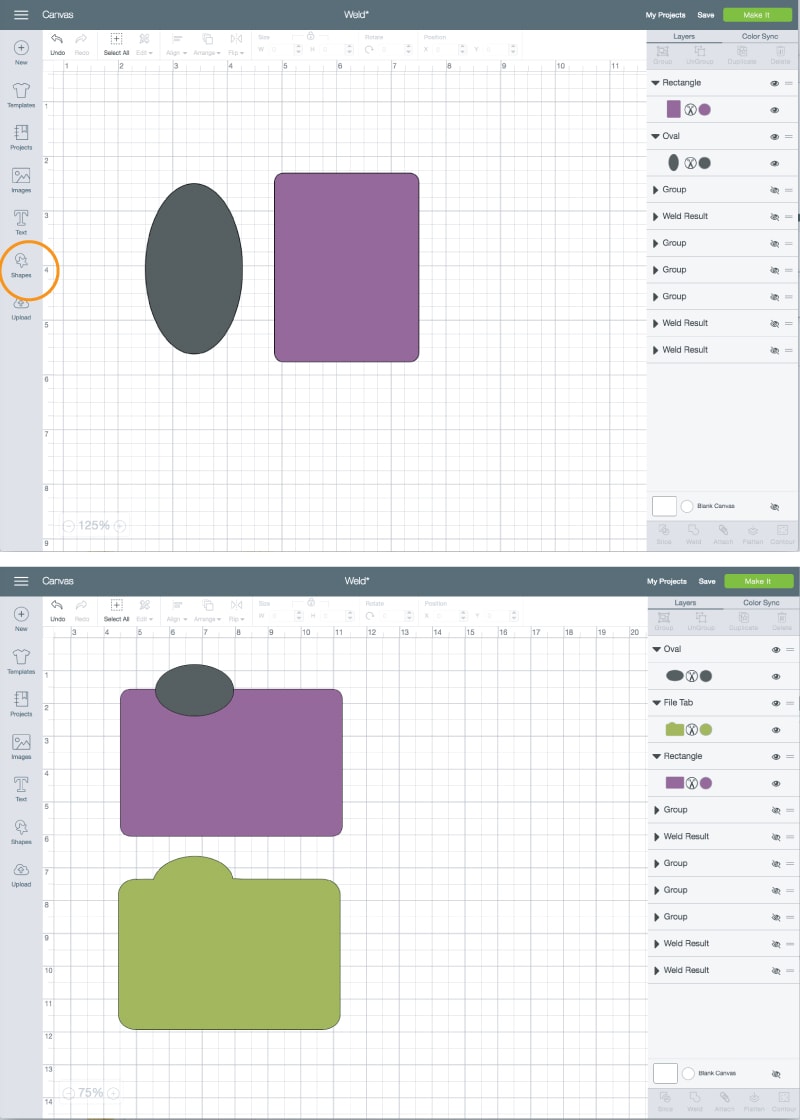
By using the Weld tool, I created a near identical graphic and saved myself the $0.99!
Making my own dividers is one of my favorite things to do! I have a whole tutorial coming for you soon!
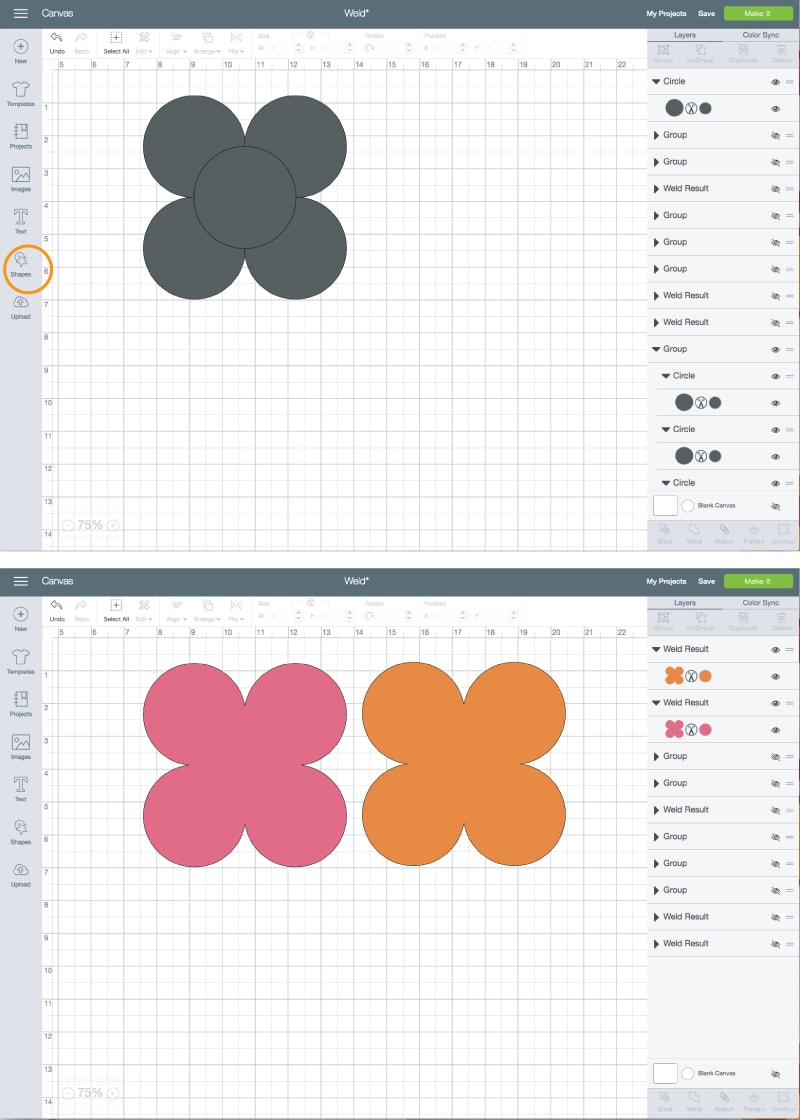
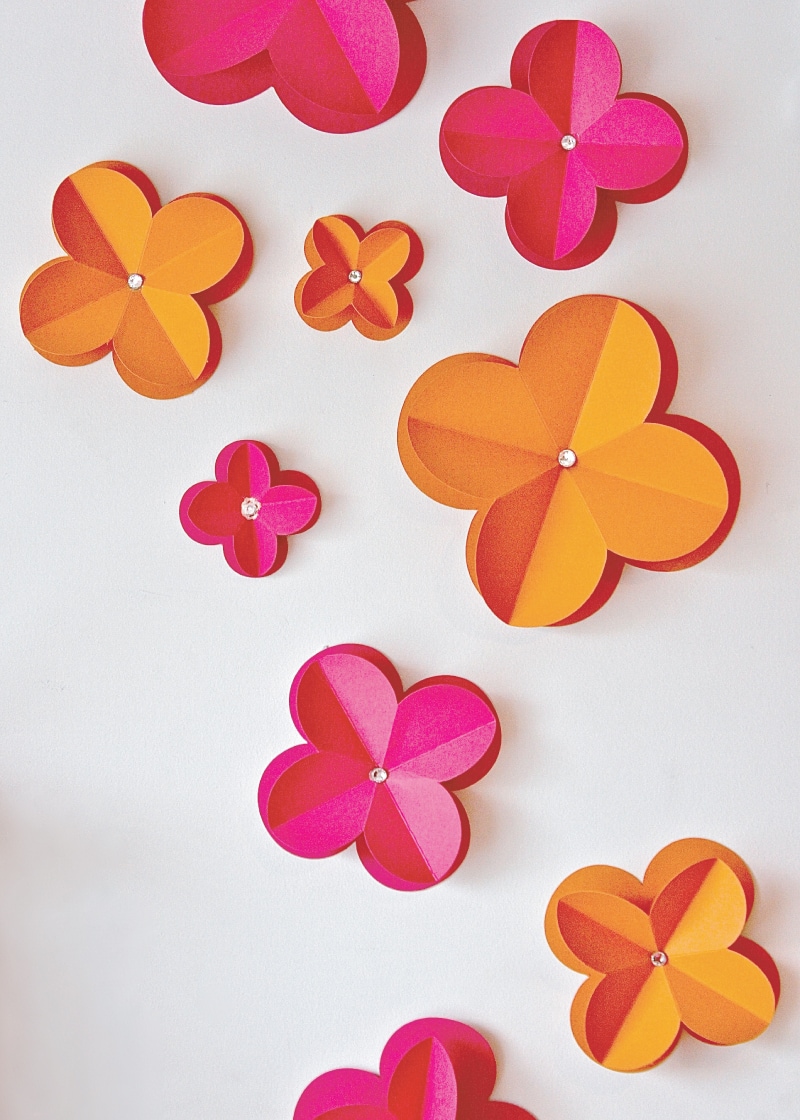
This concept can be carried one step further. Perhaps you don’t need to replicate an image available in the library, but instead want to create your own image entirely. Waaaay back when, when I was helping my niece with her bedroom makeover, we wanted to create a wall art installation that matched her theme fabric, which featured this simple rounded flower shape. At the time, there was no pre-designed image available to us that matched quite right, so we created our own using a variety of circles. Back then, we did it using the Gypsy and a ton time. Now, this project would have taken us seconds! Five basic circles overlapped and welded together create the exact flower shape seen throughout her theme fabric.
Want to save this post?
If you can’t find exactly what you’re looking for in the Design Space library (or you don’t want to pay for what you want!), play around with the Weld tool and some of the designs you do have access to (in your subscriptions, cartridges, and purchases, as well as the free files and the free shapes). You might be amazed what you can pull together!
Use 3: Expand Borders and Patterns
This last technique is probably my favorite and most frequent use for the Weld tool. Many of the border and pattern designs in the Design Space Library are finite, meaning they don’t go on forever. Sure you can size these patterns, but simply re-sizing them often messes with the scale you may want for your project. The Weld tool allows you to extend borders and patterns infinitely without having to sacrifice other dimensions, giving you ultimate control over the look of your project. Here’s what I mean!
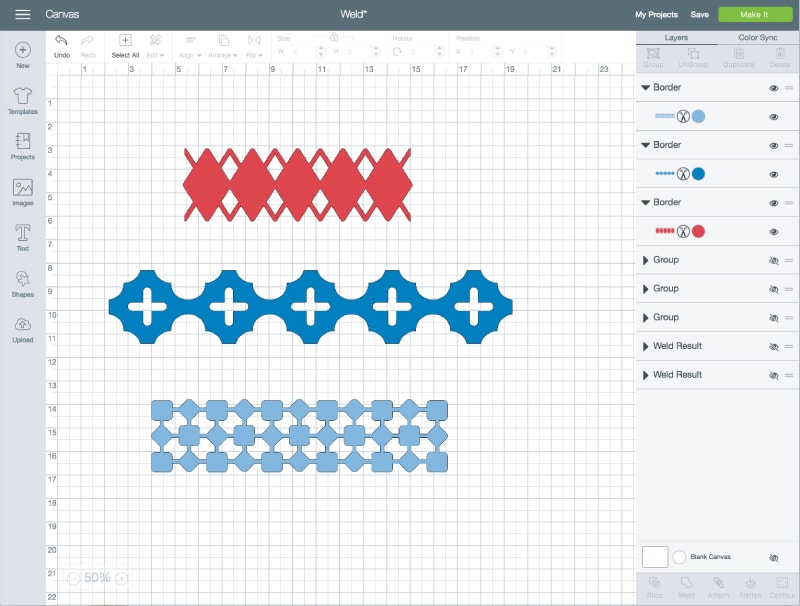
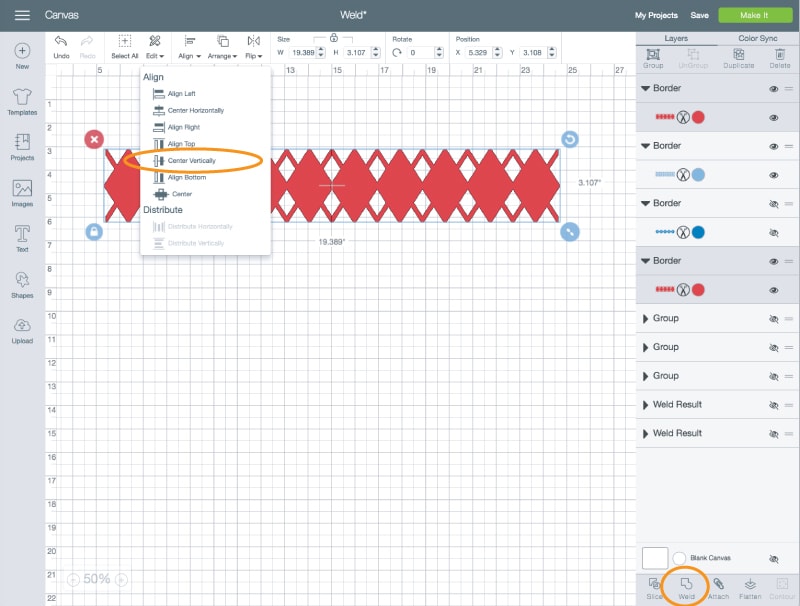
Above are three basic border patterns I picked from the Design Space library. Let’s first look at the red argyle pattern. The original design is about 10″ long by 3″ tall. Let’s say I want this design to extend across a 20″ wide tray. By sizing the pattern to 20″ wide, the height jumps to over 6″. This may or may not be what you are envisioning. Me? I wanted the shorter height, but longer length.
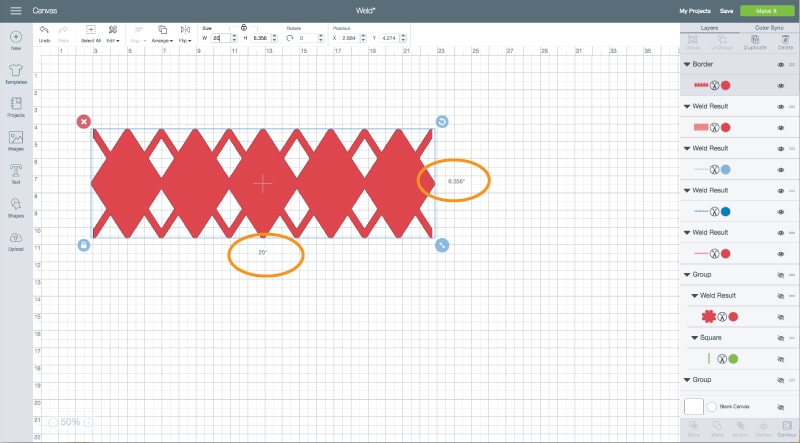
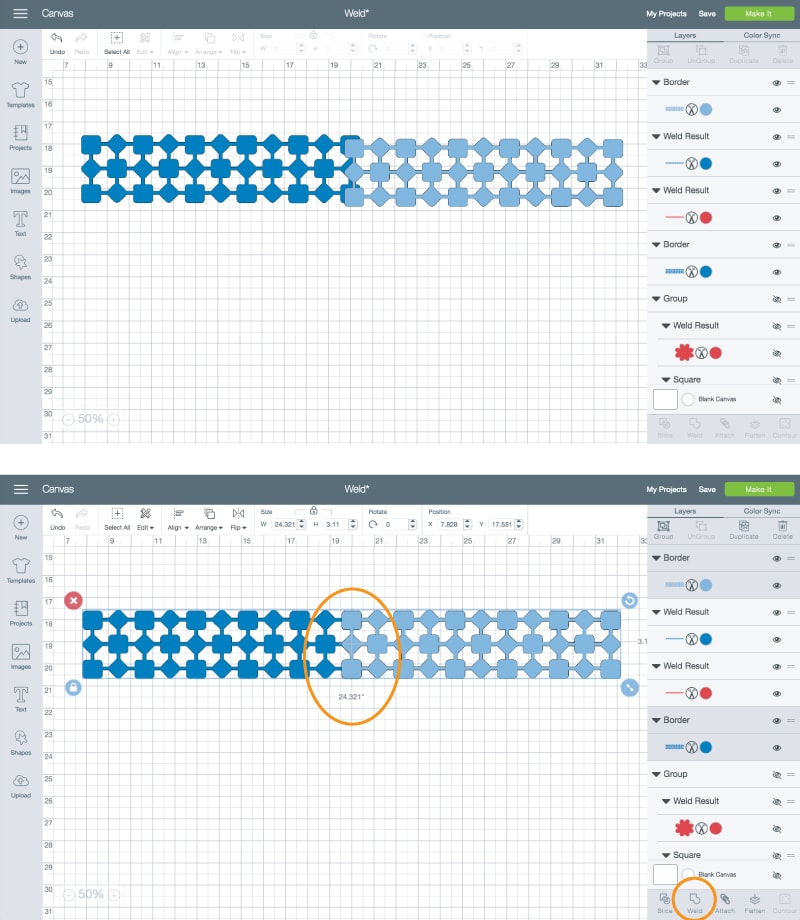
To do that, simply duplicate the design as many times as you desire. Note: just by putting this shape side-by-side, you can tell it was designed to be easily welded.

Next, align your design (center vertically) and then nudge the two ends together so they are touching. Select both and hit the weld button.
By repeating this process over and over, you can create a border any length while maintaining the original height.
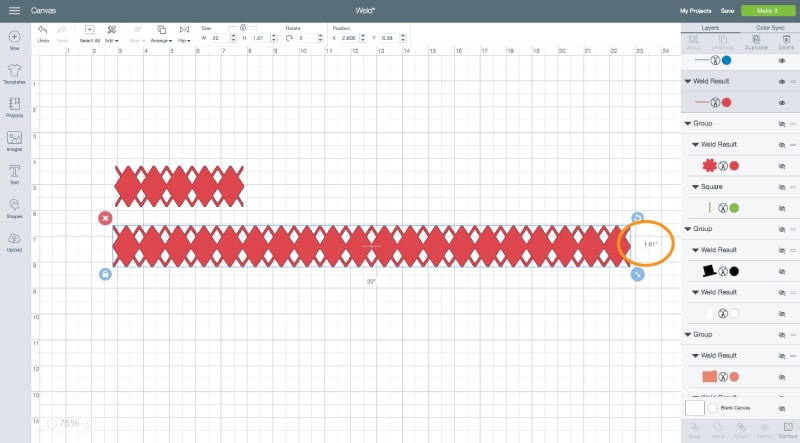
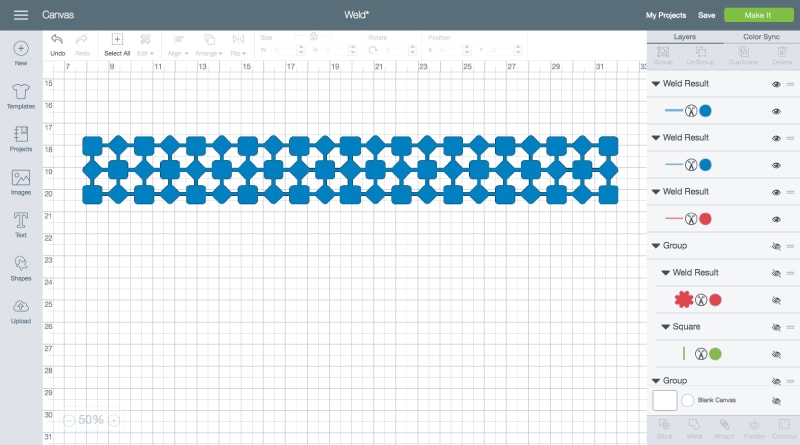
Many patterns in the Design Space library are designed to be repeated just like this. Here is another example of a very straight-forward weld…
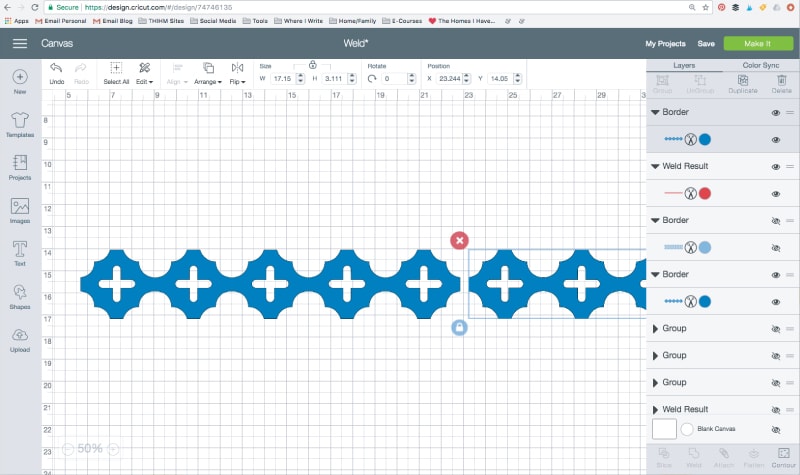
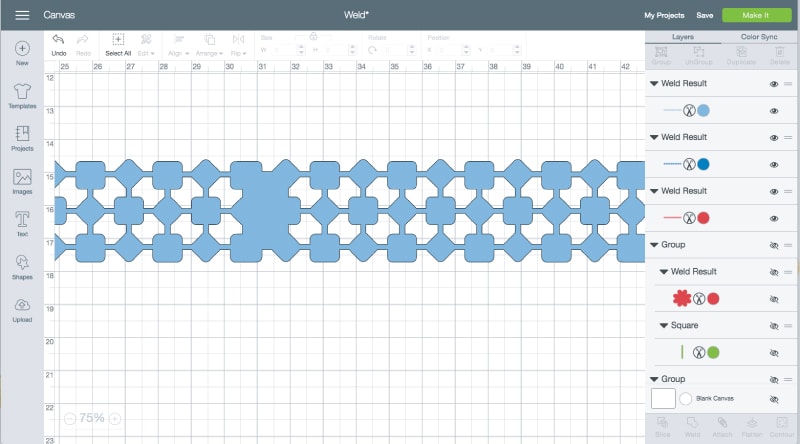
But what do you do when the original design is not intended to be easily welded, like below? Here, I duplicated my original image, but the end designs butt up against each other in a way that obviously disrupts the pattern.
Get ready for it, because this little technique will allow you to see and use designs and patterns in a whole new way! This time, overlap as much or as little of the design as you need to in order to match up the design elements. You may need to zoom in and nudge carefully to get the overlap just right, but once you do…
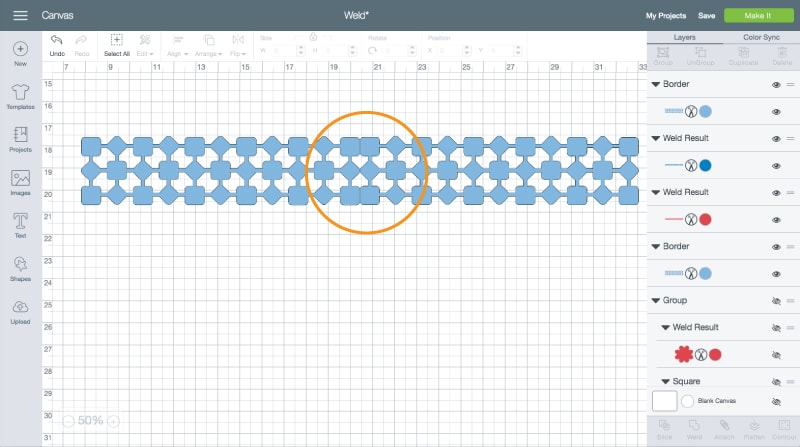
…select both images and hit Weld. The overlapped segments of the two designs become one, and your pattern continues on in a single cut!
Quick Tip! Every now and then the Design Space software “glitches” and the Weld function gives you a wonky result like shown below. It happens to me randomly, and I can’t quite figure out why or what causes it. However, I have found that un-doing the Weld, re-nudging the images a bit to change the alignment just a hair, and re-welding most often fixes it!
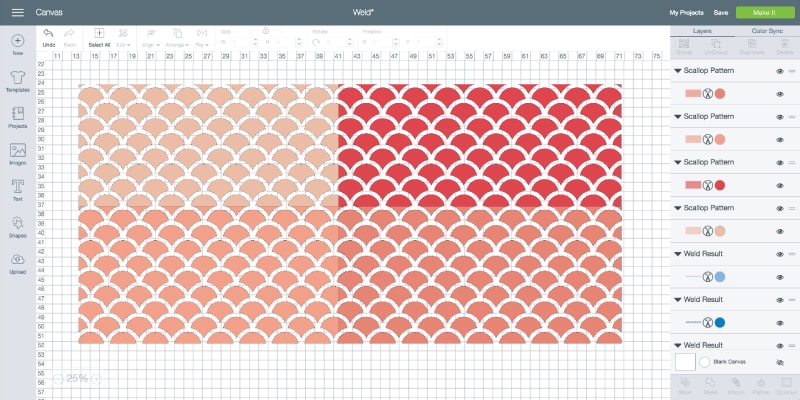
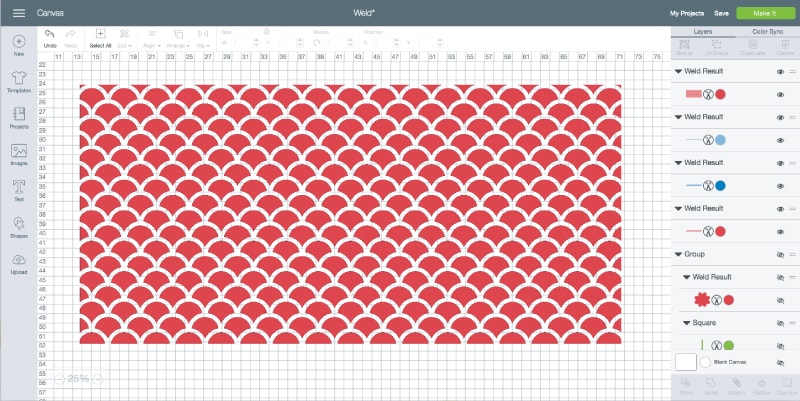
This overlap + align + Weld technique can work on anything that has a repeating design. Even if it doesn’t appear that you can easily overlap designs, play with it and see if you can make a Weld work to give you the effect you’re looking for. Below, I started with one small scallop pattern. After duplicating it three more times, overlapping each one juuuust right, and Welding them all together, I was able to quadruple the size of my original design without having to make enormous scallops!
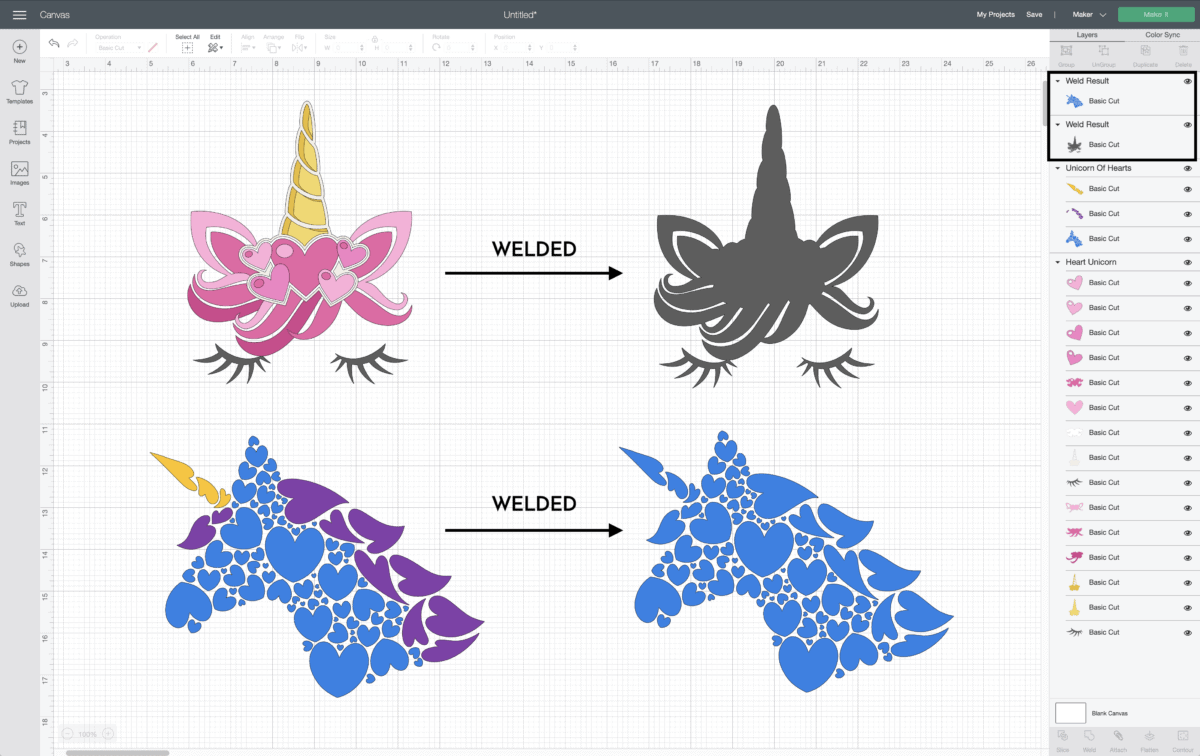
Use 4: Create Single Layer & Single Color Designs in 1 Click
The final use I want to share today is a really handy shortcut for simplifying multi-color and multi-layer designs. While there are lots of ways to change each layer’s color (i.e., the Color Sync Tool or selecting each layer separately), you can also make any multi-layer or multi-color design into a single-color version by selecting all the layers and Welding them together. Even if they various components aren’t touching, the Weld tool will transform the image into a single layer (see the right-hand Layers panel below), which can often lead to quicker cutting and easier design assembly.
More Helpful Cricut Design Space Tutorials
Cricut Design Space is a very powerful program, but it can have a steep learning curve for beginners. Check out my other comprehensive tutorials below:- How to Use Cricut Design Space | A Breakdown for Beginners
- 20 Cricut Design Space Tips & Tricks You Really Need to Know
- The Ultimate Guide to Cricut Terms & What They Mean
- How to Find Free Images to Use with Your Cricut Machine
- How to Use the Attach Tool in Cricut Design Space
- How to Use the Slice Tool in Cricut Design Space
- How to Use the Weld Tool in Cricut Design Space
- How to Use the Contour Tool in Cricut Design Space
- How to Use the Offset Tool in Cricut Design Space
- How to Use Print Then Cut in Cricut Design Space
- How to Design Monograms in Cricut Design Space
- How to Cut Really Big Designs on Your Cricut (The Off-the-Mat Technique)
- How to Design Mugs in Cricut Design Space
I hope these four mini tutorials on the Weld tool in Cricut Design Space give you ideas for using it in new and creative ways! I love this tool, as it allows me to take images I find in the Design Space library and really customize them for my projects. I’d love to hear if you give it a try!
I am starting to decorate for Christmas this weekend and plan to give you the first glimpse of one of my holiday projects next Tuesday – see you then!
Megan
5 Comments on “4 Creative Uses for the Weld Tool In Cricut Design Space”
Hello! Thanks so much for your tutorials! I am trying to make your dividers (5) and everything welds together !! I do not get individual dividers. Thoughts????
Hello!
Make sure you are selecting one rectangle and one tab at a time. You may need to “un stack” the various shapes to grab each shape individually (or hide various shapes using the side layers panel).
Let me know if that helps or if you’re still having trouble!
Megan
This tutorial was excellent!!!!!!! Thank you!
Linda
Thank for showing what the weld function can do in CDS!! This will definitely help with some of my projects!
Thanks for a great tutorial! Keep the Cricut tips coming.