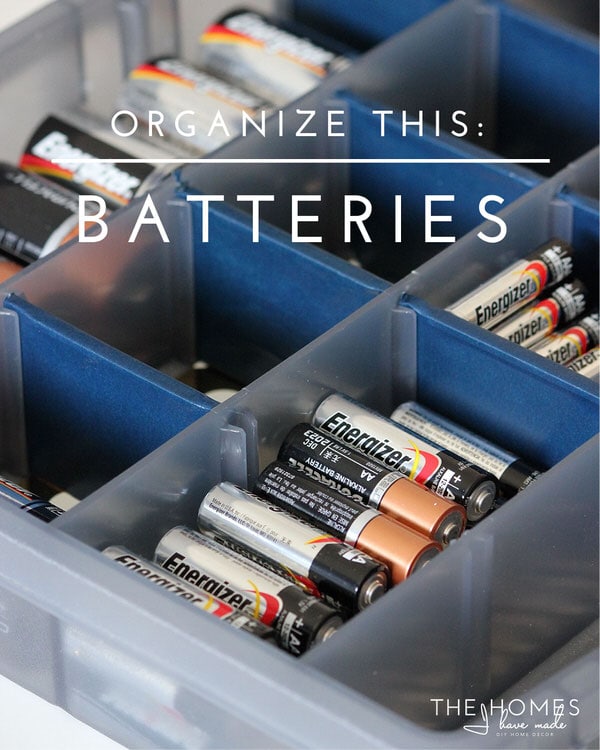
How to Organize Batteries with a Battery Kit!
“Moooommm, my ______ needs new batteries!” It’s a request I get at least a few times a month. So after digging through junk drawers and pulling batteries out of remote controls far too many times, I took an hour to organize our batteries into a simple, quick-grab case. Now storing, accessing, and stocking our batteries is super easy (even the kiddos know where they are!), and this 1-hour project is easily one of the smartest things I’ve done in our home. Let me show you!
This post contains affiliate links. You can read my Disclosure & Privacy Policy here.
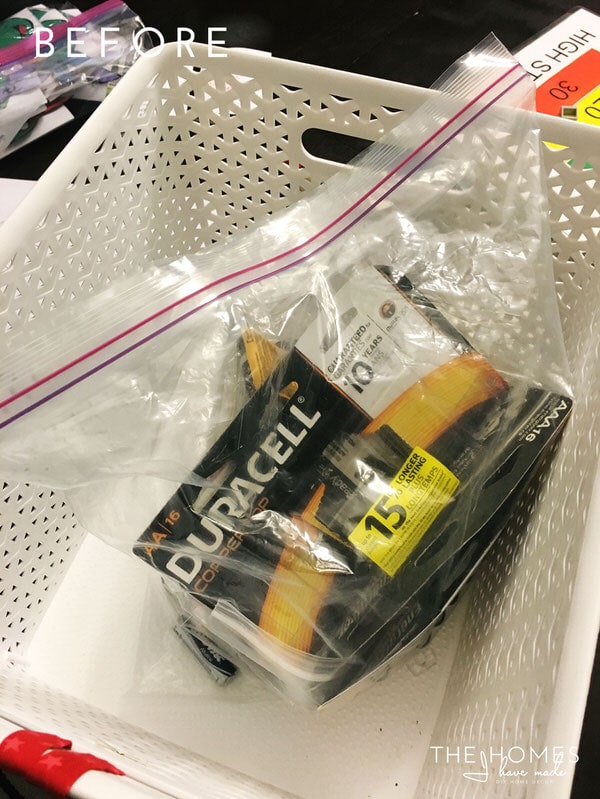
Organizing the batteries wasn’t really on my To Do List. We usually keep all of our batteries corralled in a basket so they were easy to find whenever we needed them. However, when we moved last summer, I threw them all into a giant Ziplock bag for transport (packers won’t move batteries), and they were still in that exact same bag until this week. Rummaging around the bag had become a nuisance, so I decided to come up with a better solution!
A trip the garage and and an hour in my craft room later, we now have a snazzy new “battery kit,” and I am so excited about it. It’s the little things in life, right?!
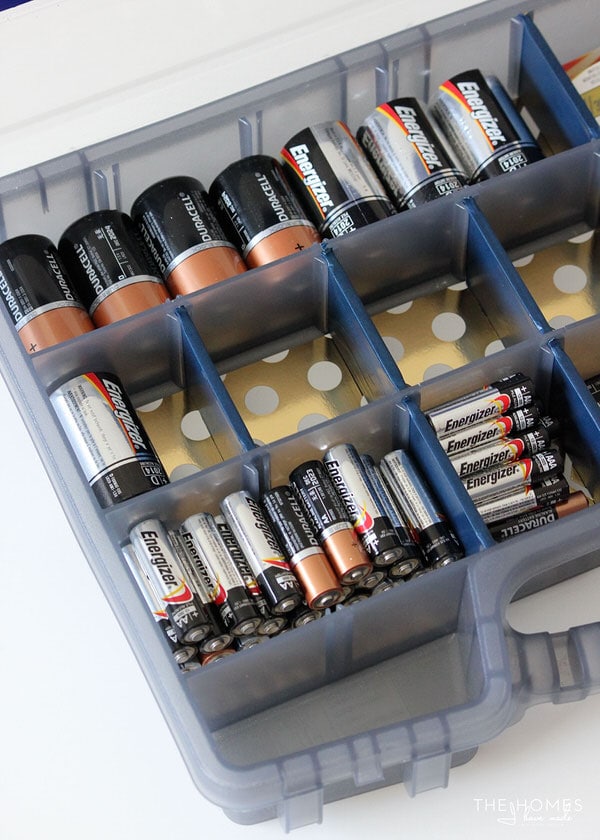
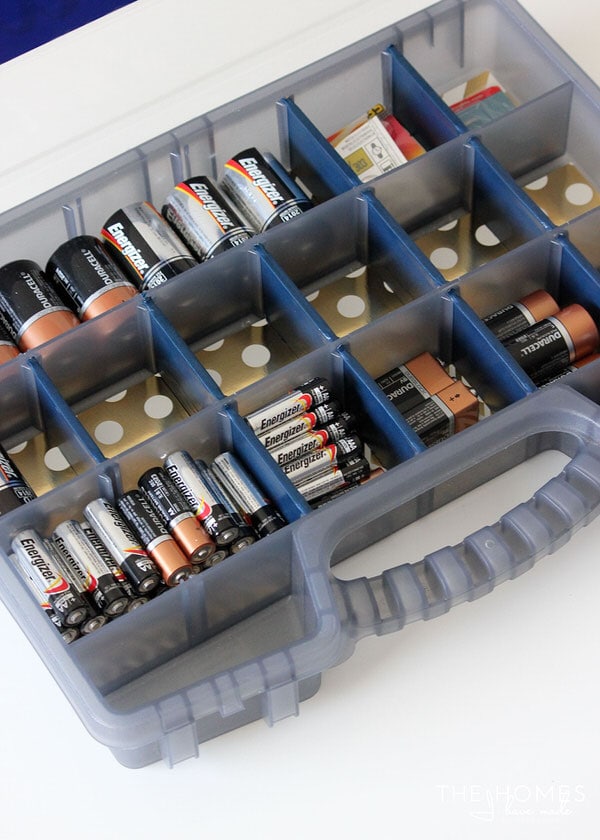
Not only are the batteries now in a more space-savvy container (rather than just a large open basket), but they are all separated by size/type so finding just the right battery (or assessing which ones are out!) is easy peasy!
Like I said, this was a spur-of-the-moment project I wasn’t planning on. But now that it’s complete, I really wish I had done it sooner. Best of all? I used all items we had on hand so this fun little organization project didn’t cost me a penny!
Finding the Right Organizer for Batteries
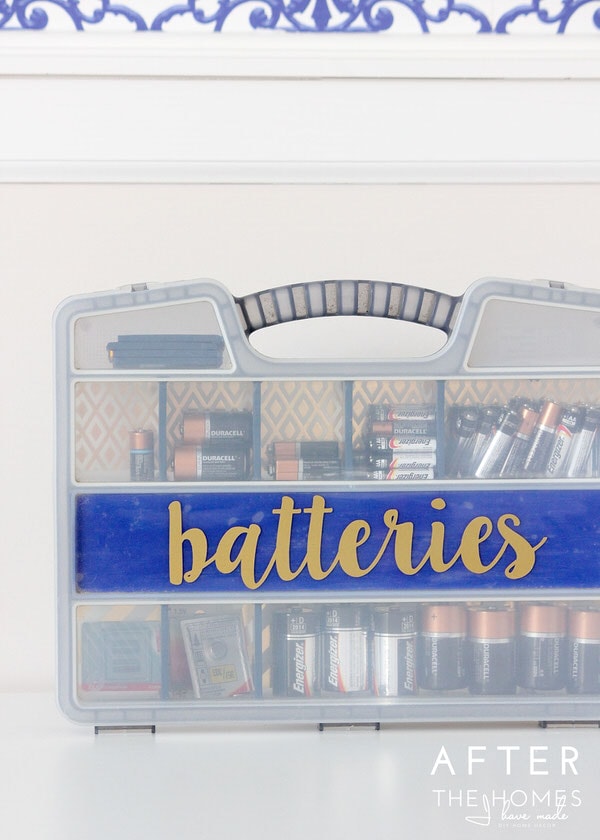
When I was trying to figure out a better way to store our batteries, I remembered my friend Jen’s post. I was literally about to empty one of my craft boxes to copy her when I remembered we had a single-layer hardware organizer sitting empty out in the garage. I sure love to purge, but I almost always hang on to organizers. I’m so glad I did because look at how well this adjustable toolbox fits batteries!
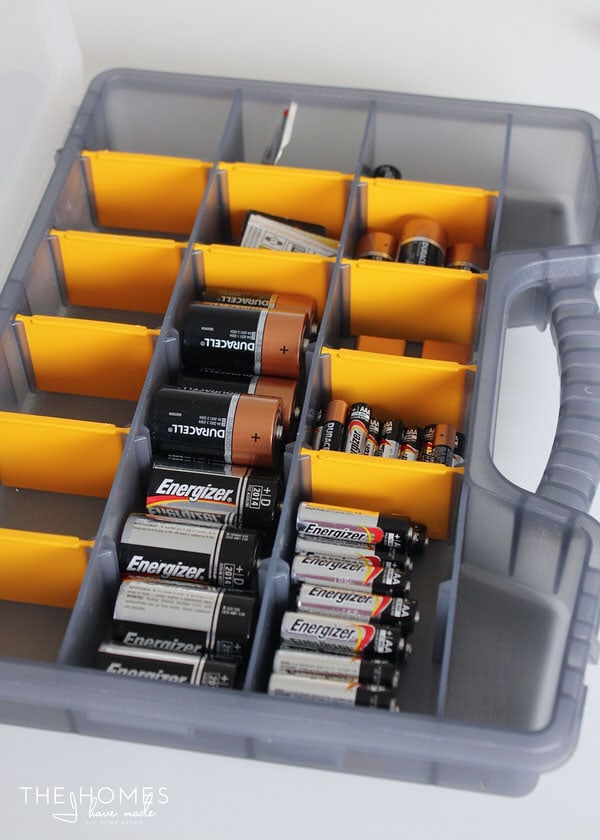
At first, I loaded in all the batteries, got rid of all the trash, snapped the case shut and called it a day. But if you guys know me at all, you can guess that the bright yellow dividers were really, really bugging me. So….I gave it a makeover (of course). Some paper and tape later, here we are:
Now…admittedly, this project errs on the side of “Seriously? You made over a hardware box? Do you have nothing better to do with yourself?”
Trust me, I was saying the same things to myself the entire time I was working on it. I’m often saying I don’t have time for anything these days, but this was one of those projects that just made me happy and I really wanted to do it…so I did!
Want to save this post?
Supplies Needed
- Single-layer hardware organizer with adjustable dividers. (The one I used is no longer available, but THIS ONE
 is similar!)
 - Patterned Cardstock – (I used paper like this.)
- Washi sheets or Duck tape (to cover the plastic inserts)
- Roller adhesive or double-stick tape
- Vinyl (optional, for the label)
- Tools: scissors/paper trimmer, e-cutter (optional)
 is similar!)
Decorating the Battery Case
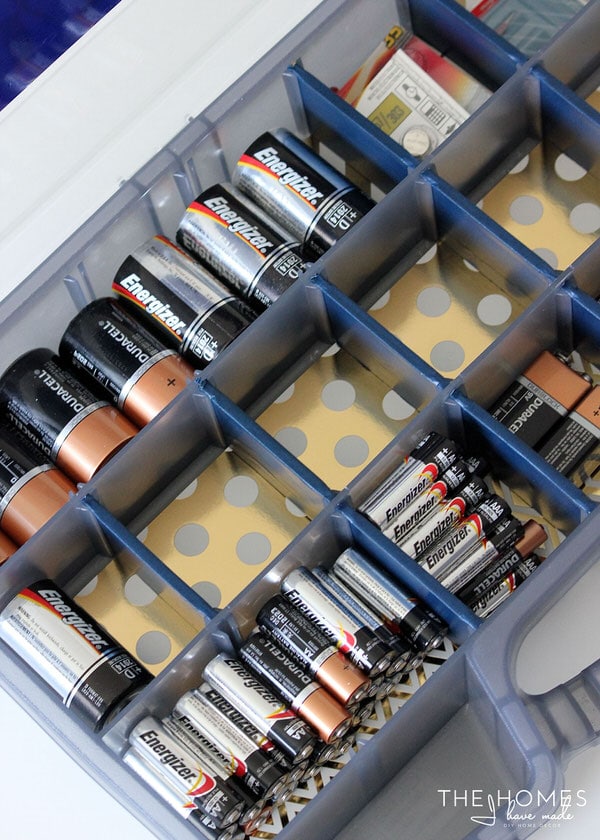
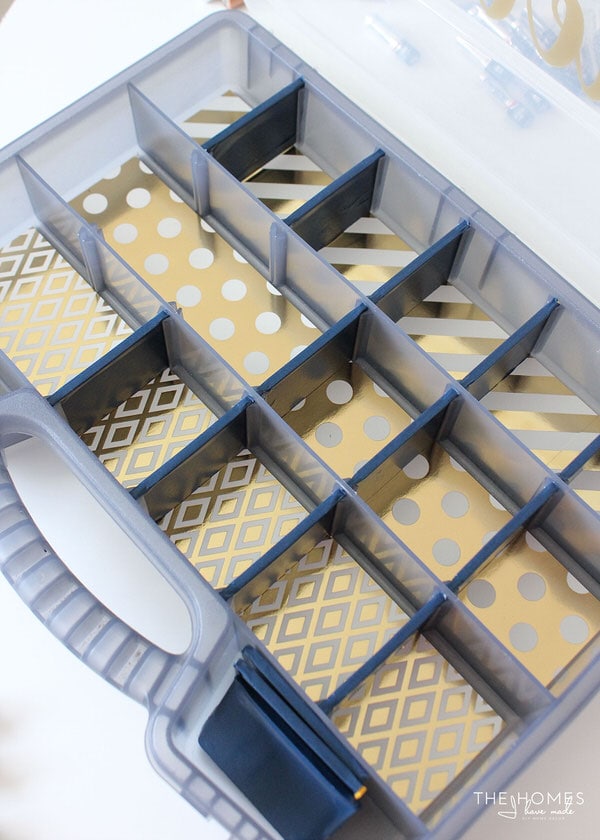
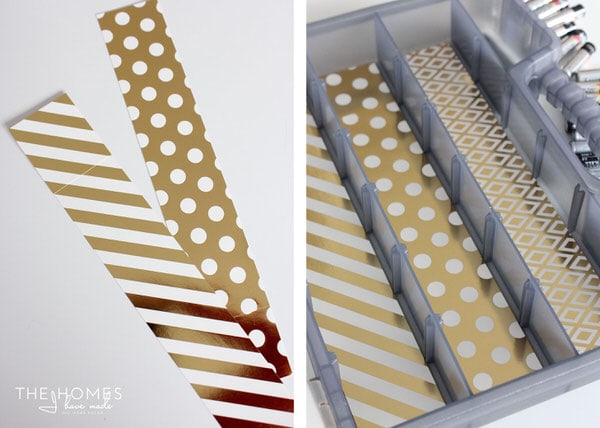
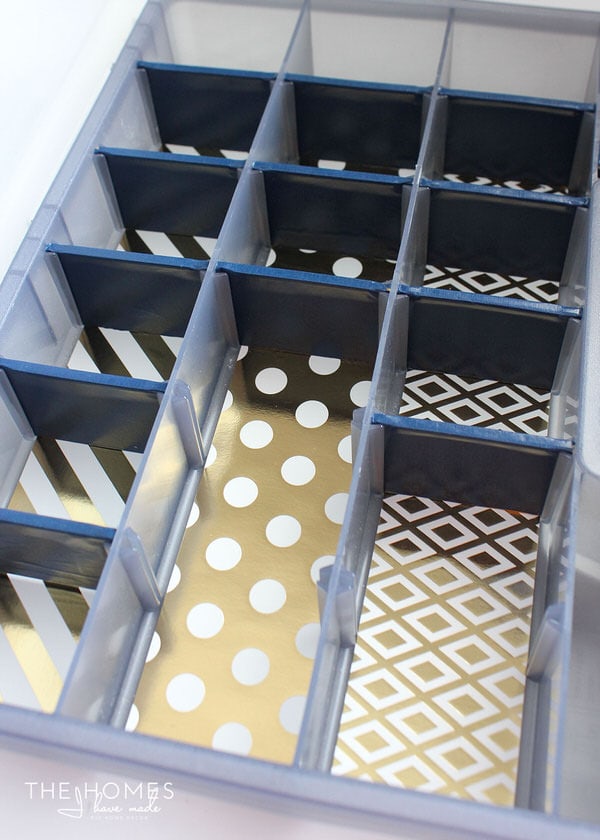
Start by removing whatever dividers come out of your organizer and measuring the base of each compartment. Using a paper trimmer, cut down sheets of patterned cardstock to dimensions that will comfortably fit into the base of each section. Secure the papers with double-stick tape.
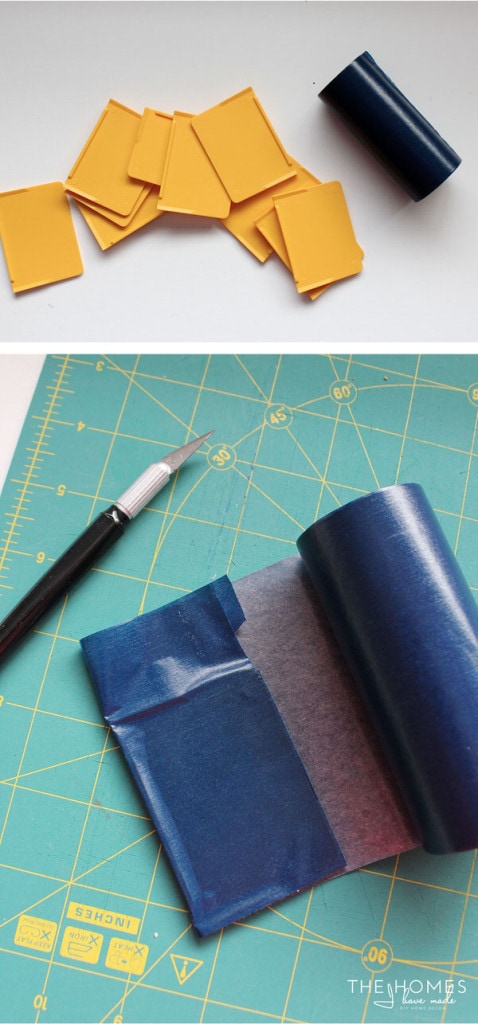
The splash of pattern along the bottom of the organizer was just for fun, but it was really the yellow dividers that bothered me the most. At first, I thought I would just have to embrace the color, but when I realized the extra-wide washi tape I had on hand from my Rugby-Striped Dresser Makeover stuck really, really well…I decided to give it a go! You should be able to do the same with Washi sheets, Duck tape, etc.
Don’t worry about wrapping the dividers just right. Simply wrap each one in the tape and then trim away the bottom and side excess with a craft knife. The tape should cling to all the ridges on the dividers just fine, and they should still slide into their slots with ease.
Here is how my organizer looks with paper liners and tape-wrapped dividers…
Loading the Battery Kit
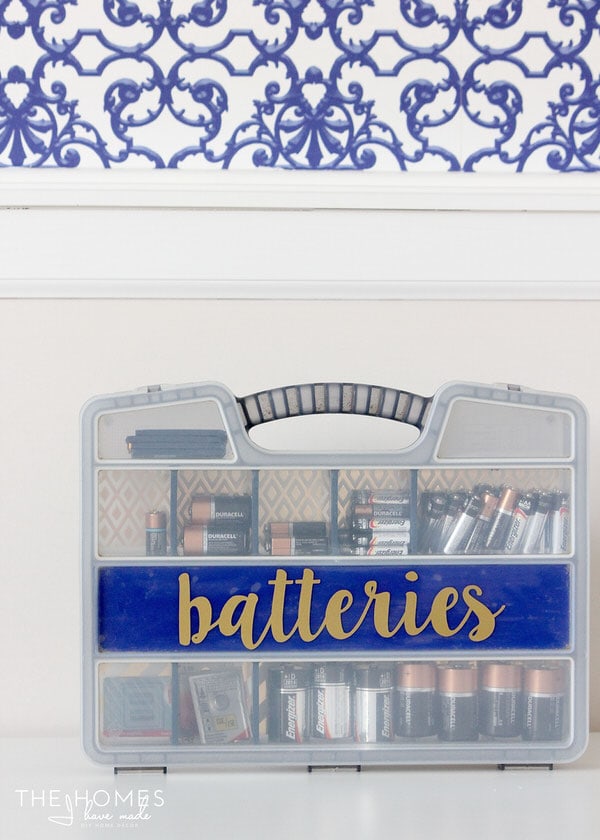
The last step is to fill up your organizer with your batteries. Adjust compartment sizes to best fit the size and amount of batteries you have. If desired, label the sides of the compartments with a label maker. I chose not to label them (shocking, I know!) because batteries themselves are labeled, and I want to be able to adjust the compartment size (up or down) and move things around based on how many batteries we have/buy.
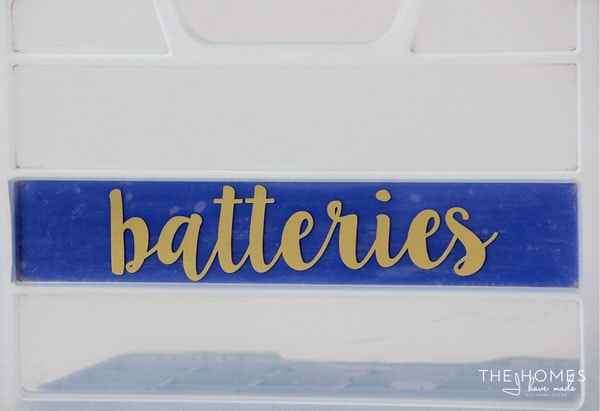
If you’d like, add a simple label to the outside of the box so it’s evident and obvious what’s inside. I cut my gold letters out of vinyl with my Cricut Explore, but you could get the same look with peel-and-stick letters from the craft store. The gold on its own wasn’t bold enough, so I added a strip of blue vinyl to the inside of the lid to help it pop.
If you need help making vinyl labels, see my tutorial HERE!
Not only are our batteries now sorted, easy to find, and access, but we have a pretty happy battery kit to boot!
How do you store your batteries? Have you come up with other creative uses for these hardware organizers? Do you think you might give this one a try? Be sure to let me know what you think in the comments below!
Megan
22 Comments on “How to Organize Batteries with a Battery Kit!”
Hi Megan. Happy Valentine’s weekend. This is a great way to,store batteries. However, based on your picture I am concerned about how the 9volt batteries are stored. It looks like the terminals (the knobby things on top) are exposed. If these should bump into other things, or each other they “could” cause a fire. Fire experts recommend covering the terminals with electrical tape, or the batteries should come with a little black snap on cap, or else store them in their original packaging. Please research this on the Internet. Jen from I Heart Organizing did a post prior to the one you linked in your post today and several of her commenters noted the same fire hazard.
Have a great weekend!
Hi Laurie!
Happy Valentine’s Day weekend to you too! Thank you so much for this warning. I seem to remember reading something about the 9 V batteries, so I will definitely look into storing them in safer way. Appreciate your concern and hope you have a great rest of the weekend!
Megan
I was just going to mention the 9V batteries too but for a different reason. I don’t know if metallic washi tape has any actual metal in it but 9V batteries will spark a fire if the terminals come into contact with metal.
Hi Meresu!
Thanks for your thoughts here! Since reading everyone’s comments, I have since covered the terminals of the 9V batteries with electrical tape. My husband (who used to work with lighting quite a bit) has looked over everything and said we’re safe!
Appreciate your comment! Happy Sunday!
Megan
Okay, yes, this is a crazy over the top thing to do just for batteries. And I LOVE IT!!!! I question my sanity when I do stuff like this but the giddy joy it brings me totally outweighs the crazy part. 🙂 I used my Cricut to label my fridge and my husband thought I’d officially lost my mind (he wanted to know why I stopped at labeling the actual apples). I actually just cleaned out my junk drawers in the kitchen and wanted something like this for my batteries but couldn’t find anything that wasn’t lidded so I’m still using another clear bin until I find the perfect setup. Also, yes on the 9 volts. I read about them catching fire a long time ago and they scare the daylights out of me! I store them so they don’t touch but think I’m going to add electrical tape to them today to be safe!
Hi Kara!
Okay, your post TOTALLY made me laugh oh loud. Not making fun of you at all, only because I am the exact same way. My husband is always making fun of me labeling things that are obvious/in plain sight, lol. You and I must be cut from the same cloth 😉
I’ve since covered my 9Vs in electrical tape, so now this solution is not only cute and effective but also safe!
Thanks for reading and hope you have a great rest of the weekend!
Megan
Hi Megan
Once again what a nice project! I haven’t as many batteries as you have so I keep them in their packaging. I can inspire me from this to organize some tiny things. What about the lights bulbs, I find it hard to organize them. I keep the most used ones in a deep round box and the other ones in the garage. I hope you spent a nice week-end. Michèle
Light bulbs are indeed tricky! We store them in a basket in our linen closet, that I will be showing you soon so keep your eyes out for it!
Megan
You can even make battery storage look cute! You’re totally my hero! 🙂
Lol! Thanks, Karen! Sometimes it’s the completely un-necessary and totally ridiculous projects that make me the happiest! Glad you enjoyed the post and thanks for spreading the love!
Megan
That is crazy cute and I love it. Those projects are always great to work on, crazy or sometimes unnecessary but SO necessary am I right? Also who cares?! If it makes you happy no matter how crazy it seems that’s all that matters 🙂
Great work!
Lauren | Lovely Decor
xx
Megan,
I was wondering, what font did you used for the “battieries” label on the outside?
Thank you!
Hi Maggie!
Pretty sure I used Lily Belle: http://www.dafont.com/lillybelle.font
Good luck!
Megan
I love how you jazz everything up! Anything and everything can be art! I also love this idea. I have had a battery organizer in my amazon cart for about a year. I just can’t justify buying it. I have an empty box like this in my basement right now so this is happening tomorrow!!!
This would make a great gift for a wedding gift or graduation (filled with batteries of course).
Absolutely love it!
Can’t think why I haven’t done it before! Thanks
What a great idea! Can’t wait to try it. My husband uses so many for his different remotes. I buy my batteries at Costco which I organize in small boxes. That graduated to using the big boxes of Band Aids you can also purchase there. Do you have any suggestions for storing the used batteries? Here in the San Diego area, it’s against the law to throw batteries in the trash. And you have to pay the recycling companies to take your used batteries.
Great tips, and I understand making it pretty!
Rima – In San Diego, Home Depot has a bin by the entrance door to drop off used batteries and light bulbs. I have a small box where I collect them until I am going there! I also keep a battery tester with the box (and the box of batteries) so I can make sure they are actually dead before throwing them out.
My husband did this a few years back. This is one small organizing project that has big payback! And it’s quick. I recommend everyone to at the very least keep all their batteries together. Then you don’t waste time trying to remember where you put that pack of batteries
Thanks for chiming in here, Diane!
This project is still one of our best evers, because like you said, it makes life easier over and over!
I love this idea. And just had a question. You indicated that you’ve used this style organizer container for your batteries as well as picture hanging item. Where do you put these containers? (e.g., where & how do you keep them….are these kits all together in one location?
I’ve been using the plastic storage cases (individual) – e.g. crayon box, pencil case…the ones that can come in different colors and/or clear. The bottom case has handles that overlock the lids. And I kept these individual containers in a drawer in the kitchen….but they basically take up the whole drawer.
You’re idea might be a better choice….but I would just need to find a “home” for the organizer..and wondered where you co-locate the organizers.
Hi Mary Jo!
We have a skinny cabinet in our laundry room where they stand up nicely. You can see them here: https://thehomesihavemade.com/rental-laundry-room-makeover/#Laundry_Supply_Organization
Hope that helps!
Megan
Very practical! Every home needs one. The one thing missing in my opinion, though, is a battery tester. Also, what do you do with partially discharged batteries? I seem to wind up with a number of these. When a device breaks I can’t just throw away the batteries, but I don’t want to mix them in with new ones either. Switching to rechargeables has solved a lot of my battery woes.