How to Use Cricut Design Space | A Breakdown for Beginners
When you think about making a project with a Cricut machine, there’s a good chance you immediately think about loading mats, pressing buttons, and cutting beautiful materials. But before any of the physical magic actually happens on your machine, you must first design your project in Cricut’s software: Cricut Design Space. Using Cricut Design Space is not hard; but it’s also where many beginners get overwhelmed, frustrated, and ultimately walk away. So today, I’m breaking down all the Cricut Design Space basics. I’m covering what it is, why you have to use it, and how to navigate the software in order to make your first few projects. There’s a lot to learn; but I promise it will all come fast, and you’ll be feeling confident in no time. Let’s get to it!
This is a sponsored conversation written by me on behalf of Cricut. The opinions and text are all mine.
What Is Cricut Design Space?
Cricut Design Space is Cricut’s proprietary design software (and corresponding app). It is required in order to:
- Set up your new Cricut machine
- Register your new Cricut machine
- Update your Cricut machine with newly-released updates
- Design your projects, and
- Run your Cricut machine in order to make your projects
When using a Cricut-brand cutting machine, Cricut Design Space is not optional nor is there any other program you can use. In fact, you will be prompted to install it as as part of your initial machine setup and product registration.
What Devices Support Cricut Design Space?
The Cricut Design Space software is available for both Windows and iOS operating systems.
The Cricut Design Space App is available for both Apple (iPhone, iPad) and Android devices.
Installing the Cricut Design Space Software/App
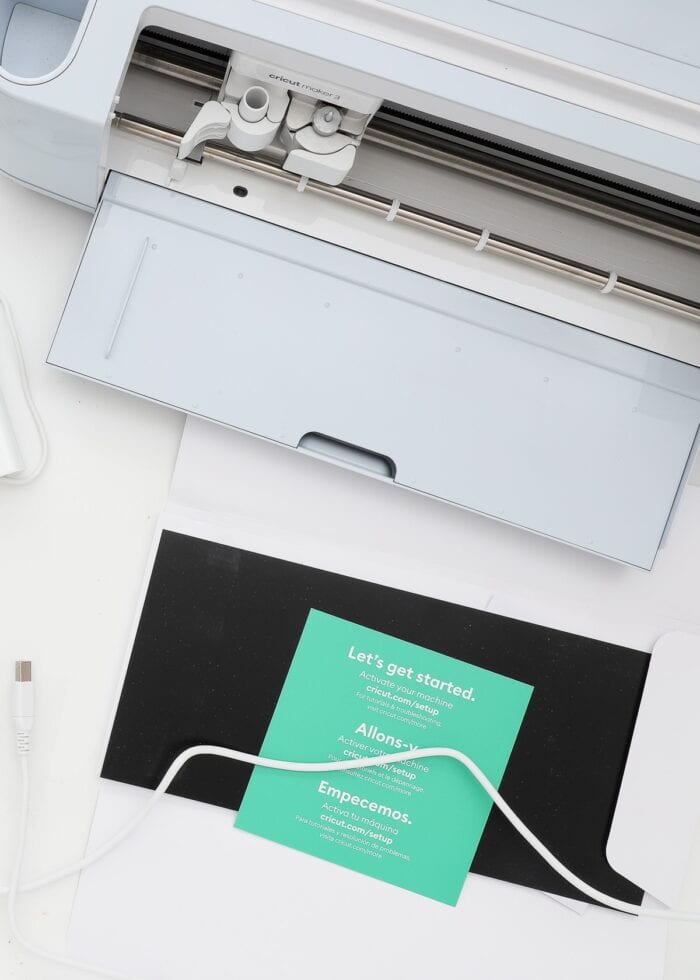
When you first unbox your new Cricut machine, the get-started guide (from inside the box) will prompt you to download the appropriate software for your device and create a Cricut Design Space account. If for some reason, you need to re-install the software, you can download both the software and app HERE.
Are the Desktop and App Versions of Cricut Design Space the Same Thing?
Mostly. A vast majority of the functions and tools available in the computer-based software are also available in the app. However, the two platforms do operate a bit differently, so you will need to learn how to navigate each one. There are a few tools (e.g., curved text) that are not supported in the app, but updates to the mobile software are improving every day.
Additionally, you can save your projects “to the cloud,” meaning you can open, design, and run your projects from either the computer software or the mobile app at any time.
How Much Does Cricut Design Space Cost?
The Cricut Design Space software and app are free to download and install on your computer, laptop, tablet, or mobile device. As such, getting set up and running your machine does not require any additional payments.
So, What Does Costs Money in Cricut Design Space?
What does cost money within Cricut Design Space are the images and fonts you may want to use on your projects. A vast majority of Cricut image and fonts require follow-on payment, typically ranging from $0.99/image to $4.99/font, and $29.99+ for an entire “set” of images.
Purchasing images and fonts can be done on an a la carte basis (i.e., one at a time as you need them), as a set, OR you can purchase a Cricut Access Membership to have access to the entire Cricut Design Space Image Library for a monthly/annual fee.
What is Cricut Access?
Cricut Access is essentially “membership” access to most of the images and fonts within the Cricut Design Space Library. Instead of paying for individual graphics as you need them, you instead pay a monthly or annual fee in order to access everything. If you create a lot and/or don’t enjoy being charged for every single design you use, a Cricut Access Membership is more than worth it!
Can I Use Cricut Design Space for Free?
Yes! While most images and fonts will have a charge, there are lots and lots of images and fonts available to cut for free within Cricut Design Space. Cricut also “releases” free images weekly, and you can upload images you download from other sites (e.g., Etsy, blogs, Creative Market, etc). To learn more about all the free options within Cricut Design Space, check out this comprehensive post: How to Find Free Images and Fonts for Cricut Design Space.
Do I Have To Use Cricut Design Space?
Yes. If you are a Cricut machine owner, the only way to set up and use your machine is using Cricut Design Space and/or the Cricut Design Space App. From desinging your project to knowing which accessories to put in when, Cricut Design Space is necessary to complete your project literally from start to finish.
NOTE: Cricut Joy users can also use the Cricut Joy App to make projects; however, this app also connects with your main Cricut Design Space account.
Cricut Design Space is a very powerful program with new features being added constantly. You can easily get overwhelmed with every tool and technique available. That said, after helping new Cricut users get started with their machines for years, I know exactly which features you need to master in order to make your first few projects and build up your confidence.
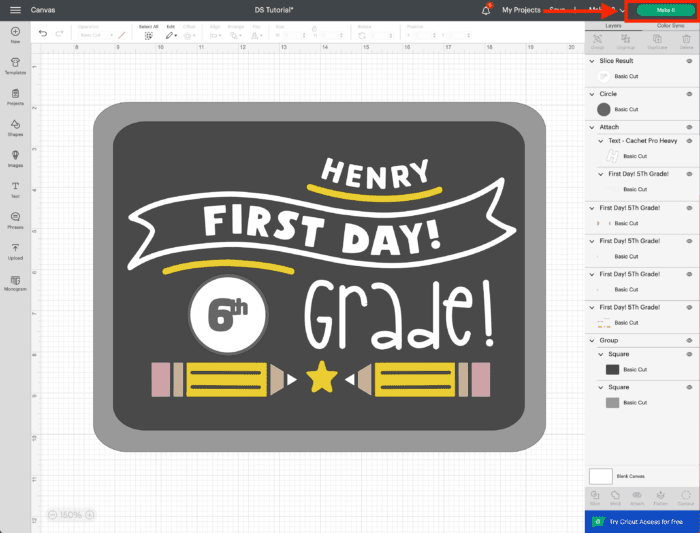
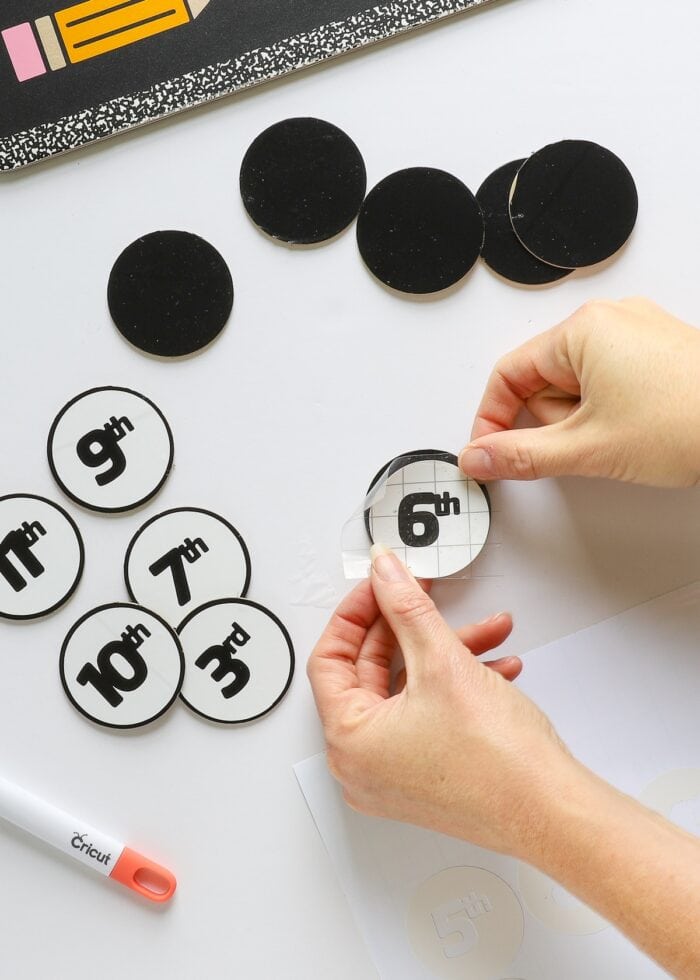
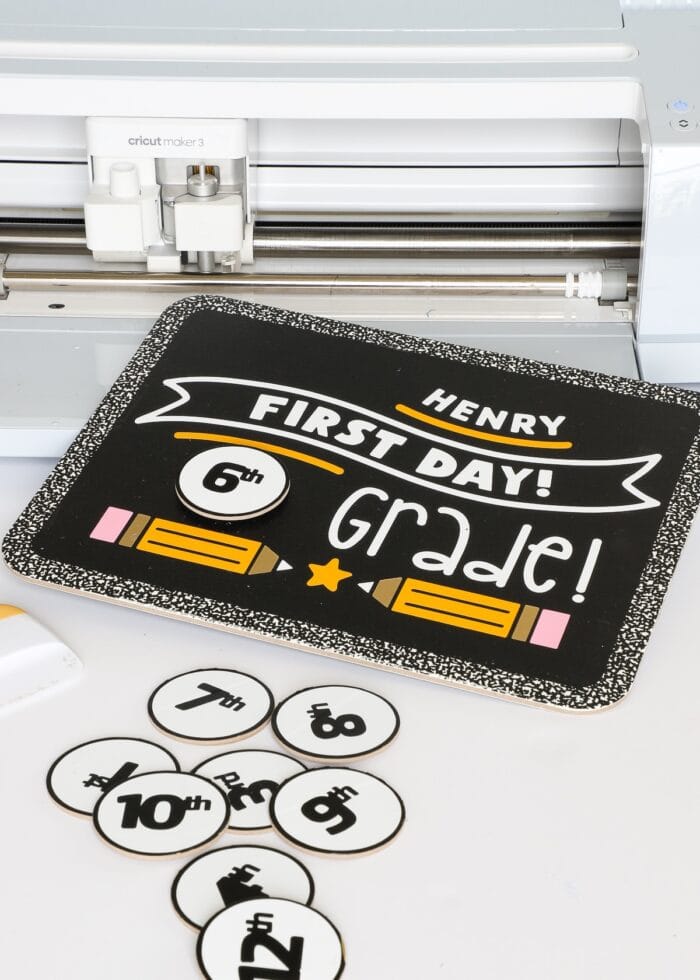
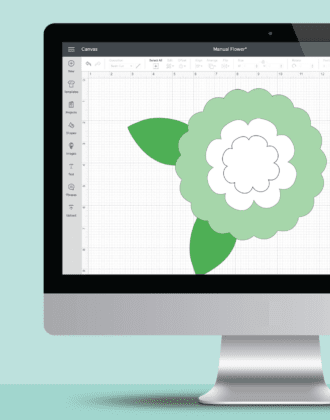
The remainder of this tutorial is going to walk through a sample project (this adorable “First Day of School” sign!) to show you how the software can be used in countless ways to bring your creations to life!
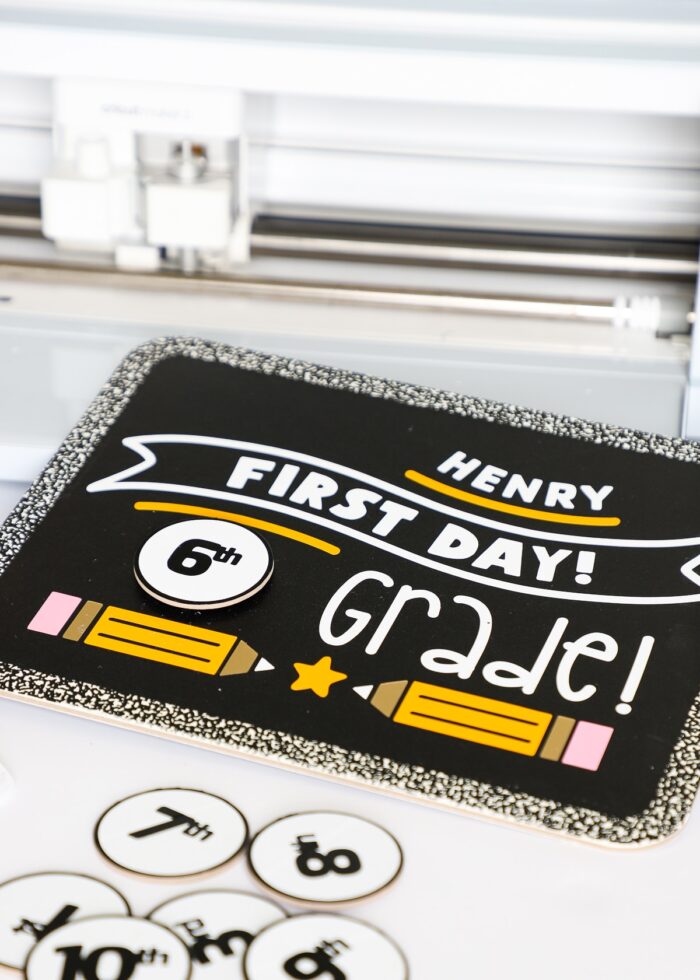
Full Assembly Instructions: DIY (Changeable) First Day of School Sign
Starting a New Project in Cricut Design Space
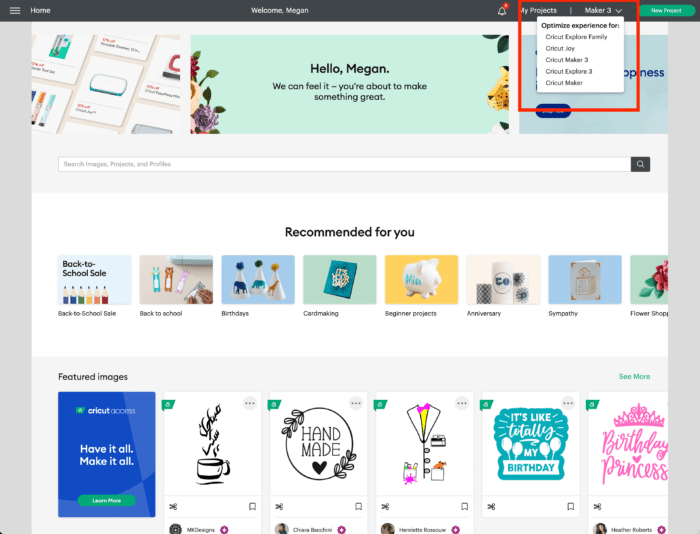
Machine Selection
When you purchase a Cricut machine, you will connect it to your Cricut Design Space account as part of the setup process. In the upper righthand corner (of any screen) in Cricut Design Space, you should see your machine designated. If you own more than one Cricut machine, make sure you select which machine you will be using for your current project, as various tools within Cricut Design Space will vary based on machine.
How to Find Cricut Access Projects
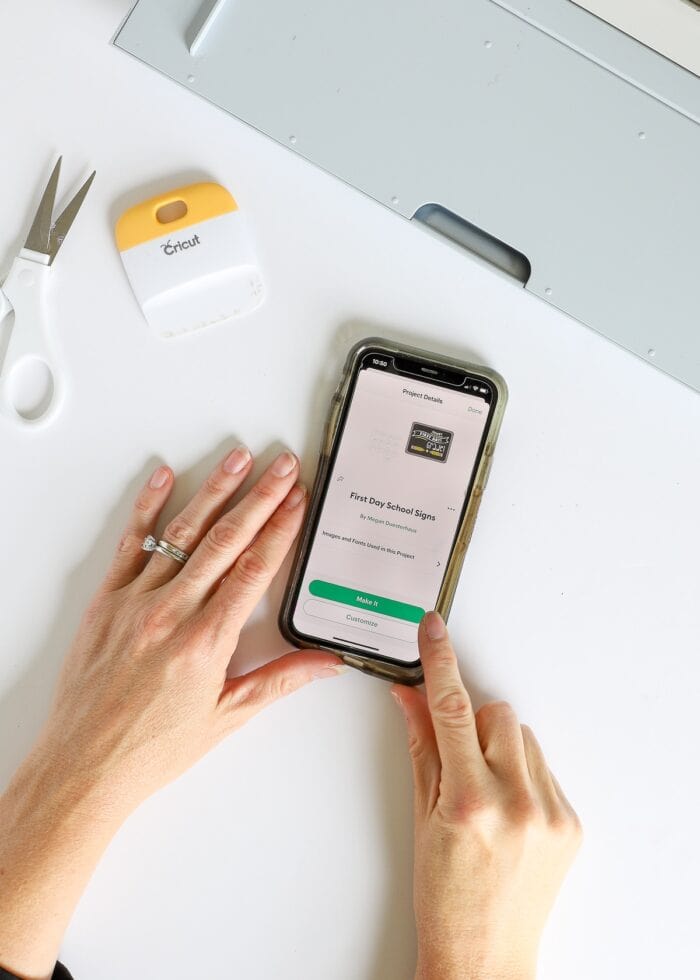
If you are brand new to the world of Cricut crafting, one of the best ways to get familiar with how your machine actually works (without getting overwhelmed by the software) is to make a Cricut Access project…projects that our friends over at Cricut have designed. All you have to do is follow the on-screen directions to cut and assemble!
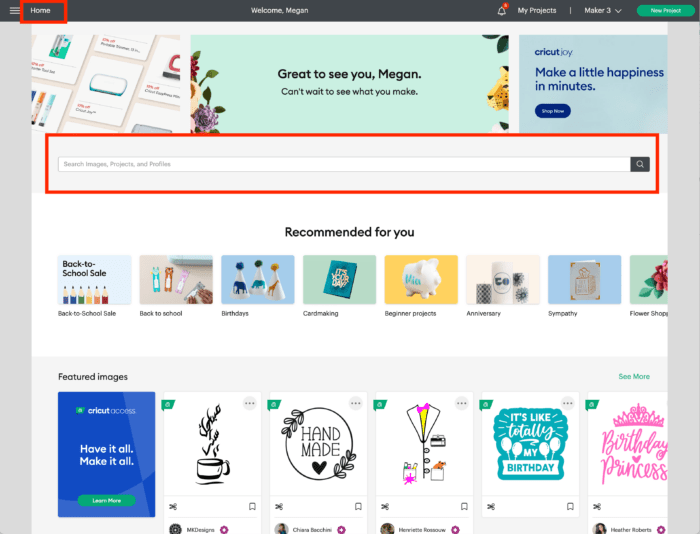
In order to find a “ready to make” Cricut Access project, visit the “Home” screen within Cricut Design Space. You can then browse all the image tiles or find a particular project type/theme/category using the search bar.
How to Start a New Project From Scratch
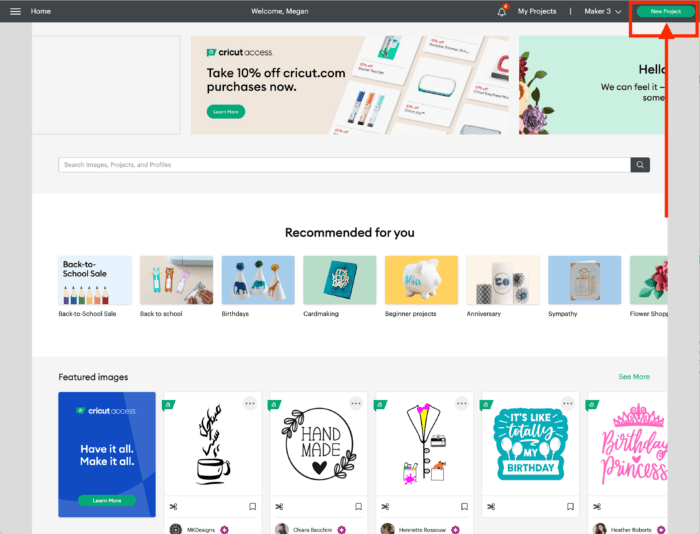
When you are ready to dive in and make your very own design from scratch, you’ll want to start a “New” project. You can do this one of two ways:
- From the Home screen: click the bright green “New Project” button in the upper righthand corner
- From the design canvas: click the plus symbol button (+) in the upper lefthand corner
How to Select (Or Make) a Template
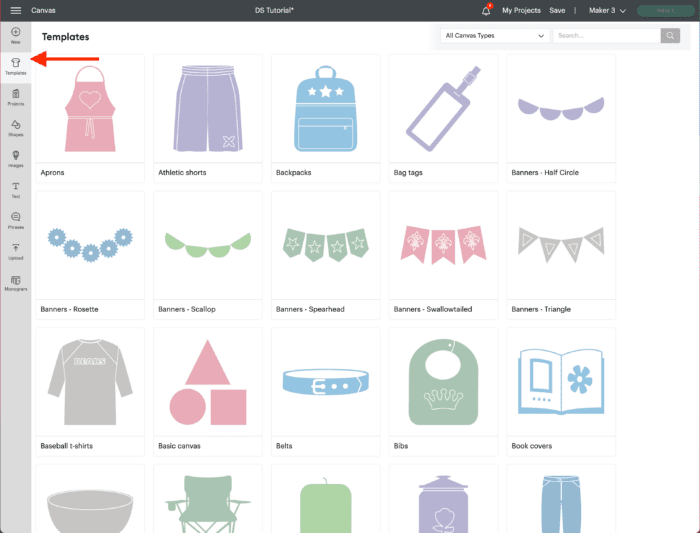
If you are just getting started, you might find it difficult to gauge the right size and shape for your design. As such, I recommend using an on-screen “template” to help you visualize how different elements look together. Cricut has provided dozens of “standard” templates (e.g., apron, t-shirts, tote bag, etc) that you can access by clicking the “Templates” button on the left hand side. These outlines will load on your design canvas but will not cut.
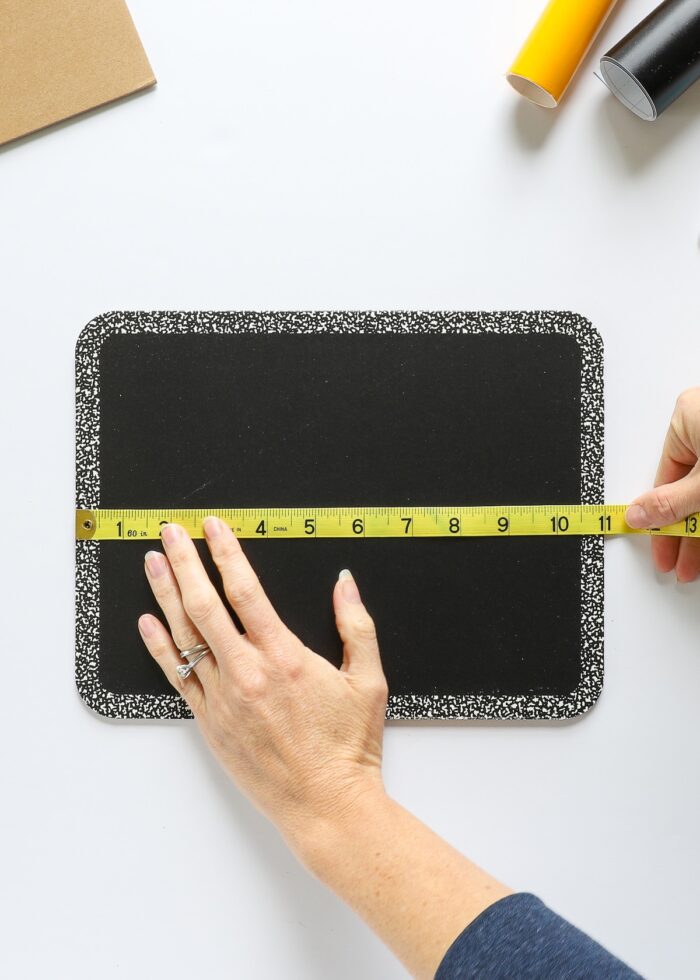
If one of the pre-designed templates doesn’t work for your project, you can also make your own guide. I will often measure my blank (the item I am putting a design on)…
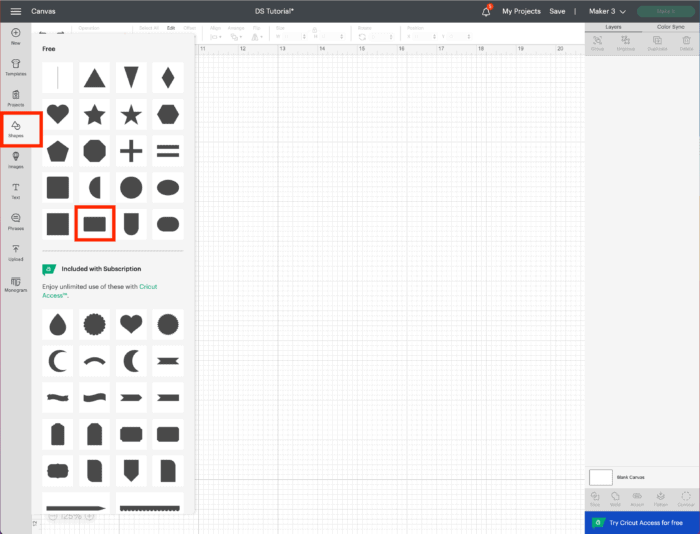
…and then use shapes from the Shapes menu (access via the lefthand toolbar) to create a matching template.
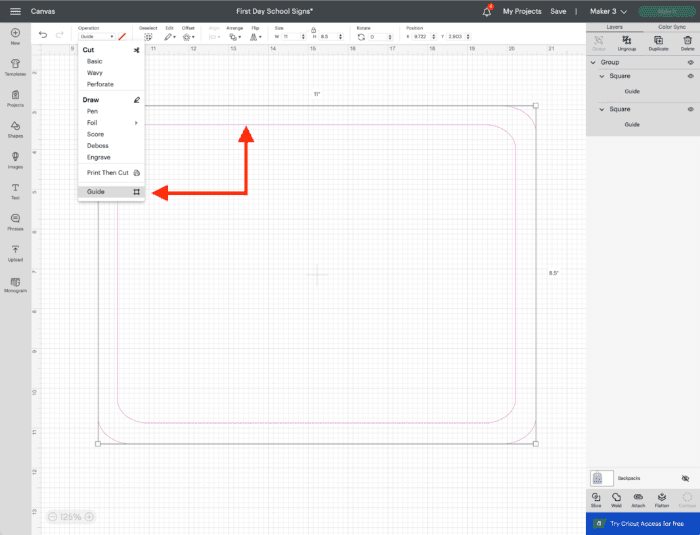
By setting these layers to “Guide” in the Operations menu (more information on this below), your template will be reference only and won’t actually cut.
Saving Your Cricut Project
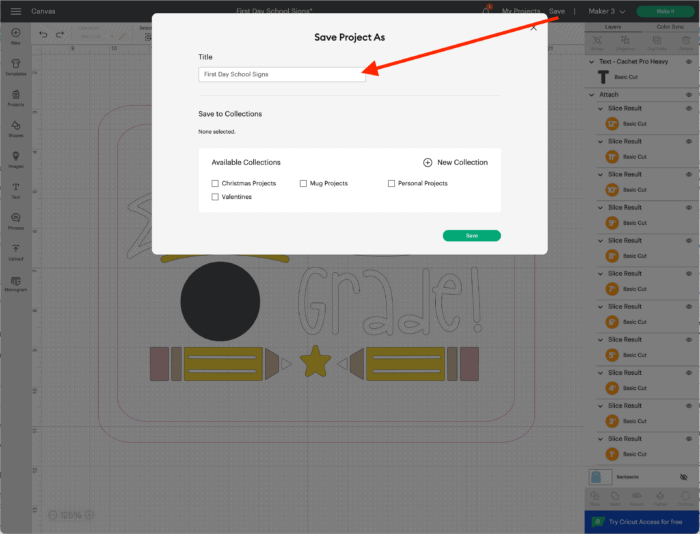
Your Cricut projects can be saved at any time using the “Save” button in the upper right-hand corner. In order to keep your Cricut Design Space account organized and be able to find projects easily, consider making collections of similar projects (available directly on the Save screen).
Adding Images to Your Project
The foundation of almost all Cricut projects is Images: the designs you want your machine to cut, draw, etc. Although you can upload your own images (SVG, PNG, and JPG files), the easiest and quickest place to start is right within the Cricut Design Space Image Library.
How to Search For Images in Cricut Design Space
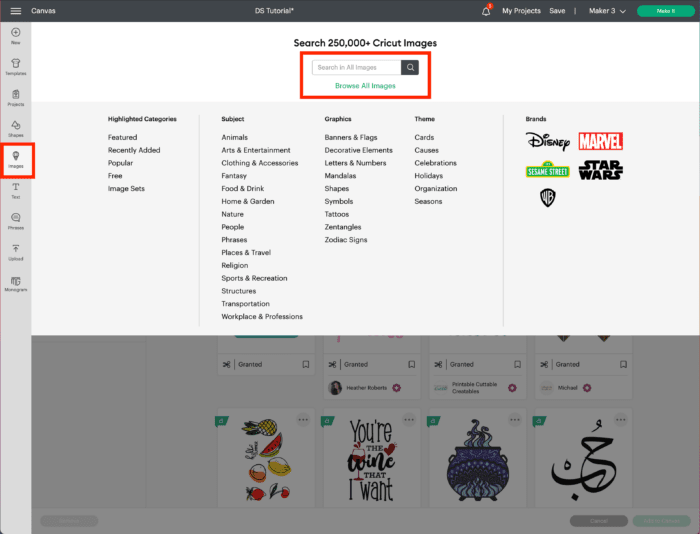
Access the Image Library by clicking the “Images” button on the lefthand toolbar. Then type in your search term into the bar in order to bring up a variety of applicable images.
How to Add Images to Your Design Canvas
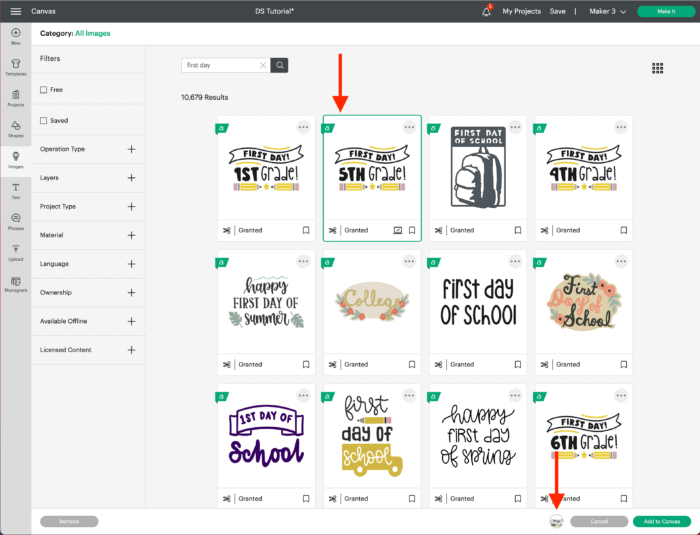
As you find images you like, click on them in order to select them. A green frame will appear around them, and they will populate along the bottom of the screen. At any time, you can click those bottom images to remove them from the queue. You can conduct multiple searches and collect dozens of images (if desired) before adding them to your canvas. Once you are ready to place all selected images onto the canvas, click the green “Add to Canvas” button.
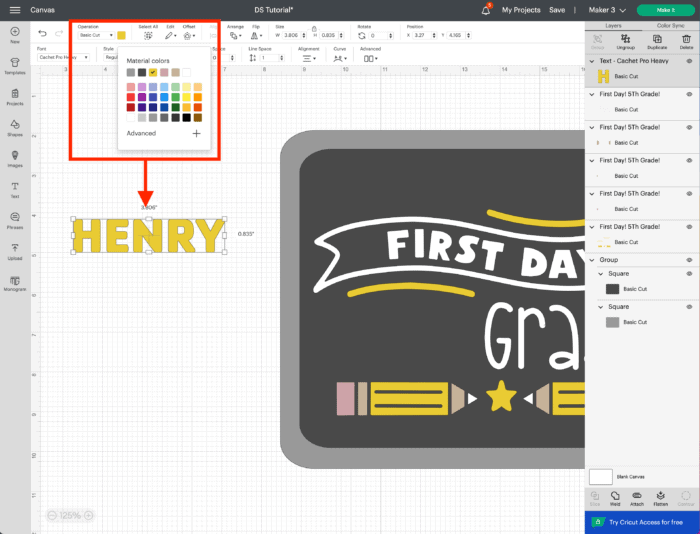
How to Change Image Color
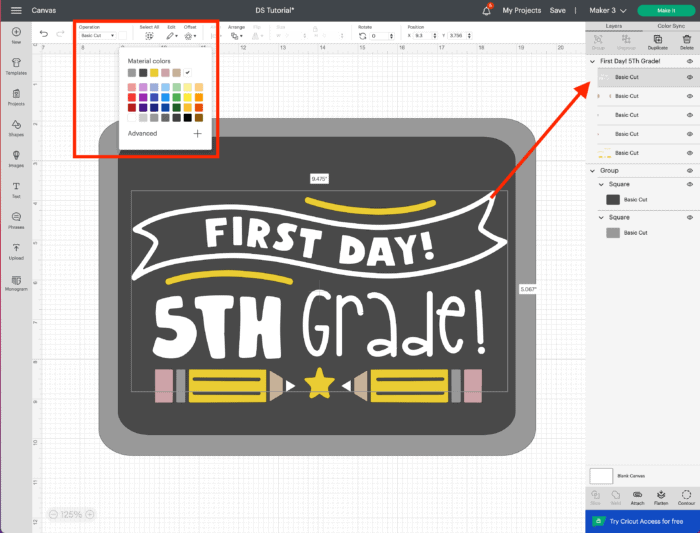
Every image within Cricut Design Space will pre-populate on your canvas in pre-set colors, but they can easily be changed to your liking! Simply click on the particular element (referred to as “layer”) you want to change in the righthand Layers Panel. Then navigate to the Operation menu along the top toolbar, where you will also see a colored block. If you click on the colored block, you will be able to change that layer to any color option shown.
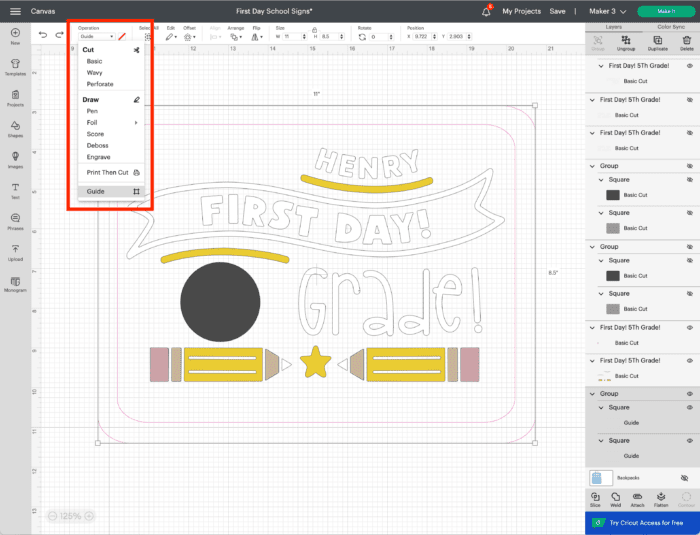
How to Change Image Operation
“Operation” is the term Cricut uses to designate how a particular image is created. The options will change based on what machine you have, but can include:
- Cut – Layers that are cut out, usually with the Premium Fine-Point Blade, Knife Blade, or Rotary Blade.
- Draw – Layers the machine will create using Pens or specialty tools like the Scoring Stylus, Engraving Tip, Debossing Tip, or Foiling Tool.
- Print Then Cut – Layers that are first printed onto paper with your home printer and then cut out with your Cricut machine. Learn more about using the Flatten Tool to make your images “printable” here: How to Use Print Then Cut In Cricut Design Space.
- Guide – Give any image a light pink outline to serve as a template; these guides are for on-canvas designing only and won’t be created by your machine.
Any layer can be changed to any operation by clicking on it in the righthand Layers Panel and then changing the operation from the dropdown menu in the top toolbar.
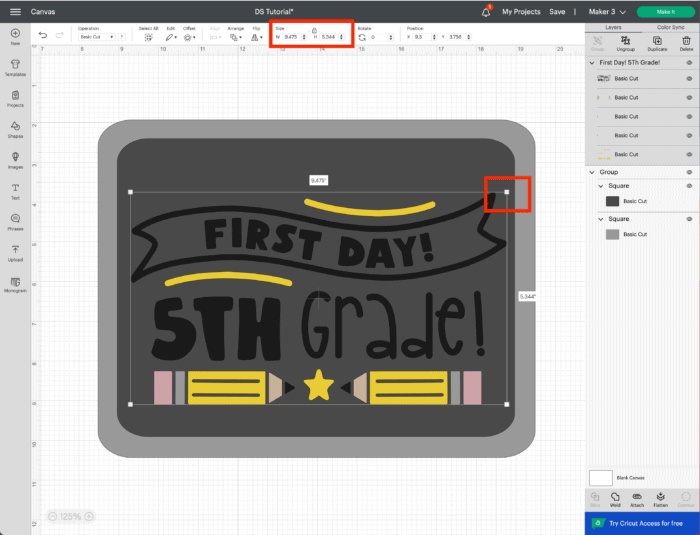
How to Adjust Image Size
At any time, you can re-size any layer on your canvas by doing either of the following:
- Click on a corner handle of any layer and drag to your desired size.
- Manually type specific dimensions into the “Size” specifications in the top toolbar.
How to Adjust Image Position
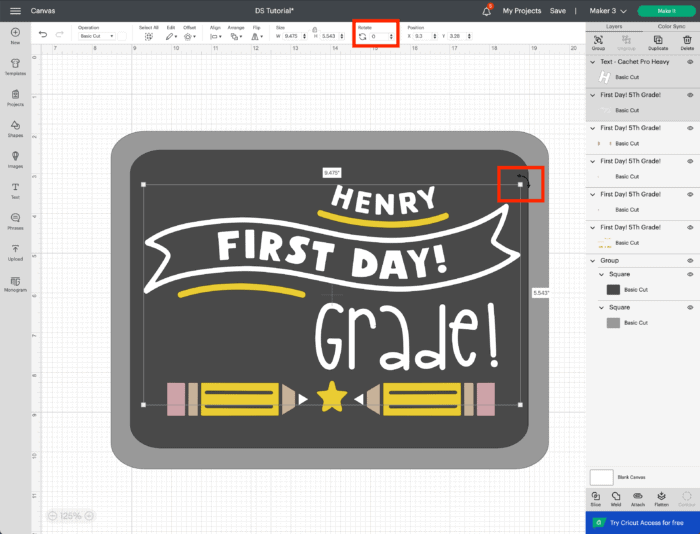
Rotating Images
You can rotate any element on your canvas by doing either of the following:
- Hover over a corner handle of any layer until a curved arrow appears. Move the arrow side-to-side to rotate the design.
- Manually type specific rotation degrees into the “Rotate” specifications in the top toolbar.
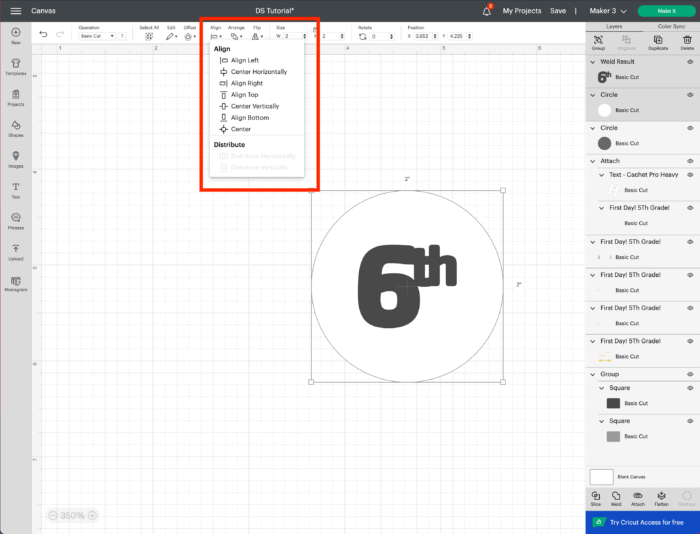
Aligning Images
If you have two or more images that you want in a particular alignment (e.g., all centered, all to the right, all to the left, etc), select the layers together and open the “Align” dropdown menu to chose your preferred layout.
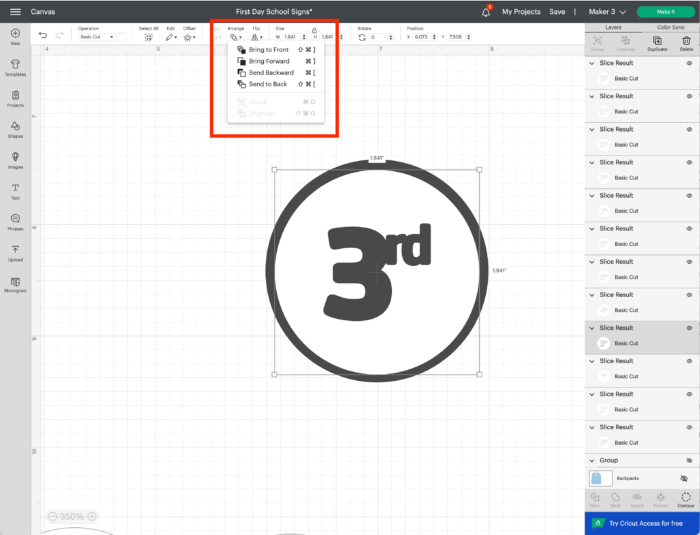
Arranging Images
Every time you add a new element to your canvas, it will automatically appear in front of existing layers. If you want certain elements to be behind or in front of others, select the layer then use the “Arrange” menu in the top toolbar.
Flipping Images
Images can be flipped, either vertically or horizontally, by using the “Flip” tool in the top toolbar.
Customizing Your Images
There are lots and lots of ways to change the look of any layer on your canvas (including ones right out of the Image Library). These are more “advanced” techniques; so if you need additional help, be sure to visit my follow-on tutorials.
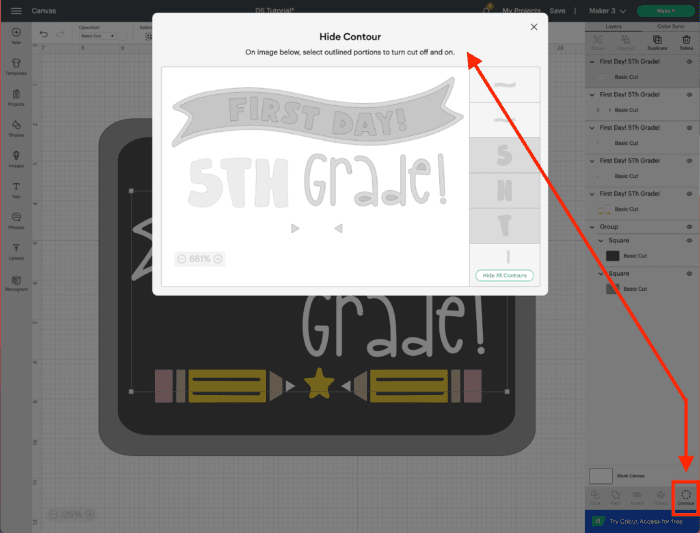
How to Hide Parts of an Image | The Contour Tool
If there is a certain element of a design you don’t want to include, you can remove it with the Contour Tool. For my sign, I didn’t want to use “5th,” so I used the Contour Tool to turn those elements off. At any time, elements can be turned back on. Learn More: How to Use the Contour Tool in Cricut Design Space.
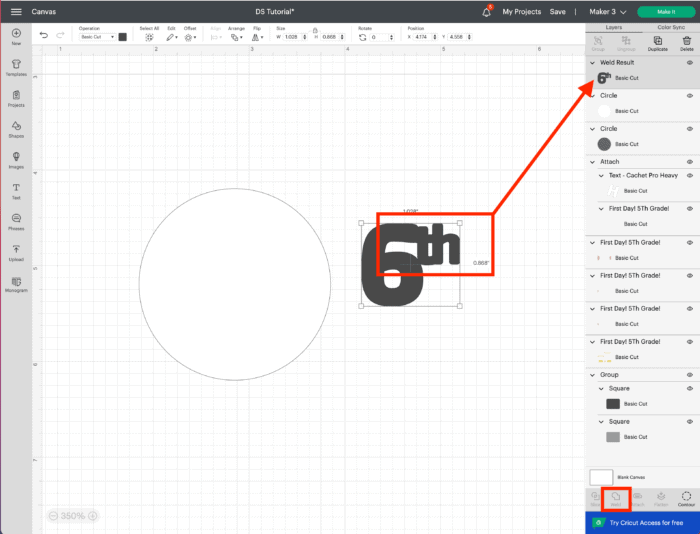
How to Blend Two Images Together | The Weld Tool
If you want to merge two images into one one solid layer, it is best done with the Weld Tool. Simply select all overlapping images (my 6 and th, for example) and click the Weld Tool on the bottom righthand toolbar to create one solid form. Learn More: How to Use the Weld Tool In Cricut Design Space.
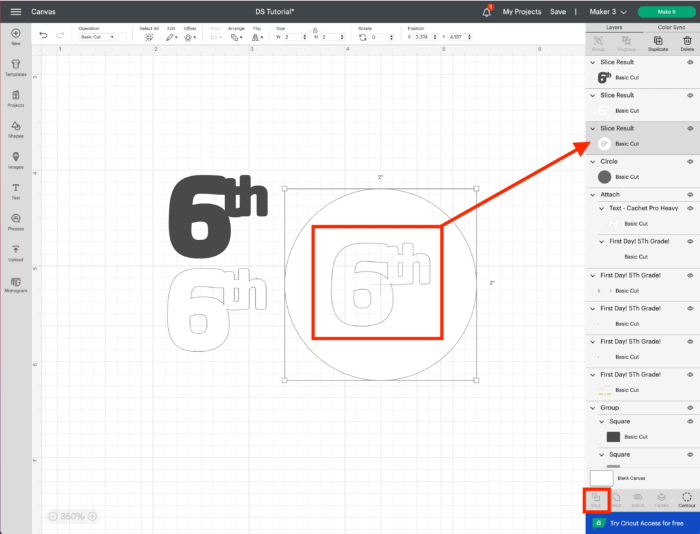
How to Slice Images Out of Each Other | The Slice Tool
If you want to cut one shape out of another (like cutting the 6th out of the white circle), select both shapes and click the Slice Tool in the bottom righthand toolbar. Delete out excess layers as necessary to reveal one shape cut into the other. Learn More: How to Use the Slice Tool in Cricut Design Space.
Want to save this post?
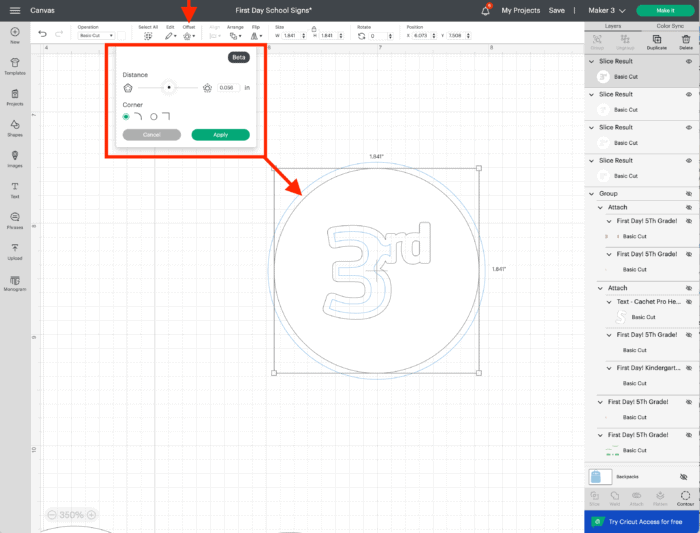
How to Give an Image an Outline
Any image (or text) can be given an outline layer by using the Offset Tool. With a layer selected, open the Offset Tool in the top toolbar. Then use the slider to determine the size of your outline and click apply to create a new layer. Learn More: How to Use the Offset Tool in Cricut Design Space.
Adding Text to Your Project
Apart from images, the other main element you will likely be adding to your Cricut projects is custom text. Just like with images, there are now lots of options for adjusting your text so that it looks just right!
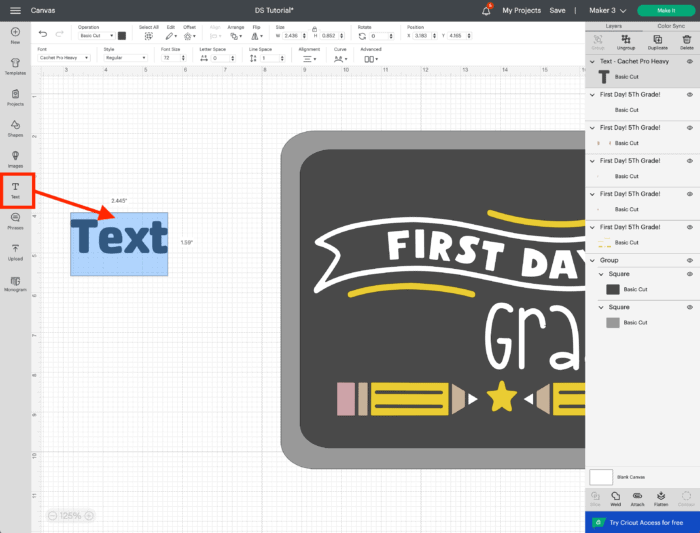
How to Type Text
To add custom text to your project, click the Text Tool in the lefthand toolbar. A blue box will appear into which you can immediately start typing.
How to Change Text Font
Most text will default to “Cricut Basic.” In order to change it, select the text and then open the Font dropdown menu in the Font Toolbar. Once you find a font you like, select it and your text will automatically change.
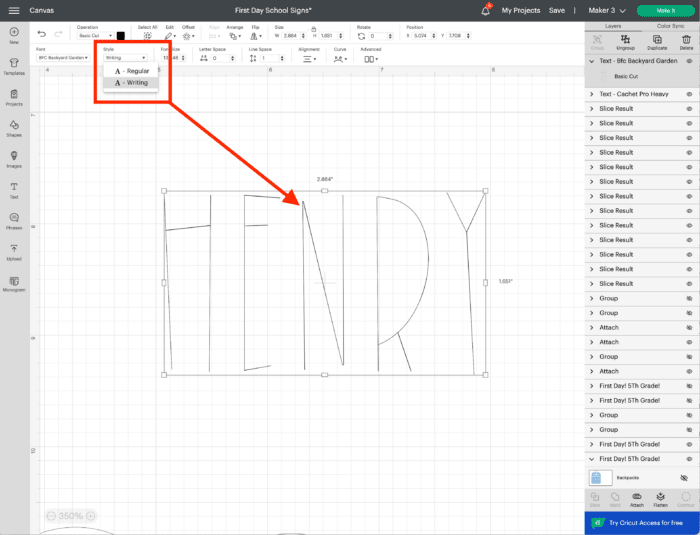
How to Make Your Text Look Like Handwriting
Almost all Cricut fonts will default to a “Cut” operation, which means your Cricut machine will cut the outline of each letter. If you want your letters to have a handwritten appearance (if you plan to create them with a Pen, for example), then you will need to change the font to “Writing,” which is under the “Style” menu in the Font Toolbar.
NOTE: Not all fonts have a Writing style available.
How to Change Text Color
Cricut text will default to a dark grey color. Easily swap it by selecting the text (either on the canvas or in the righthand Layers Panel) and open the color menu next to Operations in the top toolbar. Select any color you prefer for your project.
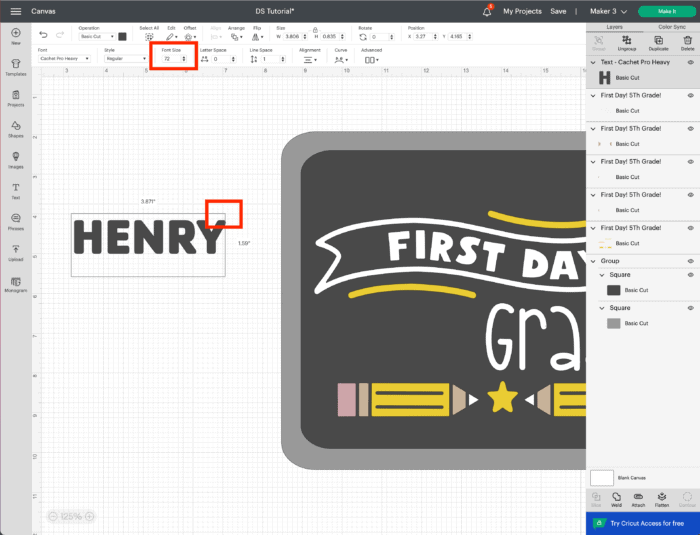
How to Change Text Size
At any time, you can change font size by doing either of the following:
- Click on a corner handle of any text layer and drag to your desired size.
- Manually type specific font points into the “Font Size” specifications in the Font Toolbar.
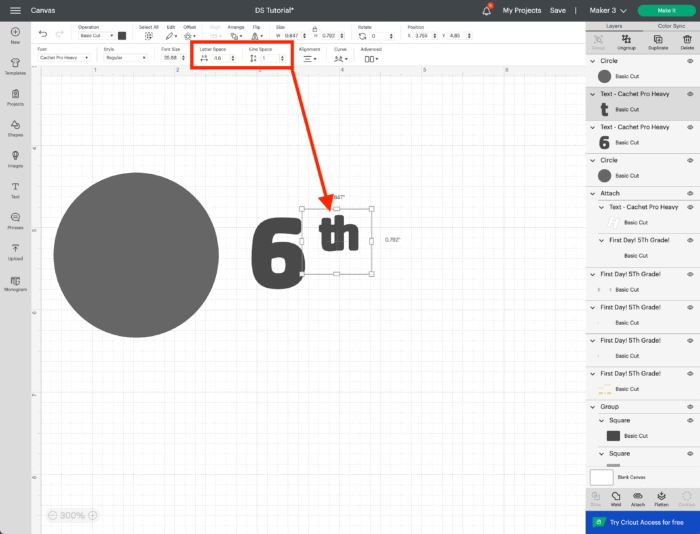
How to Adjust Letter Spacing
If your letters appear too far apart or too close together, adjust their spacing (horizontally or vertically) using the “Letter Space” and “Line Space” options in the Font Toolbar.
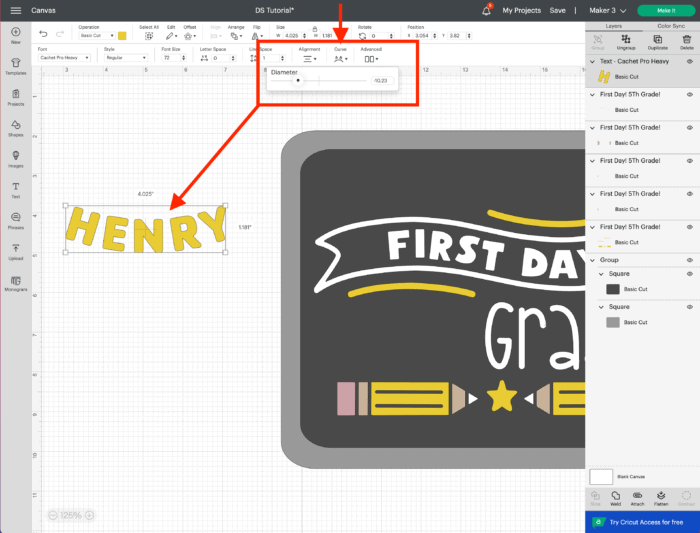
How to Curve Text
If you would like to make your text arc, select the text and then open the “Curve” dropdown in the Font Toolbar. Scale up or down to bend the text to your desired degrees.
Preparing Your Design For Cutting
Once you have your project designed exactly as you want it, you might be quick to send it your Cricut machine. But before you do, there are some important things you might need to do first!
How to Hide Unwanted Elements
As you design your project, you might end up with lots of “extras” on your canvas. While you can always delete anything you really don’t need, you can also easily “Hide” anything you may want to keep but don’t need cut right away.
In order to hide any layer on your canvas (text or image), find it in the righthand Layers Panel. Click the eye symbol to toggle the image on/off from your canvas.
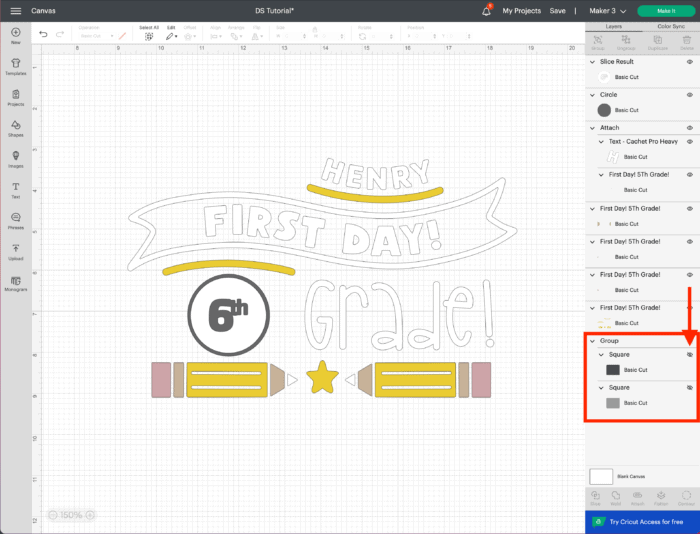
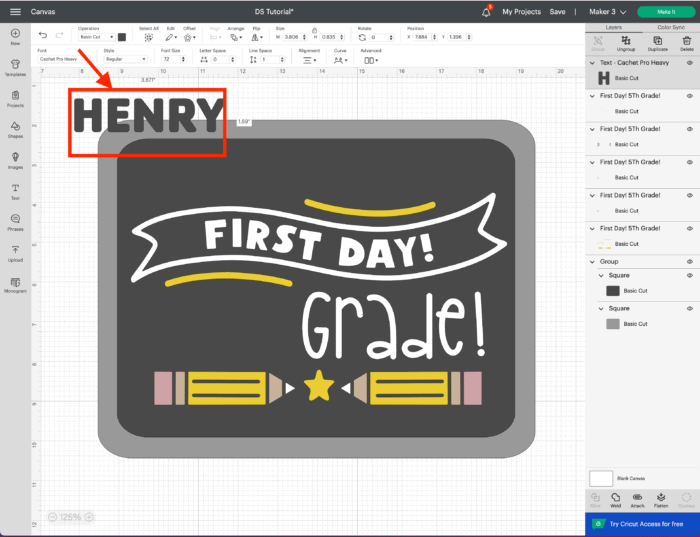
How to Attach Design Elements Together | The Attach Tool
When you go to send your design to cut, you might be surprised to discover that certain elements don’t “translate” to the cutting mat exactly as they are positioned on your canvas. For example, on my sign, I want the “Henry” to be positioned above the white “First Day” banner, but Cricut Design Space automatically loads it underneath because it wasn’t part of the original design.
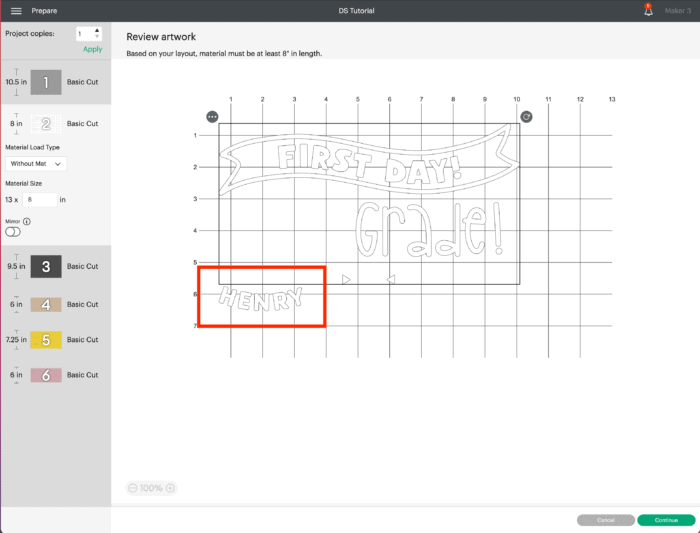
This is a common problem that has a very easy fix. If you want to cut elements from the same color in a very specific layout, they must first be “Attached” back on the design canvas. To do this, select both layers and click the “Attach” tool in the bottom righthand toolbar. Once you attach these two elements together, they will maintain that layout on your cutting mat.
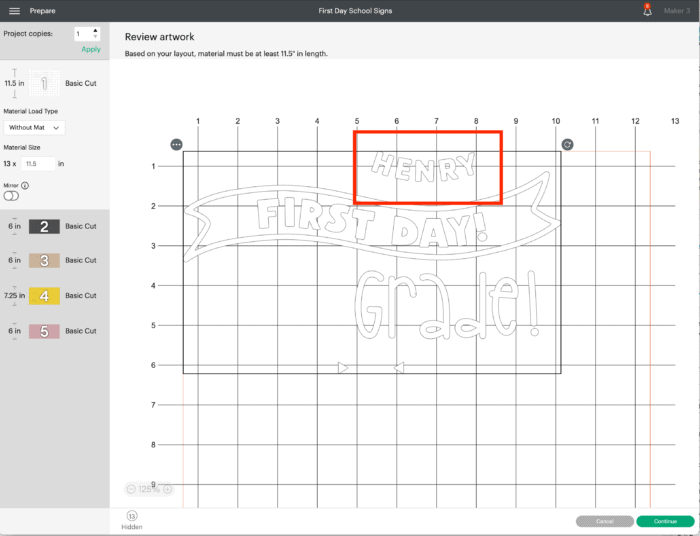
Attaching elements together isn’t always necessary, as there are times when the layout on your cut mat isn’t important. But when you want multiple layers cut (or drawn) in a very specific place, you must use the Attach Tool. This concept is one of the hardest to understand in Cricut Design Space, so for more help, see here: How to Use the Attach Tool In Cricut Design Space
How to Send Your Project to Your Cricut Machine
Once you have finalized your design, hidden anything you don’t want cut, and attached specific elements together (as needed), it’s finally time to send the project to your machine! To do this, click the green “Make It” button in the upper right-hand corner.
Navigating the “Prepare Screen” In Cricut Design Space
After clicking the green “Make It” button, you will land on the first of two very important screens (e.g., the Prepare Screen and the Make Screen). There are so many details on these screens that ultimately determine the overall success of your Cricut project, so let me walk you through all the important specifications you need to make.
Mat Selection
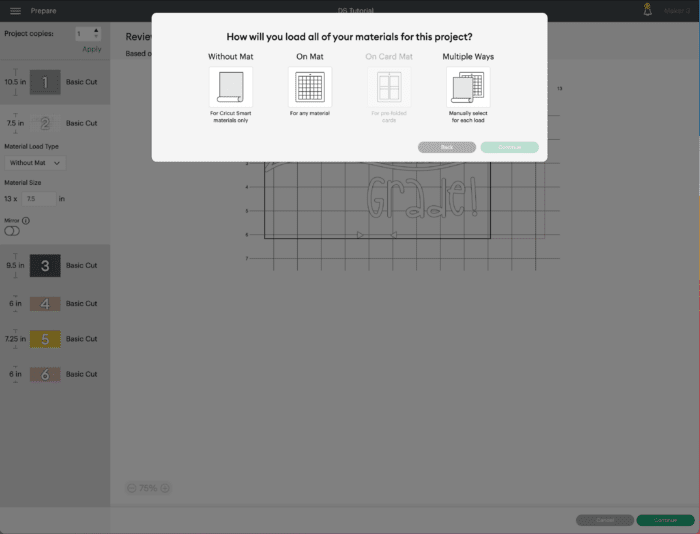
If you have a Cricut Joy, Cricut Explore 3, or Cricut Maker 3, you will be immediately prompted to choose how your project will be cut. Your options include:
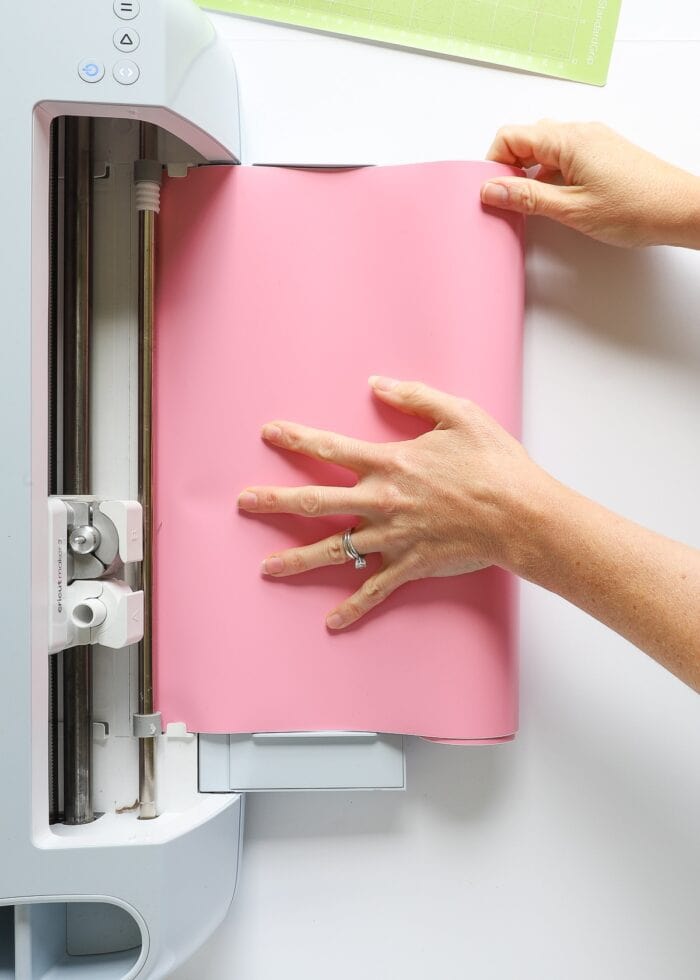
- Without a Mat – Choose this if exclusively using Smart Materials
- On Mat – Choose this if exclusively using non-Smart Materials
- On Card Mat – Choose this if using the Card Mat
- Multiple Ways – Choose this if using both Smart and non-Smart Materials
If you choose the wrong thing here, don’t stress. You can easily change how each color is cut on the next screen. This setting will just pre-populate each color for you.
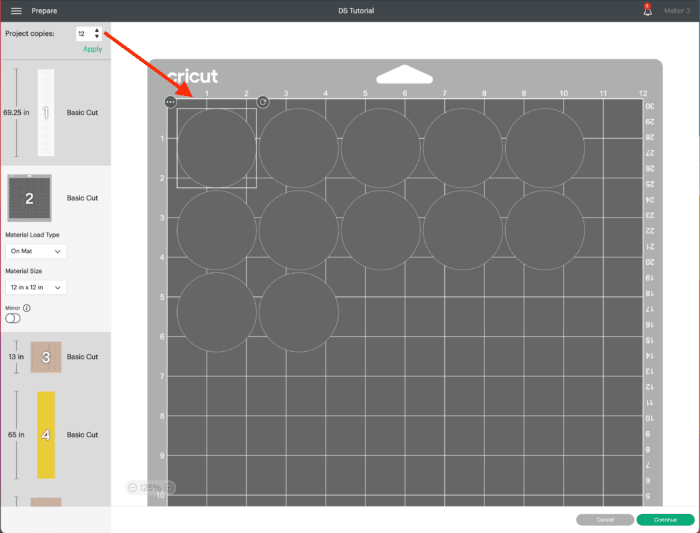
Project Copies
In the upper lefthand corner of the Prepare Screen, you will see a box titled Project Copies. This is helpful if you want to make identical duplicates of your project (e.g., 25 sets of the same Valentine). Instead of putting 25 copies on your design canvas, you can simply up your copy number here and each design element will multiply accordingly.
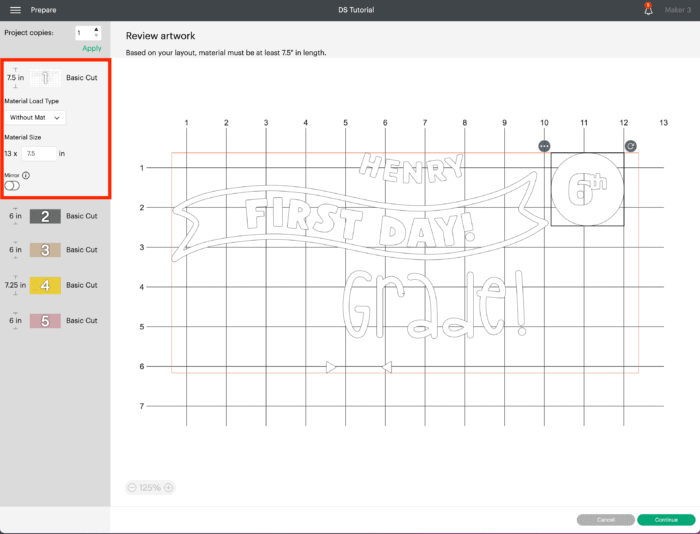
Cut Specifications
Along the lefthand side of the screen, you will see each color of your project represented in ROYGBIV order. You can click on each mat and make various specifications for each one individually, including:
- Material Load Type – You can choose mat or no mat
- Material Size – You can choose which size material you plan to use (which can affect how layers are laid out)
- Mirror – This flips the design horizontally, which is usually needed if cutting Iron-On Vinyl or Infusible Ink
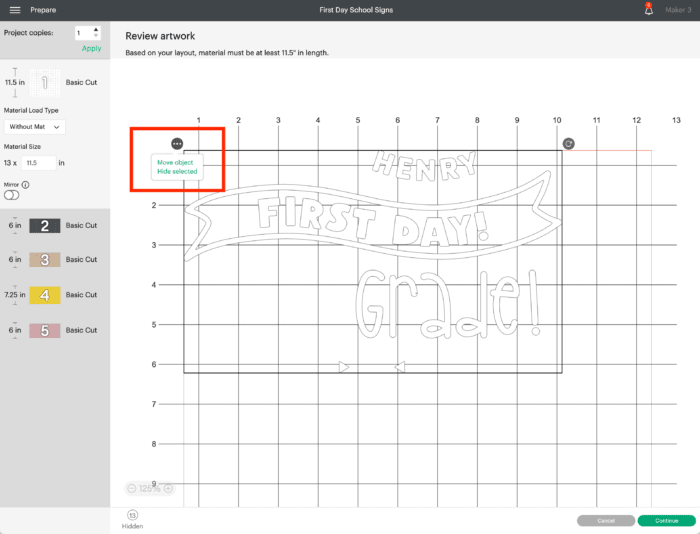
Also on each virtual mat, you can:
- Move images around the mat – Just drag and drop to your preferred layout
- Rotate images – Helpful if you want to tighten up the default layout
- Move object to another mat – Do this by clicking the three dots on the image itself; helpful if you decide to cut something a different color at the last minute
- Hide object from mat – Do this by clicking the three dots on the image itself; helpful if you decide something doesn’t need to be cut at the last minute
All of these settings allow you to decide exactly how every part of your project is cut. Once you are satisfied with the layout of each and every mat, click the green “Continue” button.
Navigating the “Make Screen” In Cricut Design Space
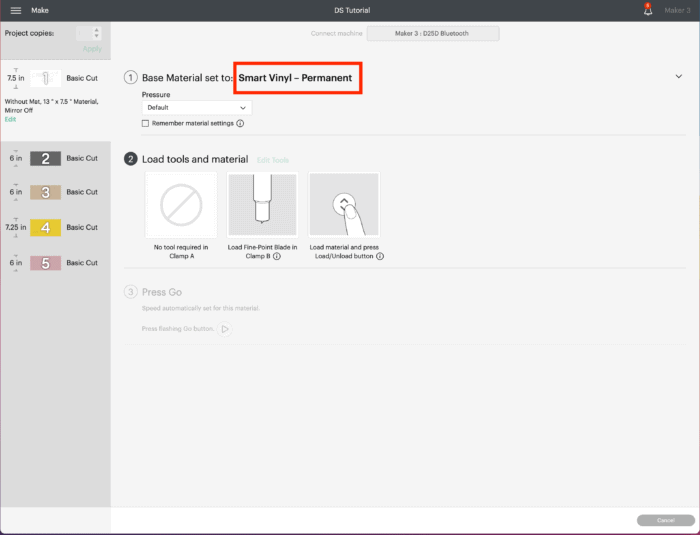
On the (final) Make Screen, you will make material selections (e.g., vinyl versus paper versus iron-on, etc) and then get very specific prompts for cutting out your project.
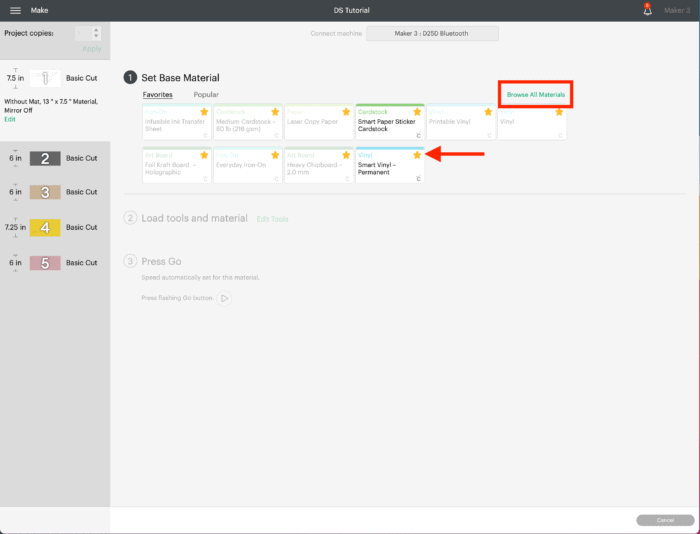
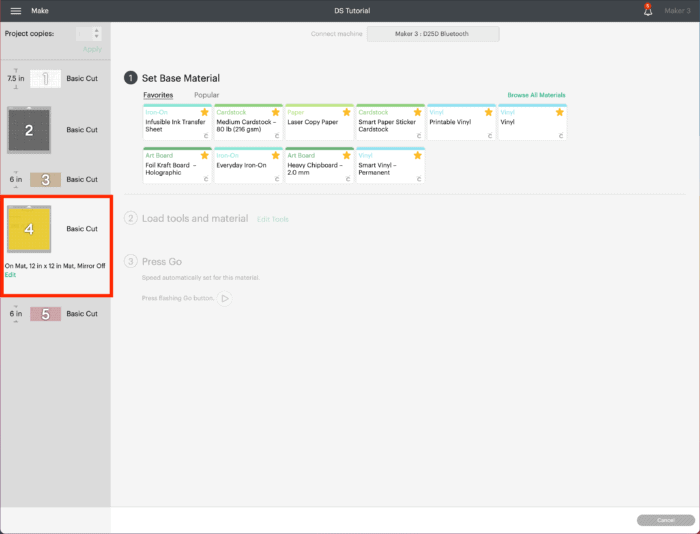
Material Selection
By default, Cricut Design Space will prompt you to select a material for every color individually. This is incredibly helpful if you plan to cut different colors out of different materials. In order to find the specific material you’ll be cutting, click the “Browse All Materials” text and search through the extensive menu. If it’s a material you cut a lot, click the star icon to save it to your favorites (this just makes it quicker and easier to find on future projects).
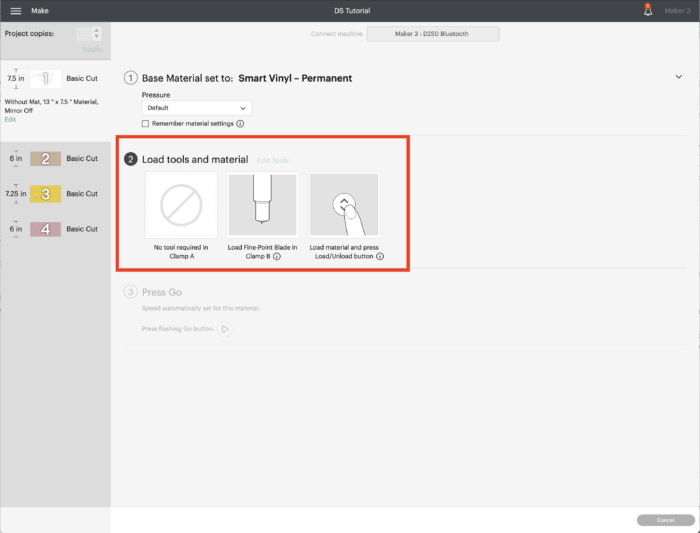
Cut Out Your First Color
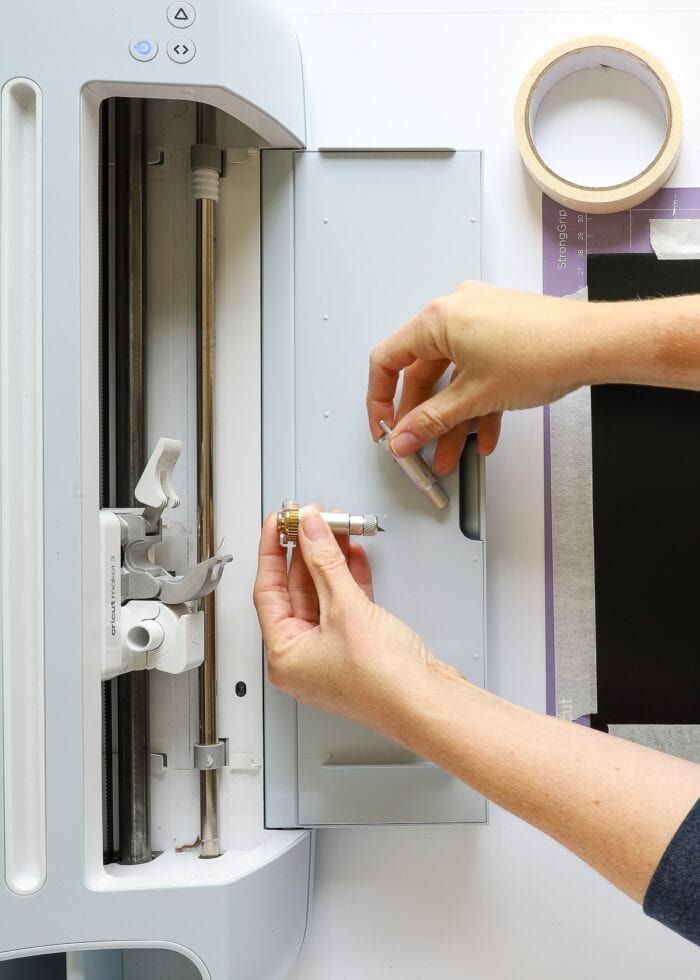
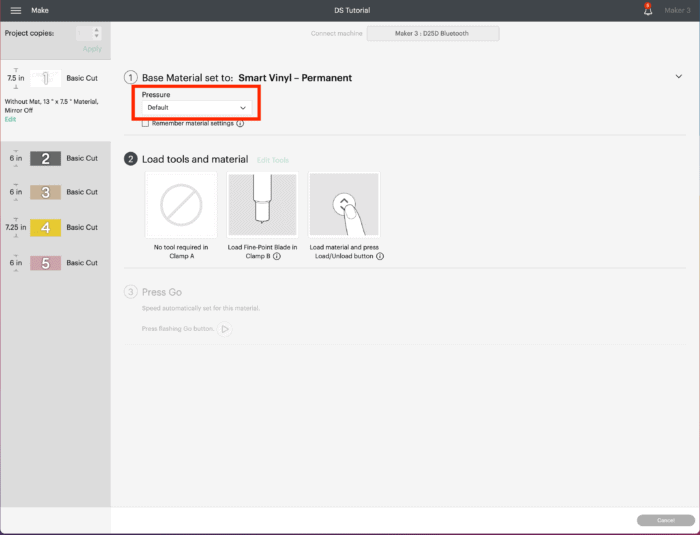
Once you make a material selection for your first color, the screen will immediately populate with specific instructions you need for that specific material. While most basic materials won’t have really unique instructions (beyond Load Fine-Point Blade and Load Mat), specialty materials will have extensive instructions you need to follow.
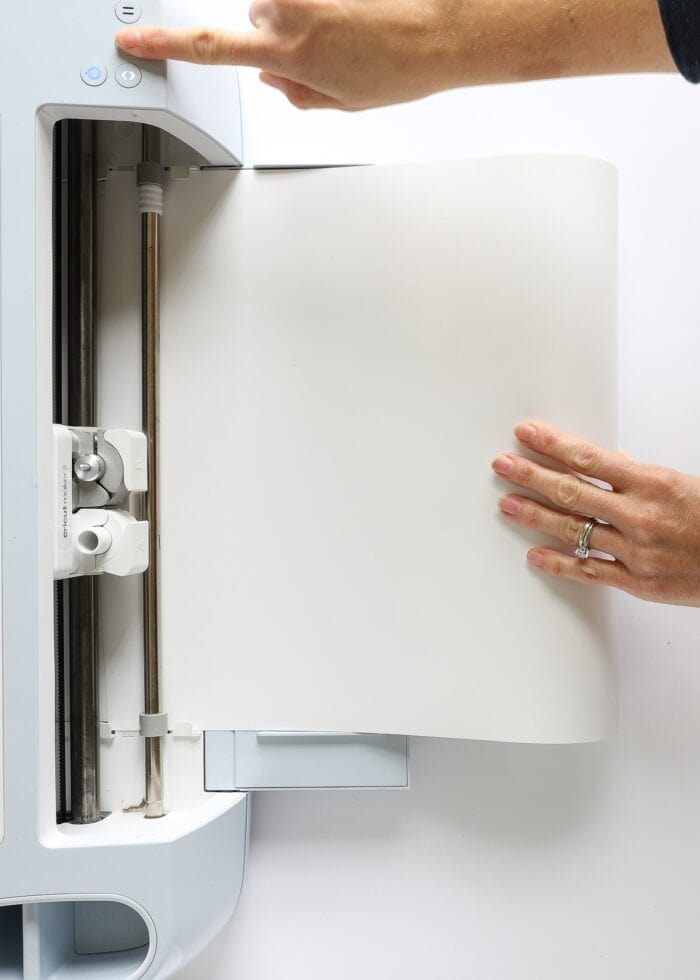
Once you are at the #2 step on the Make Screen for a particular mat, your machine’s button should be flashing, prompting you to load your mat/material. Cricut Design Space’s job is mostly done, and it’s now on you to load your machine correctly and press the flashing Cricut/Go buttons.
Cut All Remaining Colors
Once your first mat finishes cutting, Cricut Design Space will automatically jump to the next mat in order. You will again be prompted to make a material selection, and then be presented with the applicable cutting instructions. You will essentially continue running mat(s)/material(s) through your machine until you reach the last color and your entire project is cut out.
Make Screen Must-Knows
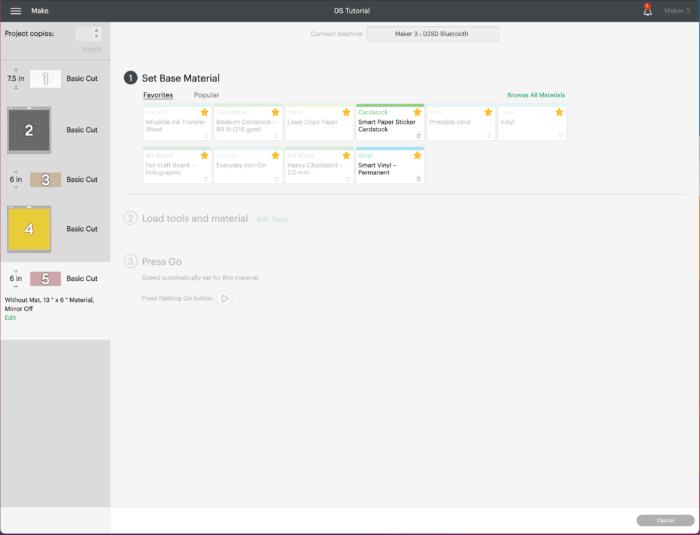
Manually Pick Your Mat
Although Cricut Design Space will automatically move down the screen (cutting each color in vertical order), you can manually select which color cuts next simply by clicking on it. The white background behind a mat indicates that it is the one queued up to cut next.
Customize the Pressure
If you cut out a specific color, and it was either too much or not enough pressure to your liking, you can quickly increase or decrease the default pressure by using the dropdown menu under the material selection.
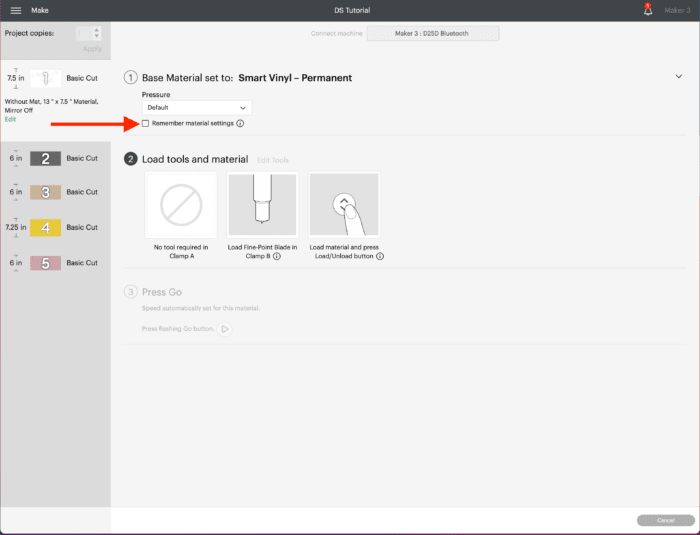
Remember Material Settings
If every color of your project is to be cut from the same material (e.g., vinyl), you don’t have to make a material selection each time. By clicking the checkbox next to “Remember material settings,” whatever material selection you make for the first color will be carried through all remaining colors.
Change Materials
If you accidentally pick the wrong material for a particular color, simply click on the bolded material name. This will re-open the “Browse All Materials” menu so you can make a different selection.
Assembling Your Cricut Project
With all of your layers fully cut out, your work in Cricut Design Space is done! If you created a Cricut Access project, you can exit out in order to refer back to the original project for detailed assembly instructions.
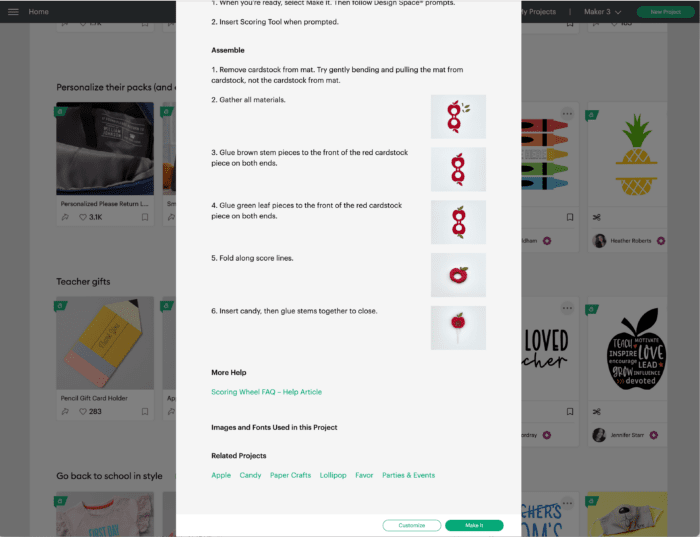
If you designed your project yourself, assembly is completely on you; but here are some tutorials that can help!
- How to Create a Cricut Project from Start to Finish
- How to Layer Vinyl | 4 Methods to Try
- How to Apply Iron-On Vinyl
- How to Apply Cricut Infusible Ink

More Helpful Cricut Design Space Tutorials
Cricut Design Space is a very powerful program, but it can have a steep learning curve for beginners. Check out my other comprehensive tutorials below:- How to Use Cricut Design Space | A Breakdown for Beginners
- 20 Cricut Design Space Tips & Tricks You Really Need to Know
- The Ultimate Guide to Cricut Terms & What They Mean
- How to Find Free Images to Use with Your Cricut Machine
- How to Use the Attach Tool in Cricut Design Space
- How to Use the Slice Tool in Cricut Design Space
- How to Use the Weld Tool in Cricut Design Space
- How to Use the Contour Tool in Cricut Design Space
- How to Use the Offset Tool in Cricut Design Space
- How to Use Print Then Cut in Cricut Design Space
- How to Design Monograms in Cricut Design Space
- How to Cut Really Big Designs on Your Cricut (The Off-the-Mat Technique)
- How to Design Mugs in Cricut Design Space
But what I’ve outlined here is a comprehensive breakdown of what you most need to know in order to make your first few Cricut projects. As you start to master these tools and techniques, you can then dive in deeper and really expand your design capabilities even more.
I hope this systematic look at Cricut Design Space helps clear away some confusion and gets you motivated and ready to tackle your first (or next!) Cricut project!
Megan

2 Comments on “How to Use Cricut Design Space | A Breakdown for Beginners”
For personal use which Cricut machine would you recommend? And is there a specific time or event when Cricut machines are typically on sale?
Hi Kim!
Thanks so much for asking this great question!
Which machine you get VERY much depends on what kinds of projects you want to make. In general. I recommend the Cricut Explore series (the newest is the Cricut Explore 3) for basic paper/vinyl crafts. If you want to work with fabric, then you’ll want the Cricut Maker 3. For even more information, check out my guide HERE.
As far as sales, the BEST time to buy a Cricut machine is Black Friday/Cyber Monday weekend :)Hope that helps!Megan