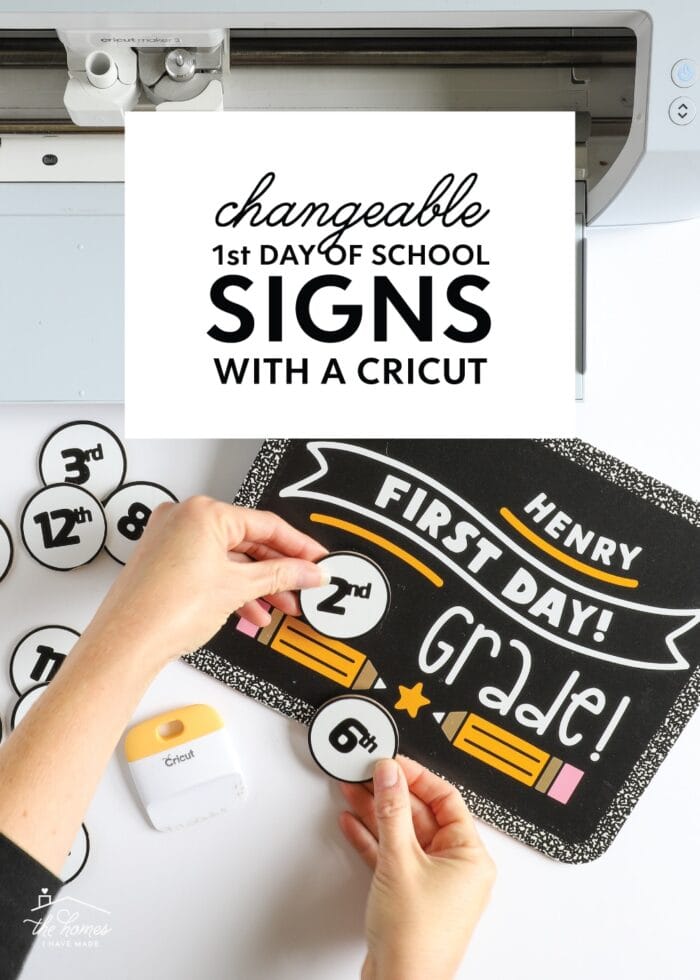
(Changeable!) DIY First Day of School Sign with a Cricut
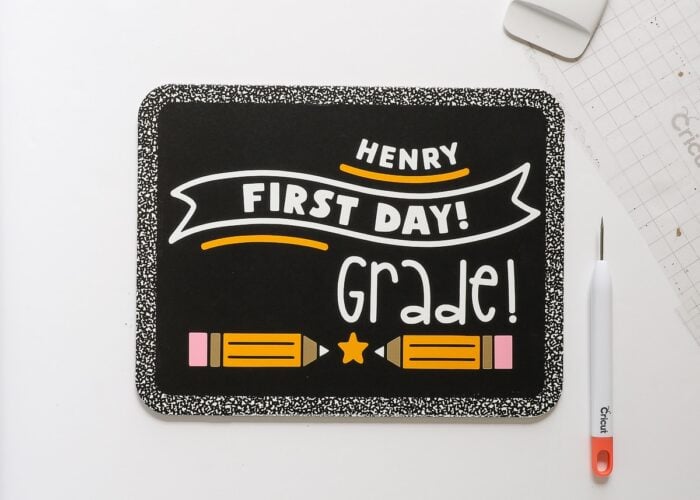
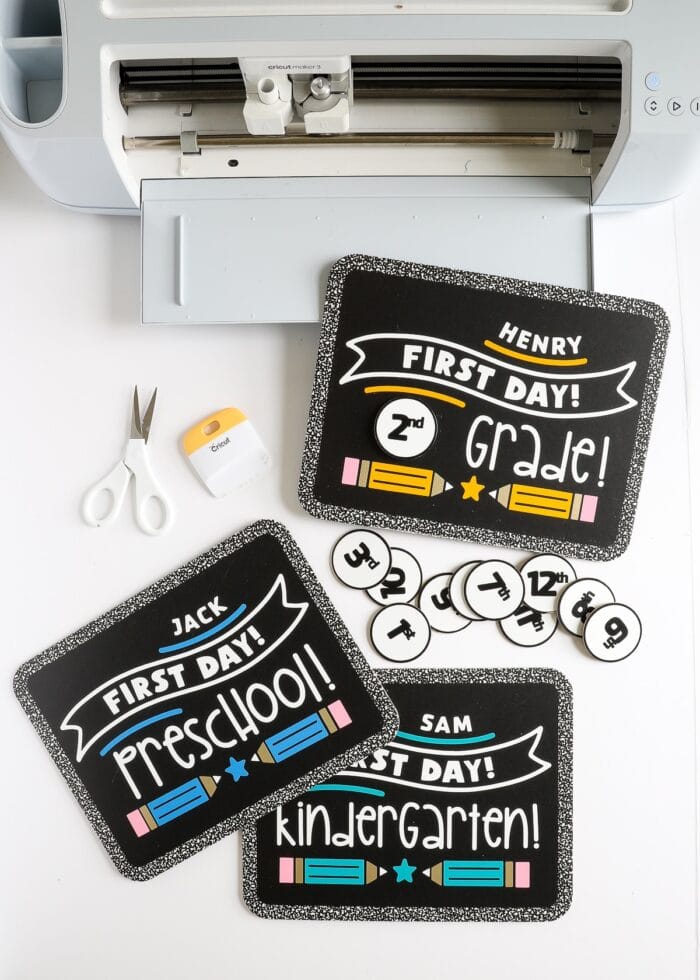
With a middle school kid in the house (6th grade!!!), you’d think I would have made a First Day of School sign years ago. But truth be told, I’m never quite on my new school year game; so if I do remember to snap photos on the first day of school, it’s usually with a paper sign I ran off the color printer that morning (See More: Editable First Day of School Signs). But this year was my year, friends! I had an idea…a pretty great idea, actually…and scrambled to get the signs done just in time for first day photos. I chose to make personalized signs for each of my kids…but with changeable grades…so they can be used year after year after year! This is a fun take on the traditional First Day of School sign…and it’s easy enough to make last minute (speaking from experience!) Let me show you how!
When I so proudly marched down the stairs on the first day of school a few weeks ago, these three personalized signs in my hands all ready to go, my husband said: “It’s about time we had some of these!” And it’s true!
For someone who is quite crafty and has access to a plethora of supplies, it’s a bit embarrassing that we didn’t have this quintessential back-to-school photo prop. And while I love the adorable signs that you can hand-write in with a teacher’s name, favorite things, and more, I really liked the idea of having something small, easy, and reusable from year to year.
In recent years, I’ve been on a kick to find/make items that we pull out year after year or for special milestones. Like our Christmas Chain, our DIY Wall Ruler, and our Valentine’s signs, I saw this project as an opportunity to create another item that would stick out in their childhood memories.
But knowing me and my last-minute-ness (and my horrible handwriting), I wanted something cute but also totally hassle-free. Hence the idea of a single sign with each child’s name…but with changeable grades!
This allows us to pull out the same signs…even at the last minute…and have them ready to go for first-day photos. No markers, no ink mess, no getting kids to give answers as they roll their eyes. Just stick on the right grade for the current year and snap your pics (yes, mamas…even as the bus is coming down the road!)
I’m so excited to (finally!) have cute First Day of School signs ready to use from year to year. If you too are a last-minute Mom who’s never quite back-to-school ready, you’re going to love this project!
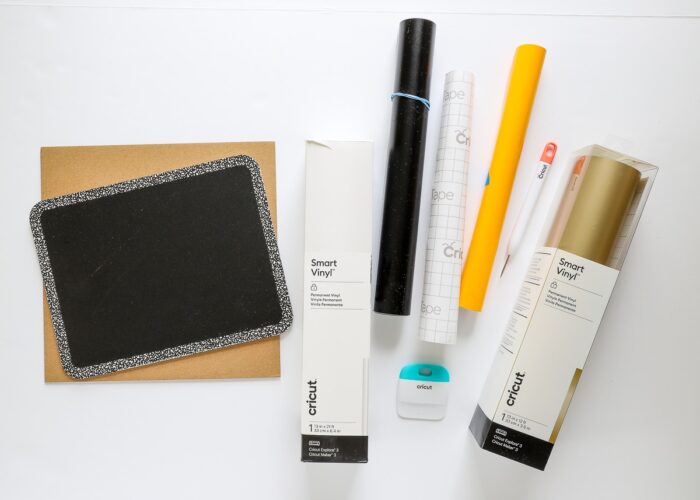
Supplies Needed
- Cricut Machine – This project involves cutting chipboard, which is only possible with a Cricut Maker model. That said, you can buy chipboard circles (instead of making your own), which means you can then use any Cricut machine for this project!
- Premium Fine-Point Blade – the one that comes with all machines
- Knife Blade – for the Cricut Maker, only needed if cutting your own chipboard circles
- StandardGrip Mat
- StrongGrip Mat – only needed if cutting your own chipboard circles
- Vinyl in white, yellow, black, light pink, and gold
- Transfer Tape
- 2mm Chipboard
- Chalkboard Sign – I found these 8.5×11″ signs in a 3-pack at Michaels, but here are some other options that would work too:
- Velcro
- Tools: Weeding Tool | Scraper
- “Changeable First Day of School Sign” Cricut Design Space File – the images on my signs are proprietary to Cricut, so I do not have them in a different download format other than this Cricut Design Space link.
Part 1 | Making the First Day of School Sign
This project has two parts: making the sign itself, then making the changeable grade pieces. Let’s start with the sign!
Step 1: Prepare Design in Cricut Design Space
Start by measuring your specific sign. Mine measures 8.5×11,” but you can easily adapt the design to fit any sign you have.

Open the “Changeable First Day of School Sign” file for Cricut Design Space. I have everything ready for you to cut right away, but you may want to adjust the size, names, fonts, and other details as needed. You can also re-color the pencils to look like crayons if you prefer!
Step 2: Cut Vinyl Design with Cricut
Once you are ready to cut out the First Day of School sign design with your Cricut, click the green “Make It” button in the upper right-hand corner. Then feed the correct colors of vinyl into your machine in order to cut out each element:
- White – Banner and text
- Yellow – Pencils
- Pink – Erasers
- Gold – Pencil tips/ends
Need more help with this step? See here: Your Complete Guide to Cutting Vinyl with a Cricut

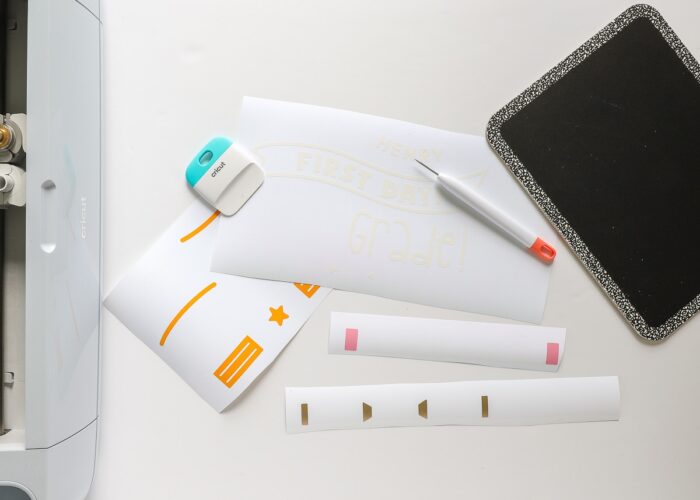
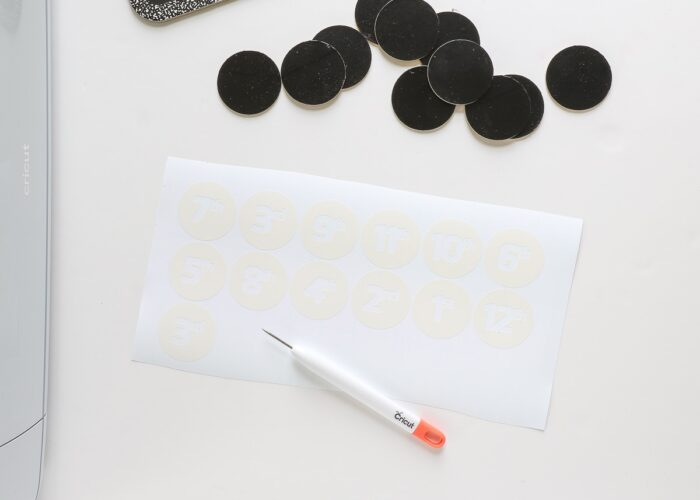
Step 3: Weed Vinyl Design
Once all the different colors of the design have been cut, use a Weeding Tool to pull away all the excess vinyl and prepare each element for transfer.

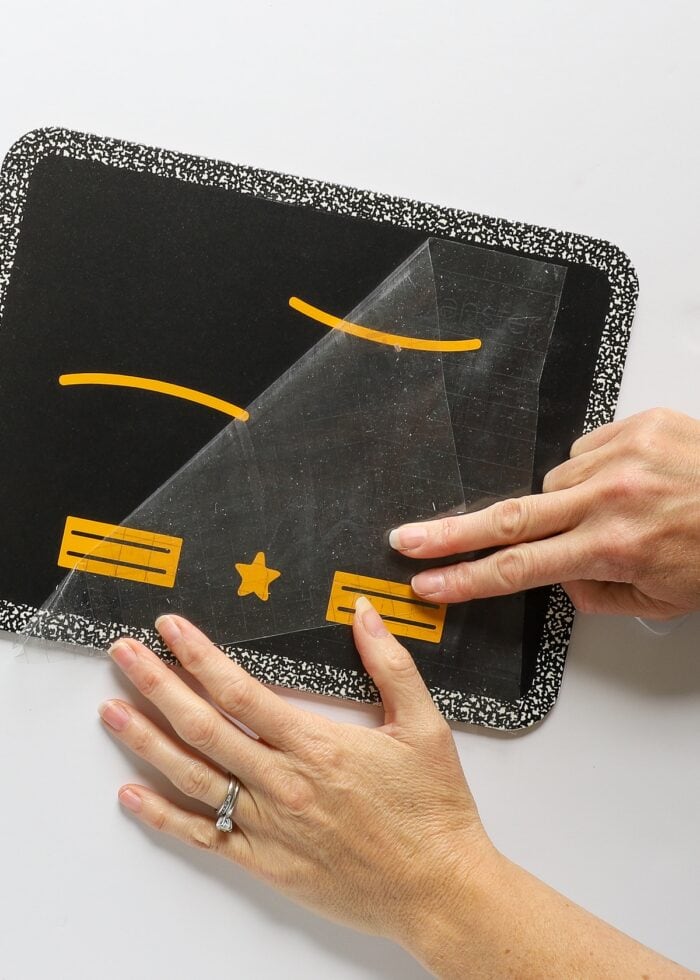
Step 4: Apply Vinyl Design To Chalkboard
I applied the same vinyl design to three different chalkboards for my kids and definitely figured out the best order so that everything ends up centered just right. You can certainly work in your own order, but here is what I recommend most:
Use transfer tape to pick up and place the yellow layer first. Center the star on the chalkboard’s width, and position the pencils about 1.5″ from the bottom of the sign.
Need more help with transferring vinyl? See here: Your Complete Guide to Cutting Vinyl with a Cricut
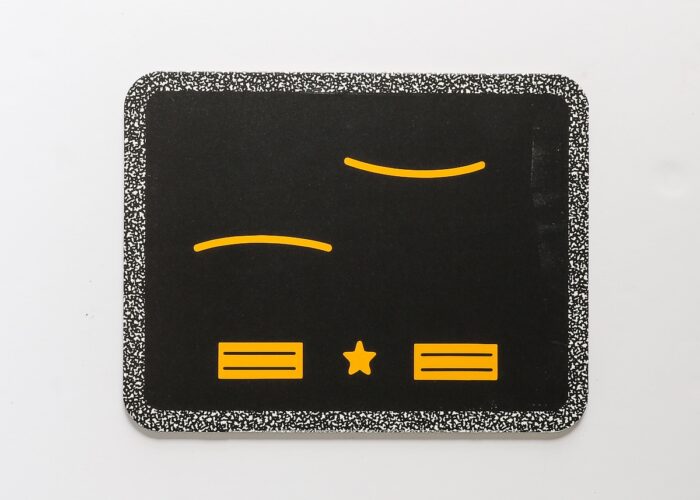
Next place both the gold and light pink pencil details, lining them up with the yellow pencils already on the sign.
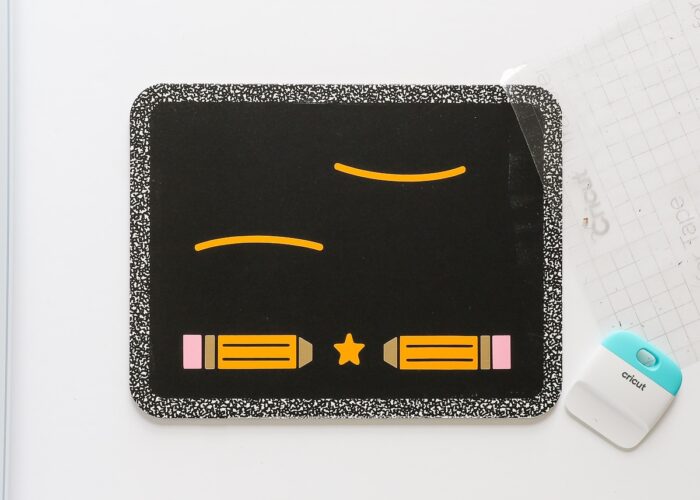
Finally, pick up and place the white layer. With the pencils and other details in place, it’s much easier to get these more prominent aspects of the design in just the right spot!
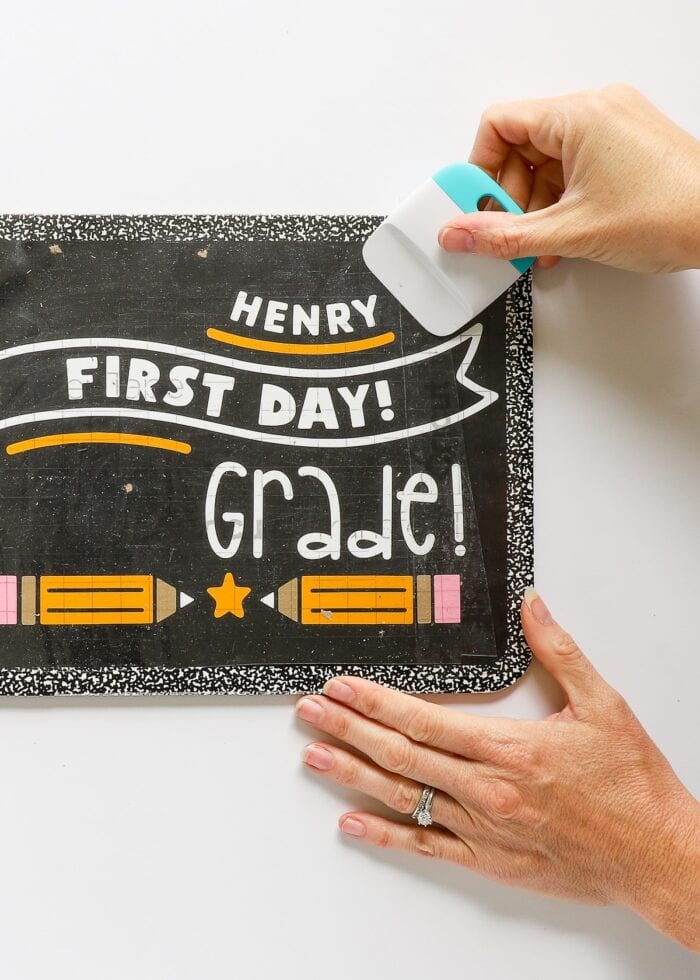
Your First Day of School sign is now complete! Let’s move on to making the grade pieces.
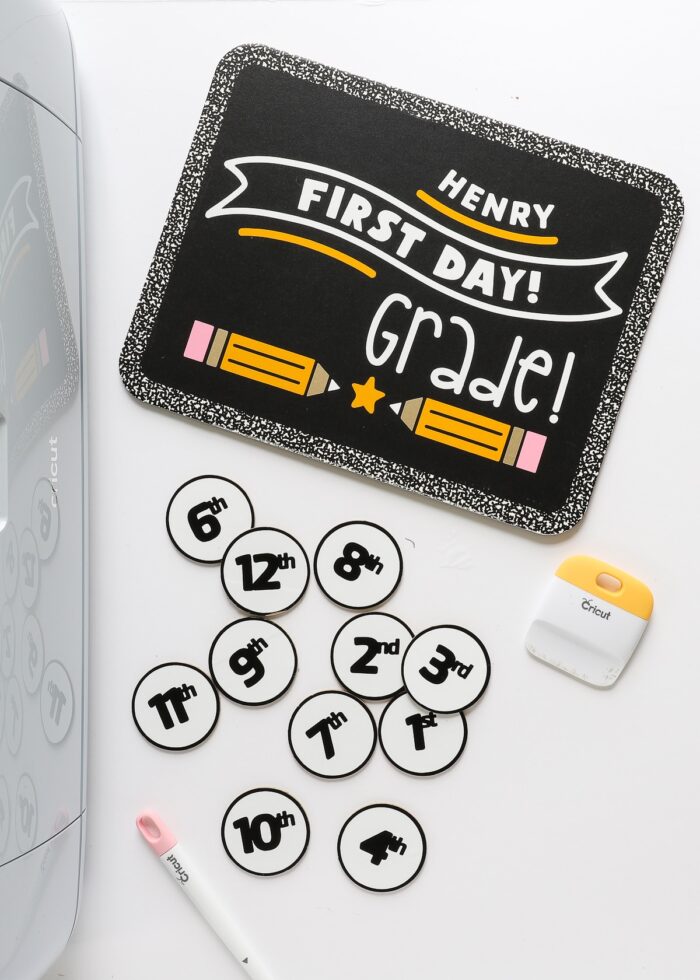
Part 2 | Making the Changeable Grade Pieces
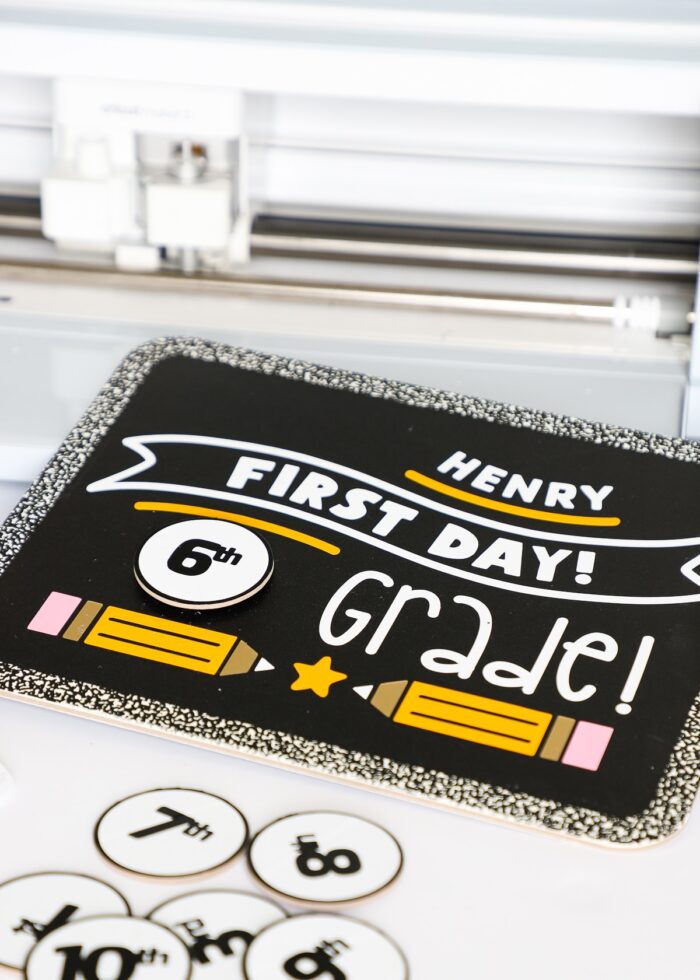
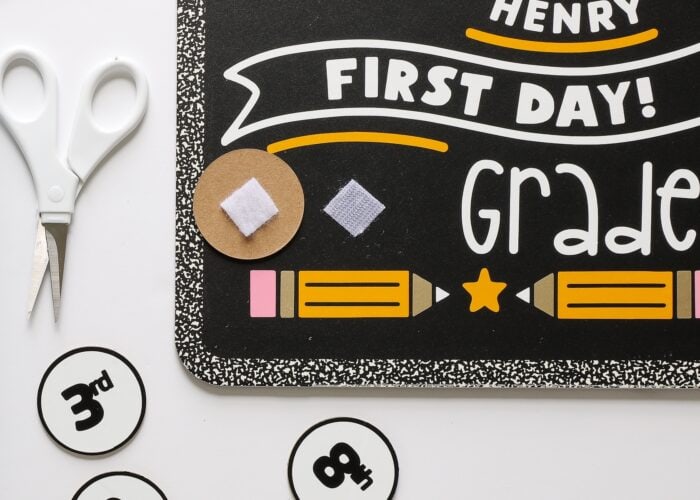
With three boys who will cycle through the various grades on different years, I really wanted to make a single set of grades that we could easily swap on/off each sign as needed.
Sure, I could have cut these out of cardstock; but to make them a little more durable (and prominent), I chose to cut them out of 2mm chipboard. However, cutting chipboard is only possible on Cricut Maker machines. So if you can’t or don’t want to cut your own circles, you can buy ready-made ones here or look for 2″ wooden rounds at your local craft store.
Step 1: Prepare the Grade Pieces in Cricut Design Space
I have the grade pieces (1st grade, 2nd grade, 3rd grade, 4th grade all the way through 12th grade) all designed and ready-to-cut in the same Cricut Design Space file. The black circles should be cut from chipboard, and the white numbers should be cut from vinyl. Full instructions are included below.
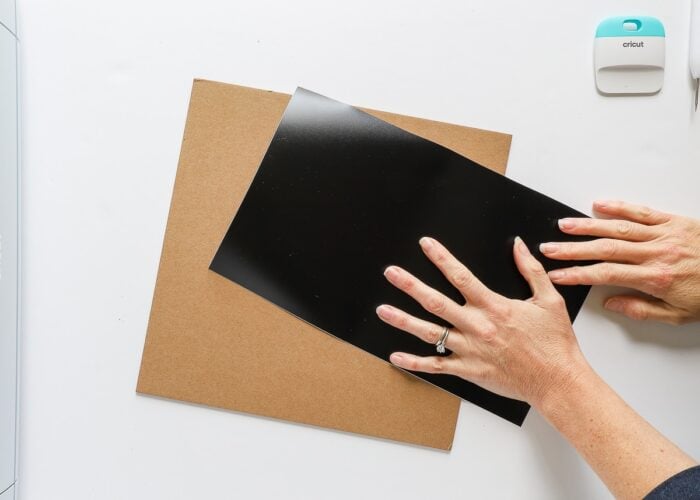
Step 2: Place Vinyl onto Chipboard (Optional)
I didn’t want my chipboard circles to be brown, so I opted to first cover the chipboard in some black vinyl. This step is optional, but worth it to conceal the brown color on your sign.
Want to save this post?
Start by laying a single stretch of black vinyl on top of a sheet of chipboard, using a scraper to smooth out any and all bubbles.
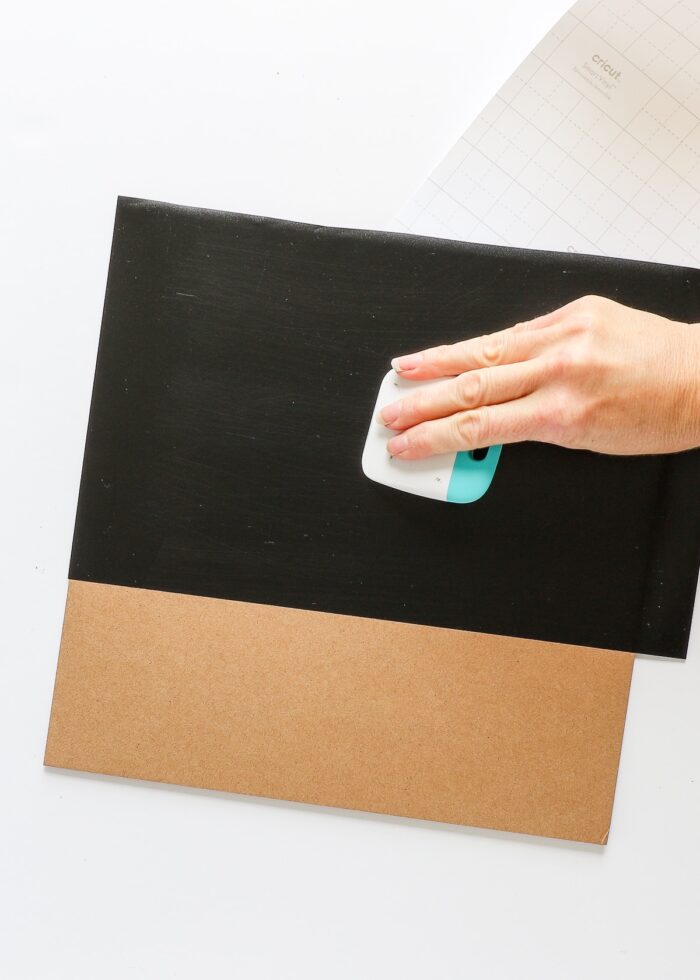
If you have excess vinyl hanging over the edges of the chipboard, flip the chipboard over (so the vinyl layer is down on your work table) and trim away the excess edges with a sharp craft knife. Now, your chipboard is ready to be cut into circles.

Step 3: Cut Chipboard Circles with Cricut Maker
If you’re new to cutting chipboard, see my full tutorial here: How to Cut Chipboard on a Cricut Maker
Place your chipboard+vinyl combination onto a purple StrongGrip Mat and secure it on all four edges with masking tape.
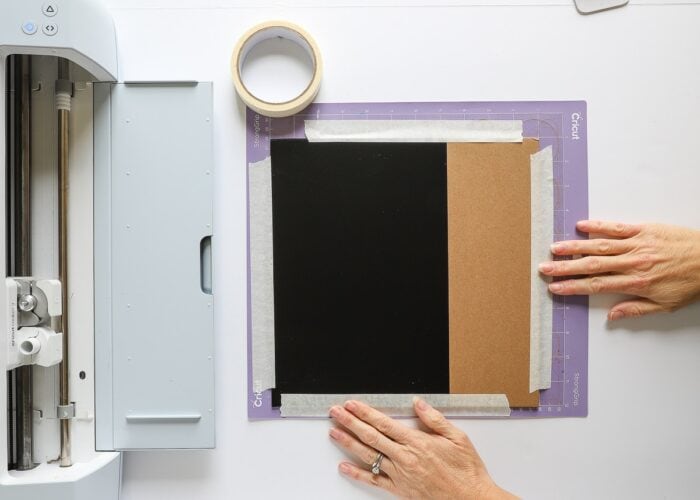
Swap out the Premium Fine-Point Blade for the Cricut Knife Blade and Housing. Then, move all four white star wheels (on the roller bar) to one side of the machine.
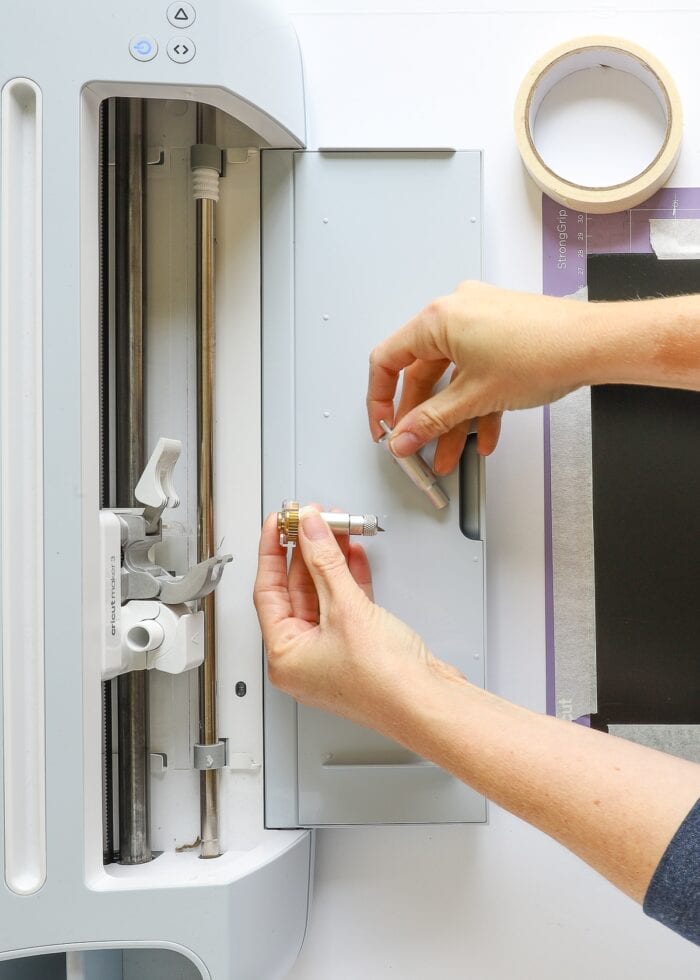
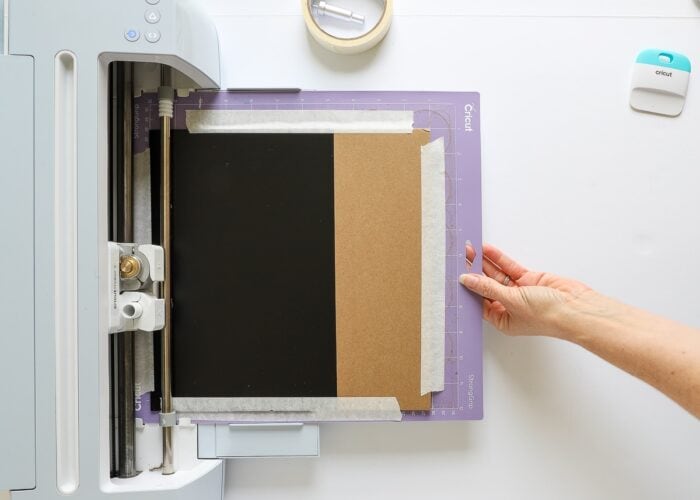
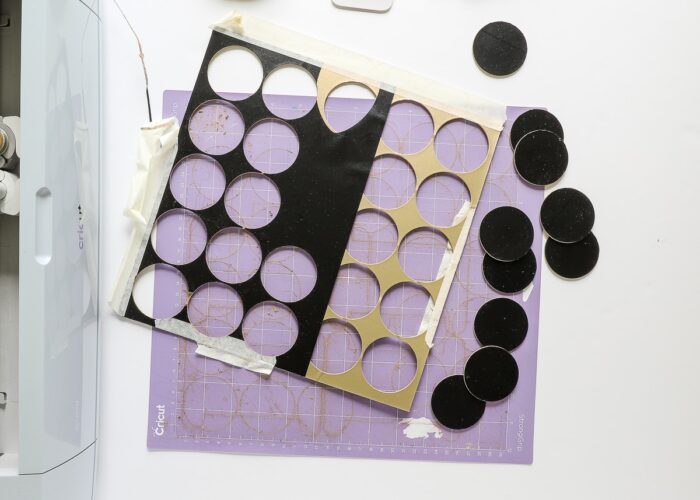
Load the mat into your machine and start it cutting the 12 circles. The machine will need to make many passes to cut all the way through the chipboard, likely taking upwards of 30 minutes to complete. Once done, you can pop your vinyl-covered chipboard circles off the mat!
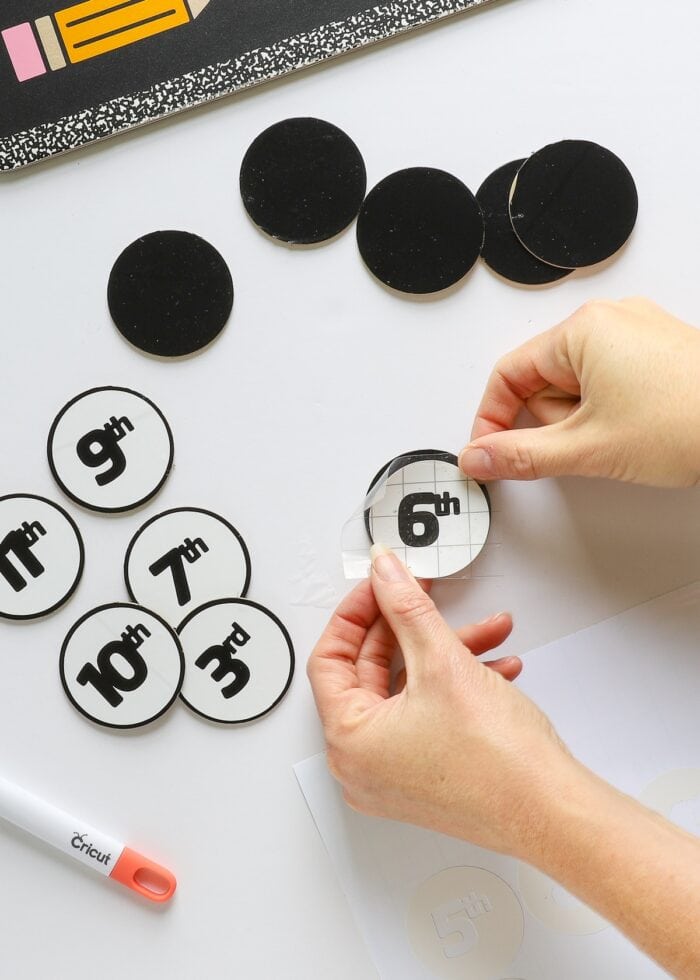
Step 4: Cut & Apply Vinyl Numbers
With the circles all cut, you will next need to cut out the number decals onto more white vinyl. Once cut, use a weeding tool to pull out all the small, unnecessary details from each grade number.
Using transfer tape, place each grade label onto the chipboard rounds, centering them as best as you can.
Need more helping with layering? See Here: How to Layer Vinyl on Your Cricut Projects
Step 5: Add Velcro Backings
To make these grade pieces easily swappable on our First Day of School signs, I chose to use adhesive-backed Velcro to hold them in place. I just used a strip of sticky Velcro I had on hand, but these pre-cut dots would work great too!

Start by cutting small squares from one side of the Velcro (I used the soft side) and center them onto the backs of each circle.
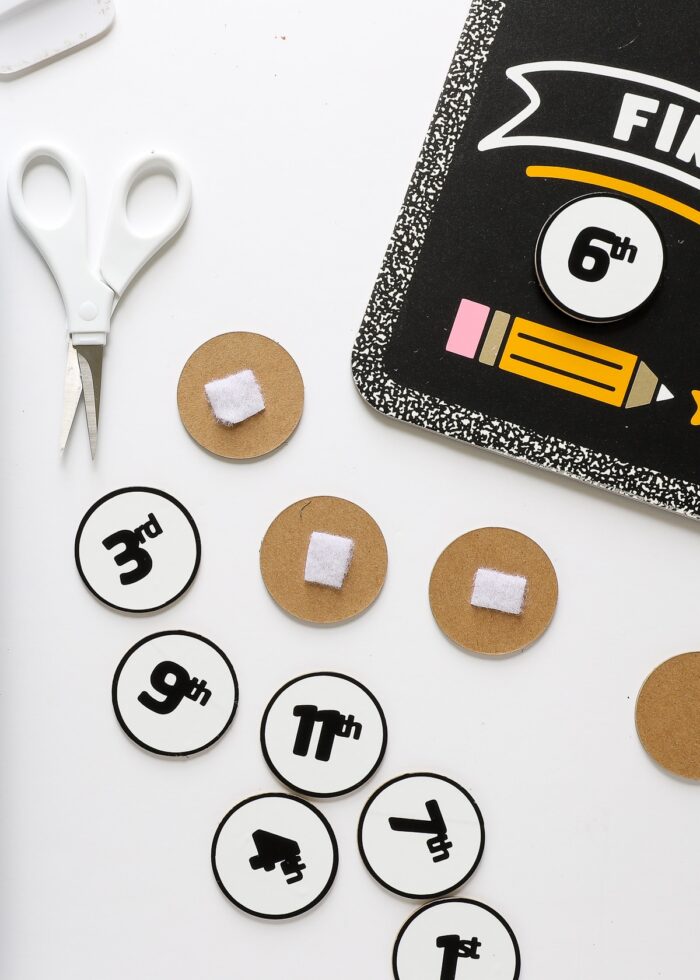
Pick one grade piece (likely the one you’ll be using first) and place the other side of the Velcro on top of it, right-sides together, sticky side facing up.

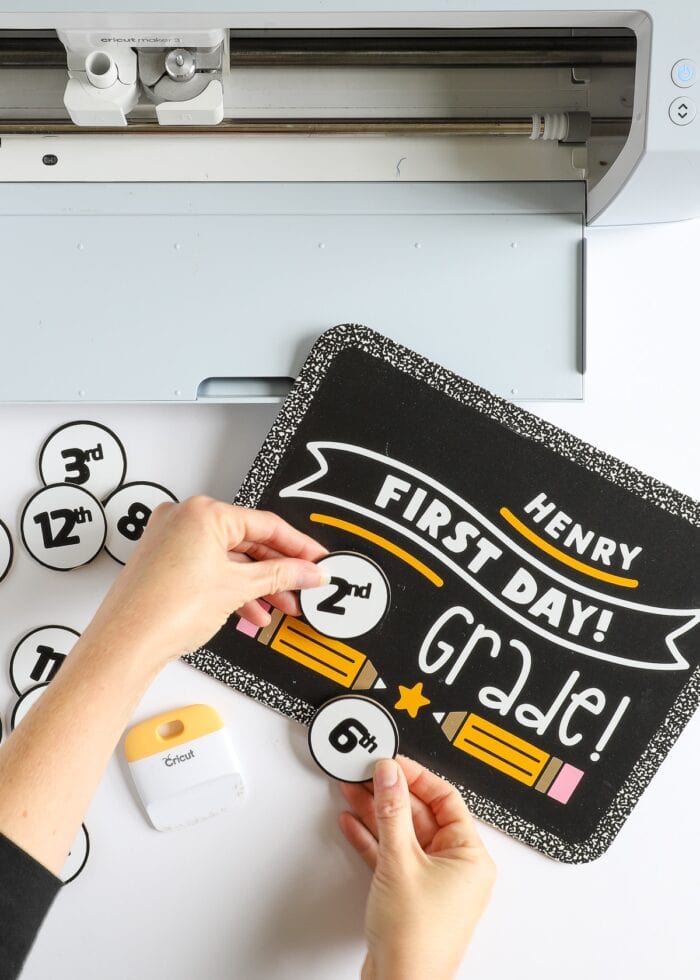
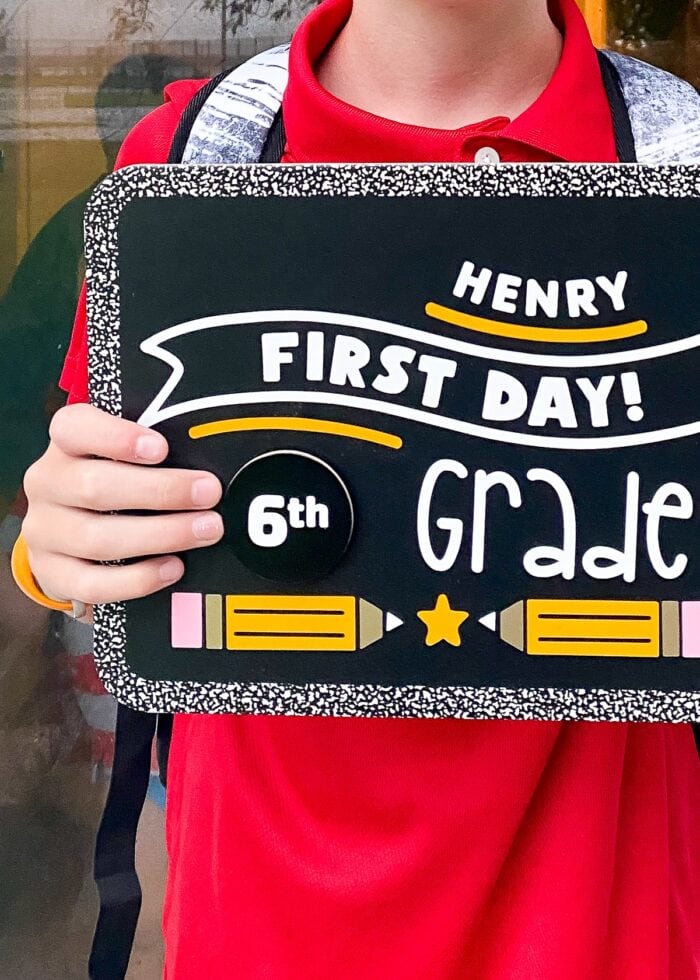
With both sides of the Velcro attached to the back of one circle, place the circle where you want it on your First Day of School sign.
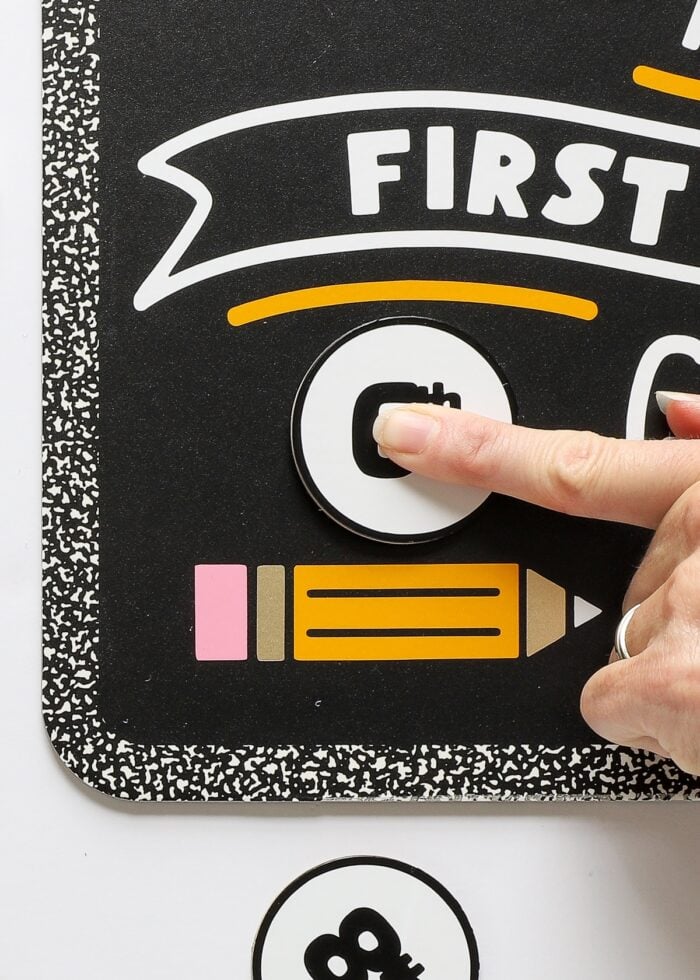
When you remove the chipboard circle, one half of the Velcro will be left behind; and now you’ll always know exactly where to put future grades as you swap them out for the current school year!
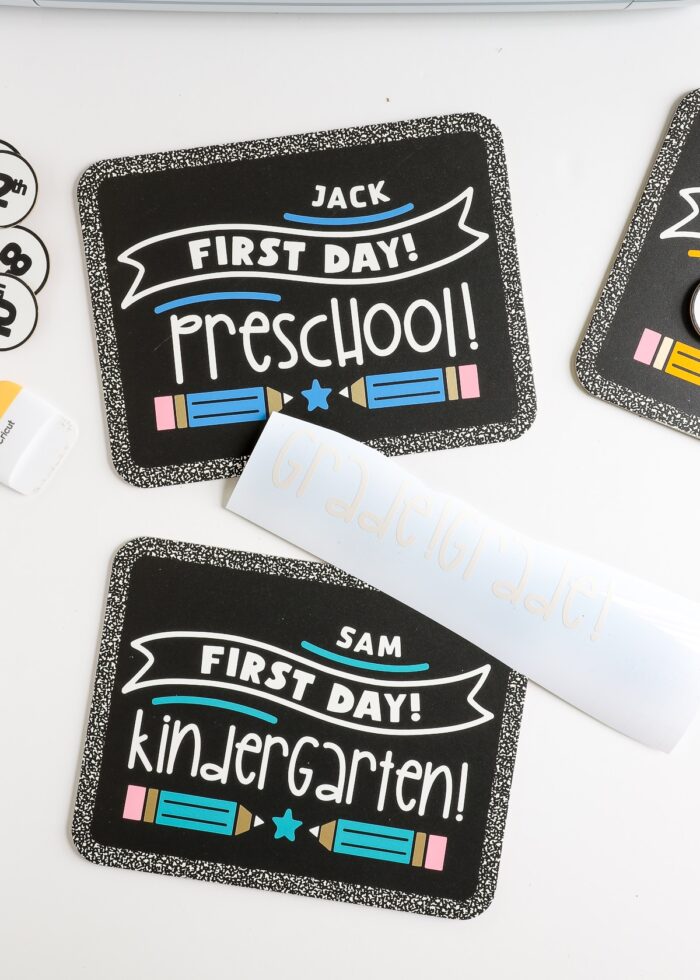
What About Preschool & Kindergarten?
Okay – so you might be wondering? If the swappable grade pieces are unique to grades 1-12, what about kids going off to their first day of preschool or their first day of kindergarten? Here’s what I chose to do for my pre-K and kinder kiddos!
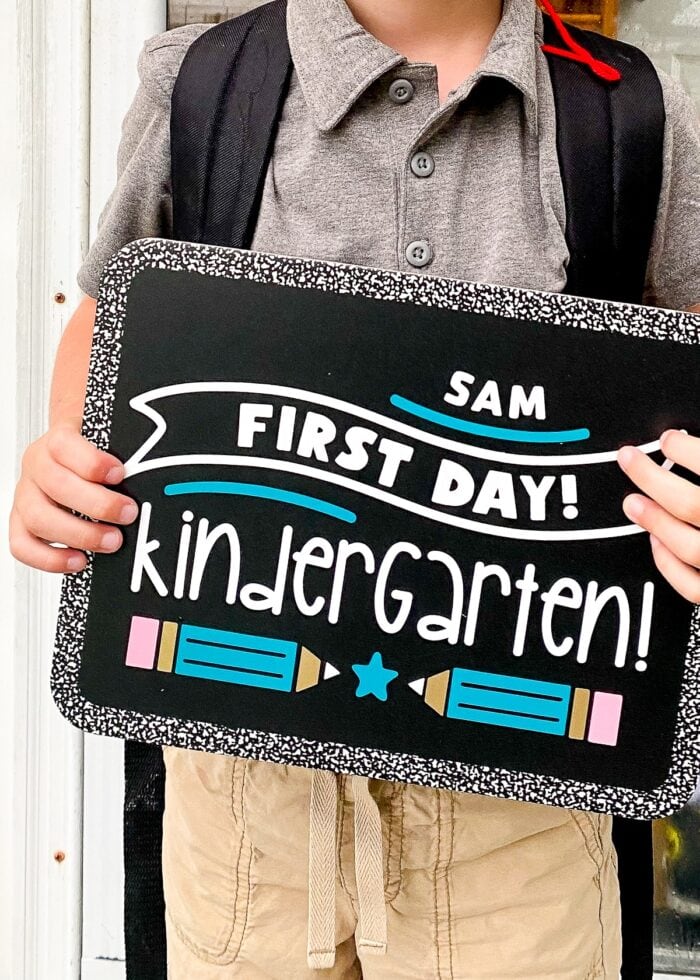
I went ahead and made the exact same signs, but cut out the full words “Preschool” and “Kindergarten” from vinyl. Remember: vinyl can be easily removed! So I also cut out two more “Grade!” parts of the design for each board (now, while I was cutting everything out) and have them stored with the signs and grade pieces.
Next year, I can peel off “Kindergarten” and place “Grade!” and start using the changeable numbers for first grade just like I did on my oldest’s sign. With a little planning ahead, you can use this same design for kids of all ages and get them all ready now!
Take It Up a Notch!
Had I really been thinking ahead when I was making these signs, I would have made “First” and “Last” on a chipboard placards too, so these exact same signs could also be used as Last Day of School signs. I’ve gone ahead and included those cuts in the Cricut Design Space file if you want to try that. Another option is to flip the chalkboard over and create the same design on the back, using “Last” instead of “First.”
Either way, you’ll be able to use the exact same signs…both at the beginning and end of the year…year after year after year as your kids go from elementary school into high school!
It is so much fun to find a great design in the Cricut Design Space Image Library and fully customize it to suit my needs and my lifestyle! I hope this project inspires you to not only (finally!) make your own First Day of School sign (whether your kid is going into the 2nd grade, 5th grade, any grade!), but do so in a way that you can store and use over and over again!
Megan