Can You Put Wallpaper On Textured Walls? My Real Life Results!
It’s a question I’ve gotten from quite a few readers over the years: “Can you put wallpaper on textured walls?” The quick answer is “Yes, wallpaper does work on textured walls” (at least in my experience!), but I’m guessing you might want some more details than that. Read on to find out what you need to know when attempting to wallpaper textured walls in your own home!

Wallpaper is Not Necessarily Off Limits
When I first realized how quick, easy, and transformative wallpaper was in our rental homes, I boldly proclaimed that it would “forever” be my go-to solution for our walls (instead of paint). But when we moved into a home (in southern California) with orange peel walls in every single room, I began to panic.

Most wallpaper products recommend only applying the paper on smooth, flat walls for “optimum results.”
But does that mean you can’t use wallpaper on textured walls at all?
Before assuming wallpaper wouldn’t work or investing in paper that might not, I decided to experiment with some wallpaper scraps I had on-hand from previous projects.
What I saw with the small scraps encouraged me enough to give both peel and stick wallpaper AND regular wallpaper a try on our textured walls.
Here’s what I found…
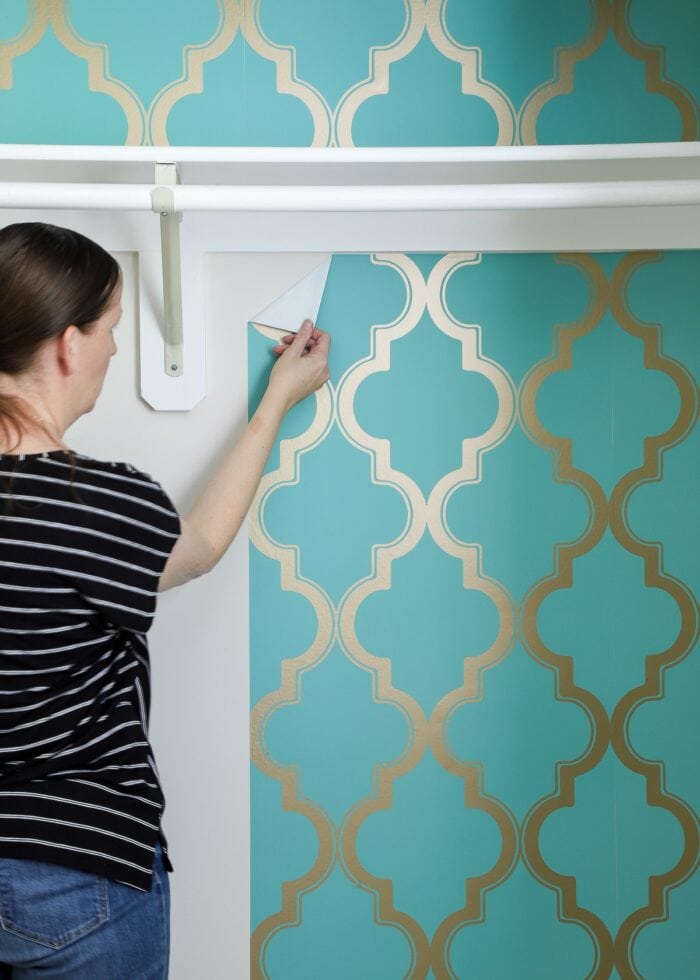
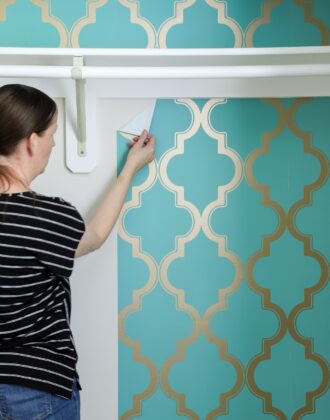
Peel & Stick Wallpaper on Textured Walls
Peel and stick wallpaper is big right now, coming in so many colors, patterns, textures, widths, lengths, price points, and paper quality. I have successfully hung peel and stick wallpaper on countless walls, but almost all of them were completely smooth.
Before applying full rolls of somewhat-expensive paper on our textured walls, I wanted to be sure it would 1) stick to the textured walls, and 2) stay up.
So I stuck three small samples of different peel and stick wallpapers to our wall and watched them for a few weeks. Below are samples from (1) Spoonflower, (2) Target’s Threshold line, and (3) Walls Need Love.

All three wallpaper brands stuck to the textured wall without any issue, but there are a few things I’d like to point out:
- The Spoonflower wallpaper, while very expensive, is also VERY thick and has a slight texture itself. As such, you can neither see nor feel the wall’s texture underneath. I also think the darker wallpaper helps hide the wall imperfections.
- Target’s Threshold wallpaper is the thinnest and “flimsiest” of the group, yet it also stuck to the wall without any issue. If you look closely however, you can see the wall texture under the paper. Both the lighter paper and the lighter color contributed to this.
- The Walls Need Love paper is in between the two. It has a slightly heavier weight than the Target paper but it isn’t quite as thick as the Spoonflower paper. As such, the texture under the paper isn’t as noticeable.
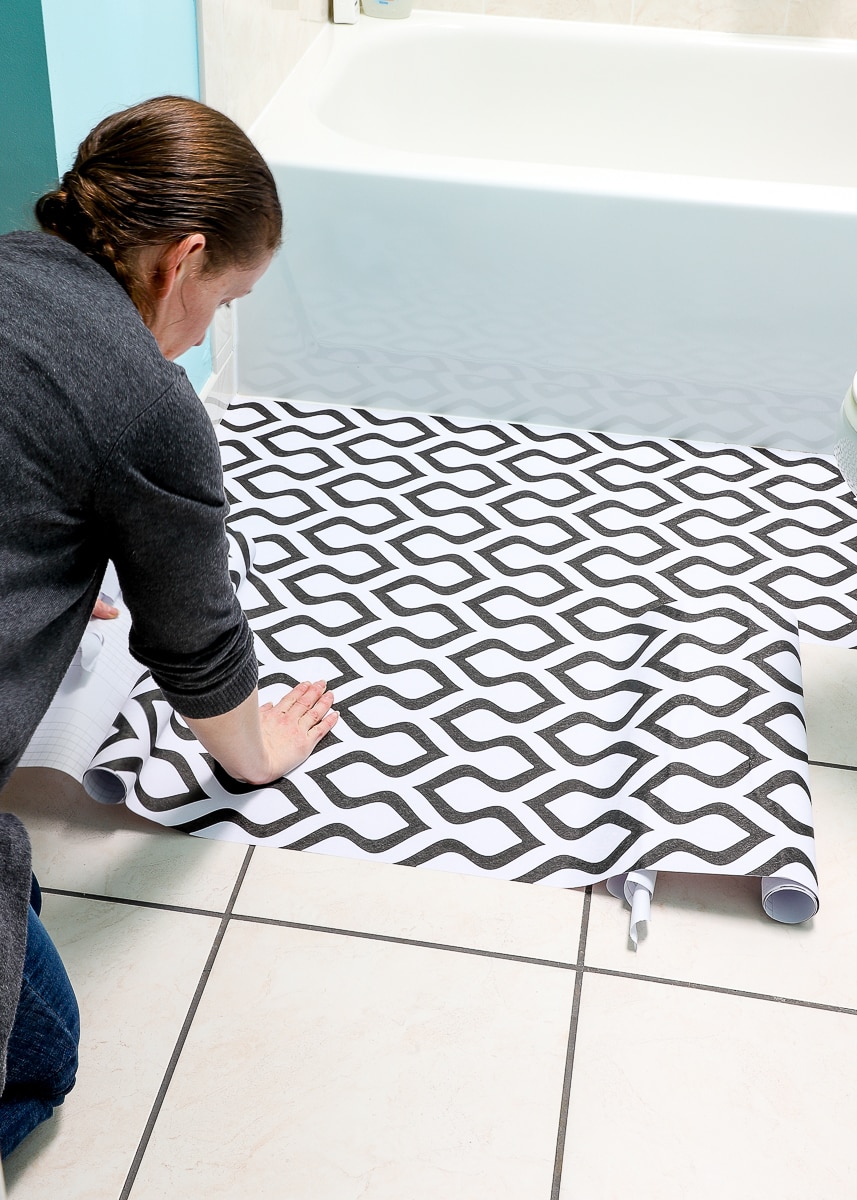
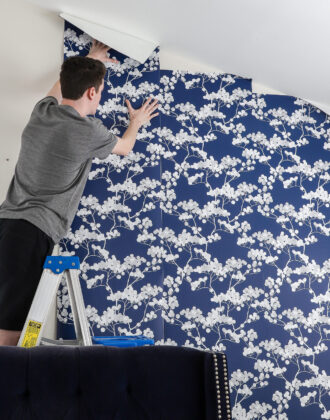
After leaving the paper samples up for a few weeks, I felt confident enough the paper would stick and stay on the textured walls, and decided to wallpaper an entire wall using Target’s Threshold paper (it’s my overall favorite paper based on price, ease of application, and pattern availability) inside the closet (which had the same textured walls as the rest of the house).
Having applied a lot of peel and stick paper over the years, I can say that it went up exactly as it does on any other surface. The seams match up fine, and I had absolutely no issue with the self-adhesive backing gripping onto the textured walls.

Red and White Striped Wallpaper from Target
That said, if you look veeeery closely below, you can tell that the wall under the paper is indeed textured.

However, it is hardly noticeable from a “normal” distance; the paper honestly does a great job camouflaging the bumpy walls underneath!

With my confidence bolstered by the nursery closet project, I proceeded to wallpaper a bathroom feature wall in the same house, using the same product, achieving the same awesome results.

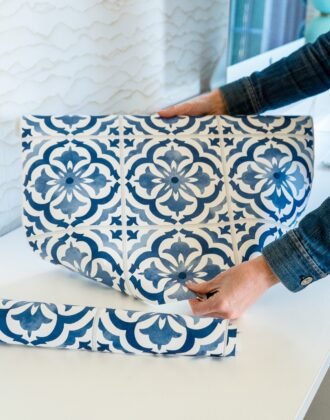
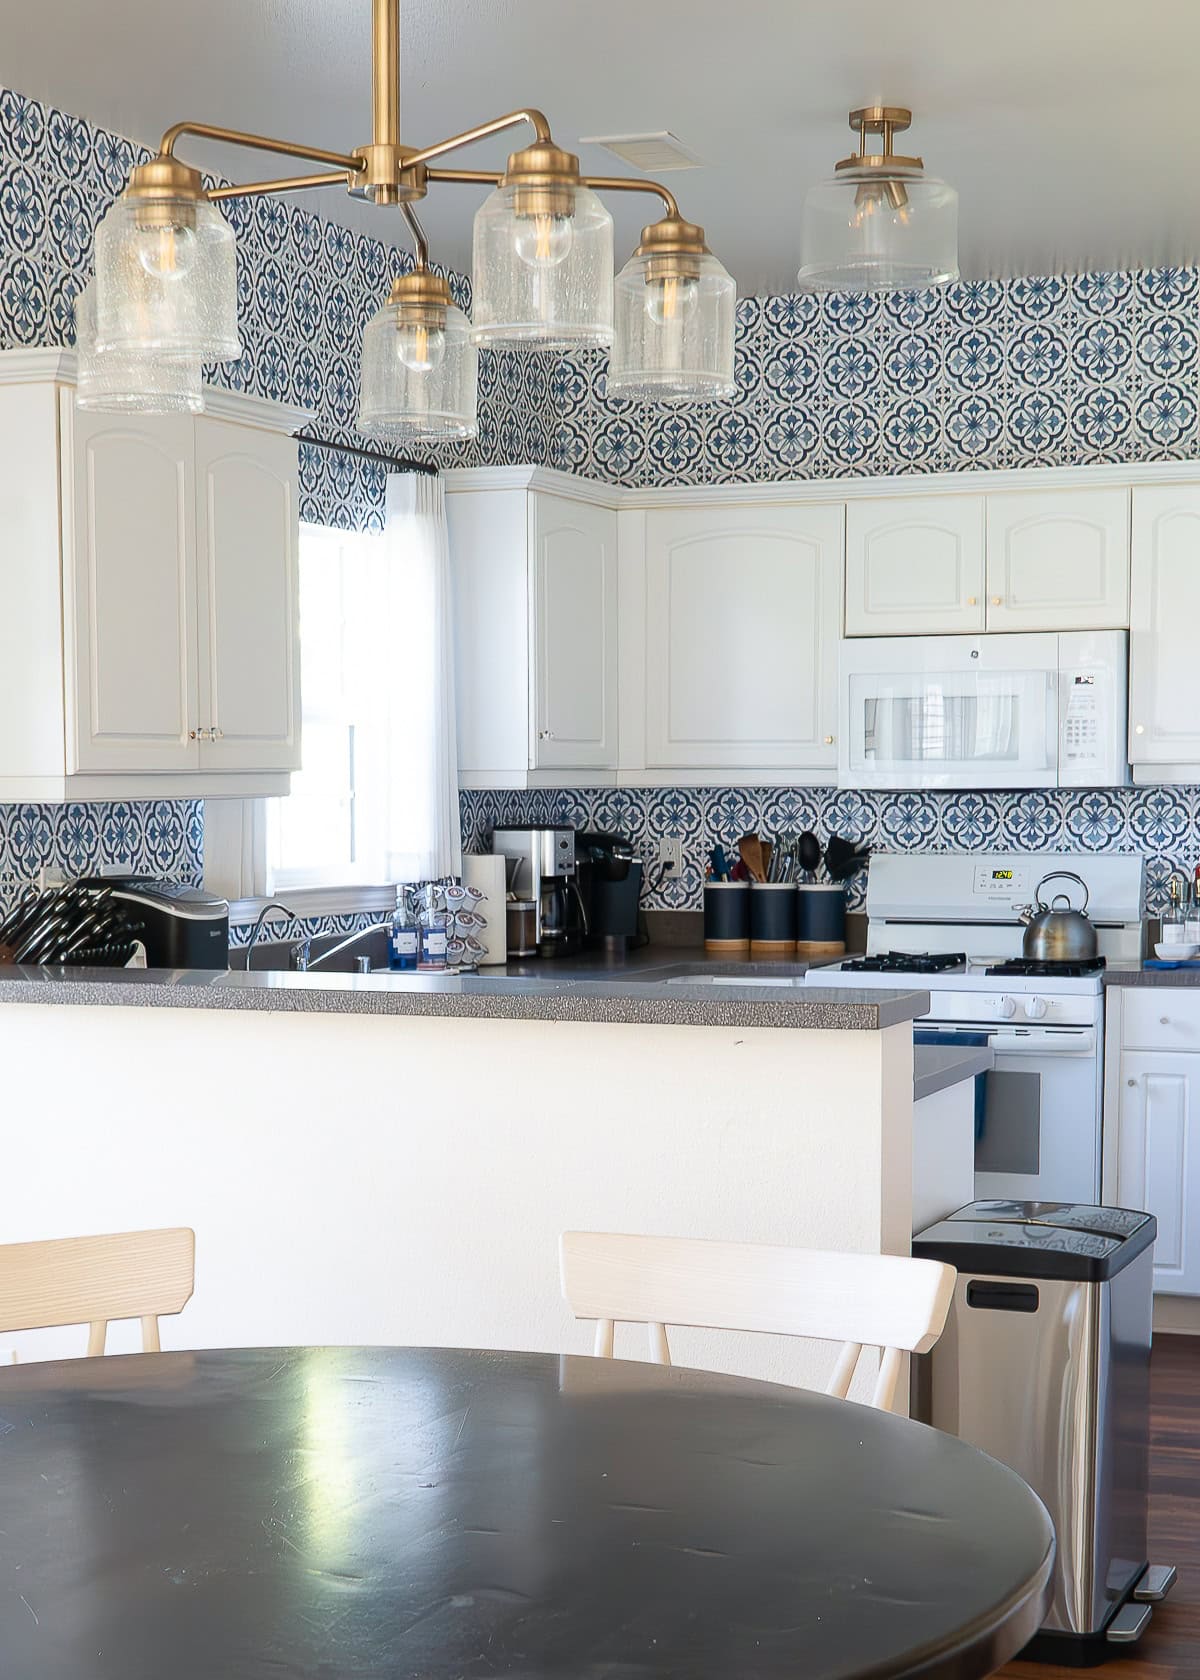
Further, I also successfully wallpapered the backsplash and walls of our kitchen with the Walls Need Love paper.

Conclusion
All three peel and stick wallpaper installations stayed perfectly in place until we moved out (2.5ish years). So in conclusion, yes peel and stick wallpaper can work on textured walls.
However, I caution you to ALWAYS test your walls and the specific paper you want to use before doing a complete installation (you can order swatches from most wallpaper companies). Peel and stick wallpaper is expensive and not the easiest thing to put up, so apply a sample to your walls and allow it to stay for a few days before investing your time and money!
Want to save this post?
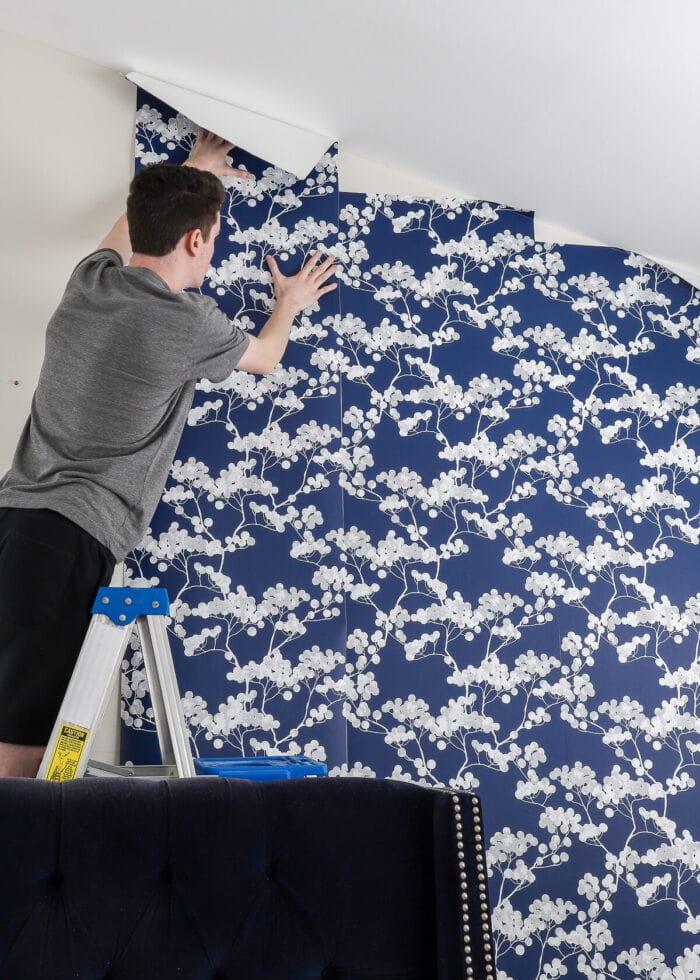
Traditional Wallpaper on Textured Walls
Peel and stick papers have many advantages, but for a variety of reasons, you might be considering applying a traditional (not peel and stick) wallpaper to your textured walls (because of cost, pattern availability, permanence, etc).
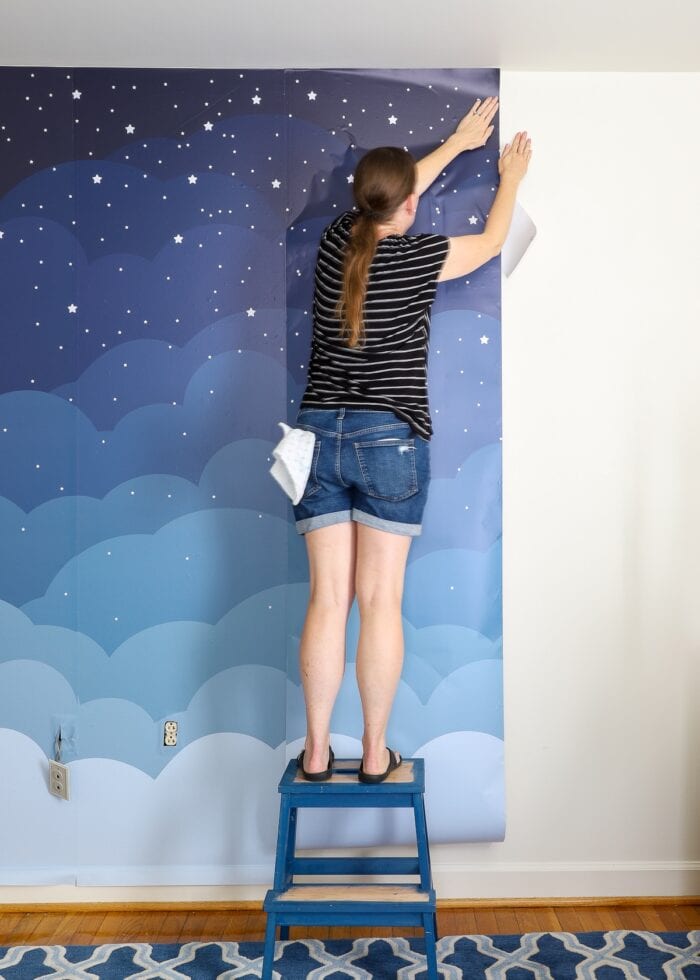
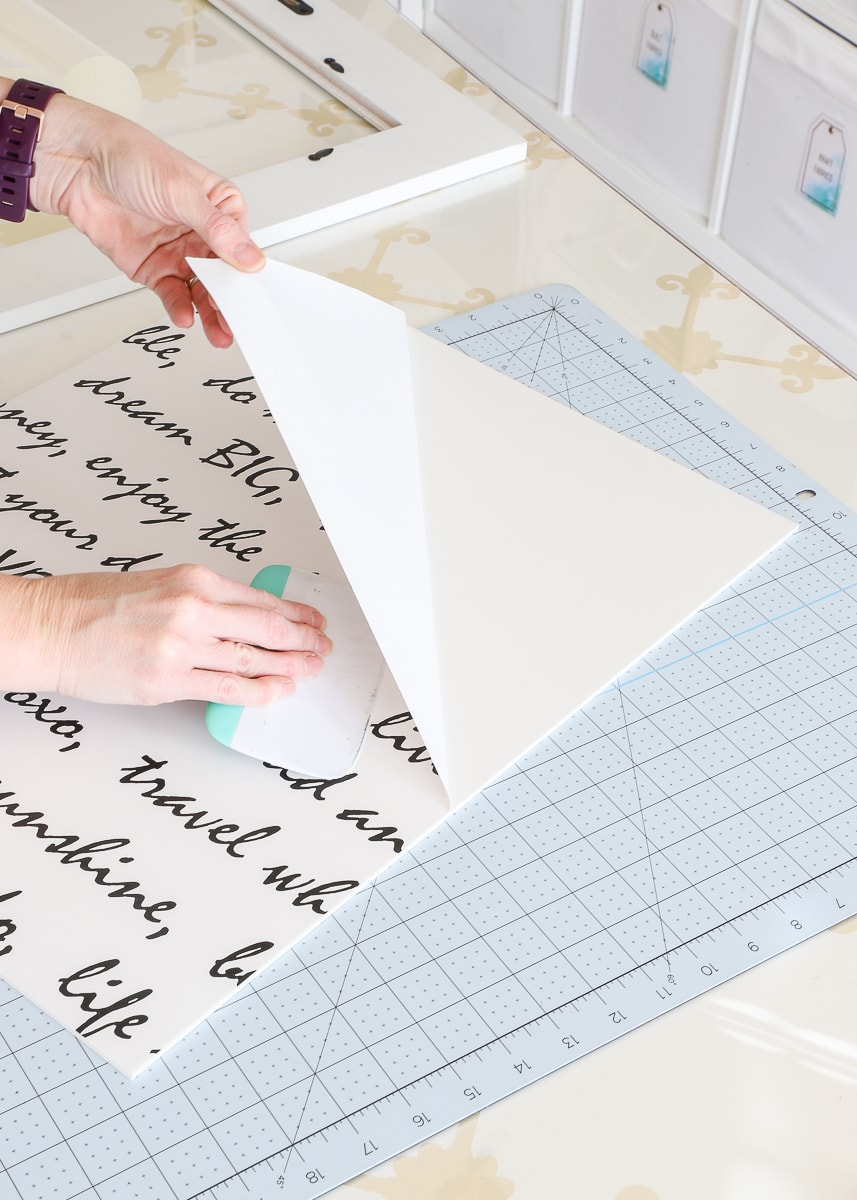
As a perpetual renter, I can’t use pasted wallpaper or wallpaper paste, but I’ve had really good luck using liquid starch to adhere traditional (non-pasted) wallpapers to our walls in a removable way. (Full blog post tutorial: Renter-Friendly Wallpaper Installation Using Liquid Starch)
When I first attempted to test some non-pasted wallpaper on our textured walls, I had a hard time getting the paper to stick thanks to all the rivets, dents, and bumps on the wall. Not to be deterred, I changed my methods just a bit (soaking both the wall AND the paper with liquid starch provided the adhesion I needed), and I eventually got the paper to stick.
Below is my test scrap of traditional, non-pasted wallpaper applied to our textured walls with liquid starch. Straight on from the front, it looks perfectly fine and normal! It’s smooth, it’s secure…

…and it was still totally temporary. The angle below shows the paper coming off the textured walls in a single sheet, leaving no paper or residue behind!

However, below is a shot that perfectly shows some of the “issues” I encountered with the textured walls and this traditional wallpaper.
As you can see, the wallpaper is fairly lightweight; and as such, the texture really, really shows through the paper (especially on the reflective, metallic areas). Also note that the seam between two sheets of paper isn’t perfectly smooth.

Because of all the bumps, ridges, and grooves of the textured walls, getting the sheets of wallpaper to lay perfectly flat and create a seamless transition between panels is pretty tough, if not impossible.

Even with super precise measuring and lining up the pattern, there will inevitably be bumps and gaps that you just can’t prevent.

Now, could these gaps be prevented via skimming or sanding your walls or using a wallpaper liner prior to the paper application? Perhaps. But as renters, such measures are not considered “un-doable” and therefor not a “renter friendly” option for us.
If you’re a home owner, applying a skim coat to the surface area and/or using a wall liner can create a smoother surface and improve your results.

But did these teeny, tiny imperfections stop me? Not at all! I ultimately determined, that at a distance, the paper still looked smooth and seamless, and so I proceeded to paper the entire room!

Besides the texture “showing” under the metallic stars, I had zero issue with the traditional wallpaper sticking AND staying until we moved out (about 2.5 years).

All that said, I still had a strong suspicion that the “problems” I encountered were more due to the white, light-weight texture of the paper rather than the walls, so I decided to experiment with some heavier, darker, more-textured paper just to see.
I chose to hang some leftover grasscloth wallpaper (from my grasscloth covered truck); and this time, I had absolutely no issue with the wall showing through or matching up the seems (since the paper was thicker).

Conclusion
Based on my experiences, I believe you can apply traditional pre-pasted wallpaper or non-pasted wallpaper (with liquid starch/paste) to textured walls. Darker, thicker wallpaper will do a better job at concealing the texture of the wall underneath, and you will likely need more starch/paste to get the job done.
That said, the minor “imperfections” you may encounter with lighter papers (texture showing through, slight bumps in the seams) may not be a deal-breaker either. Only testing it on your walls will determine if you will ultimately like the results.

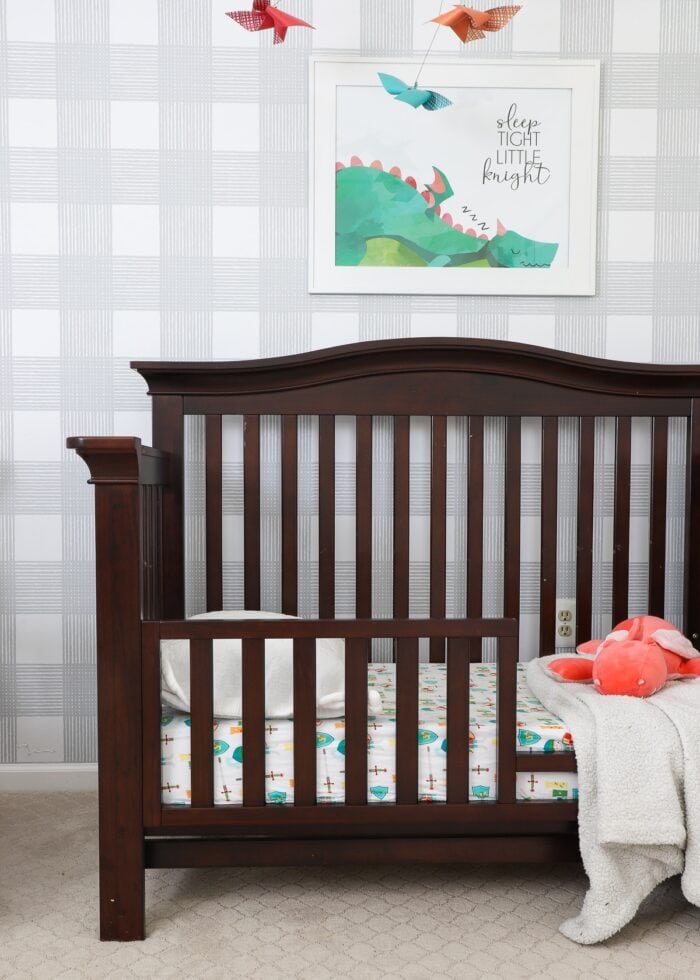
You can see the full nursery reveal here!
More Great Information on Wallpaper In Your Home
Ready to tackle more wallpaper projects in your home? Check out some of my other favorites!
- How to Hang Peel and Stick Wallpaper
- Does Peel and Stick Wallpaper Damage Walls?
- A Complete Guide to Updating Furniture with Wallpaper
- Can You Use Peel & Stick Wallpaper In a Bathroom?
- Can You Put Wallpaper on Textured Walls?
- How to Wallpaper the Back of a Bookcase | Step-by-Step
- Wallpapering a Stairwell | Tips You Need to Know!
- How to Hang a Wallpaper Mural | Tips & Tricks for Great Results
- How to Wallpaper a Backsplash
- The Best Wallpaper for Your Kitchen Backsplash
- Can You Put Peel and Stick Wallpaper on the Floor?
- How to Line Drawers with Wallpaper
- Solid Wallpaper | What It Is + Ideas for Using It
- Wallpapering a Whole Room Versus an Accent Wall | What I Learned
- How to Frame Wallpaper as Art
- How to Use Wall Decals to Look Like Wallpaper
- How to Wallpaper the Inside of Wall Molding Frames
I realize this post isn’t full of the prettiest pictures, but I do hope it helps out those of you who are loving the wallpaper trend but have been hesitant to give it a try because of your textured walls.
I can’t emphasize enough that you should ALWAYS test a sample of the paper you want to use on your walls before doing a full installation. That said, based on my few experiments using both peel and stick and traditional wallpaper, you should be able to enjoy the wallpaper trend in your home…bumps and all!
Megan

51 Comments on “Can You Put Wallpaper On Textured Walls? My Real Life Results!”
I have different textures all over my house. But mostly the orange peel texture. This totally gives me something to think about. And then practice. Thanks for sharing your tips and tricks!
oh, this is exactly what I have been asking myself lately. i have texture walls all over my house and will love to try the wallpaper method on some walls. Thank you for the insights and testing it for us, there are very helpful.
Great post! Thanks for taking the time to try all of those scenarios!!
Thank you for this post! We are in the process of building and I knew I wanted wallpaper in some areas but was concerned about the texture! Thank you!
Thank you so much for doing this! I have textured walls (possibly a tad too textured), and I was dreading having to get someone to come in and plaster the wall I wanted to wallpaper. But your post gives me the courage to try some thick Spoonflower paper, which I picked because it’s also formaldehyde-, PVC-, and phlalate-free. Most wallpapers have this toxins that off-gas into your house!
Great info on off-gassing! Especially for doing a child’s room like I am!
You are wonderful for sharing this. The pictures provided so much detail. I’m going to order some samples right now to try on my walls. Thanks again for a great detailed article.
Where can i find the starch that you used? Does this already come in liquid form and is there a trusted brand that works the best?
Hi Courtney,
The liquid starch shown is from Walmart. I’ve never tried any other brands, but this one (https://www.walmart.com/ip/Sta-Flo-Concentrated-Liquid-Starch-64-fl-oz/22374157) is cheap and has always worked for me!
Good luck!
Megan
If I used the peel & stick in our apartment (where we’re not allowed to paint), would it pull off the paint/damage the walls when I went to take it down?
Hi Brittany,
It shouldn’t. I always recommend testing a small strip on your wall first, but I’ve never had peel-and-stick wallpaper take paint off with it. In fact, you can see some of my experience taking down peel-and-stick paper here: https://thehomesihavemade.com/2016/08/hit-miss-renter-friendly-walls/
Hope that helps and good luck!
Megan
Hey there! Thank you for the great post! I have textured walls and am wanting to hang some of the target wall paper on one wall in a nursery. My walls are the same texture as yours but they do not have the egg shell paint on them. Do you recommend applying any extra adhesive to the wall? Thank you!!
Hi Danielle!
I wouldn’t add any additional adhesive than what it already on the peel-and-stick wallpaper. I’ve applied Target’s brand to both flat/non-textured walls, as well as our current textured walls with eggshell/semi-gloss paint. I would test a strip before you do a full installation, but otherwise, I think you should be fine to put the paper straight on your walls!
Good luck!
Megan
Thank you!
I just found my dream bathroom and jumped right on that wallpaper, being shipped as I write, from the UK. THEN………I began thinking that in less than a month, my contractor is going to raise my bathroom ceiling from 7 to 8′ standard height. (I do not understand why both my bathrooms were 7′ tall and the rest of my villa is normal. I live in SW FL. There must be some logic in this.) Anyway, when Hurricane Charlie went through here (2004), I guess my villa had water damage. The paint in that bathroom is awful. It is sort of blistered. I thought perhaps they had failed to take wallpaper off……….or maybe they never washed off the sizing well after they did……….but really messed up. Therefore, I told the contractor, rather than tearing out the drywall, when he adds the foot of height, let’s just texture the entirety (currently the walls are flat — but with blisters). This save beaucoup $$$$$. I have already agreed to the estimate for this demo of my bathroom. Now, with the expensive wallpaper on the way, would it work on the newly textured walls? I tried with an exact blade cutting through some of the blisters to see if that was wallpaper. I picked the most conspicuous spot available……..duh. I found that the paint would pop off the drywall leaving VERY dry drywall, which will now have to be covered with mud to camouflage where I chipped away……..itsy bit by bit…….very tedious. Found no wallpaper under there. No idea how blisters could have happened. Water pouring in perhaps through skylight during “Charlie”? I think it probably best to follow through with changing the wall to textured. What do you think?
Wonderful job! I found your site, bc i have a home built in 1950; &had the same question! Not as much texture on walls as what yours show in the pics,(&no popcorn-type ceilings), but I wanted to try some of the new “night sky” cieling papers out now; I find them so interesting & relaxing.(Especially as someone who meditates& doesn’t sleep well.) My grandfather built this home,& the walls are almost soundproof, due to the drywall thickness & a coat of plaster somewhat swirled on top, common during that period. So thank you for your site,& if you have any additional info on the new “night sky” papers, let me know! Thank you!
So glad you found the post helpful! Let me know how it turns out with the night sky paper!
Megan
Thank you so much for the post! I’ve been wondering for months if wallpaper would work on my textured walls and have had people (who have never used wallpaper) that it wouldn’t work. I’m so happy to know it’s possible. Thank you!
You are a lifesaver! Your details and instructions were exactly what I needed. The starch app is one I’ve never used and intrigues me. This is our daughters new home and I could use paste and that’s what I tried but the only paste I found at Home Depot kind of looked like Elmer’s and not at all like glues I’ve used in the past The paper she chose is thicker and the walls are similar to yours just lightly textured and the paper over the texture takes on some more interest but those seams are very familiar. That was one of the issues I had….seams not staying down at all and annoying the heck out of me! I’m headed to Walmart tonight and back to my daughters tomorrow. You are generous to share your knowledge and experience with us! Thank you. I’ll send pics!!
Thank you for your post! How just how thick/heavy-weight were the papers that you found worked best on textured walls? I’m excited about a particular wall mural from Houzz, but it’s not possible to get a sample without buying a whole roll, so I’m hoping to have some metric I can use to tell if it’s thick enough before purchasing.
Thanks in advance!
Kelsey
I have tried peel and stick decor on flat walls while living in IL and after a few weeks all start to peel away from wall. Now I live in CO and have horrible textured wall everywhere with shiny paint. Very unforgiving paints. It’s so thick, it does not crumple when you hammer in nail, it peels off. Very hard to fix your mistakes. I loath it. Wallpaper does not peel off without damage. I think your theory on peel off wallpaper depends on walls, paint and humidity factor.
How thick the traditional wallpaper should be for textured walls is 2mm thickness good enough to hide the texture if not what should be the thickness of the paper.
Hi there!
I am sorry I don’t have an exact answer for you! I admittedly didn’t note the thickness of papers when I was doing my experiments. The thicker the paper, the better if you have really significant texture…but really, the only way to know is to do a test. Most paper companies can send you samples (unless you are ordering from a big box store)…so I recommend doing a test with a small section before ordering/installing a full wall/room.
I am sorry I can’t be of more help on this one but good luck with your project!Megan
I’m wondering what smoothing tool you used for these applications of wallpaper to textured walls. Worried with a hard plastic tool and thinner paper it may rip. Just wondering if you had to modify at all from other wallpaper installations you’ve done. Thanks for all the great info.
Hi Danielle!
Thanks for reaching out. I personally used a small craft brayer and wads of paper towels (seriously!). You might be surprised to see that even “thin” wallpaper is pretty durable…and don’t hesitate to do some tests with smaller swatches before doing a full installation!
Hope that helps!Megan
I read this post and decided to try a sample on my textured walls (mine are not like Megan’s but rather remind me of ceiling texture but not the popcorn kind). It sticks good so far (day 1) but, given I am a total novice at wallpapering and didn’t know how much pressure to apply, I did tear the wallpaper in several places where the pointy tips of the texture popped through. I smoothed it pretty hard because I wanted to make sure it would be completely adhered to the wall. It may work if I took a lighter hand at smoothing. However, I am concerned about the seam issue that Megan referenced so I think I probably will opt to do the whole sand-and-primer route. I own my home so what I do with the walls is my choice. I’m just lazy and would prefer to skip that step! Anyway, thanks for this post Megan!
Is there a reason you use starch instead of wallpaper adhesive? I have very light orange peel walls and so far my peel and stick is fine. But I’m about to dive into the non pasted for my breakfast nook. Nervous!!
Hi Tiffiny!
I only used liquid starch because we’re renters…so we NEVER do anything that is remotely permanent. Using wallpaper adhesive is going to be a fairly “permanent” method that will require more work to take down.
Hope that helps!
Megan
Hi, thanks for all this info! Do you use the roller to apply the liquid starch to only the strip of the wall you are working on and then roll it on to the back of the wallpaper for textured walls? Should the liquid starch be applied liberally to both areas? Thanks for your help!
Hi Elizabeth,
Thanks for the note and sorry for the delay getting back to you.
When I applied wallpaper two smooth walls (in two different homes), I only had to starch the wall. On our textured walls, it didn’t seem like enough tac so I applied liberal amounts to the paper too.
So I would just test to see what your walls need. The liquid starch will dry clear…eventually…so it won’t hurt to add more than needed. It may just take a little longer to dry!
Hope that helps!Megan
Thanks for all of your great information
On your textured walls using the starch , when you removed it did you have any cleanup left to do on the wall?
Considering hanging a wallpaper non-pasted mural to one of my walls in my bathroom but want to make sure it would come down and not mess up the wall and leave a lot of starch or weird deposits on the wall
Hi there!
No, there was not a ton of residue left behind on the walls…at all. If anything, I would say the textured walls felt a bit “rougher,” so I just wiped them down with a wet washcloth and they felt like glossy paint again.
Hope that helps!Megan
I want to apply a wallpaper mural to one textured (same texture as yours) accent wall but the paint is flat. Do you think it’s ok to apply traditional wallpaper using your method to flat painted walls or would you recommend priming the wall with a different paint finish first?
Hi there!
I’ve used the liquid starch method on flat paint (non-textured) walls and it worked just fine. I don’t think the paint sheen really affects adherence. That said…my best advice is to do a test, if you can, before doing the full mural installation to make sure 1) it stays up to your satisfaction and 2) you can get it back down again!
Hope that helps a bit!Megan
You just saved my life. Thank you!!!
You’re the Saint of Wallpaper.
I’m working on a statue for you.
Which will happily distract me from the fear of finally making a decision. 😏
Ha, I love this comment! So glad this post was helpful to you!
Yes…picking the “right” paper is indeed the hardest step. Good luck and keep me posted on how it turns out!
Megan
Thank you so very much for writing this post, it was super super helpful!
I am so glad!
Good luck with your project!
Megan
Thank you for taking the time to write this! I was so looking forward to following this method and read this (& the other one referenced) post numerous times before trying it on my own. We did a test sample on my textured wall, and it worked great. However, after our putting up an entire strip, wetting the wallpaper with massive amounts of liquid starch, the paper still would not stick. Maybe it was too heavy? I’m super bummed and now have rolls of unpasted wallpaper with which I’m not sure what to do with in a rental. I’d love to know if I’m missing something!
Hi Dana!
Hmmmm…I am so sorry you’re having trouble – I can certainly empathize with your disappointment! I’ve actually NEVER had strips fall down, either during hanging or after drying. I am sure not every single wallpaper is “equal” in this regard, so yes, it might be that your paper is too heavy. I wonder if you’d be able to hold the top of the strip in place while the starch dries (painter’s tape between the wallpaper and ceiling)? When I did my textured walls, I applied a ton of liquid starch and could get it to hang. Did you REALLY saturate both the wall and the strip?
If you can’t get it to work, you can try something like this to still use it: https://www.makinghomebase.com/how-to-make-any-wallpaper-removeable/
I’ll keep brainstorming for you!Megan
Very insightful!
Hi there! I have a glass block wall in a room I’m looking to cover. This would mean it is very “textured”. Just wondering if you think that this would work for wall paper as besides not being smooth probably isn’t also flat.
Thanks!
Hi Alyson!
Sorry for the late reply here, but it’s probably worth a shot. I can’t say for certain since I’ve never tried it, but peel-and-stick papers tend to stick to glass pretty well. I would do a test with a small scrap before doing a full installation though.
Good luck with your wall!Megan
HI,
i was wondering how your peel and stick wallpaper has ended up sticking to your orange peel textured walls now that you are a few years and months into having it up?
we want to put this in our nursery but i am terrified of it coming down over the crib or something crazy.
thank you!
Hi there!
We applied peel-and-stick wallpaper to 2 different spaces with textured walls: our kitchen and downstairs powder room. Neither papers budged the entire time we lived there, and only came down when we intentionally took them down before moving out.
I personally wouldn’t hesitate to put peel-and-stick wallpaper up in a nursery (or any room) with textured walls, but I always always alway recommend doing a test before a full installation just to be sure. I suggest hanging a single strip and watching it for a few days/weeks to make sure you’re comfortable.
Hope that helps!Megan
Hi. I was wondering if you’ve ever tried stick-and-peel or wallpaper on wood panels or tile. I’m in a rental with both of these, and I’d love to cover up the existing finish. But I’m wondering if the gaps between the wood slats and from the grout in the tile would cause excessive bubbling over time. I also live in an area with higher humidity. Do you have any thoughts on these scenarios?
HI Rachel!
While I have not put peel-and-stick paper on paneling, I have done it on tile floor. You check out the post here, where I specifically talk about grout lines: https://thehomesihavemade.com/2021/02/can-you-put-peel-and-stick-wallpaper-on-the-floor/
I honestly wouldn’t hesitate to try it on wood paneling though. I don’t think grooves will be all that noticeable, and I am of the mind that a good wallpaper is almost always an improvement over existing ugly walls!
Regarding humidity, I’ve personally had no problems in hot/humid areas (we’ve lived in NC, VA and KS), and have successfully hung peel-and-stick wallpaper in high-moisture areas like bathrooms and kitchens.
That all said, I always recommend testing a few strips (and leaving it up for a bit) to make sure you like the way it looks and stays!
Hope that helps and good luck!Megan
yes you can as wall tiles actually comes with a strong adhesive that is stuck at the back of the stickers, allowing the stickers to be attached with the walls quite easily.
Hey Megan,
Thank you! Your down to earth information is absolutely priceless…so thank you so much for sharing!!!
We are at the beginnings of fitting out a shop and I have ordered a textured brick wallpaper for a lang feature wall and just today realized that the walls are rendered concrete with a course texture….but I happened across your post just now and my apprehension has turned back into excitement 💖
Please add me to your mailing list…
Kind regards
Kath