How We Organized All the Things In Our North Carolina Garage
I’ve put off writing this post for months. I’ve had all the pictures ready to go since November, but kept procrastinating because this garage now feels like a (very) distant memory. The truth is, it’s been almost two years since we moved everything out of this garage (and we’ve since moved into and organized two more garages!)
But even though I have other (newer) stuff I’m itching to show you, there are still some valuable and worthwhile organization solutions I want you to see in this garage. (This garage reveal actually marks one of the very last spaces in our North Carolina home I’ve yet to show you. I’m on a mission to get it wrapped up so I can start showing you our new home soon!) So let’s chat garage storage!
Our North Carolina Garage | Before & After
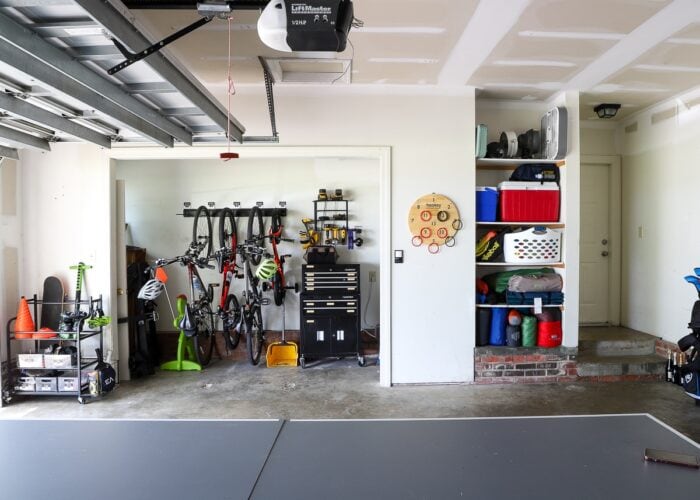
Below are some quick before and after shots of our very large two-car (plus!) garage in our home in Camp Lejeune, North Carolina. With no basement, this space became everything but a place to park our cars. Bike storage, sports storage, beach storage, deep/holiday storage…it all landed right here.
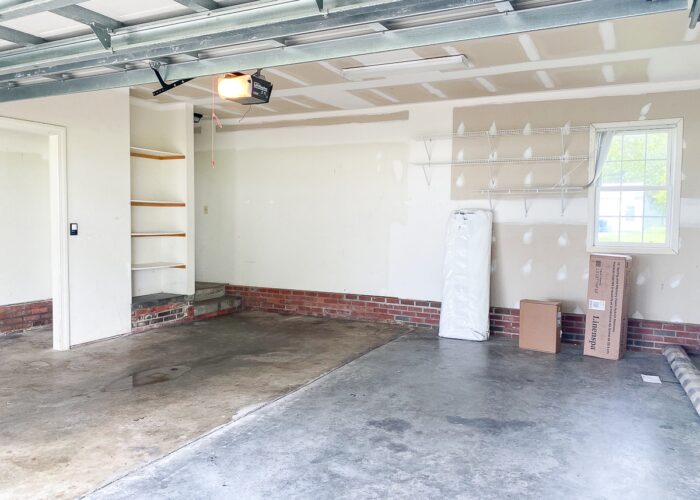
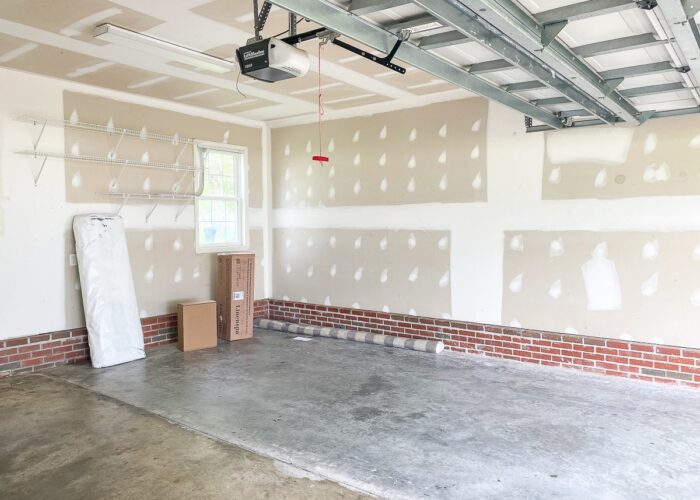
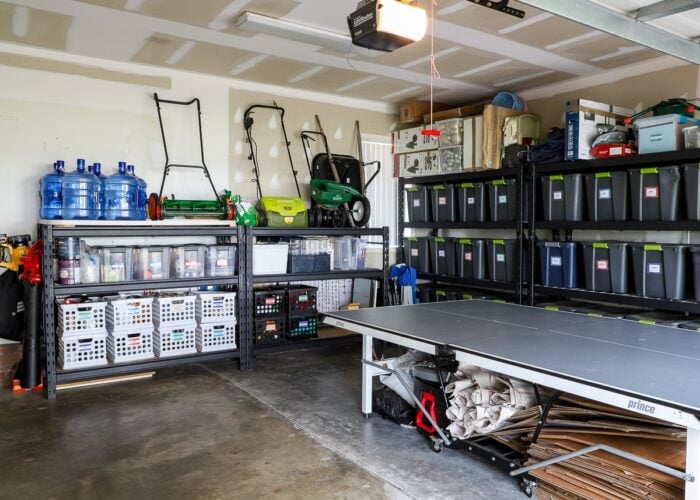
I’d really love to say this garage looked like this the entire time we lived in this house. Alas, it took us most of our 2-year assignment to get it purged, sorted, and organized just right (or, let’s be honest, to get it so that we could just walk through it!)
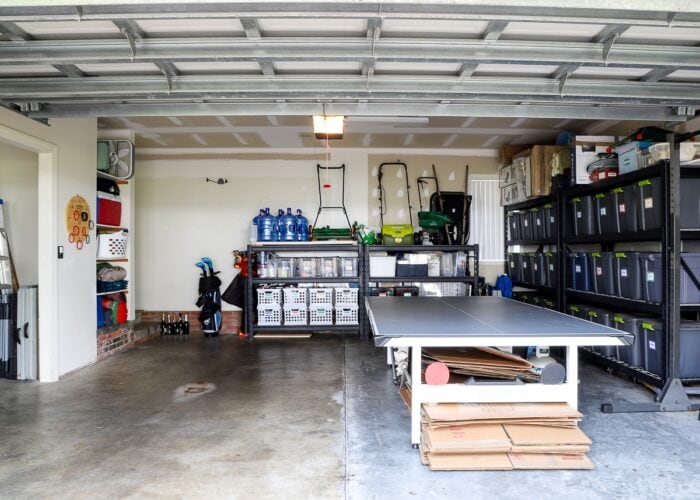
When I do “room reveals,” I typically systematically work around the room. But here, I think it might be more helpful to show how we organized various categories of garage items. Some solutions worked great, others not so much. By deep diving into each category, maybe you’ll see something that might work in your particular space or for your particular stuff!
Organizing Sports Equipment
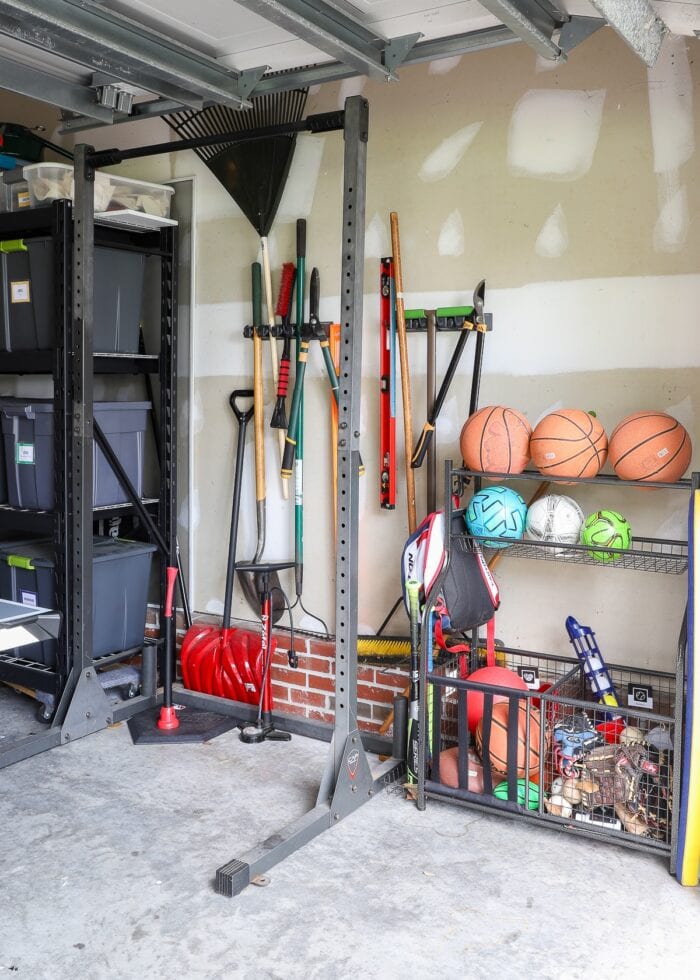
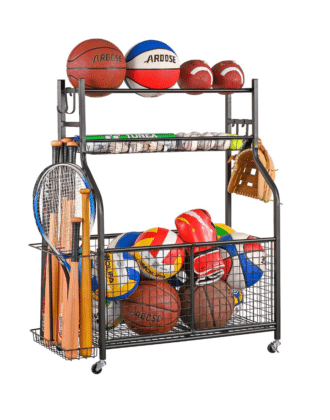
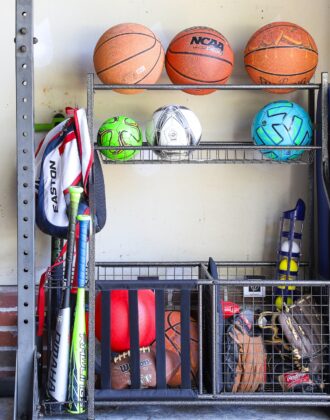
Corralling and organizing all the sports equipment kids accumulate is tricky. Over the years, we’ve tried big open bins, specialty racks, and everything in between. In this house, we purchased two rolling racks (this one and this one) and had them positioned on each side of the garbage opening.
These carts are designed to hold a wide variety of sports items (e.g., balls, bats, rackets, mats, bags, etc); and by positioning them close to the garage door, it was easy for the kids to grab whatever they needed for play or practice.
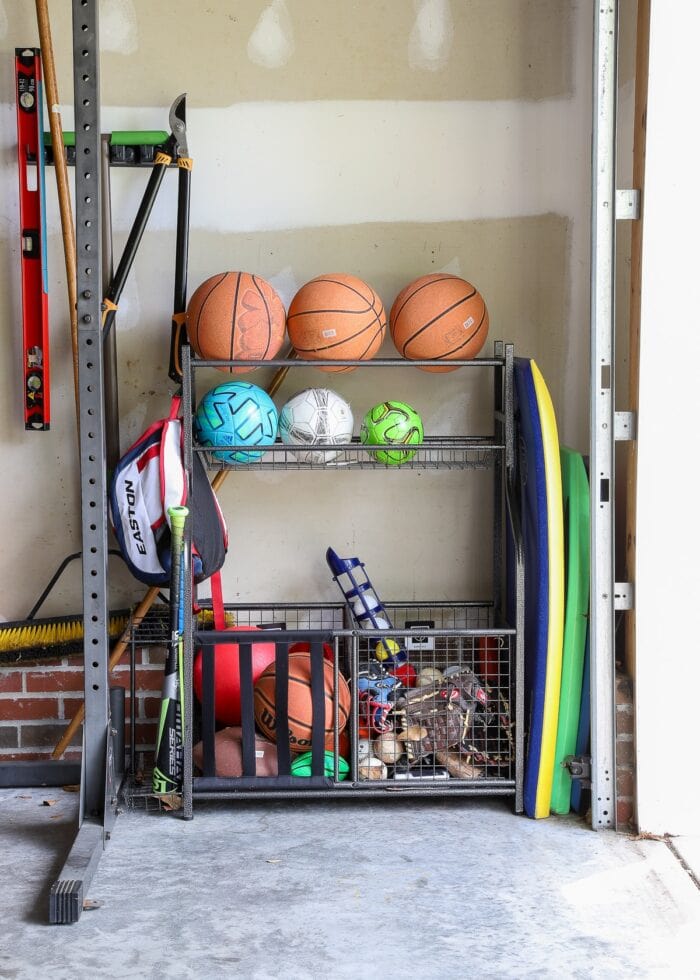
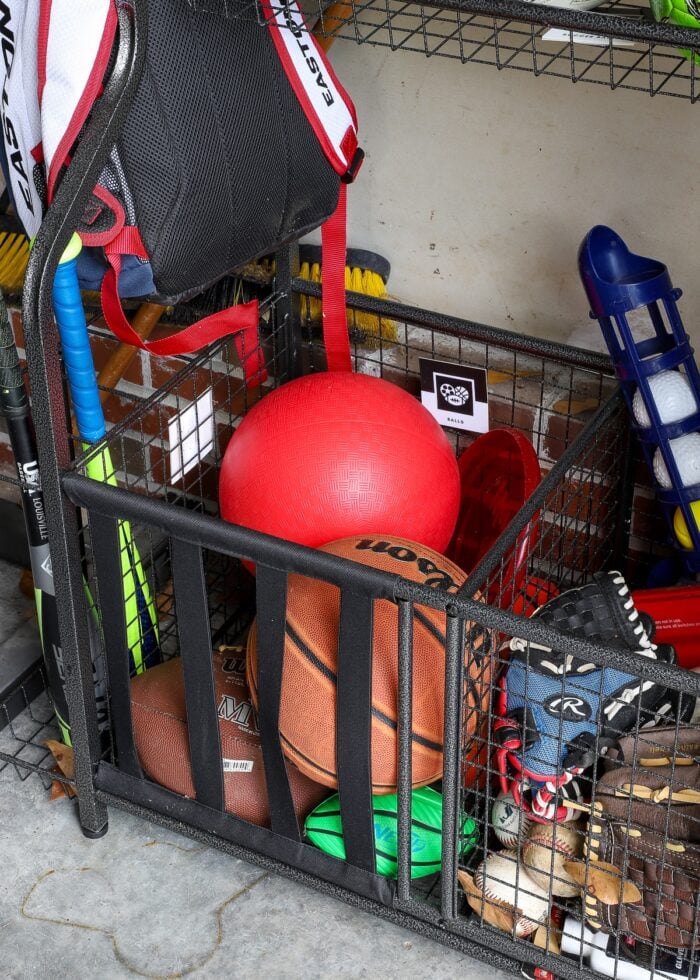
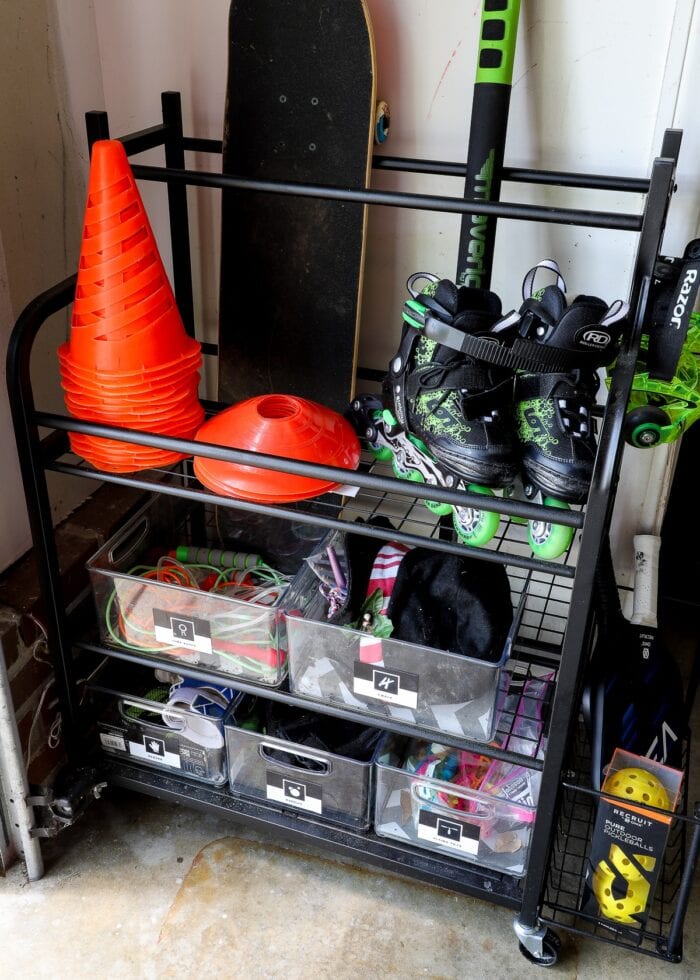
The cart above was positioned on the right-hand side of the garage. We LOVED the open rails along the top for basketballs and soccer balls, as well as the big open ball bin with elastic straps (for more balls) and the vertical rack for bats (left side).
These specific features really kept unruly items from just lying all over the garage. And since the overall size of this cart is somewhat compact, it never got too deep or too unruly for the kids to rummage through.
On the other side of the garage was this cart (below), which is intended to hold fitness equipment. As such, it didn’t have quite as many useful areas for small stuff.
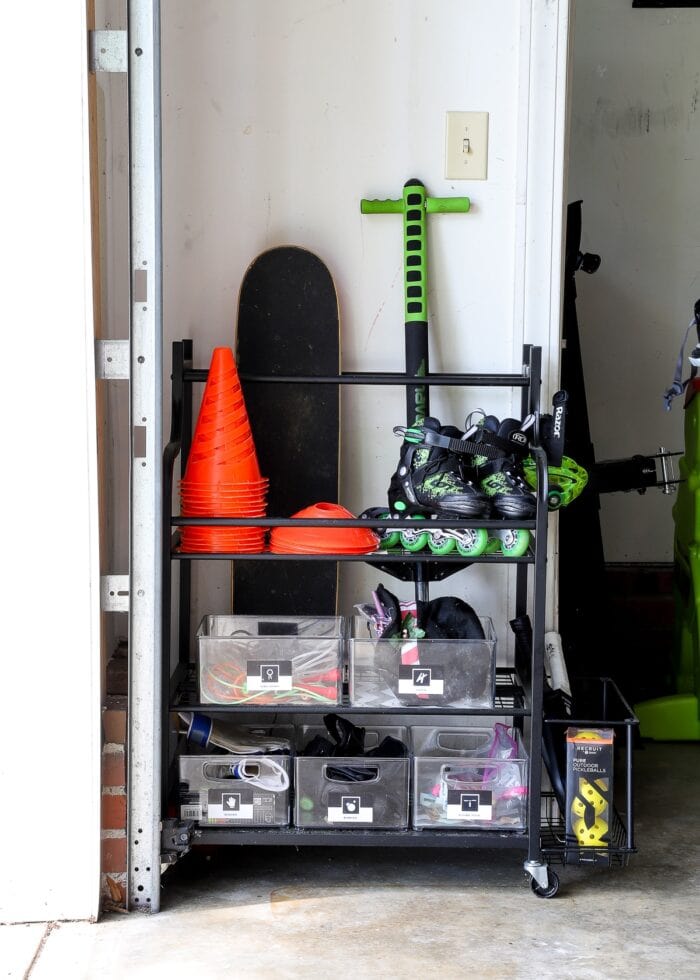
The open back compartment was great for longer items (e.g., skateboards and pogo sticks), but the open shelves necessitated bins in order to be useful to us.
Unfortunately, these bins quickly became jumbled, filled with dust/leaves, and an overall mess. This rack is still great if you have large/flat things to store, but the small bins on the shelves didn’t quite work as intended.
Looking for more details on our sports storage? Dive deeper here: Storing Kids’ Sports Equipment | Our Real Life Solutions
Organizing Lawn Tools
Lawn care tools are another item that quickly become a mess because of all the different shapes, sizes, and lengths.
I purchased these wall racks, thinking they would be a great solution for all our clippers, brooms, rakes, shovels, etc. In the end, the prongs were too close together to hold everything in a neat, orderly way.
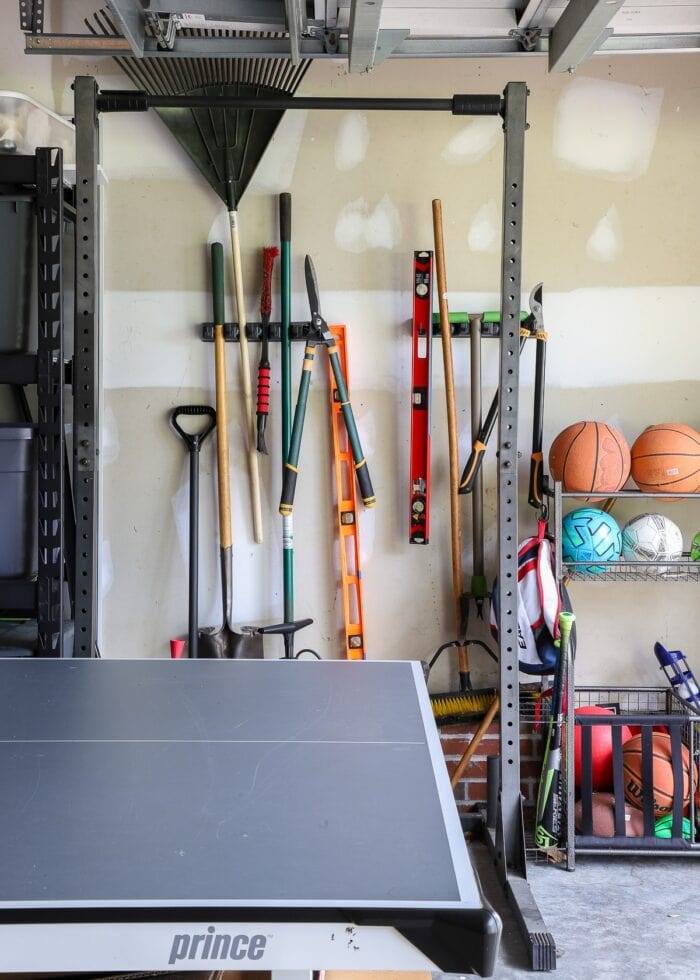
Some items didn’t clip in at all, and others had to be offset (high/low) just to make them fit (look at that ridiculous rake). Not only could we not hang everything we needed to (the shovel and big broom couldn’t reach the clips), but it just looked like a jumbled mess overall. Two thumbs down, do not recommend.
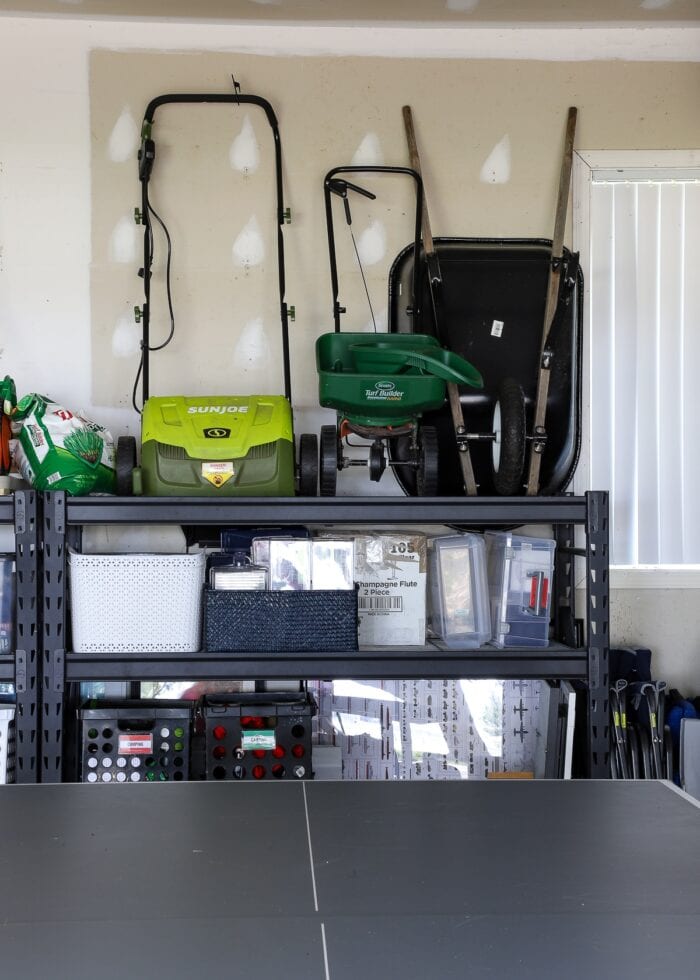
Small, skinny lawn tools are tricky enough. But large, bulky things like the wheelbarrow, seeder, push mower, and dethatcher require entirely different solutions.
I really wanted to mount hooks for these items (way up and out of the way) but we ultimately determined we had “shelf space” for them instead.
Our shorter utility shelves had plenty of clearance to the ceiling, and we didn’t need the top shelf for anything else. So while this solution wasn’t quite “Megan approved,” Greg loved being able to pull things down and put them back up without any hassle. (And I’ll admit, not having to mount heavy-duty hooks was a serious plus!)
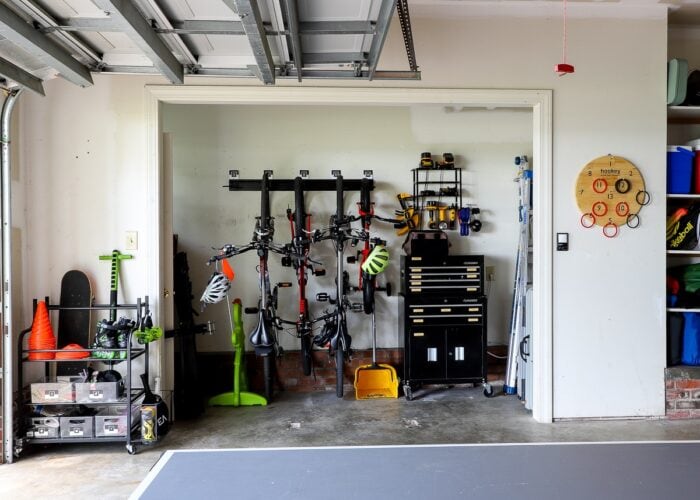
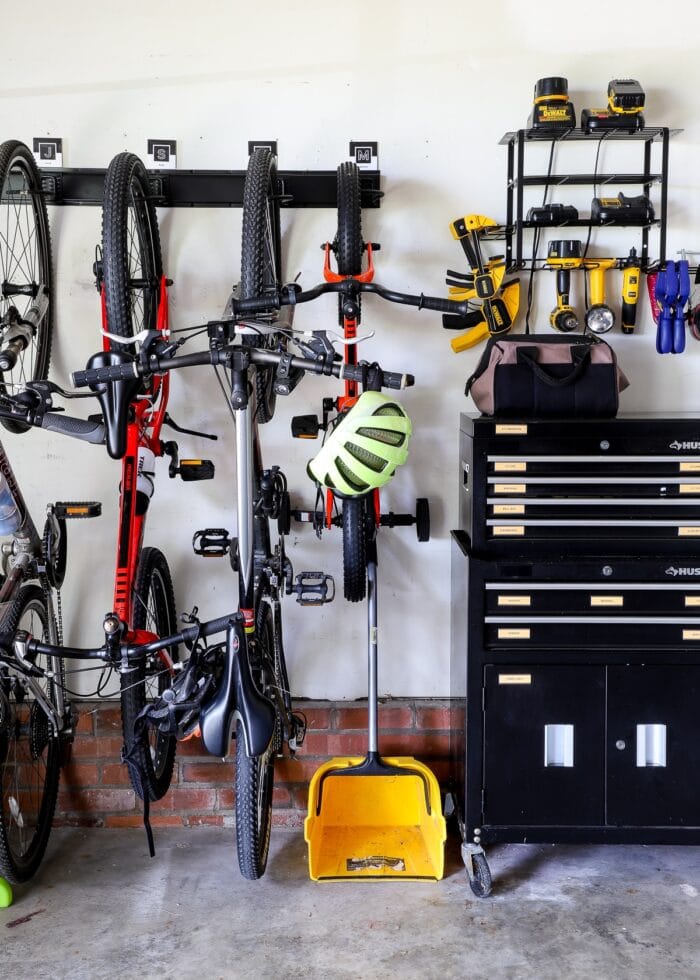
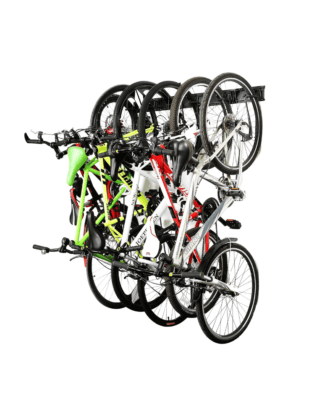
Organizing Bikes
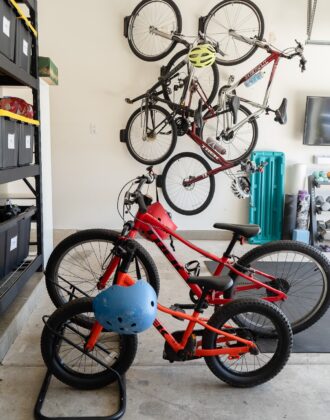
When we first hung up our bikes on this wall-mounted rail, I was obsessed. Primarily because for the first time ever, there weren’t bikes covering the floor of our garage and we could actually walk through it unimpeded.
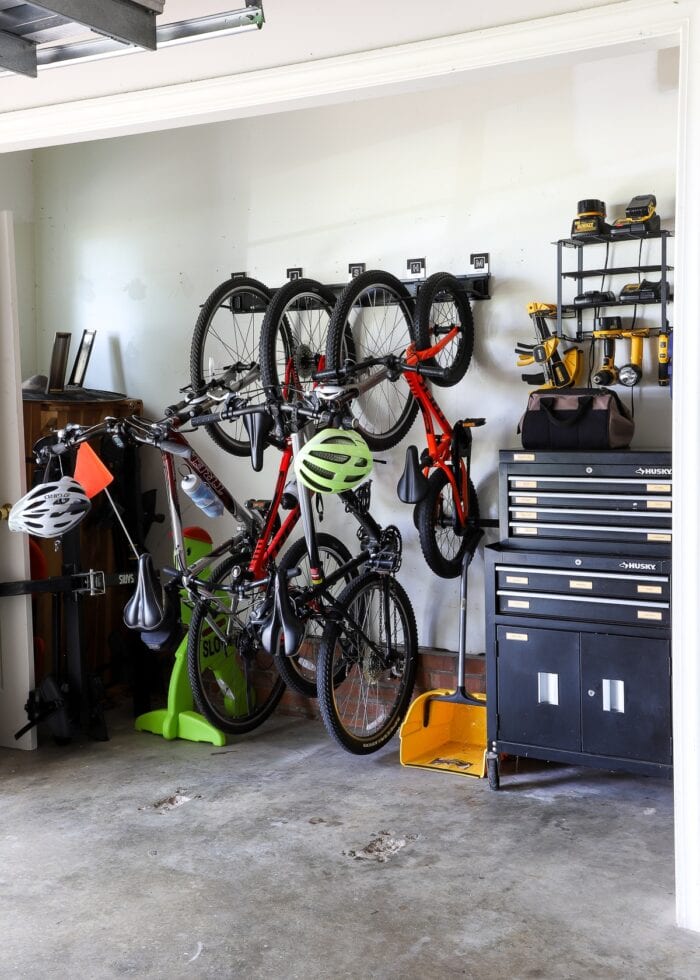
Also, because we hung the bikes in this side alcove in the garage, it meant the bikes were 100% out of the way and didn’t take up main garage floor space at all.
If we rarely or never used our bikes, this would have been a 10/10 solution. But we’re a family that uses our bikes, especially our kids. And these hooks were just too high and cumbersome for them to use on their own.
So as a result, the boys’ bikes ended up on the garage floor (although Greg and my bikes remained mostly mounted). This was a solution I really wanted to love, but it just isn’t practical for kids (or even adults who don’t have good discipline to put their bike away every time!)
We just installed a different bike storage solution, and we like it so much better. See it here: How We Store Our Family Bikes
Organizing Beach & Camping Gear
I personally find storing beach and camping gear annoying because the items just don’t fit neatly into tidy bins. Sleeping bags, sleeping mats, tents, shovels, pails, coolers, yard games…all of it is pretty bulky, with lots of mis-matched sizes.
Fortunately, these (somewhat shallow) built-in shelves in our garage turned out to be the perfect height and depth for these oversized items.

This single “set” of shelves turned out to be one of the most functional solutions for our camping and beach gear we’ve ever had!
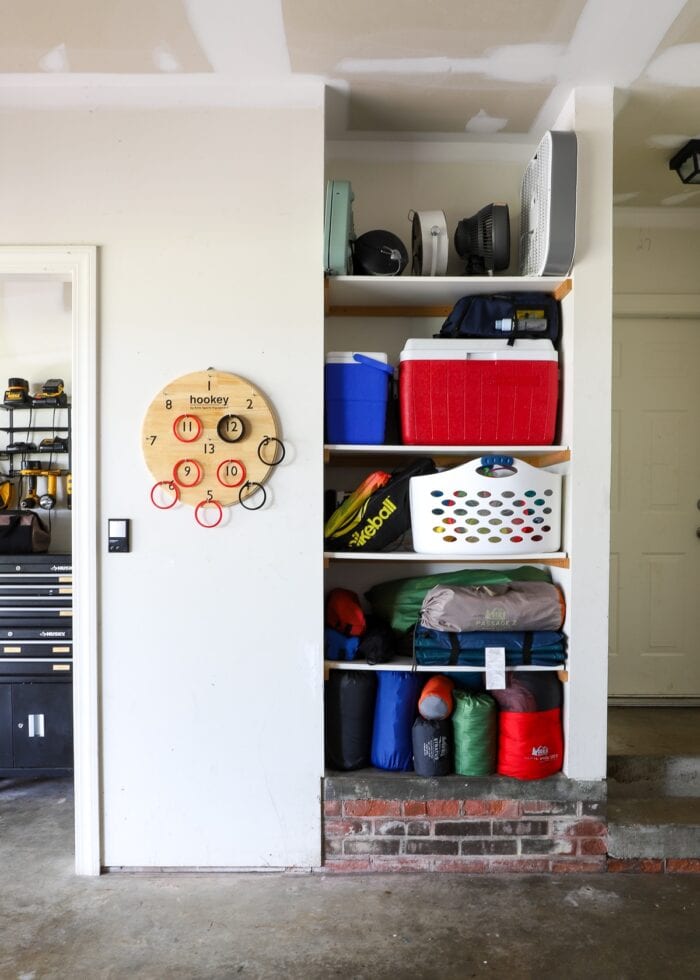
I think the real key to this arrangement’s success was the height and depth of the shelves themselves. They were big enough to hold a single set of items (e.g., tents, sleeping bags, coolers) but not so big that everything toppled over or became a disorganized hodgepodge of items.
For about the first time ever, getting packed up for campouts wasn’t a huge headache!
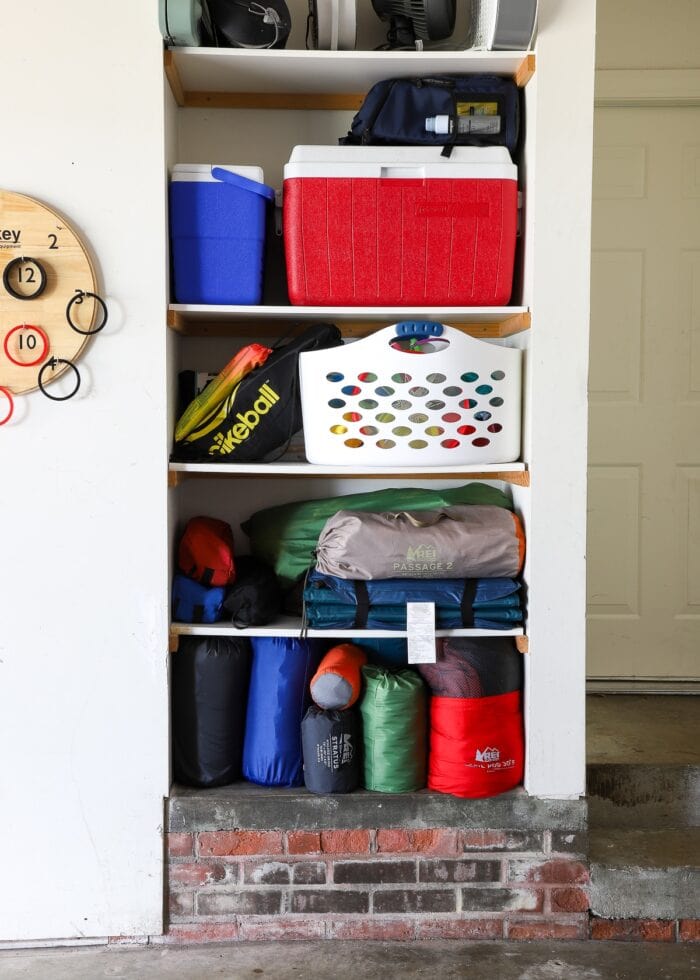
A quick note on where and how we store folding chairs (i.e., camp chairs, beach chairs etc): skinny nooks!
Want to save this post?
We will often intentionally place shelves (or other storage units) in a way that creates slender openings. These skinny spots work great for skinny things that topple easily…like chairs!
Although this particular spot (below) wasn’t near the rest of the camping and beach gear, it was SO easy to slide these chairs in-and-out whenever we needed them that it still proved a solid solution overall.
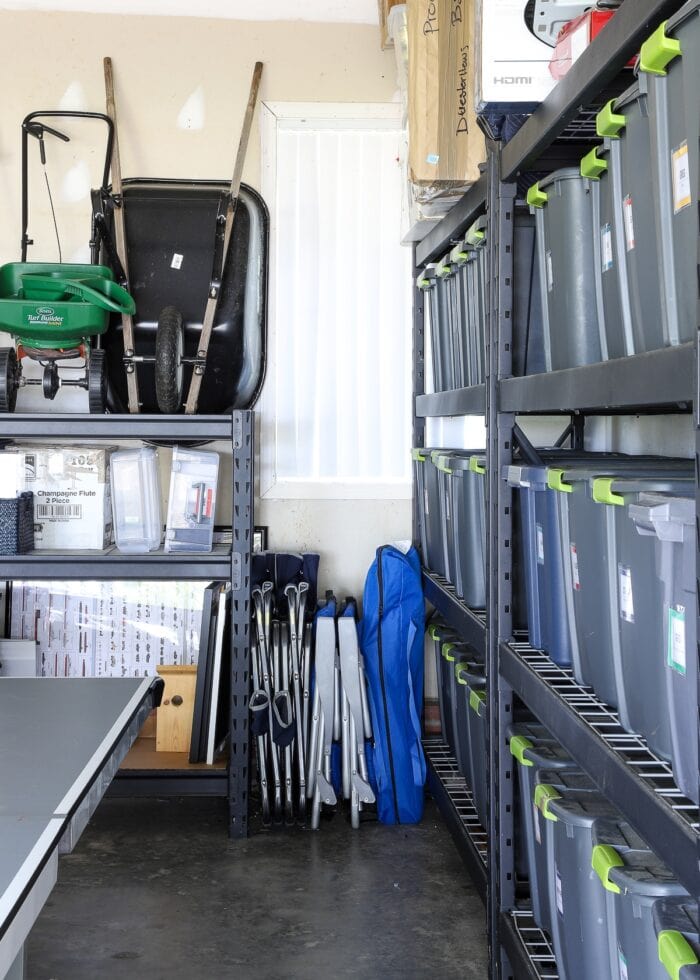
Organizing Tools
Ladders are another item we often tuck into those skinny nooks; but in this garage, we had the entire wall-size alcove that allowed us to store other awkward things out of the way.
Inside the corner of the nook, there was plenty of space to safely store our ladders, saw horses, and folding tables.
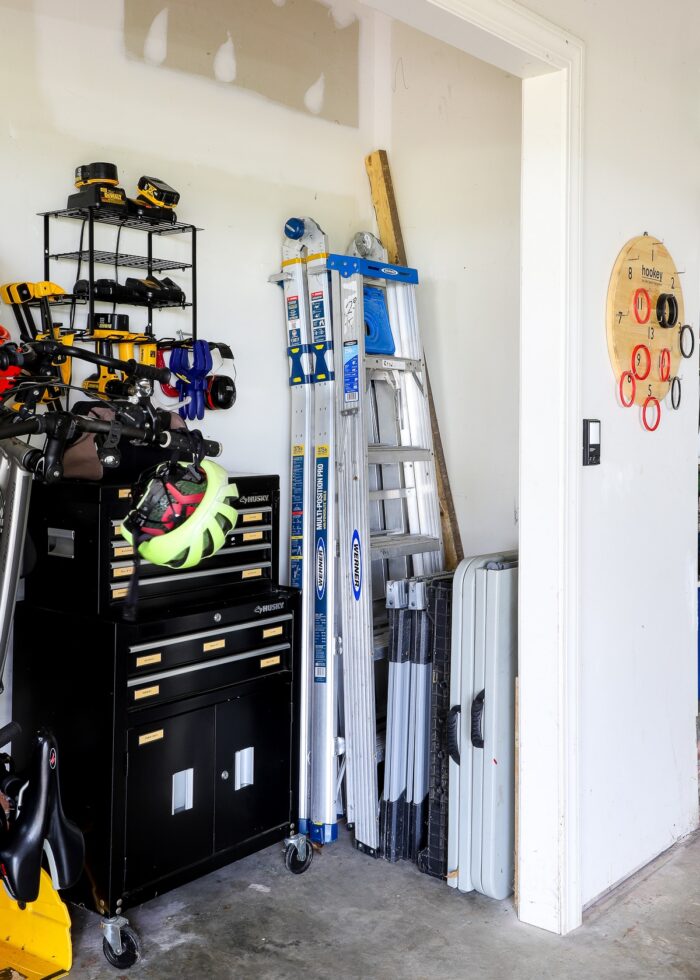
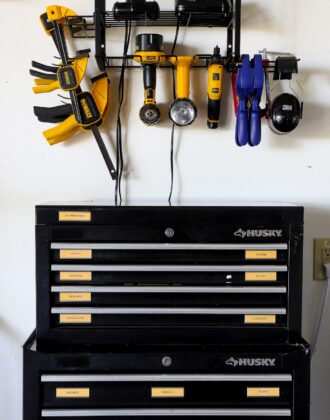
And then sandwiched between those items and the hanging bikes, we had just enough room for our rolling tool box and wall-mounted tool shelf.
This arrangement, while somewhat compact, often takes up a lot of floor space in a traditional garage layout. Having it tucked into this nook allowed us easy access to all our tools without it feeling constantly in the way.
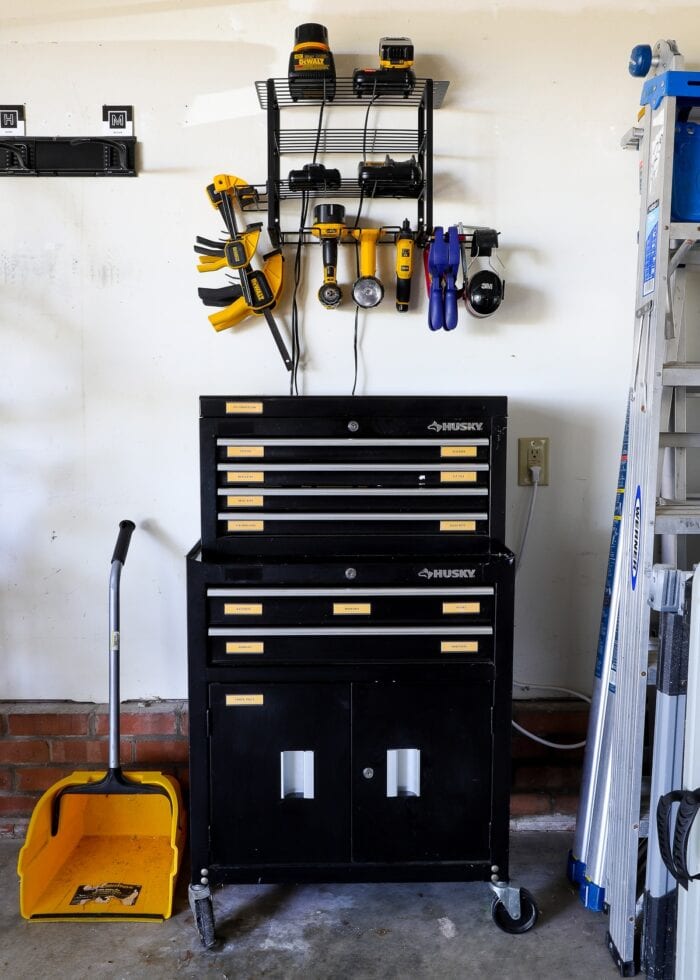
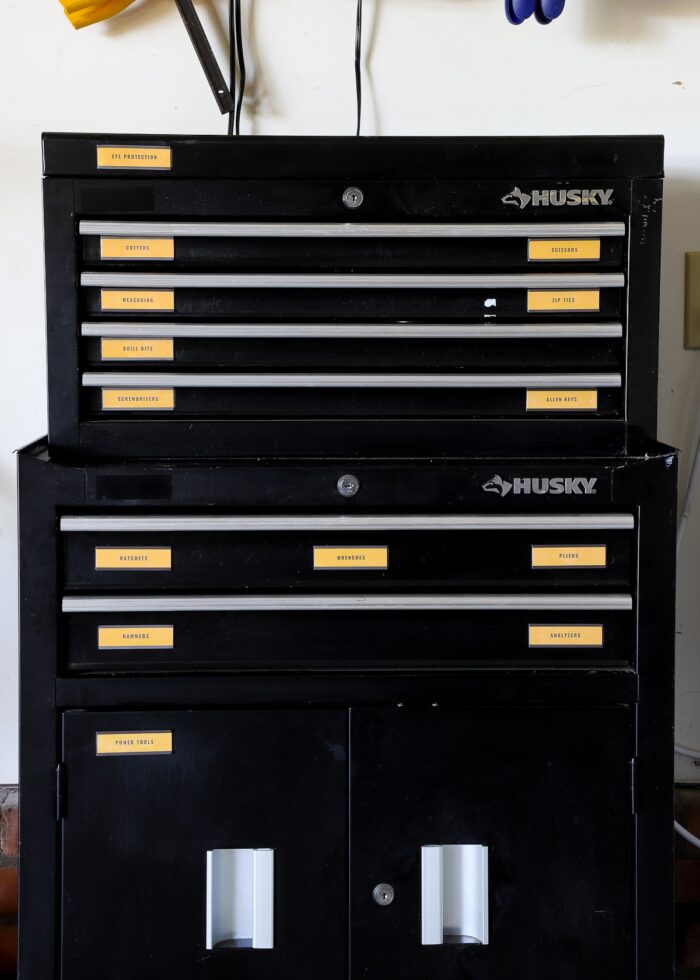
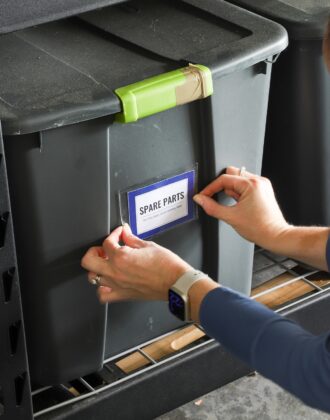
Another major win in this space was figuring out how to easily and practically label the rolling tool cart: magnetic labels!
After years of total chaos inside these drawers, it was so nice to finally get it sorted out and be able to know exactly where everything was!
See how the magnetic labels were made (and get the template!) here: DIY Magnetic Toolbox Labels (With Template!)
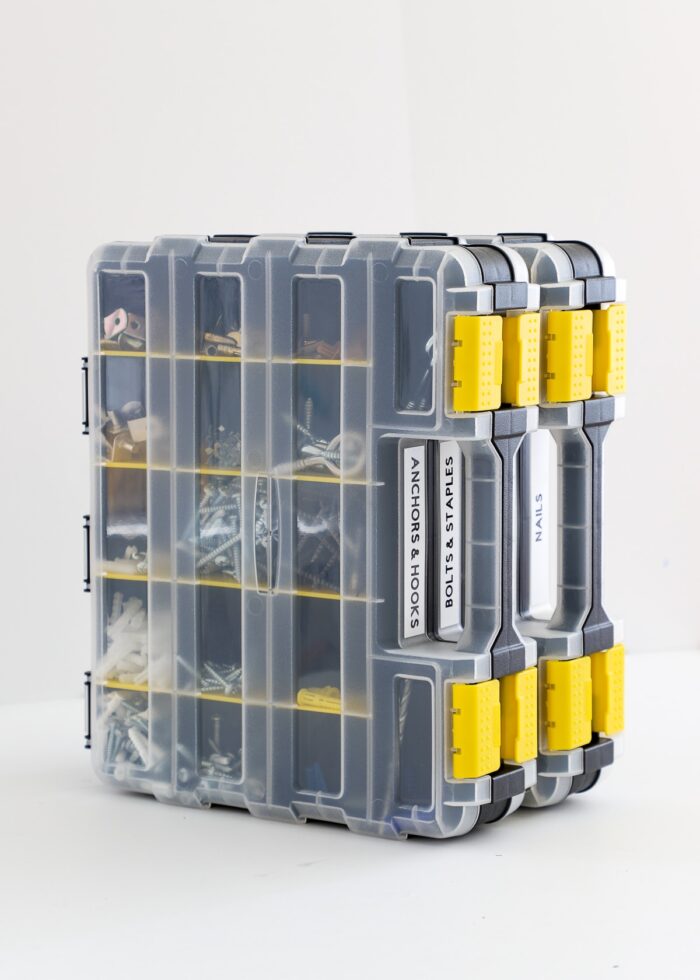
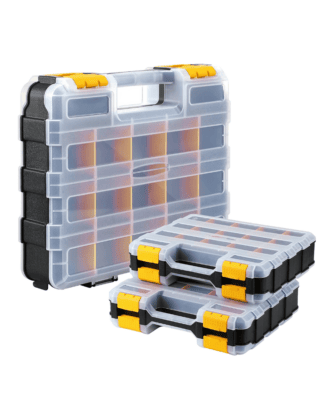
Lastly, getting all our hardware (i.e., screws, nails, hooks, etc) sorted into these double-sided bins was another game-changer. This project was tedious (yet very gratifying), and it’s one that has held up all these years later!
See all the details here: Organizing Screws & Nails | A Solution That Really Works
Looking for more details about ALL our tool storage? Our Compact Tool Storage in the Garage (& Why It Works!).
Organizing DIY Supplies
As much as I love to DIY projects for our home, I don’t particularly love all the tools and supplies we end up gathering. Cans of paint (along with all the rollers, brushes, tape, trays, etc), spackles, glues, sand paper, and on and on and on. All this little stuff can become a big mess without some good systems in place. But anything too complicated makes it difficult to access what you need when you need it.
All of our DIY supplies ended up on this set of shelving, in both the smaller clear lidded bins and the white crates.

This shelf was both a major success and a bit of a failure. Here’s why…
Those lidded clear plastic storage bins on the upper shelf are 30 quart, and they really are the perfect size for DIY supplies. They are big enough that you can hold larger items (like a sander with all the associated discs) but small enough that they comfortably contain a single category of items. Plus, they sure filled out that top shelf so nicely, making for a really good use of space.

We used the white crates for additional storage (e.g., car supplies, ropes, bike pumps, garden tools, etc) more because we already had them and not because they were the best solution.
While their size did allow us to store a good bit of stuff in each one, the stacking (or rather, the unstacking) was a major nuisance anytime we needed anything out of either the top or bottom crate. This arrangement was just too precarious to be practical.

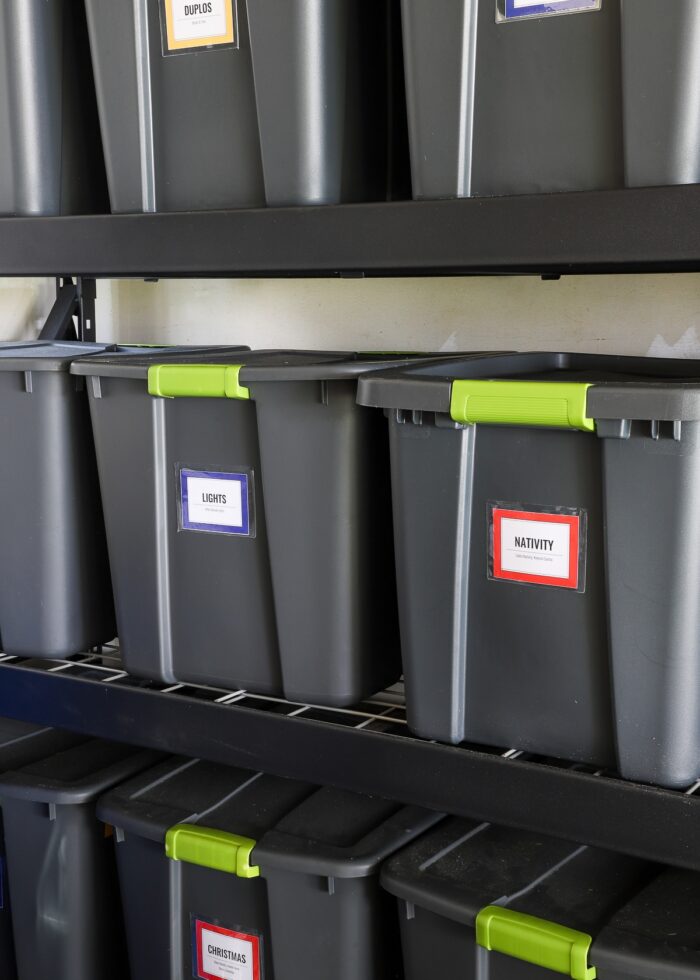
All that said, my nifty storage labels (one of my favorite labeling projects ever!) held up great…even when all these bins spent a year in storage. Not one fell or ripped off! The Easiest Way to Label Your Storage Bins (With Template!)
Deep Storage
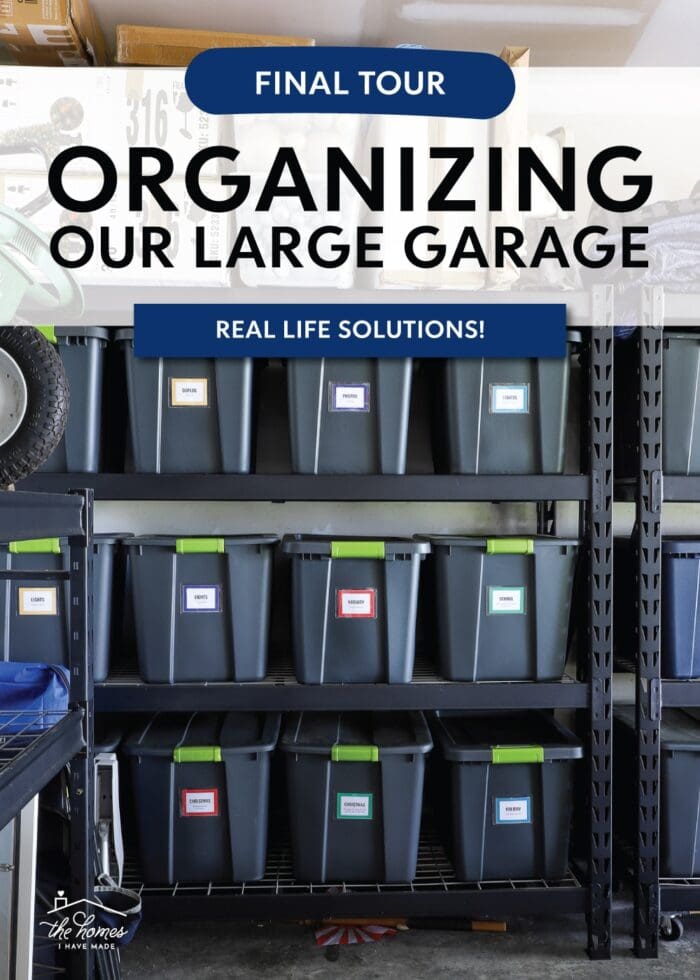
Last (but not least!)…what about everything else? The yearbooks and photos and wedding dress and Christmas decorations and Easter baskets. Where did all that end up? On these two big storage shelves along the right side of the garage.
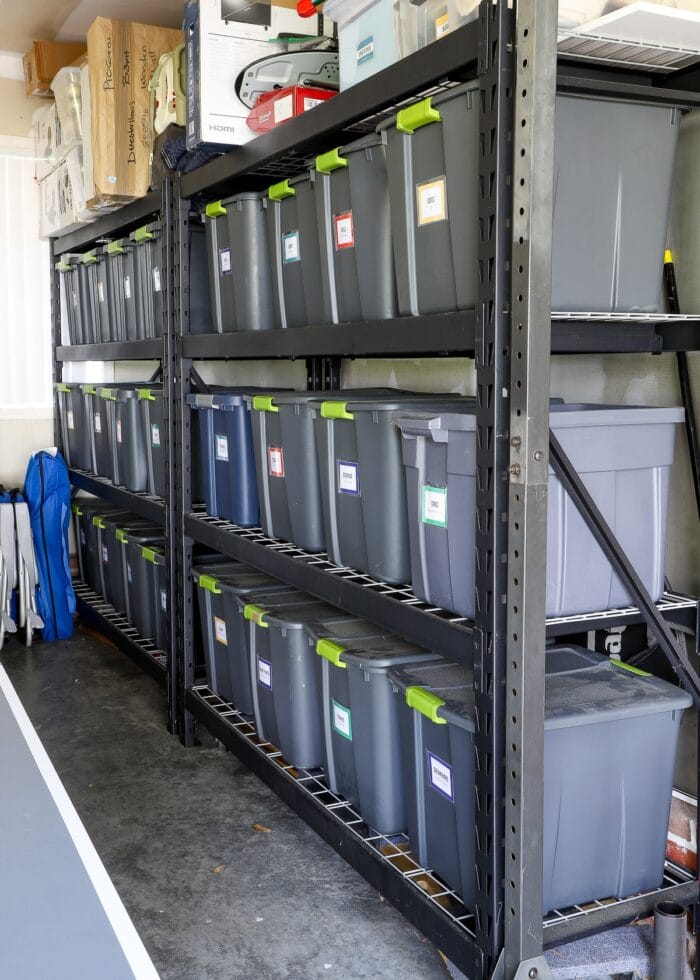
Purchasing these heavy-duty shelves (and bins that perfectly fit on them) remains one of our best organization purchases ever. Not only are these shelves sturdy and hold a lot, but they are (surprisingly) flexible enough that we’ve been able to make them work in home after home after home.
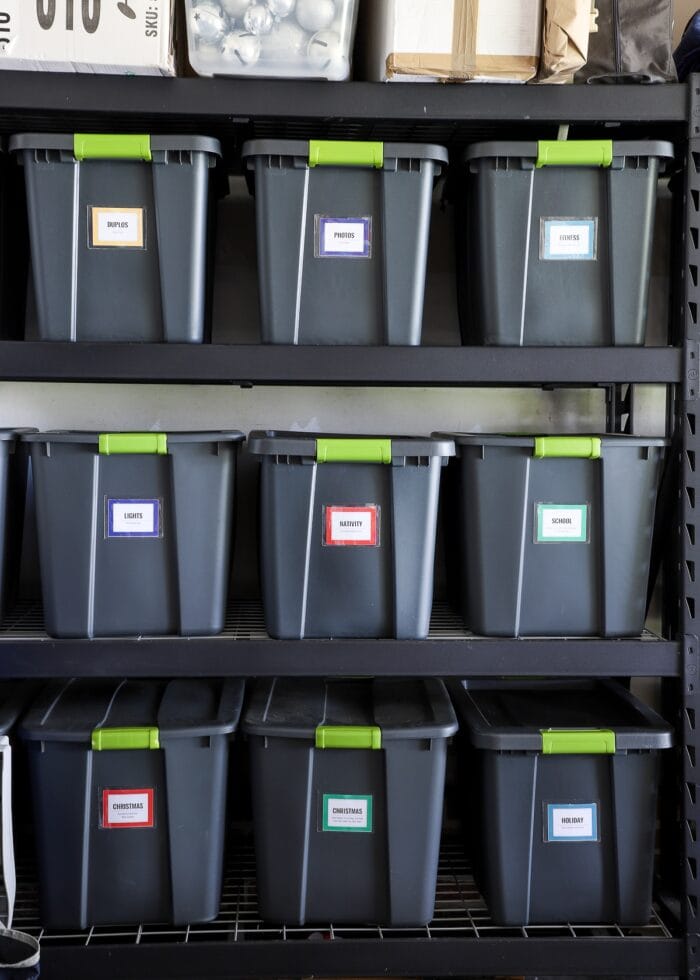
Along the top of the shelves are all those things that don’t fit into matching bins or are just plain bulky. The Christmas trees, wedding dress, pac’n’play, extra booster seats.
Putting these mis-matched items up high, almost out of eye sight, makes it all accessible while keeping the overall garage looking nice and tidy.

Inside these bins are a lot of holiday decor, memorabilia, toys our kids have outgrown (but we want to keep), and more. It’s a bit of a mixed bag; but thanks to the clear, concise labels, it’s easy to know what is where!
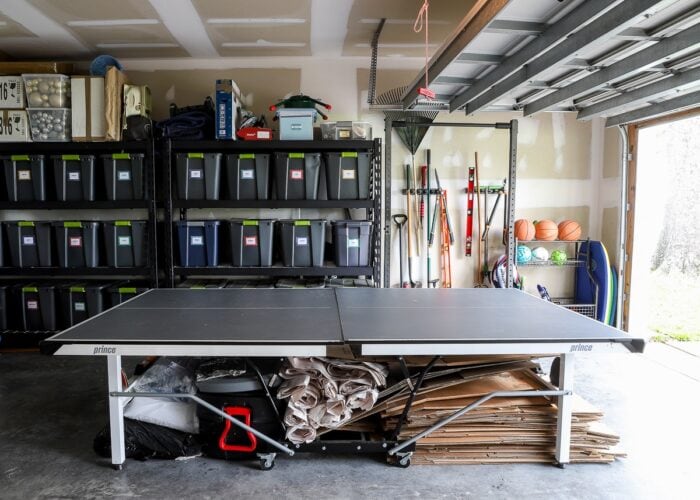
Both the shorter and taller storage shelves, as a whole, really provide us with so much useful (vertical!) space without having to mount anything on the walls. (Just wait until you see these same shelves in our current garage – they’re even better!)
I know someone will ask, so I’ll quickly answer why there are so many boxes and rolls of packing paper under our pingpong table. No, we don’t keep boxes from move-to-move. These photos were taken right before we started packing out, and we scored a bunch of packing materials for free. So they lived here for our final months until we needed them!
Explore All the Projects In This Space
If you’re looking for more details about anything in the photos above, below are the in-depth posts for all the projects featured in this space:
- Storing Kids’ Sports Equipment | Our Real Life Solutions
- Organizing Screws & Nails | A Solution That Really Works
- Our Compact Tool Storage in the Garage (& Why It Works!)
- DIY Magnetic Toolbox Labels (With Template!)
- The Best DIY Tools to Invest In (When You Don’t Have A Workshop)
- The Easiest Way to Label Your Storage Bins (With Template!)
- The Easiest Way to Properly Dispose of Household Paints
Tour More of Our NC Rental
Want to explore the other room makeovers from our NC Rental home? Tour the entire home in the following posts:
- Full Before Tour
- The Kitchen
- The Family Room
- The Dining Room
- The Laundry Room
- The Office/Craft Room
- The Master Bedroom
- Our Teens Tiny Bedroom
- Shared Little Boys' Bedroom
- The Garage
- The Final Home Tour

In the end, we were able to organize this garage juuuuuuust right, but we really only got to enjoy it like this for a few months before it all got packed up and sent to storage.
Almost every time we move, we leave the garage until last (while we tend to other spaces first); but wow, you really can’t overestimate how nice it is to have an orderly garage. Although it’s not a space you “live” in, you do interact with everything out there quite frequently…and having it all organized really can be quite the sanity saver.
(Maybe that’s why we tackled it first on the next move! 😉)
Megan


5 Comments on “How We Organized All the Things In Our North Carolina Garage”
Hurray! She’s back!
I just wanted to add that I was in the middle of a garage re-organization and had bought lots of the 27-gallon totes and the sticky label holders, and index cards when I had to stop due to a family illness. Ready to go back to it now, and it’s so helpful, as I even labeled several of them “empty” so I know right where to start!
Thanks, Tenney
It’s great to hear from you! I agree that lawn tools are a pain to organize in a way that makes them useable and accessible. I’ve tried many ways over the years (the clips like you show, nails “custom spaced” in a 2×4 that gets hung on the wall, everything working end up in a big trash bin…) and still haven’t hit on one that gives me a sense that this is THE way.
Love it! We just moved and lost a shed… but gained a tandem garage – so the timing of this post was perfect. We definitely need some shelving racks to tame our precarious stacks of tote bins!
I think we need to invest in some of those HEAVY duty shelves. The thinner metal ones just don’t hold up well enough to moves and life in a garage.
I wonder if I can convince my husband HE *deserves* a good tool chest so *I* can finally get the tools all in one place! haha