How to Wallpaper a Backsplash
I’ve applied peel-and-stick wallpaper to a ton of different surfaces over the years, including walls, floors, insides of drawers, furniture, trays, and even lamps. But by far, one of the most transformative wallpaper projects I’ve tackled was the backsplash in our ugly California kitchen. Wallpaper is an awesome backsplash alternative to traditional tile (especially for us renters!), but it’s also a fairly tricky installation process thanks to outlets, low-hanging cabinets, appliances, and precise patterns. Today, I’m breaking down exactly how to wallpaper a kitchen backsplash so you feel inspired (and prepared!) to tackle this challenging (but rewarding!) DIY project yourself!
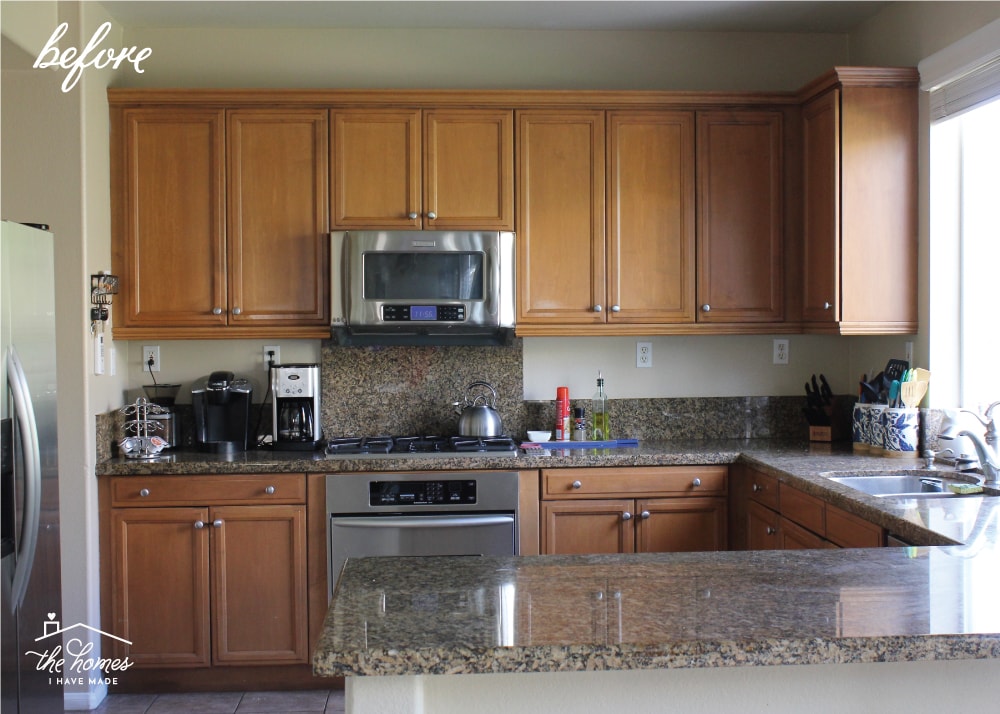
Before & After
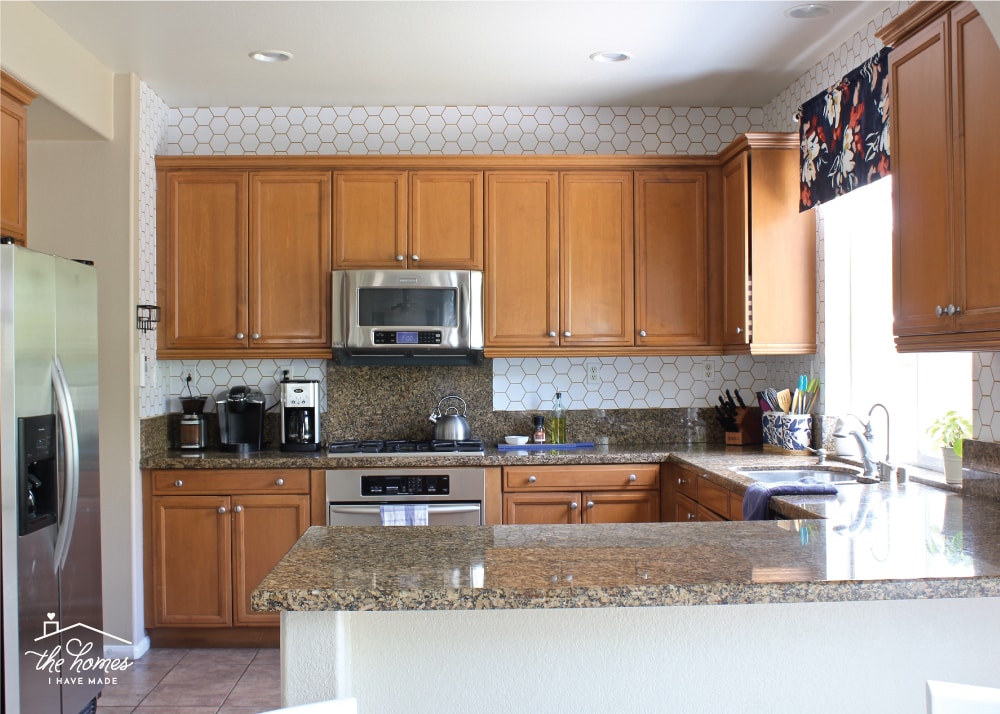
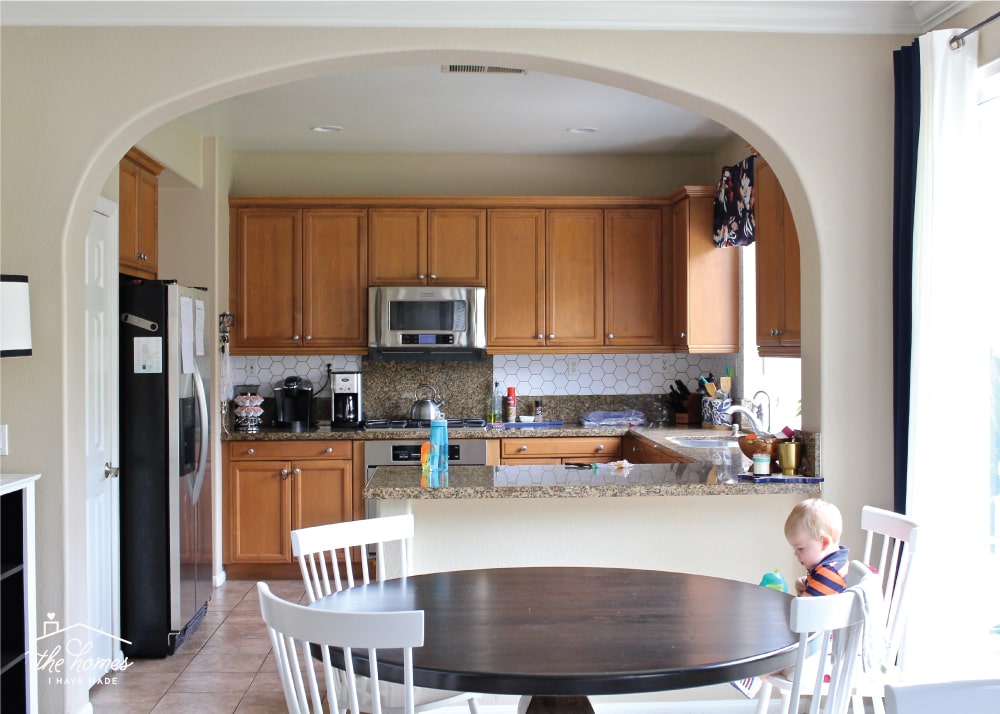
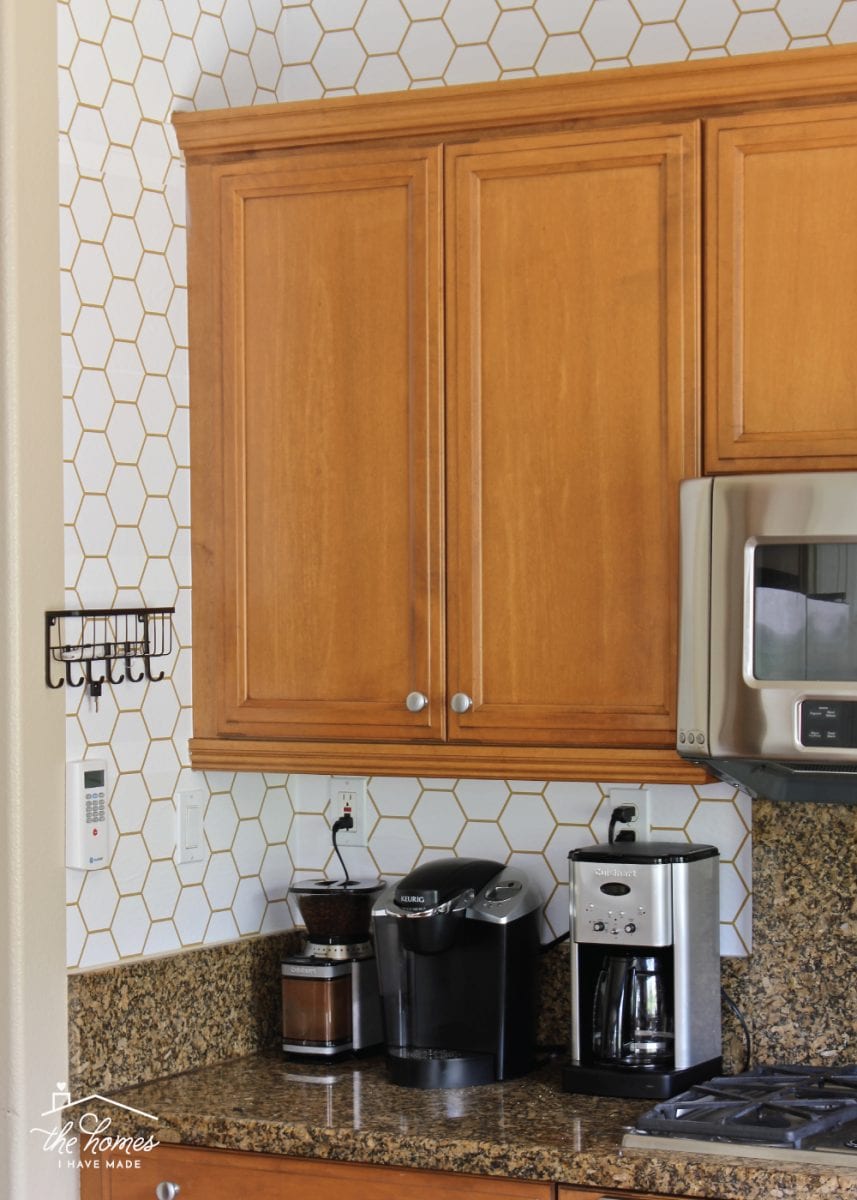
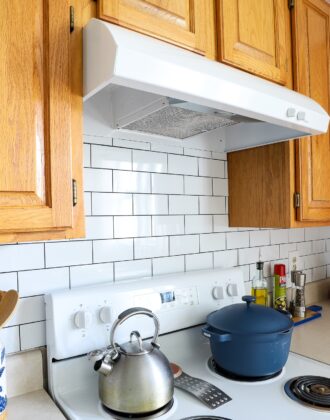
Here is our kitchen before I added a fun backsplash using peel-and-stick wallpaper. As you can see, I started with a ugly monochromatic and dark blank slate.
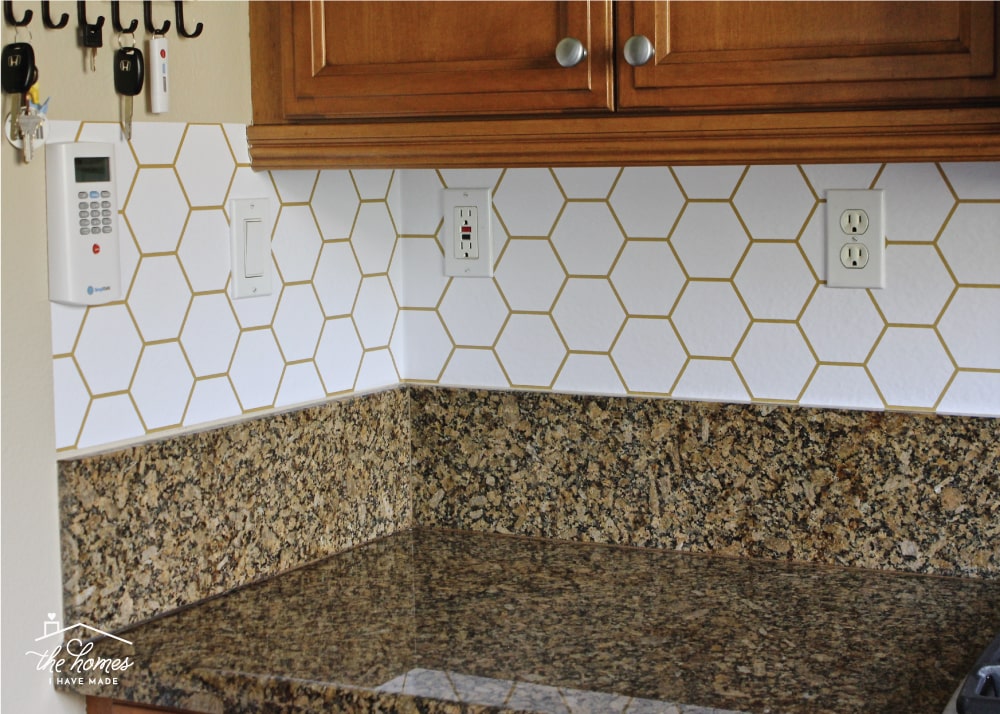
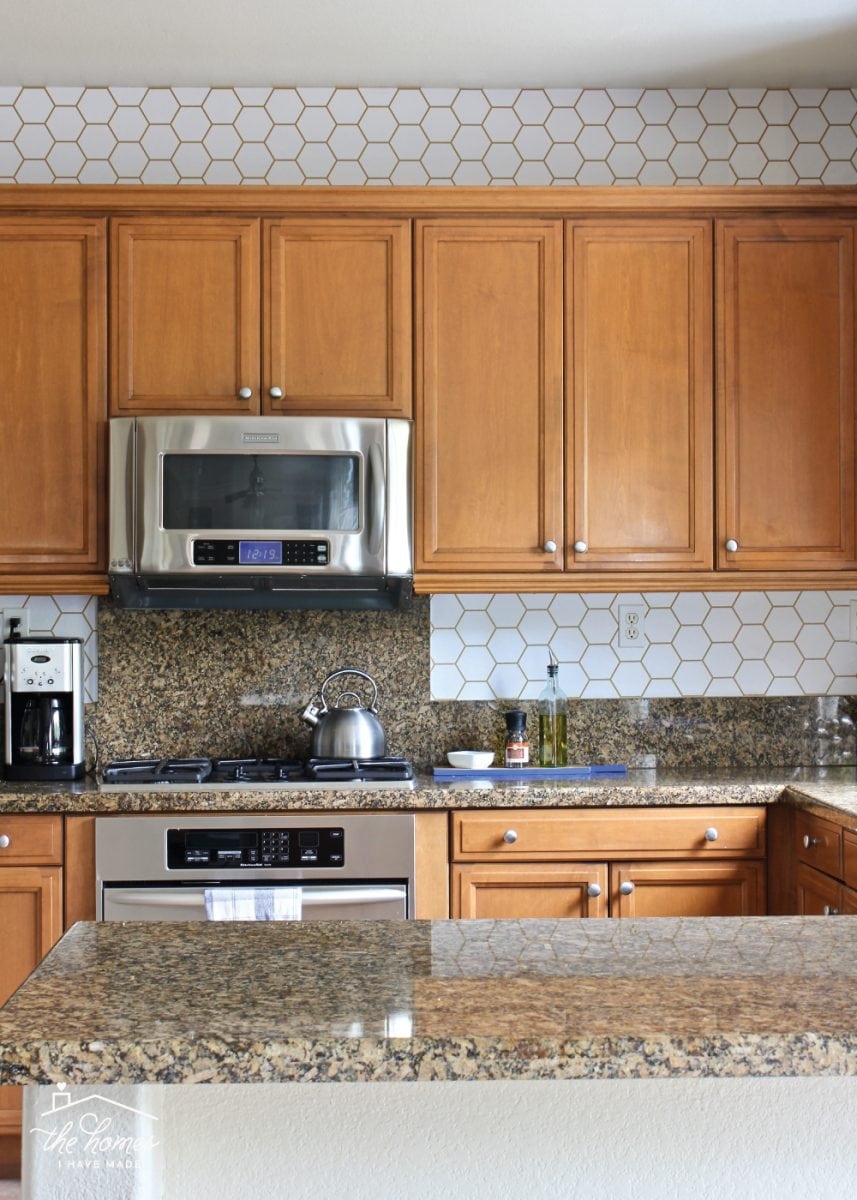
And here is how the kitchen looked after the application of a bright white hexagon peel-and-stick wallpaper!
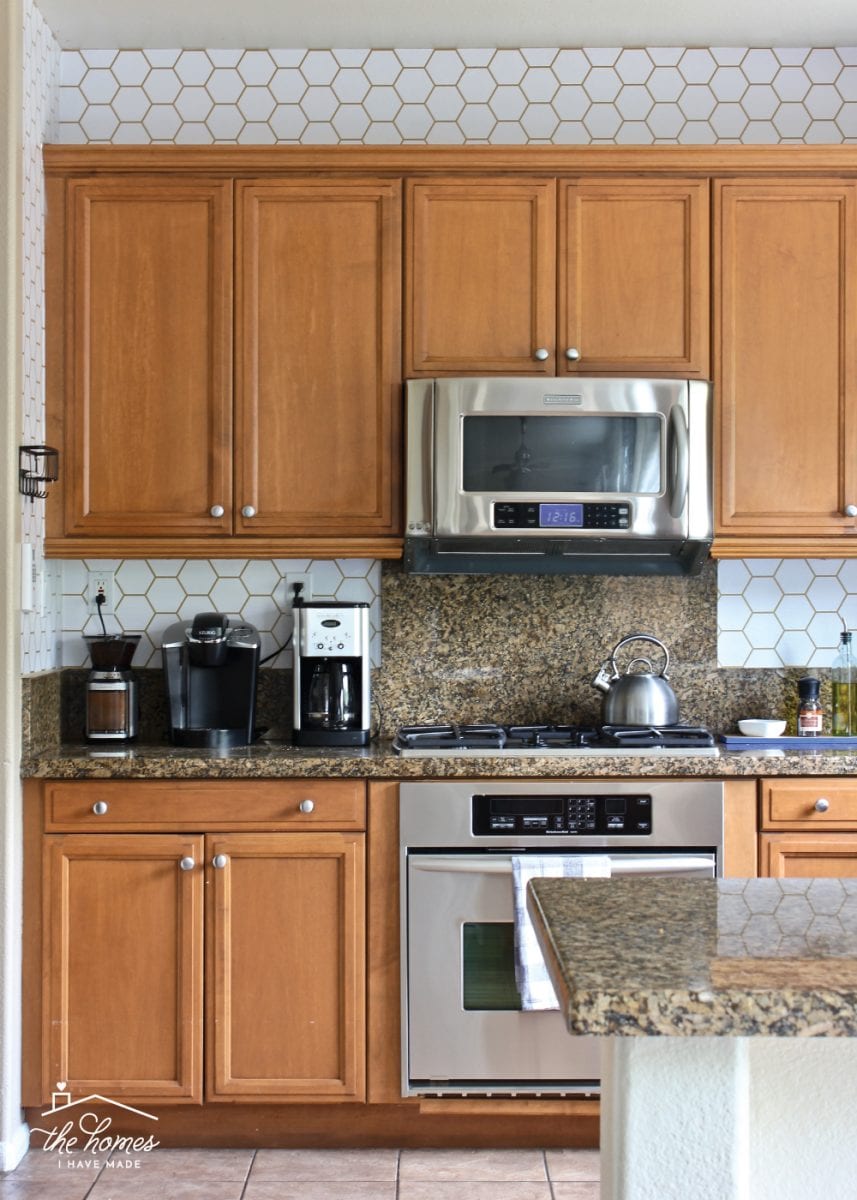
The bright white paper infused some lightness and brightness into the otherwise dreary kitchen. The hexagon design nods to a tile pattern, and the gold lines play off the cabinets just enough to make it all work nicely together.
Although adding a crisp white wallpaper to this dreary space was quite the gamble, it ended up being money and time so well spent (as wallpaper almost always is!)
While this transformation was well worth the blood, sweat, and tears, it is definitely one of the tricker wallpapering projects I’ve done…so let me walk you through everything you need to know before you tackle something like this in your own space!
Using Wallpaper for a Backsplash
In a “normal” kitchen, a backsplash is usually created with tile. But there might be lots of reasons you don’t want a tiled backsplash including your budget, your DIY confidence, and (as is our case) the permanence. As renters, we can’t do anything permanent to our homes, so wallpaper is an excellent alternative for adding color, pattern, and style to an otherwise bland kitchen.
Why Not Use Peel-and-Stick Tile?
I get asked all the time why I don’t use peel-and-stick tile in our rental kitchens. And my answer is: because it’s not removable!
Just because something is peel-and-stick doesn’t mean it comes off easily and mess-free. In my experience, peel-and-stick tile is not a removable product and will destroy the drywall as you peel it off. If you want to add a backsplash that is removable, wallpaper (or vinyl decals like I show here) is going to be your best bet.
If you REALLY want to use peel and stick tile, I came up with a clever hack to keep it renter-friendly and totally removable! See it here: How to Install a Peel & Stick Tile Backsplash In a Rental (Without Damage!)
What Type of Wallpaper Is Best for a Backsplash?
You can technically wallpaper a backsplash with any wallpaper (e.g., peel-and-stick, pre-pasted, non-pasted etc). However, since this wallpaper will be in an area that gets wet, moist, and dirty, I do recommend picking a vinyl wallpaper (rather than fabric or textured) that is wipeable (most will indicate so on the packaging).
I personally recommending using peel-and-stick wallpaper or heavy-duty contact paper for backsplashes because they are both durable (easy to wipe clean) and removable (it just peels right off!)
Does the Wallpaper Need to Be “Waterproof”?
In my experience, no…at least not for a kitchen. While you may experience some splashing of water or food particles on your wallpapered backsplash, the area will rarely (if ever) get heavily saturated. As such, you will want a wallpaper you can easily wipe clean, but it does not need to be labeled “waterproof” to work well on a backsplash.
Picking a Wallpaper Pattern for a Backsplash
You can really pick any wallpaper pattern to put on your backsplash. But if you’re hoping to mimic the look of real tile, keep an eye out for patterns that look like tile! Here are some great examples:
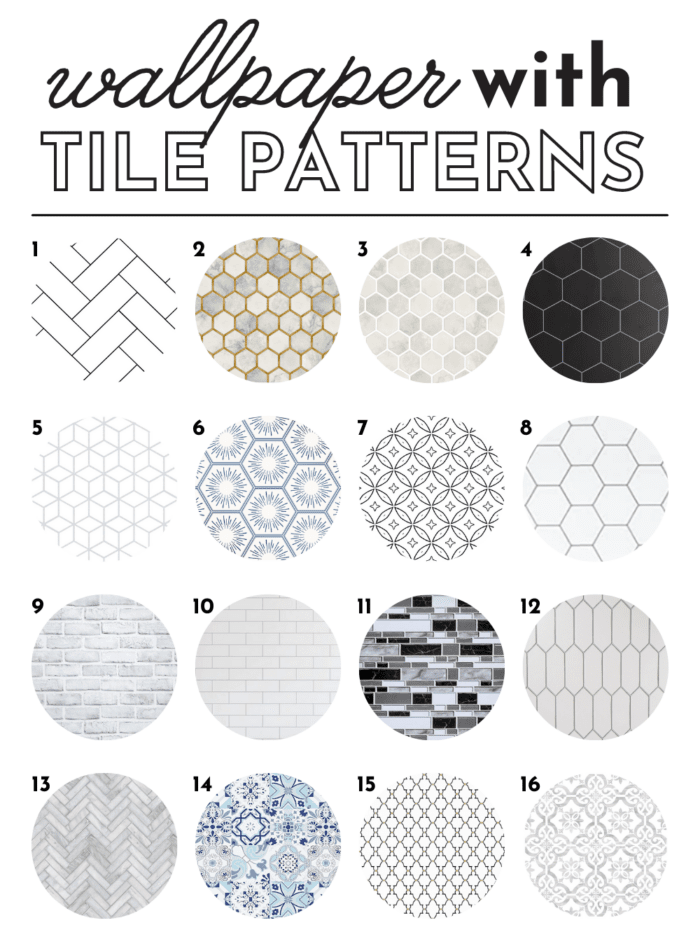
1 – Black & White Herringbone | 2 – Grey & Gold Hexagon Paper | 3 – Cream & Neutral Hexagon Paper | 4 – Black Hexagon Wallpaper | 5 – White & Silver Cube Wallpaper | 6 – Blue Medallion Wallpaper | 7 – Black & White Circle Wallpaper | 8 – Grey & White Hexagon Wallpaper | 9 – Faux Brick Wallpaper | 10 – White Subway Tile Wallpaper | 11 – Black Marble Tile Wallpaper | 12 – Long Hexagon Tile Wallpaper | 13 – Marble Herringbone Wallpaper | 14 – Blue Mosaic Tile Wallpaper | 15 – Black & Gold Trellis Wallpaper | 16 – Grey & White Medallion Wallpaper
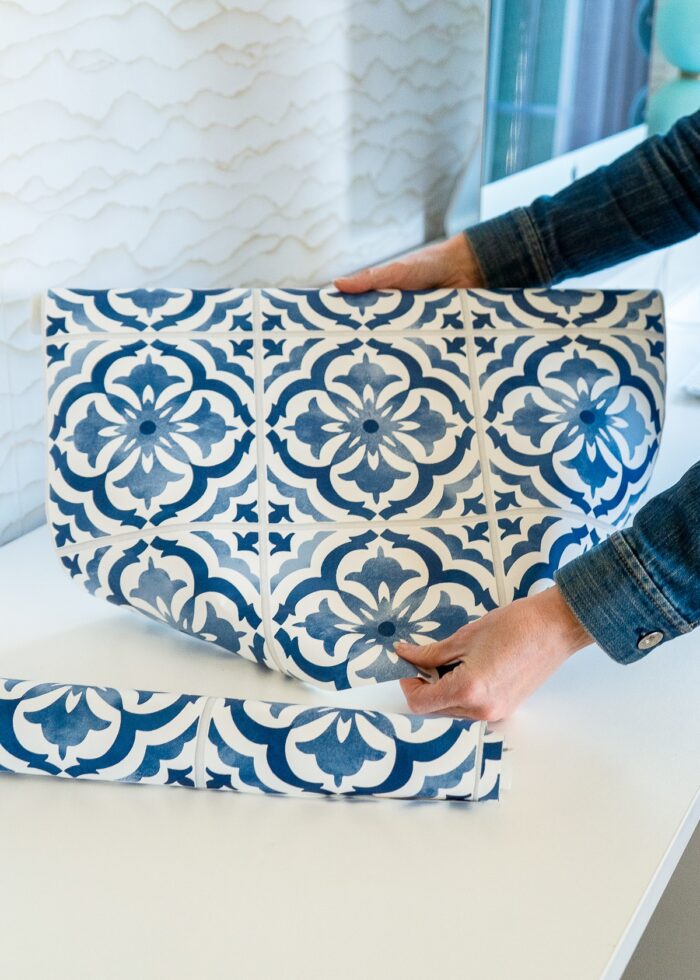
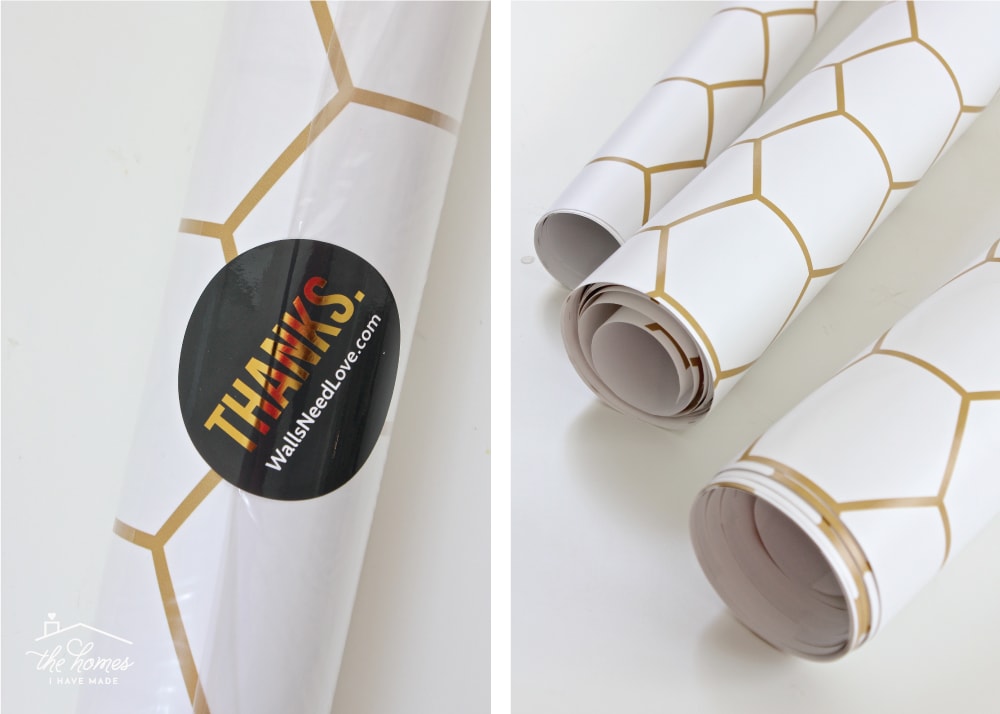
From the moment I first saw this photo on the Walls Need Love’s Instagram account, I knew the white and gold hex pattern was perfect for a wallpapered “tile” backsplash for our kitchen!
UPDATE: I recently used this incredible wallpaper for a kitchen backsplash and explained here (The Best Wallpaper For Your Kitchen Backsplash) why it makes for the perfect wallpaper choice!
Determining How Much Wallpaper You Need
Before purchasing your wallpaper, it’s a good idea to accurately measure the space you are wallpapering and devise a plan for how you will use the paper.
When determining how much paper you need, be sure to take into account:
- The surface area you want to cover
- The roll dimensions
- Pattern size and scale
- Pattern repeat information (usually detailed on the wallpaper’s web description or packaging)
- Which orientation you will hang the paper (as that can affect how much or little you need to cover certain size areas)
If the paper you want to use can be easily returned, considering buying extra, because not being able to finish when you run out of paper can be very…very…frustrating.
Supplies Needed
Every project will vary slightly; but in general, here are the supplies you will need to wallpaper a backsplash:
- Wallpaper
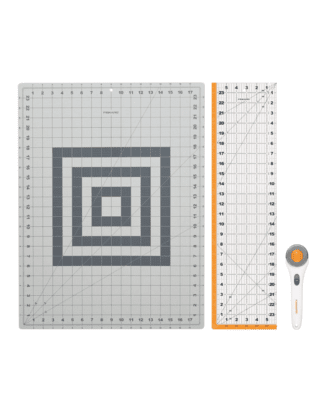
- Cutting Tools
- Rotary cutter, ruler and self-healing cutting mat (although a ruler and scissors will do, these tools make it easy to get really precise cuts)
- Sharp scissors
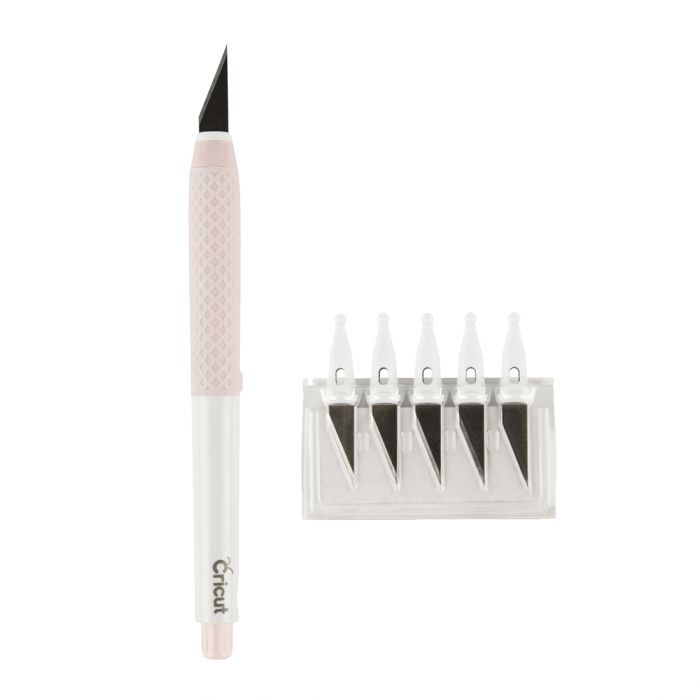
- Sharp craft knife
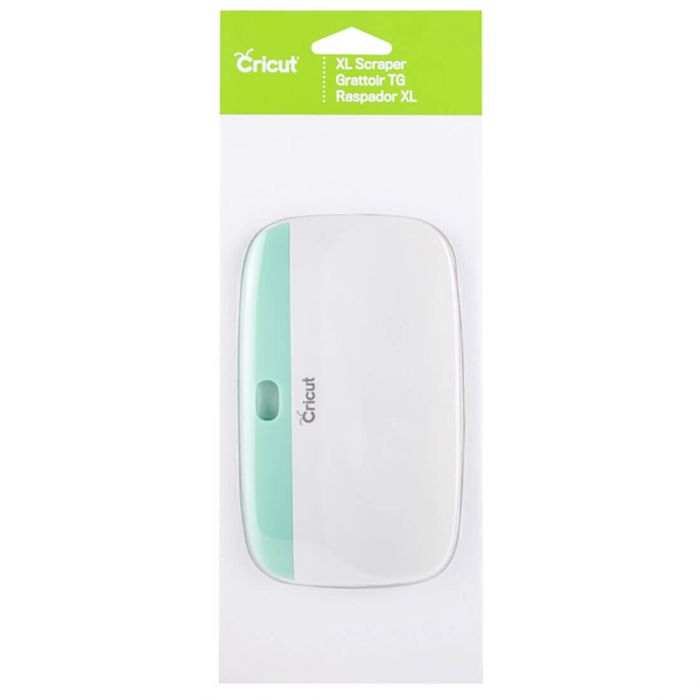
- Paddle Scraper – Some wallpapers come with a smoothing tool, but I prefer the wide size and shape of this one for big wallpaper projects.
- Basic Tools
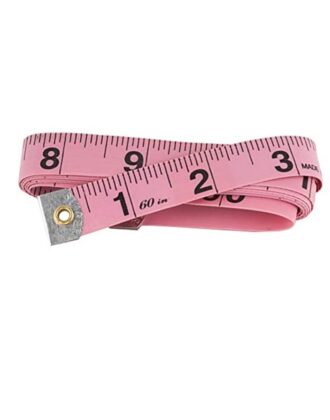
- Measuring tape
- Screwdrivers for removing outlet covers
- Calculator
- Notebook and pencil
Step 1: Clear & Clean the Backsplash
Start by removing any outlet covers, artwork, or other items covering your backsplash. Wipe down the blank walls of any dust, dirt, debris, grease, oil, or food particles. Let the wall(s) fully dry before applying wallpaper.
Step 2: Measure Your Backsplash
Wallpaper can be expensive, so I highly recommend spending a considerable amount of time planning out exactly how you will apply the paper to your backsplash (and other areas) before you even start cutting and peeling.
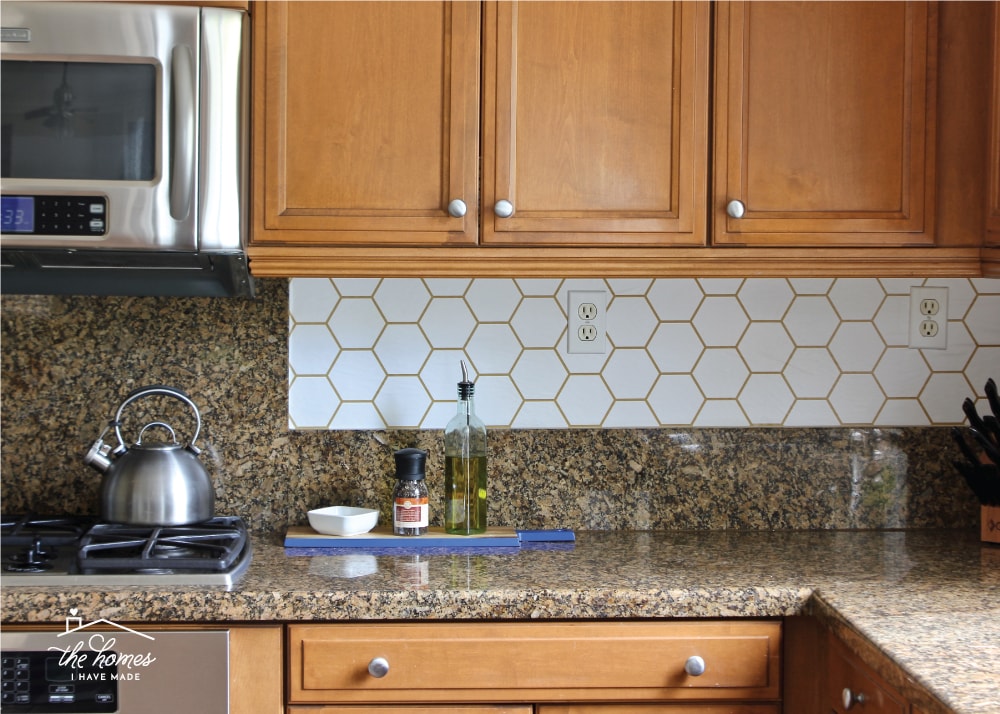
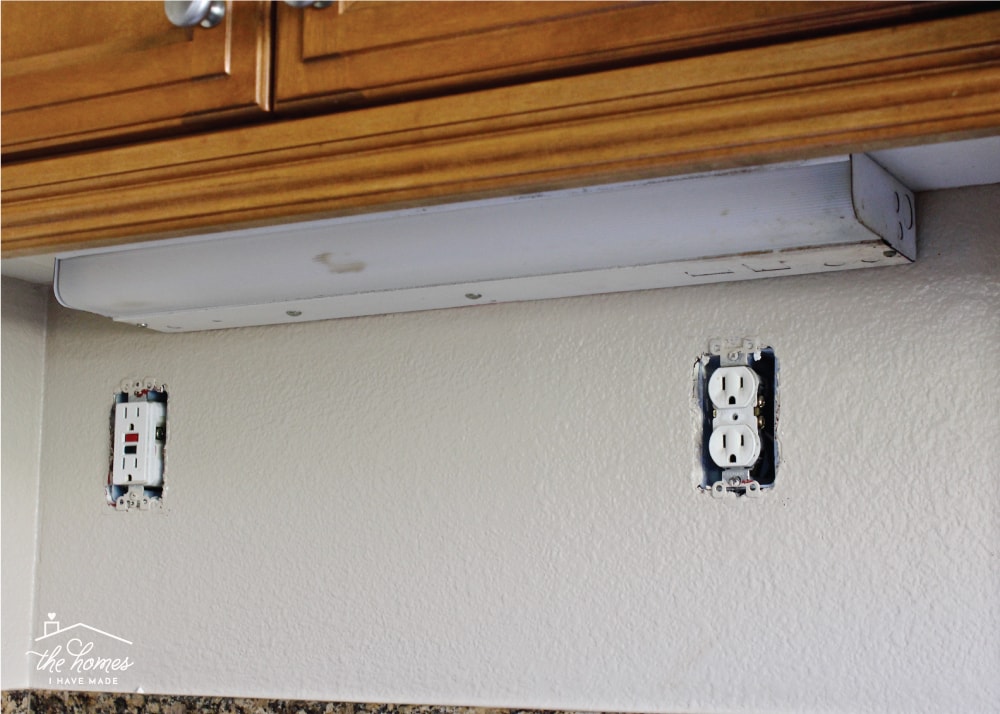
I mentioned before that wallpapering the backsplash was my trickiest papering job ever, and the picture above shows exactly why. Backsplashes tend to have lots of things that need to be papered around. Outlets are certainly one, but your backsplash might have vents, hoods, shelves, or other items that can’t be removed and need to be considered.
TIP! Whenever possible, remove items off the walls/cabinets instead of trying to work around them. Wallpaper is tricky enough to lay flat without anything in the way. I did everything I could to remove the under-cabinet lighting (above) but was unable to do so, which left me having to make tricky cuts around the fixtures.
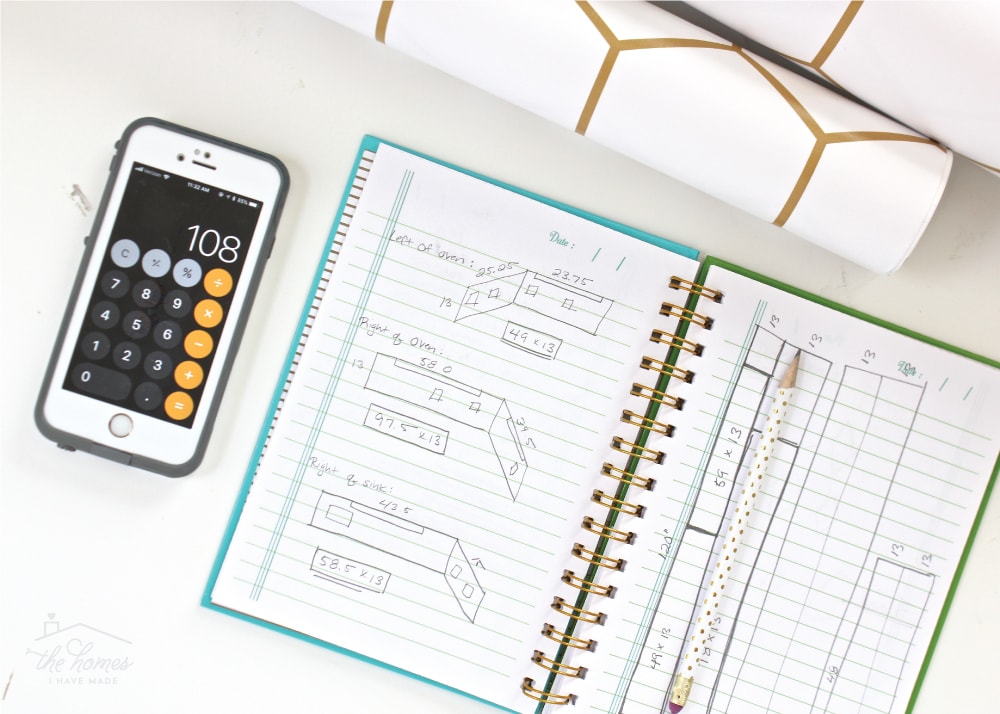
In order to deal with anything you need to paper around, make a detailed plan of your entire backsplash. As you can see below, I not only detailed out the length and height of each area (to the left of the stove, to the right of the stove, to the right of the window), but I also marked the exact placement of each light and outlet.
On another page (not shown), I dove into even further detail, notating where precisely each light feature was so I could translate those measurements to the wallpaper during the cutting phase (more on that below).
Step 3: Plan Your Wallpaper Layout
With the dimensions fully calculated, you can then determine how best to cut your wallpaper.
Want to save this post?
Typically, wallpaper is hung from top to bottom and you work laterally across a space. These days, most paper is printed to be hung vertically, which will make cutting and hanging much easier.
I don’t ever do anything the easy way though. I wanted to use as little wallpaper as possible (because it’s expensive), so I chose to apply the paper horizontally (from left-to-right, rather than top-to-bottom). While this choice certainly added to the complexity of the installation, it did allow me to maximize every inch of paper with very little waste.
In the notebook above (right-hand page), you’ll see I cut each wallpaper strip in half (possible because of the height of my backsplash and the horizontal installation). Instead of a 10′ length of 20″ wide paper (with lots of potential excess thanks to pattern matching), I instead had 20′ of 13″ tall strips that fit the horizontal area above the counter.
This approach may not work for you based on your pattern and orientation preferences, but my point is this: think very carefully about how you can apply the pattern and how you can cut the paper to get the most space covered with as little paper as possible!
Step 4: Cut the Wallpaper
Figuring out the plan for the wallpaper may very well be your most tedious and time-consuming step. However, once you have all the measurements figured out, you just need to translate them to the wallpaper and get cutting.
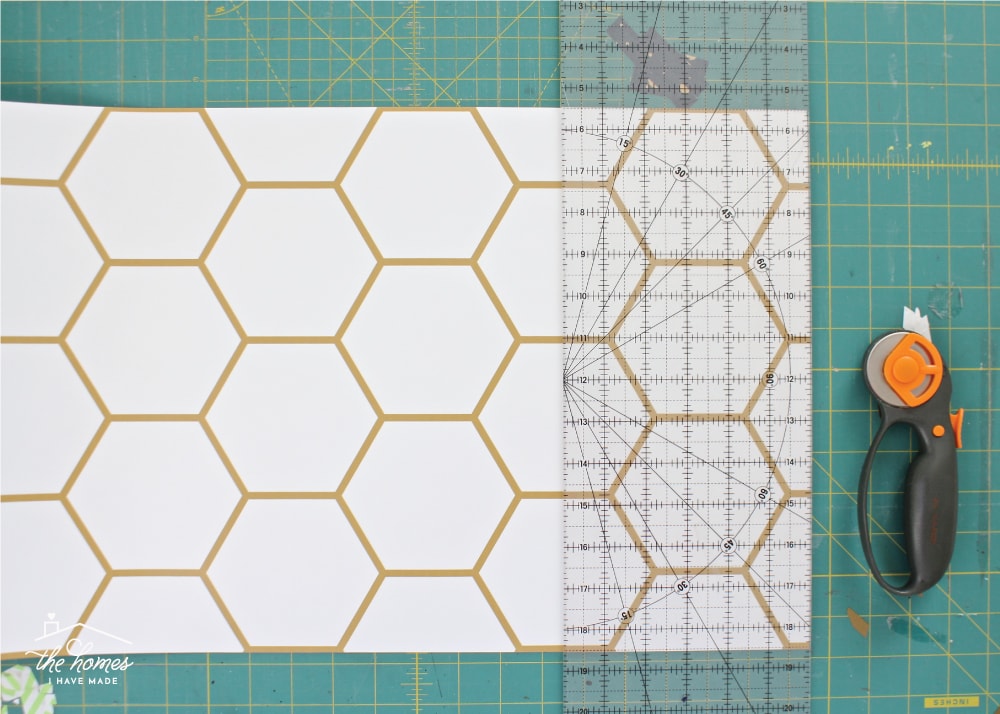
Cut Large Sections First
Start by cutting the large rolls down the general sizes determined in your planning. I found it easiest to do large cuts (both length-wise and width-wise) using a rotary cutter and large ruler. Before cutting a particular section, always be sure the patterns line up with the adjoining panels.
TIP! I was trying to use up every inch of wallpaper, so I cut my panels down into the exact same measurements as my backsplash. However, if you are able to, try leaving an excess 1-3″ of paper along the top and bottom of each panel so it will perfectly reach the edges of your counters and cabinets no matter how straight (or not) you hang the paper. Then trim away the edges after the paper is on the wall.
Pre-Cut Details
NOTE: If your backsplash area doesn’t have any large or unique features to work around, you can likely skip this step and set right to hanging your larger cuts of paper directly to the wall.
When papering large expanses of wall, I usually deal with outlets and other features as I’m laying the paper down. However, the backsplash area is such a tight space with so many extra features to work around, that it can be very difficult to get the paper to lie flat without pre-cutting out bulky features.
After some trial-and-error, I determined it was much easier to cut each feature (the light fixtures) out of the wallpaper before applying it to the wall. To do this, translate the size and placement of any “extra” features (precise size and location measurements are KEY!) to the larger wallpaper strips. In the photo below, you can see the faint lines of the light fixture (along the top) and the outlet (vertical line in the top/middle).
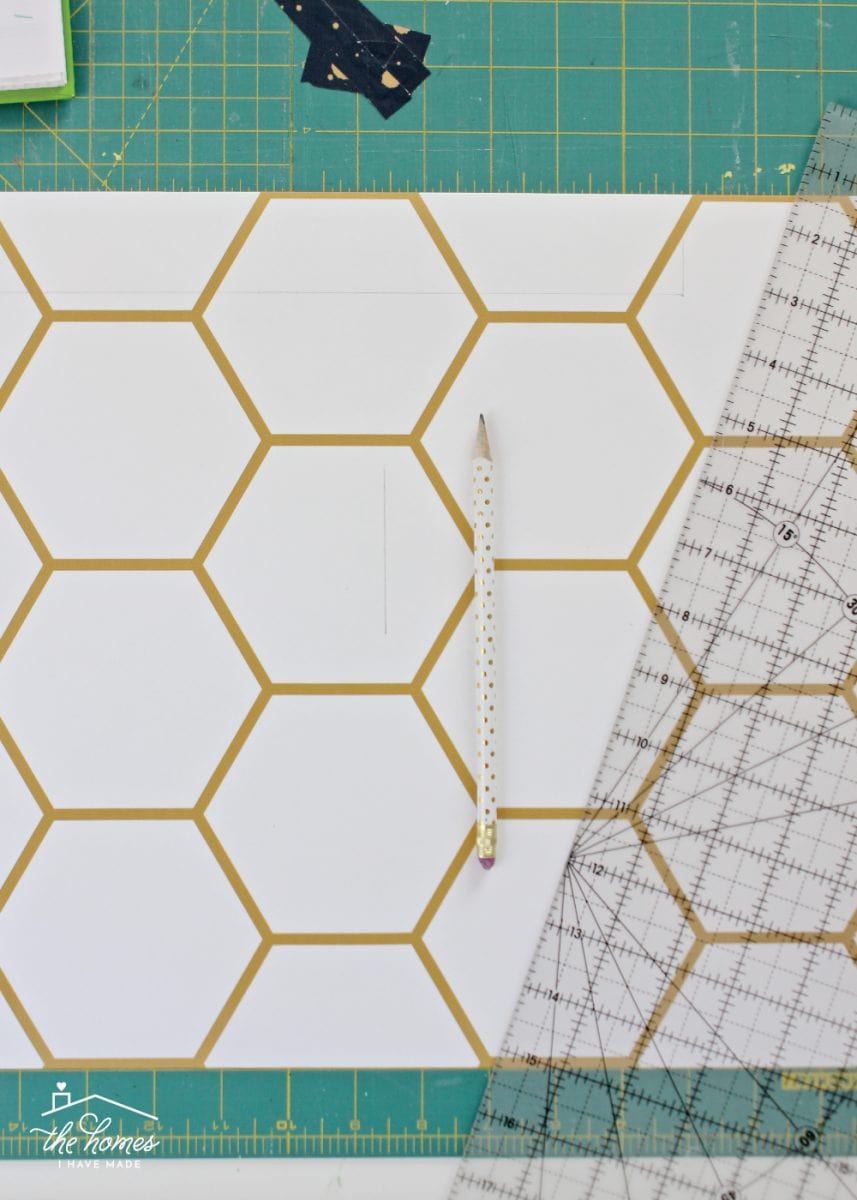
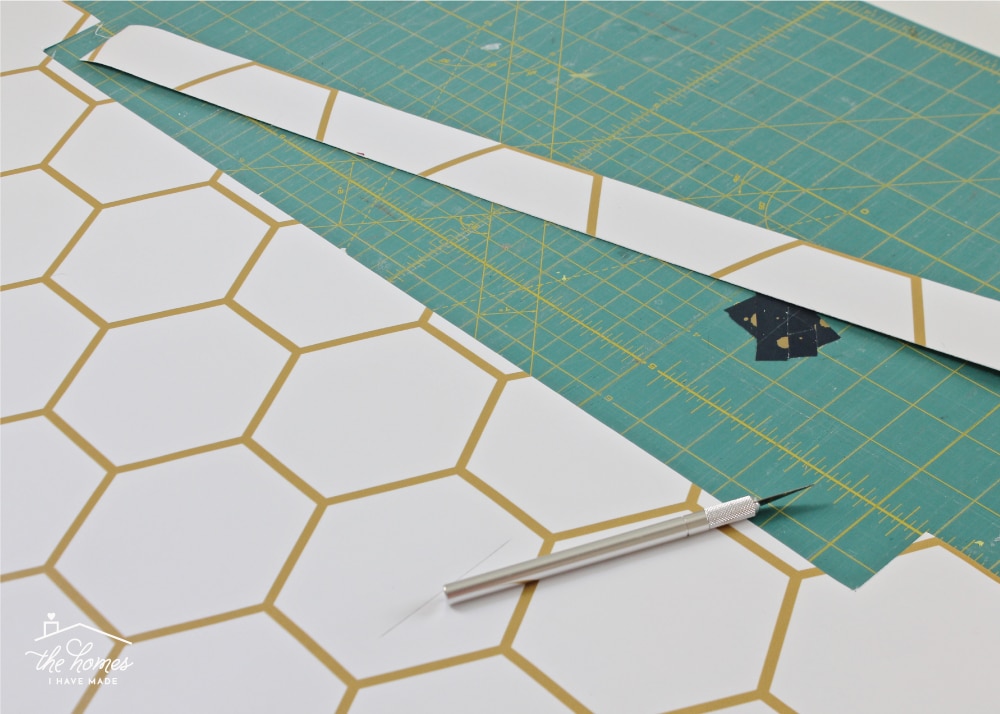
Once you have each feature measured and “drawn,” cut them out using a ruler and very sharp craft knife. This part can feel tedious and a bit scary (slicing big holes in the middle of your wallpaper can be a big risk!) so don’t hesitate to re-measure and double-check as much as necessary!
Step 5: Apply the Wallpaper
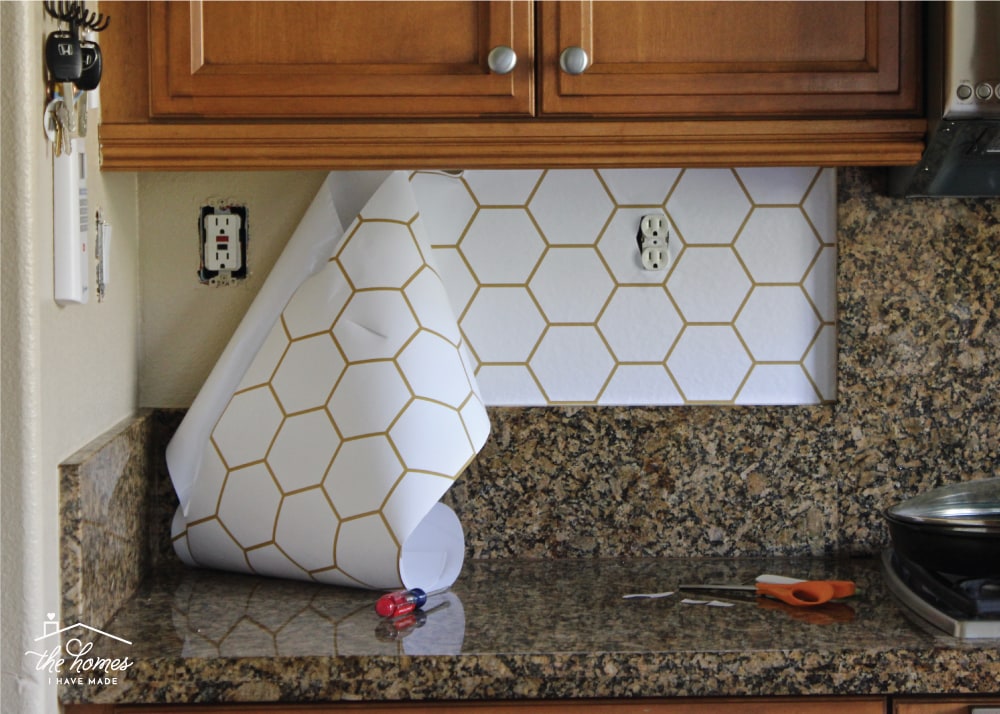
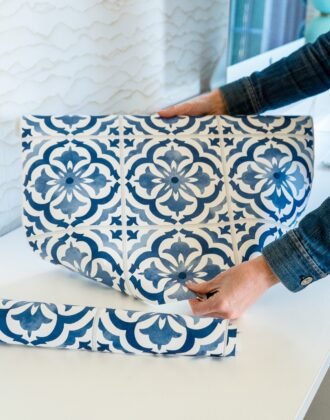
Once you have all the necessary features cut out of the wallpaper strip, it’s time to apply it! As I mentioned above, I chose to hang my temporary wallpaper horizontally to conserve paper and eliminate excessive match lines on such a small area.
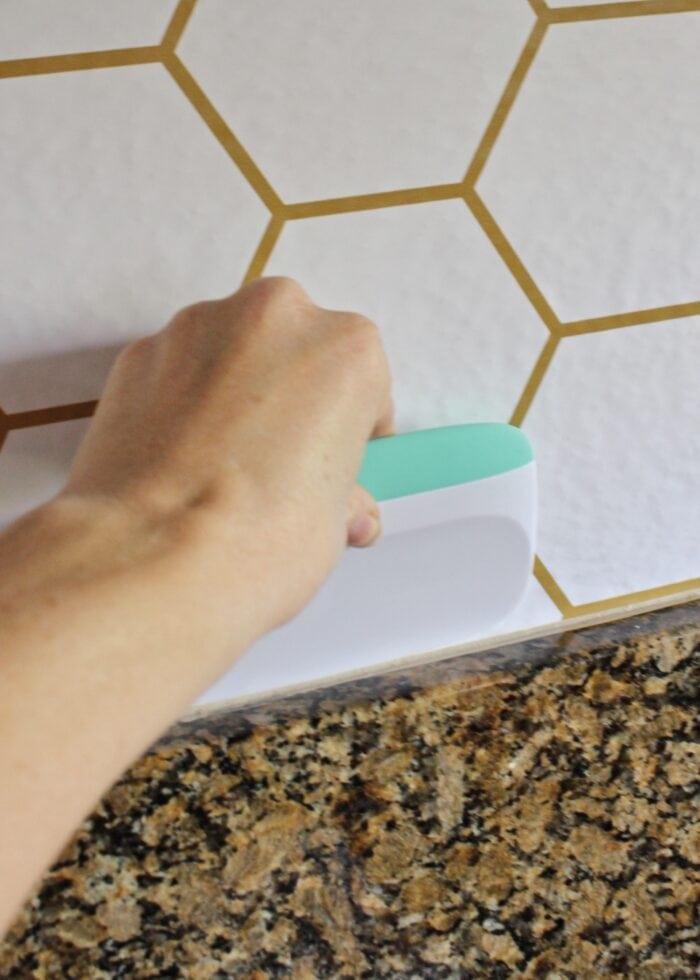
No matter how you are applying your paper (top-to-bottom or side-to-side), peel off just a few inches of the paper backing from the top/side of the wallpaper. Stick that leading edge to the wall, ensuring it is as straight as possible. Then as you work across/down the wall, slowly peel away the paper backing and smooth the paper down with a large paddle scraper.
As you get to edges, outlets, and corners, use a sharp craft knife to make notches as necessary (to relieve paper tension) or trim away extra paper. Once you get the paper in place, use the scraper to really adhere the paper to the wall and work out any wrinkles or bubbles.
Continuing hanging your panels, matching up the patterns and working around features, until your entire backsplash area is covered in removable wallpaper!
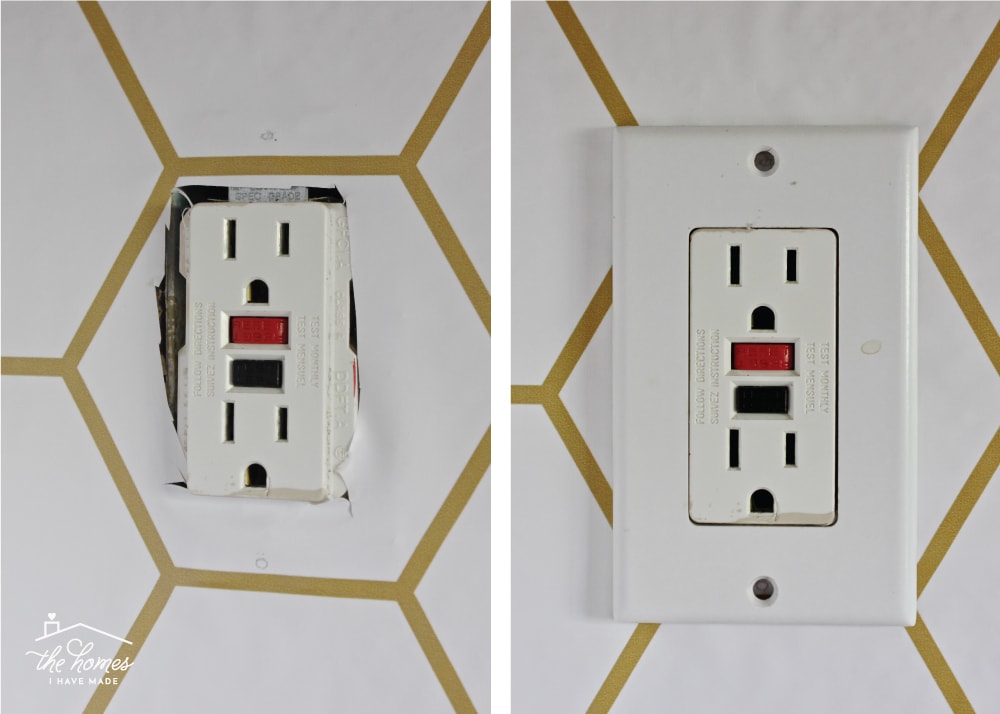
Working Around Outlets
Before hanging the wallpaper on the wall, I recommend creating a single vertical slit for each outlet (to relieve the paper tension and allow the paper to lay flat on the surrounding wall). Once the paper is fully adhered to the wall, re-visit the outlets to trim away extra paper and ensure it’s laying smooth and flat in every direction. Replace outlet covers only once you’re satisfied with the placement and smoothness of the wallpaper.
More Application Tips & Tricks
My pictures and descriptions make it sound like you just lay the paper down, replace your outlet covers, and walk away. In truth, it will require a lot of placing, peeling off and re-placing; tugging and pulling; sweating; and maybe even crying. Working with peel-and-stick paper CAN be very exasperating, so here are some things to keep in mind:
- Don’t hesitate to pull it off and re-lay it down. Whether it’s your initial 2″ or the full sheet, if it’s angled funny or has lots of wrinkles you can’t easily get out with a scraper, simply peel the sheet off and re-stick it. I promise, it will stick again.
- Don’t force it. If your initial 2″ of paper aren’t quite level, the paper will only continue to “veer off course” as you move down/across the wall. It’s better to peel it off and re-align the panel instead of trying to re-route the paper further down the wall.
- Corners. I chose to cut long strips of paper that would stretch into and past the corners so that the pattern would continue nicely. However, getting paper to “turn the corner” straight can be very difficult. In hindsight, I would have sliced the paper at each corner and started a fresh application at each turn.
- The paper is REALLY durable. Don’t hesitate to bend, wrinkle, or curl up the paper as you’re working with it. It’s veeeery durable and once you have it smoothed onto your wall, those bends and wrinkles won’t even be noticeable.
- Take a step back. Despite my efforts for the smoothest application possible, I was still left with some pretty considerable wrinkles in the paper (those darn corners!). But that’s actually one of the best things about wallpaper. It’s so “big picture,” and those small imperfections aren’t really noticeable in day-to-day life. So do the best you can, step away, and just enjoy the improved view!
Deciding Where to Stop the Wallpapered Backsplash
One of the trickiest things about backsplashes (tiled, painted, papered, anything!) is deciding where to stop. In some kitchens, there will be doors, trim, appliances, molding, or ends of counter top that make it very clear where the wallpaper installation should end. Other times, it’s not as evident.
My original plan was to only tile the backsplash, and I used the width of our countertop and the height of the cabinets as my guide (as seen below).
But even as I stepped back, put my supplies away, and called the job done, the “tiling” really bothered me. The white paper felt random in the context of the rest of the kitchen; and instead of my eye drifting to the pretty paper, it kept drifting to the ceiling where there was none. Below is a quick snapshot I took as I debated (for weeks!) what to do about it.
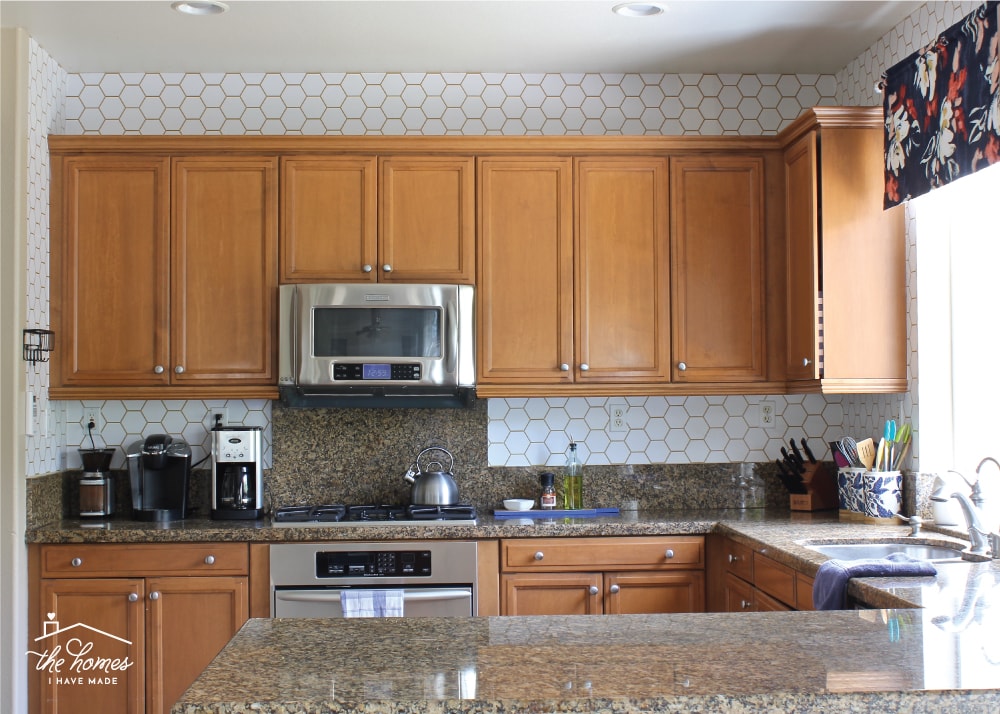
I finally decided that I needed to extend the wallpaper up the wall to the ceiling in order to make it work. After a quick calculation, I determined I had enough paper leftover to cover the remaining wall (I originally bought enough to “tile” the fireplace in the adjoining family room too).
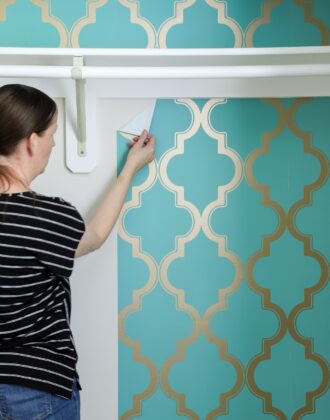
The wonderful thing about installing wallpaper above cabinets is that there is usually nothing to work around…no outlets, no lights! As such, I just cut the paper into strips and put it right up, matching the pattern as I went around the kitchen.
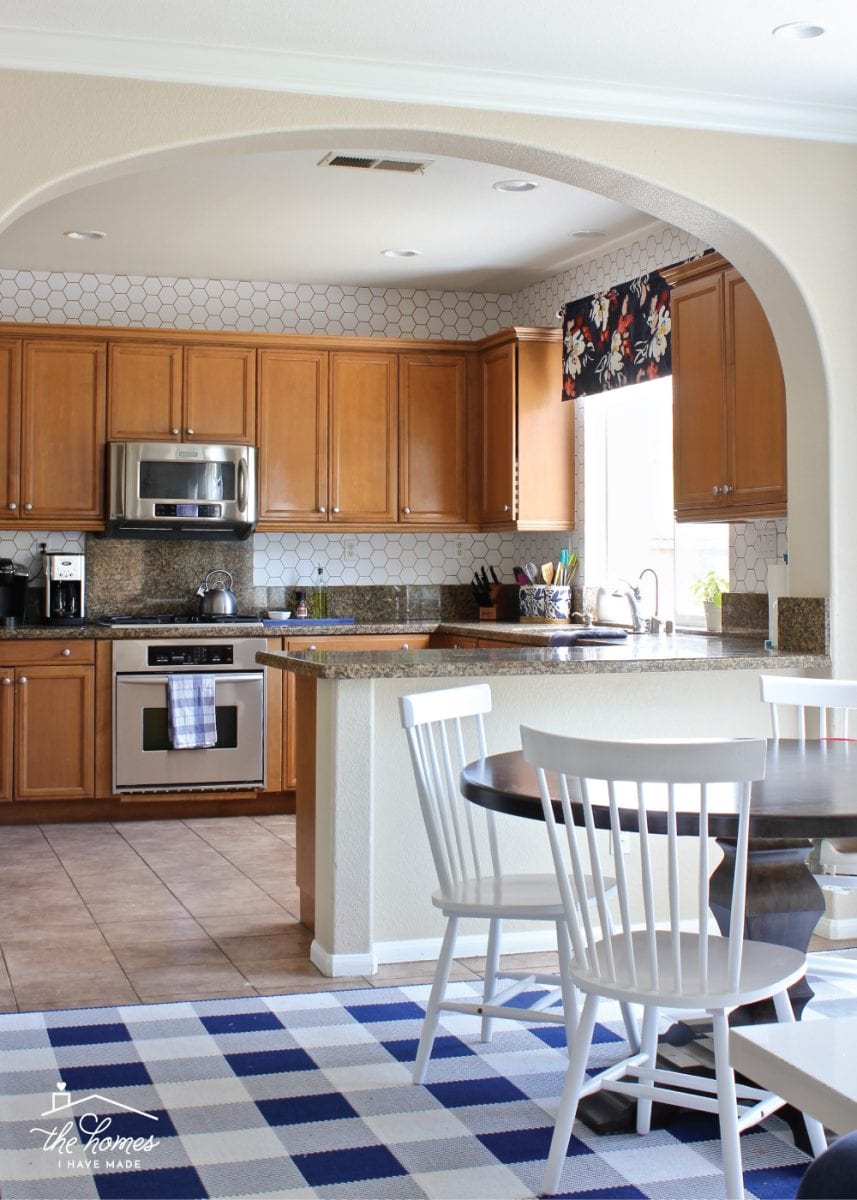
We lived with just the backsplash area done for about 2 months before I finally did the rest of the wall, and to say the change was dramatic is an understatement. The wallpapered backsplash went from feeling random and disjointed to providing a fun and fresh detail that really woke up the entire kitchen.
If your cabinets do not reach the ceiling or a soffit, I highly recommend wallpapering the area above the cabinets for the most visual impact.

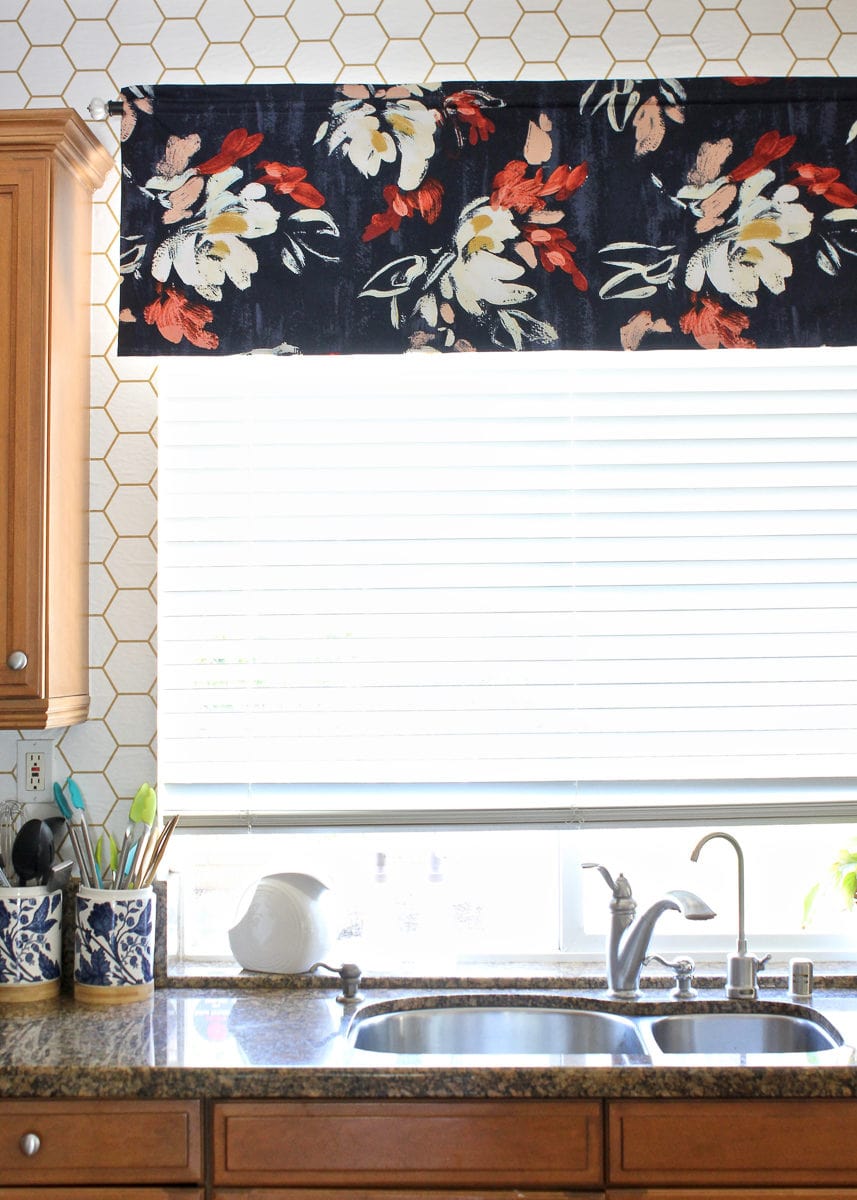
In the three years we lived in this house, I was never really able to get used to the brown cabinets and brown counters and brown floors. But the small temporary changes I was able to make (like the wallpapered backsplash and this simple window valance) truly helped me like the space a lot more than the dull cave we started with. Although this wallpaper backsplash wasn’t the easiest DIY I’ve taken on, it was certainly one of the most rewarding!
Other Renter-Friendly Kitchen Updates
- How to Shiplap a Kitchen Island with Command Strips
- A DIY Butcher Block Island Countertop (Anyone Can Do!)
- An Easy Way to Add Pattern to Your Pantry with Wrapping Paper
Whether you rent or own, I suspect most of us have aspects of our homes we just don’t love. And while a big fancy renovation would be nice, it just might not be in the cards for one reason or another.
I hope this wallpaper backsplash tutorial not only shows you a fun and creative way to change up your kitchen, bathroom, laundry, or work space (in a totally temporary way!) but also inspires you that even small, seemingly insignificant or unnecessary changes can help you love the home you’re in just a little bit more!
Megan
13 Comments on “How to Wallpaper a Backsplash”
What you have done is beautiful! It makes such a difference. Here’s another suggestion for you. Chalkboard vinyl on the panels of your cabinet doors. My son-in-law suggested that I paint my doors with the chalkboard paint, but I couldn’t bring myself to do something so permanent. I found the vinyl online though, on some sort of deal, and I LOVE IT. It is fun to label my cabinets, and it would cut way back on the brown in your kitchen. (I think it would coordinate with the black on your fridge and appliances, too.) Anyway, just a suggestion. I love your ideas.
Love this!
Megan, your info is great – many thanks. Any experience or suggestions for using wallpaper for a backsplash? I want to use nautical maps which are just heavy paper. I would probably need to paint with a clear waterproofing product after it is up. I wallpapered a powder room with National Geographic maps and it turned out fantastic but they don’t get splashed with water and the occasional tomato sauce splatter. – Keep up the great work! (Lining drawers with wallpaper is another brillliant idea – thanks)
Love the paper design you chose.
I’ve always wanted to use peel & stick wallpaper but have heard horror stories of removal. Don’t be surprised if when removing (because your renting) some of the sheetrock paper comes off as well; meaning now you have to texture in a rental.
Wondering – was has been your experience removing peel & stick after several years?
Thanks!
Hi Rob,
Thanks for sharing your thoughts! Personally, I’ve used peel-and-stick wallpaper over and over and over and have NEVER had it ruin the walls…including the hex paper shown in this post (we pulled it down after it being up for 2+ years).
I do always test any paper before I do a full installation (often leaving a swatch up for a few weeks to make sure there isn’t any long-term damage). The most I’ve had peel-and-stick paper do is pull little specs of paint off, which are easily touched up.
I have so much faith in it that I now use it more than paint in all of our rentals…which we usually move out of every 2-3 years.
Hope that encourages you to give it a try!Megan
Did you apply any kind of water proof coating? I’ve heard of that or covering it with glass or plexiglass. Do you think that would be necessary?
Hi Becky!
No, I don’t think that’s necessary at all. At least not for the paper we used. Most peel-and-stick papers are like a thick contact paper, so they can easily be wiped clean. I would just be sure not to pick a fabric-like wallpaper or one with texture, although even some of those would likely be fine. Wallpaper is much more durable than people think!
Hope that helps!
Megan
I love this! Such a great idea. Love your blog! So helpful and great ideas.
I can *almost* do this except for having textured walls and living in FL – humidity may make wallpaper not stick to it.
We have a galley kitchen so already no counter space but need something waterproof over the sink. Wall-mounted dish rack is the only way to deal w no counter space. But you would still see the wallpaper behind it.
Do you happen to know of a very affordable product or treatment I can use over wallpaper that is waterproof & washable?
Thanks!
Hi Vanessa,
First – make sure you check on my wallpaper on textured walls post here:
Second, in my experience, I have never had wallpaper fall down, bubble or peel up. And we have lived in North Carolina, Kansas, California and Virginia. That said, I would ALWAYS do a test on any wall and leave it up for a while before you do a full installation.
Third, most peel-and-stick wallpapers are wipeable/washable. So if the wallpaper DOES stay up, you’d be able to clean it without any issue. The white wallpaper in this post was wiped down with a wet rag constantly.
Finally, if you determine you do need something over the wallpaper, some sort of plexiglass/acrylic sheet could work (although it would be pricey) or you could try clear contact paper.
Hope those thoughts help a bit!Megan
You are so very inspiring!
Thanks so much…glad you stopped by!
Megan
Any thoughts on how you would manage an outside corner with wallpaper?
Hi Shonda!
I’m not sure what you mean by outside corner…do you mean one that protrudes outward rather than in?
I actually think paper bends easier around a protruding corner, but it will still be tricky to keep it perfectly level. I’d give it a try going around the corner first. If you can’t get the follow-on paper to line up level, then you could technically cut it at the corner and start over, but you run the risk of the seam being really visible.
If you cut your paper 1-2″ taller than you need, you’d be able to turn the corner and not have any gap between the paper and the upper cabinets, even if it does go a little off as you make the bend.
Does that help?
Thanks!Megan