Renter Friendly Fireplace Makeover with Peel & Stick Tiles
One of the biggest eye sores when we first moved into our current rental home was the brick fireplace in the living room. I knew I could fix it with a little bit of paint; but even after a fresh coat of white, it was still missing something. So I recently gave it a budget-friendly makeover using some inexpensive peel and stick floor tiles. This project was quick, easy, and looks amazing, but there are definitely some tips, tricks, and lessons I learned along the way. Let me break down this full fireplace makeover for you!

Our Rental Fireplace | Before & After
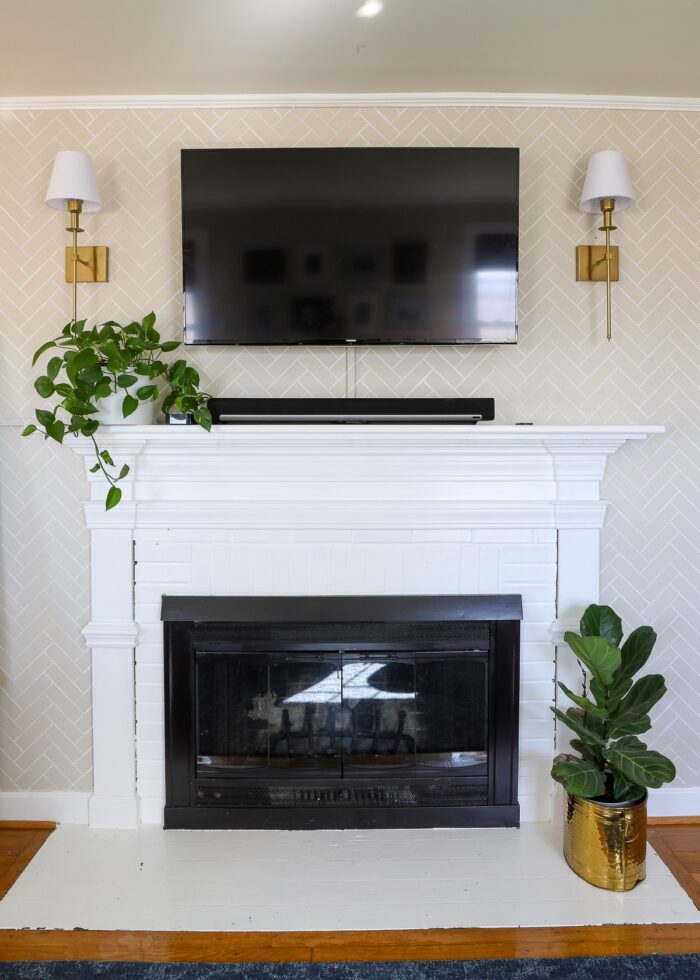
Below is a snapshot of our family room fireplace the day we moved into this home. Not only was the mantel painted the exact same ugly, blah white as the walls and trim, but the brick surround and hearth were given some sort of weird “faux” paint treatment.
(My hunch is something happened to the original brick or tile; and someone, somewhere along the way, attempted to camouflage the damage with paint.)

The original paint job was quite terrible, and I immediately asked if I could paint over it. With approval from our management company, I painted the mantel in semi-gloss white and the bricks in high-gloss white.
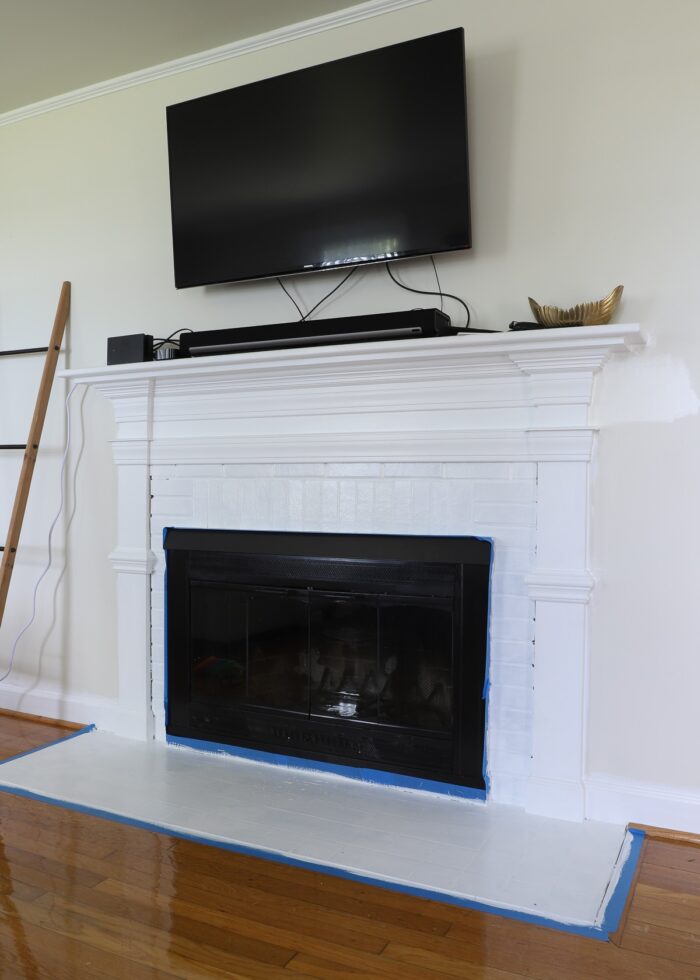
While the white paint was a significant improvement over the faux red bricks, the bright white hearth has really bothered me from minute one.
Not only did this 2×5′ stretch of tile stand out like a sore thumb against the original pine floors; but it’s already chipping and peeling (despite using primer and several coats of high-quality high-gloss paint).
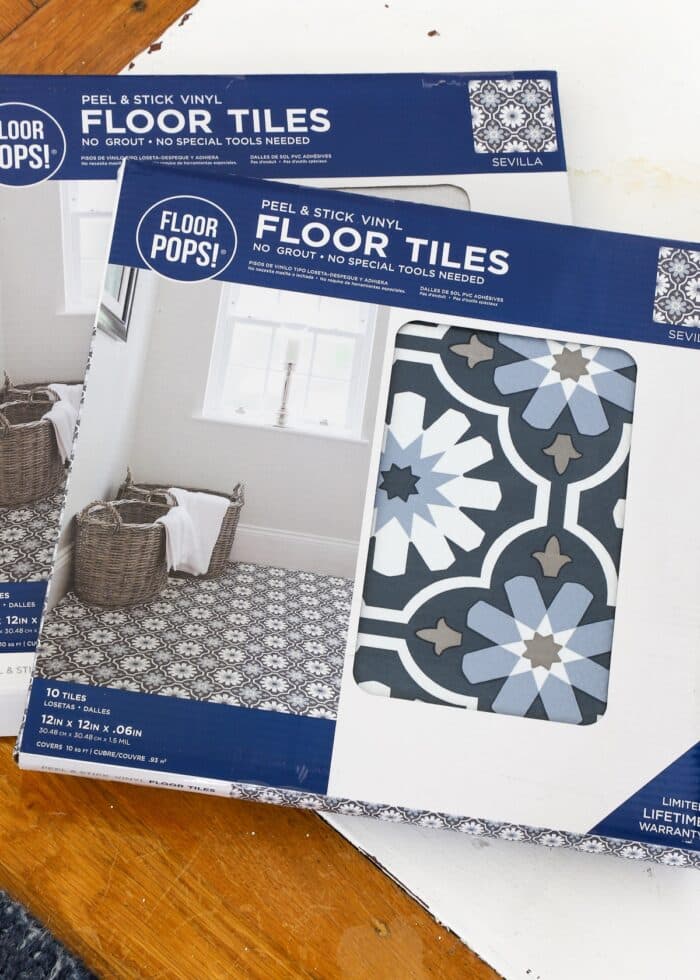
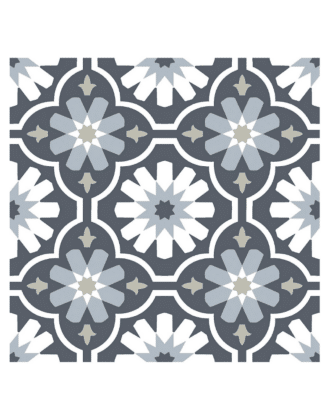
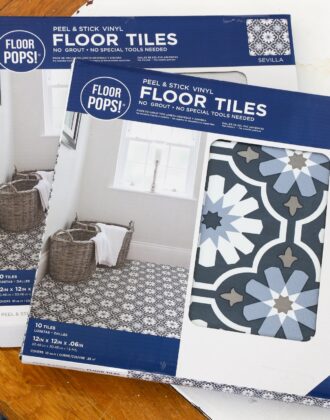
Ever since the stenciled wall behind the fireplace was completed, I’ve been scheming and dreaming about different ways to improve the look of the fireplace hearth. After weighing tile stickers, peel and stick wallpaper, and a few other temporary fixes, I finally landed on using inexpensive Floor Pops Floor Tiles for this project. I’ve always wanted to try peel and stick tile flooring on something; and this blue, white, and tan pattern totally stole my heart!
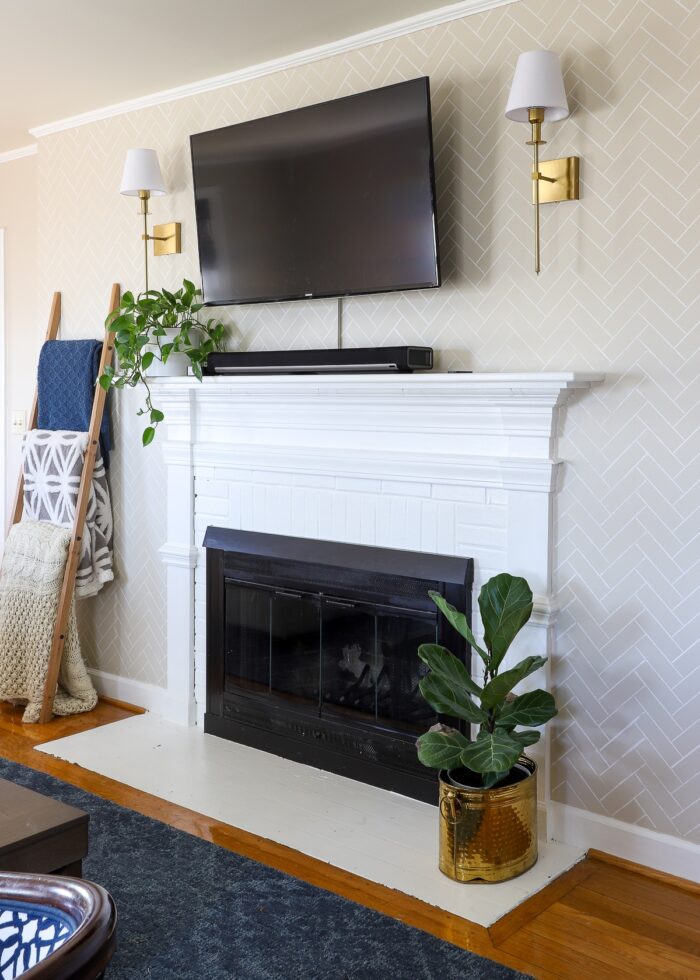
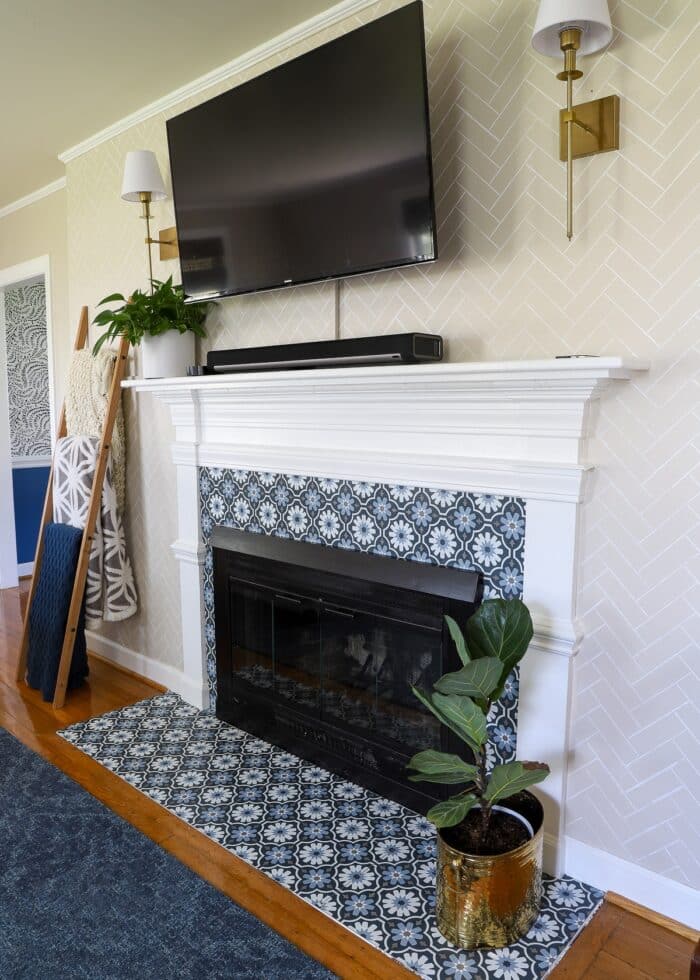
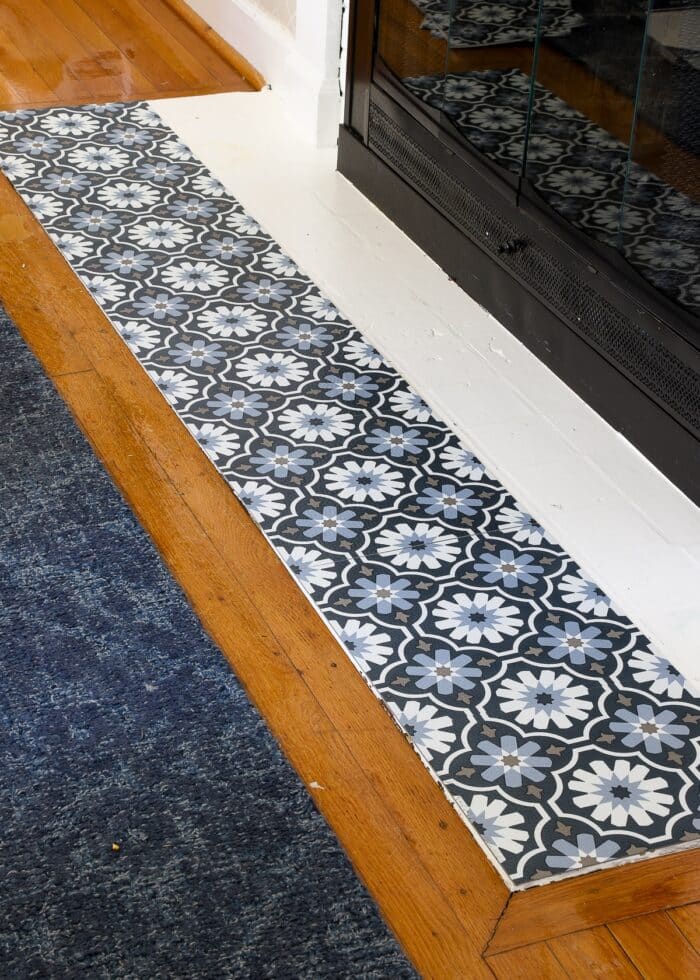
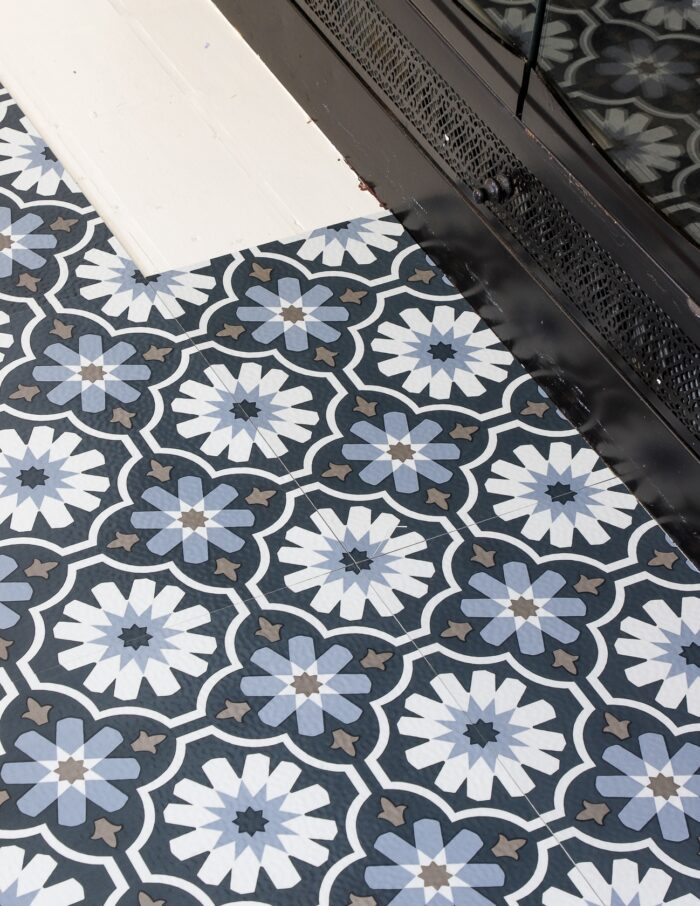
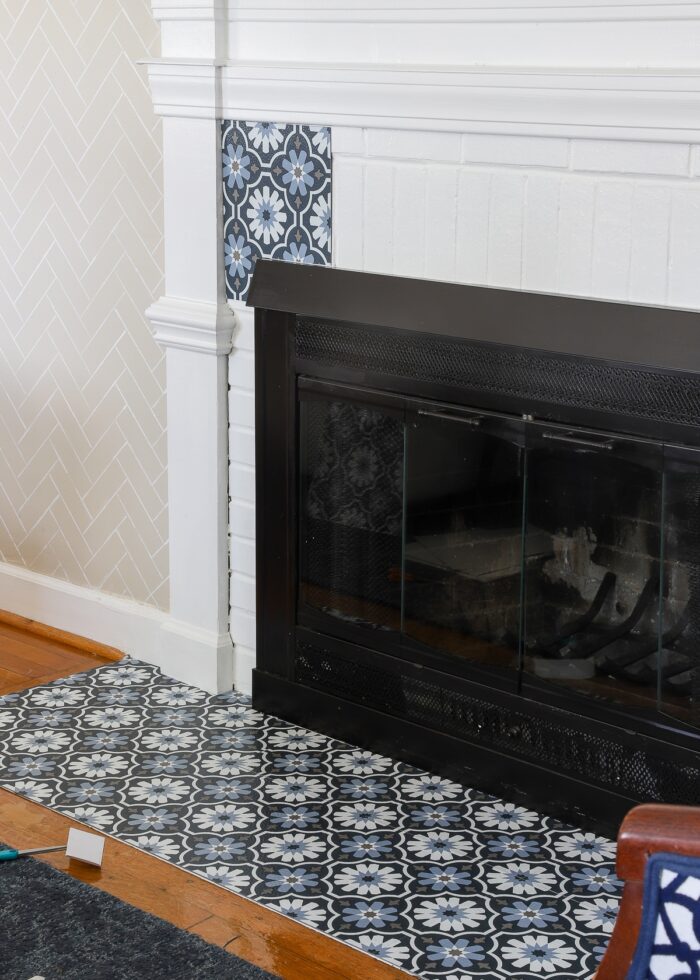
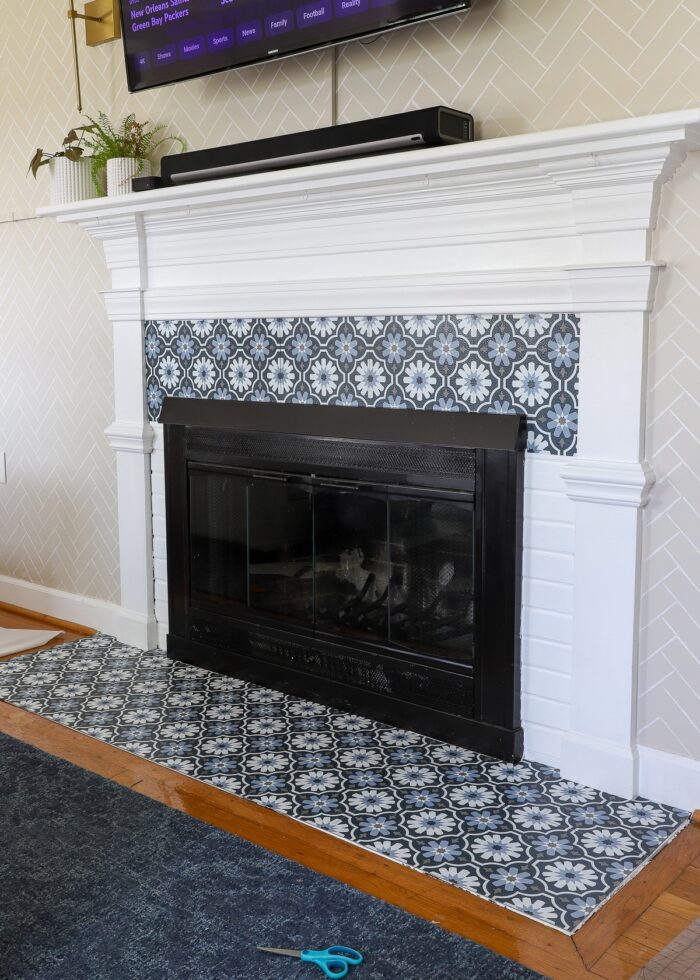
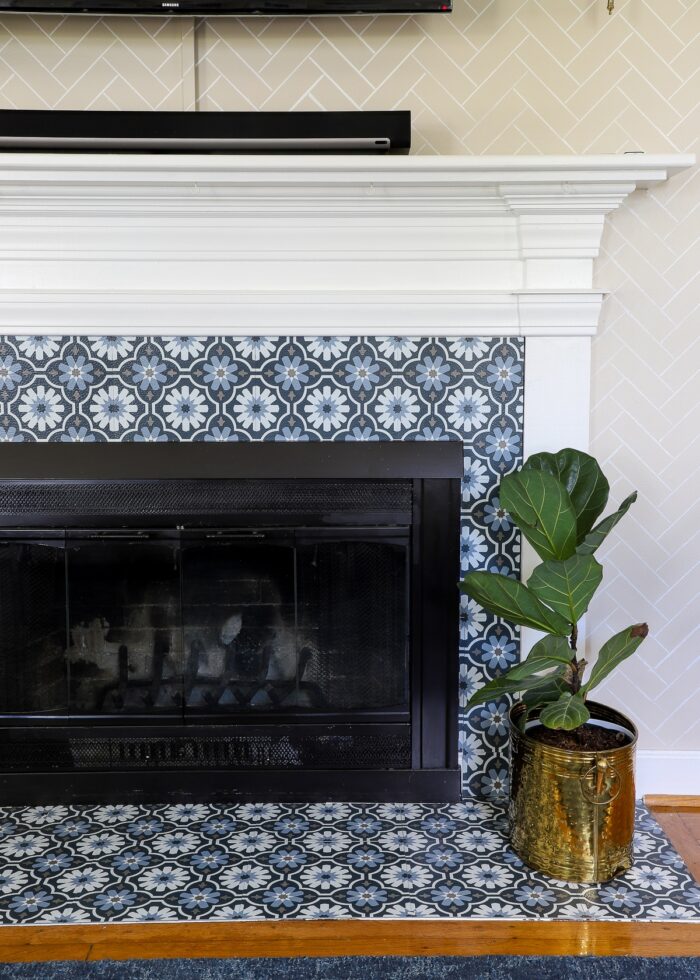
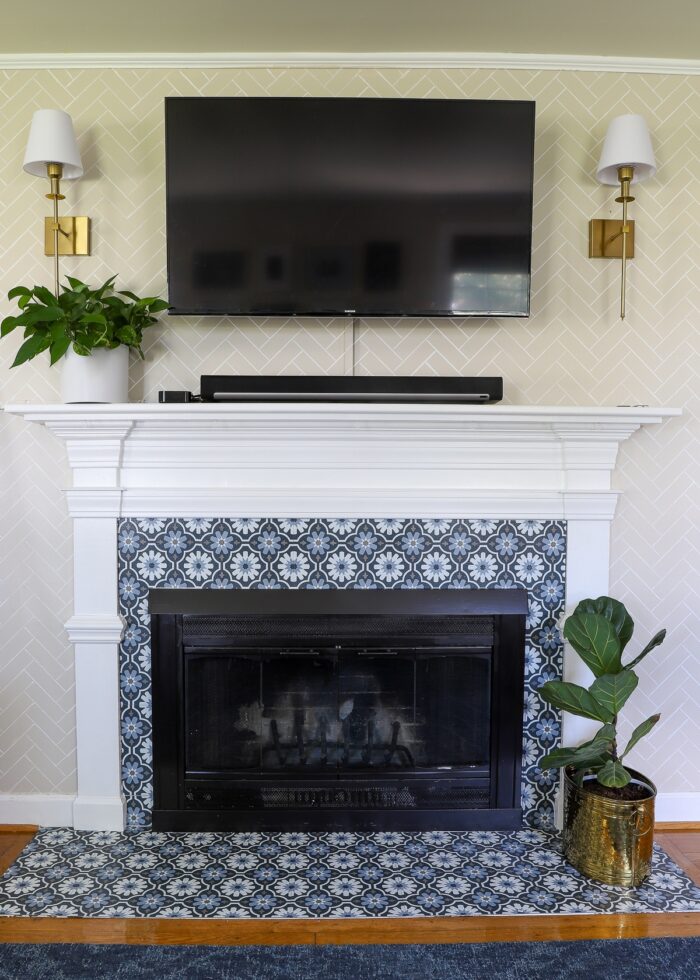
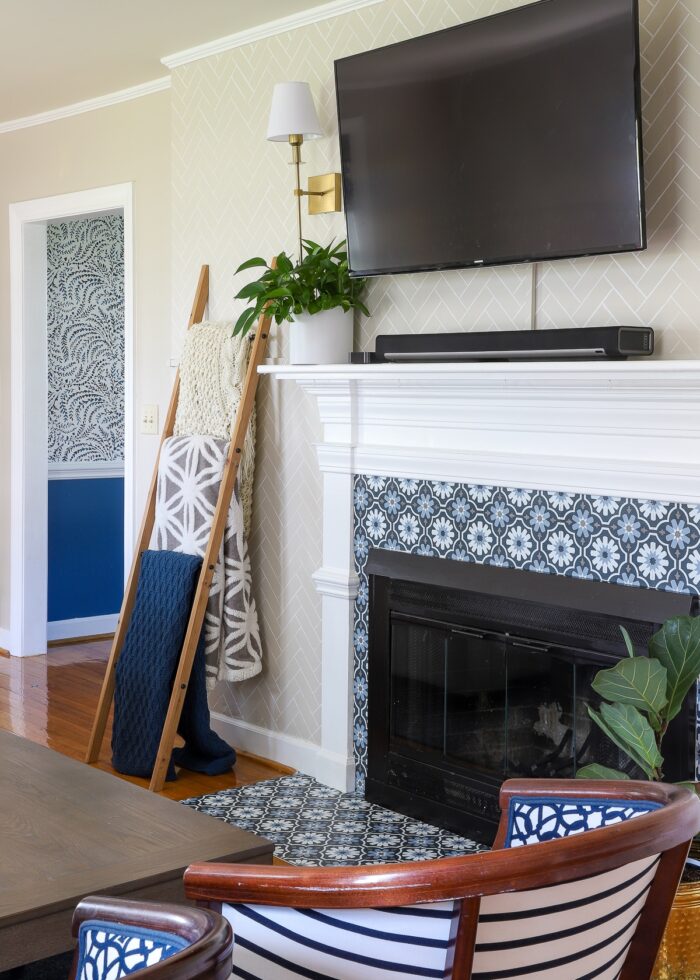
My original plan was to only cover the hearth tiles, but it felt very incomplete. So I opted to take the floor tiles up and around the fireplace insert, covering up all the white painted bricks as well.
The final result is quite stunning, to say the least! I dramatically changed the look and feel of this entire fireplace wall in a totally removable way. The whole project cost less than $25, took about three hours, and had almost zero mess!
By all accounts, this fireplace transformation would be an unqualified renter-friendly DIY success around here, right?
Well…I have to admit, I’ve got some mixed feelings about this project as a whole.
So read on to learn exactly how to “tile” your fireplace surround with peel and stick tiles (and aaaaall the tricks I learned along the way). But also why I’m not sure I “hit this one out of the park,” so to speak. (Yep, not every project turns out quite right after all!)
Pssssst – Curious to see how the peel and stick floor tiles removed before we moved out? I have the full removal details here: Can (& Should) You Use Floor Pops! Floor Tiles In a Rental?
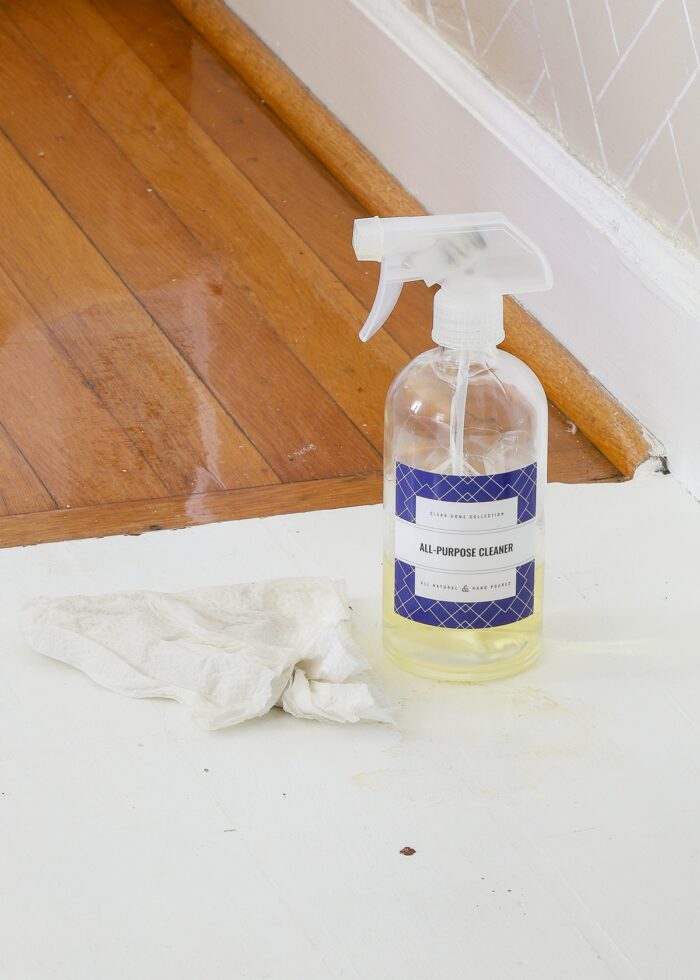
Supplies Needed
If you’d like to give your fireplace a totally temporary (and very inexpensive) update, here is what you need:
- Peel and Stick Floor Tiles (see more below)
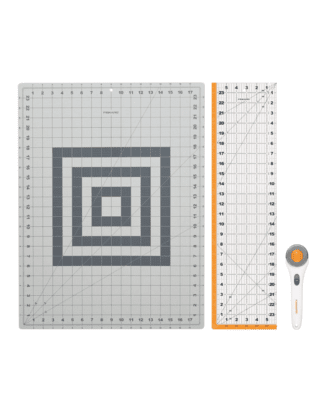
- Rotary Cutter with Long Ruler and Self-Healing Cutting Mat or utility knife with a straight edge
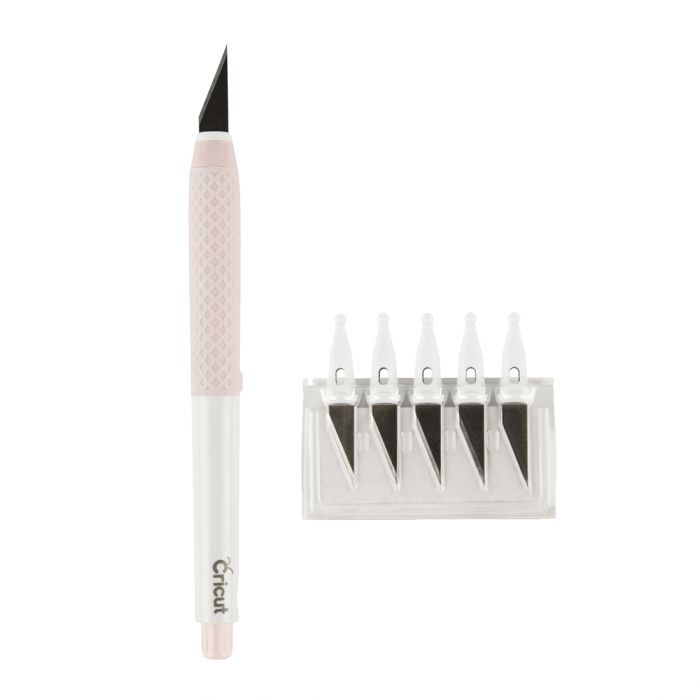
- Scissors – that you won’t mind ruining
- Strong Double-Stick Tape
- Tape Measure
- Stack of Printer Paper
- Pencil
Why I Chose Floor Pops For This Project
You all likely know by now that I do a considerable amount of research when selecting products for my projects. Especially ones that I need to be able to remove.
I’ve long been intrigued by “peel and stick floor tiles” as a renter-friendly flooring solution, but I’ve always hesitated to use something that proclaims to be “permanent.” (I never take on a project unless I know I can un-do it completely and without damage.)
For this fireplace surround, however, the risk of damaging the underlying surface was pretty minimal. Not only is the adhesive on these tiles not that sticky (more on this below); but if they did peel the paint upon removal, it would be really easy to fix (since the original can of paint is still out in my garage).
So I determined this fireplace makeover was, in fact, the perfect project to experiment with adhesive floor tiles. And at less than $25 for the entire fireplace surround, I really didn’t have much to loose!
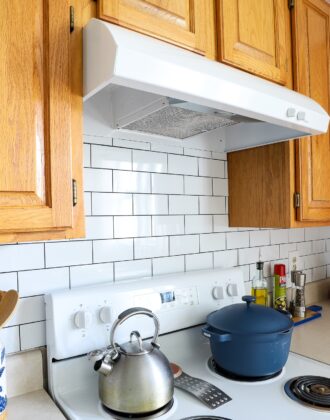
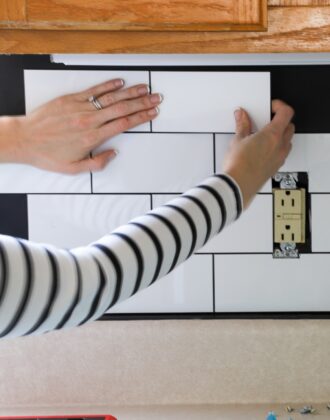
That said, if you choose to use a different peel and stick tile product (like, these for example, that I used on our subway tile kitchen backsplash) or you’re VERY concerned about damage, you might want to take additional steps to protect the existing surface. Like I show in this peel and stick backsplash post, adding contact paper to your surround first will allow you to adhere stickier tiles without ruining existing finishes or leaving residue behind.
NOTE: We do not use our fireplace, so I was not looking for heat resistance in my tiles. If you do use your fireplace, be sure you look for a product that can withstand increased temperatures.
Video Tutorial
If you’d like to watch this fireplace makeover from start-to-finish, here’s a short video of the entire project! (Video not loading for you? Watch it HERE.)
Fireplace Makeover with Peel & Stick Tiles | Step-By-Step
Step 1 – Clean Fireplace Surround
Anytime you are using peel-and-stick products, you always want to make sure it’s as clean as possible, since dust and debris can significantly affect adhesion. So before proceeding, give all surfaces a good clean.
Step 2 – Plan Tile Layout
Next, spend a little time laying out your tile pattern before you start removing paper backings. This will help you determine which way the tiles work/look the best with your specific fireplace layout.
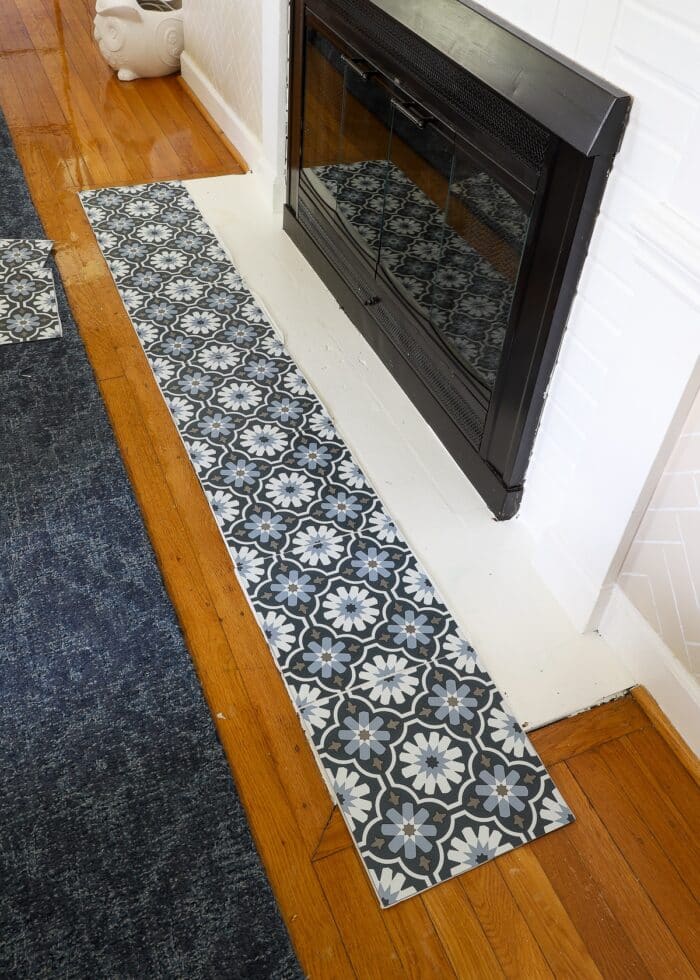
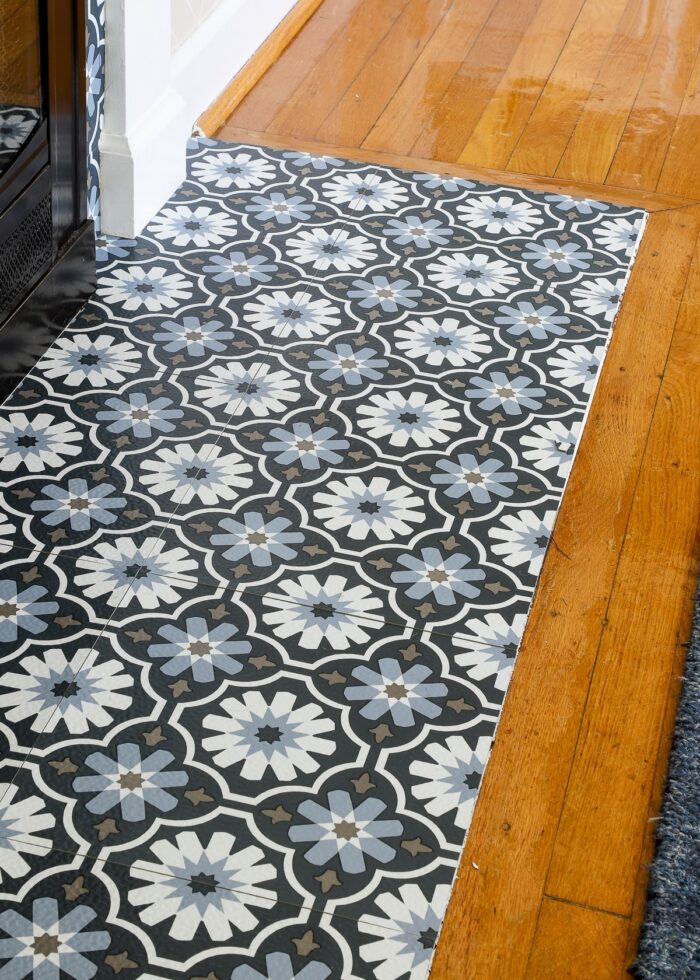
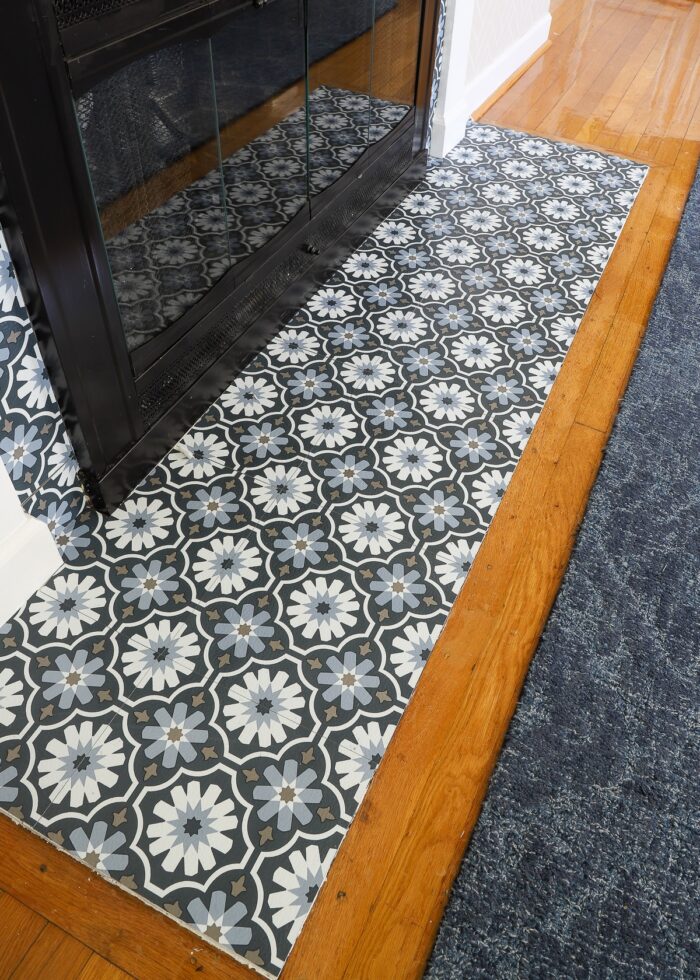
As you can see below, the tiles didn’t quite fit “as is” across my fireplace hearth. Since I’d have to trim tiles down anyway, I opted to center my pattern on the hearth instead.
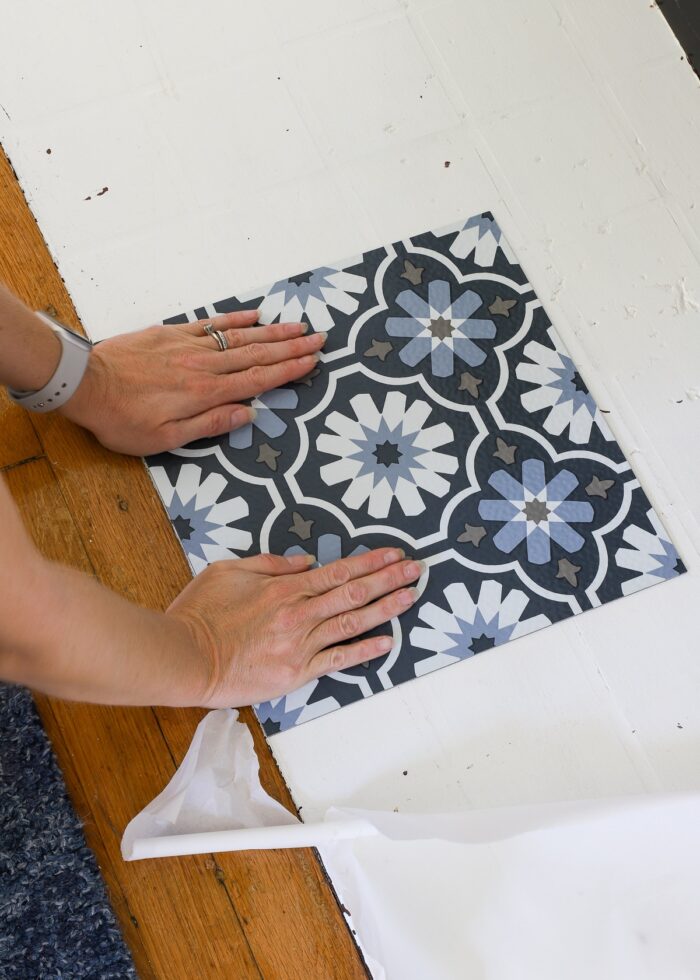
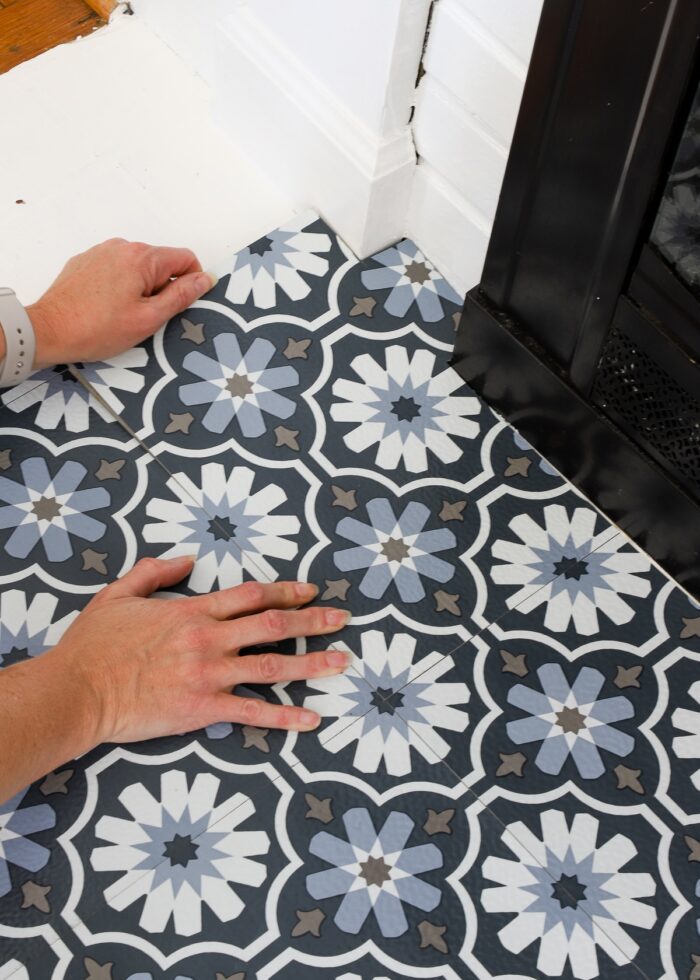
Step 3 – Place First Tile
Once you figure out how you want the tiles to be laid out, you can start placing them down. All you have to do is peel the paper backing off of each tile and stick it into place (yep, it’s that easy!)
Since I was centering my tile layout, I chose to place my first tile in the exact center of the hearth; I then worked my way outward.
Keep in mind that because all the rest of your tiles will align off this first one, you really want to get it right. Ensure it’s straight; and if necessary, peel it up and fix it before proceeding with the rest of your tiles.
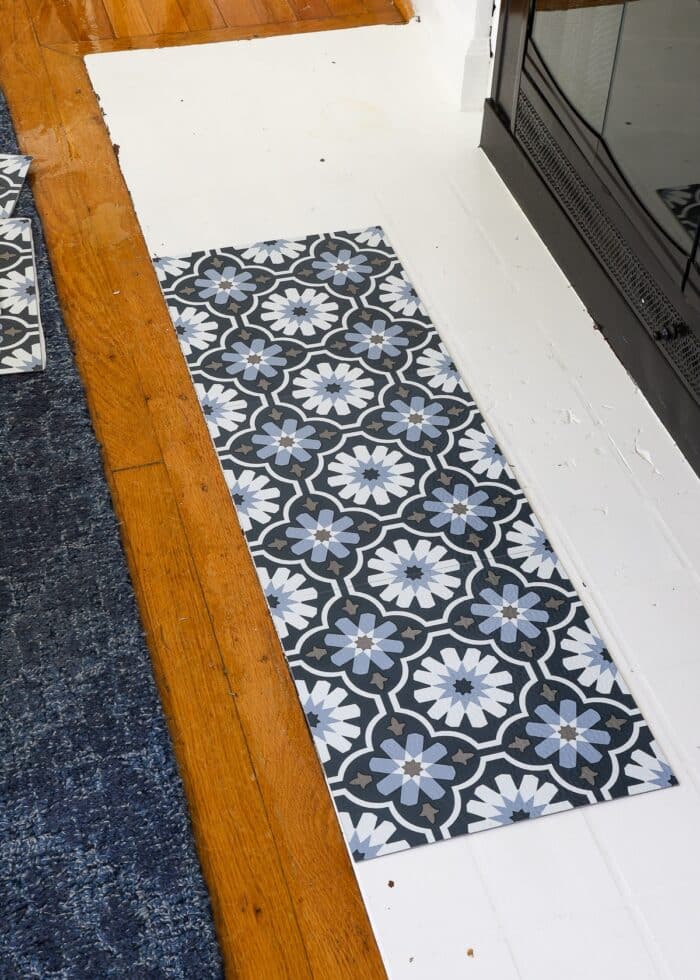
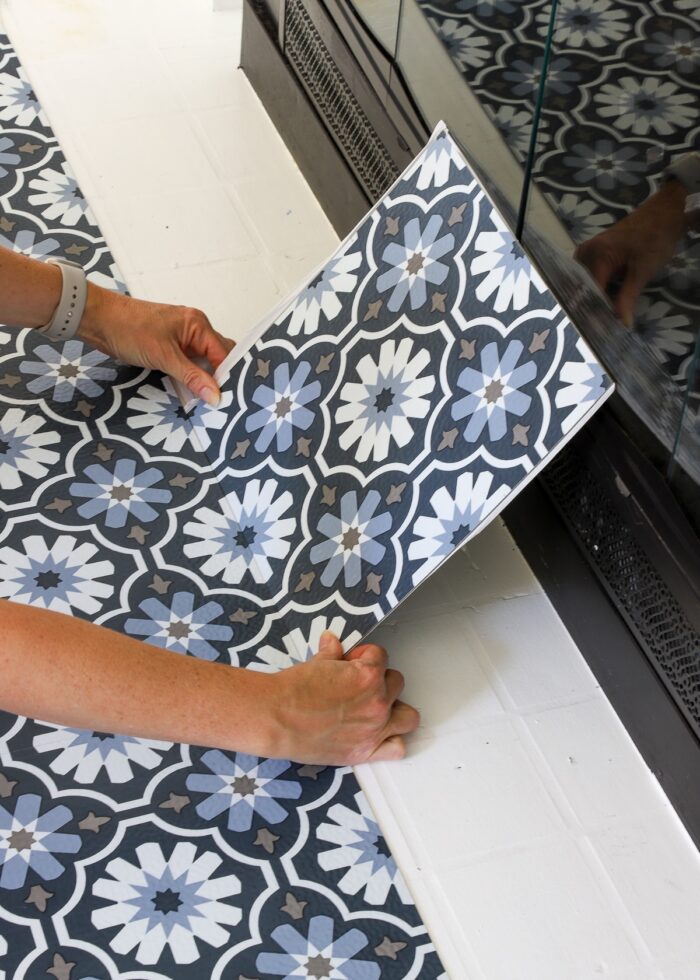
Step 4 – Build Out Pattern
With your first tile down, you will next work in all directions to build out the pattern with additional tiles, peeling and sticking as you go.
I can’t speak for every tile pattern out there, but this one required quite a bit of rotating to find exactly where each tile matched up right. Take your time and keep yourself oriented on each tile to ensure your pattern matches up correctly.
Step 5 – Trim Edges
As you work around your fireplace, you will eventually need to trim the tiles down where they meet the edges/wall.
The Floor Pops tiles are thin enough to be cut with a scissors, but I can’t cut a clean, straight line to save my life. I found it easiest to score the tiles a few times with my rotary cutter blade along a ruler on top of a self-healing mat, then snap them apart on the score line.
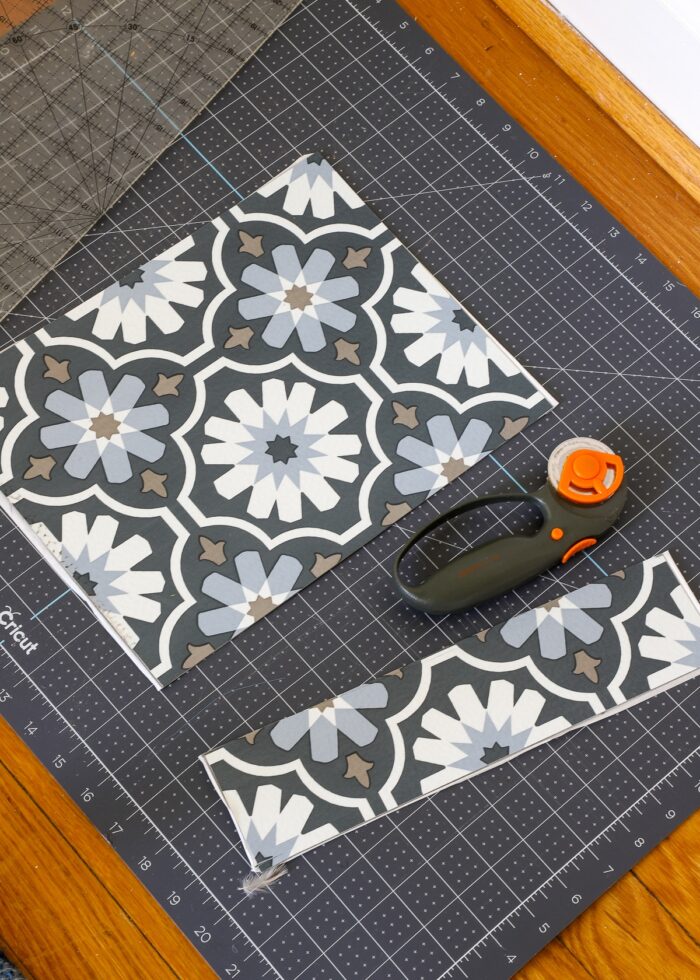
Laying the tiles across the front of the hearth will likely be the quickest and easiest part of this entire project. As you get closer to the wall, you will need to cut down tiles individually, which takes some time and patience.
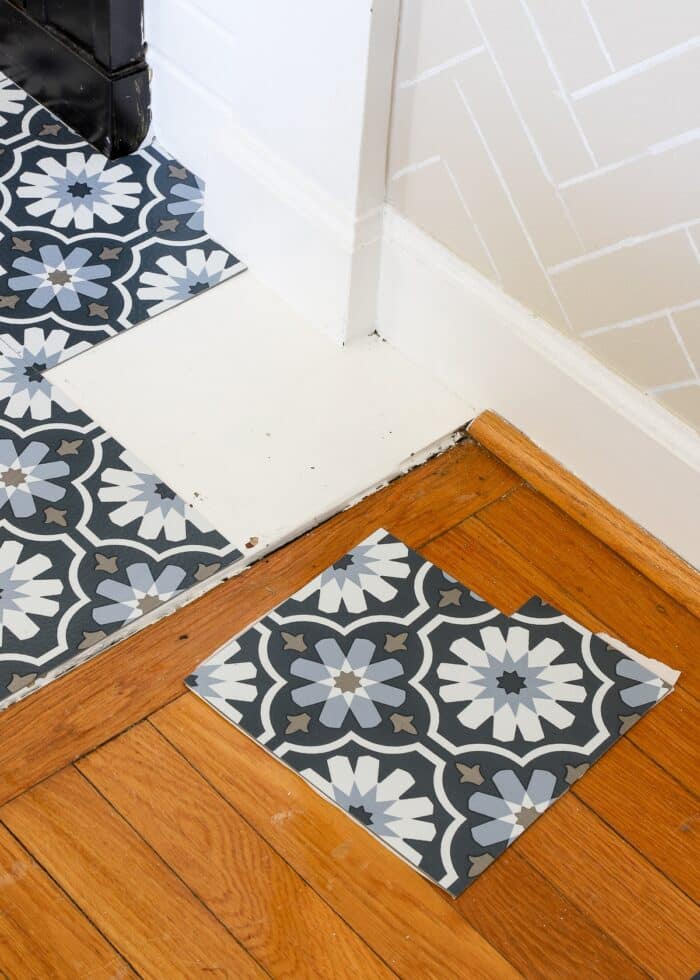
Step 6 – Fill In Gaps
With my front row of tiles in place, I had about 8″+ of hearth still to fill in. Once you find yourself in a similar situation, it is very much a tile-by-tile process. Here is what I found worked the best:
Start by finding the pattern match on the next tile…
…then turn the tile around (so that the pattern match is away from you) and mark your needed cut line where the new tile overlaps the existing tile. Trust me, this works.
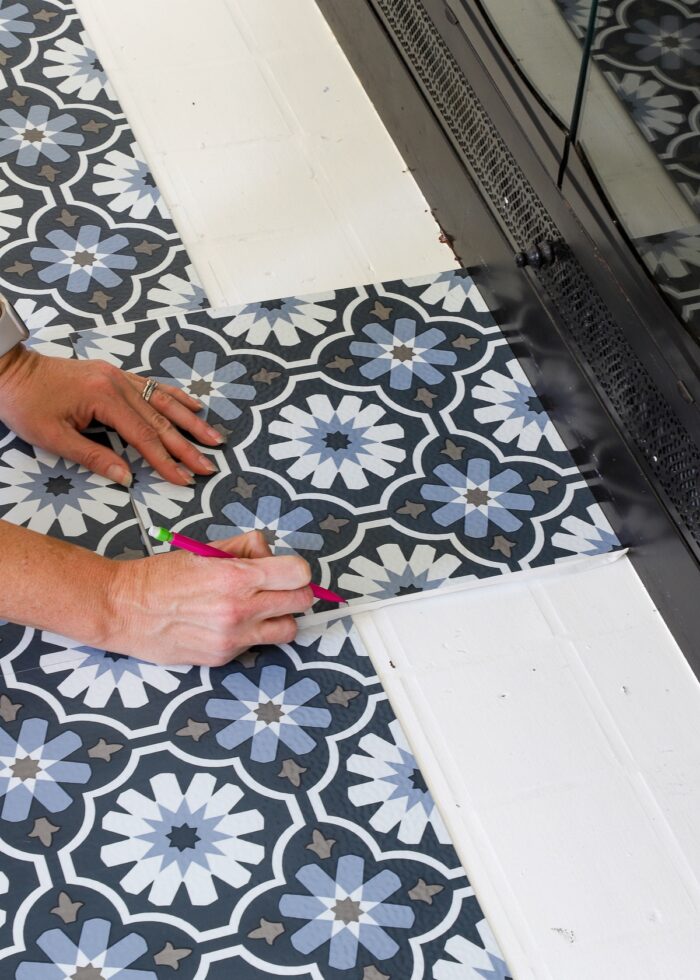
Trim down the new tile on your marked line; and once you line the pattern back up, it should slide right in!
Step 7 – Trim Tile(s) to Fit Around Mantel
If you have a completely flat, flush hearth, filling in tiles won’t be that difficult. But if you have a protruding grate, mantel, or baseboards, you may have to make some tricky cuts into the tiles in order to carry the pattern across the entire surface.
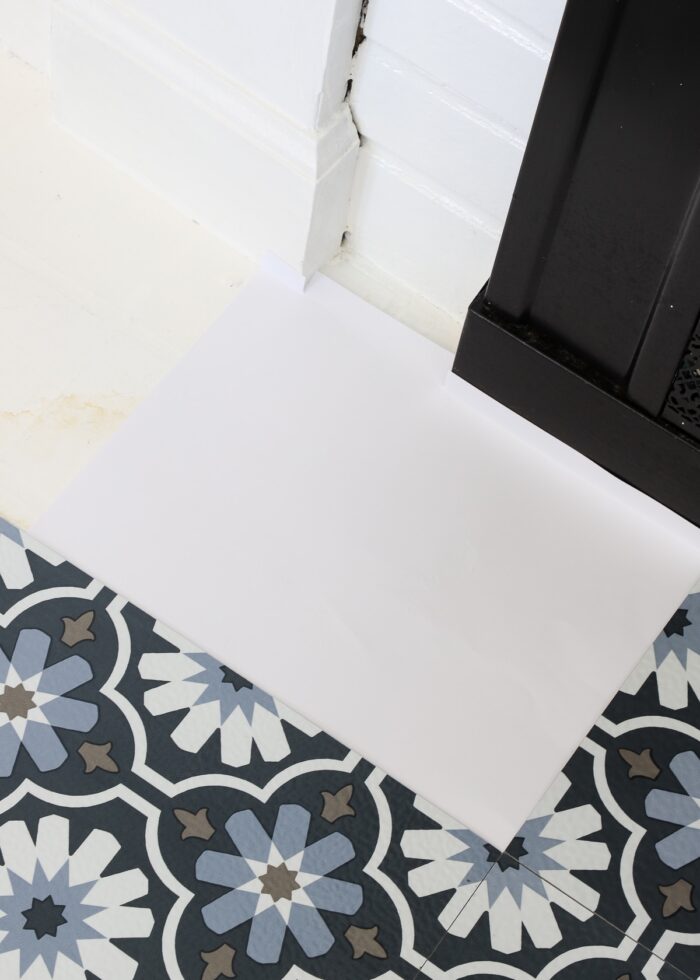
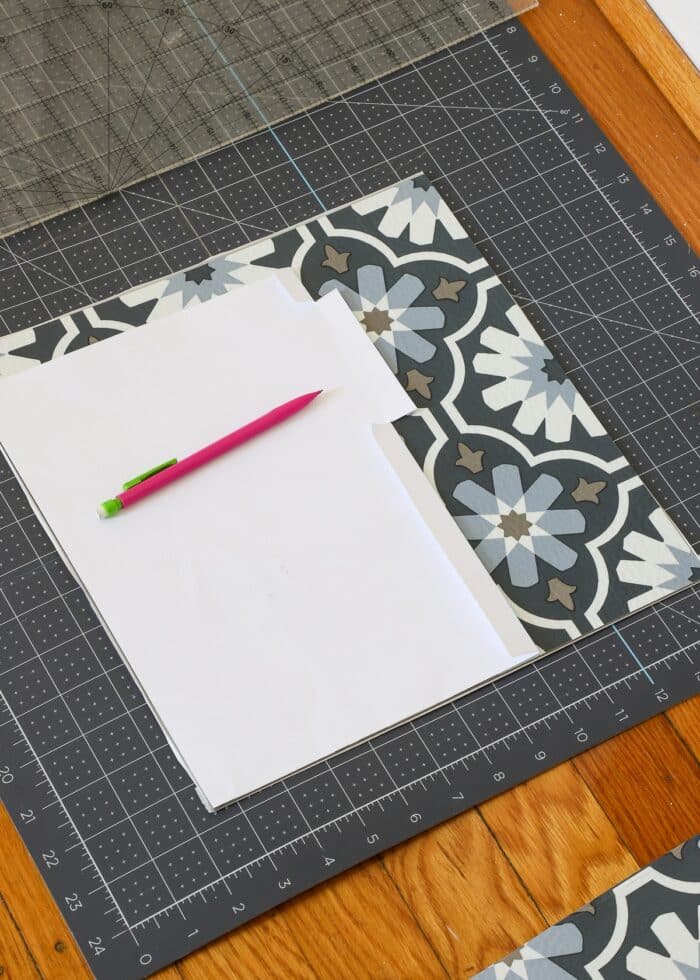
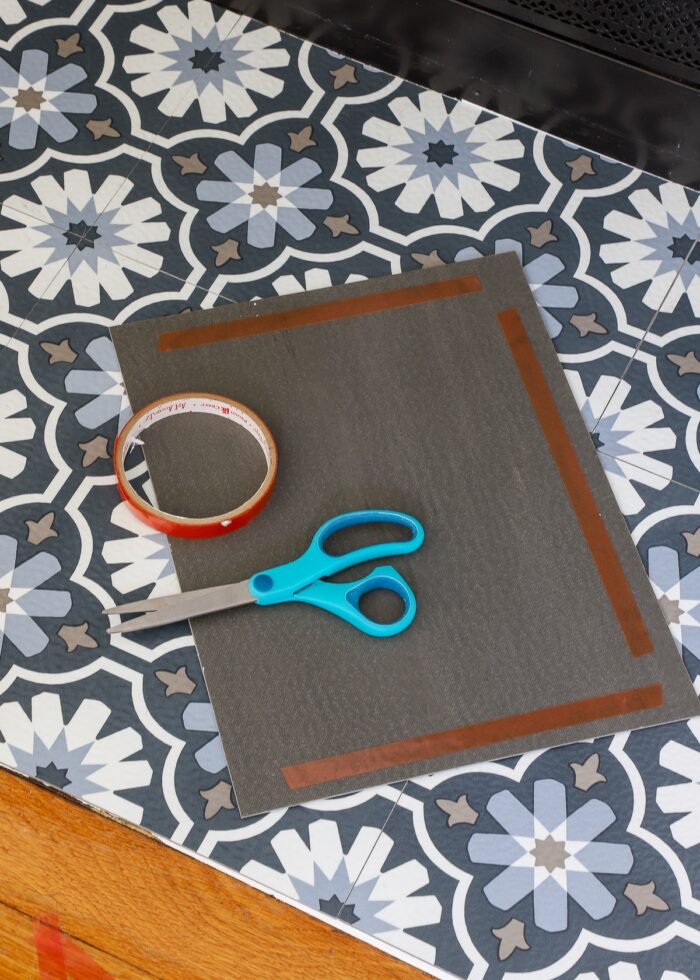
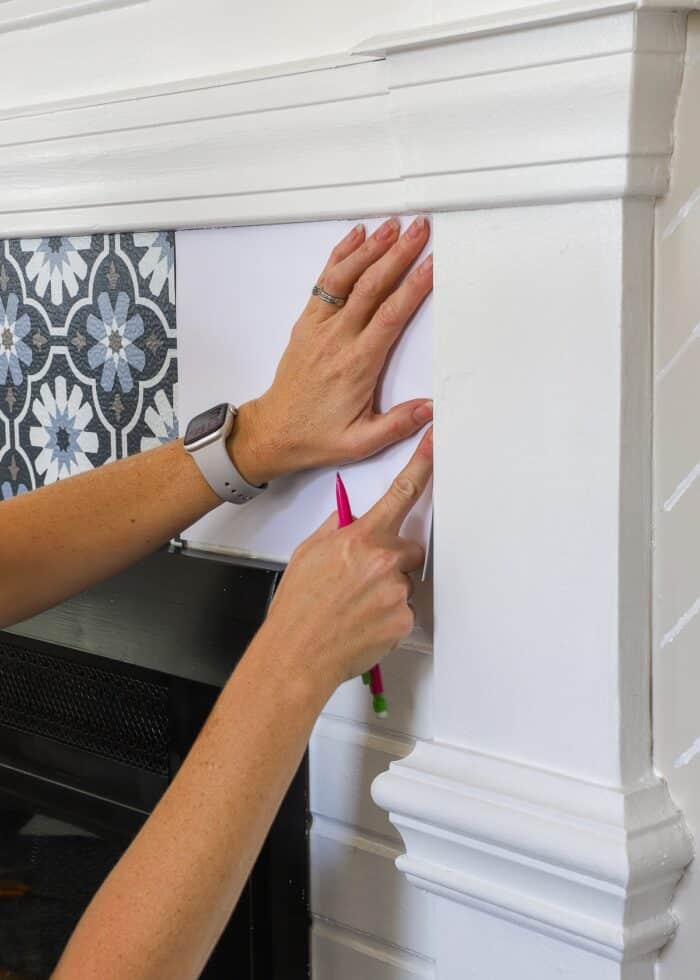
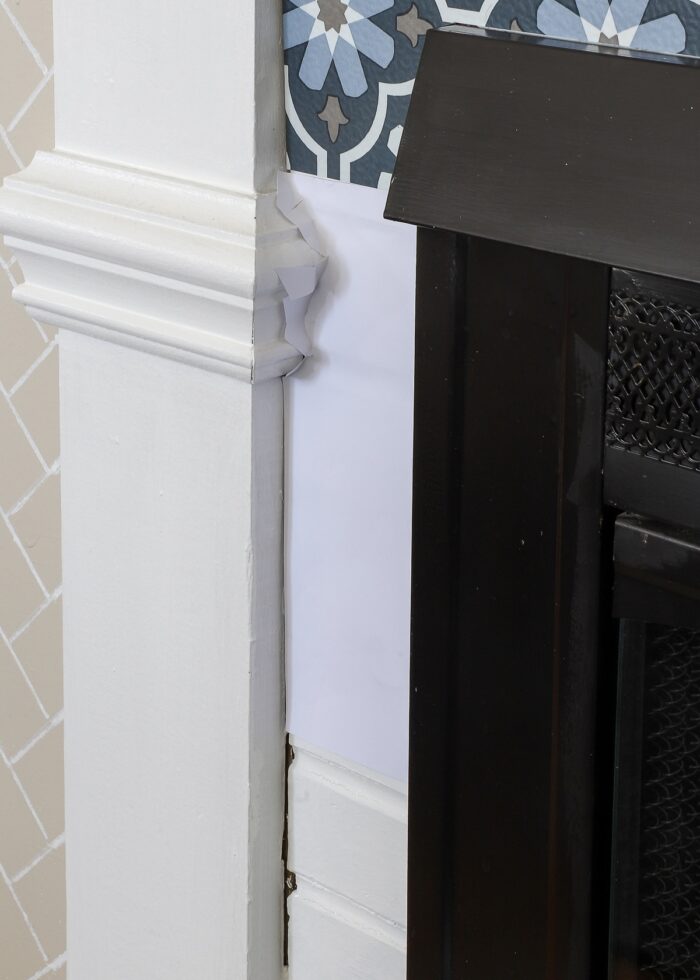
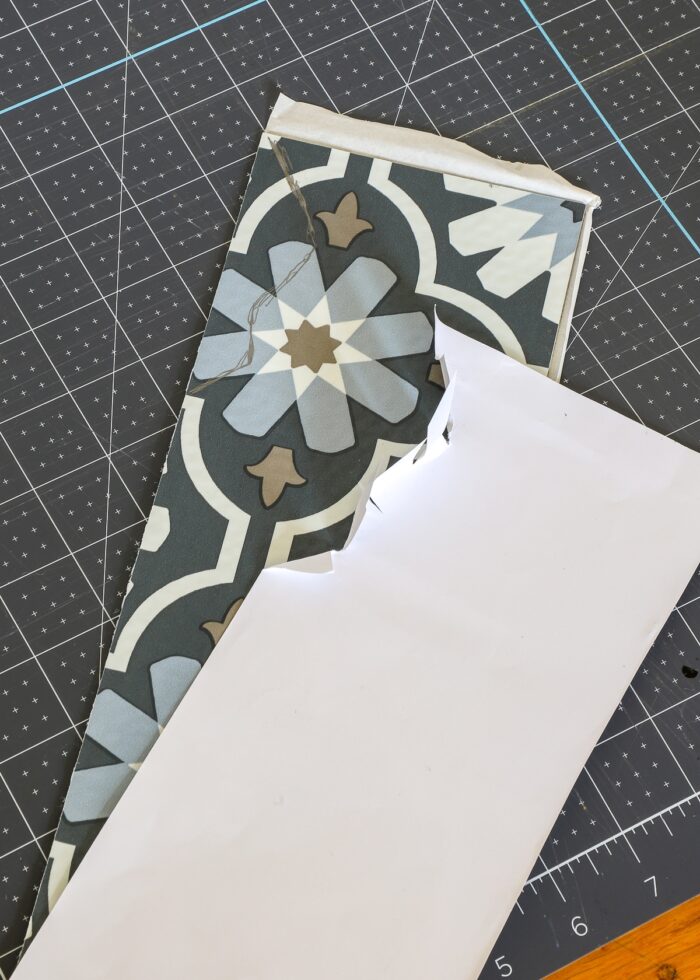
My favorite way to do this is to make paper templates with plain ol’ copy paper.
Place a piece of paper where the next tile should go. Then fold/cut the paper up against any walls, edges, or indentions. Be as precise with your folds/cuts as you can.
Then, trace the paper template onto the tile (again, make sure you have it oriented correctly for the pattern to match up)…
…and trim it out. While I love to make straight cuts with my rotary cutter, sometimes a scissors works a bit better here depending on the length and angle of cuts you need to make.
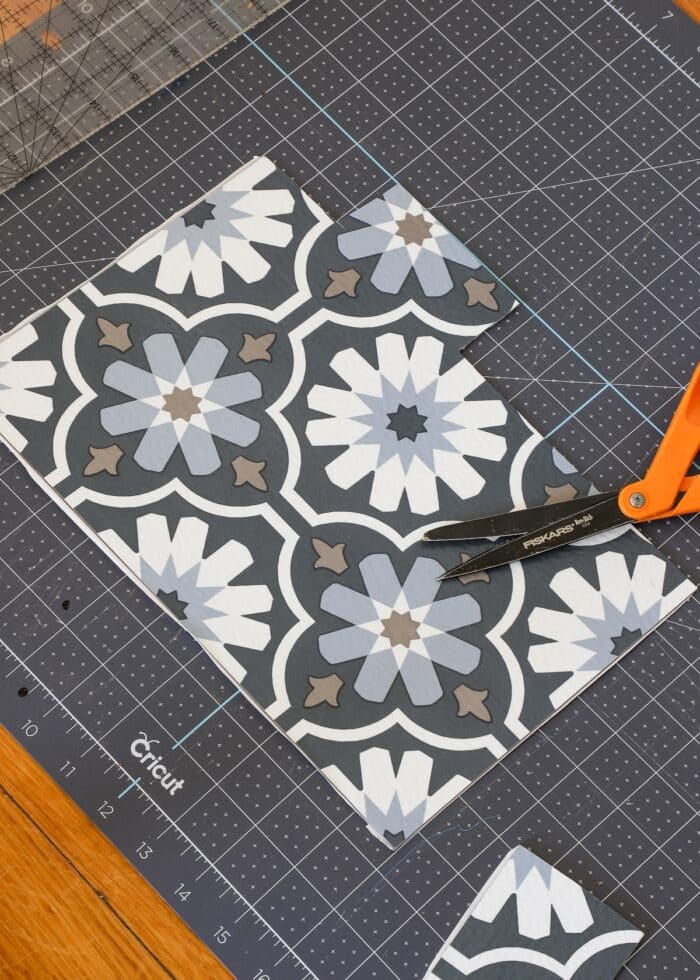
Although you may need to fine-tune your cuts (by slicing tiny edges off), your tile should eventually fit into place!
NOTE: Don’t force the tile into place if it’s too tight. It will bend or pucker the adjacent tiles. Instead, keep slicing away tiny cuts until the tile fits without much effort.
Want to save this post?
If your entire fireplace mantel is perfectly centered, you may be able to use the same templates for both sides. But don’t count on it. Always check to make sure your existing template fits before cutting any tiles. If the template is too big or too small, make a new template.
Step 8 – Adhere Tile to the Fireplace Surround (Optional)
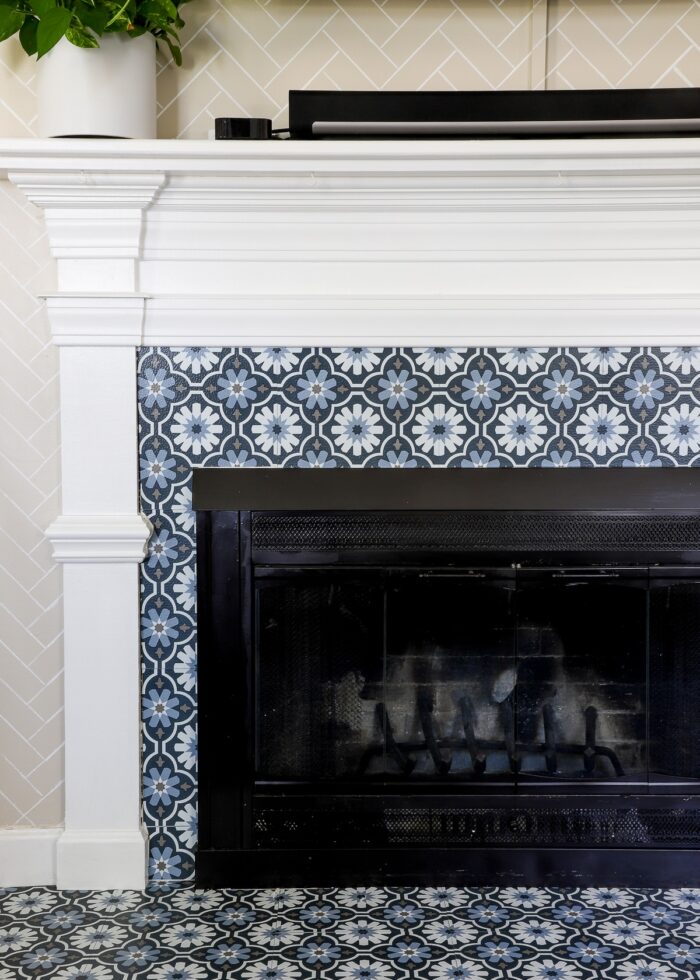
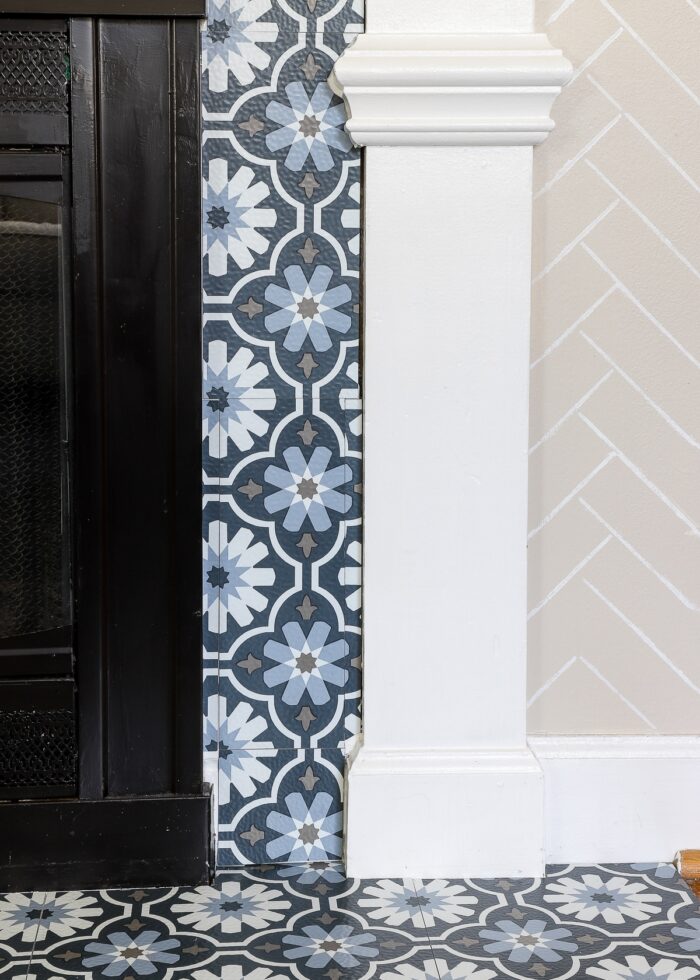
My original plan was to tile the hearth only (I love that white painted brick). But it felt very incomplete to me. Since I had most of a second box of tiles left, I opted to take the tiling up and around the fireplace surround, as well.
In general, I found the adhesive on Floor Pops floor tiles not very strong. While the adhesive is barely strong enough on the floor (more information below), it is definitely not strong enough when these heavy-ish tiles are placed vertically on the fireplace surround (especially if the surface is uneven or has texture, like brick).
True Story: I put that corner tile up first. In the few minutes I spent trimming down the tile next to it, that first tile fell down.
Although the packaging says not to add additional adhesives to the tiles, there is no way these tiles will stay on a vertical surface without something more. Since I want to eventually be able to remove these tiles without damage, I grabbed some double-stick tape I had on hand (but I actually recommend using this one instead). Since adding the tape, the tiles haven’t budged!
Depending on how much space there is between your fireplace grate and the mantel (as well as the size of your tiles), the surround can be very slow going. Each and every tile will likely need to be custom cut, one at a time. While you may be able to get away with measuring and trimming, any corners or edges will be easier to cut with precision using the paper template technique I showed above.
Wondering why I went across the top first, instead of up one side? I wanted to make sure I reserved the full tiles for the larger open surface area. Sure enough, I was able to use mostly scraps to fill in the skinnier sides!
If you have rounded corners or moulding to work around, the paper template process is also really helpful. Just make lots and lots of slits in the paper until it hugs around the edge of the trim as tight as possible.
Then translate that edge to the tile itself and trim out with a scissors.
Again, you may have to adjust the fit (by continuing to cut small, thin slices off the edge), but eventually you’ll be able to get the tile to slide right in along the molding.
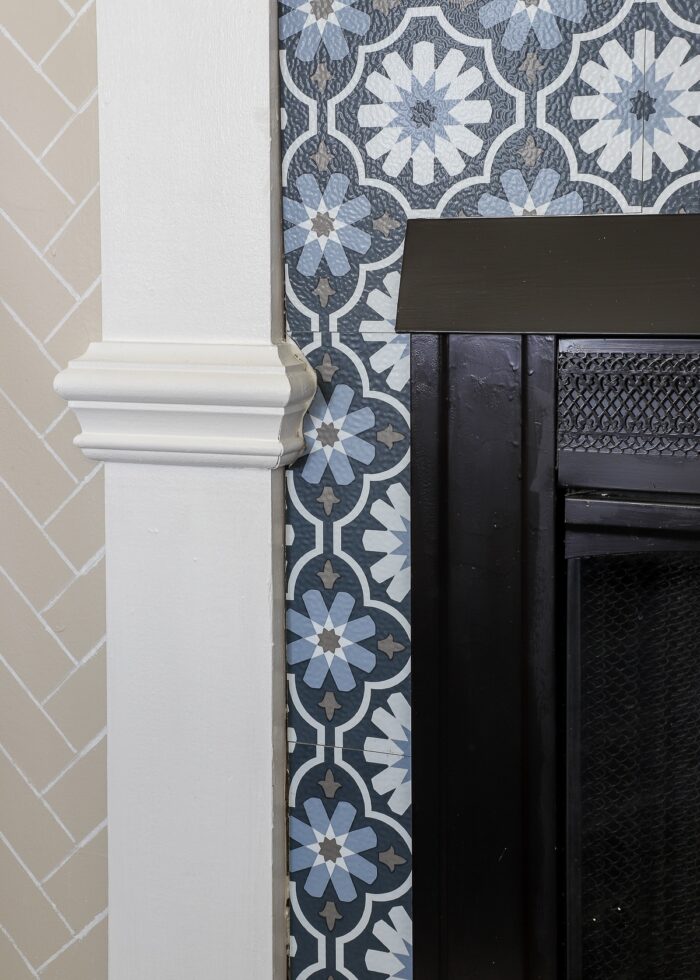
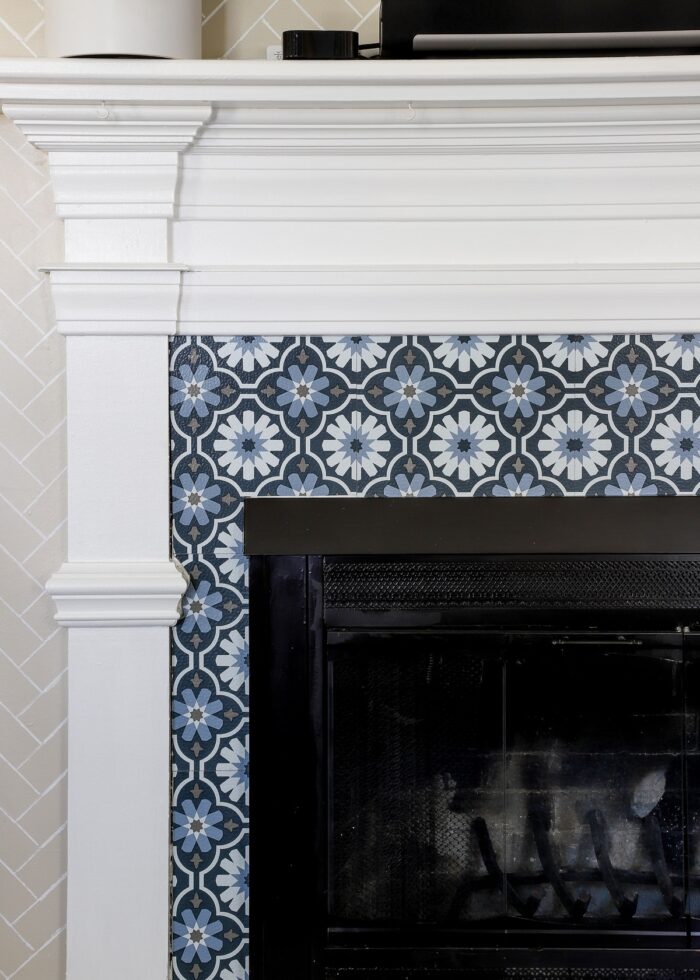
At all times, remain aware of how the patterns match up. I’d love to say it was just luck that the pattern followed a straight line from the mantel all the way down to the hearth, but that was intentionally achieved with careful cutting and paying attention to how the pattern laid out from top-to-bottom.
Step 9 – Step Back & Enjoy Your Fireplace Makeover
With your last tile in place, your project is complete! There are no grout lines to fill and very little cleanup (besides all the paper backings and excess tiles that likely litter your floor). So step back and enjoy your much-improved focal point!
Should You Use Floor Pops On a Fireplace Makeover?
At the top of this post, I hinted that I have a few reservations about this project. And since I pride myself on keeping things real around here, I want to go deep on a few things that are keeping me from proclaiming this a “true” success!
First, I want to chat about whether Floor Pops vinyl tiles were the best choice for this makeover.
Pros
I opted to use Floor Pops (compared to other brands or products) for three main reasons:
- Price – They are so cheap compared to other options. I used 2 boxes, totaling about $23.
- Curiosity – Do peel and stick floor tiles really work? Can they be removed? Will they cause any damage?
- Pattern – I just really loved this blue, white, black, and tan pattern.
And now having used them, there are certainly some other pros to keep in mind.
Transformation
They certainly create a visually delightful transformation. With lots of different colors and patterns to choose from, they allow you to go from boring to beautiful in just a few hours. Here is a quick before/after:
Easy to Install
I was very pleasantly surprised how easy these tiles are to install with virtually no mess. You can cut them with scissors; and it’s pretty easy to match up the patterns. (Just look how I used scraps to piece together my final corner so I didn’t have to buy a third box!)
Temporary
There is no doubt in my mind that these peel and stick tiles are temporary (lots more details below). Even without protecting the underlying surface, I am not at all worried about these tiles damaging the paint or the bricks/tiles themselves. So as a renter who has to be able to un-do this, I wouldn’t hesitate to use this product!
Cons
That said, my biggest disappointment in this product is the adhesive.
I have worked with a lot of peel and stick products. A lot. And this adhesive doesn’t strike me as particular sticky in general, and definitely not at all deserving of the description “permanent.”
I’ll concede that this project falls outside what the tiles are designed for. My tile/brick fireplace surface is far from the required “smooth surface.” And hanging the tiles vertically (on the fireplace surround) is not the “intended” use for this product at all (they do make “wall tile” versions intended for backsplash tiles), but let me zoom in on the floor installation for you.
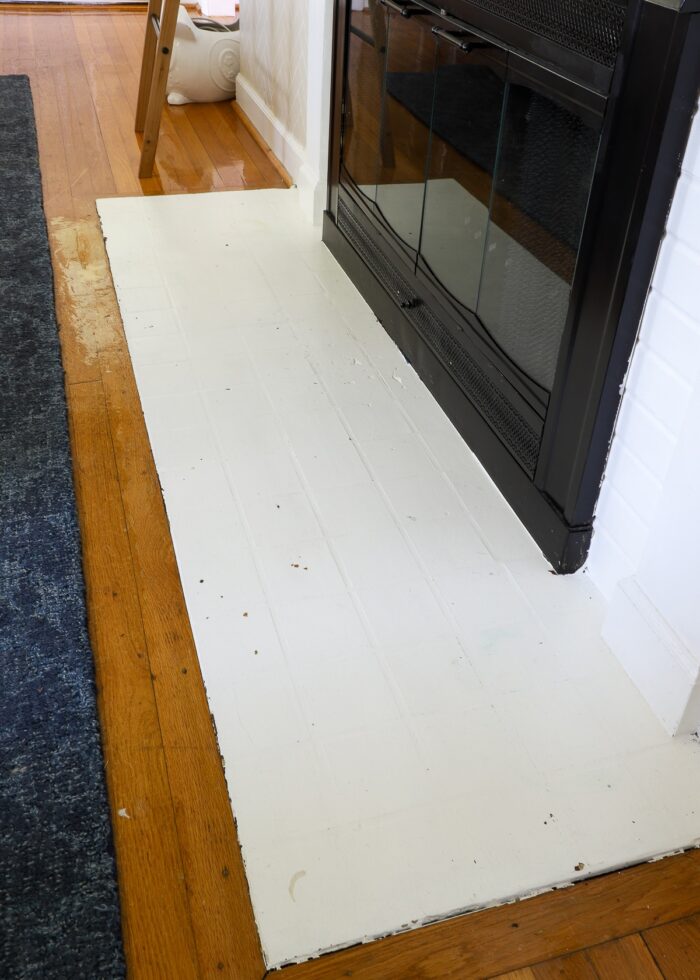
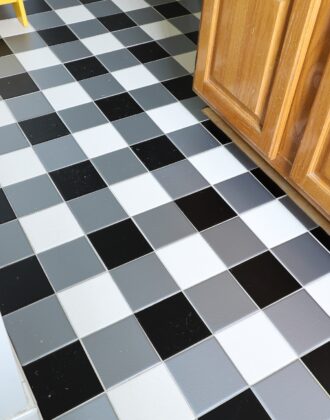
This picture, below, was snapped about 24 hours after the floor tiles were first installed. Notice how the seams, already, are no longer flush. The edges are popping up, ever so slightly.
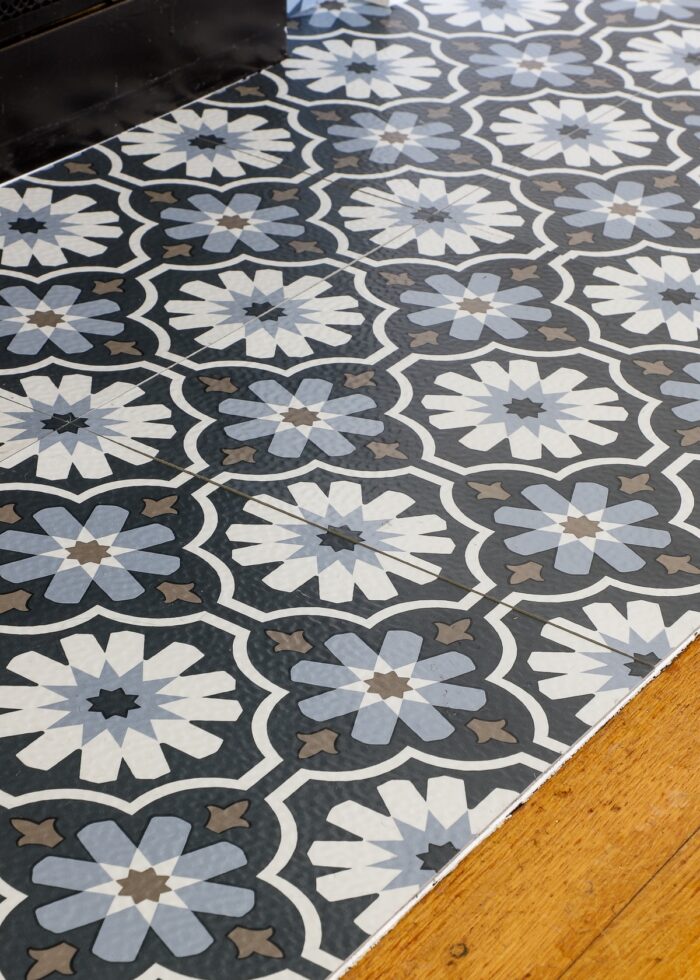
From a distance, the seams are not noticeable at all. But up close, the tiles do not lay flat, and I’d worry about catching shoes and toes on the edges/corners if this were a full floor installation. Thankfully, we don’t really walk across this hearth. But I’m very much wishing I had used the double-stick tape along the perimeters of the hearth tiles too.
So I’m actually really torn about recommending this product.
On one hand, I achieved an amazing transformation really cheap; it was pretty easy to do with just a scissors, and it’s completely removable. All wins!
But I am not impressed with the stickiness of the tiles themselves. I would never use them on a full floor installation (especially in a bathroom where there is moisture), and I’m fairly certain they’ll continue to pop up over time (which is annoying to me because I hate revisiting/fixing projects).
This one will definitely be interesting to watch, and I’ll be sure to revisit it before we move out!
You can now check out the all peel and stick tile removal details here: Can (& Should) You Use Floor Pops! Floor Tiles In a Rental?
This Fireplace Makeover Sure Is Pretty, But…
Last but not least, there is one more thing I want to address on this project: how it looks in the context of the overall room.
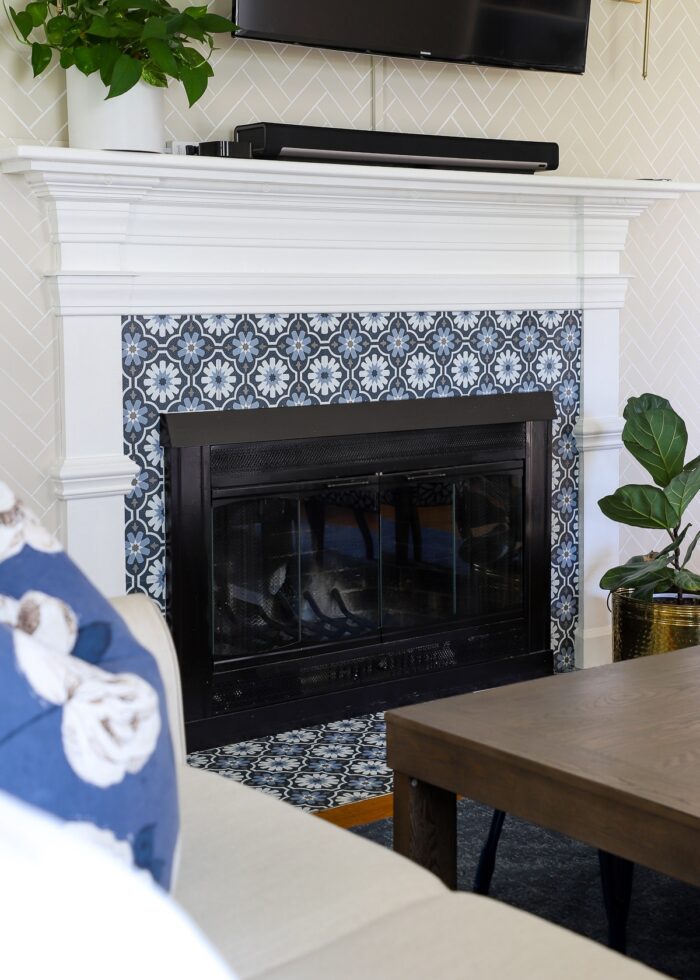
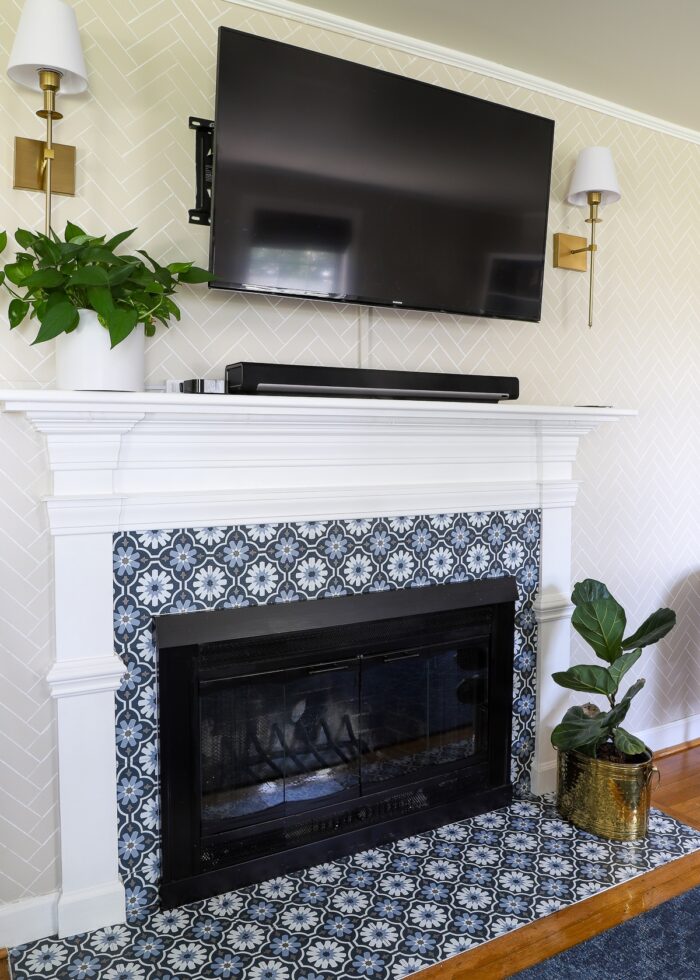
I do love, love, love how this entire fireplace wall turned out (below). I love the tile design itself, and I really like how it plays off the stenciled pattern on the wall behind it.
I also love this angle. The blues in the tile work so nicely with the rug and the bookcase wallpaper, and the browns and tans tie in with the coffee table and foyer. This photo below gives me lots of heart eyes!
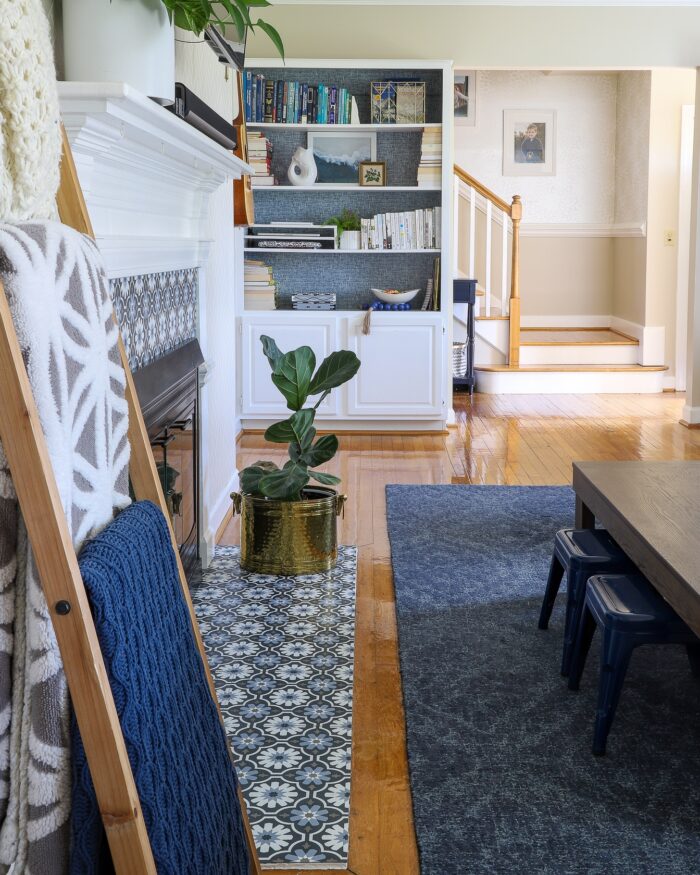
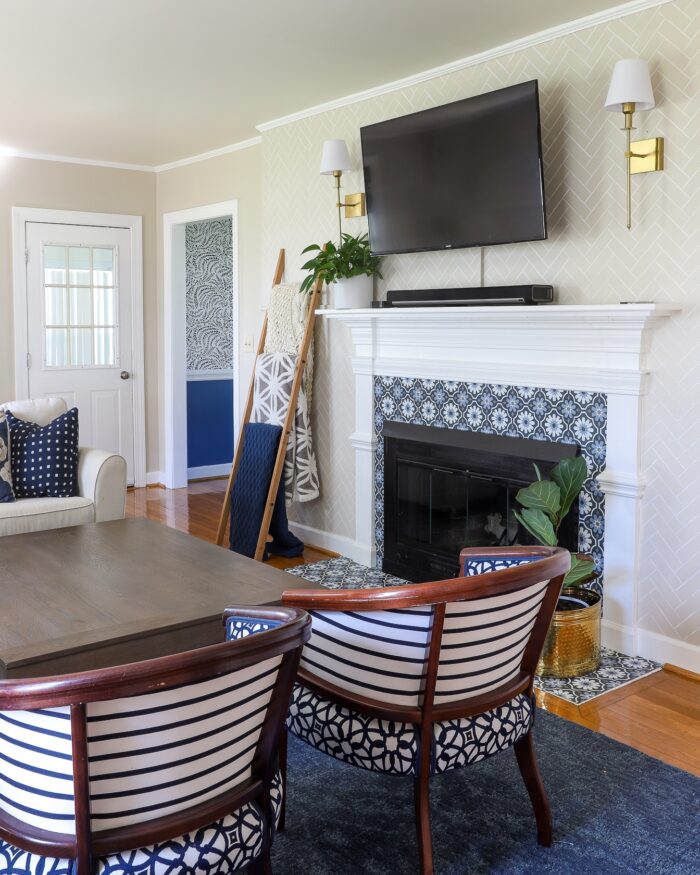
But from the other angle? Where you can see my two (very favorite) patterned chairs and the dining room wallpaper peeking in from the next room over. Ugh. Even for a gal who loves pattern, it’s kind of a lot. Too much actually.
Even though all the colors play nicely together, the fireplace tile pattern is not working with the other patterned elements in the room. And it makes me very sad. Because despite the adhesive debacle, I do really love this fireplace transformation. I’m just not sure I picked the right pattern for this room after all.
So what am I going to do about it? Not sure actually. I might peel off the vertical tiles only, and see if I can get used to just the hearth being patterned. I might also swap out the blue tiles for some more neutral ones, which might prove less busy overall. What do you think? What would you do?!? I’d love to hear your recommendations!
In the end, a lot of the projects I take on are learning experiences. And I learned a lot on this DIY fireplace makeover! Was it the “you guys need to try this ASAP because it was so easy and turned out so great” kind of project? Not quite. But do I consider peel and stick floor tile a viable option for temporarily transforming an ugly rental fireplace? Absolutely! Just be sure to use that double-stick tape 😉
Megan
7 Comments on “Renter Friendly Fireplace Makeover with Peel & Stick Tiles”
I like the patterns together. There is enough eye space between the tiles and the other patterns, at least in the picture. The only jarring thing to me is the gray patterned blanket on the ladder. But I could send you a picture of my family room and you’d not like all my patterns/fabrics.
Megan, the fireplace is very pretty. I love your overall sense of style and your clear and honest writing. I just wanted to offer a hint about a tool that can make projects like this easier. You may already know about these, but to copy the shape of molding outlines etc. you can use a contour gauge like this one: https://www.homedepot.com/p/General-Tools-10-in-Contour-Gauge-Profile-Tool-and-Duplicator-833/100659804. It’s faster and likely more precise than cutting out a paper pattern (and it’s kind of fun, too!).
I admire your patience and attention to detail! I agree in some shots it looks great and in others it seems there is too much pattern. I like the photo where there is no tile on the side of the surround. Did it look unbalanced in the room? Removing the tile from here might reduce the impact of the pattern. My other thought is to paint the hearth one of the colors in the tile – black? Tan? -to match the adjoining rooms. My impression from the photos is that it’s the surround that needs the visual impact from the tile.
I gasped when I saw the first photo – not only a great idea but gorgeous! I love all the patterns in the room and you did a great job mixing them. Think of Sarah Richardson, my fave, who I think said she puts 25 fabrics in a room on average!
You turned us on to the vinyl sheet floor mats/rugs, any way that would be feasible to cut and secure to a fireplace hearth to avoid tiles curling up?
Forgot to say please don’t remove the vertical tiles from the surround (since you asked)! If you must (bc the whole thing looks phenomenal and no one would believe your living room is a rental!), remove just the curled hearth and touch up the white paint. I’d bet if the primer didn’t grab onto the brick, when the floor got a coat of varnish, the workmen got it on the very very porous brick and it drank it up, and that’s why nothing’s sticking!
Or just gently lift the corners and put double sided tape 🙂
Love your work & have a great weekend!
It looks nice on its own but I agree the styles of the patterns don’t match well. Something with more straight lines might work better in combination with the wall.
you want to light your house on fire because that’s how you light your hose on fire.
the surround and the hearth in front of it are non combustible for a reason.
yes, i saw the note that you don’t use your fireplace. not good enough. someone could light a fire in there and then it’s game over. so, either seal it off or take the fire hazard down.
too many people are going to see this article and not read every word, and may even attempt this, so it’s borderline irresponsible to even put this up here. yikes.