Look for Less: How to Stencil a Wall to Look Like Wallpaper
My love for a wallpapered accent wall is no secret around here. But when I calculated up the cost for a large feature wall in our family room, I decided to find a more budget-friendly option. And my solution? A wall stencil! Today, I want to show you how to stencil a wall with paint. With a bit of work and lots of patience, you can indeed get the same same effect as wallpaper, but for a lot less!
A huge “thank you” to Cutting Edge Stencils for providing the stenciling supplies for this project. I only work with brands and products I fully support and that make sense for my home, my family, and this blog. All opinions are 100% my own.
Choosing a Stencil Over Wallpaper
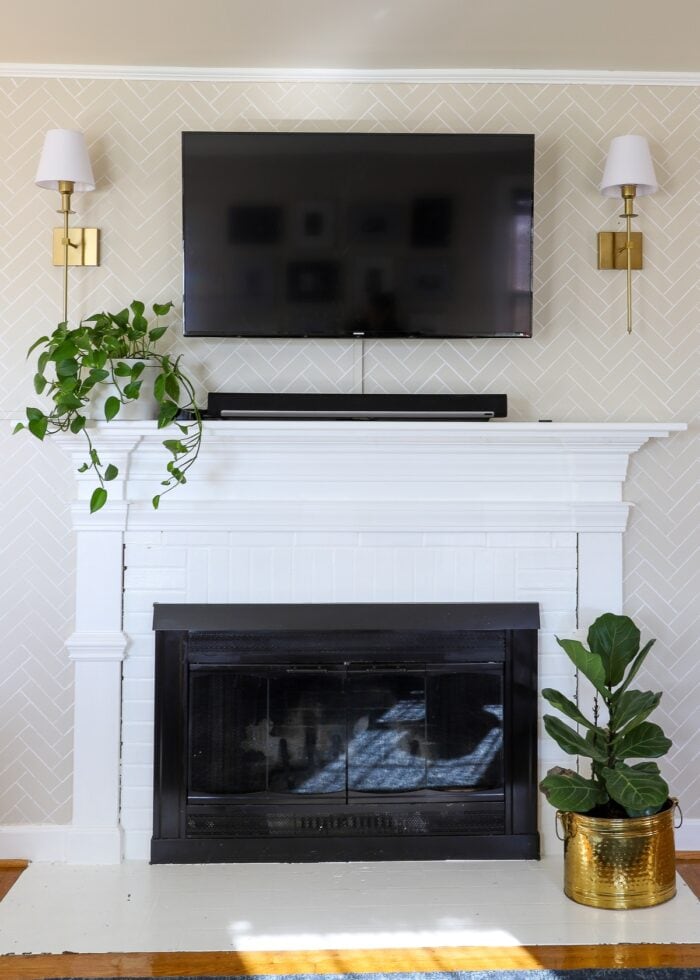
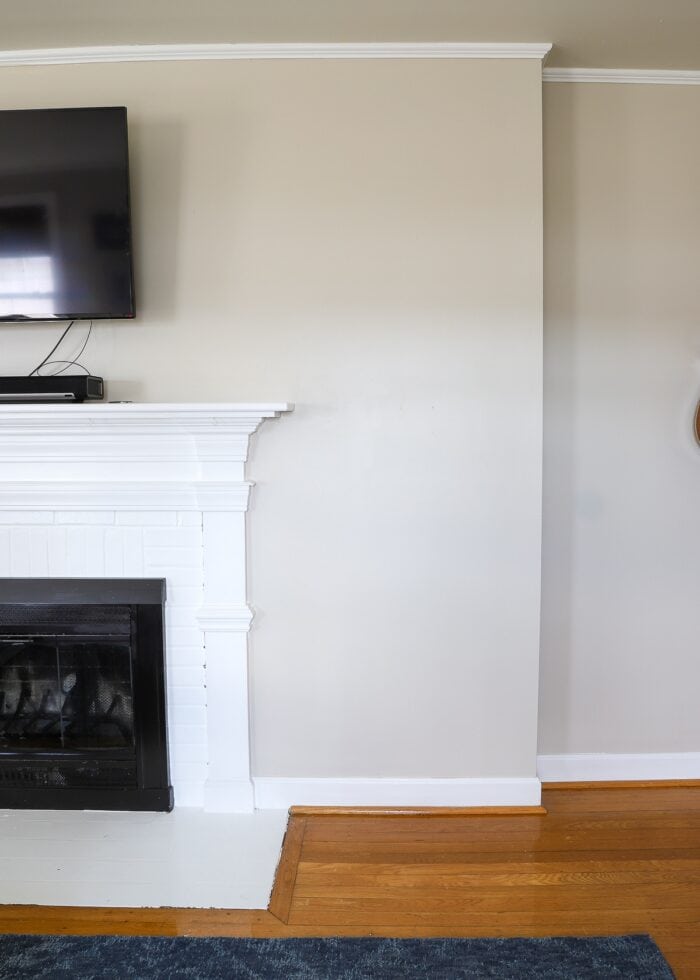
When we first laid eyes on our current rental’s living room, I instantly knew the fireplace wall would become some sort of feature wall. Not only is it the focal point of the entire room, but about 12′ of the wall protrude forward about 8″, creating a pronounced bump-out that was literally begging for some sort of fun treatment.
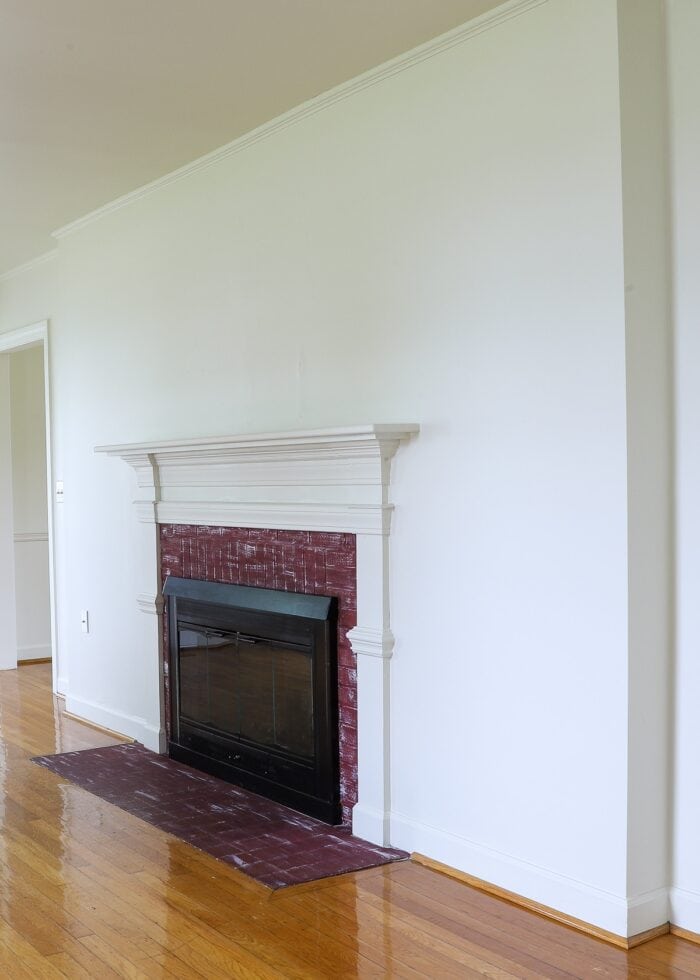
In all honestly, my original plan was to cover the bump out in peel and stick wallpaper. It is my go-to product for accent walls, after all; and I could easily find several patterns that would make sense in this space.
But at 8′ high and 12′ feet wide, this single section of wall would have likely cost me ~$200. And having already tackled some really large wallpaper projects in this house, I was simply looking for a cheaper option that would provide the same design impact as wallpaper.
I’ve never stenciled a wall before, so I figured this was the perfect “small” project to learn! And sure enough…after (admittedly) quite a bit of effort…I was indeed able to achieve a phenomenal stenciled focal wall…but on the cheap!

Supplies Needed
Here is what you need to stencil a wall:
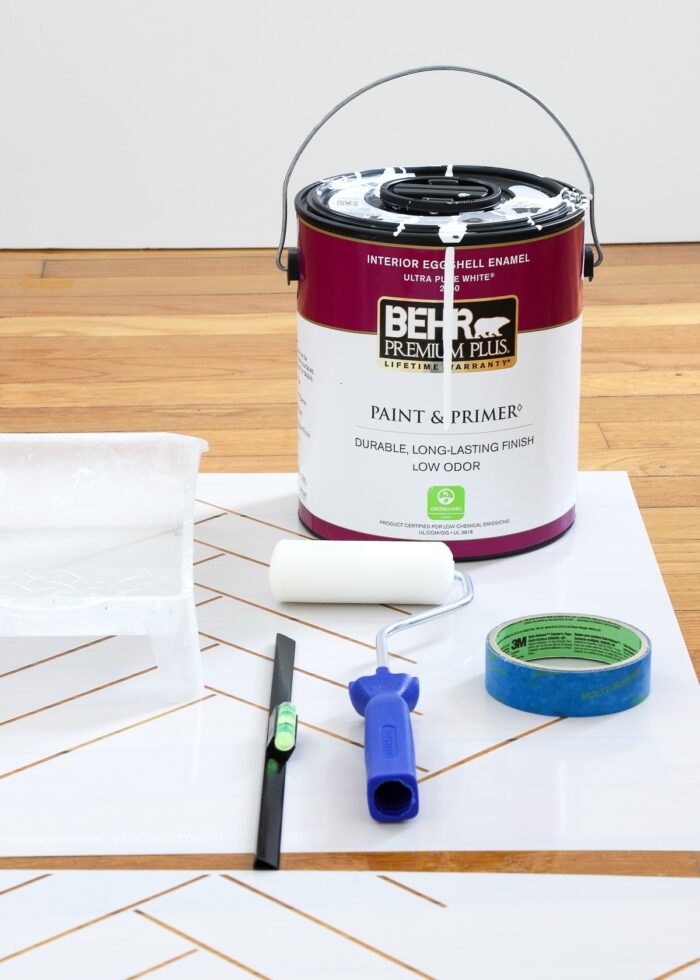
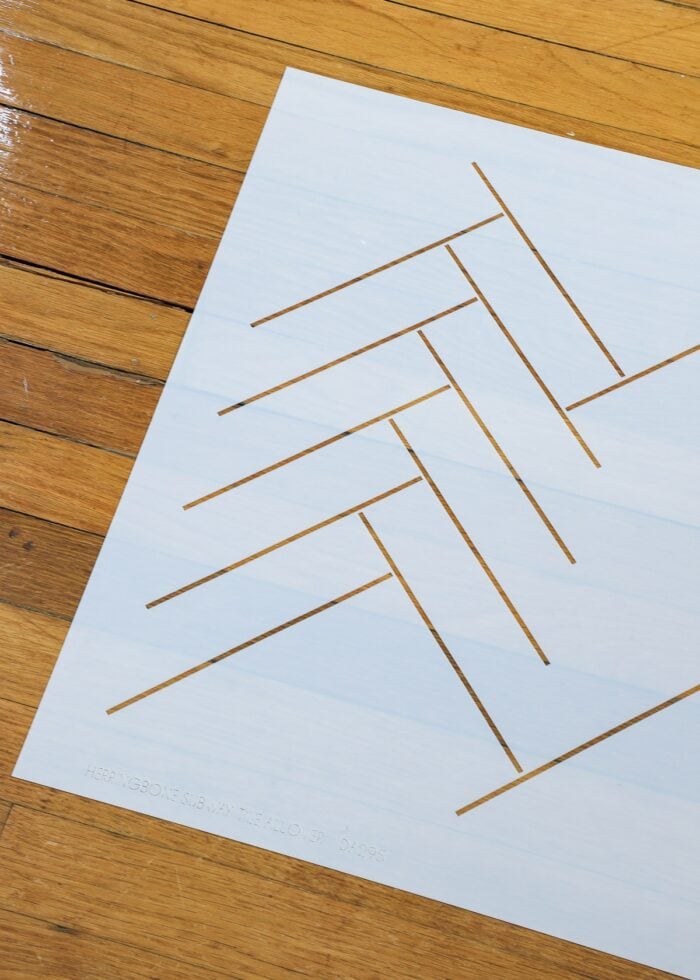
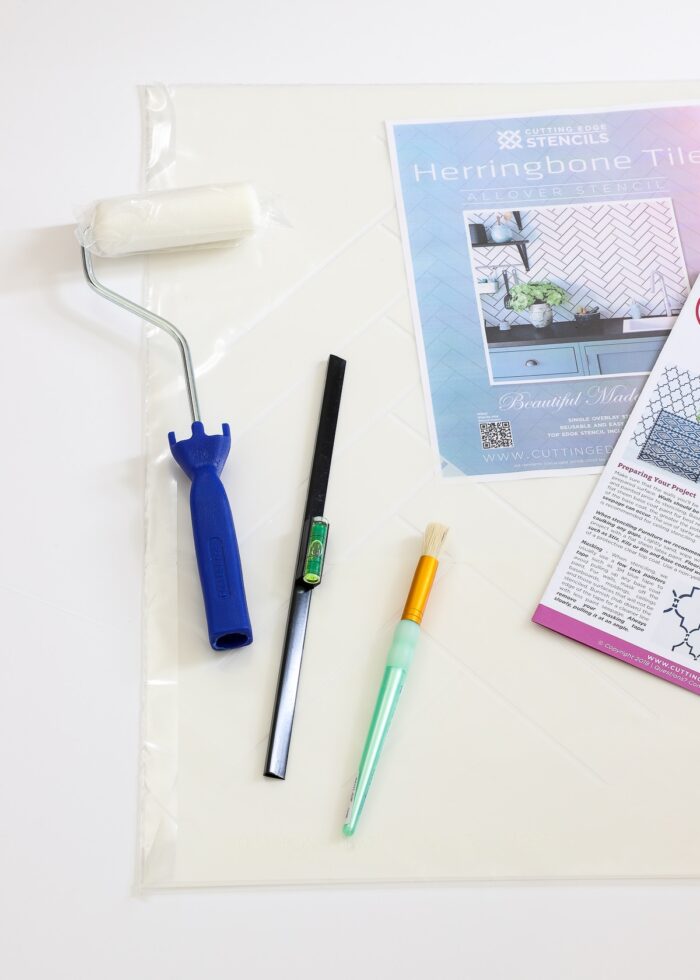
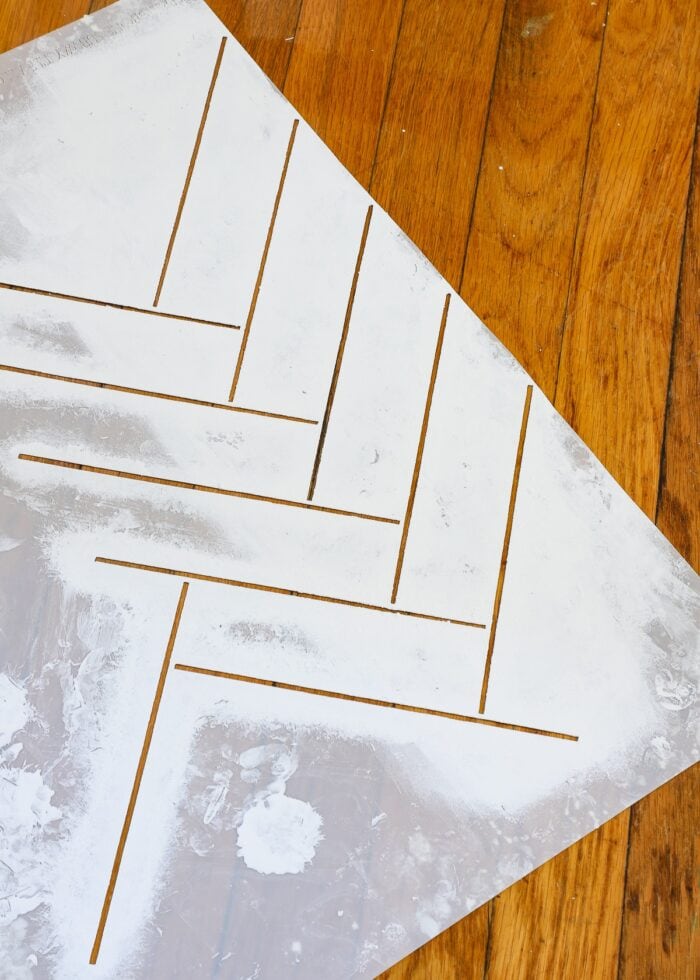
- Wall Stencil – When painting a wall, you’ll want to use a “wall stencil,” one that is sized and scaled for a larger surface application. I used this Herringbone Subway Tile Wall Stencil by Cutting Edge Stencils.
- Wall Painting Supplies – If your wall is not yet the color you want
- Roller
- Brush
- Paint Tray
- Stencil Painting Supplies – You will likely need a variety of tools as you work across your entire wall; you can get everything you’ll need in this Stencil Essentials Kit.
- Adhesive – You will likely need both as you work across your entire wall.
- Paint – At least two colors: a base color and an accent color
- Level – This stencil kit comes with a clip-on level, which is incredibly handy and user-friendly; however, a small level can also be used to align your stencil placement.
What Is the Best Paint For Stenciling on Walls?
Both acrylic craft paint (yep, the kind you buy at the craft store in small bottles) or latex paint (like in cans from the hardware store) can successfully be used for wall stenciling.
Cutting Edge Stencils recommends that you use “flat” paint (base coat and stencil coat) for optimum adhesion, smooth finish, and minimal seepage. I used an Eggshell finish (for both colors) with little issue. That said, oil-based paints and spray paints are not recommended for interior wall stenciling projects.
How Much Paint Do You Need to Stencil a Wall?
The amount of paint required will very much depend on the size of your wall, as well as the particular stencil pattern you choose.
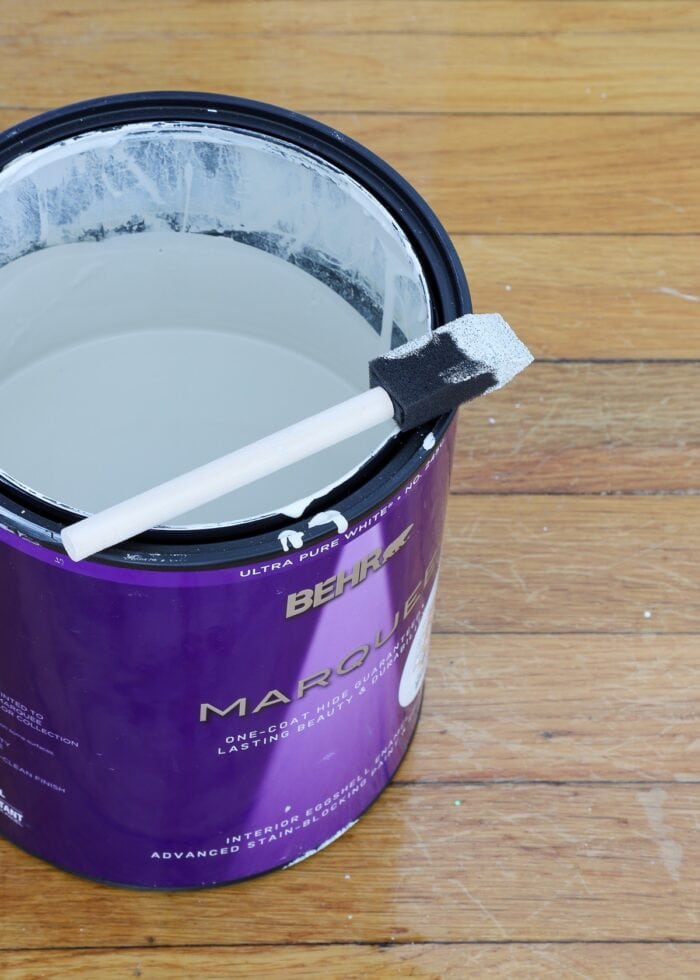
Base Coat
For the base coat, you will need however much paint is required to give your wall (at least) a single, good coat. For my 8′ x 12′ wall, I used not even a half gallon of Behr Marquee paint in Edgecomb Grey.
Stenciled Design
As you will learn further down in this post, the best way to avoid paint seepage is to use as little paint as possible. As such, you will likely not use much paint at all. In fact, I used the final remnants of a can of white paint I already had on hand.
If you’re buying new paint for this project, I would consider getting one or two sample sizes (8 oz) or a few acrylic bottles to start. You can always get more as needed.
Video Tutorial
If you’d like to watch how to stencil a wall, here is a 3-minute video of the entire process! Full picture/text instructions are below the video. (Video not loading for you? You can watch it HERE!)
How to Stencil a Wall | Step-By-Step
Let me first break down this project for you from start-to-finish. Then at the bottom of this post, I’ll share aaaaaaall the stenciling tips and tricks I learned along the way!
Step 1 – Pick Your Stencil Pattern & Paint Colors
Start by picking out your wall stencil design and which colors you will do it in.
One of the best parts of using a stencil instead of wallpaper is that you have so much more control over both the pattern and the colors. Countless stencil patterns now exist, ranging from florals and mandalas to geometrics and tiles. And since you can get paint in practically any color, you can really bring any vision to life.
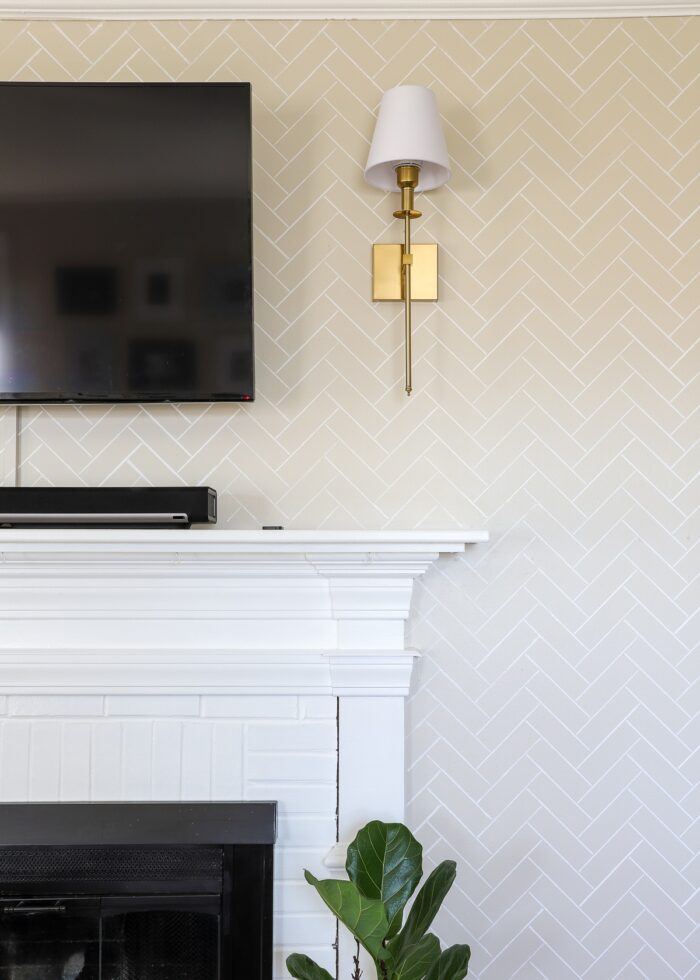
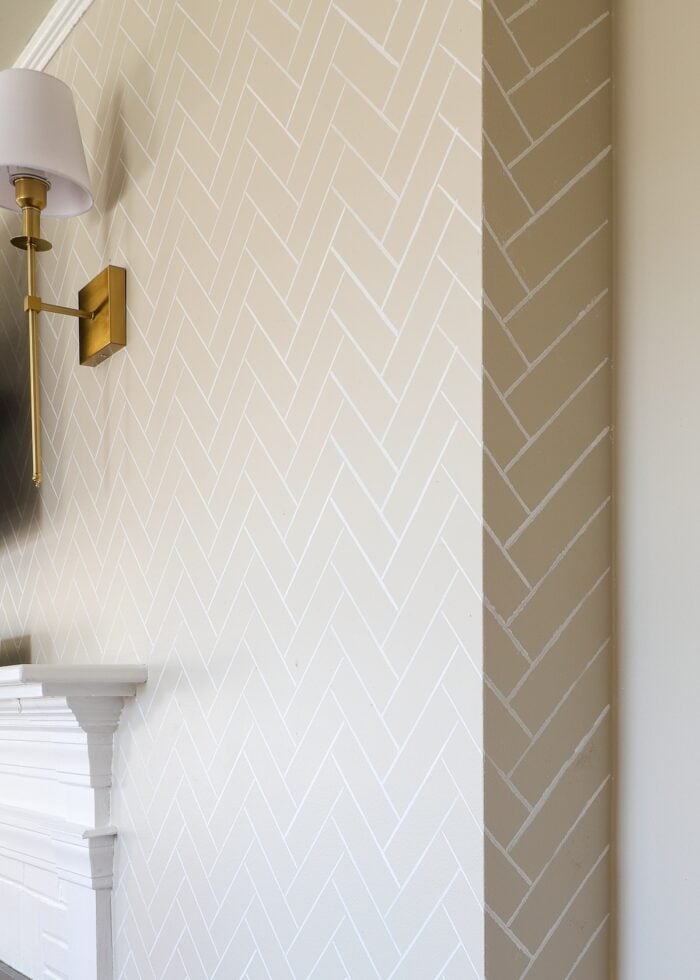
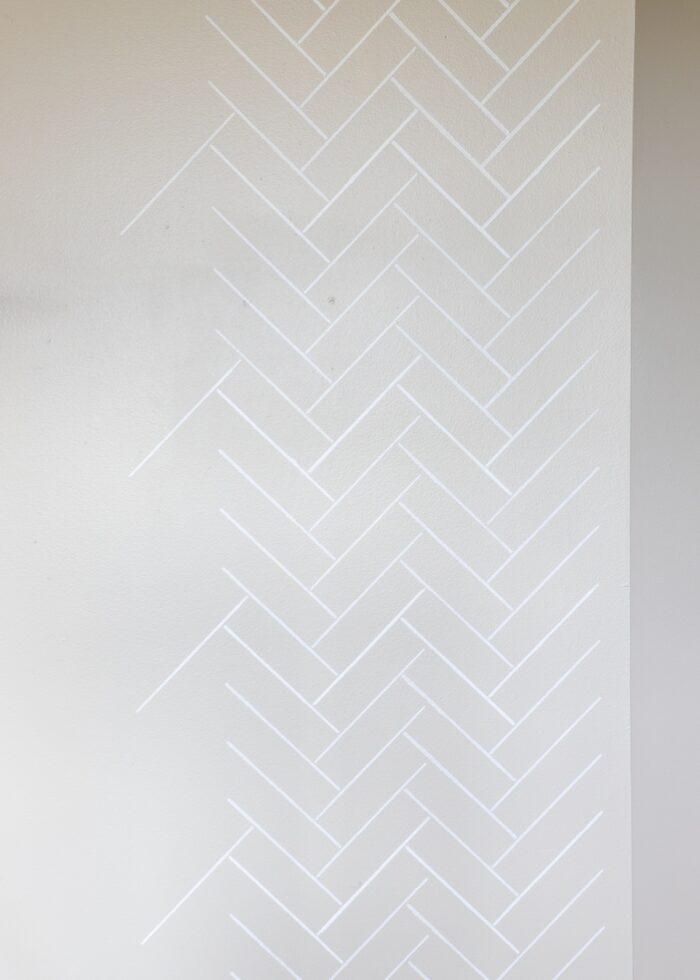
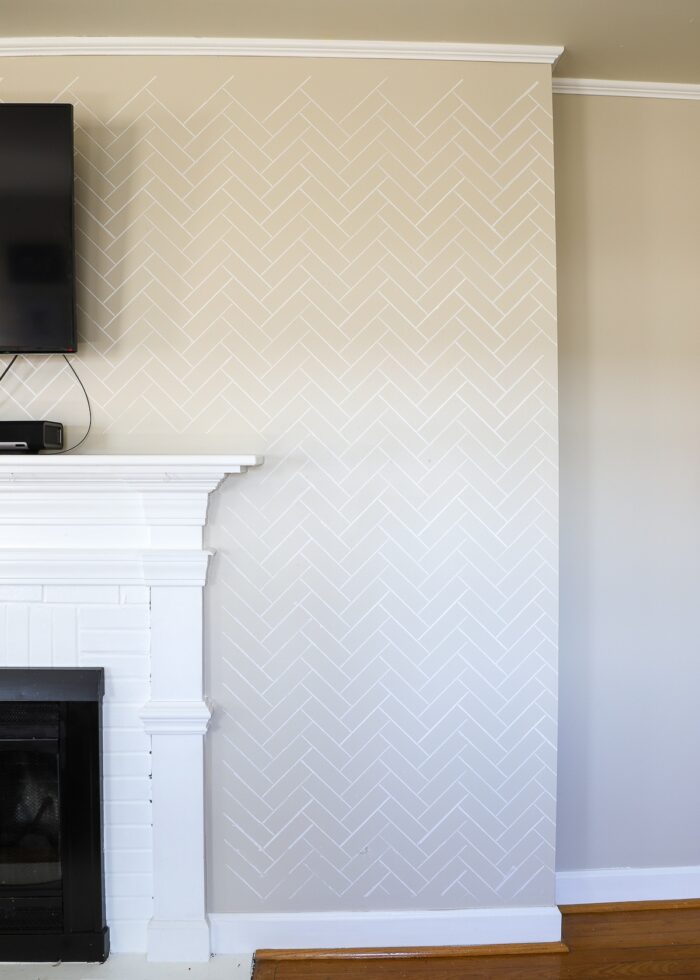
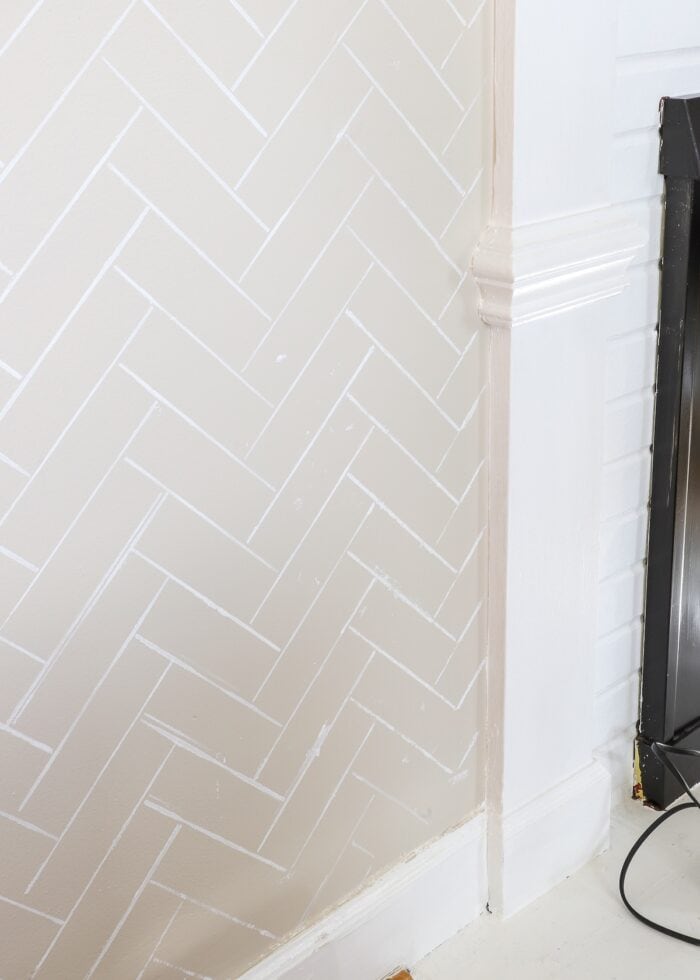
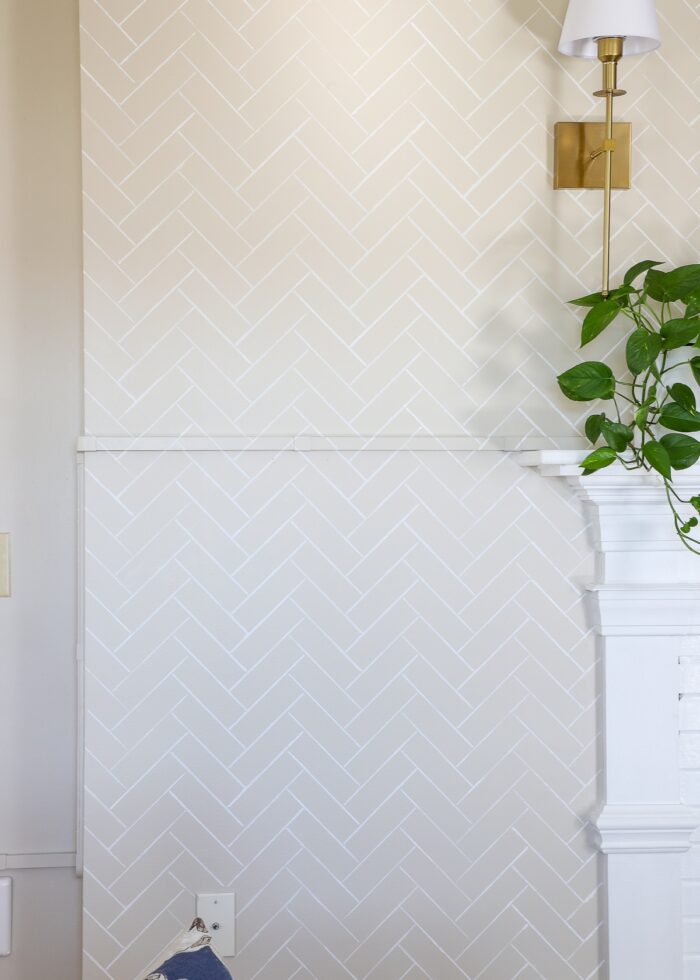
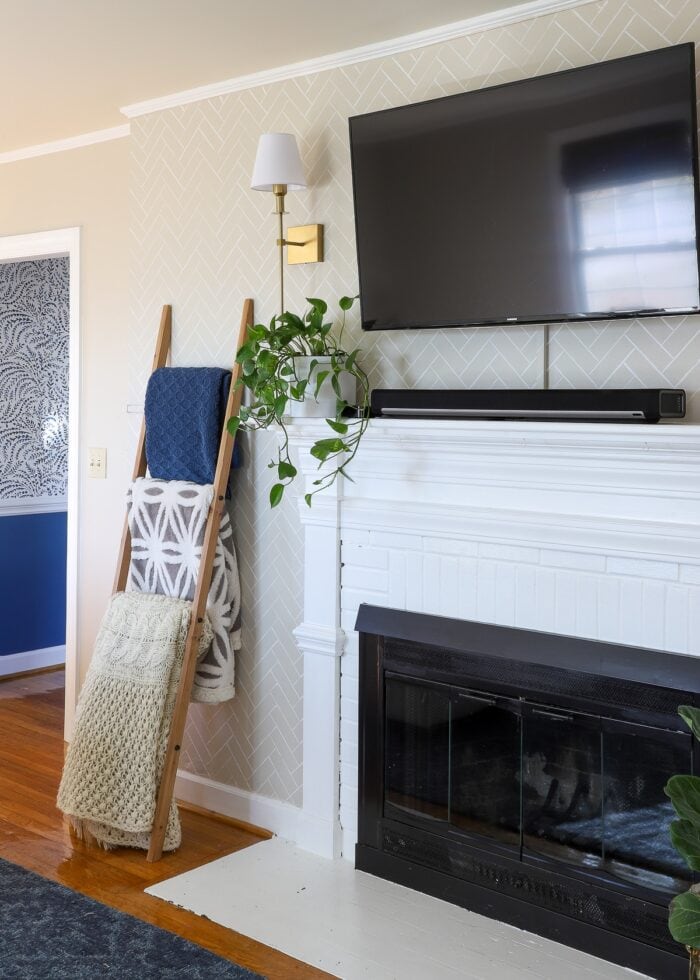
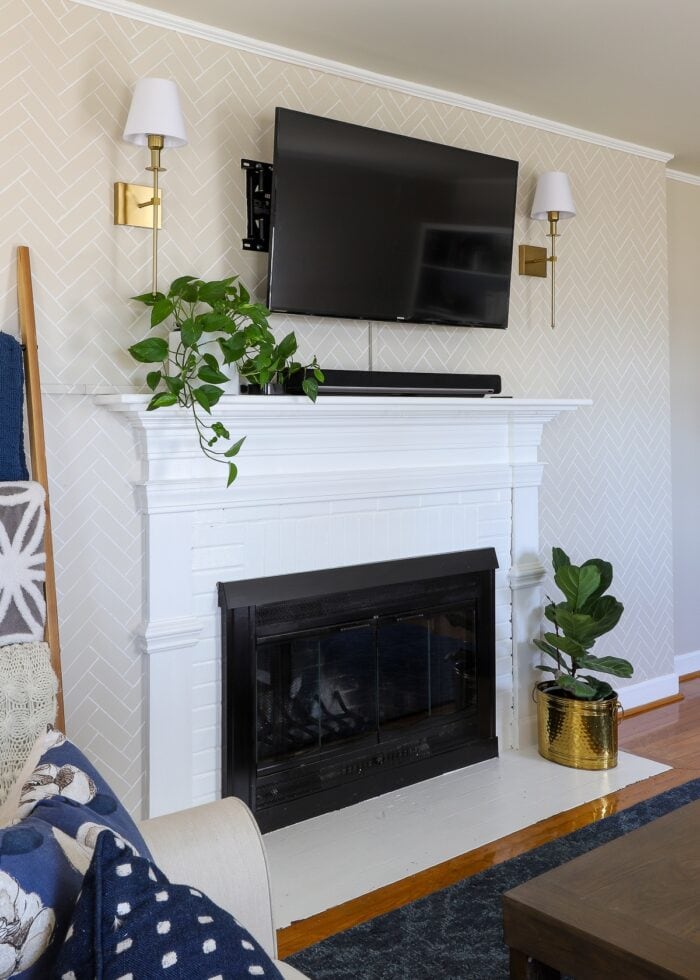
With different floral wallpapers in the two adjoining rooms (the dining room and foyer), I wanted something understated, monochromatic, and geometric for this wall. This herringbone tile pattern caught my eye immediately for its simplicity; and I knew adding the white design over the beige wall color (also throughout the rest of the room) would provide just enough interest on this bump-out without competing with other patterns around the room.
Step 2 – Paint Your Base Coat
With your stencil and paints in hand, the next step is to apply the base coat of paint to your wall(s). You will have to consider your particular stencil in order to figure out which color this should be. For this herringbone pattern, I wanted the “grout” lines to be white, so I needed to the wall color to be beige first.
NOTE: Whether you need one or two coats of your base color is up to you. If your stencil pattern will cover most of your base color, you can likely get away with a single coat. But if your stencil pattern shows most of the base color (like mine does), you may need two good coats of the base color before moving on.
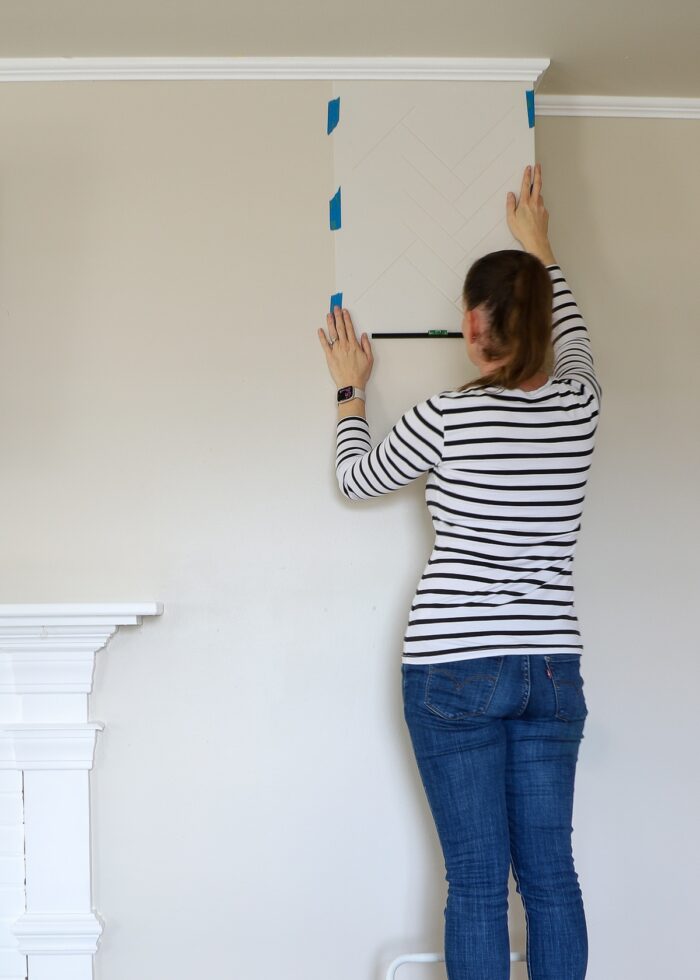
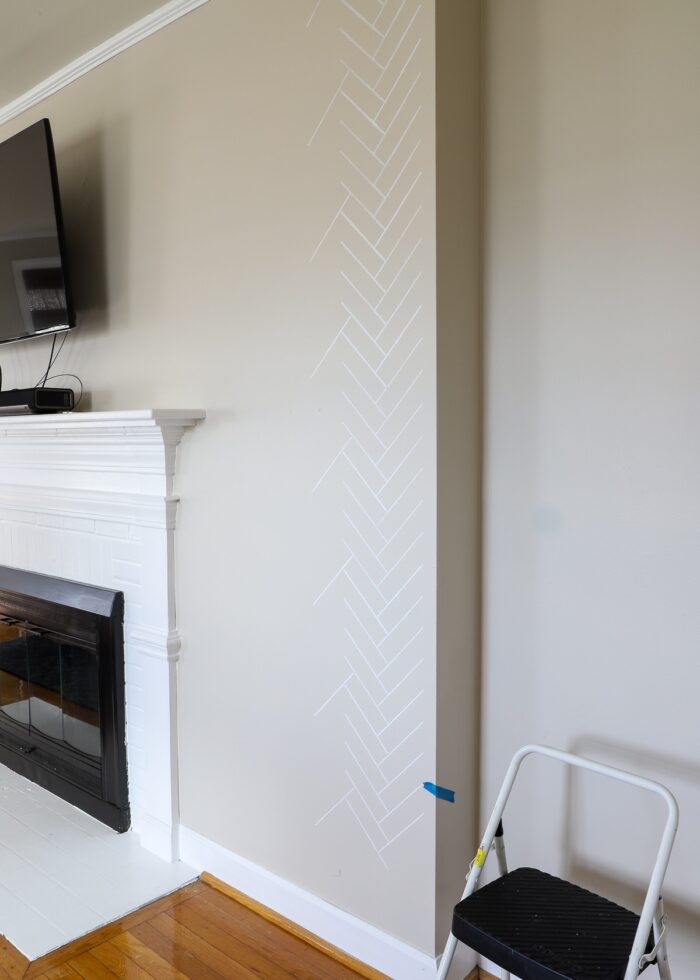
Step 3 – Identify Initial Stencil Placement
With your base coat applied and fully dry, it’s time to start stenciling your wall! And to do that, you’re going to need to determine your initial placement.
Every wall and every pattern will call for something different. You may want to mark the center of your wall with a pencil (so that the entire pattern is centered), or you can choose to start in a corner (like I did).
Your initial stencil placement is the most important, as it will dictate how the rest of the pattern lays out. As such, take care to get it perfectly level. This clip-on level makes it so easy to place the stencil, but you can also hold up a small level against the plastic edge if needed.
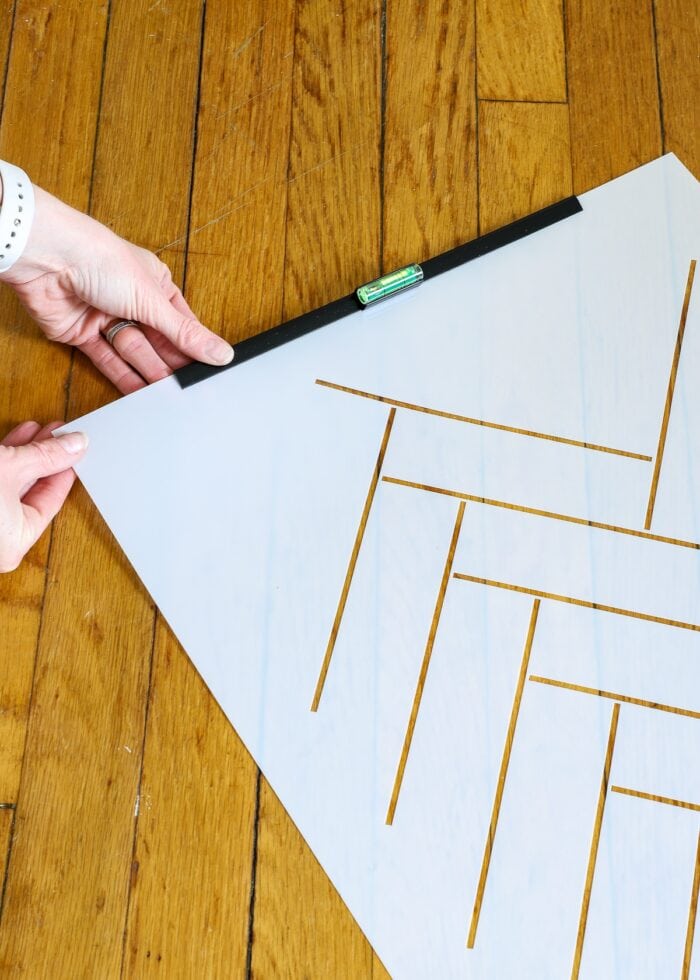
Before putting up your stencil for the first time, I also recommend placing strips of painter’s tape around the entire perimeter of the stencil.
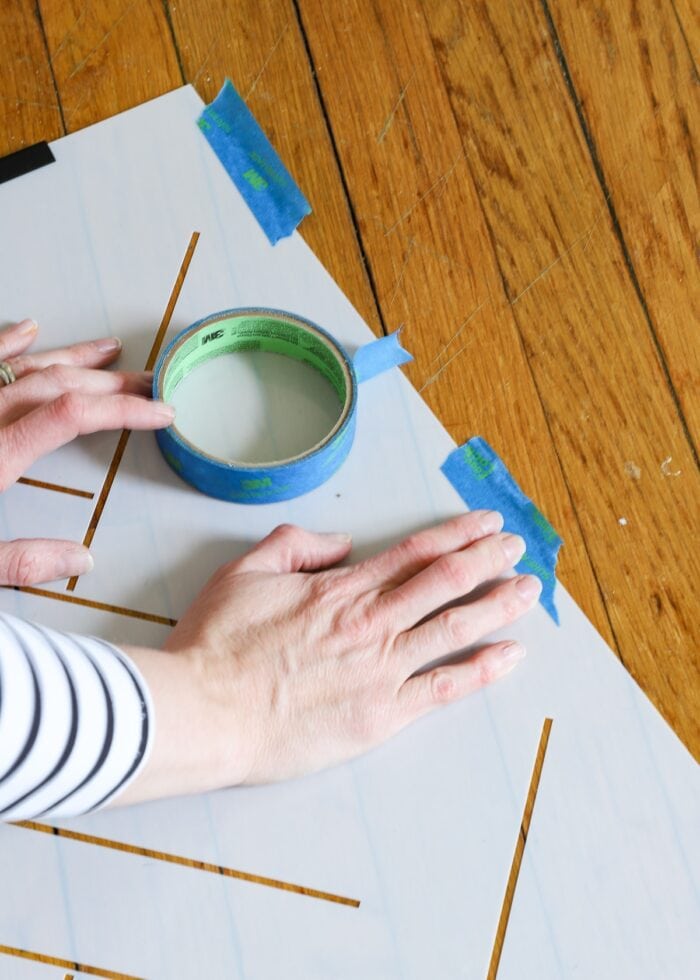
Then with the level and tape pre-attached, you can stick it right to the wall once you determine the right spot.
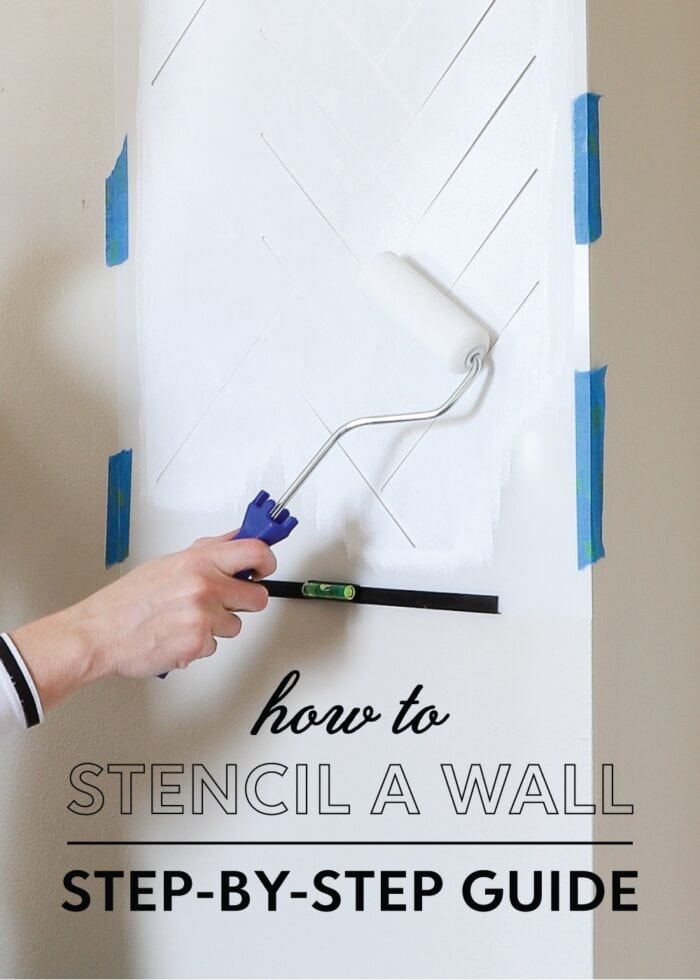
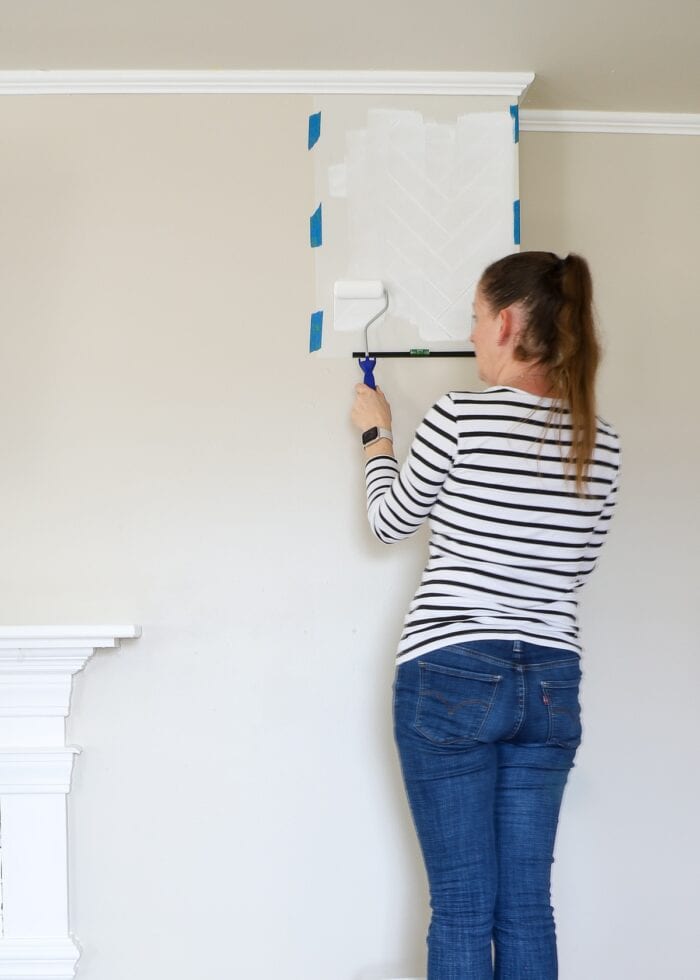
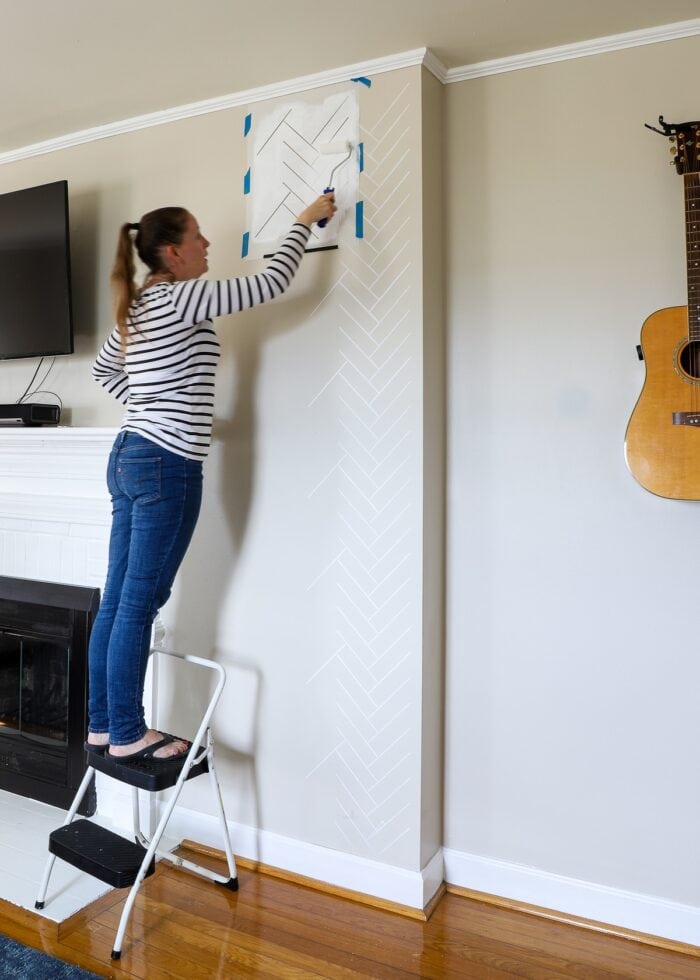
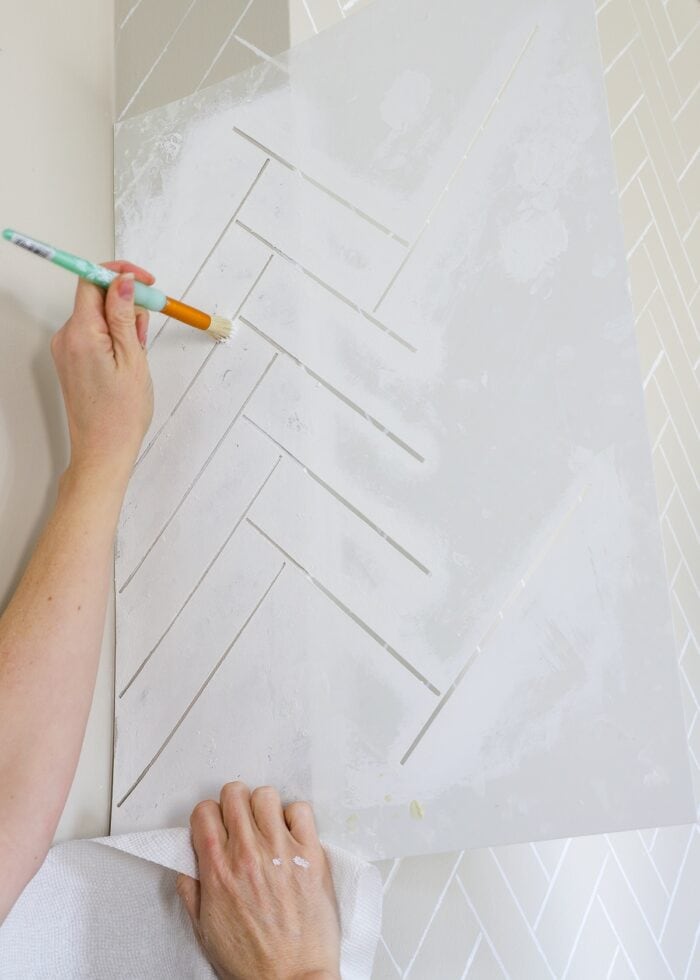
Step 4 – Apply Paint Over Stencil
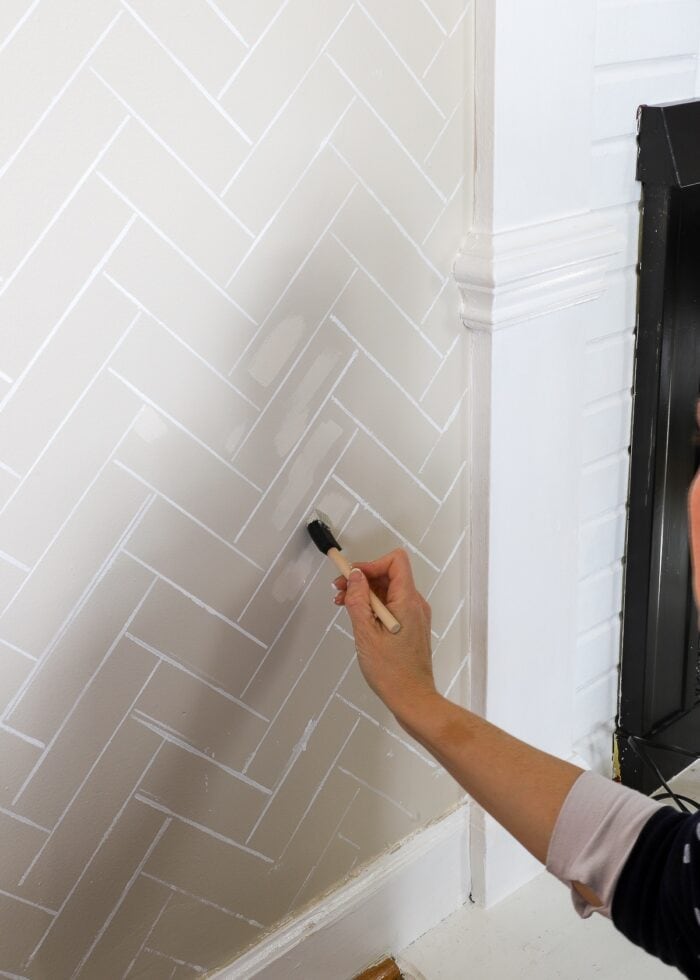
With the stencil in place, use either a stencil brush or 4″ roller to apply the thinnest application of paint possible.
One of the most important things to learn with stenciling (and you’ll learn it fast if you forget) is to use as little paint as possible every time you apply it to the stencil. The #1 reason you will end up with seepage under the stencil is because you use too much paint.
So whether you use a brush or roller, after you load it with paint, always then “offload” it by rolling/pouncing your tool to rid it of as much excess paint as possible.
To apply thin coats of paint, roll right over the stencil (with medium pressure) or use a “pouncing” motion with a stencil brush. Always avoid “brushing,” as that can also encourage paint under the edges of the stencil and muddy your design.
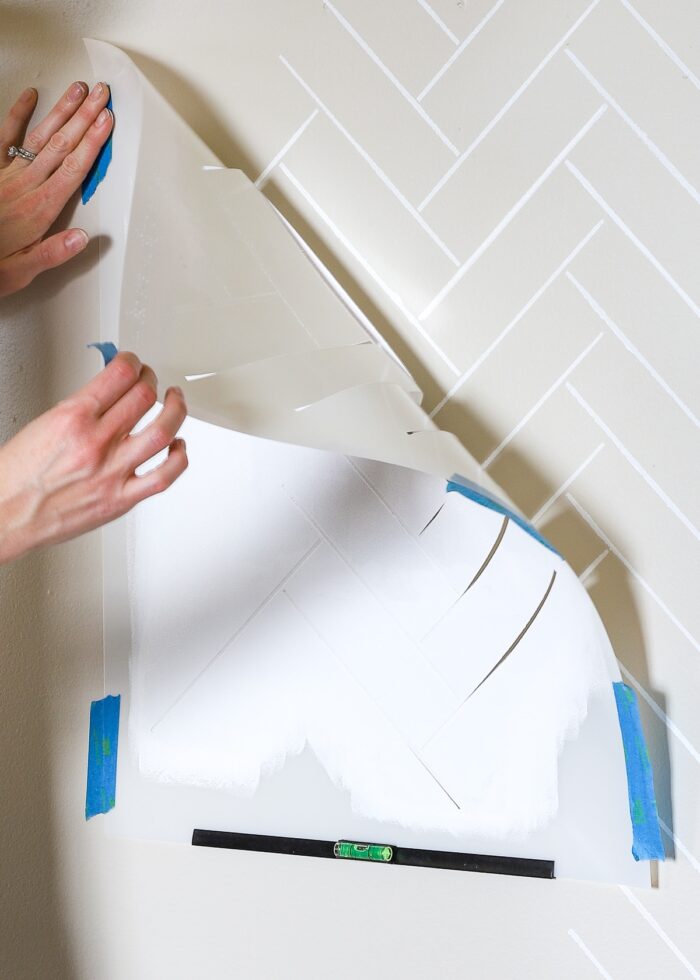
Step 5 – Remove Stencil
After you apply paint to all the “open” areas of your stencil, peel it up off the wall.
No, the paint doesn’t need to be dry; and yes, this can be a little scary. But go ahead…peel off the stencil to reveal your freshly-painted design underneath!
Step 6 – Line Up Stencil With Previous Application
Every stencil will be made a little differently, but there will always be “registration marks” to help you line up the stencil for your next application. Yes, this typically means that you have to lay the stencil down over wet paint you just applied, but it’s okay! Line up the stencil with your previous application, double-check the levelness, and re-secure the stencil to the wall (using the same strips of tape).
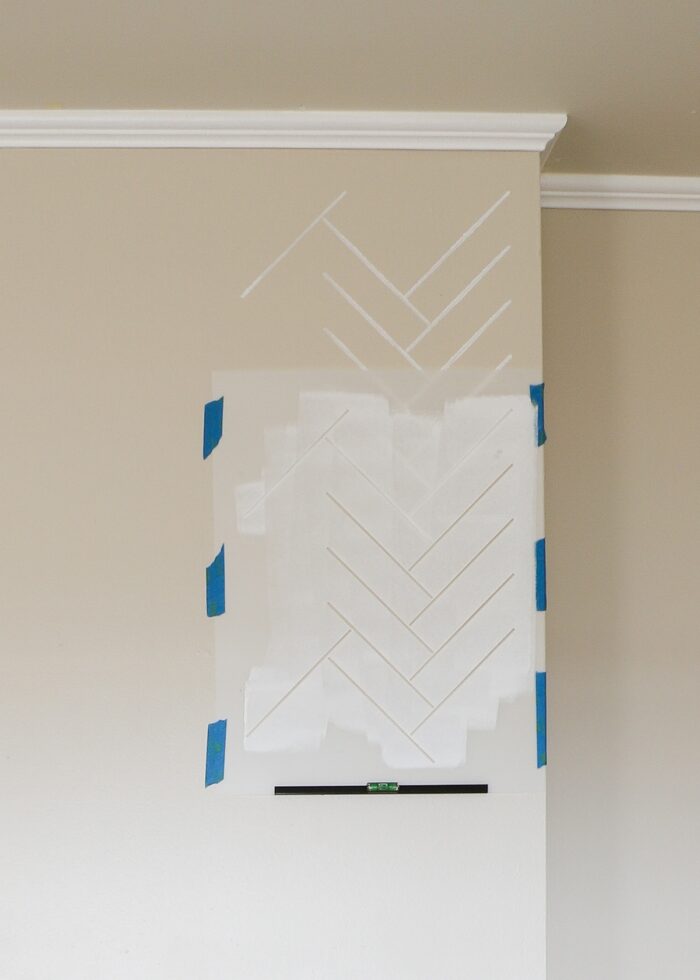
Once in place, apply more paint as described above.
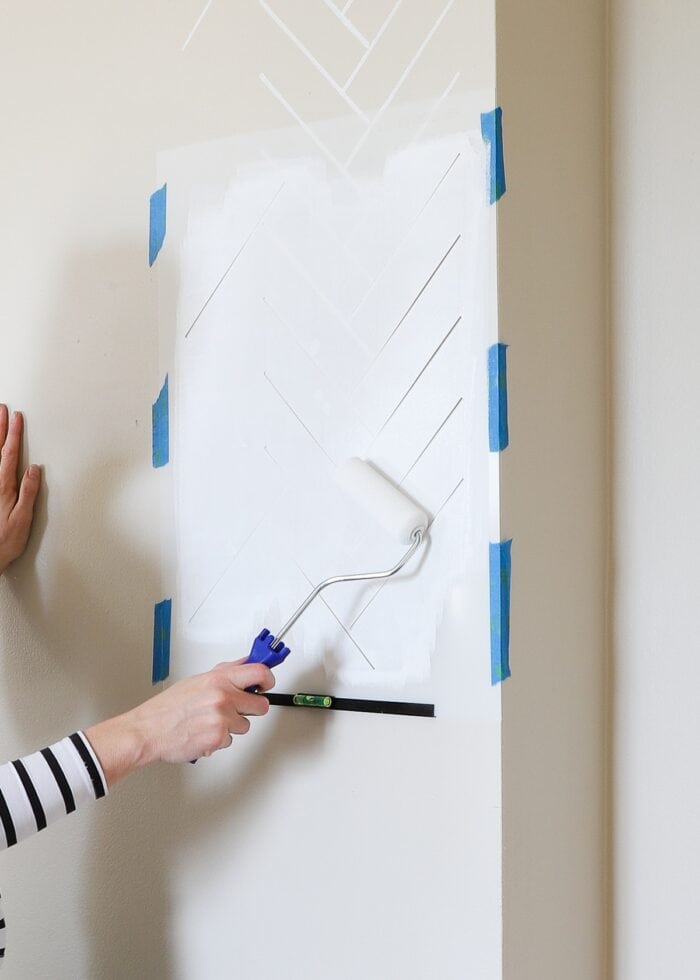
Step 7 – Stencil First Vertical
Continue working down the wall, matching up the stencil with the previously painted registration marks to create a continuous pattern. As you approach the floor/baseboards, stop. You’ll clean up the edges later on in the project.
Step 8 – Repeat Horizontally Across the Entire Wall
Once you’ve completed a single vertical application all the way down the wall, move horizontally to start the next stretch. Just like before, line up the stencil with the previously painted design, secure it to the wall, and roll on more paint.
Want to save this post?
Continue working down in columns and then across the entire wall until most of the wall is covered in pattern.
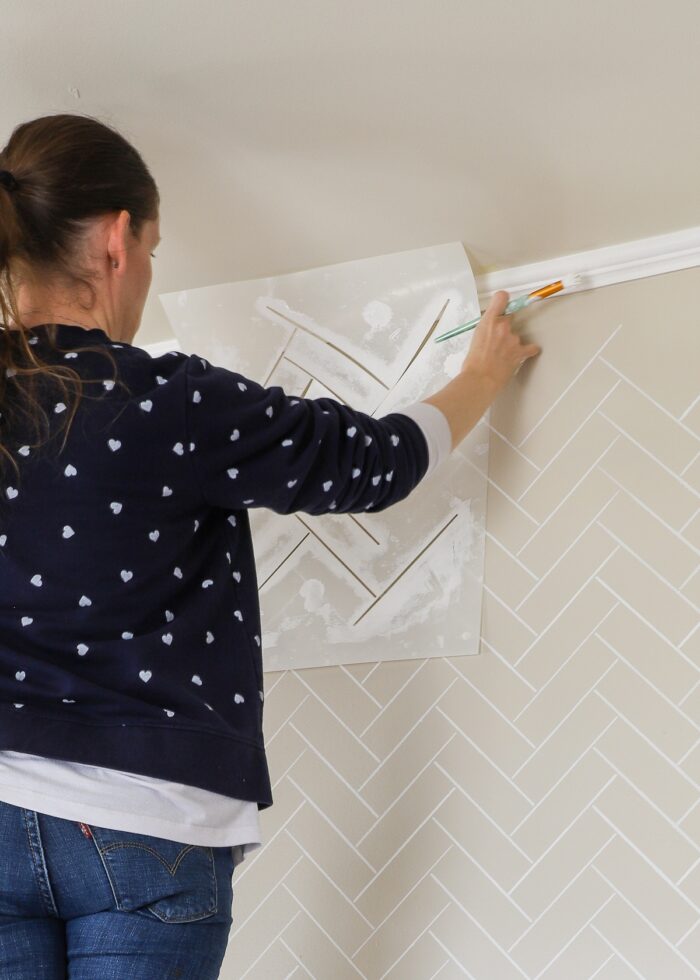
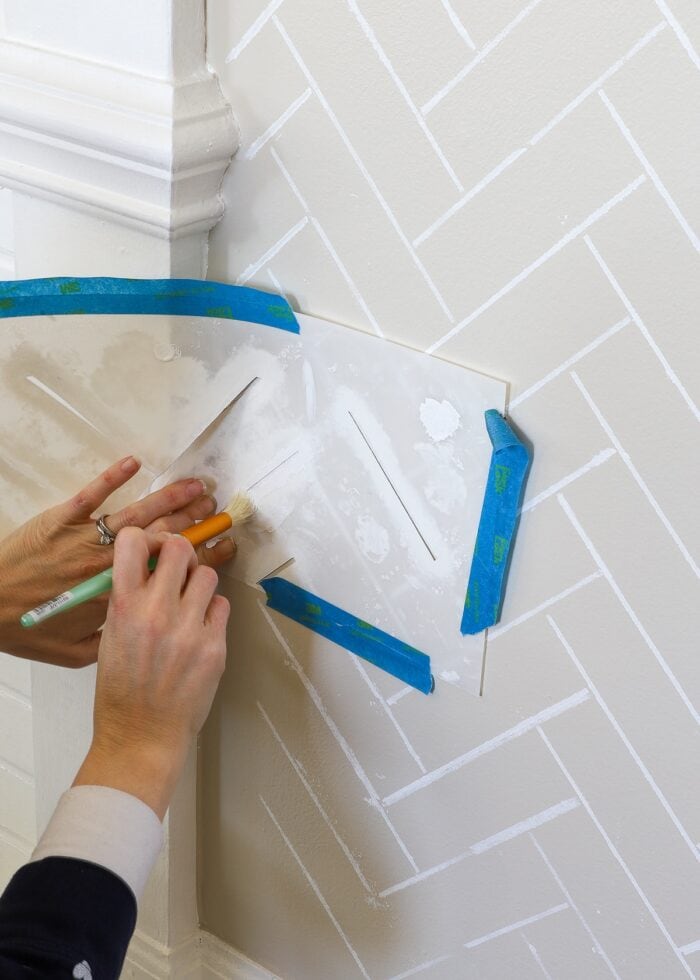
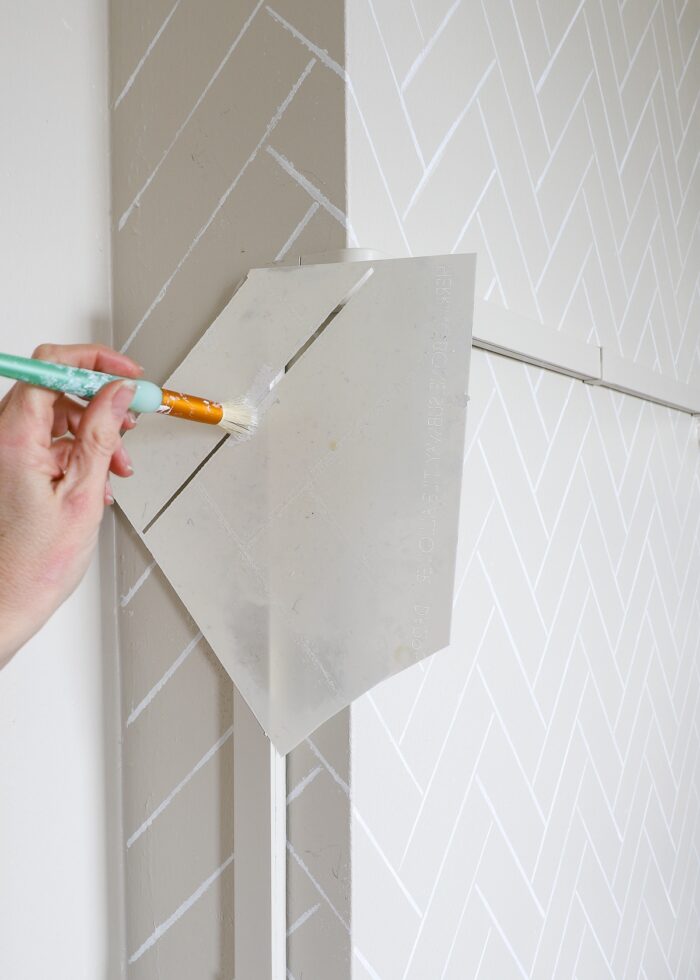
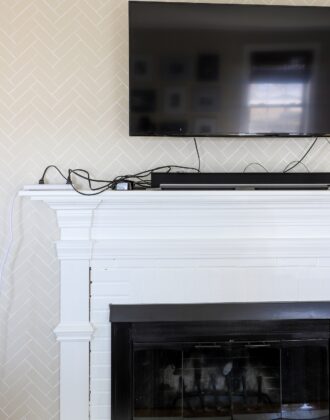
Step 9 – Stencil Edges
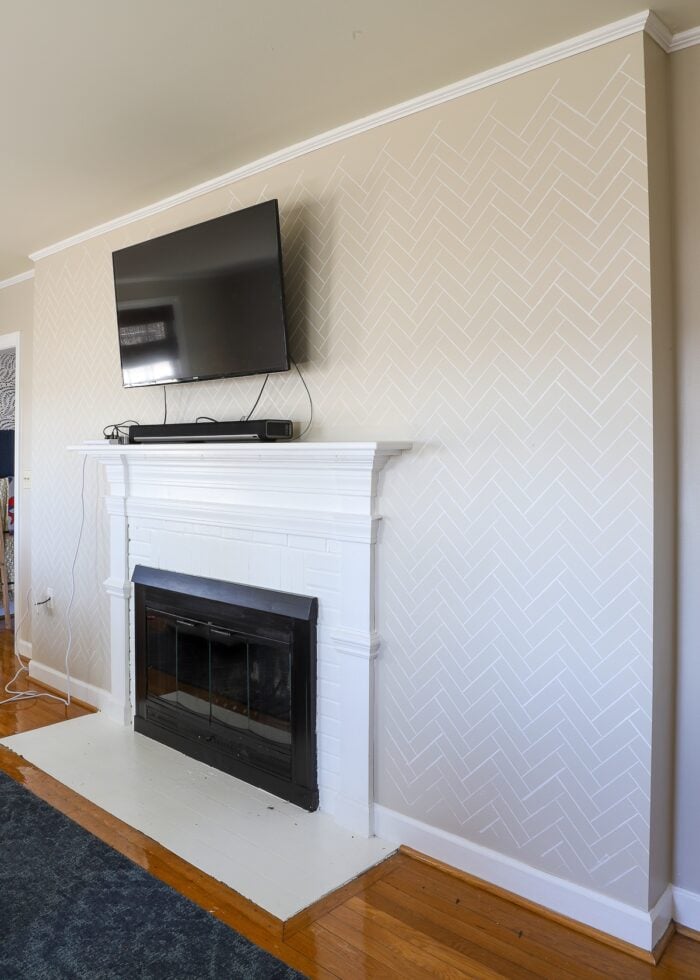
Once the full wall is covered in pattern, you will now need to go back and re-visit all the edges (i.e., corners, ceiling, molding, and floor). Notice below that my initial application didn’t stretch all the way to ceiling, the baseboards, or along the mantel. To reach into these areas, you have a few options.
Cutting Edge Stencils provides a “ceiling” or “edge” stencil: a smaller, cut-down version that allows you to get into smaller areas. Use this smaller stencil exactly as you did the larger version in order to fill in these outer gaps.
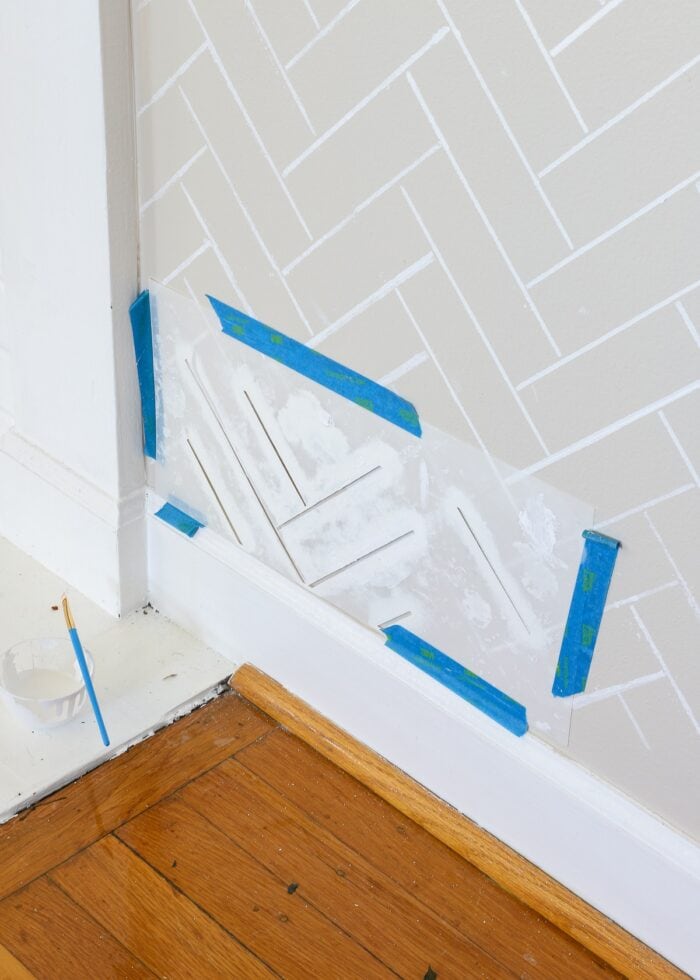
However, depending on the pattern, even this smaller stencil may not get all the way to the edges. As your pattern requires, you may need to bend the larger stencil into corners/edges in order to create the continuous pattern.
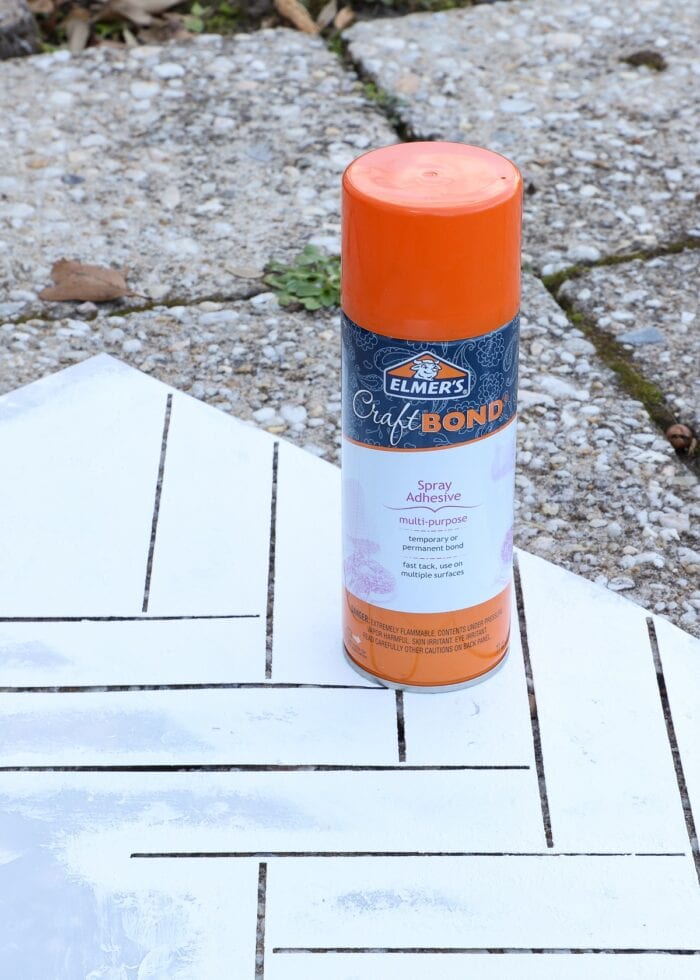
TIP! Bending the rigid stencil can become quite difficult. I found switching to spray adhesive (to hold the stencil in place) and a stencil brush (to get into the smaller areas) better for the edges.
A word of warning here: stenciling the entire wall is a fairly speedy process; but filling in all the edges can take a lot of time since you have to match the pattern and work the stencil into tight spots…over and over and over. I recommend working in batches and taking breaks as you get tired/frustrated.
Step 10 – Stencil Special Features
Before putting your stencils and paint away for good, you may need to stencil over any special features that are on your wall. For this particular wall, I also needed to stencil down the side of the bump out…
…as well as over our cord concealers.
Curious how we concealed the TV cords on this wall? See here: How to Hide TV Wires Above a Fireplace (When You Can’t Go Through the Wall)
In these instances, I found it helpful to cut the stencil down into even smaller sections so I could work on these tight areas. However, use caution when cutting apart your stencil, as you can disrupt the pattern or ruin its usability entirely. Only cut the stencil apart, as needed, at the very end of your project.
Step 11 – Clean Up Mess-Ups
If you like pristine, clean paint projects…then stenciling a wall is likely not for you. Despite being as careful as possible and loading up my roller/brush with as little paint as possible, I still ended up with a fair amount of bleeding, spots, and mis-aligned pattern.
Thankfully, though, fixing this is as simple as using some leftover base coat paint!
Almost like using an eraser, simply dab some base coat paint over the messes to clean up mistakes and “sharpen the focus” on the entire pattern.
Tips & Tricks for Stenciling Walls
What Is the Best Brush To Use For Stenciling?
When faced with such a big wall, I was really thankful to have the foam roller. The paint really went on quickly, whereas using a stencil brush would have significantly increased how long each application took.
That said, when I got to the ceiling, baseboards, and mantel trim, the roller was too unwieldy. I really needed the precision and control of the stencil brush to adequately get into the tighter spots.
So my best advice is to have both application methods on hand, and feel free to move back-and-forth between the two as needed.
What is the Best Adhesive to Use for Stencils?
I was able to secure the stencil to my wall using painter’s tape for all the flat wall, full-stencil applications. It wasn’t until I got into the bends of the ceilings and edges of the mantel that tape just wasn’t holding the stencil flush-enough against the wall. For these areas, I switched the spray adhesive on the back of the stencil, which yielded much better results.
However, while the spray adhesive definitely held the stencil nice-and-tight to the wall, there are a few things to know about using spray adhesive on this project:
- Be sure your spray adhesive is low-tac and repositionable; even light spray adhesives can peel paint or leave sticky residue after the stencil is removed.
- You will likely need to spray your stencil outside, which can decrease the ease and efficiency of this entire project.
- After a few rounds, spray adhesive can “gum up” on the back of your stencil, which will ultimately effect its overall adhesion.
So while I was happy to have spray adhesive on hand for the end of this project, I wouldn’t personally use it as the primary method for holding the stencil on the wall.
How to Stencil Without Bleeding
I’ve already mentioned this a few times, but it’s SO worth reiterating. When stenciling, load up the roller/brush with as little paint as possible. Excess paint is the primary reason you’ll experience bleeding under the stencil, so just get in the habit of clearing your roller/brush of paint every single time. In this project, a little goes a really long way.
Gunk Management
Even with using as little paint as possible, I was really surprised how “gunked up” the stencil became after about 10-15 applications. All the excess paint that stuck to the front of the stencil not only gathered along the open edges (allowing less paint to come through and create the pattern on the wall) but also caused the stencil to become quite heavy (and therefor, it pulled away from the wall during application).
If you find that the stencil is just becoming too wet/heavy with paint and is preventing you from getting a crisp application, it’s time to clean it (usually soap and water is sufficient). Although it can be a bit of a nuisance to have to stop and clean the stencil, you’ll get more frustrated at the imperfect results you’re getting from the heavy stencil.
NOTE: By the end of this single wall, my stencil had really started to lose it’s rigidity. Had I been doing a larger wall or full room, I would have liked to have a second/fresh stencil. If you plan on tackling a lot of wall space, consider buying more than one stencil.
Take a Step Back
I do not “demand” or even expect perfection in my DIY projects. My curtain hems aren’t always straight, my pillow covers don’t always fit right, and my wallpaper panels don’t always line up. But I was surprised how much the “imperfectness” of this project bothered me.
While the initial applications were fairly easy and clean; as the project wore on, I started to have quite a bit of smudging, bleeding, misalignment, etc. This was mostly due to 1) my stencil getting too heavy with paint, and 2) me getting tired. And I definitely had moments when I felt like I was just making a big ol’ mess of our wall.
But then I’d take a step back and realize that all those little imperfections didn’t really detract from the overall impact of the wall. Sure, there are some bleeds, messed-up patterns, and inconsistent coverage…but as a whole, the wall looks complete and honestly: quite spectacular!

So if you find yourself stressing over the “messiness” of this project: take a deep breath and take a step back. I bet your wall looks amazing! (Plus, touch up paint really does make everything better!)
Stencil or Wallpaper? Time Versus Money
When I first embarked on this wall stencil project, I was focused on one thing: saving money. I wanted the wallpaper look without the wallpaper cost. And that is most certainly what I got. Since I used 100% leftover paint, this wall required just the cost of the stencil and supplies (about $50). But what I didn’t appreciate at the start…was that this cost-savings would come at the expense of my time.
Without a doubt, stenciling this wall took MUCH longer than hanging wallpaper panels would have. There was also added mess and clean-up that you mostly skip when applying wallpaper (at least the peel-and-stick kind). I had to re-visit this wall on four different occasions to complete it, mostly because of the mess of the paint and the complexity of the edges. I could only do so much until I just needed a break.
So while I do love that I was able to indeed get a “look for less,” I think it’s important to remember that when applying an amazing all-over pattern to a (large) wall, you have to decide what you want to spend: time or money.

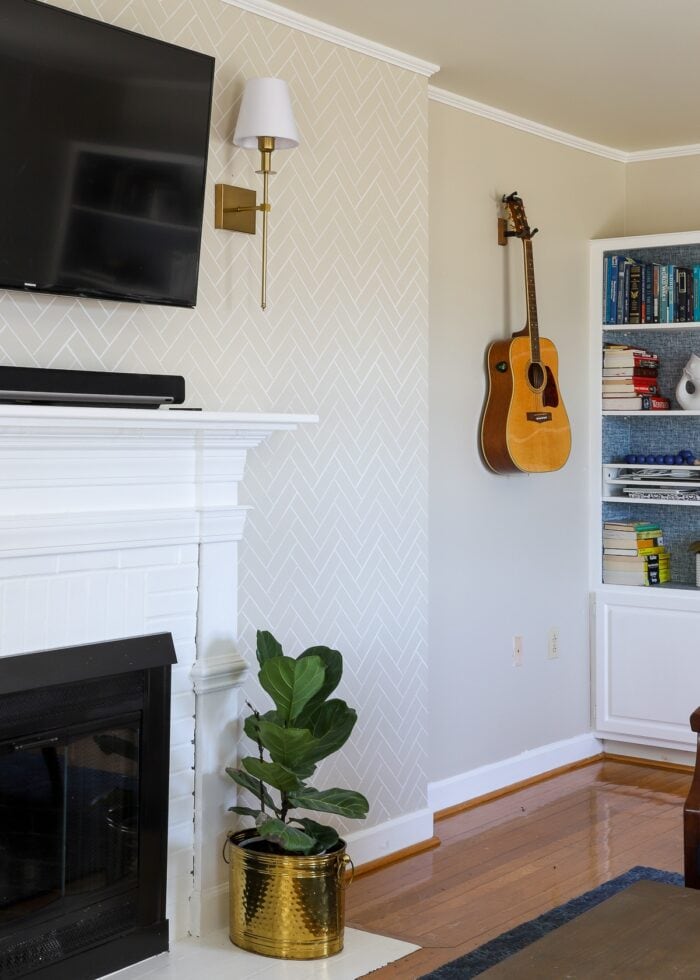
In the end, this wall has seen quite the gratifying transformation, including a re-painted fireplace surround, a complicated cord concealing project, and new renter-friendly lighting, I’m so glad I gave this stencil project a try, as it’s another great “tool” in my renter-friendly toolbox. Yes, stenciling takes some work; but it also allows you to transform your walls in a pretty inexpensive and un-doable way!
Megan

16 Comments on “Look for Less: How to Stencil a Wall to Look Like Wallpaper”
The wall is amazing. The whole look is really great! Can you also give us information on the sconces and how you mounted them? Are they wired or remote controlled puck lights or ??
WOW what a transformation! You did a great job! Fantastic before & after, and so brilliant to add the sconces that you tease as well as a Bravo producer! I’m guessing they are battery bulbs?! 🙂
I was hoping for a stencil post from you, ever since you did the cricut vinyl suns … which at the time seemed to be easier with a stencil (but now we know NO).
I’ve been planning a tricky floral stencil but I pretty much won’t attempt any project unless you’ve done it (otherwise I overthink it!) so thank you for once again giving us Real Talk, with the good, bad and ugly of the process. Sounds like I’ll need to look into the glue remover Cutting Edge recommends to keep the back from gumming up with Elmers for a large wall.
The photo with the dining room wallpaper peeking out shows your rooms flow so well – what an accomplishment!
Absolutely stunning! We live in a home with very heavily textured walls. Some call it knock down and others call it orange peel. All I know is if you reach behind furniture to access a plug or retrieve a lost object you better put on an old long sleeve flannel or be ready for bloody abrasions. Yuk, right? I have a floor to ceiling fireplace painted white and there’s only about 4 ft to the corners. I’d love to try this. We’ve papered before using mud to fill, then an under paper liner and then the final paper. That was so hard to get off. Took hours and then $$ to have texture repaired. I’m thinking I’d really like to stencil but it may be so bumpy that the paint will creep. I love that wall though and the white brick is awesome.
Megan, you put Martha Stewart to shame! You offer amazing talent and ideas for the rest of us. Thank you for sharing!
Are you allowed to paint the brick in the fireplace? Or did you do another treatment? It looks so much better. I would like to move in after you and tell them not to bother with the boring one tone paint. Just leave it like you decorated it.
JUST FABULOUS!
It looks so good! I love the colors coming together and making your room look like you. But i agree, time is always money. A home remodel that seems like it will never end. And that is just because we are doing it and we work. Only so much gets done when the 40 hour a week jobs are over.
Thanks for sharing all the good tips. So helpful to know as you look at doing a project like this. And deciding if it is worth it. 🙂
Thanks for sharing your k owledge and experience…it’s a great saver in time, resources and energy.
This was a great and ‘honest’ tutorial, easy to follow and it clearly indicated what to expect during and after the transformation. Thank you!
It turned out AMAZING!!! Your posts always make me want to try something new! I am really curious though about your fireplace. I noticed in the before pictures it had some red brick. What kind of paint did you use to cover it up and to be heat safe? I keep wanting to paint our fireplace. It’s tile though so I don’t know if it would work as well. Thoughts?
Do I need to topcoat my Stenciled wall? I used gold acrylic metallic paint on a white wall and I wonder how it will hold up? it is in a pantry as the accent wall. I can’t find anything on protecting it so I am thinking it doesn’t need it? Thanks so much for your informative tutorial. Your wall looks FaB!!
Hi Becky!
Sorry for the delay in getting back to you but wanted to answer your question in case you hadn’t found an answer.
Generally, you don’t need to topcoat a stenciled wall. I’m not sure what paint you used, but regardless, I don’t think it will easily wipe/smudge off. If you do start to see some wear-and-tear, you could always add a clear coat at that point.
Hope that helps a bit!
~Megan
I’m in the middle of stenciling my bathroom and was googling to see whether I was just bad at stenciling or if other people had problems too. Your review encouraged me! Thank you! I’ll try to let go of my perfectionism and enjoy the process.
I’m so glad you found this post helpful! Stenciling is NOT for the faint of heart! I’m sure your bathroom turned out beautifully!
~Megan
I love love love the herringbone, perfect with the neutral beige background! The living room is beautiful! You are one talented lady! You work so hard to make a home for your family for the time you be there.
Do you know if there is a way to make a stenciled wall feel more like wallpaper?