Upholstery – What I Learned From Hiring It Out
If you follow me on Instagram, you may have caught a peek at some “new” chairs that have made their way into our home…two chairs that are now so stunning and so “ME!” I am over-the-moon in love with these chairs, but I have DIY blogger confession: I didn’t do them myself. After years of them sitting in our garage, waiting for me to summon the courage to give them a makeover myself, I ultimately hired the job out. Today, I want to not only show off our amazing chairs, but also chat a bit about why I hired this job out, and what I learned in doing so!
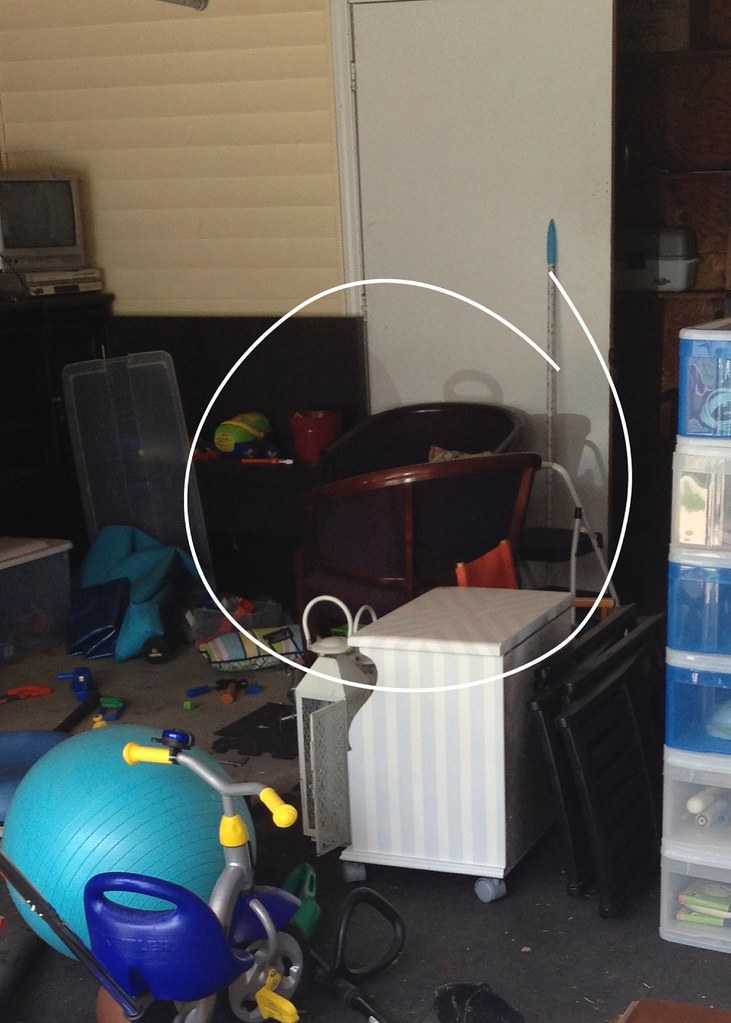
So…shame on me…I don’t have really good before photos. No kidding, these chairs sat in my garage for over 2 years, and I never got good pictures. I had to dig through all my photos even to find just a few photos to show you how bad they were when I bought them! Here’s one from a few Christmases ago…I think we were testing the size of the chair in the space and then left it there for a few weeks before it eventually got put back in the garage…
And here’s another of them way back in the depths of our disaster-of-a-garage last summer when I was cleaning it out.
I bought these chairs at the Raleigh Flea Market in the Spring of 2013. As soon as I saw them, I knew I was buying them. I loved their barrel-back shape and curvy legs…and what really sold me were the openings across the backs. These chairs were the perfect candidates for a multi-fabric treatment, and I was swooning big-time. The frames were solid wood, they were super comfy, and the foam and springs were in good shape. They did stink REEEEAAALLLY bad though, and the dark purple/blue fabric wasn’t doing the gorgeous frames any favors. The guy had 6-8 of them, but I only wanted two. I was really nervous about bargaining, but I went for it. I can’t remember for sure, but I am pretty sure I paid $25/chair.
I was so excited to buy these as my first upholstery project (although another lady, also buying some at the same time, thought I was nuts because she saw them as a tricky and tedious job – and I got the sense she knew what she was talking about.) This was back when I was all “paint everything white,” and of course, was planning on painting the frames white and upholstering them in bright fabric. Again, the lady next to me pointed out their gorgeous and relatively clean frames and thought I was crazy to paint them. (And right there, a seed was planted.) Still, when the vendor told me to grab any two I wanted, I didn’t take note of the frame colors (because I was going to paint them white)…a “mistake” that is still “haunting” us today….I’ll explain in a bit.
As the months passed and they sat in the back of our garage, I looked at them over and over. First, they were going to be my summer project, then my deployment project, then my winter vacation project. These were going to be my “teach myself to upholster“ chairs…but the more I looked at them, the more I realized I reeeeeaaalllly didn’t have the skills for the job. After months (years!) of hemming and hawing over these, I finally took the plunge and hired this job out. I ultimately paid to get them upholstered, and this is why:
- I wanted them done. Like yesterday…and I have too much on my plate. I’m juggling a lot right now and the idea of getting into a big, involved, figure-it-out-as-I-go project just wasn’t in the cards. There are times when I am game for that, right now isn’t one of them. These chairs have been sitting in the back of our garage for too long, and I wanted them done for our next house.
- I wanted them to be perfect. There are pieces of furniture in our house that I am willing to experiment on. If my plan doesn’t work out or the final result isn’t great, no big deal. But these chairs? I wanted them to look amazing. I didn’t want to spend a bunch of time, money and effort for them to just look okay.
- I wanted the upholstery job to match the pricey fabric. So let’s chat fabric selections for a minute. I am all about finding and using inexpensive fabrics whenever and wherever I can. But I also know how super frustrating it is to make something on the cheap for it not to hold up. I wanted to upholster these chairs in super durable and kid-friendly fabric. Fabric that I would love but wouldn’t cause me to freak out the second Henry went near it. I knew Sunbrella fabric was my best bet (and their patterns are to die for), but it’s so pricey. I didn’t want to spend a fortune on fabric for the upholstery job to look amateur. Honestly, once I decided to buy good fabric, I knew I wasn’t doing this job myself.
- I had a guy. A good friend had just gotten some pieces re-done and she was raving about the quality, the timeline, and the prices. Suddenly, I didn’t have to research or find a place to get them done. She had a guy, and she was willing to drop the chairs off for me (it’s about 90 minutes from our house). Before I even knew it, we were loading them into her car for her to take them in. Done.
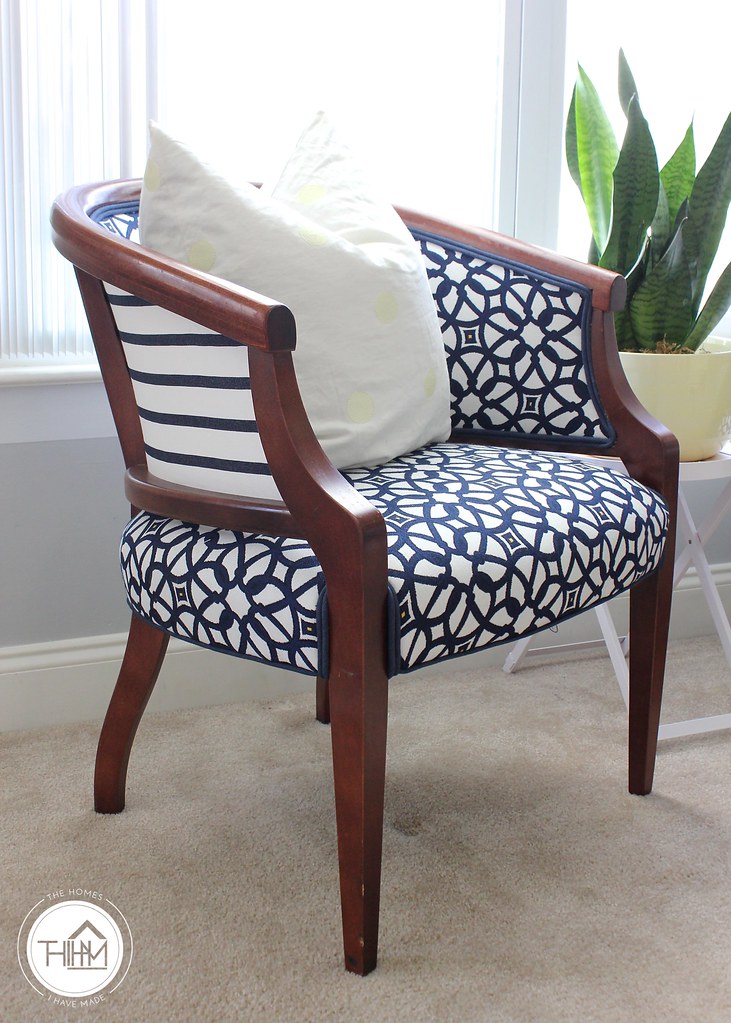
So before I get into the specifics of how the chairs turned out and what I learned along the way, let’s chat a bit more about our fabric selections. Like I said, I really wanted to use Sunbrella fabric. I had bought a yard of it a few summers ago for the throw pillows on our porch, and I have been so impressed by it. Not only is it spill- and sun-resistant, but it looks and feels like normal fabric (not plastic-y) like outdoor fabric, and the colors and patterns are crazy good. When I literally stumbled upon the large-scale navy and white floral motif (below, #1), I knew it was the one. I must have looked at that fabric 20 times over the course of a few months before finally ordering it.
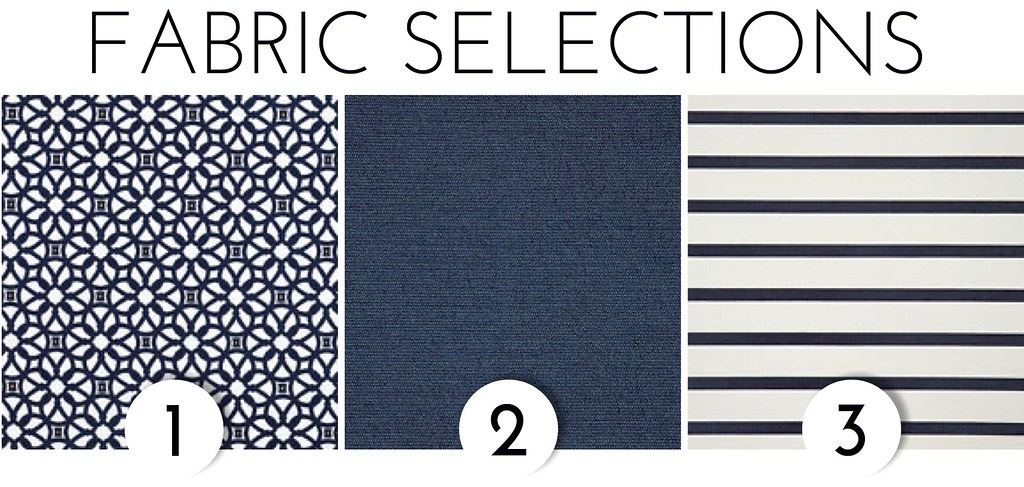
(1) Sunbrella Luxe – Indigo (45690-0000)
(2) Sunbrella Lido – Indigo (57004-0000)
(3) Sunbrella Spectrum – Indigo (48080-0000)
Want to save this post?
A few things to think about before taking the plunge on expensive fabric
- Order samples when you can. I looked at that #1 fabric so many times online but not once did I realize it had teeny-tiny yellow squares in it until 8 yards of it arrived. It wasn’t a huge deal because yellow still works in our house AND it’s not even noticeable, but it was something I wished I knew before buying it.
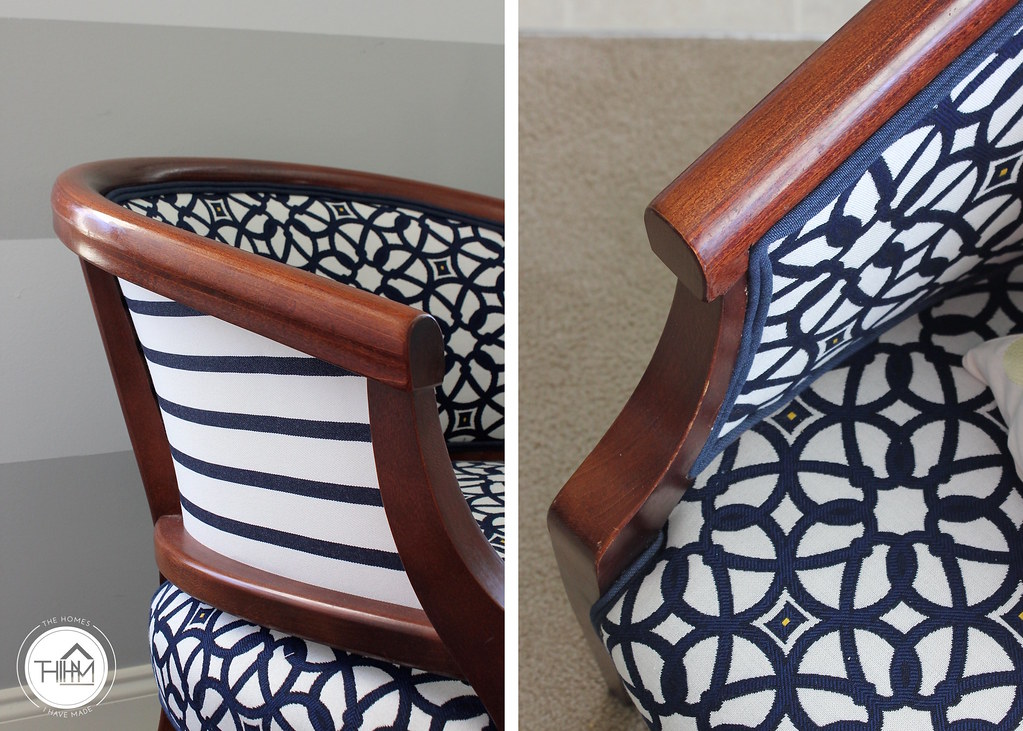
- Look for coordinating patterns within a line of fabric. I knew I wanted a contrasting fabric for the open backs of the chairs. Obviously, matching colors online is super tricky, so I opted to shop coordinating Sunbrella fabrics for the back and welting fabrics. Once I saw that navy stripe, it was a done deal.
- Wait for a yardage quote. I had absolutely no idea how much fabric to buy and I didn’t want the job to get put on hold to wait for more fabric. As such, I dropped the chairs off first, the upholstery guy quoted me yardage for fabric, and then I purchased it. I also factored in an extra yard for each so I can make some extra pillows, curtain trims, and other small accents using this same fabrics without having to hunt down and find more.
- Wait for sales. The Luxe fabric is regularly priced at $80/yard. Ouch. I know that fabric stores tend to put home décor fabric on sale during holiday weekends when there is also typically a 20% off entire purchase coupons. Over Presidents’ Day Weekend, the fabric was marked down to $39.99/yard at Joann Fabrics, plus I had a coupon. I had all the fabrics loaded in my cart ready to purchase them, when I remembered to…
- Check Ebay!!! My biggest fabric tip is to check Ebay. I found all three of my fabrics for significantly less than what I could get on sale from Joann’s. I paid $17/yard for both the stripe and solid and the floral for $30/yard on Ebay…all with free shipping, saving me close to $200. (Side Note – I originally purchased the floral fabric for $18/yard as well. I was mid-happy dance when I got an email from the seller that it was sold out at that price. Bummer! If you’re not in a hurry, watch Ebay and wait for just the right price to pop up – you can save a ton of money!)
Phew – SO much babbling. But after all that, are you ready to see how fantastic these chairs turned out? Have a look-see!

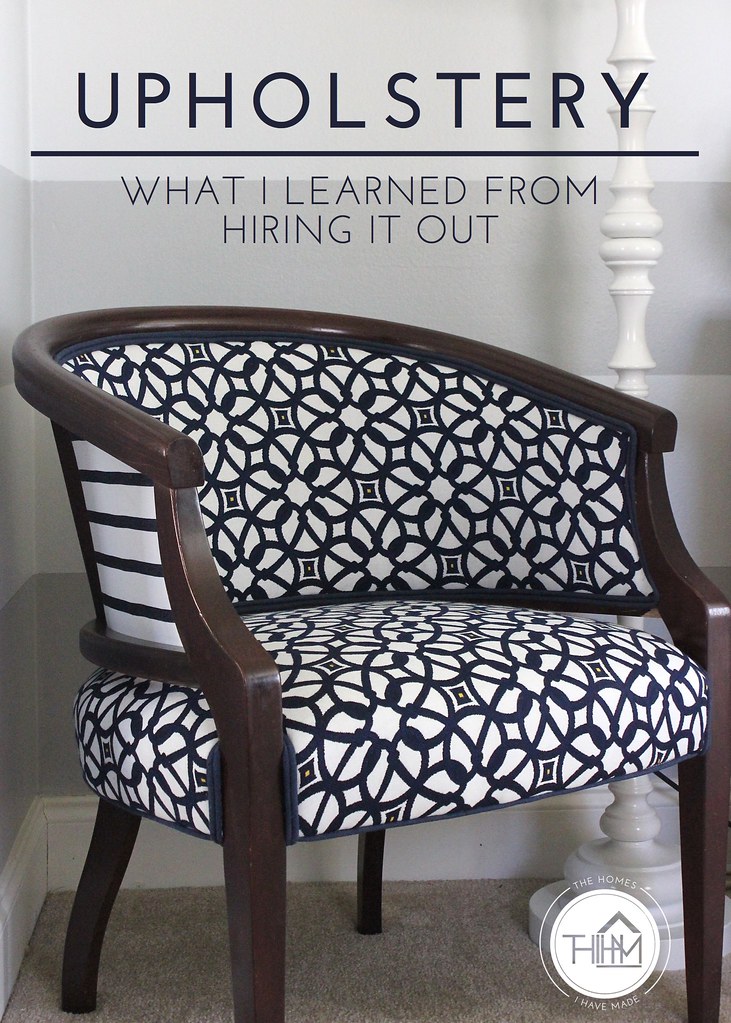
Oh.my.friends. They surpassed every single expectation.
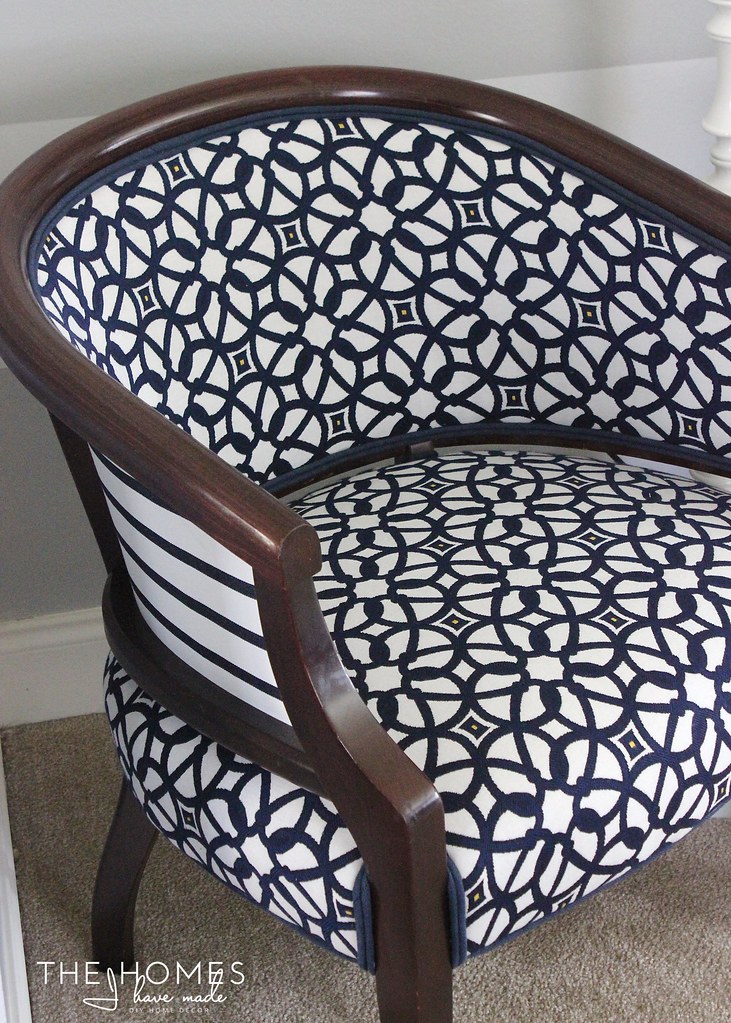
The wood was cleaned up so beautifully. The bright fabrics against the dark frames look stunning and really accentuate their curves. The frames are even more beautiful than I realized. The solid welting was such a great (and last-minute!) decision…
And can we just pause and look at these stunning backs…the whole reason I bought these chairs in the first place…swoooooon.

At the last-minute, I almost chickened out with the stripes on the back. The upholsterer wasn’t sure how “straight” the stripes would look with the rounded backs of the chairs…but I gave the go ahead to proceed…and worried endlessly about it until I went to pick them up. I’m so glad I went for it – the striped back makes the entire chair for me!
So…let’s chat about the stain colors. Recall that I paid no attention to the colors of the frames when I selected the chairs at the flea market because I was going to paint them. I ultimately determined that the lady at the market knew what she was talking about, and I decided to leave the frames stained and selected light fabrics. Once it was time to clean them up, I ultimately opted not to have the frames stripped and re-stained (due to cost). Are the frames different colors? Yes. It is super obvious? No; at least, I don’t think so. Does it bother me? Yes and No. Part of me doesn’t really notice or care because they will never be right next to each other. The other part of me wishes they did match because they turned out so incredibly stunning that it’s kind of annoying that they don’t match. Oh well. Lesson learned.
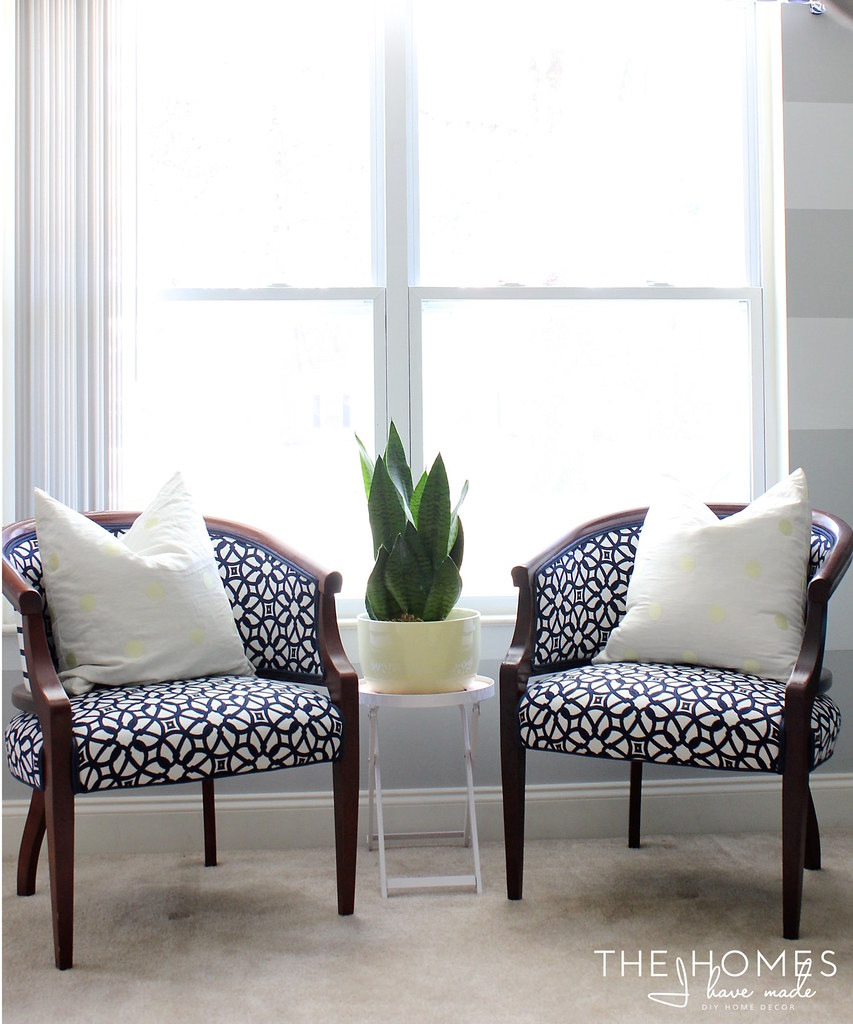
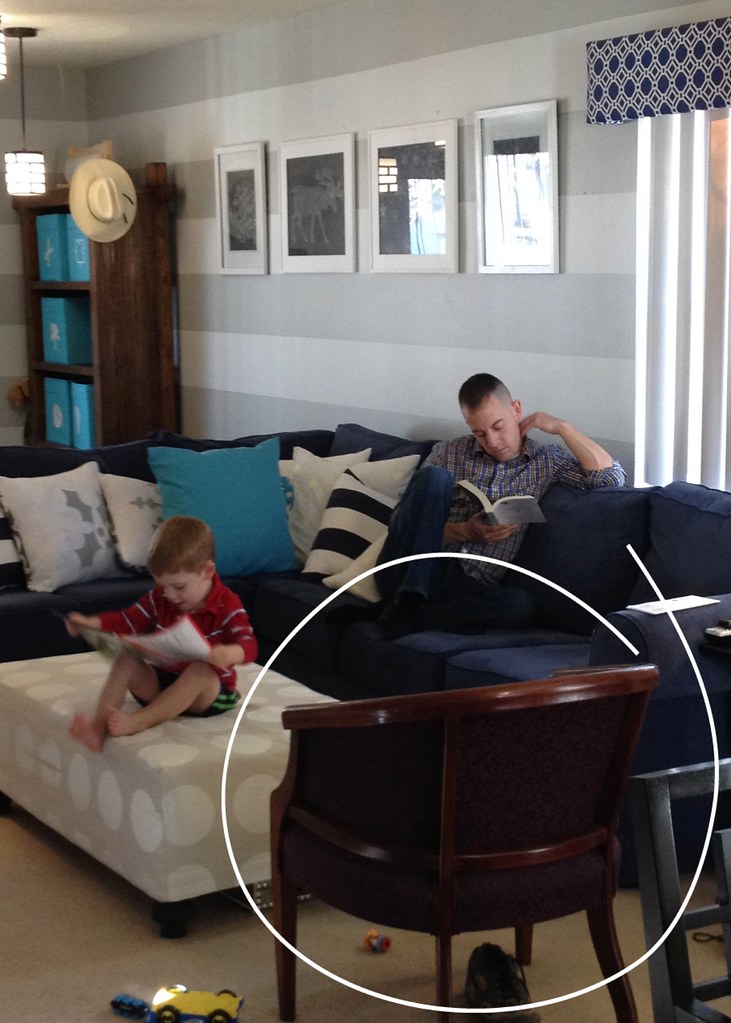
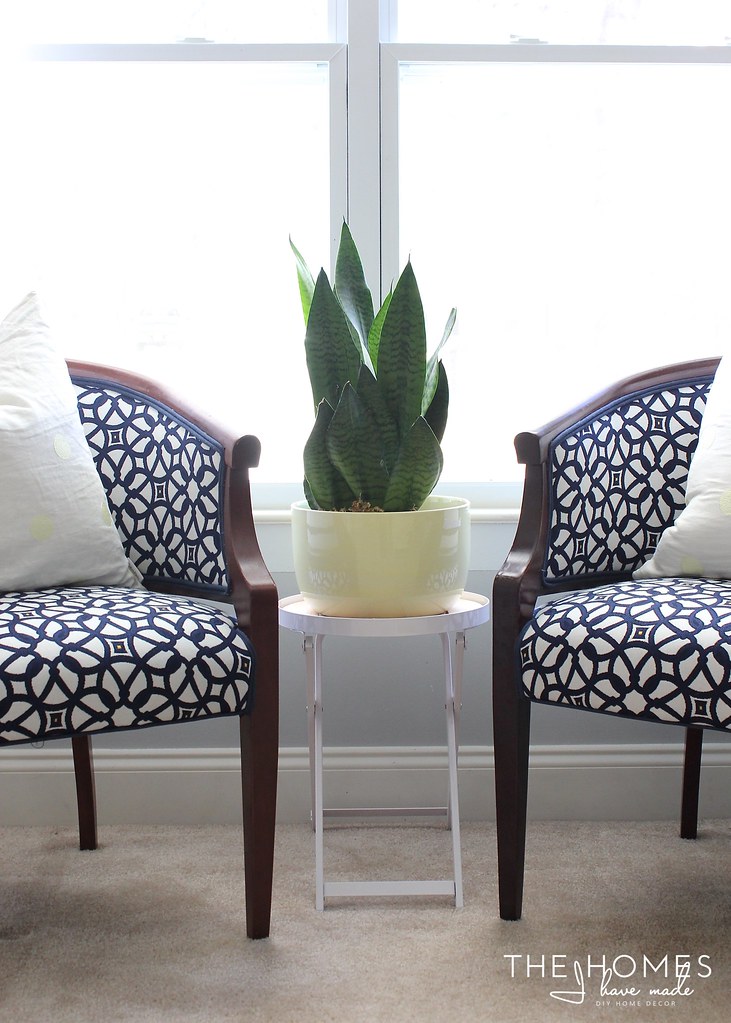
So, our beautiful, stunning chairs are now home. Unfortunately, they don’t really have a permanent spot because…um….we don’t really have room for them, AND there is SO much going on in this space…that these chairs are a bit TOO much in here. (That cornice and those chairs together are no good in so many ways).

So one chair has been put next to the television…for the next two months. It’s not a great place for her because you can’t see her lovely back. The other chair is floating around and getting put in random spots. They don’t work in here right now, but they are too pretty to stick in the garage. You better bet they will be the star of our next family room….


So…now that I’ve bought the chairs and the fabric and paid to get them re-upholstered, here’s a rundown of a few things I learned on this journey:
- Paying to get them done was worth every.single.penny. My husband and I have uttered that at least 20 times (each!) since we brought themhome. I would have never been able to get such a professional-looking final result. The upholstery job is impeccable, and they are now some of the nicest things we own. We paid the money, and the result matches it. Instead of being a DIY we’ll cast off in the next garage sale, these will be in our house for a very, very long time.
- Trust your gut. Sarah Richardson is my very favorite interior designer, and one of the things I love the most is how she mixes and matches fabrics on her custom upholstery. I bought these chairs ready to channel my inner Sarah, but started to worry that I was using too many fabrics. I came so close to using just the floral. In the end, the combination of fabrics on these chairs is what I love the most, and was the whole reason I bought them in the first place. I am so glad I trusted my gut and hunted down fabrics that looked fabulous next to each other.
- Fix the problems. Our upholster never asked us about the difference in stain colors between the two chairs, and I never brought it up. Who knows how much more it would have costs to remedy it. I assumed it would have been a lot more, but I’ll never know. If differences in stain or other details are going to bother you in the long run, get it fixed while you’re having everything else done. The idea of now un-doing this gorgeous upholstery to fix the stains is unthinkable, so we’re living with it.
- Address the smell. We assumed that by replacing the fabric on the chairs that the terrible smell would be gone. Although we didn’t specify for the foam to be replaced, we think he did and we’re happy to report that the cushions no longer stink. However, the wood still stinks. It never occurred tous that the wood was containing the stench. Now that the chairs are home, the smell is getting better, but there is still a hint of must. We haven’t tried to treat the frames with anything yet – if you’ve experienced this and have any suggestions, let me know what worked for you! I do wish we had mentioned the smell to the upholsters because they might have been able to treat the frames before re-doing the fabric.
All in all, I’m so pleased with our new chairs, but we definitely learned some do’s and don’ts for next time. I felt like such a grown up sending off our chairs to the upholsterer and picking out custom fabrics. We obviously made some novice mistakes, but they sure did turn out nice! I think the thing I love most about these chairs is that they are so ME. I often struggle to find “my look” and “my style.” I see such a variety of rooms and spaces I love, especially around the blog-o-sphere, and I find myself swaying with what I like and what I buy. When I look through my pin boards and search for images that make me swoon the most, it’s the preppy yet playful spaces full of smart patterns, contrasting colors and interesting details. These chairs are all those thing to me, and I am excited to use these as the jumping off point moving into our next space! You might be wondering about price. Including the chairs, the upholstery and the fabric, each chair ended up right around $400. Certainly not my usual thrifty DIY project, but, as I said, these evolved into investment pieces that will be in our home for a long time.
Have you ever had anything re-upholstered? Have you experienced any of my newbie mistakes? Anything I should know for next time? I hope your week is off to a great start! Next up here on Wednesday, a sweet little baby shower reveal I think you all will love!See you then!

Megan
17 Comments on “Upholstery – What I Learned From Hiring It Out”
I LOVE the chairs! I'm so glad you went with the stripes and the floral, I think that's what makes the chairs to be honest. I'am an avid lover of Sarah Richardson as well, I love how she mixes and matches I think its becoming more of a staple than matching!
Great job and I say great choice on getting them done 🙂
Lauren | LB Designs
xx
I love how the chairs turned out! The details that you ended up with by having a professional do the work make all the difference. Your post is quite timely for me as I just had a major a-ha moment with blue.
Love the chairs. The turned out fantastic.
I am pretty lucky. My mom does upholstery. So all it will take is me buying the fabric and spending a couple of days being her slave. 🙂
Thanks for the fabric tips. I now know where to start looking!
Those are beautiful! I love the coordinating fabrics. I've had an itch to reupholster something but I have nothing to reupholster. LOL! And great tips on buying the fabric, I will definitely use those! I'm thinking of making some pillows for my bed soon. Thanks!
We've been debating reupholstery vs. new for a couch, oversized chair, and ottoman combination we have. After nine years, six moves, two cats, two dogs, one kid, and thousands of naps they are really showing their age. Since we probably have at least three more moves before we settle in one spot we don't want to do anything too expensive, but since the the fabric is (quite literally) coming apart at the seams we need to do something!
I'm French , so excuse my bad english , but I just wanted to say that I love your blog ….
Try Howard's restore-a-finish. It might even out your matching tone issue and may help with the smell. You apply it with 000 steel wool. Be super careful I the fabric though since you purchase it in the color o your wood. Good luck-they look lovely 🙂
Incredible chairs! They turned out brilliantly. The only thing I have done to treat must is to put the piece out in the sun for a couple of hours. It seems to help. Just make sure the sun isn't too hot, or it could warp the timber.
Sheree
I dont know if Will work with finished wood, but yhl did tutorial redoing a dresser that smelled. Wiped with vinegar and air dried. Worked for them, and I’ve used on drawers, too, and has always worked.
Hi Heather (again 🙂
I did try the vinegar, and also some cloths/spray that a reader sent. The smell seems to have lessened over time, but if I sit in them for a while, I still feel like I can smell them 🙁
But they sure look pretty, lol!
Megan
My grandmother’s dresser and make-up desk were in my brother’s apartment for several years, and now I have them. He smoked. I cleaned them thoroughly and applied vinegar, which helped a great deal. However, over time the cigarette smell has come back. I emptied the pieces and washed and re-applied the vinegar treatment. So far the smell has not come back. Maybe you just need to repeat a few times. I also think the sun idea is good. That’s how I got the musty smell out of an old quilt my grandmother made. I’m not sure I’d go with a commercial product and steel wool. It sounds as though you could make some big mistakes in the process.
I am an upholsterer and appreciated this article! The beauty of upholstering is taking amazing pieces of furniture and making them “yours”! It’s why I love what I do. Thank-you for not belittling the profession but for uplifting it!!
Hi Heather,
Thank you for this article! I was on the fence about getting my $15 adorable, outdated wing backs reupholstered or to try myself and you convinced me! I didn’t know wether it was worth trying to do them myself with zero experience. Now I will def have someone professional do them. Did you mention how much it cost to get them done? I didn’t see that anywhere… just how much fabric was. Maybe I missed it. Anyway, thanks for the tips! Stay true to your style! Authenticity is the way to go with your home!
Ann W. / HumbleDuck.blog
Sorry I meant Megan!! 🙂
I love how you explained procrastinating the reupholstering of those chairs. We’ve actually been thinking the same thing for months now, but the couch in our living room is still ugly. Hiring a professional to do it does seem like the most cost and time effective way!
Absolutely love your two tub chairs. Some years ago I too found a bargain . Two tub chairs with rattan inlays which is exactly what we needed to compliment the high chair. It was of the same bentwood design and I think it is Beechwood that was dark stained .I did the refinishing of the frames with a chalk look myself, but as you decided with your two babies, we got the professionals to re-upholster them, in a co-ordinated pattern to compliment our high chair. Totally thrilled with the result and we have never regretted the decision to use good quality fabric.
Again, your chairs are stunning. Well done!
Love the chairs! Who was your upholsterer? I am in Raleigh and looking to get a couch redone. Looks like a job well done!