How to Organize a Pantry | Real Life Solutions That Look Good Too
Across nine different rental homes, we haven’t once encountered a pantry with a repeat size, design, or layout. Every time we move, we have to reimagine our food storage solutions until we find the right arrangement and containers for that particular pantry. And while this might seem like a nuisance to some, the result is that I’ve become pretty adept at setting up pantries that work well (and look pretty good too!) Today, I’m going to teach you exactly how to organize a pantry. These are the real life solutions we use in home after home and will work in your home too, whether you have a spacious walk-in pantry or an awkward kitchen cabinet. Let’s get to it!
Our Pantry | Before & After
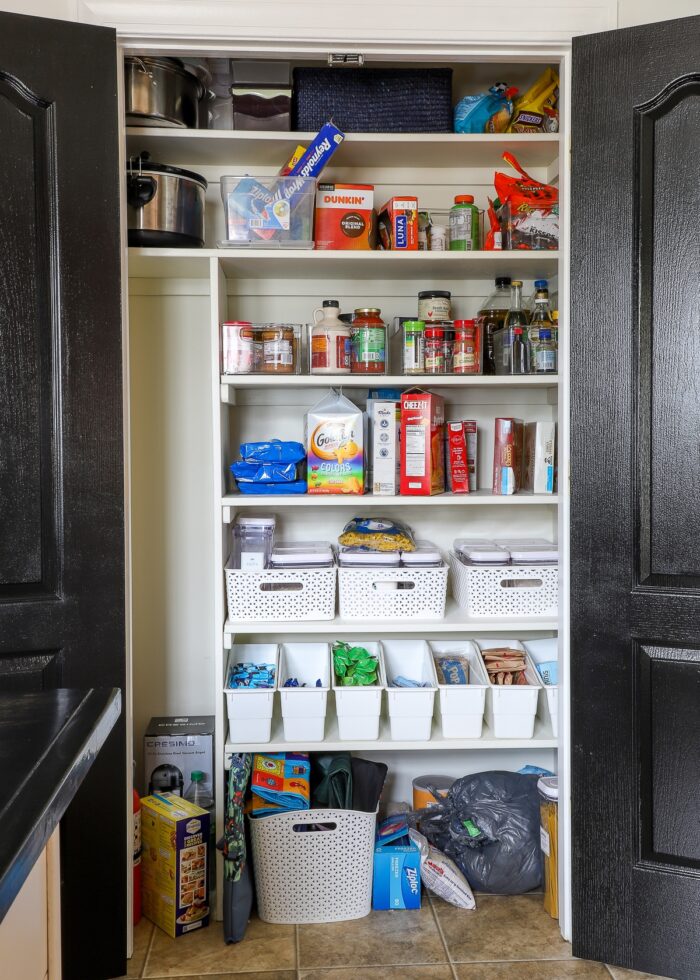
After not having an actual pantry in our last home, you better bet I was beyond thrilled to have a full, large pantry in our current rental. While this pantry’s layout is a bit dated and not quite ideal, it’s a significant improvement from squirreling away foods in random cabinets and drawers like we did for the last few years.
Before

There’s a reason I am just now getting around to organizing the pantry. Even though it is one of the few spots in the entire home that the whole family interacts with constantly, it also takes some “living” in a kitchen to really figure out where and how you need certain items.
Upon moving in, I quickly threw in some bins and baskets we’ve used in the past…
But as our pantry slowly filled up in the months since, items started getting stuffed into corners, piled on top of each other, and tucked up high.
Once things became a little too unruly, I knew it was time to whip this pantry into shape!
After
This “before and after” might not be as dramatic as some of my other projects, but I really can’t overstate how finding the best solutions for your pantry can make a world of difference.
The result will be one that functions seamlessly AND looks tidy…but most of all, stays that way day in and day out, grocery trip after grocery trip.

While I love the pictures of color-coded granola bars and matching containers for each and every item in a pantry, you won’t see that in my setups. Because I’ve learned that maintaining a “perfectly pretty pantry” with a household full of busy boys can be more work than it’s worth.
Rather, the key to organizing a pantry “for good” is finding the perfect balance for your foods, your pantry, and your lifestyle. This includes decanting what you can, labeling what’s necessary, and embracing imperfection when it works.
Let me break down my entire process for you, so you too can organize your pantry “once and for all”!
How to Organize a Pantry | Step-by-Step
Before You Start
To identify true-and-lasting organization solutions, I suggest you organize a pantry under the following conditions:
- Organize your pantry only once you’ve lived in your home for a few months – this allows you to “get to know” your pantry layout and gives you a better sense of where you tend to place items, how things fit, what’s too hard to reach, etc.
- Organize your pantry after a full grocery trip – you don’t want to pick bins and assign locations when you’re not fully stocked. Do a full shop of your “usual” items so you can find the best places for everything you usually keep on hand.
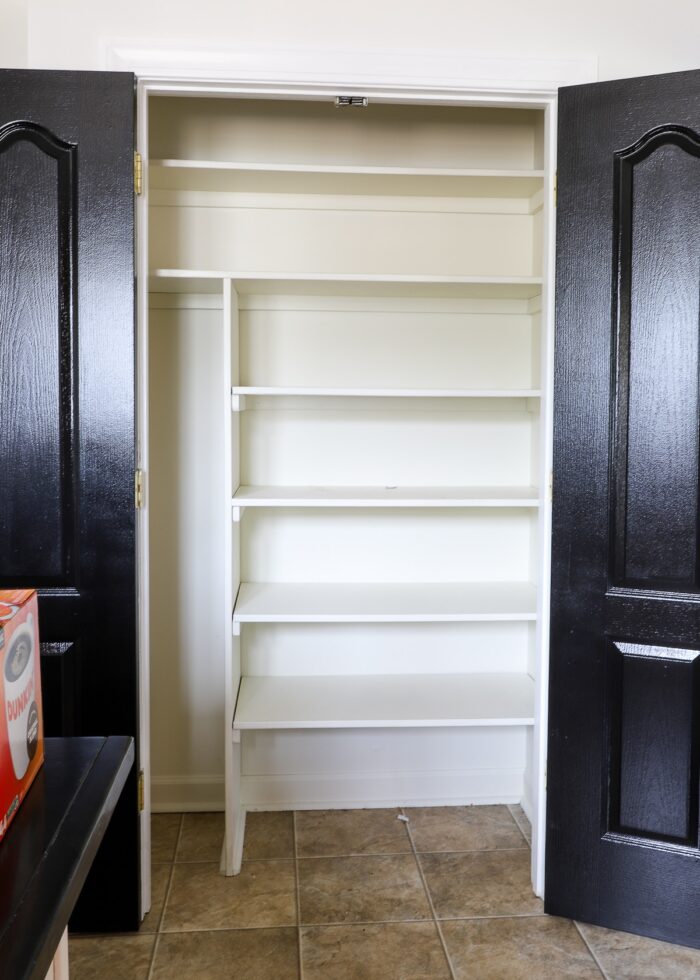
Step 1: Completely Empty the Pantry
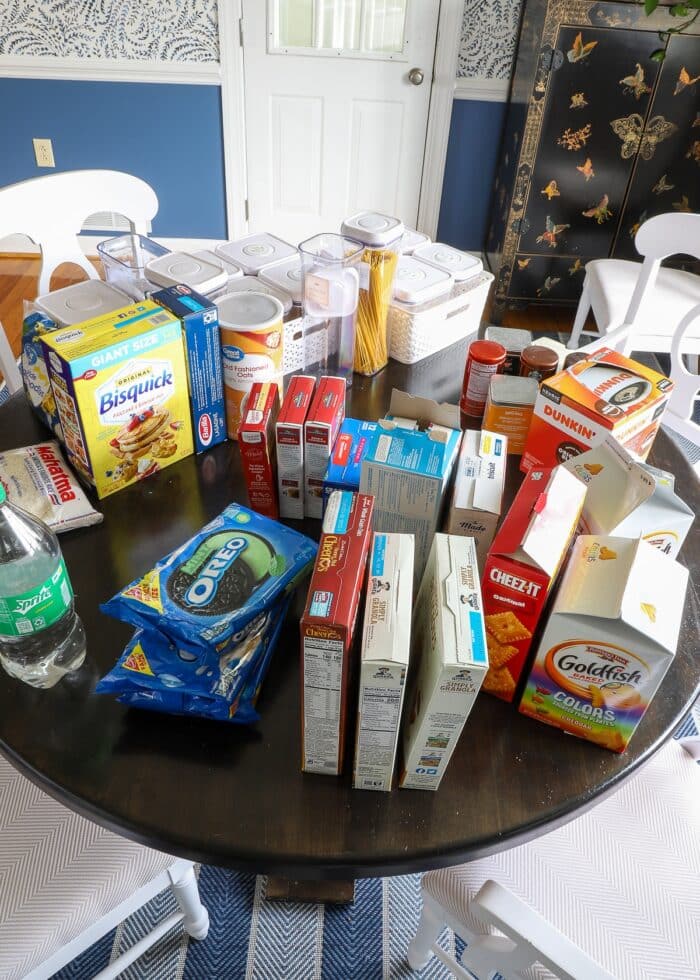
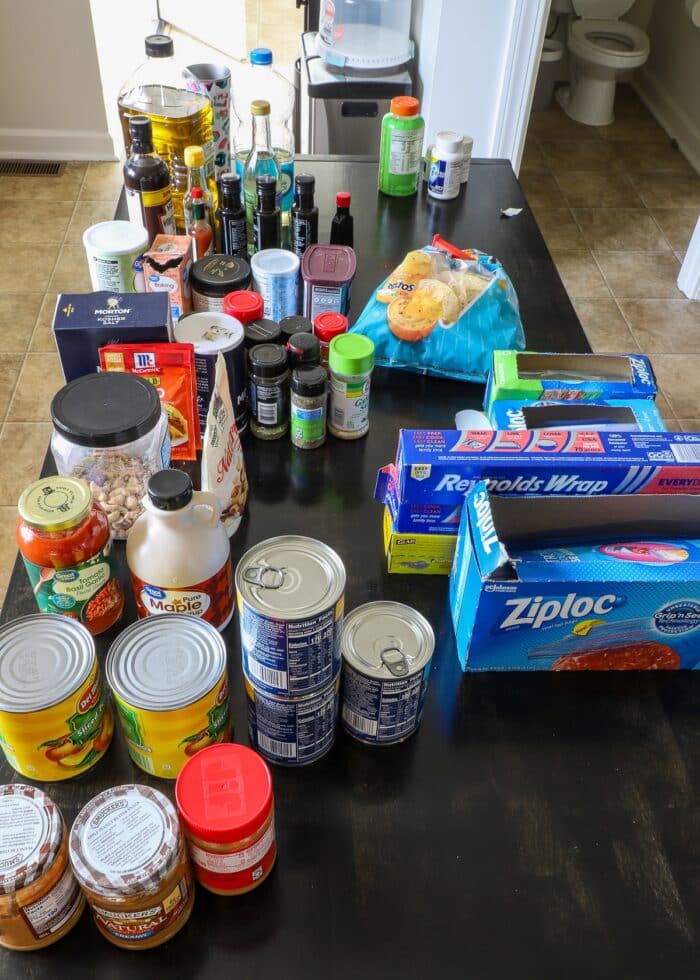
No matter how full or cluttered (or not!) your pantry is, start by emptying it out. Yes, completely. Use a nearby table or counter to hold foods as you empty.
A perfectly clean slate is the only way to truly be able to find the best locations for each and every item. You don’t want to be anchored to a solution just because you’ve always used it.
Step 2: Sort Foods Into Categories
As you empty out the clutter, toss stale foods, items you’ll never use, and broken containers. After checking all expiration dates, sort all “keepable” foods into logical categories.
What Food Categories Should You Use In a Pantry?
I’m not going to tell you that.
In order for YOU to be able to find and maintain foods in YOUR pantry, YOU have to identify what groupings make sense.
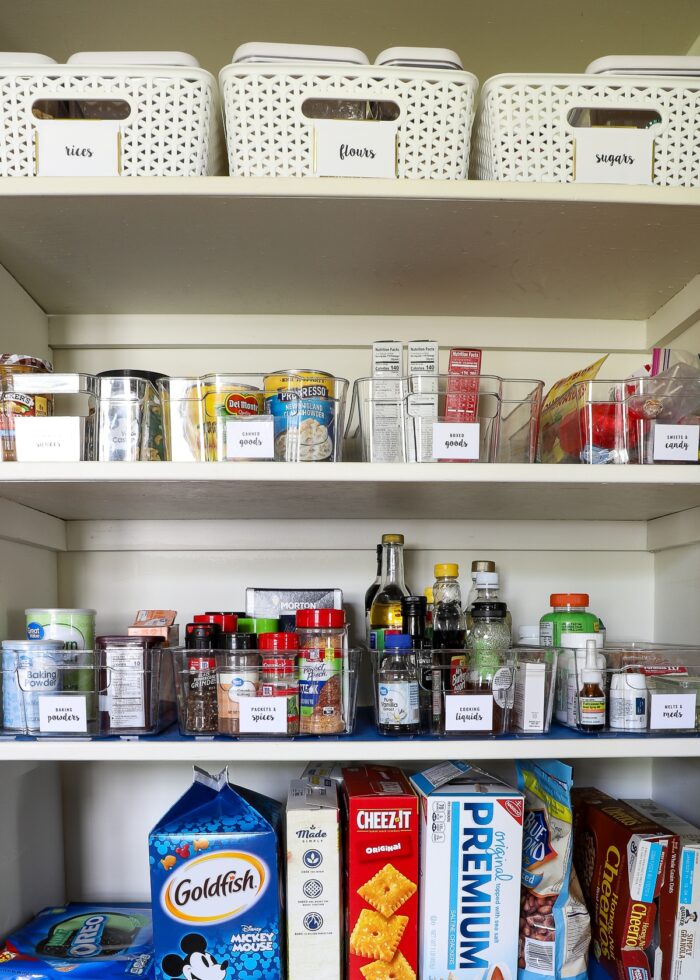
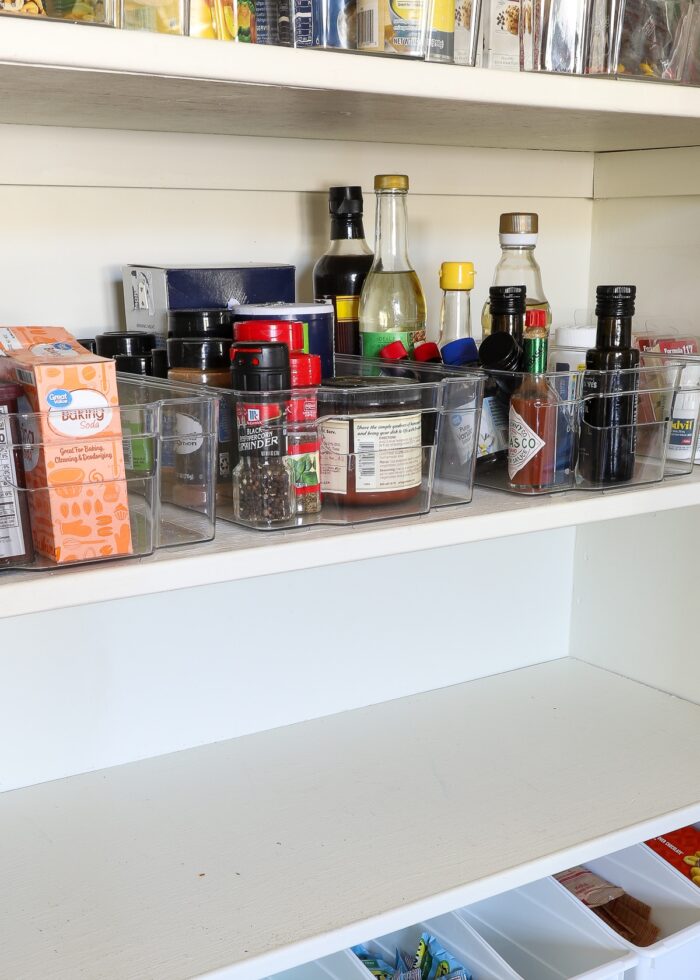
I, personally, tend to group items by type: canned goods, liquids, spices, snacks, cereals, dry goods, sauces. However, you might prefer to categorize items by meal (i.e., breakfasts, lunches, dinners, snacks etc), baking, size, shape, or some other criteria.
As you empty your pantry and group items together, continually analyze what you have and what makes the most sense together.
Step 3: Clean Pantry Shelves
While your pantry is empty, give it a good cleaning. Vacuum up all the crumbs, wipe up grease stains, and clean out any cardboard or paper scraps.
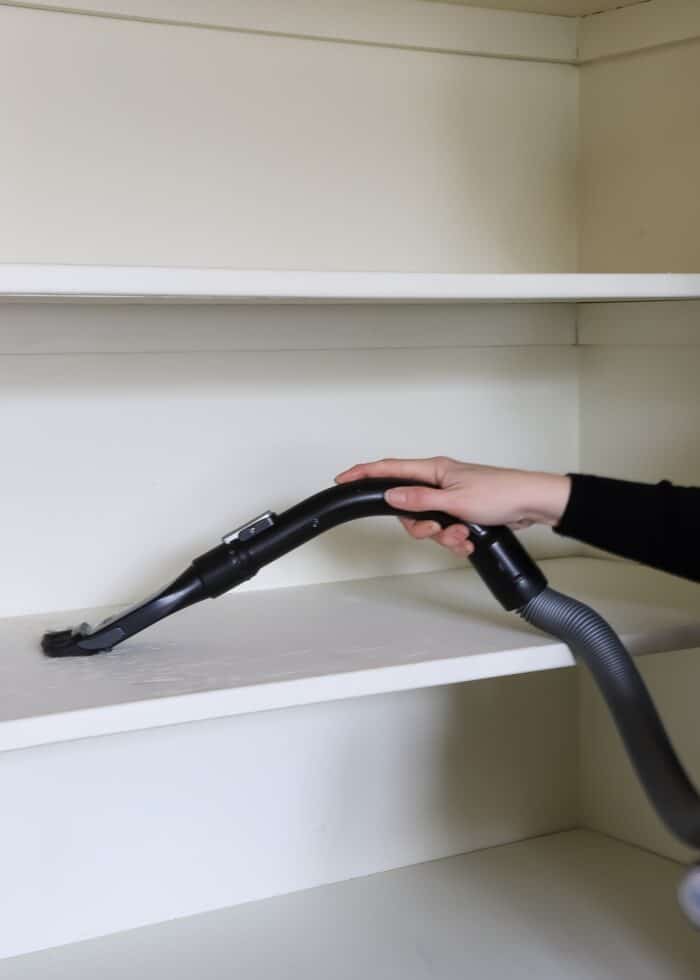
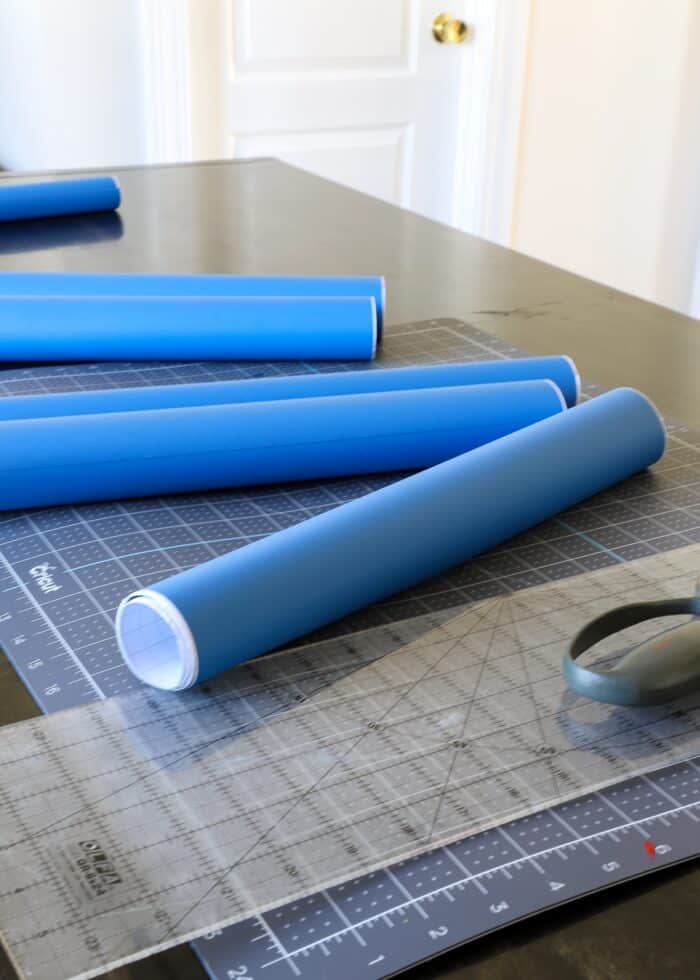
This is also a good time to add shelf liner, wallpaper the back wall, or paint shelves as desired.
Step 4: Measure & Analyze Pantry Shelves
With a completely blank slate, next spend some time analyzing your pantry layout, including the height and depth of shelves, cubbies, hooks, clearances, etc.

Don’t be afraid to “think outside the box” when it comes to layout.
Clearly, the left-hand side of our pantry was meant for brooms, mops, aprons, and other tall items. But we prefer to keep these items elsewhere.
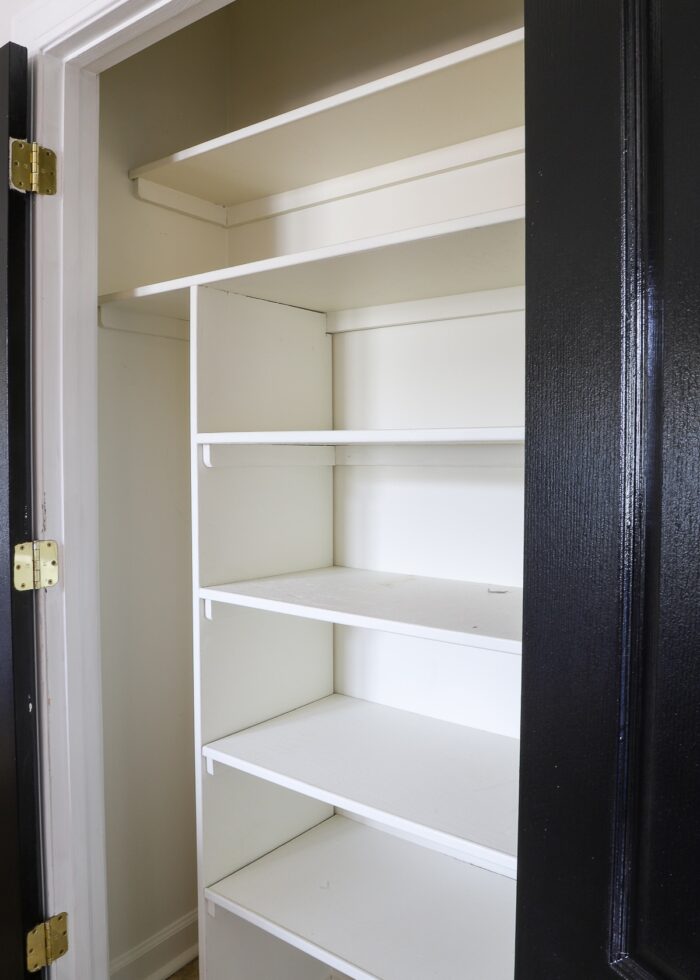
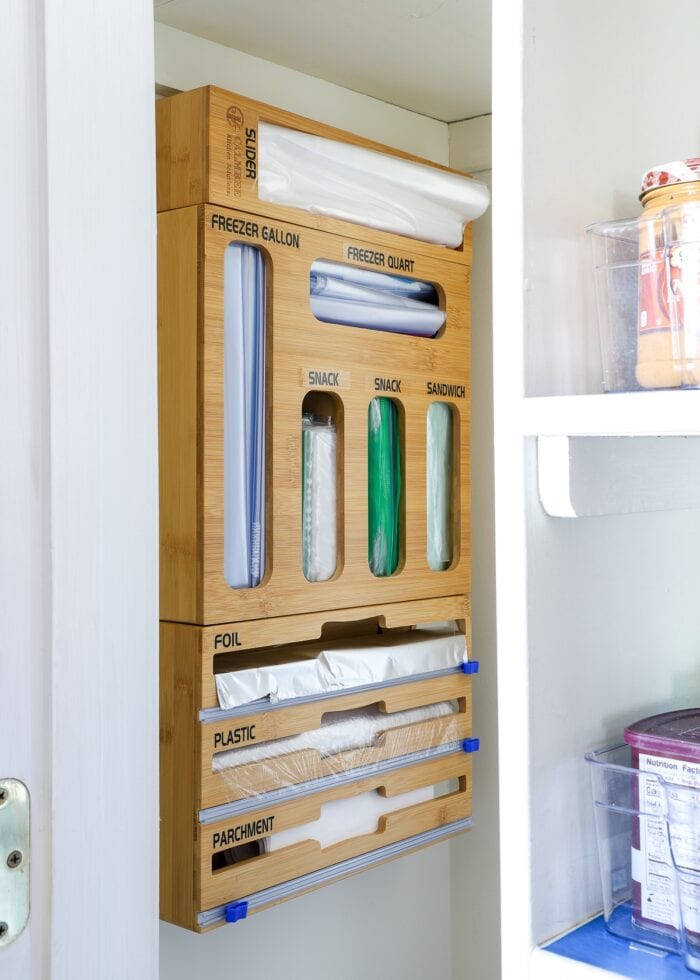
Instead of “forcing” ourselves to change something that’s already working, I brainstormed different ways to use the awkward nook that ultimately served us better (i.e., our Ziplock organizer, hooks to hold tall items, etc).
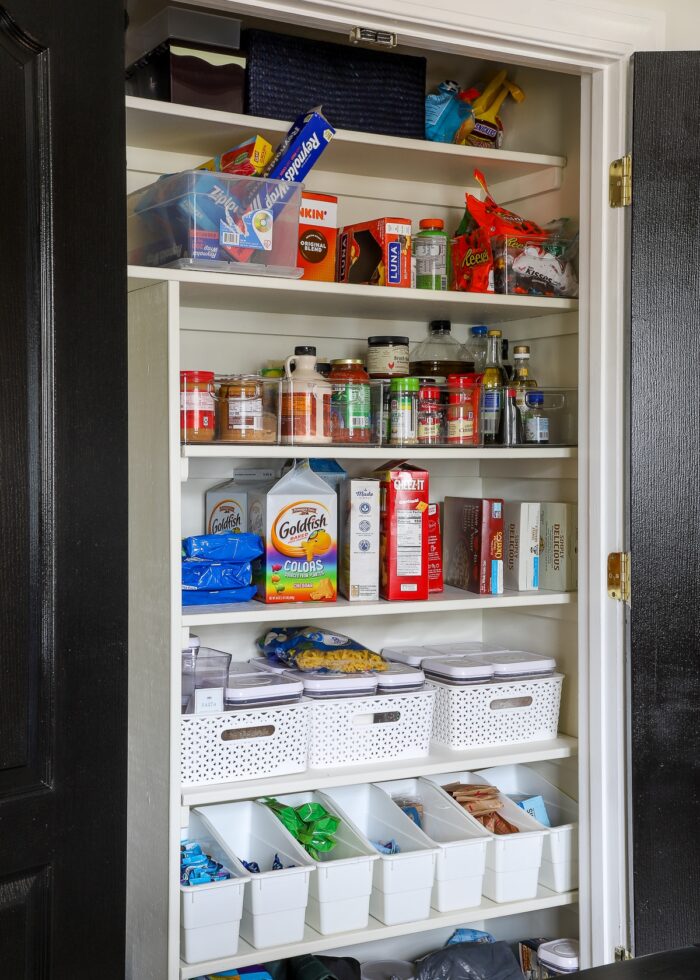
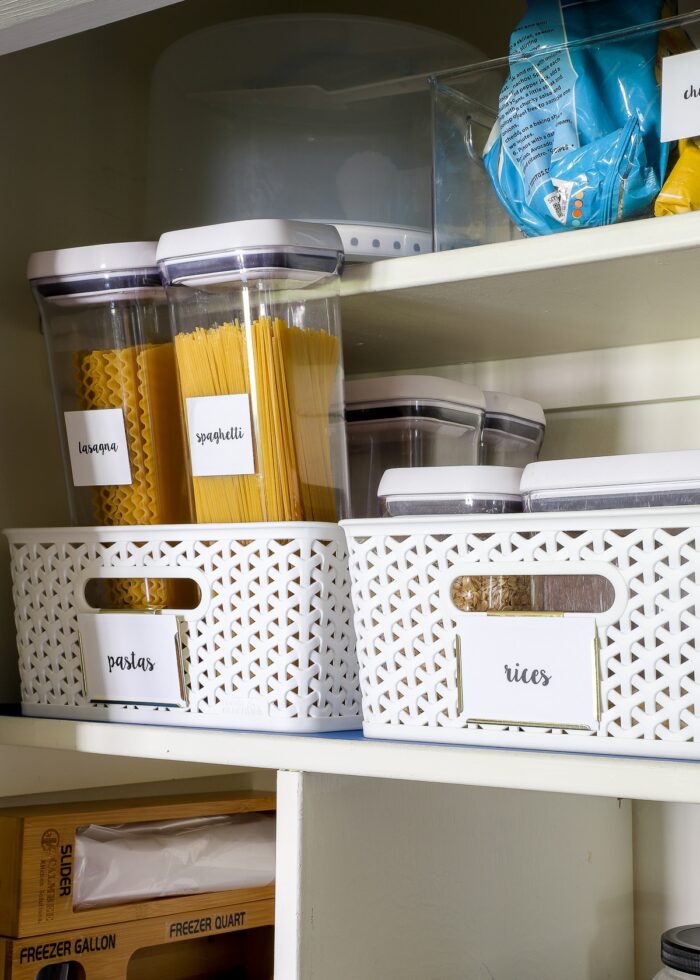
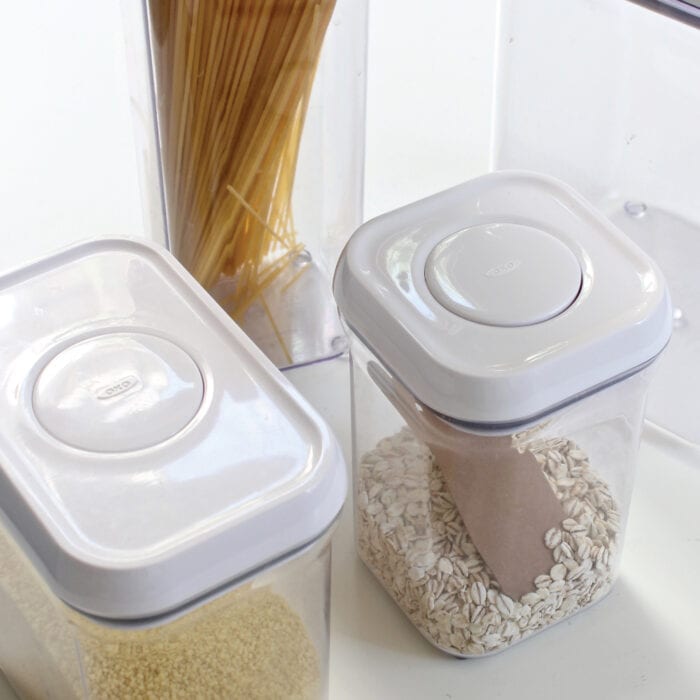
Another example is our tall pasta containers. They didn’t fit on any shelf, but I’ve used these containers for years and really wanted to find a way to make them work.
I discovered that by placing them inside a basket all the way to the left side, they “fit” but were also out of the way and still reachable. Not a perfect solution, but it’s working!
Step 5: Identify the Best Organizers for Your Pantry & Your Foods
With measurement and ideas in hand, shop your home or your favorite retailers for bins, basket, and containers that will fit your shelves just right and hold your food groupings.
I wish I could say it’s as easy as taking some measurements and picking out some bins; but in actuality, this can be a tedious process of trying arrangement, testing options, and moving things around over and over and over.
Here’s what I mean…
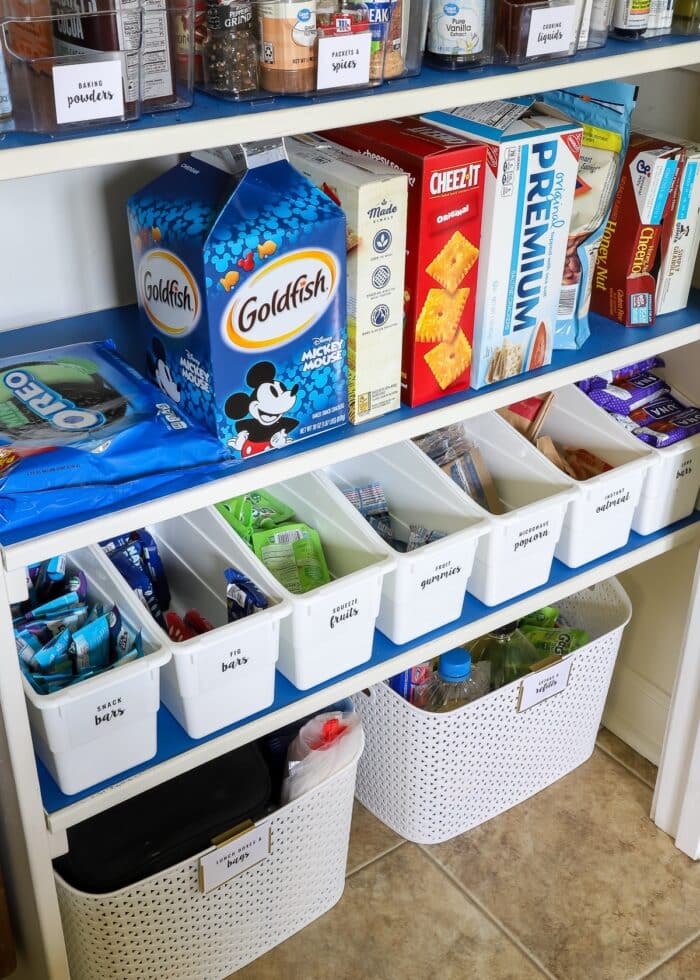
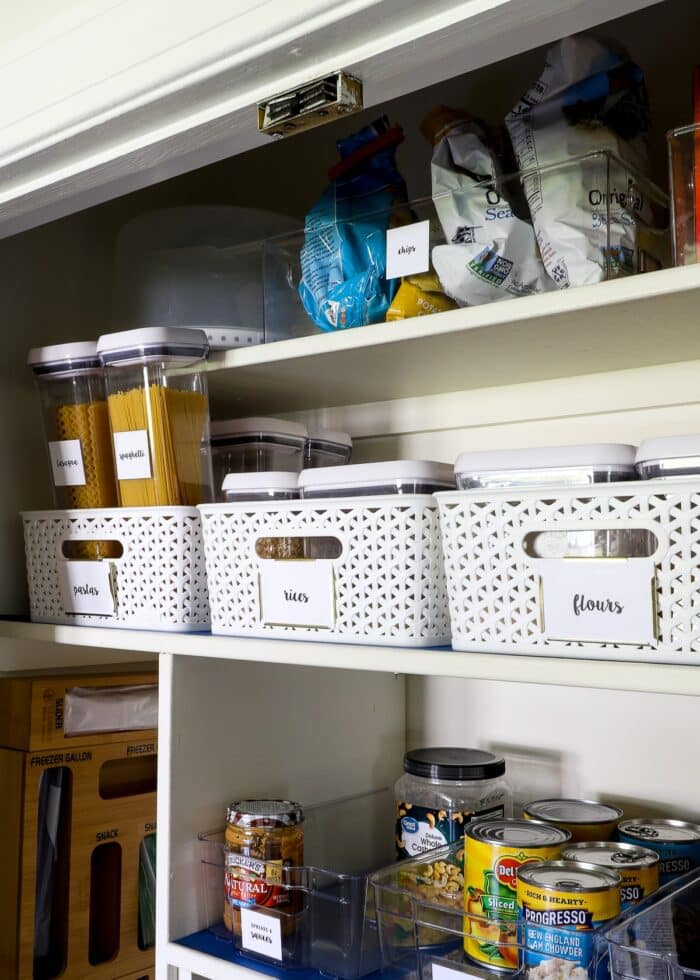
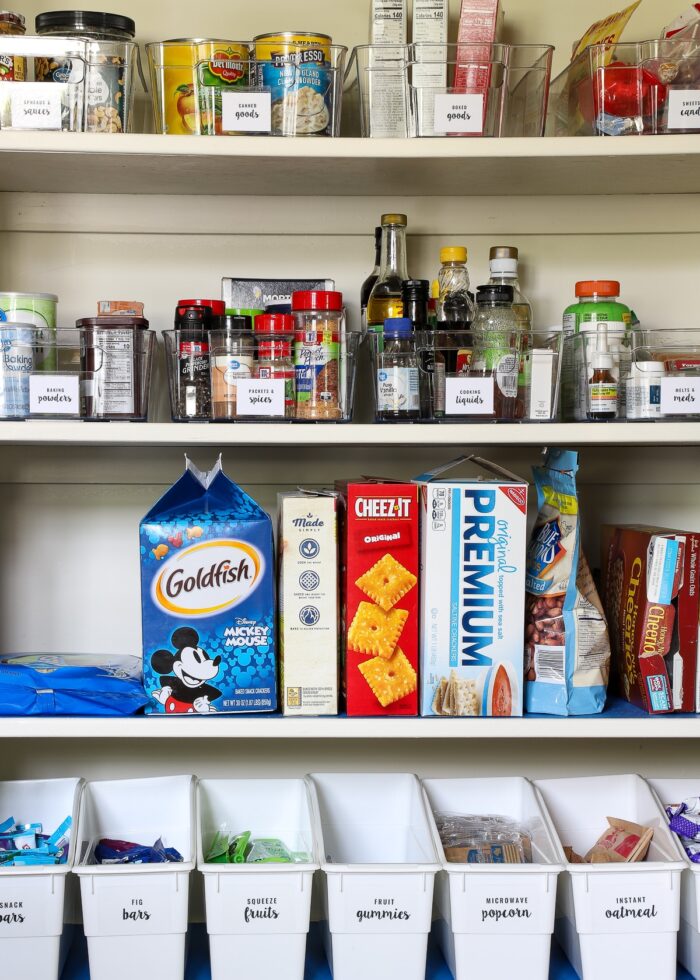
Notice, below, that by moving the white baskets up a few shelves, I could add one more (only three fit on the lower shelves). The tall canister was me checking height clearance and how easy things would be to slide in/out. I knew I wanted the snack bins low for the kids so those stayed put.
Don’t hesitate to try every and all arrangements because you might be surprised what works!
Beyond just searching for bins that fit your shelves, also make sure they hold what you need them to. Your goal should be for entire categories to fit into a singular basket/container with room to grow.
Do You Need to Put Pantry Foods Into Baskets?
Yes and no.
Bins are very helpful in keeping like items together, and they also make it easier to slide a collection out to find exactly what you need. Items are less prone to toppling over and you will ultimately be able to fit more into less space because you can use the full shelf depth.
Want to save this post?
That said, not everything has to be loaded into a bin or basket. We determined that our boxes of crackers and cereals were just too big to fit into baskets and could stand up just fine on their own. As such, we dedicate a single shelf to any items that can stand alone.
Resist the urge to force an un-natural solution just because it might look better!
TIP! Not sure if and when a basket is necessary? Let size and function be your guide. If you can’t find a bin to hold a certain collection due to size or it’s just too tedious to get things in/out, a bin is likely not necessary.
Step 6: Load Foods Back Into the Pantry
As you identify the right containers for various foods and where they should be positioned, start to load groups of foods back into your pantry. You will likely continue to move items/categories around until you land on the best location based on how things fit, what you reach for most, etc.
Part of loading foods back into your pantry may include “decanting” them into clear canisters. I have helpful tips on decanting further down in this post.
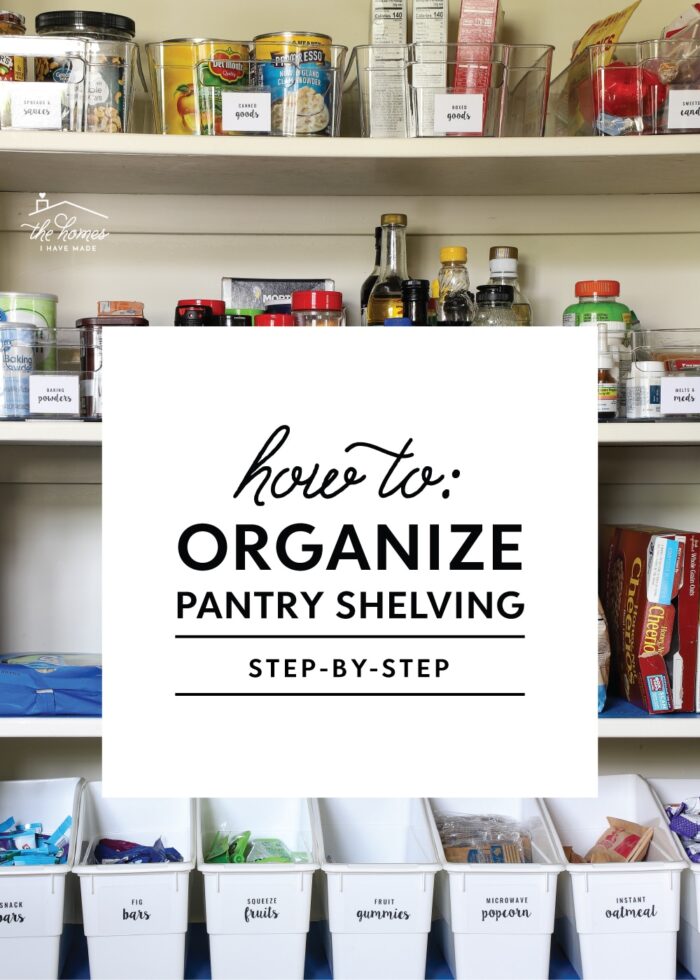
Step 7: Label
I am a huge advocate of labeling items in a pantry…and not so that you can easily find them. Even in a crowded, over-stuffed pantry, you can usually see and pull out what you need.
Rather, when you organize a pantry specifically, labels are much more about communicating where items go back.
Whether it’s while you’re putting groceries away or cleaning up after a meal, labels are 100% about holding you accountable to your organization system. The label is your gentle reminder to put the jar back in the appropriate place rather than just stick it on a shelf anywhere.
In short: labels are one of the only and best ways to ensure your pantry stays organized for the long haul.
There are lots of ways to make labels for your pantry including using a Cricut machine, printables, or even just a label maker:
- How to Make Pantry Labels with a Cricut | 3 Methods to Try!
- Easy-to-Use Printable Pantry Labels (That Look Amazing Too!)
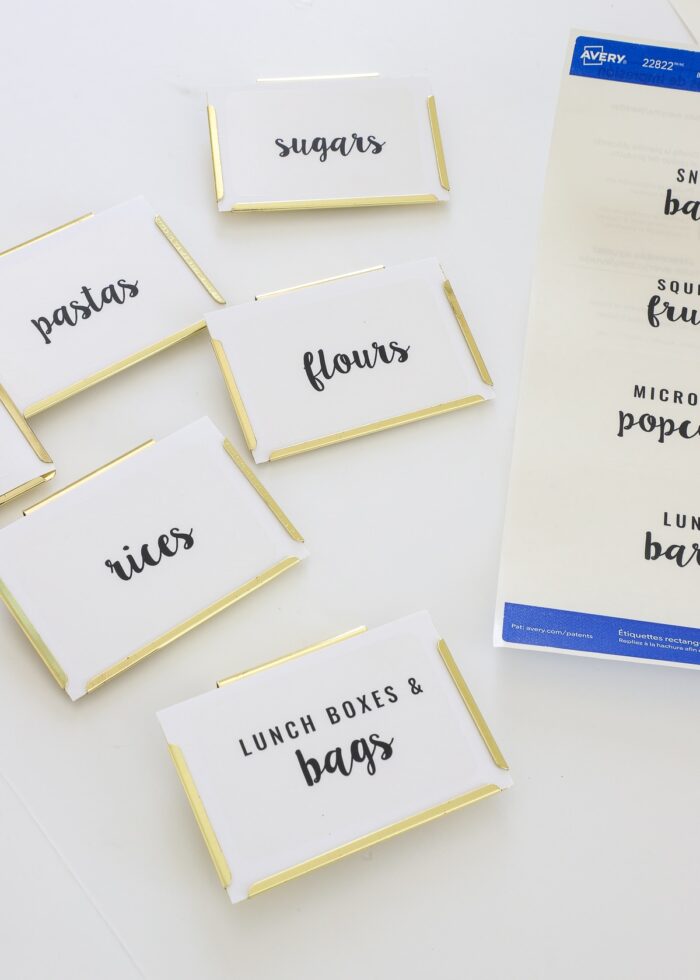
For years, I’ve used and loved these printable pantry labels to not only label our dry goods containers, but also all bins or baskets using bin clips.
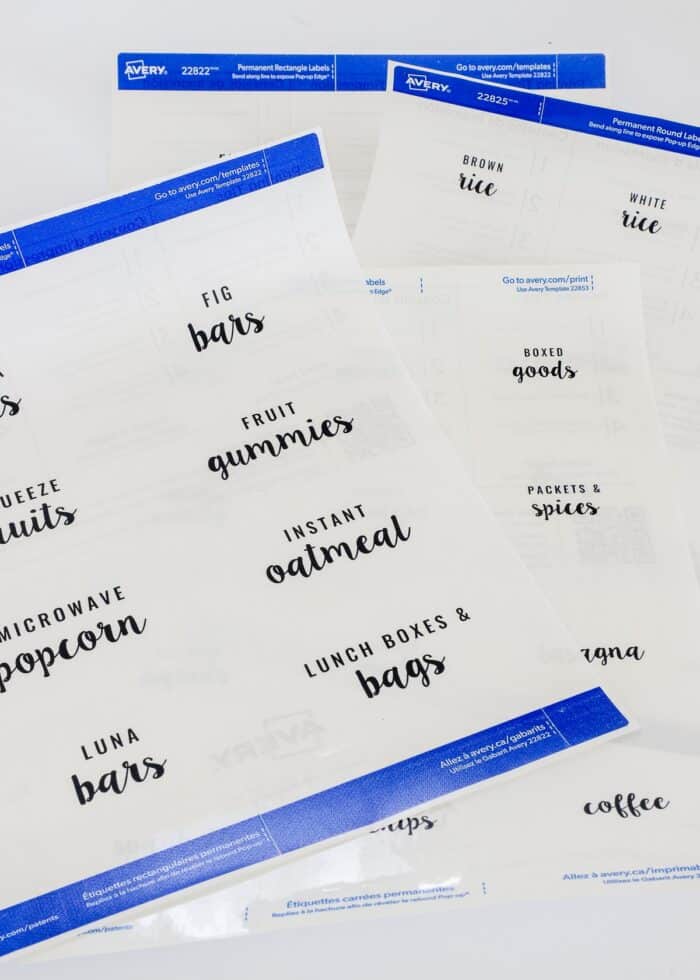
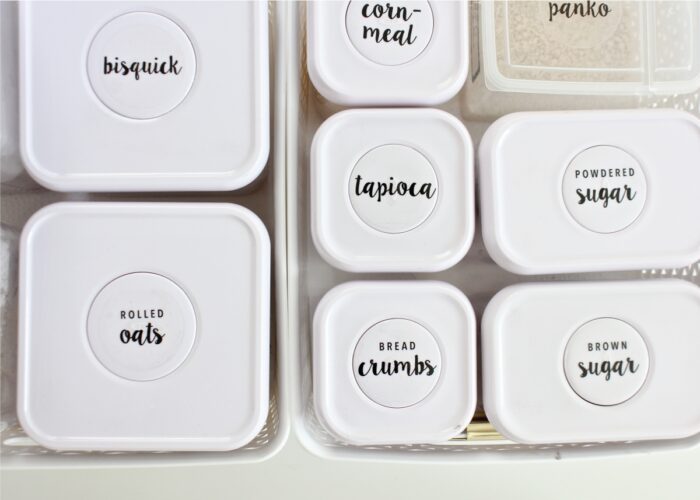
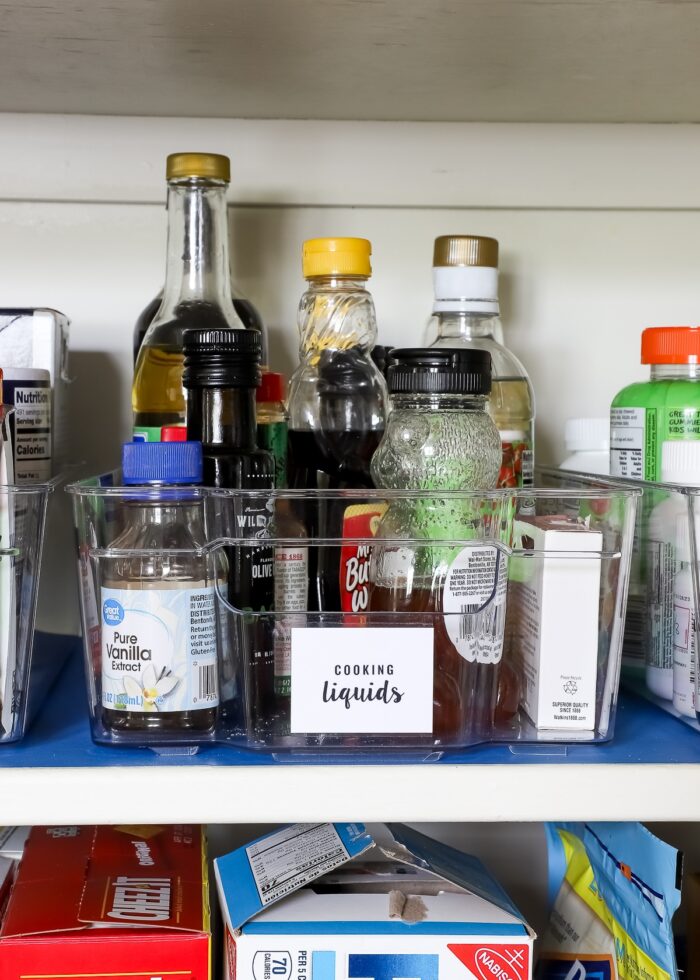
When making pantry labels, I highly suggest using fairly generic terms (e.g., cooking liquids, canned goods) for large categories full of mis-matched items.
If you want to make very specific labels for containers, make sure it’s only for foods that don’t change frequently (e.g., flour, sugar, rice) or items you always keep stocked (our snacks below).
If you change your food stocks pretty regularly, consider using a wet erase marker for labeling instead!
You’ll notice that labeling is the very last step in the pantry organization process. That’s because you should only add labels once you’ve fully identified all the locations, containers, and bins for each and every item.
Once you have everything exactly where you want it and labeled as such, consider your organization project complete!
Other Helpful Pantry Organization Ideas
While the general process outlined above is what you’ll want to follow to organize a pantry, there are some other tips and tricks you’ll need to keep in mind as you work.
What Can Be Stored Elsewhere?
The pantry has a tendency to be a “catch all” location within the kitchen. If you have a large pantry, it’s certainly okay to store things like cleaning supplies, small appliances, paper products, and more.
But if your pantry is small(er) and you’re short on space, consider what items can be stored somewhere else.
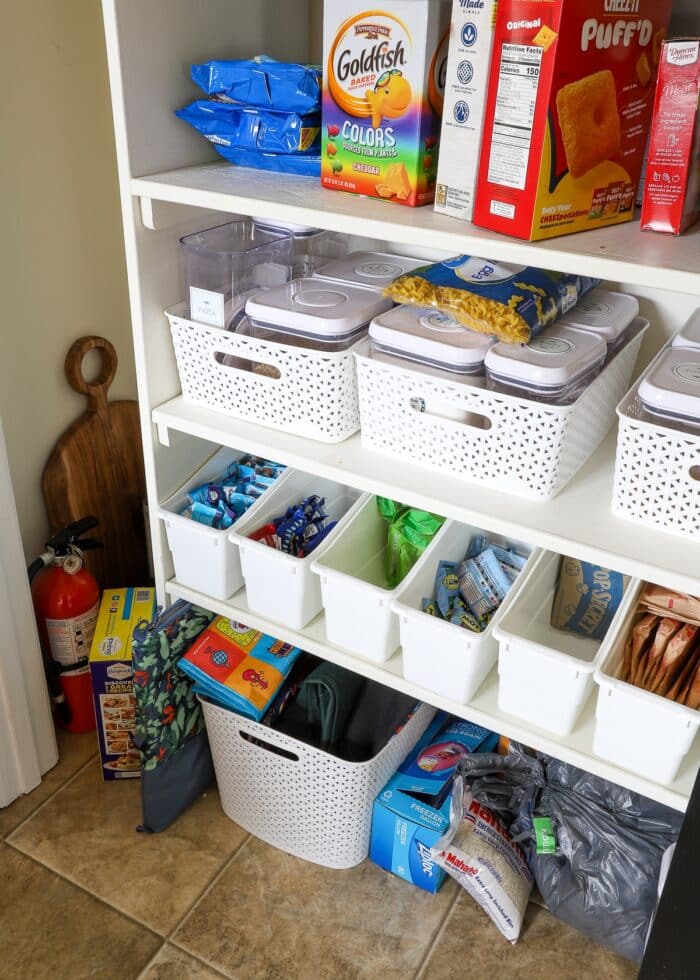
In my before photos, our crockpot, coffee carafe, s’mores fixings, and fire extinguisher all landed in the pantry. But each and every one of these items could easily be stored in nearby closets and cabinets.
By removing these items, it created space for the things we really needed in the pantry (i.e., food).
How to Use High Shelves In a Pantry
One of the trickiest things about high shelves in pantries (or anywhere around the home, for that matter!) is items getting lost or stuck because you can’t see or reach them.
I’ve found the best way to combat this is to load whatever goes onto higher shelves into baskets. Not only is it more difficult for items to get stuck behind baskets, but then you can easily pull down the entire bin to get what you need.
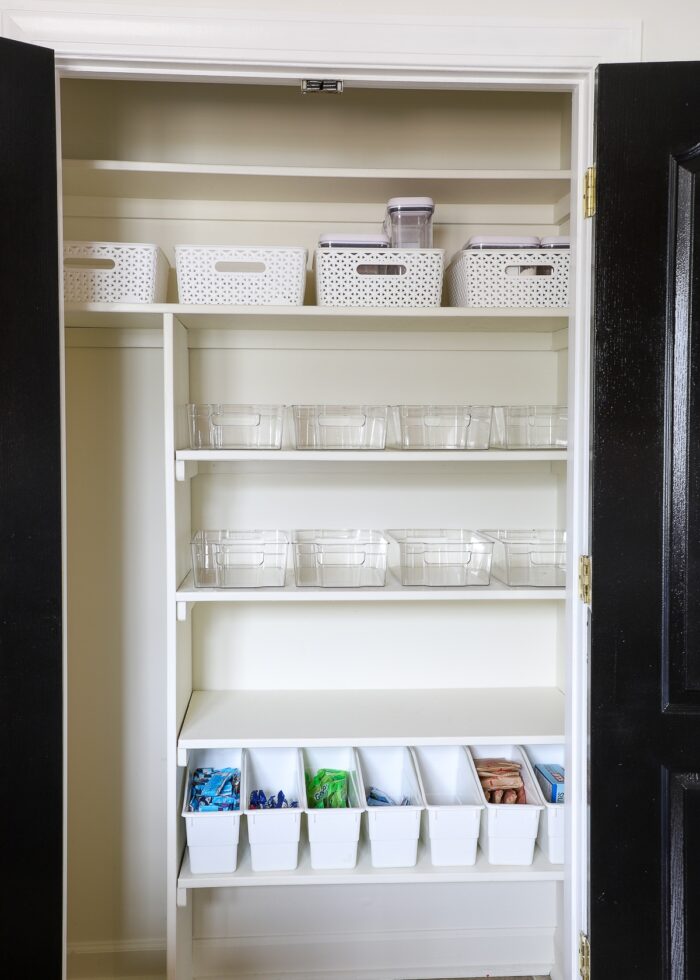
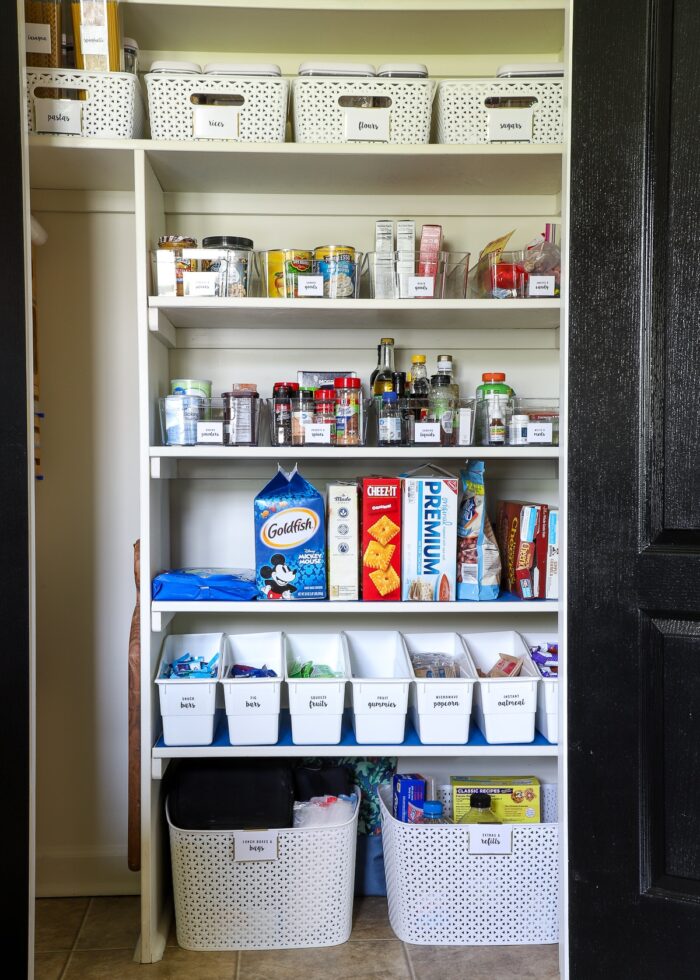
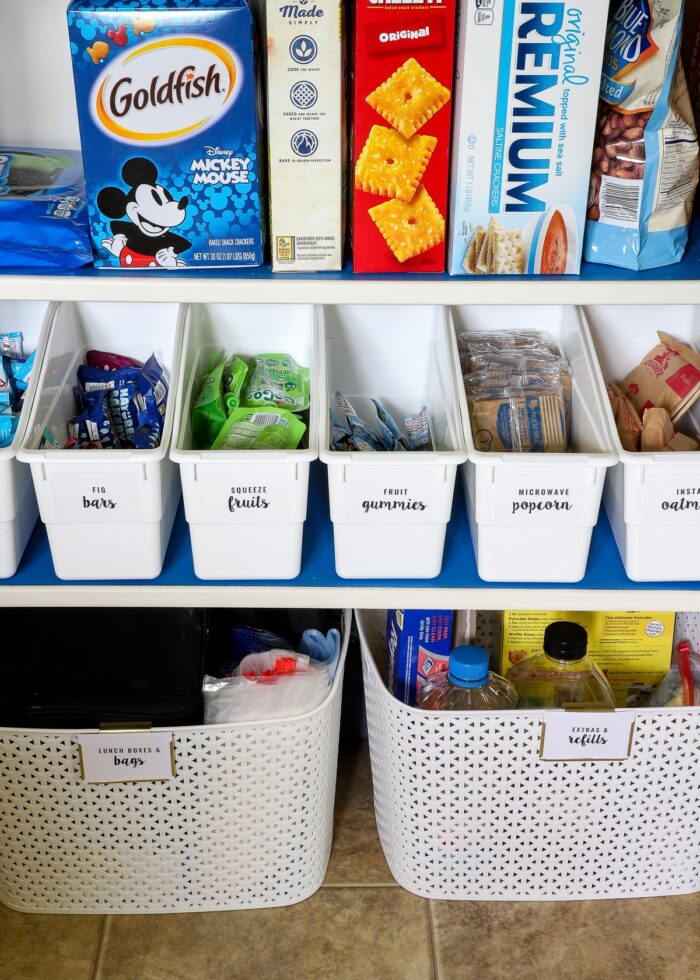
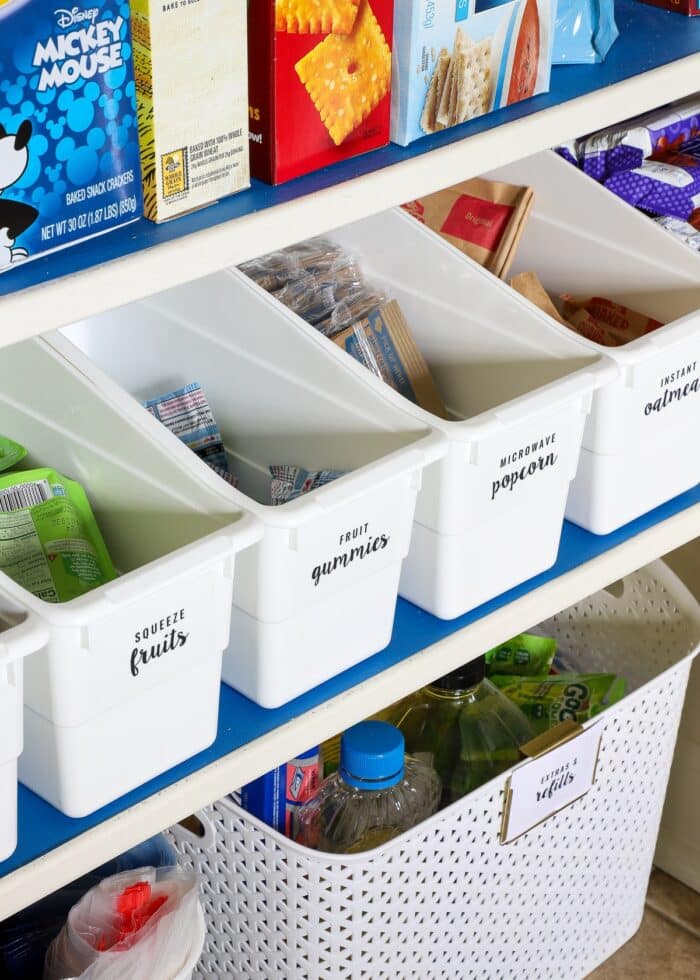
In our current setup, I have all of our decanted dry ingredients in four easy-to-grab y-weave baskets and our chips and coffee/cocoa supplies in two clear bins along the very top. These bins/baskets are exactly what allow me to use these higher shelves effectively.
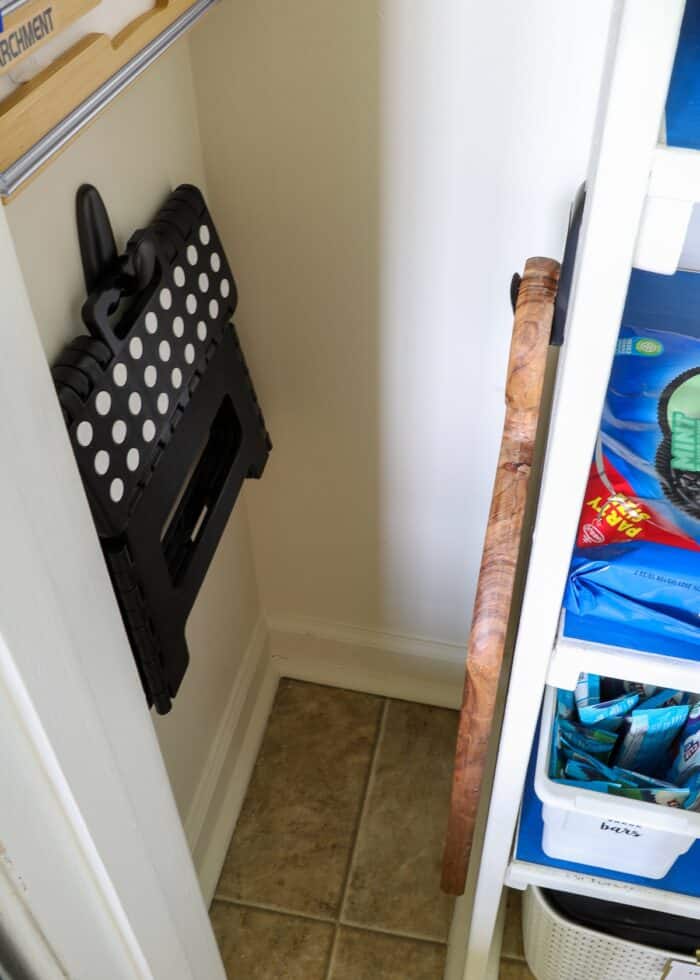
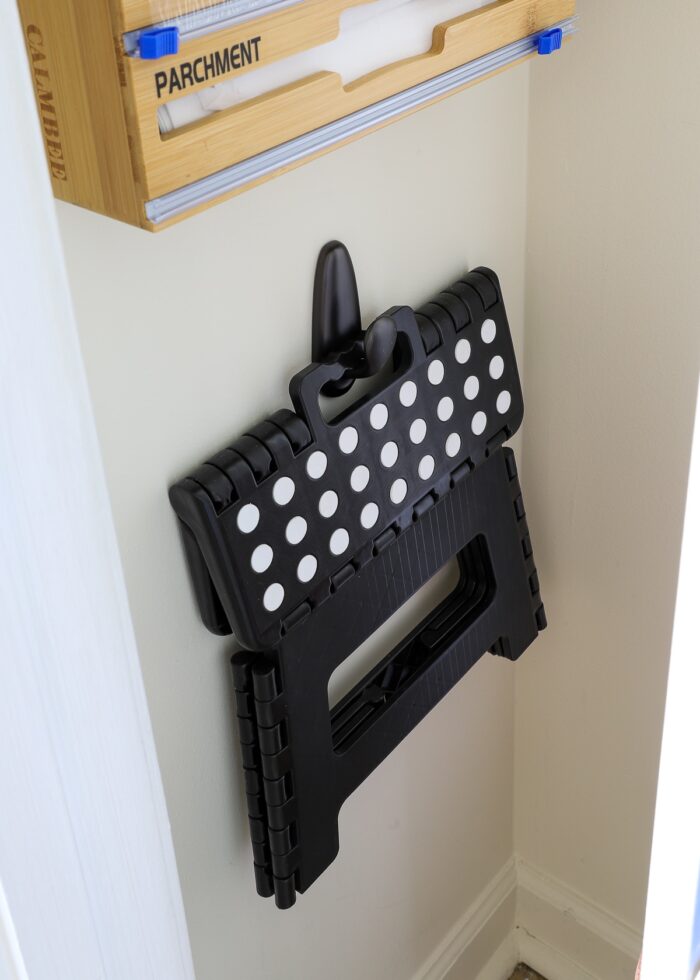
If you’re still worried about being able to reach tall shelves or items getting lost, keeping a collapsable stool nearby will make it easier to grab out-of-reach items and prevent you from just “throwing” items up, never to be seen again!
Make Strategic Decisions About Decanting
From an organizing perspective, nothing gives me bigger heart eyes than a pantry full of ALL matching containers and not a cardboard box in sight. But I learned years ago that decanting every single item into plastic containers was just impractical. Dumping package contents into containers can sometimes be time-consuming, messy, and tedious. So you really need to consider, “is it worth it”?
I recommend thinking long and hard about what items you need decanted in order to make your life easier for both meal preparations and grocery shopping/putting away.
For us, we decant just a few categories of items:
- Dry Goods (i.e., flour, sugar, rices, pastas, pretty much anything we have to measure out) – containers are just easier to measure from than bags, boxes, etc.
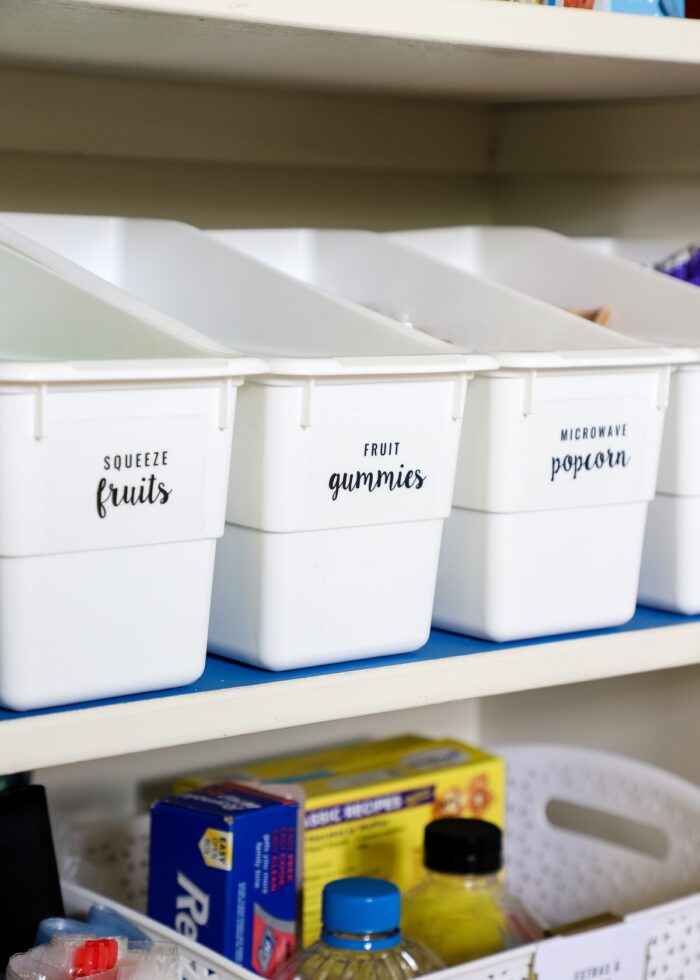
- Pre-Package Snacks (i.e., granola bars, gummies, etc) – these are easily stored in open bins that make grabbing snacks, assessing stock, AND reloading much easier.
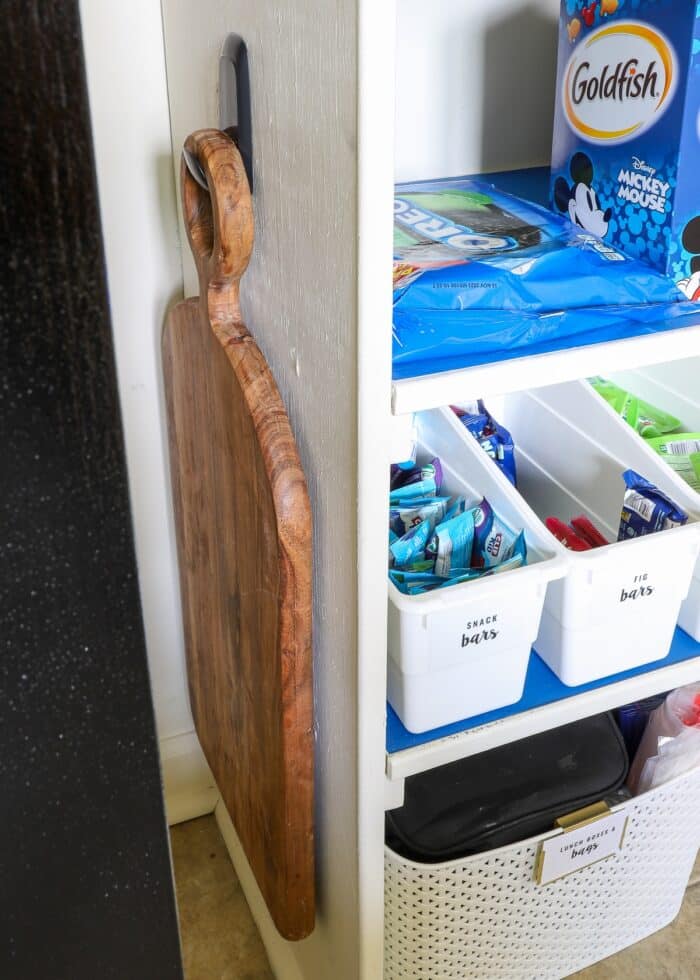
- Ziplock Bags – with precious few drawers, getting rid of the cardboard boxes and using a wall-mounted organizer saves us previous space.
- Cooking Oil – our most used oils (olive and canola) get poured into bottles that sit on our countertop next to the stove.
See my guide here if you need more helping figuring out what to decant: Practical Tips for Decanting Pantry Items
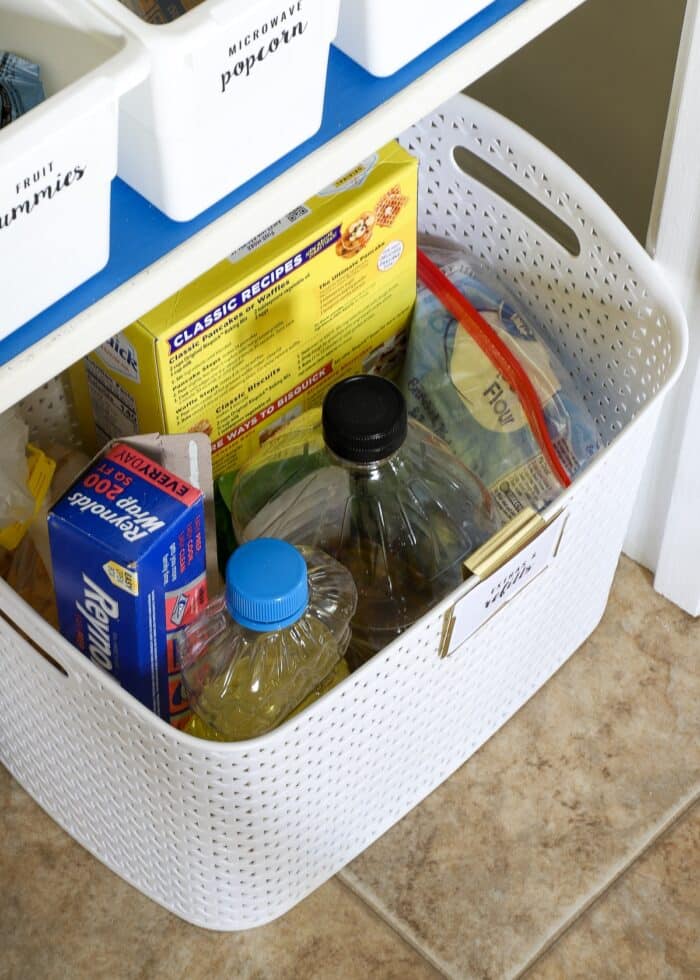
Make a Refill Basket
Whether you decant everything or nothing, there’s a very, very good chance you will end up with extras of something.
For example, if you have more flour than your container holds or you bought a two-pack of tin foil and your organizer only holds one, you’ll need a place to put these extras so that 1) you don’t forget about them, and 2) they are easy to grab when it’s time to eventually re-stock.
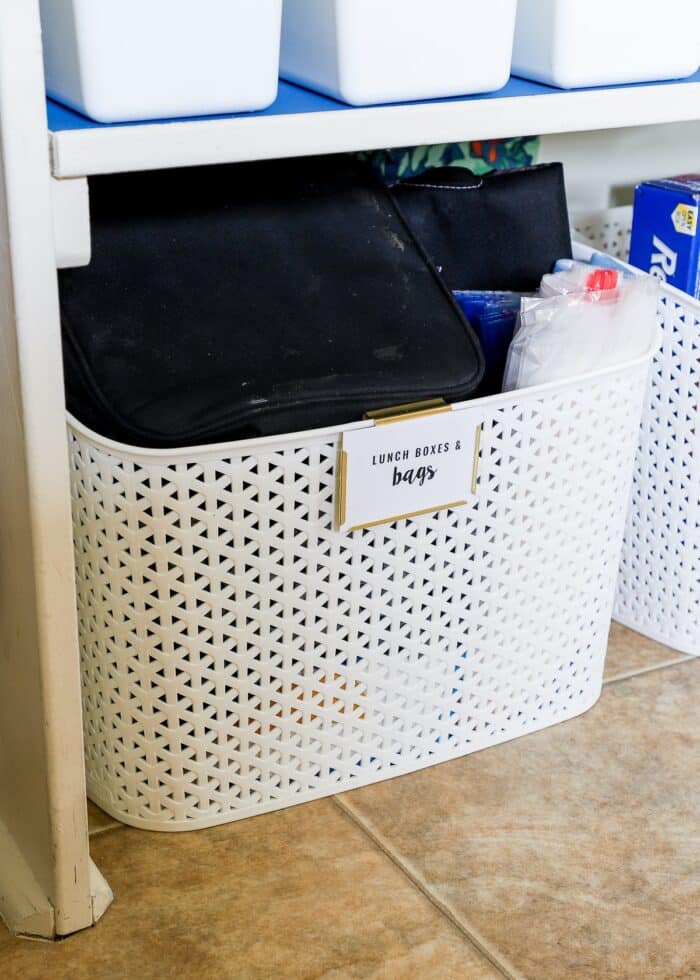
One of my larger floor baskets is a “refill” basket to hold random items that are typically decanted but we don’t have room for. As our contained stash diminishes, we reach in here to fill back up.
If you’ve struggled with “overflow” in your kitchen, this basket can be a serious game changer!
Keep Kids In Mind
If you have kids in your household, you will want to keep them in mind as you organize a pantry. But depending on you and your children, the specific solutions you use may vary!
My absolute favorite way (when we have the shelf space) is to keep kid-friendly snacks in open storage bins that are right at their level and within easy reach. Book bins happen to be just the right size for most snacks, and are really easy to load up when you’re unpacking groceries (we have our kids unbox all their snacks!)
That said, you might not prefer for your kids to have such easy access, so instead place similar bins on higher shelves or keep locks on your pantry doors.
Unify Mis-Matched Containers with Color
When shopping for bins or containers as you organize a pantry, the highest priority should be how they fit in your pantry and hold the items you need them to. But you may quickly find that this limits your selection, especially if you are trying to match a particular brand, style, or color.
It’s no coincidence that most pantry containers fall into a fairly narrow color scheme: clear, white, chrome/silver, and/or black.
By sticking to these neutrals, you will end up with a pantry display that looks coordinated, even if everything you use is a different brand!
A Pantry Is More Than Just Shelves
Although we often hyper-focus on outfitting our pantry shelving with shelf risers, lazy susans, and more, don’t forget about other surfaces in the pantry, particularly walls and the backs of pantry doors.
Over the door racks and organizers can be used for a wide range of items including canned goods, spices, and snacks.
And when I determined our side nook wasn’t needed for tall items, I used a variety of wall-mounted solutions to hold our Ziplock bags, a stepping stool, and charcuterie board instead!
Shop Our Pantry
Below is everything we’re using to organize our pantry and keep it in tip-top shape!
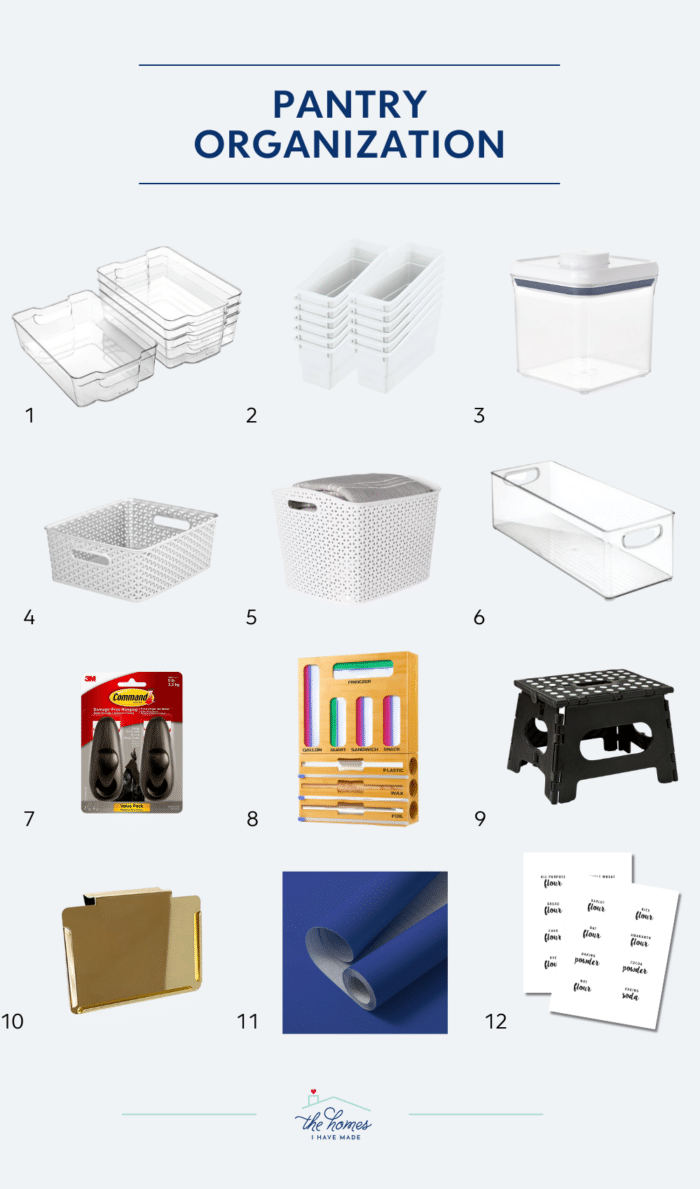
1 – Large Pantry Bins | 2 – White Book Bins | 3 – Oxo Food Storage Containers | 4 – Y-Weave Basket – Medium | 5 – Y-Weave Basket, Extra Large | 6 – Long Pantry Bins | 7 – Command Hooks | 8 – Ziplock Organizer | 9 – Collaspable Stool | 10 – Gold Bin Clips | 11 – Solid Wallpaper | 12 – Printable Pantry Labels
Other Great Kitchen Storage Solutions
Ready to organize the rest of your kitchen? I’ve got you covered with more easy solutions!
- How to Make Pantry Labels
- How to Organize a Pantry
- How to Organize Baking Pans
- How to Organize Kitchen Drawers
- How to Organize Corner Kitchen Cabinets
- How to Organize Upper Kitchen Cabinets
- How to Organize Cabinets Under the Kitchen Sink
- How to Organize Small Appliances Inside Kitchen Cabinets
- How to Organize Spices
- How to Organize Coffee Mugs
- How to Organize K-Cups
- How to Organize Recipes
- How to Organize Ziplock Bags
- What to Do with Dirty Dish Towels
Although I, quite literally, have to start from square one with pantry organization every time we move, I can say for sure that once I do it, I don’t have to do it again.
That’s because the process I outline here focuses less on picture-perfect displays and more on working with the space you have, the foods you buy, and the habits you’ve already created to come up with your very own version of a “perfect pantry.”
Do I love the look of perfectly-spaced, rainbow-sorted, clear containers holding a picturesque amount of healthy foods? Sure! But those pretty displays can’t come at the expense of time, budget, and practicality.
If you’re ready to have a kitchen pantry that looks good AND functions right too, it’s time to empty it out and find the best solutions for your real life!
Megan

3 Comments on “How to Organize a Pantry | Real Life Solutions That Look Good Too”
I’ve bought a few Bino bins and they stack if reversed front to back. I really had to redo our pantry when we redid how we eat. Gluten and soy intolerance eliminated probably 90% of processed foods so I ended up with a far more extensive baking shelf. Then I was diagnosed as pre diabetic and rather than take drugs, I opted for a cleaner diet. Out went anything with sugar, starting with actual sugar, and almost all baked goods, salad dressings, and especially snacks. Regulating blood sugar meant no in between snacks other than fresh fruit. It was a real eye opener seeing how much space was taken by that stuff. I realize this was probably impossible with three boys who are always hungry all the time.
I put all my baking flours in Oxo canisters, and my pantry is narrow but deep so I used the shorter square ones. I love being able to see what’s in most of them. Obviously cassava and tapioca flours are indistinguishable but rice and brown rice fusilli and easy to identify.
My next challenge will be a new RV pantry. Very tall, 6 shelves, upper cabinet depth and door opening 2 inches narrower than inside. Meaning put in baskets and see what fits first. Clear will be really helpful and it’s lighted.
And one other note, did not buy the moving printables yet, so will get the newest edition. Planning to have UPS store print it. No point in color coded stuff if all I have is a B&W printer!
Our current set up has most things stored in 6 or 12 qt sterilite bins, as our landlord recommended it due to mice.
(And sure enough, when I double bagged instead of binned bird seed, the mice showed up.)
This is a WONDER-FULL post–it has so many great ideas. Thank you!