How to Organize the Cabinet Under the Kitchen Sink | A Foolproof Process
Add this latest organization endeavor to the list of “I Wish I Had Done It Sooner” Projects! Truth be told, I open the cabinet under the kitchen sink at least once a day. And every single time, I’d think “I’ve got to do something in here.” With 7ish months left of living in this house, I decided it was now or never; so I set out to declutter and organize this cabinet with some smart, easy, and affordable solutions. And wouldn’t you know it: this project was quicker than I expected and is already making our lives so much easier! (Leaving me to yet again ask: Why was I dreading this so much?!?) Today, I’m sharing my favorite under kitchen sink organization ideas so you can make this tricky cabinet work better for your household too!

What is it about the cabinet under the kitchen sink that makes it a black hole of cleaning supplies, trash bags, and more?
Although spray bottles, rags, and other supplies aren’t the easiest to organize, it’s mostly the presence of the bulky garage disposal that makes this spot so tricky. Usual baskets, trays, and other common organizers just don’t fit quite right, which leaves items to precariously pile up, topple over, and get buried over time.
Whether you interact with the under-sink cabinet on a daily basis or not, having it tidy, organized (and perhaps even pretty!) can be a real game changer in how you work in and feel about your kitchen. This really isn’t a spot you need to be afraid, but the right solutions do make all the difference. Let me break down the really easy and effective process I used in our own cabinet for better under kitchen sink organization!
Before & After
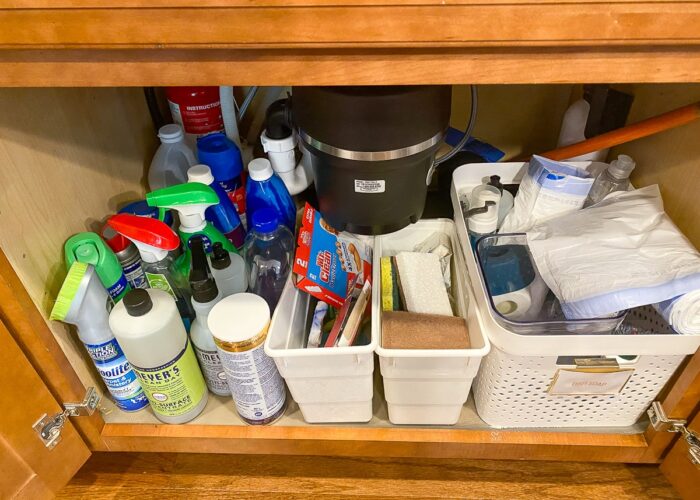
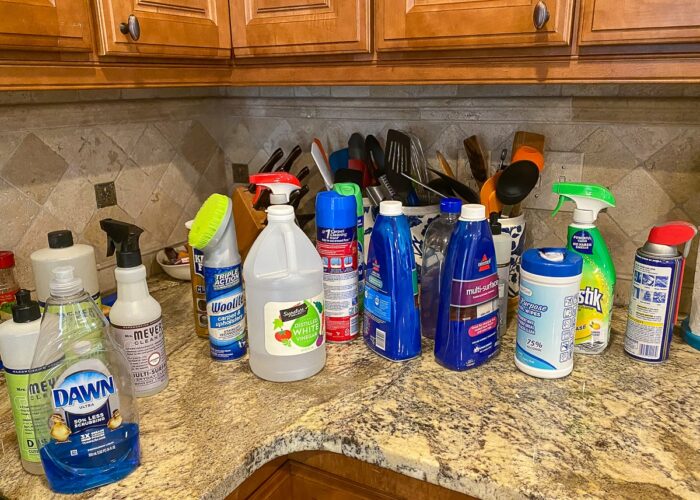
Below is how our under-sink cabinet has looked for much of the last 2 years. As you can see, I attempted to organize it a bit when we first moved in, using some bins I had on hand.
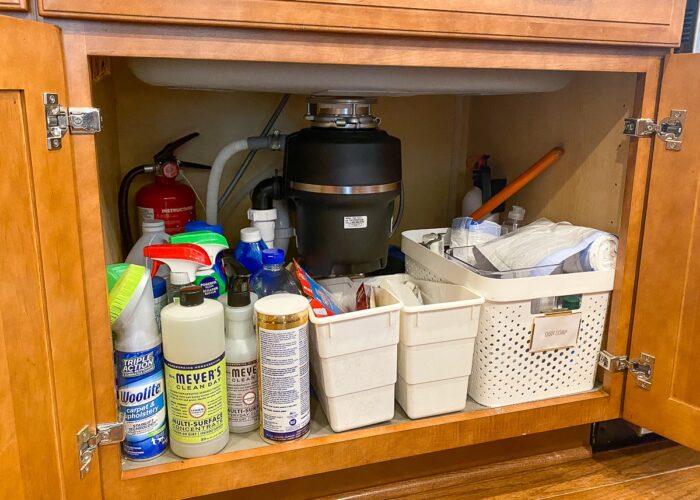
But the baskets didn’t fit the awkward space nor did they hold things quite right. This left us with a cramped, disorderly, and down-right messy situation.
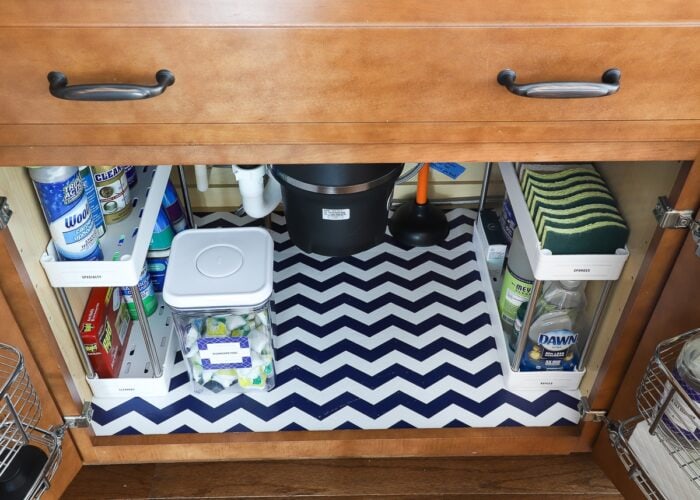
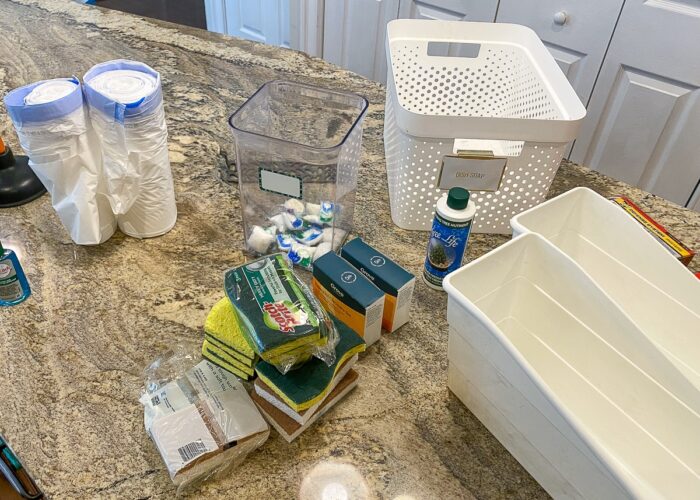
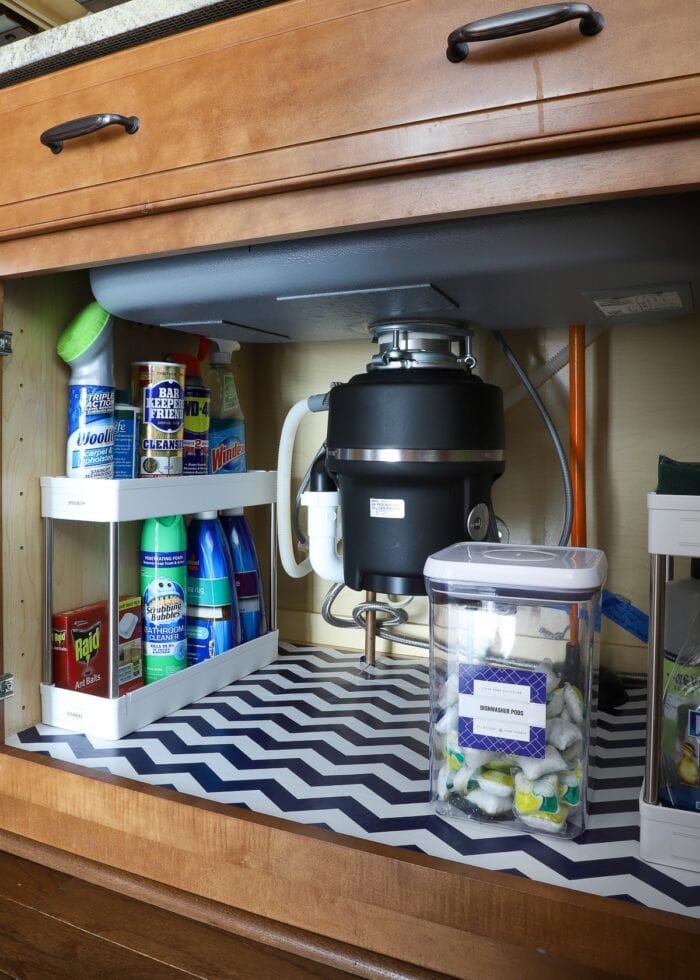
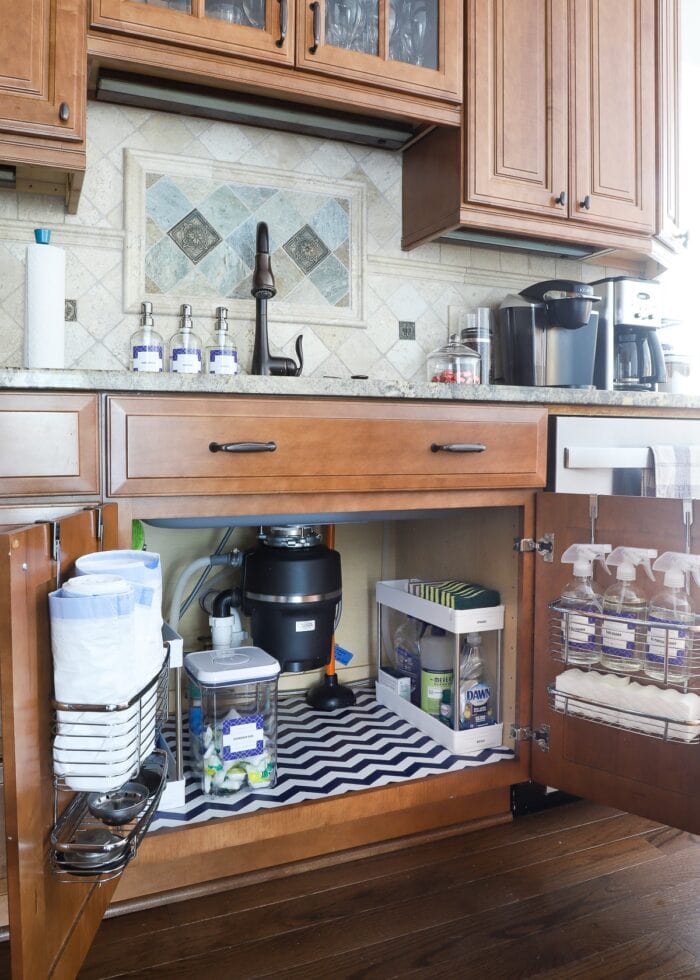
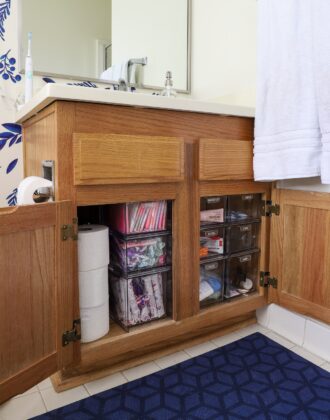
After cleaning out, measuring (and measuring some more!), searching for better-fitting organizers, and then labeling, we now have a MUCH tidier cabinet, wouldn’t you say?!?

Not only does everything look so much better, but we can easily find and access everything we have. Would you believe that these Before and After pictures actually include most of the same items?!? I only got rid of a few things…that’s the power of the right solutions in play!
Let me break it down everything I did in this cabinet!
Video Tour
If you’d like to see this cabinet go from “uh” to “uh-mazing,” watch the short video tour below! (Not loading for you? Watch it HERE.)
Step 1: Empty Out the Cabinet
Do you know what all is under your kitchen sink? No judging…I didn’t either. But like every other organization project we conquer here on the blog, the very first thing you MUST do is empty everything out.

When items get buried in such a deep, dark cabinet, they are hard to see, get out, AND use. As such, it becomes easy to buy duplicates, forget about items you meant to use, or stop using them all together because they aren’t worth the hassle.
So that you can see exactly what you have (and therefor determine the best way to store it all), take everything out of the cabinet, including any shelf liners, organizers, shelves, etc. Only with a completely blank slate will you be able to identify the very best solutions for your particular cabinet.
TIP! While the cabinet is empty, vacuum out the dust and crumbs and give it a good wipe down!
Step 2: Take Stock of What You Have
With everything pulled out, this is the best time to look at what you have and identify duplicates, almost-empty containers, things you no longer need, and even items you completely forgot about. In cleaning out our cabinet, I discovered we had not 1, not 2, but 4 bottles of dish detergent, as well as some random supplies we rarely use.
While there may be certain items you want to keep “just in case,” I’m here to tell you that it’s okay to get rid of or donate cleaning supplies. Whether it doesn’t work, you don’t like the smell, or you no longer have a need for it…get it out of your cabinet. This spot is just too small to keep things you won’t ever use.
TIP! We don’t keep a ton of cleaning supplies on hand; but if you have a lot of items, you might want to identify what needs to stay in the kitchen versus what can be stored elsewhere. I usually advocate keeping all like things together within the home; but since this particular cabinet can be small, splitting up your cleaning supplies may be worth considering.
Tip #3: Measure…Everything
As I mentioned earlier in this post, the thing that is so tricky about under kitchen sink organization is fitting everything into the cramped space leftover by the sink, pipes, and garbage disposal. So in order to identify the very best bins, baskets, shelves, or caddies for your particular cabinet, you must have a very good sense of how big everthing is. And I mean everything.
Want to save this post?
Certainly start by measuring the width, height, and depth of the cabinet. But also measure the spaces to the right and left of the garbage disposal, as well as underneath and in front of it.
But don’t stop there. Also measure your cleaning supplies (or whatever else you need to store in this space). Knowing exactly how tall and wide your items are will directly impact what kind of storage solutions will work for you and your cabinet.
Tip #4: Pick the Right Storage
Now that you know exactly what you need to store in this cabinet AND how big it all is, it’s time to find the absolute best storage solutions. I will be honest and say this will likely be the longest, most tedious step of this entire organization project. Although plenty of “under sink organizers” exist, it can be a real exercise in perseverance to find just the right shelves, bins, and drawers that will BOTH hold what you need AND fit in the space you have.
No matter how big of a cabinet you have or how much you need to put in it, here are two tried-and-true solutions to consider:
Go Vertical

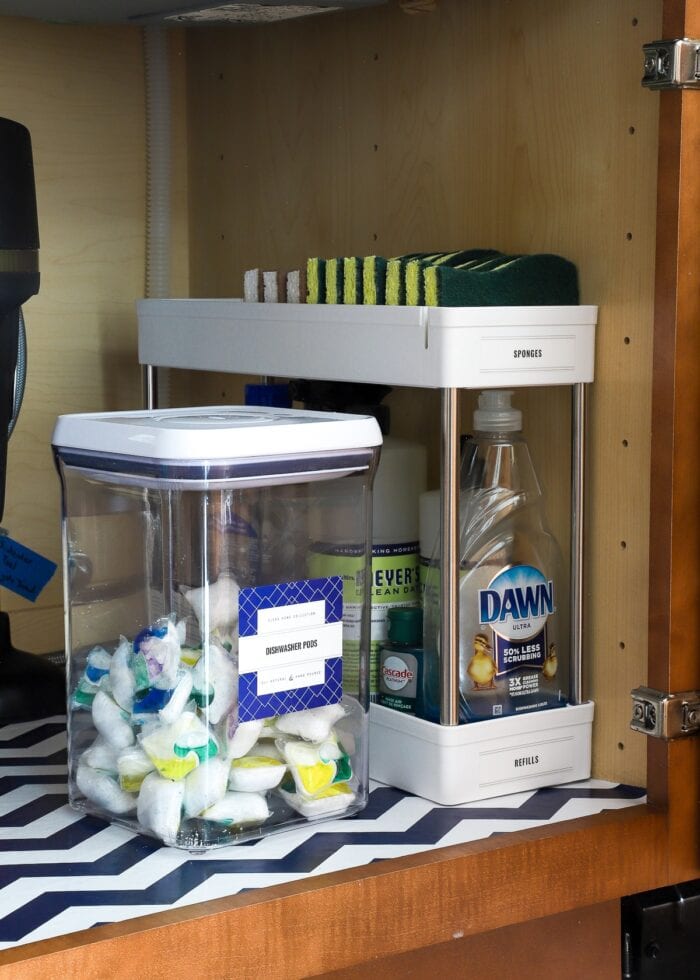
One of the best ways to store a lot of items and keep them all accessible is to go vertical. Bottles lined up front-to-back in cabinet not only leads to buried items you can’t see or reach, but it also wastes a lot of space between the tops of the bottles and the top of the cabinet. Vertical organizers (such as shelves, stacking drawers, and small carts) can use up this space well, but there are two important things to keep in mind:
- (Obviously) make sure whatever system you are using fits comfortably within the space you have. This is where measuring the cabinet and all available space will come in handy.
- (More importantly), make sure the shelf/drawer heights accommodate your specific items, both above and below the shelf. There’s no point in adding a shelf or drawer if your particular items don’t fit in it, under it, above it, etc.

I spent an inordinate amount of time analyzing various organizers in relation to both my cabinet AND my specific cleaning supplies. I worked hard to find shelves that fit my supplies on the lower level AND still left ample space on the top for additional items. All this time was well worth it though, because it’s these shelves that ultimately allow me to store the exact same amount of supplies as before in half the amount of space (and everything is super easy to see, reach, and use!)
Use the Cabinet Doors

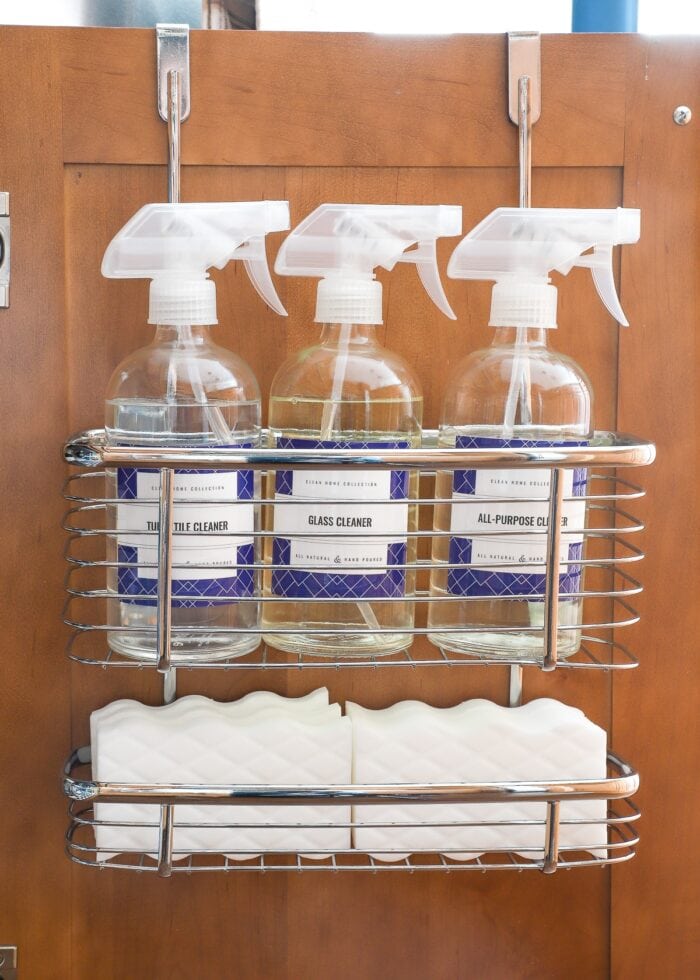
The backs of cabinet doors are often overlooked, but there are now lots of products available to help you take advantage of this space (some of my favorite finds are linked below). However, this too can be easier said than done. Here are three important things to consider when using the back of cabinet doors for extra storage:
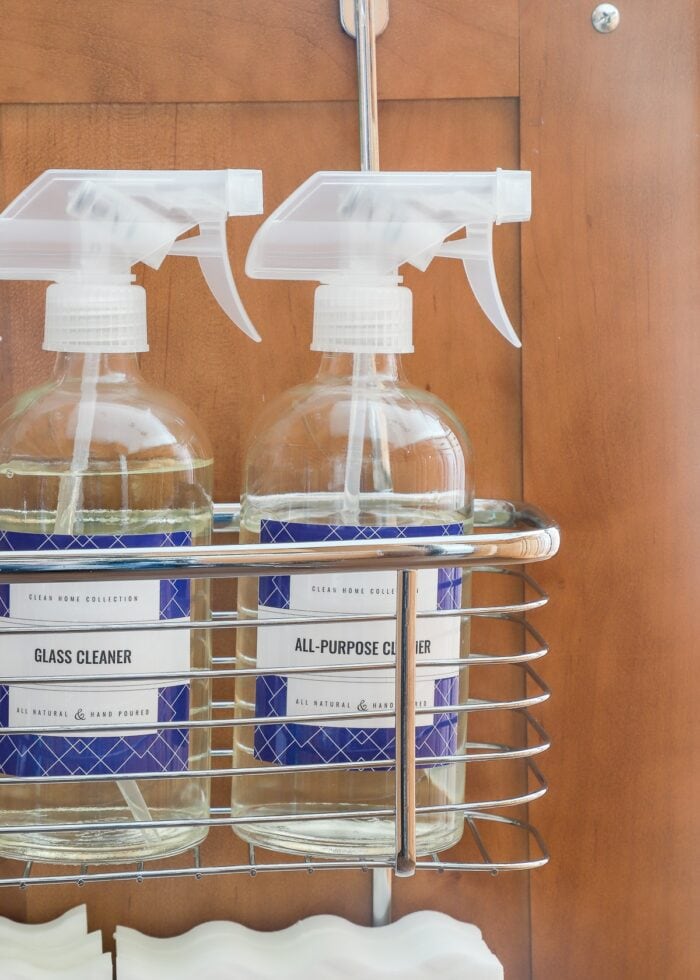
- Examine the height of the basket in relation to how it hangs on the door. I found that many over-the-door organizers weren’t deep enough for the items I wanted to store, with the baskets sitting too high on the door. If I placed our bottles or trash bags in them, I wouldn’t have been able to close the doors. If you want to store bottles on the door, you need baskets that hang lower like these and these.
- Consider the size of items you want to store on the door. Some over-the-door organizers have one basket, while others have two. And these different layouts determine what will fit where. Admittedly, I really wanted two baskets on each organizer to store both spray bottles and sponges. But then I realized the sponges fit better in one of my vertical caddies, leaving me without other small things to take up that space. Had I realized I’d only need to store bottles on the door, I would have picked organizers with bigger (single) baskets instead.
- Consider the loss of cabinet depth. If you are planning on using over-the-door organizers in conjunction with some sort of drawer or shelf system within the cabinet, make sure you account for the loss of cabinet depth when the door is closed. With these organizers, I loose about 5″ of depth, so I had to look for shelves that didn’t require the full cabinet depth in order to fit.
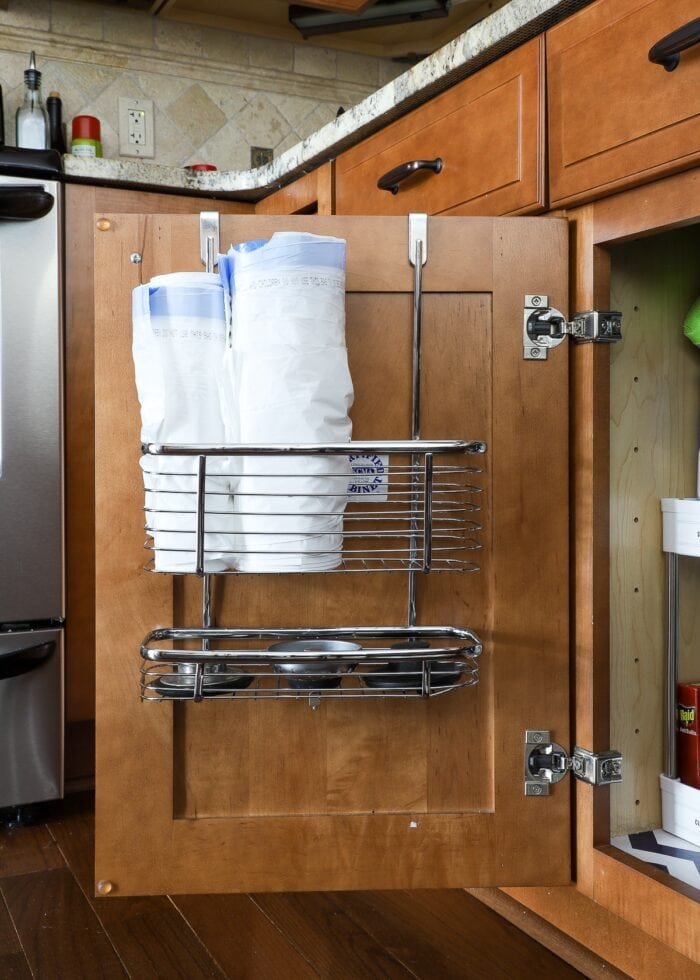
TIP! We are LOVING having our All-Purpose Spray right inside the cabinet door. It makes it SO easy to grab and use whenever spills or messes break out, like when packing lunches, bagging up or cutting raw chicken, and each night after dishes are done.
Tip #5: Make It Pretty
Finally, in my mind, no organization project is done without a few decorative touches! While labels certainly help you (and other family members) find things and (more importantly) put them away, it’s these “fun details” that help you love a space even more, which makes you more inclined to keep it nice and tidy!
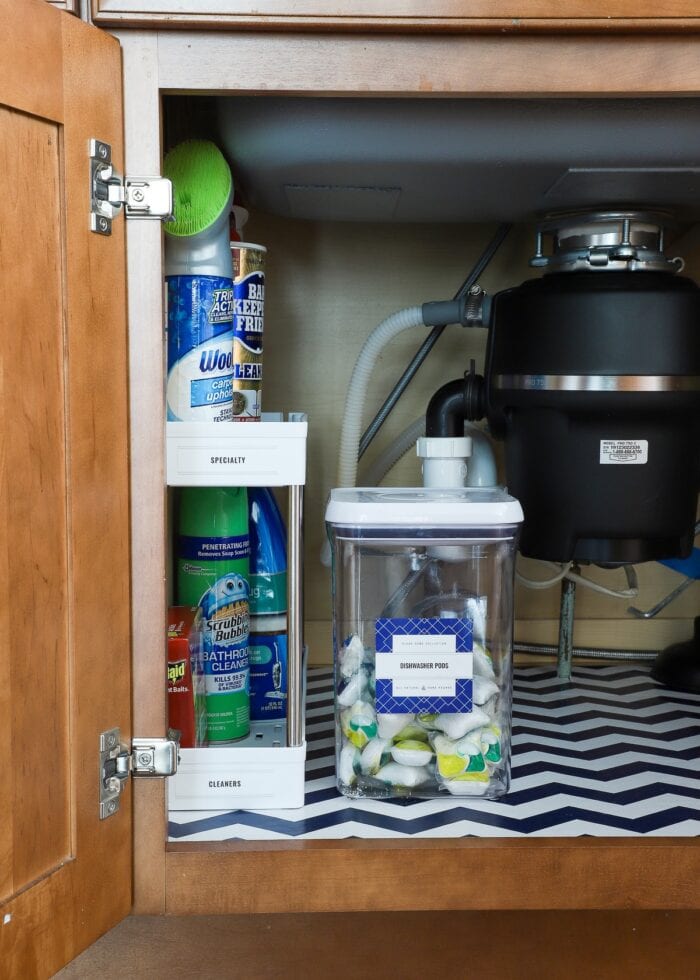
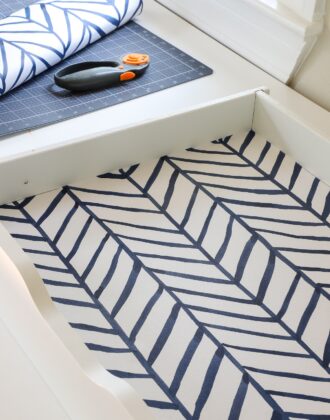
I added some navy-and-white contact paper shelf liner that I had on hand, as well as some of my own Printable Cleaning Labels in a matching navy color. I also specifically looked for organizers that used the same finishes (white, silver) so everything looked effortlessly coordinated (which also helps reduce visual overwhelm). All together, the whole display is fresh, clean, and pretty…which makes me much more excited to open this cabinet and use the items inside!
Learn how: The Best Way to Line Drawers & Shelves with Pretty Paper
My Favorite Under Kitchen Sink Organization Products
Here are the products I used in our under kitchen sink organization makeover, as well as a few other favorite finds that might work in your home!
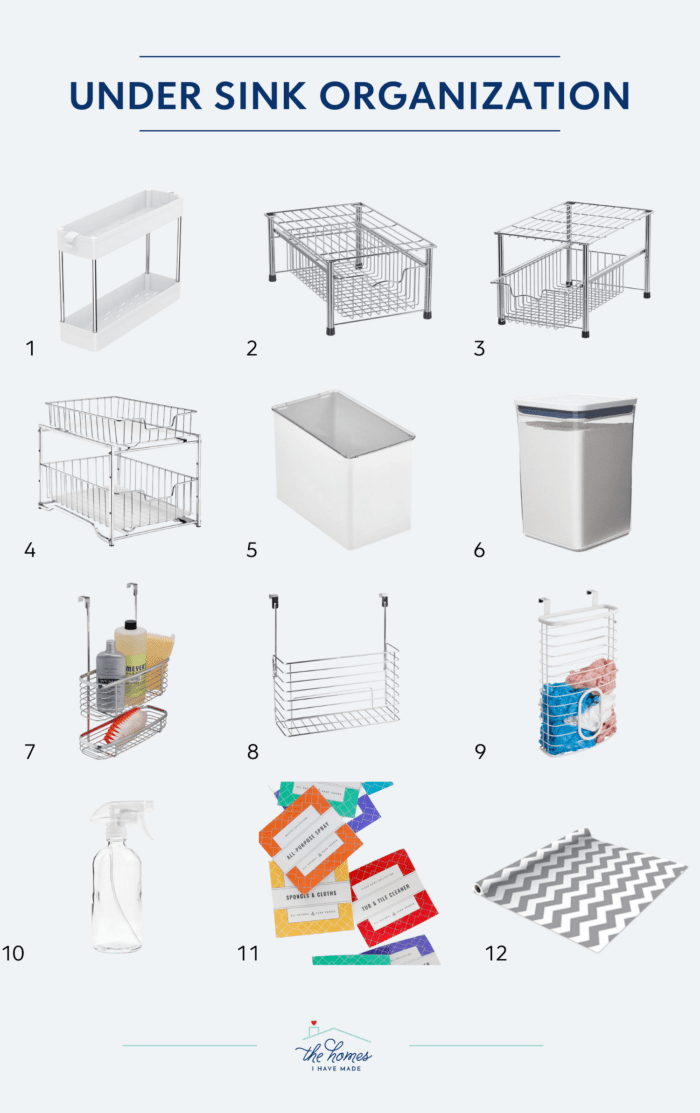
1- 2-Tier White Shelf | 2 – Stackable Basket Drawer | 3 – Stackable Basket Drawer, Tall | 4 – 2-Tier Basket Drawer | 5 – mDesign Bin with Lid, White | 6 – Pop Container, Large | 7 – Over-the-cabinet 2-Tier Storage Basket | 8 – Over-the-cabinet Singular Bin | 9 – mDesign Trash Bag Holder| 10 – Glass Spray Bottles | 11 – Printable Cleaning Labels | 12 – Adhesive Shelve Liner
I can’t tell you how long I have put off this under kitchen sink organization project. It’s kind of embarrassing…in fact, I purposely put this blog post on the calendar to force me to take care of it. But now I feel so silly. Besides spending what felt like forever searching for the best-fitting organizers, this project was SO fast (it probably too me less than an hour to do it all). I actually can’t believe how much space we gained and how much easier everything is to grab and use. This specific cabinet really is a great example of how the right organizers really do make all the difference!
Other Great Kitchen Storage Solutions
Ready to organize the rest of your kitchen? I’ve got you covered with more easy solutions!
- How to Make Pantry Labels
- How to Organize a Pantry
- How to Organize Baking Pans
- How to Organize Kitchen Drawers
- How to Organize Corner Kitchen Cabinets
- How to Organize Upper Kitchen Cabinets
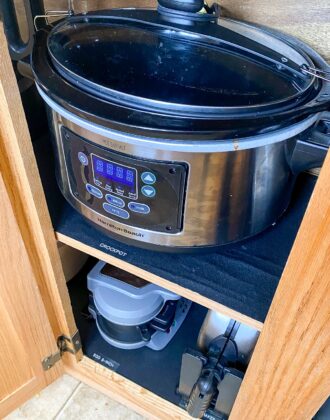
- How to Organize Cabinets Under the Kitchen Sink
- How to Organize Small Appliances Inside Kitchen Cabinets
- How to Organize Spices
- How to Organize Coffee Mugs
- How to Organize K-Cups
- How to Organize Recipes
- How to Organize Ziplock Bags
- What to Do with Dirty Dish Towels
Okay…now that I’ve broken down exactly how to do it…are you ready to tackle your under-the-kitchen sink cabinet? Don’t be scared…you can do it! I promise it will be worth it!
Megan
6 Comments on “How to Organize the Cabinet Under the Kitchen Sink | A Foolproof Process”
Great ideas again! My biggest problem organizing under the kitchen (& Bathroom) sink is my knees. I can’t get down to see or retrieve things under the sink so everything needs to be at the front. And those darn slanted shelves in the kitchen area that are … just odd. To high for things on top/to low for things under. And then things get shoved to the back… sigh. So now I have to get someone to retrieve them for me. Oh well another project to break up my Christmas sewing spree 🙂
I have the same problem. I decided to put lazy Susans in the front, with regular-use cleaning supplies, and keep the back for backstock. Since all the bottles, etc., are sealed, I can retrieve stuff with a reacher if bending down isn’t an option that day.
Kneeling/squatting is never an option.
Stupid arthritis.
Looks great! I’m currently organizing kitchen and bathroom cabinets, this is very helpful, thank you.
So inspiring! I am adopting your concept but with a few changes. First, I put any extra unopened things in my laundry room. And anything used in other rooms like bathroom cleaner or the like in caddies in the bathrooms.
I totally purged my stuff and ended up with only the things I use daily – dish liquid, dishwasher pods, an all purpose cleaner for inside microwave and under burners, a bottle of vinegar windex for my microwave door and glass stove front, plus a stack of bar mops and another of microfiber towels. Done! I was hesitant to hang metal on my new doors so I got a small Rubbermaid tray and command stripped it to the inside. We must store our wastebasket inside cabinet because there’s really no place near the sink and prep areas. I tried a tiny garbage bowl (Rachel Ray) but it was gross.
I just did my pans over the fridge. No more avalanche from unruly cookie racks. Those are the worst.
Hi there,
Do you still store used dish towels under the sink until laundry day?
Hi Stacey!
So in our CA kitchen, our laundry room was upstairs, which is when I used the basket underneath the sink.
These images are from our Virginia home, where the laundry room was literally on the other side of the kitchen. So we just threw them in there.
Now we’re back in a house where the laundry is upstairs. So yes, we are back to storing them under the kitchen sink again!
Always changing based on the layout of our house!
Hope that helps!
Megan