How to Organize Play Food
Our little boys received an IKEA play kitchen last Christmas. And while I was SO excited to stock up on play food, dishes, pots, pans, and more…I (and our playroom) was wholly unprepared for all the little things strewn about everywhere. I somewhat assumed everything would stay nice-and-tidy in the play kitchen (which it did not); so I then started throwing everything into a single catch-all basket (which was actually even worse). So in a recent mission to pair down and consolidate our toy footprint (more on this in coming weeks), I needed to figure out how to organize play food so that it was both easy to play with and easy to clean up. This was another fun quick organizing project that’s had great results so far. Let me show you what we did!
Our Play Food | Before & After
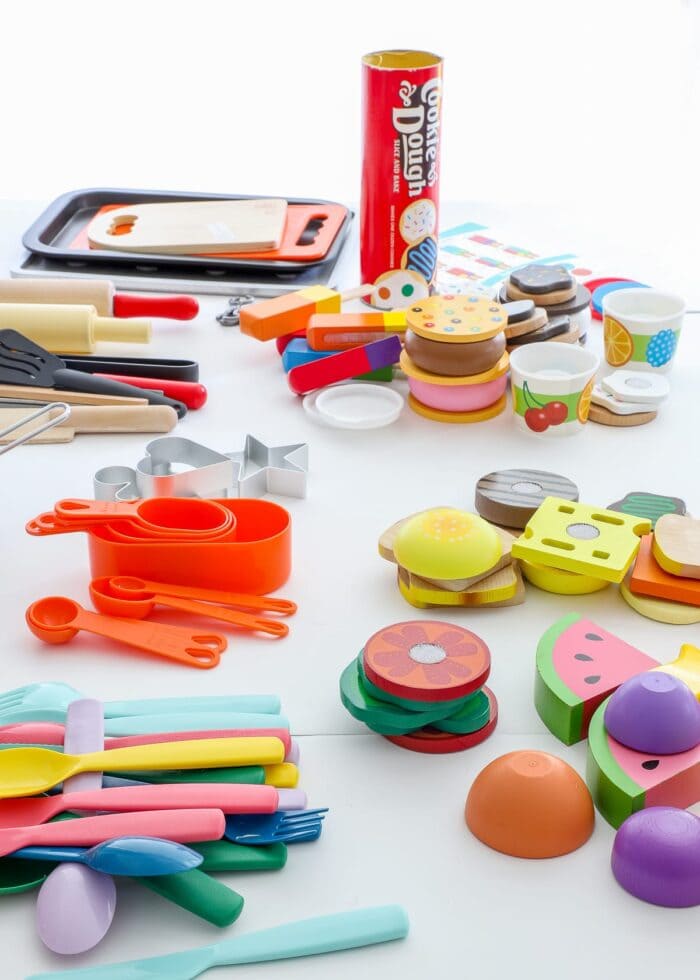
When we first stocked up on all the adorable play food, I happily sorted into its original containers at the end of every day. Well, that got old pretty fast. And after stepping on and/or loosing too many errant wooden fruits, vegetables, and cookies, I started throwing everything into a basket (that sits on a nearby shelf) and called it good.
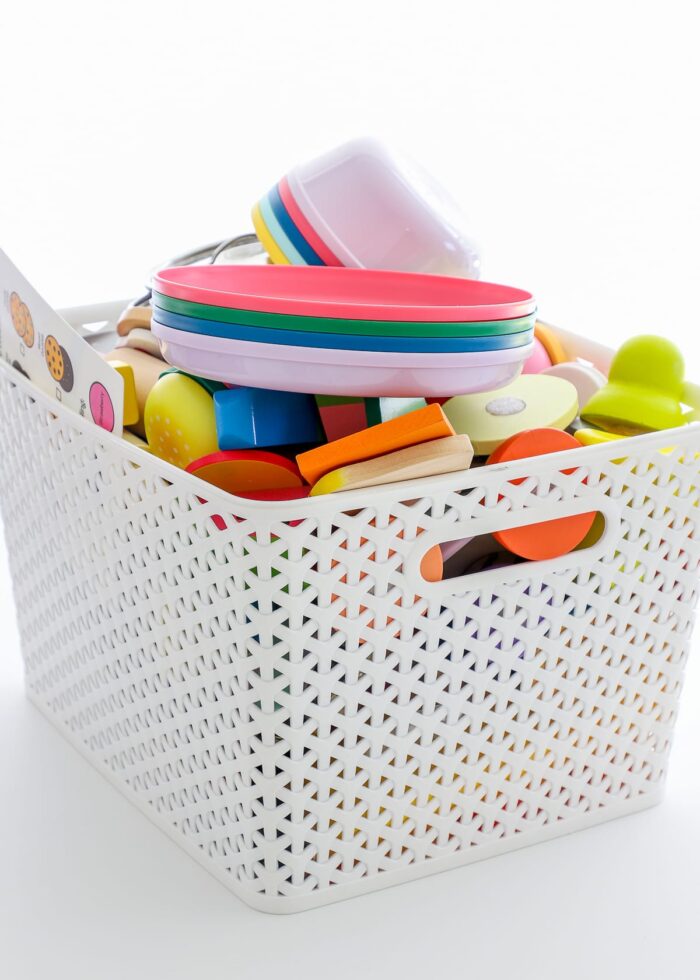
However, this catch-all solution meant that if the boys wanted to play with anything, the entire (unmanageable) basket just got dumped. All the while, every cabinet in the play kitchen sat completely empty.

It’s been a while since I’ve shown our playroom, but we are in the process of trying to consolidate all of our toys down into a single 16-cube Kallax unit. So in being very strategic about what fits where, it occurred to me that we were wasting precious storage space in the kitchen itself. And while I am grateful this specific play kitchen has cupboards and shelves, the sizes didn’t naturally accommodate many of the bins and baskets I already had on hand.
You guys know by now that when I’m organizing something, I don’t like to waste any space if I can help it. So I did a fair amount of measuring, researching, and shopping to find just the right storage containers for this play kitchen.
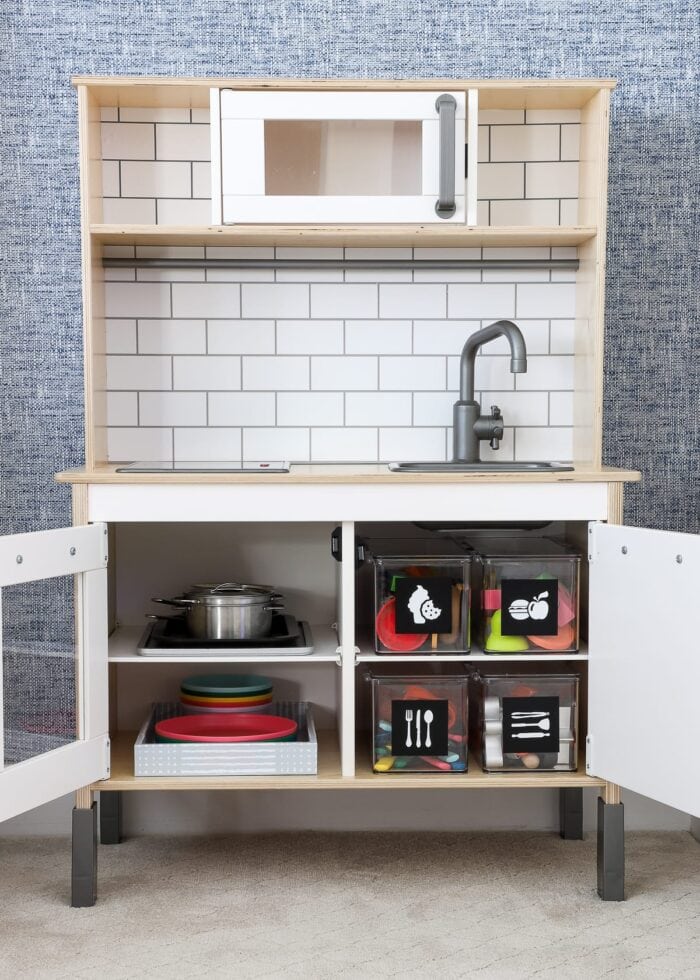
A combination of perfectly-fitting boxes, open trays, and understandable labels now help us take advantage of every inch, while still keeping everything easy to find, easy to play with, and easy to put away!
How to Organize Play Food
To organize the play food, I started as I do every single project: by dumping the basket out and sorting everything into general categories. I also took a few minutes to hunt around the playroom to make sure I had anything that was tucked into other baskets or lost under the couch. To start, my general categories were:
- Dishes (Plates & Bowls)
- Pots & Pans
- Eating Utensils
- Cooking Utensils & Baking Utensils
- Dessert Foods (Cookies & Popsicles/Ice Cream)
- Sandwich Foods
- Fruits
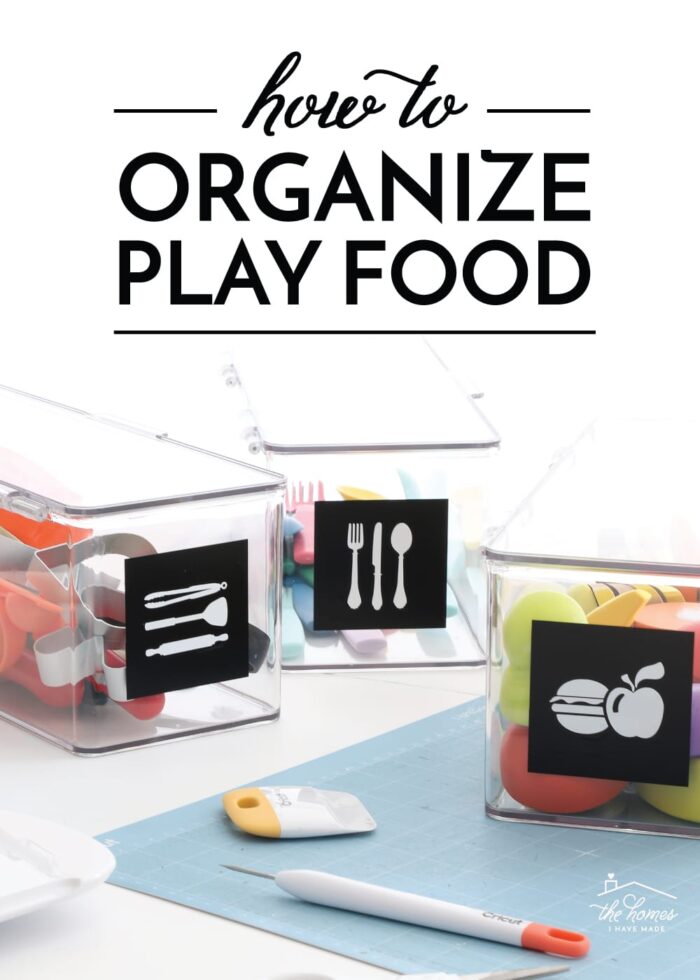
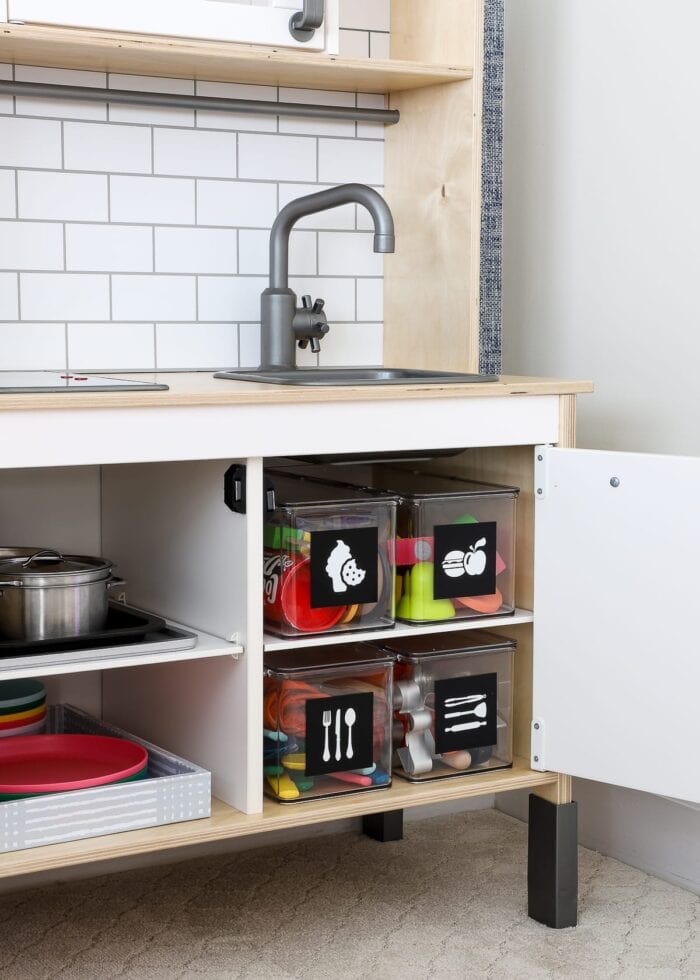
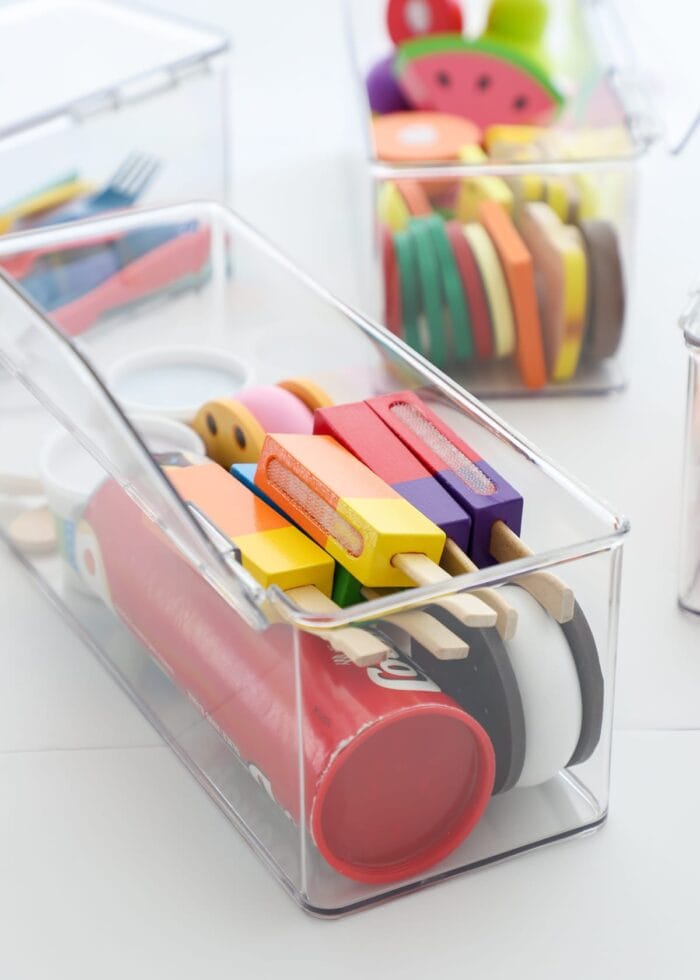
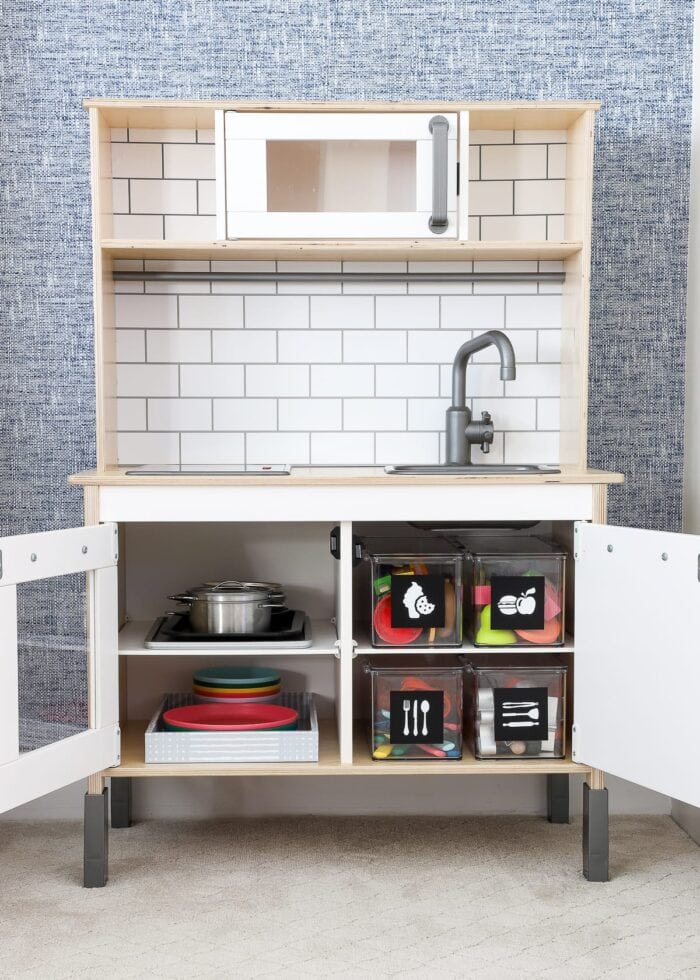
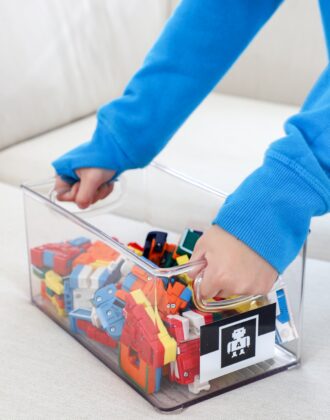
When I first started looking for containers that would fit inside the tiny IKEA play kitchen cabinets, I struggled to find ones that maximized space. But then I found these gorgeous clear lidded boxes. The dimensions were spot on for the cabinets, plus they were roomy enough to fully accommodate the sizes and quantities of play food. Although these boxes are pricier than I would have liked to spend on “toy boxes,” they are such a great size that I know we’ll be able to repurpose them down the road as needed.
Want to save this post?
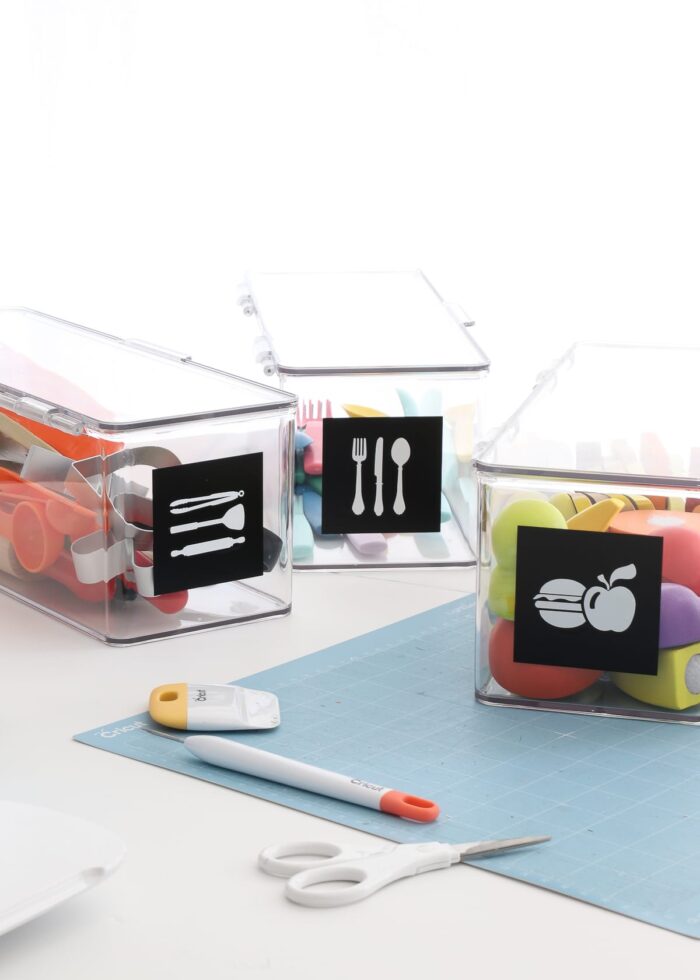
After loading in each food collection, I added some labels that match the rest of the playroom. These are just white pictures on black squares, all made from vinyl with my Cricut Joy. You can learn how I make my vinyl toy bin labels here or you can learn how to make printable toy bin labels here!
The fit of these lidded plastic boxes really couldn’t be any better. They take up almost every available inch; the boys can easily see what is where; and if they want to just play with certain things, we don’t have a mess of all the food all over the house floor.
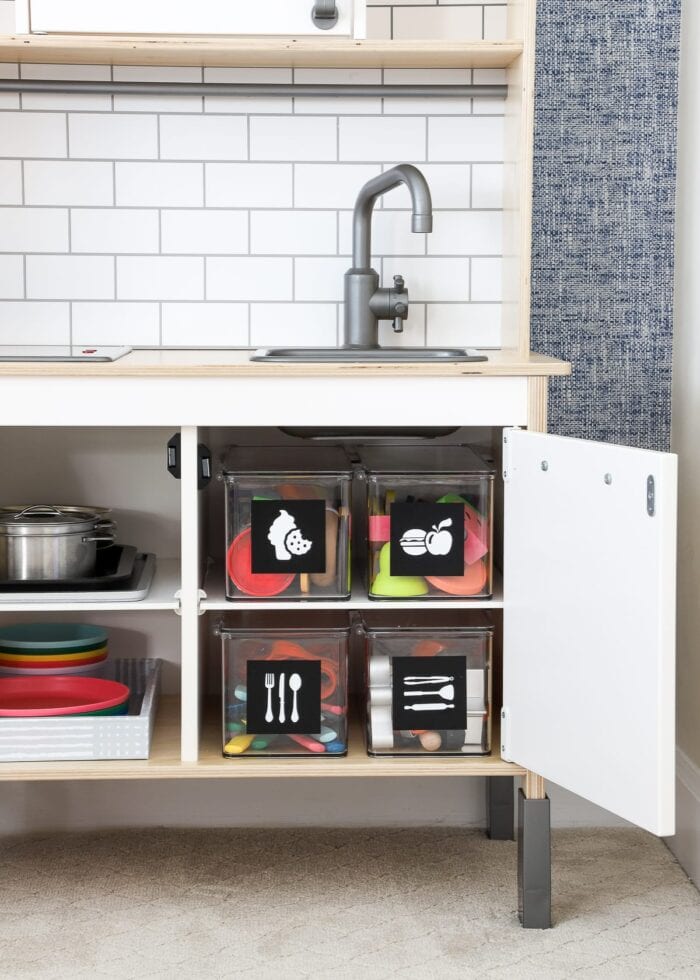
I should note that we only needed four boxes to hold our food and utensil collections. If you have more food sets and/or want to keep things better sorted, the IKEA kitchen can hold up to 8 of these boxes!
How to Contain Play Dishes and Pans
After getting the food and utensils all sorted out, I was still struggling with how to store the bulkier dishes, pots, and pans. Just through experimenting with items I had on hand, I discovered the wooden tray that came with some of the play food was a perfect fit for both the cabinet and the dishes!
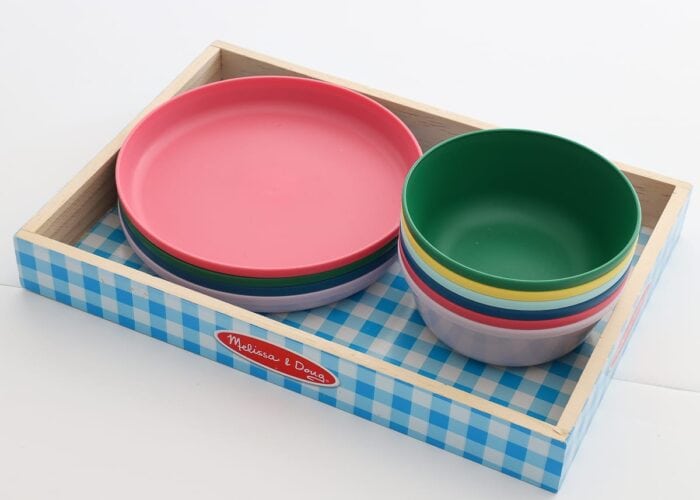
I can never leave well enough alone, so I wrapped the tray in some leftover peel-and-stick wallpaper and loaded it back up. By having a tray dedicated to specific items, we are more likely to actually put things back rather than just haphazardly throw them in!
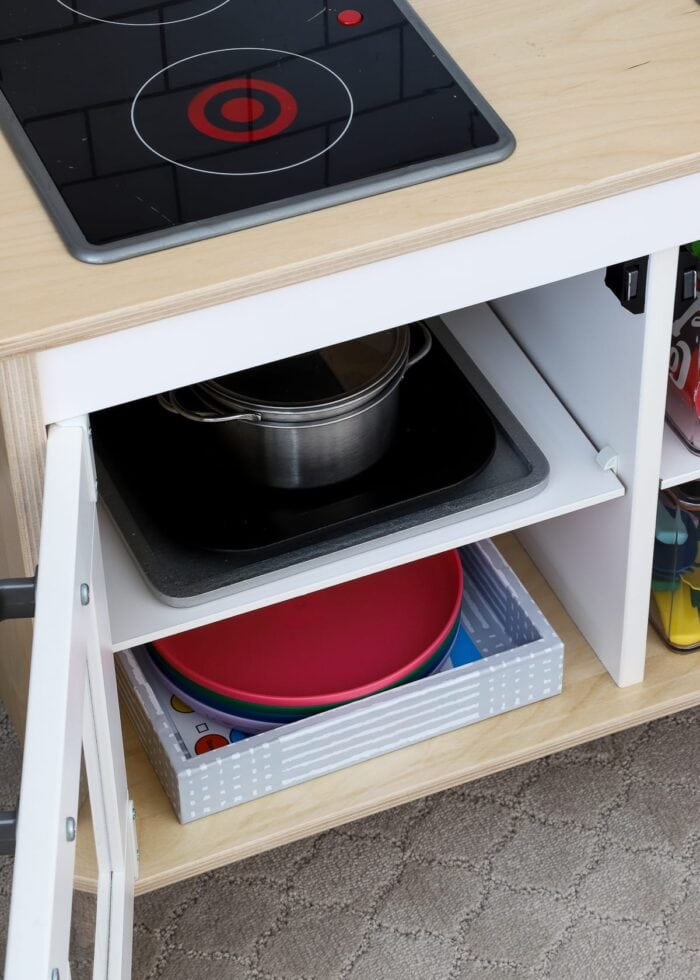
Finally, I used the play “cookie sheet” as a tray of sorts for the rest of the pots, pans, and cutting boards. It also fits perfectly on the shelf, but isn’t too hard to get in and out when it’s play time.
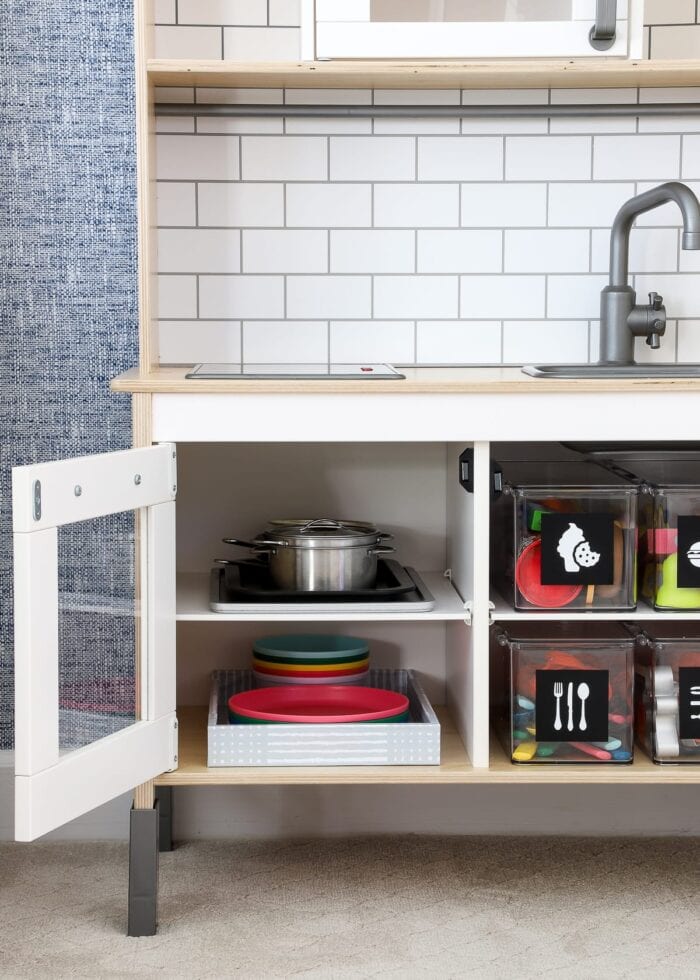
You’ll notice that I have nothing hung on the storage bar with hooks or in the upper cabinets. This is intentional. Our littlest one can’t yet reach the top shelves and would absolutely climb up to get whatever he needed. I’ve also tried…so many times…to put items on hooks to open up the cabinets below. Our little guy thinks it’s hysterical to yank everything all down, so I’ve given up on that (for now!). Having everything stored away in the cabinets underneath is the best solution for our kiddos at the moment!

Key Take Aways for Organizing Play Food
Not every play kitchen is the same, not every food collection is the same, and not every child plays the same way. So what I’ve done here might not work exactly right for your family. Regardless, here are some key take aways to consider when trying to figure out how to organize play food in your home!
- Consider how your kids play. Place items where they can reach, and use bins/trays/baskets they can carry themselves.
- Use the available storage space. Even though one cabinet is an “oven” doesn’t mean it has to remain so when not in use.
- Match your collection to the storage space you have. Things feel cluttered when you have too much stuff in a particular space. If you can’t fit everything where you need it, it’s likely time to pair down.
- Find the right containers for your specific kitchen. Well-fitting containers will allow you to store as much as possible in the footprint you have.
- Don’t overlook the bins play food comes in. Not all, but some play food sets come in really great containers. Many wood ones can easily be re-covered, painted, etc to match your kitchen.
- Avoid making items too hard to get out or put away. These lidded boxes don’t have latches (they literally just lift open) and are fairly light. They’ve been much easier for the boys to manage than the over-stuffed basket on a high shelf.
- Make easy-to-understand labels so everyone knows what goes where. Kids respond well to labels, and they sure work wonders at clean up time!
More Great Toy Storage Solutions
Looking for more great toy storage solutions? Here are just a few of our tried-and-true favorites:
- The Best Toy Storage Solutions for Every Item In the Playroom
- Sneaky Toy Storage Ideas for the Living Room
- How to Store Tiny Toys
- How to Store Wooden Kid Puzzles
- The BEST Way to Organize Board Games
- How to Organize Small Card Games
- How to Organize Play Food
- Device Charging Station in a Drawer
- DIY Dress Up Station for Kids
- How to Sort and Store Those LEGO Sets
- How to Store Kids’ Sports Equipment
- How to Setup a Kids Art Station
- How to Store Kinetic Sand

It took me over 6 months to get this play kitchen set up exactly right. Although it took some brainstorming and experimenting, I’m really excited to have it organized in a way that is playable but still cleans up easily. I hope some of these ideas work for you; and back here next week, I’m going to show exactly how I made the adorable “subway tile” backsplash (pssst – it’s even reversible!).
Megan

14 Comments on “How to Organize Play Food”
Train up a child in the way he should go….
I’d sorted the toys and books for my youngest and stored in an adjacent room from the rec room where it was played with…. she and her friends asked to play downstairs… and asked permission to get out some of the toys….
The three of them got out every.single.thing…. which would have been no problem… but they left to go on a sleepover… and every.single.thing…. was spread over the entire downstairs…..
Wouldn’t have been so bad but they were 9, 10 and 11! And the visitors were used to their mother cleaning up after them…..
Hey Linda!
I get it! My middle guy HATES to clean up, but I make him…every day…even though it’s SO painful to force him. At least the systems I have in place make it easy once he actually gets going!
What a natural fit — you are a genius at kitchen cabinets! So much fun to read.
p.s. I saw lidded boxes like this at HomeGoods last week, they’ve been hitting it out of the park on the clear acrylic containers lately. They even have the stackable clear drawers for under the sink (and saw more of them at Marshalls) so worth checking out!
Whaddya know, here they are but only 12.99/14.99 in the store: https://tjmaxx.tjx.com/store/jump/product/home-shop-by-category-office-storage-baskets-storage/Large-Multi-Use-Home-Organizer/1000689685?colorId=NS1020558&pos=1:22&N=3899969464
Hey Lauren!
You know what’s funny – TJMaxx/HomeGoods used to be a monthly trip for me. But since COVID, I don’t go at all. I completely forgot they have a website! I will definitely have to start checking them out – thanks for the great reminder!!!
Did you order the 5.75x`13.4×3 boxes for the food storage? Just want to make sure I’m ordering the right size. I don’t have the kitchen yet to measure!
Hi Kelsey!
I ordered the 5.5 X 13.3 X 5″ containers HERE. I’m glad you double-checked, it looks like the listing choices changed a bit from when I first posted.
Hope that helps!
Megan
Hi Megan! I can’t seem to find that size. Are you able to send a new link? I have been pulling my hair out looking for containers that fit this kitchen! Thank you! Christine
Hi Christine!
I get your frustration – they change the product listing ALL the time! I’ve updated it over and over and it still changes.
I *think* this is the set I used (even my Amazon Order history goes to the wrong product – ugh!).
Hope that helps!Megan
Love this! Can you share where you got your clip art for the labels?
Hi Carrie,
I made the labels using my Cricut, so they are just images from the Cricut Image Library!
Hope that helps!
Megan
Hi! I know this is an old post but hoping you can still help me out. I have the same IKEA kitchen and love the clear bins you have linked. When I view them on Amazon there are a ton of options and I want to be sure I get the ones you have that fit so well. Could you tell me the size of the ones you have? Are they the 13.3 x 5.5 x 5? Thank you!