The BEST Way to Store Board Games (Without Ditching the Boxes!)
Today, I’m breaking down one of my very favorite organization projects…possibly ever! I gave our disorganized, shameful mess of a game closet a good hard look and identified some storage solutions that are not only easy and inexpensive but totally effective too! If your board game collection is in need of some serious sorting, let me break down everything that’s working so well for us!
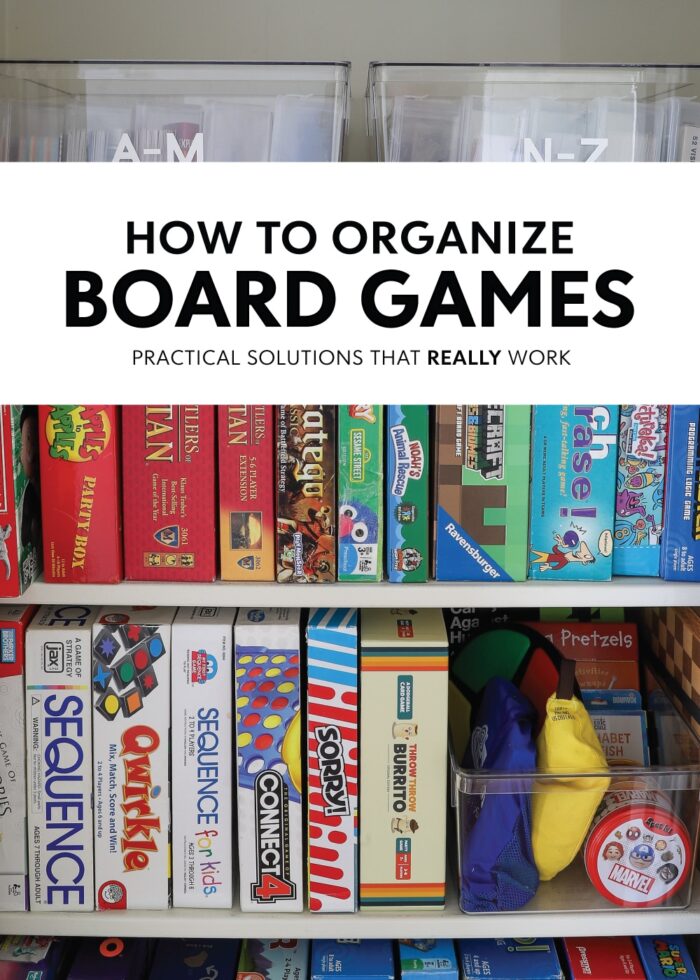
Our Board Game Storage Closet | Before & After
When we move into a new home, it takes me a while to thoroughly work my way through each and every room, shelf, drawer, and closet. And so with only months to spare before we move again, I finally made my way to one of my final spots: our horribly disorganized and quite-shameful game closet.
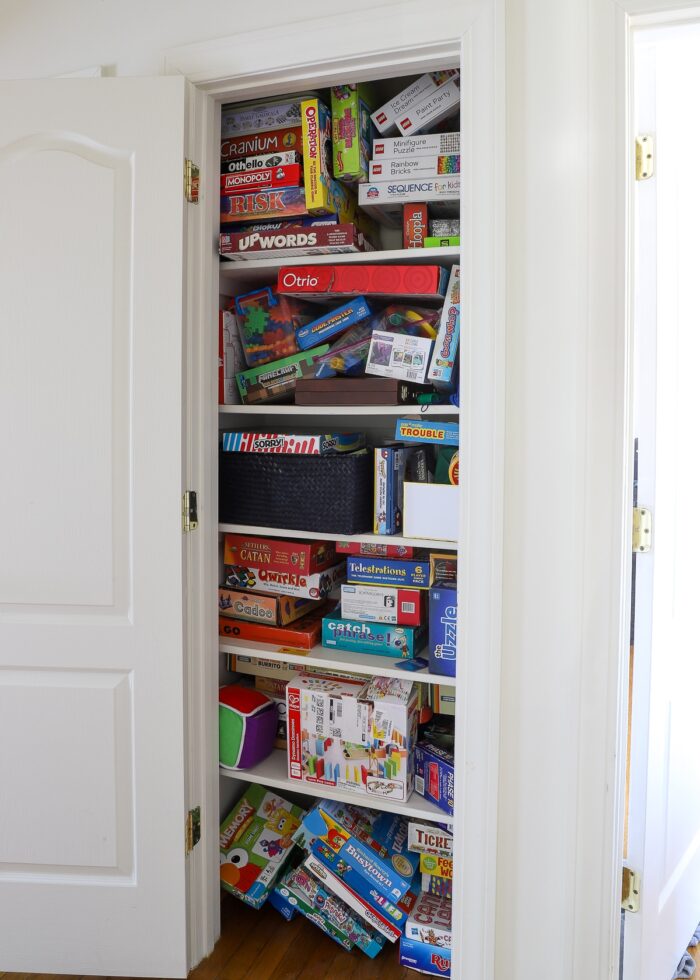
When we first moved in almost 2 years ago, our (extensive) board game collection was loaded into this tall, deep hallway closet. But since I never put any good systems in place, it quickly fell into total disarray (especially since our kids pull out games on an almost-daily basis.)
I really wanted to organize this game closet because it was becoming rather frustrating to deal with. But I also wanted to do so in a way that would translate to whatever home we find ourselves in next.
After considering lots of board game storage ideas and vetting many other bloggers’ choices, I landed on some unique solutions that not only work (and work well!) but are inexpensive and look good too.
Have a look!
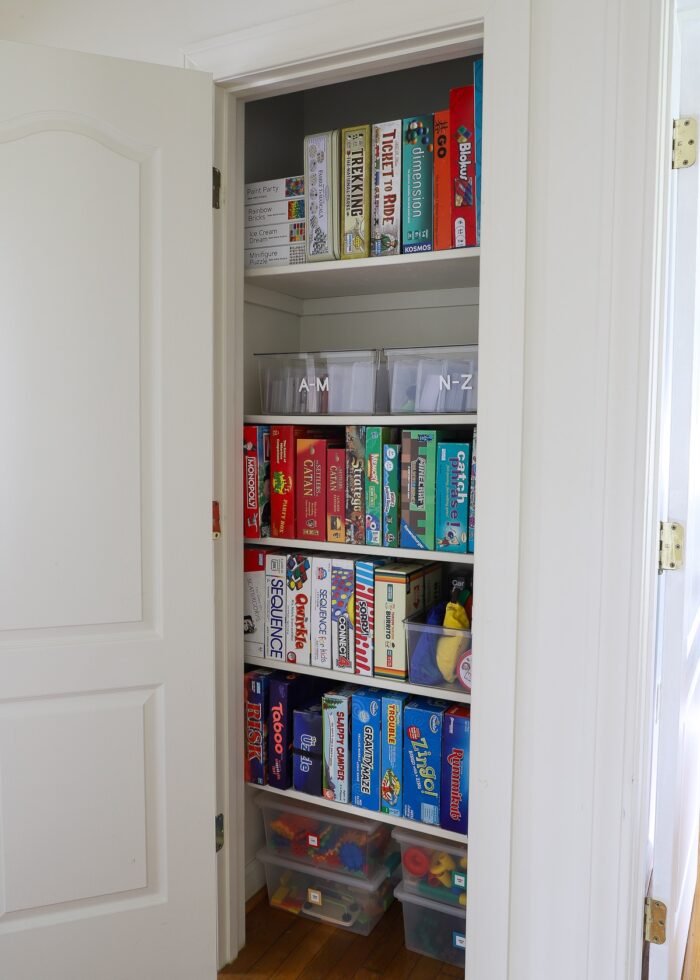
You’ll quickly notice that I landed on a hybrid of keeping original boxes AND re-loading some things into fresh storage bins.
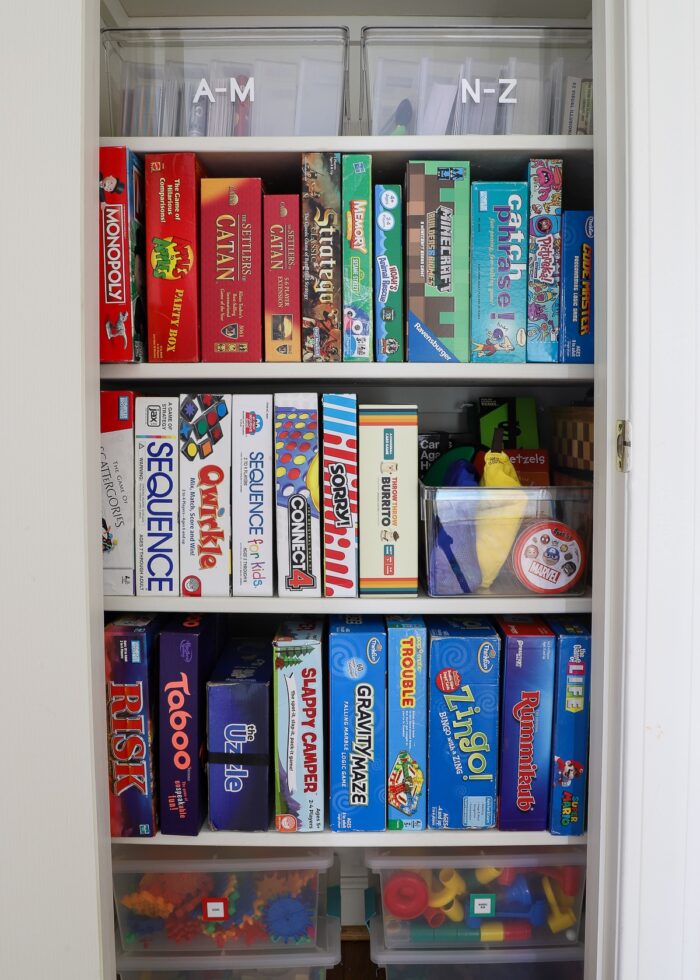
The result makes it easy to see what we have, get out what we want to play, and best of all…put it all back without too much effort!
Choosing NOT to Unbox Our Board Games
If you search for board game storage solutions, one of the biggest trends you will see is to un-box them from their original packaging (either into large zipper pouches or matching plastic cases). I certainly understand the allure. Not only do matching containers make any space look instantly tidy, but it solves two of the biggest problems with board games:
- All the various sizes and shapes make them hard to stack.
- They take up a lot of space thanks to their bulky boxes and packaging.
Considering I un-box practically everything I own, you might be surprised I didn’t jump head-first into this solution too. But I actually gave this project a lot of consideration (probably much more than it warranted), and I ultimately decided against unboxing for the following reasons:
- Like book covers, a game’s box is what catches your attention and makes you want to play it. Reducing everything down into clear/matching containers felt like it was taking something away from the game-selecting experience (especially for my young kids).
- When I unbox items, I like to do so into identical matching containers. But when it comes to games, you will be very hard pressed to find envelopes or cases that will fit every single game in your collection uniformly. From long boards like Monopoly and Life to bulky block games like Quirkle and Uzzle, there is no one box that will hold them all just right. And so if I couldn’t have everything matching, why bother at all?
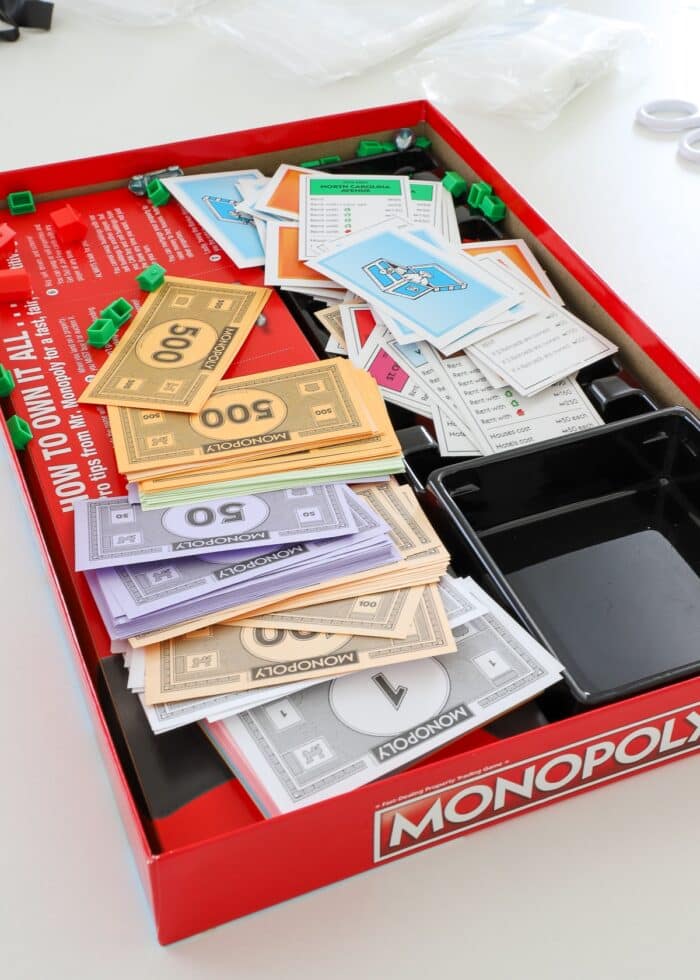
- Sometimes the internal packaging is really useful (e.g., Monopoly, Life). If using the included tray is part of playing the game, I didn’t want to get rid of it.
- I read a few “testimonials” from fellow bloggers who actually regretted getting rid of the boxes. Remember: once the boxes are gone, you can’t replace them without buying the full game again.
- Finally, the cost. I don’t mind investing in good, solid plastic containers when they are warranted. But in the case of our games (which are technically already loaded into the “ideal” boxes), purchasing containers quite simply felt wasteful and unnecessary.
What We Did Choose to Unbox
Now, all that said, we did choose to un-box two distinct “categories” of games. Here’s what and why…
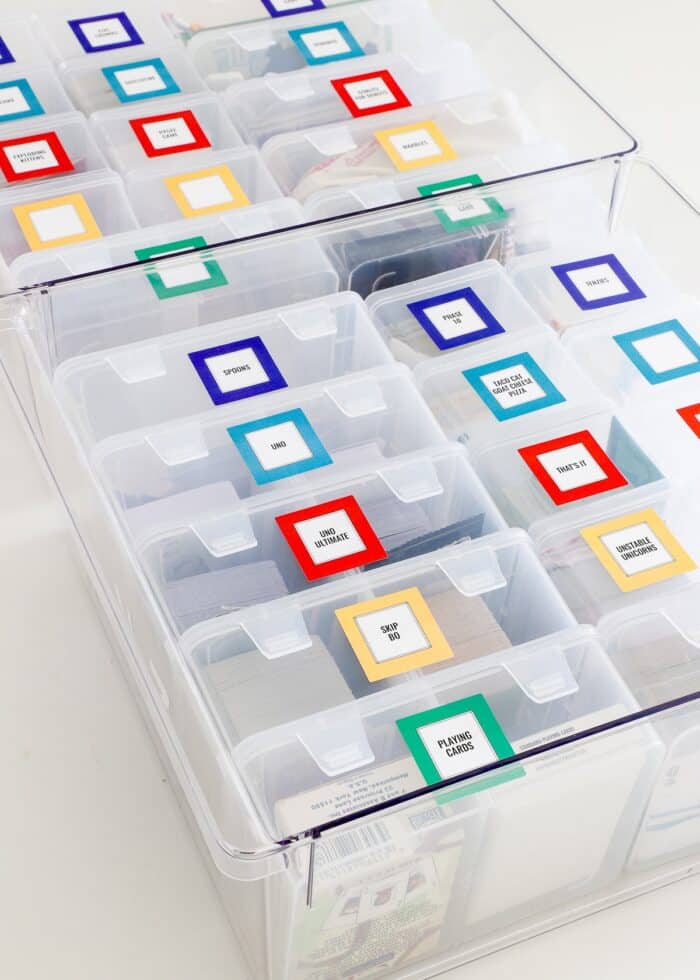
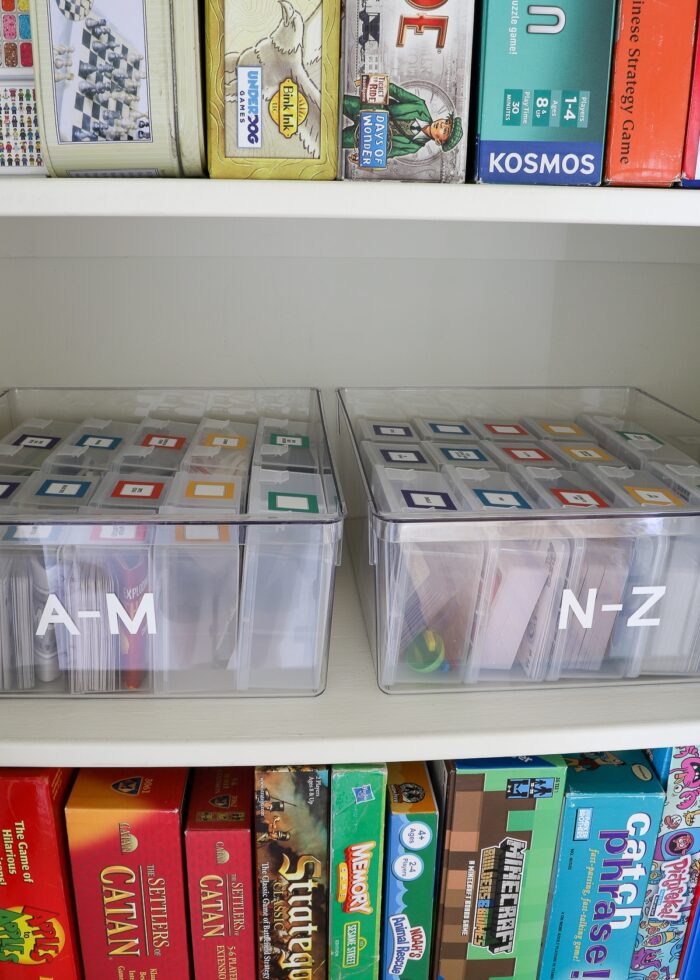
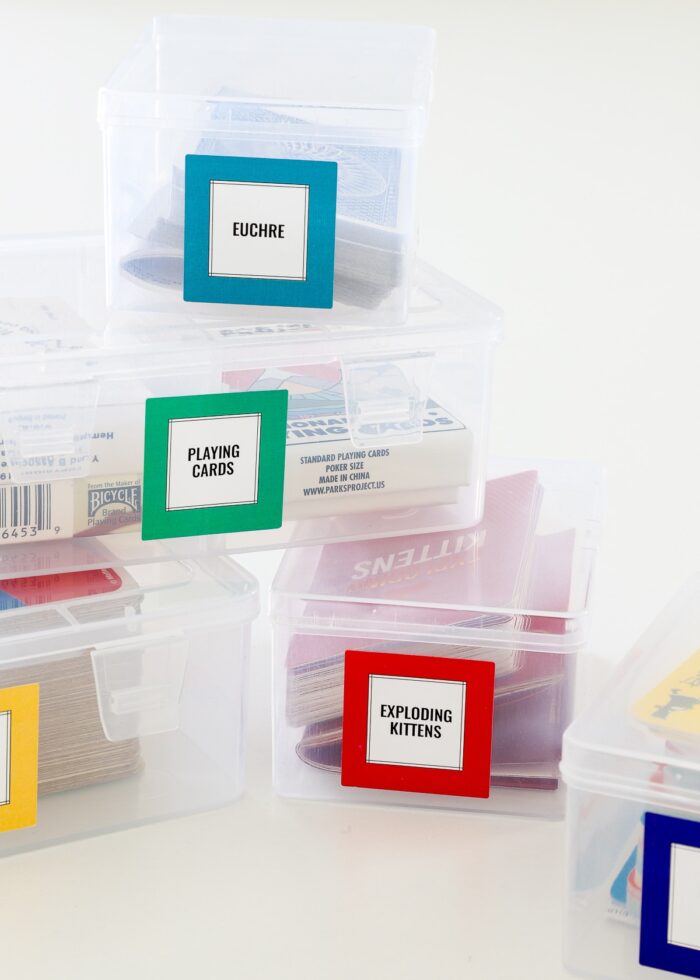
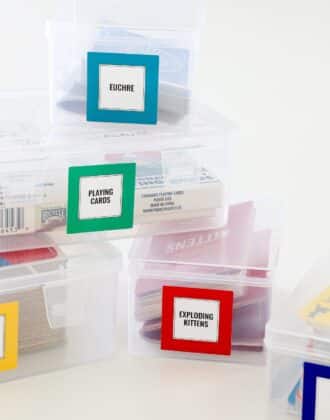
Playing Card Games
Even though small card games are all generally the same size, they still come in various sized-and-shaped boxes (which can make them a headache to organize), as shown below.
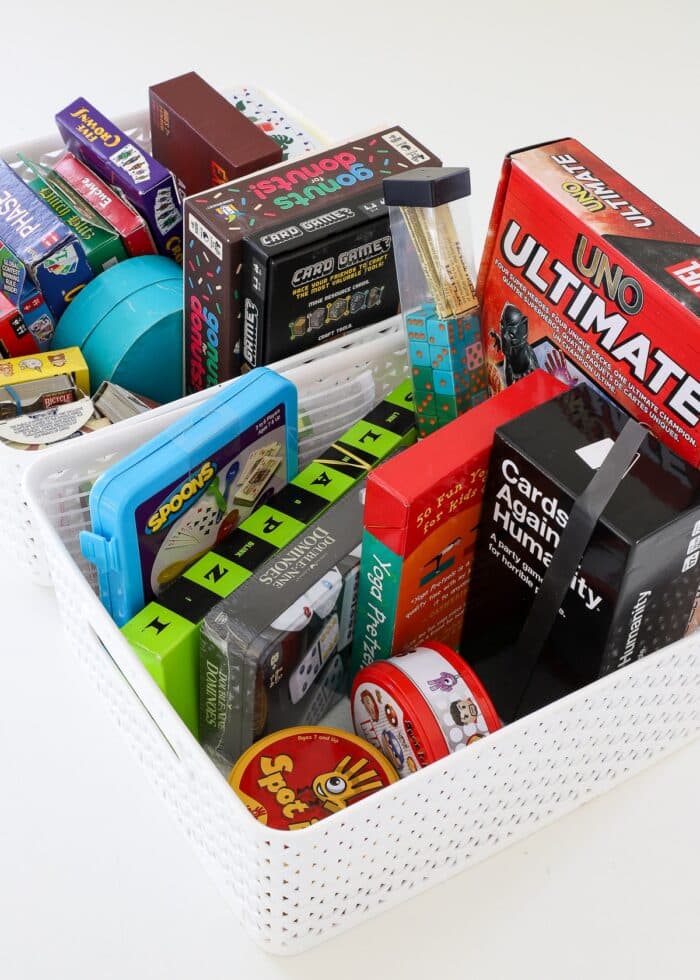
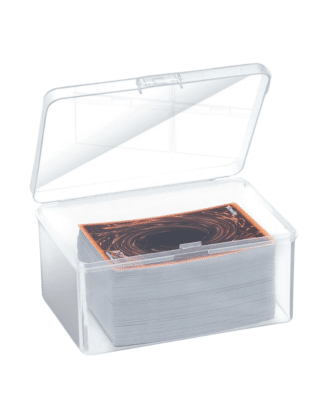
Moving our various decks of cards into uniform plastic card cases allowed us to significantly streamline these smaller games and make them much easier to find and play.
You can read all about this particular part of my game closet storage here: Practical Playing Card Storage (That Looks Great Too!)
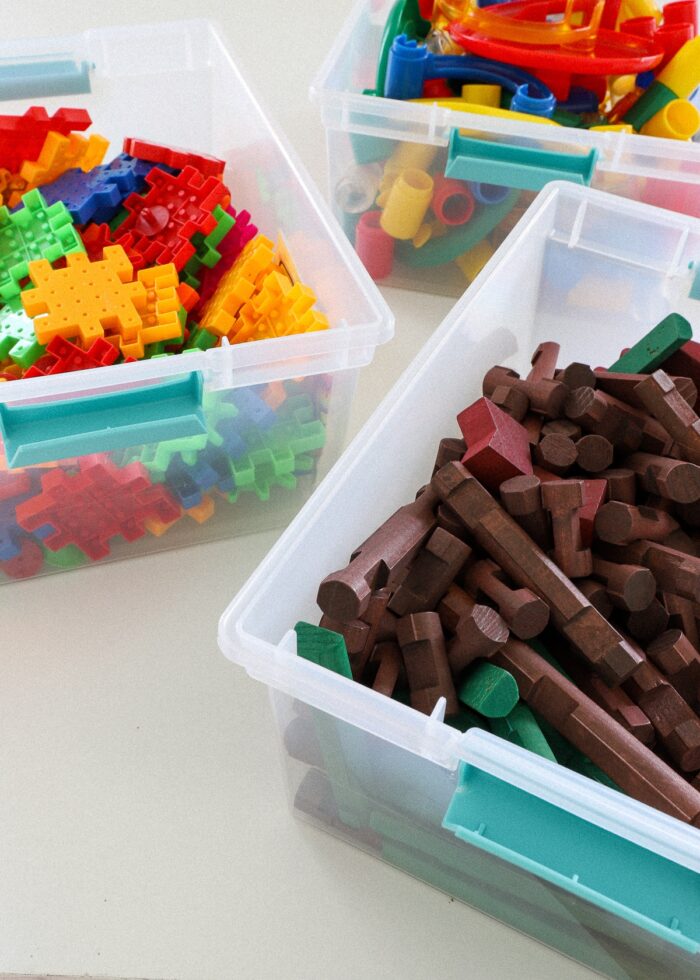
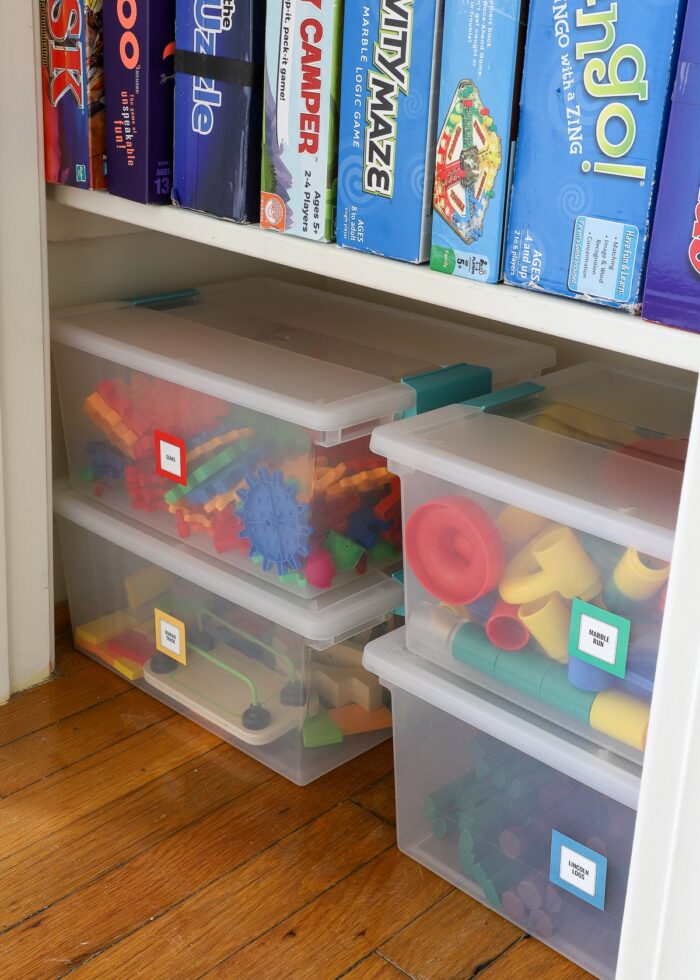
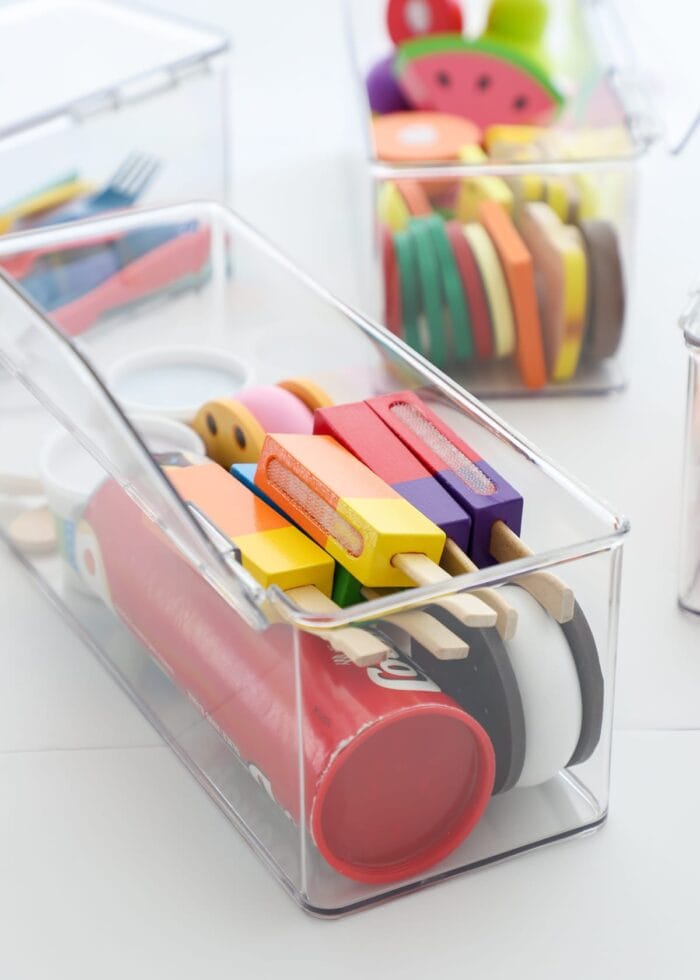
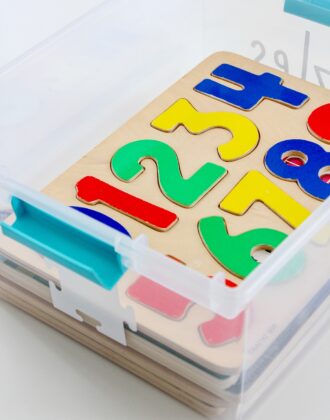
STEM Games
We have a few STEM-style games (e.g., Marble Run, Lincoln Logs, gears, etc) that feature large, chunky pieces. Very rarely do these games load easily back into their original packaging, and we determined they are much easier to play with (and clean up) if they are in more user-friendly containers.
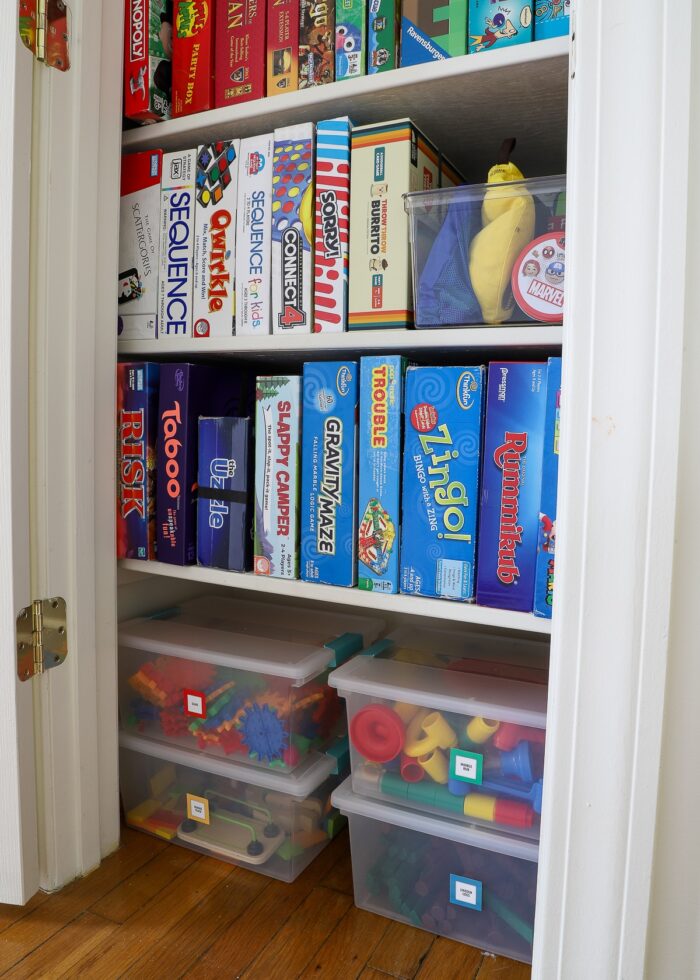
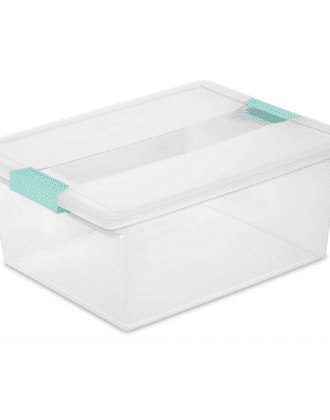
So these four games were loaded into my favorite Sterilite bins and stacked on the closet floor for easy access by little hands.
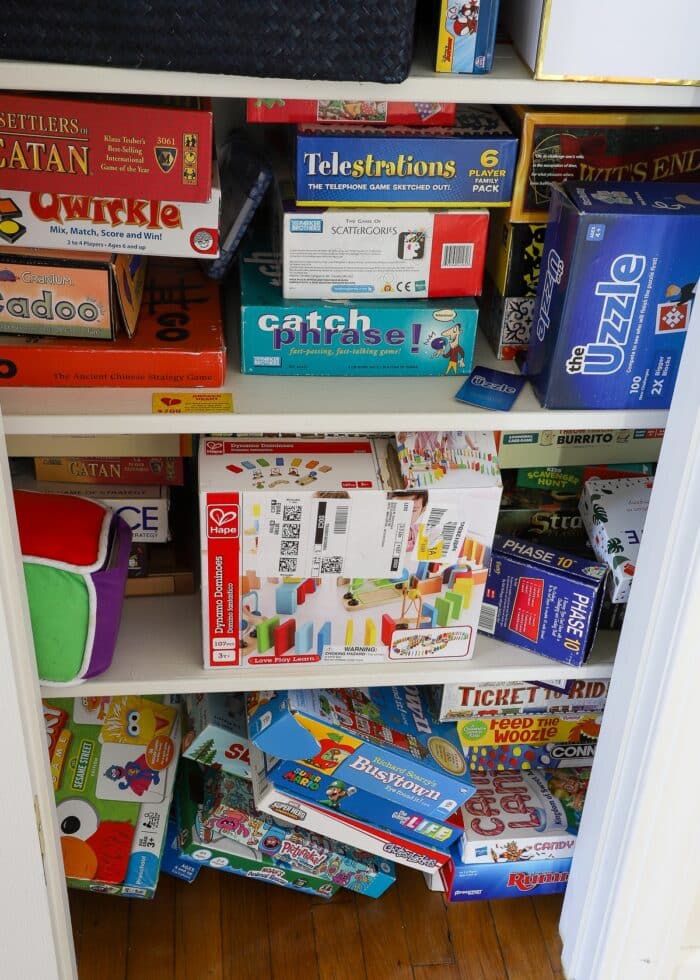
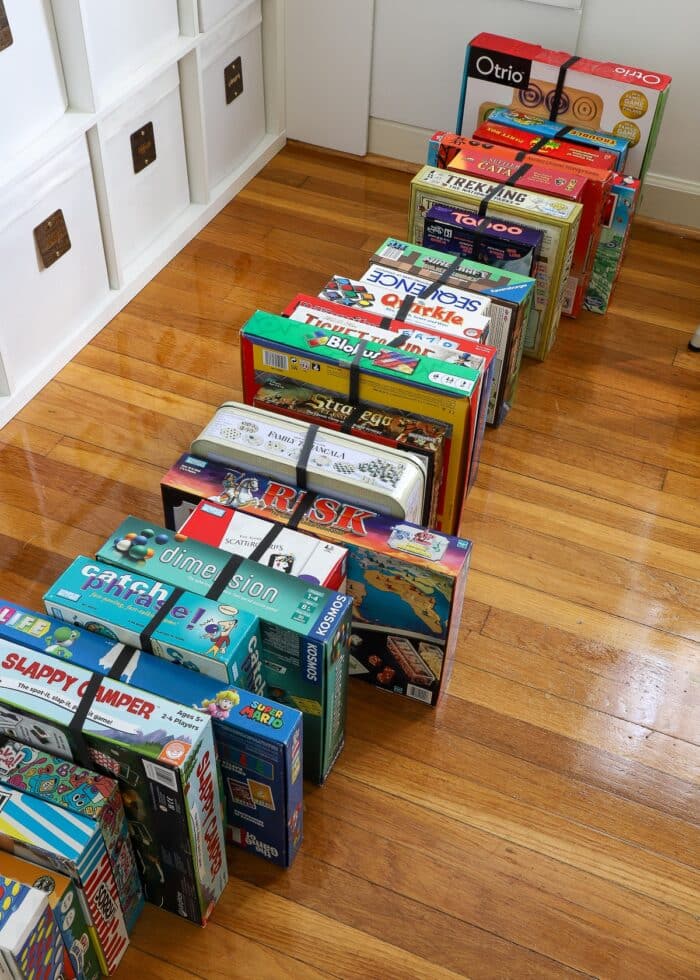
Why Stacking Board Game Boxes Doesn’t Work
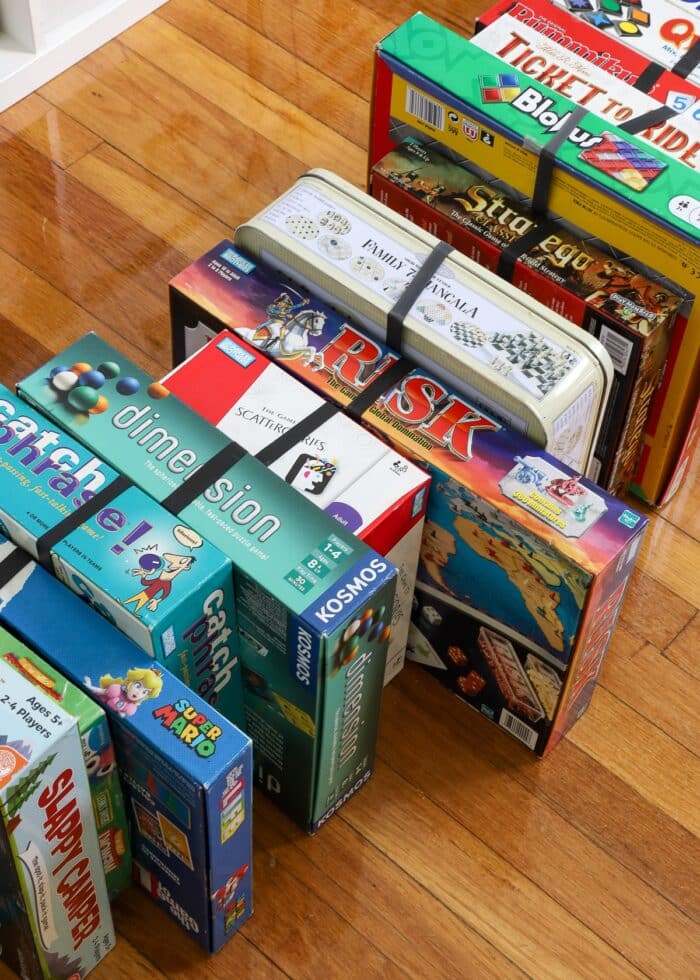
Because board games include so many small pieces, most people tend to store them in vertical stacks, one on top of the other. (This is actually how I’ve primarily stored our games for most of our marriage.)
This solution certainly keeps games in good “order” (inside the box). But without extreme diligence in putting games back just right, stacking can quickly fall into disarray (especially if kids are involved). In fact, stacking our games is precisely why our closet ended up looking like this:

I ultimately determined that the way to really keep our board games completely accessible was to place them like books…on their end. This not only looks really nice, but more importantly: you can pull out just one without disrupting the rest.
The Secret to Standing Board Games on Their Sides
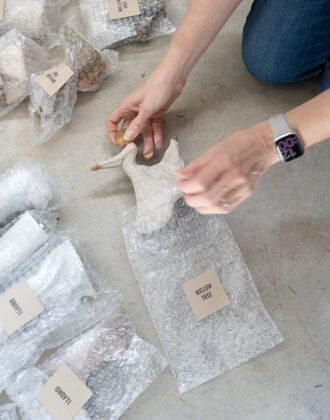
But I know what you’re thinking: “If you store games on their sides, the lids will fall off and all the various pieces and cards and accessories will become a MESS!”
You’re quite right! After experimenting with a few games on their sides, here is how our Apples to Apples game came out:
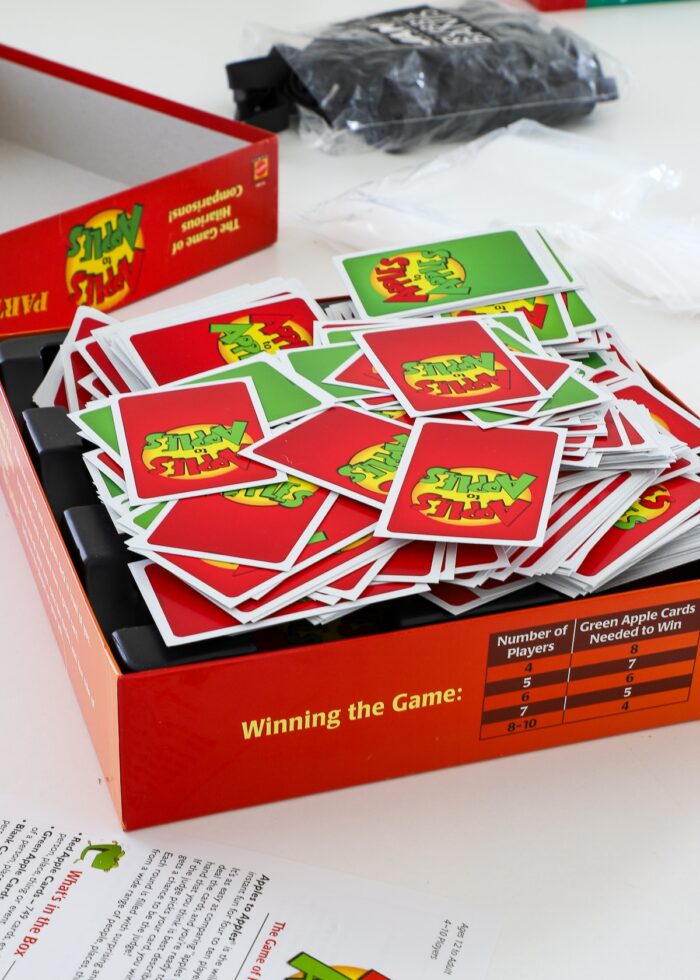
So there are two integral steps to storing board games on their sides:
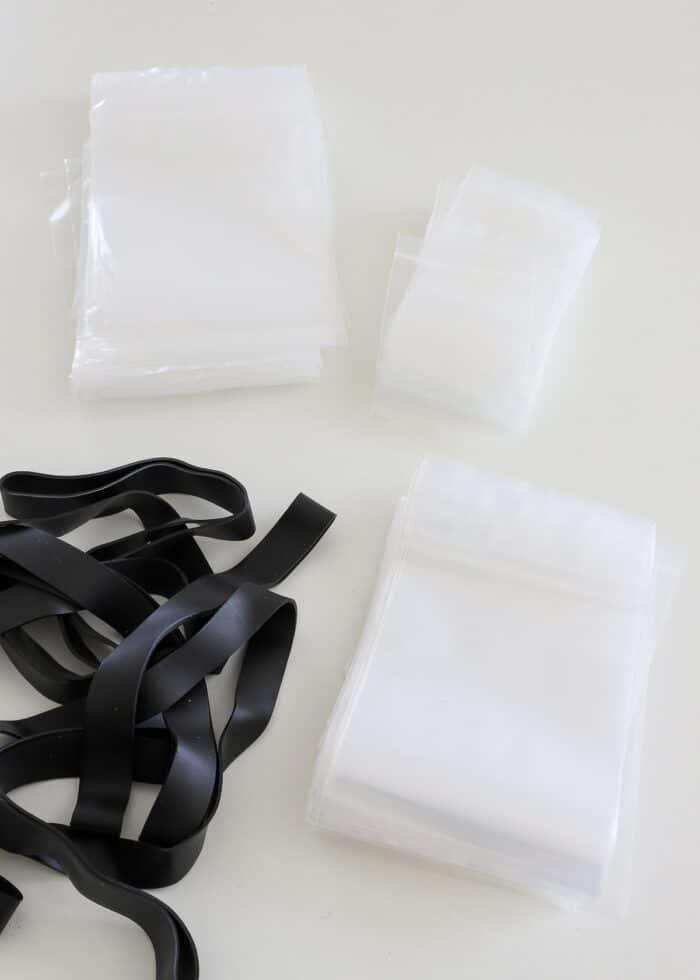
- Corralling all internal pieces via rubber bands or small plastic bags
- Banding the boxes shut
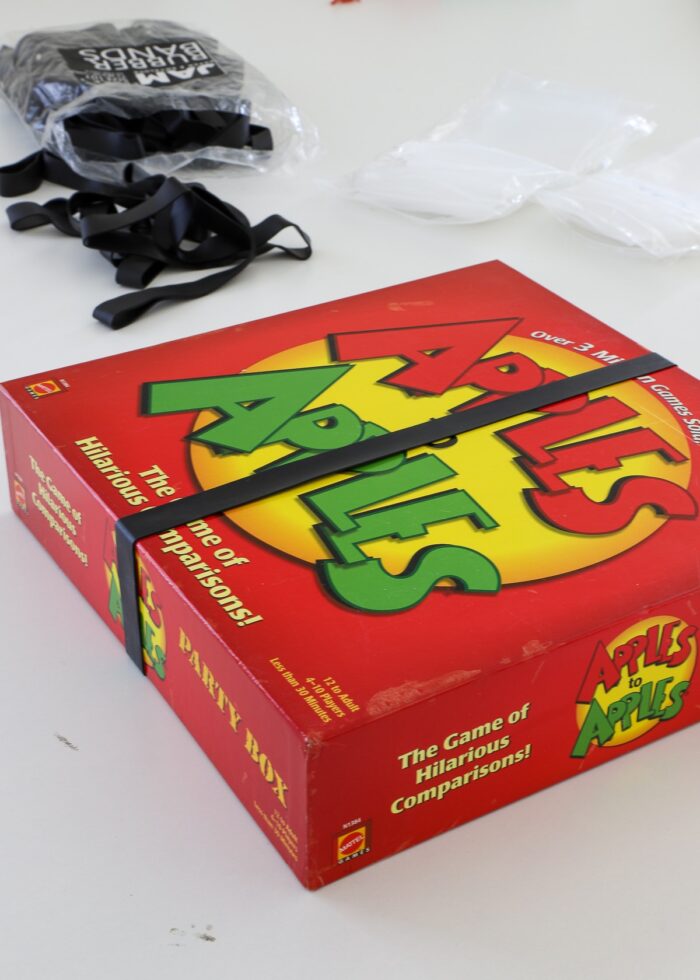
For this particular game, I rubber-banded all the cards into stacks…
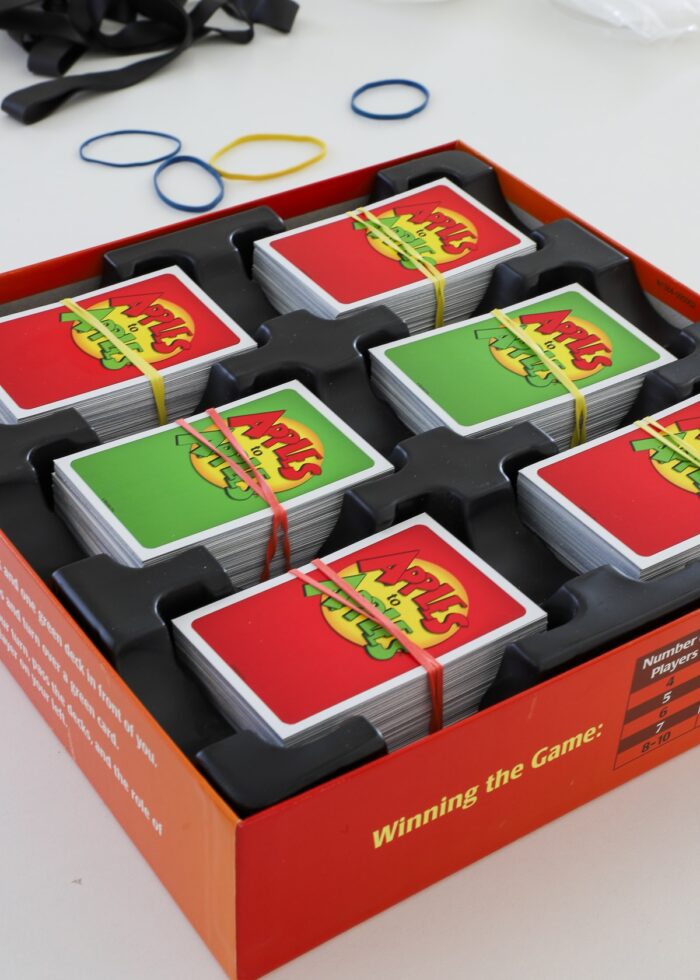
…and added a large rubber band around the box.
Want to save this post?
By following these two simple steps with every board game, you can store them on their sides while keeping everything inside neat and tidy!
Best Supplies for Board Game Storage
Ultimately, getting our game closet perfectly organized came down to these two very inexpensive products:
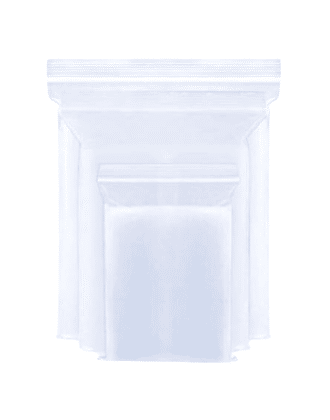
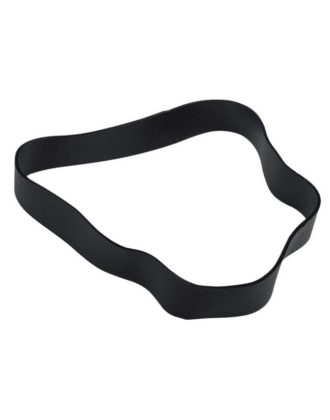
- 3 Sizes of Re-Sealable Plastic Bags – This specific set of sizes was perfect for holding all the various pieces, cards, and accessories you’ll find inside your various board games. NOTE: The exact set I used no longer appears available. This set includes comparable sizes!
- XL Rubber Bands – These bands are large enough to easily fit around any game you have but also tight enough to keep lids and boxes firmly together.
Video Tutorial
Ready to watch me organize our board game closet from start to finish? Here’s the entire process condensed into a short-and-sweet video. (Video not loading for you? Watch it here.)
Vertical Board Game Storage | Step-By-Step
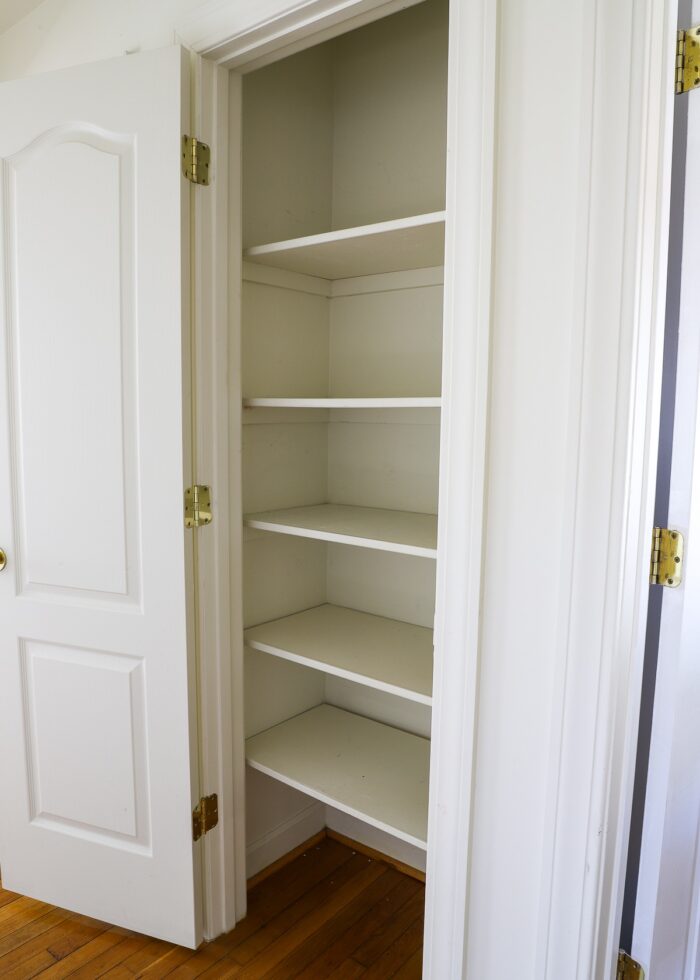
Step 1 – Empty Your Board Game Storage Area
Like any organization project, start by fully emptying out the spot where you store games (e.g., playroom, living room, shelving units, closet, storage coffee table, etc). Also, if you store games/puzzles elsewhere, gather them all into one spot so you can adequately assess what you have, how much, and each item’s condition.
Step 2 – Assess & Purge Game Collection
Whether you are short on storage space or not, this is an excellent opportunity to assess your game collection and purge out anything not worth keeping.
Consider getting rid of games that are:
- Incomplete
- Duplicates
- Significantly damaged
- Too young for your household
- Never played with
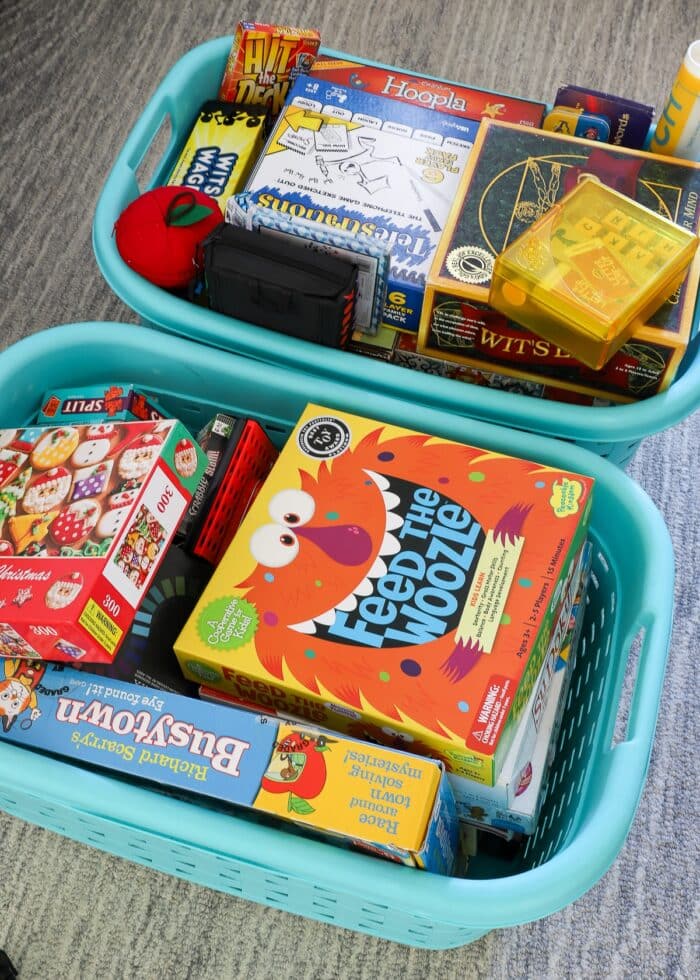
Our game collection hasn’t been decluttered in quite some time, so we were able to identify two large baskets full of games we no longer need.
Step 3 – Prepare Board Game(s) for Vertical Storage
Next, you will need to prepare each game you want to keep for vertical storage. This may appear tedious, but once you get into a groove it actually goes quite quickly.
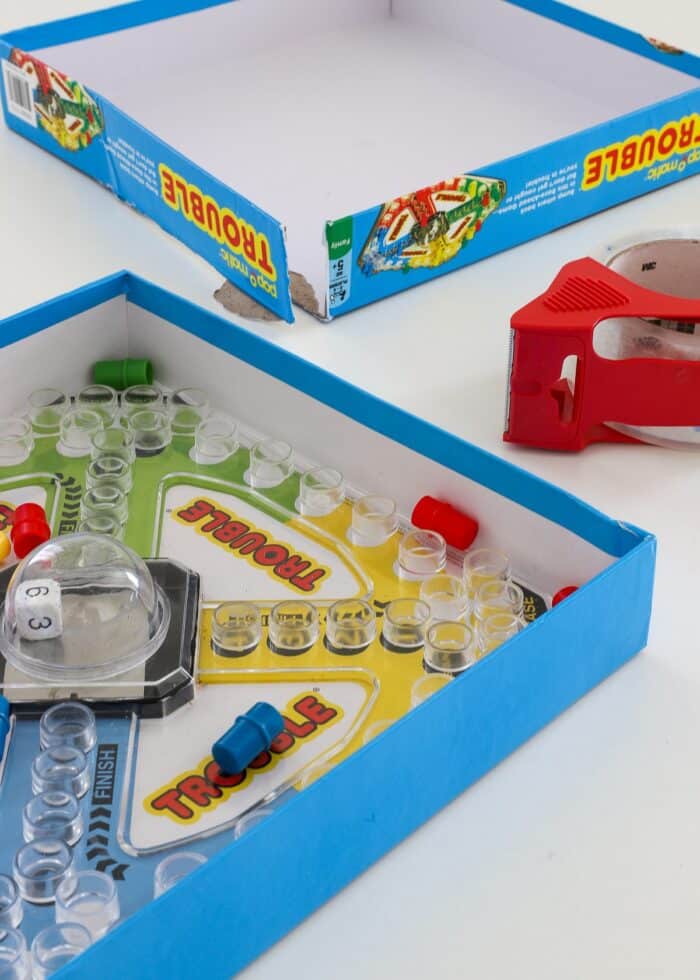
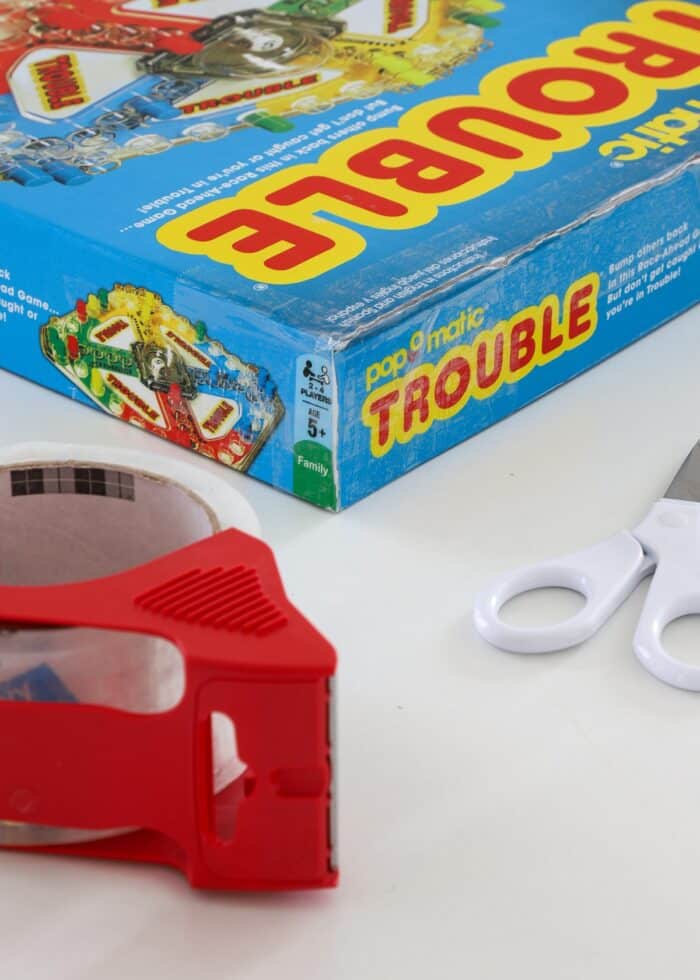
First, repair or reinforce any game board box that has fallen apart. I find (several layers of) clear packing tape to be the best way to reinforce corners, seams, or gashes in the cardboard packaging.
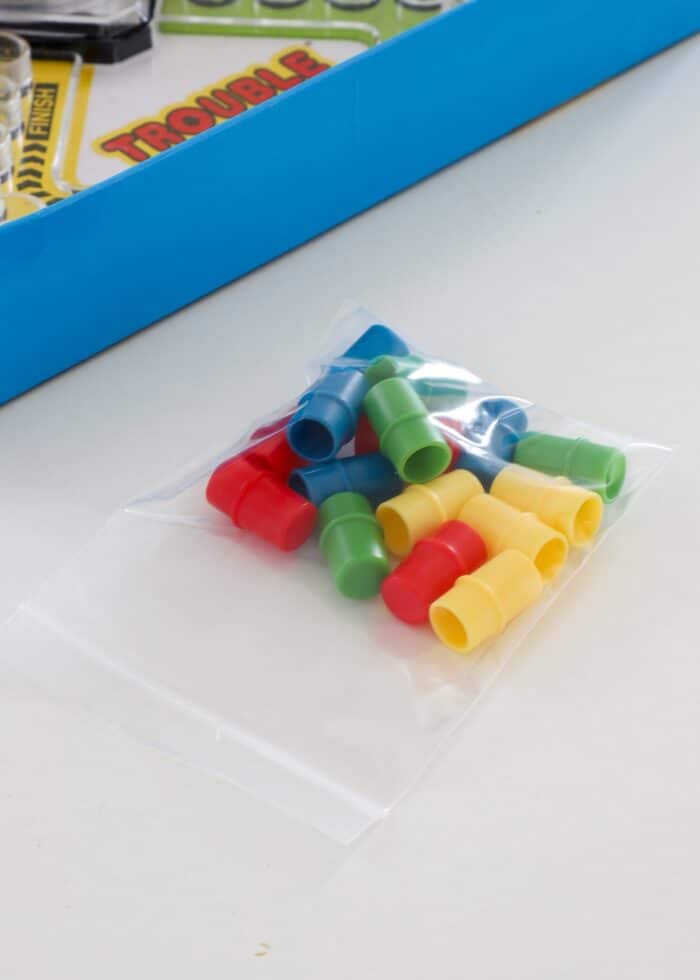
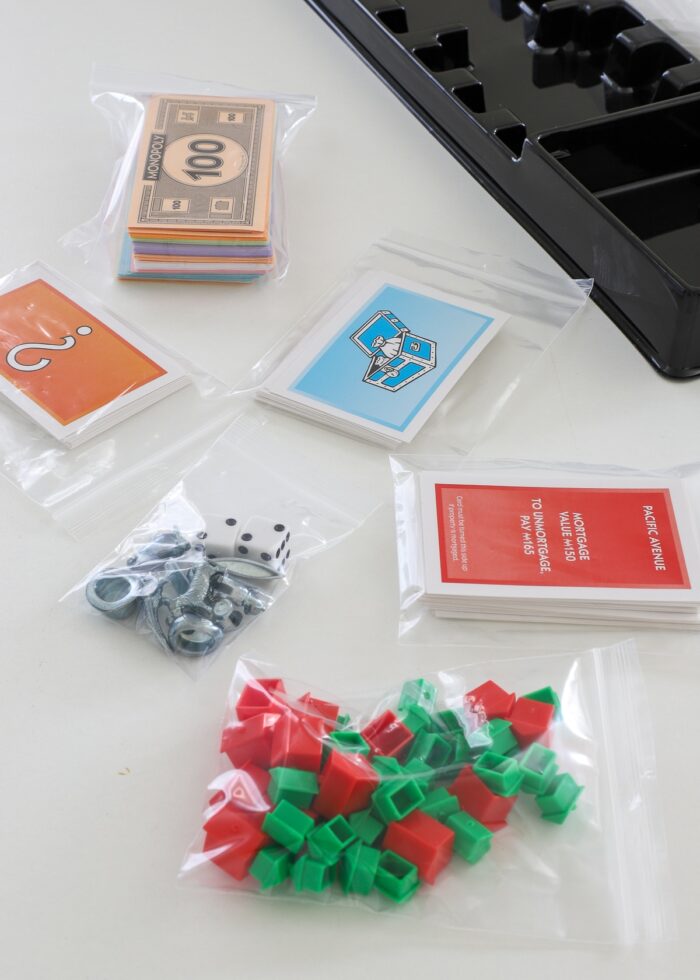
Next, load any and all small game pieces, cards, and accessories into the appropriately-sized plastic bag(s) and seal shut.
Load everything back into the (repaired) box (including any boards, dice, pieces, and instructions) and secure with a single large rubber band.
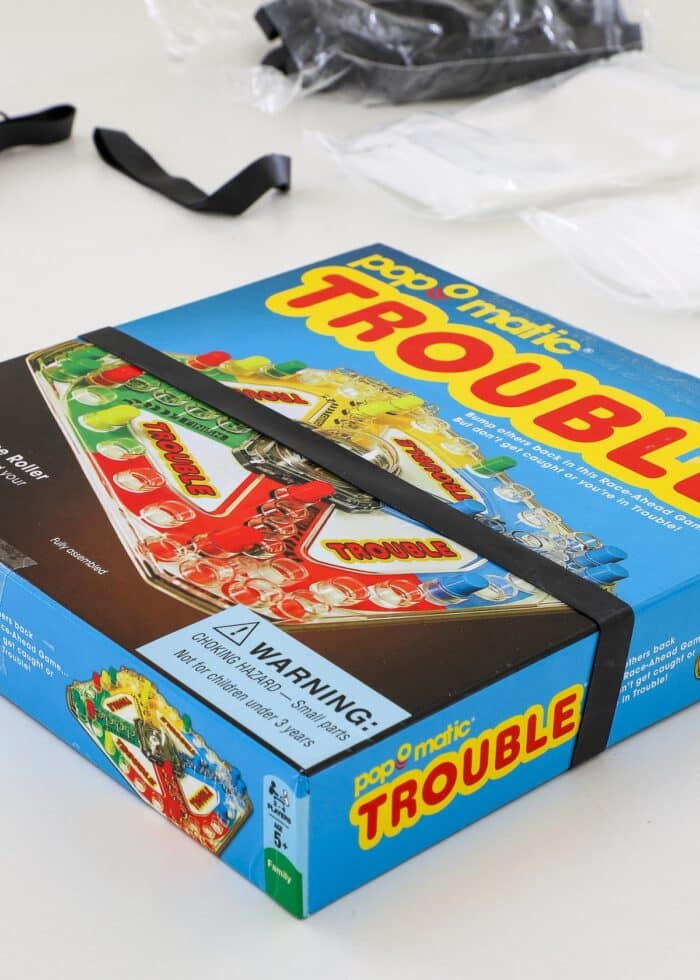
Most games have the label on all four sides of the box. So give some thought to how you’ll place the box on your shelf when determining which way to place the rubber band. I chose to wrap mine vertically so that the names are visible from the side but the bands are not.
Step 4 – Repeat with All Games
Systematically work through your entire board game collection, assessing the nuances of each game individually.
I mentioned above that this particular set of plastic bags really is a great choice for this project. The size variety allowed me to perfectly store every single piece, card, cash, etc we had within our boxes.
A Note On Interior Packaging
Sometimes, the cardboard/plastic trays within the board game boxes are worth keeping, especially if you need them for the game (like in Monopoly).
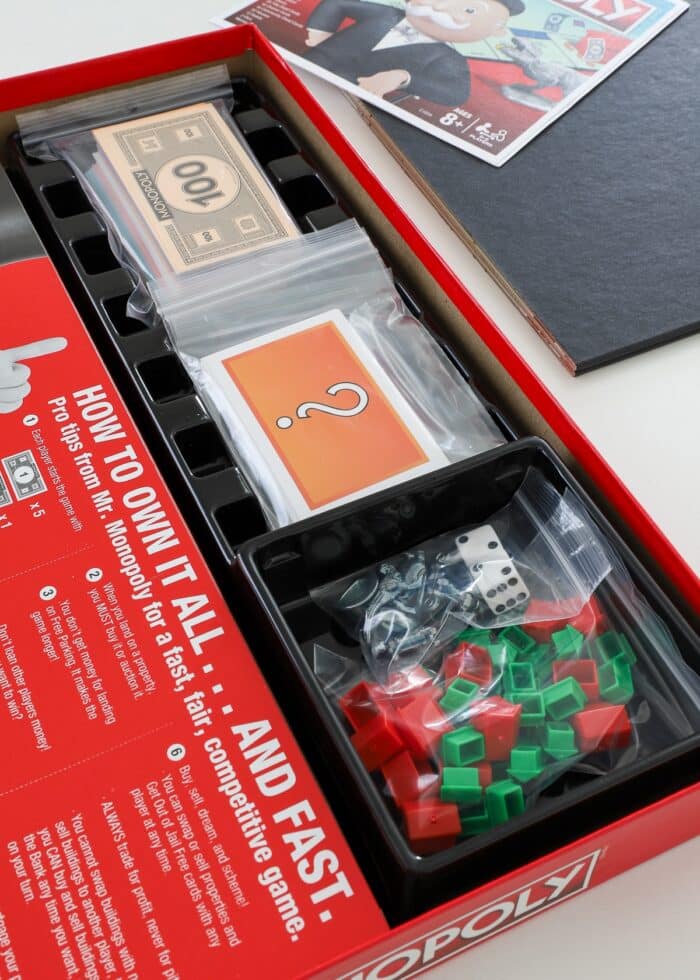
But if the cardboard is loose or only providing structure for the pieces you’ve now bagged up, you can likely toss the inserts.
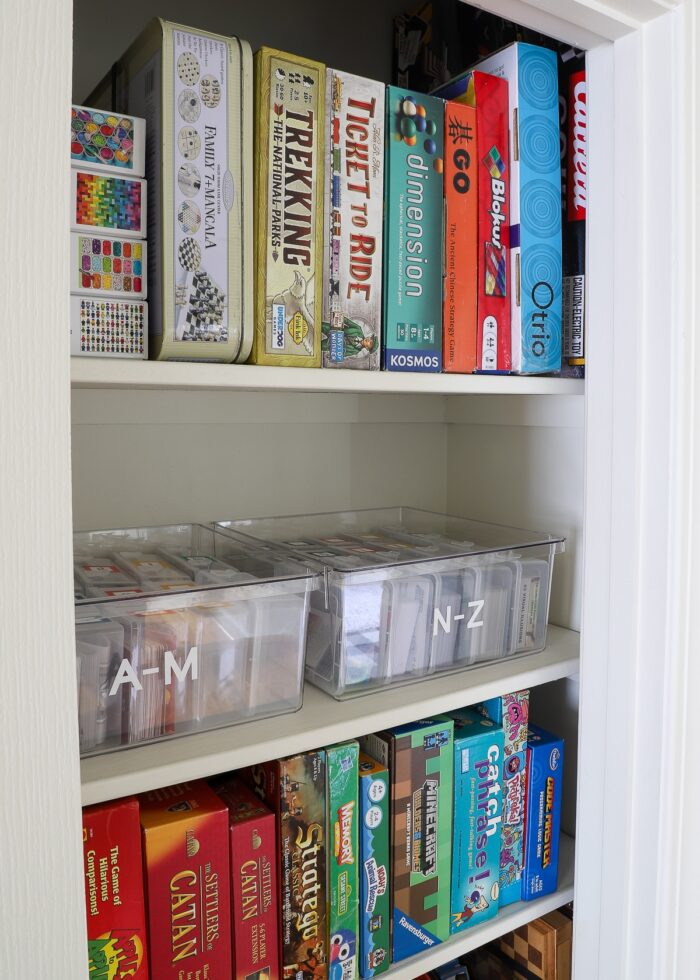
Step 5 – Place Games (Vertically) on Shelves
Once all your games have been purged, prepped, and banded, they are ready to be placed on your game closet shelves…just like books.
How you sort your games is entirely up to you.
Options include:
- Alphabetically
- Categories (e.g., party, strategy, etc)
- Audience (e.g., solo, kids, family, adults)
- Color/Size
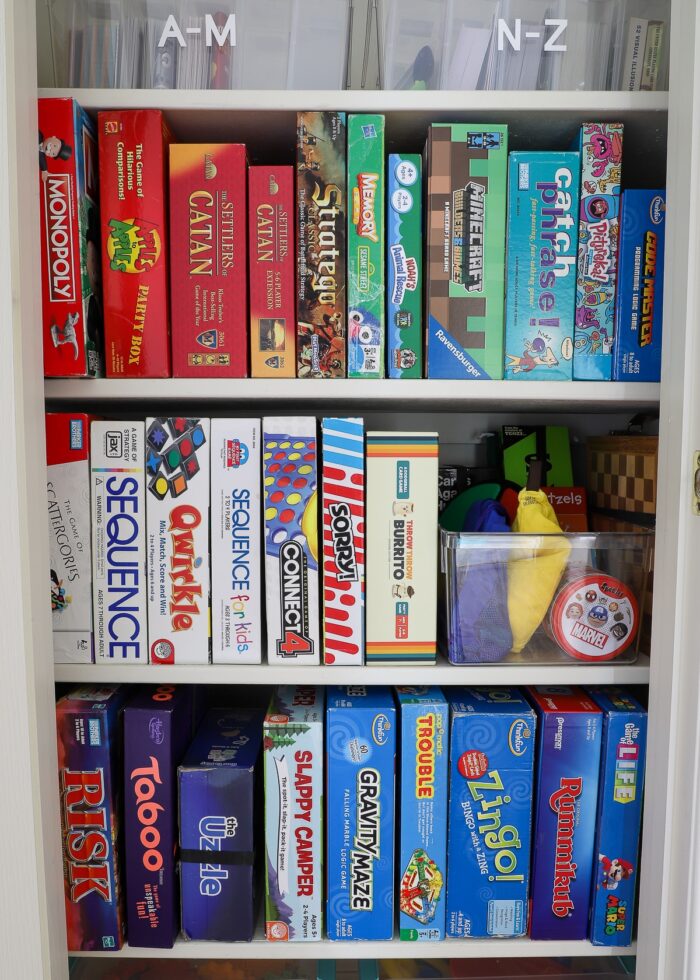
I ultimately decided to arrange our board game storage shelves primarily by color. Not only does this look the cleanest, but you also tend to remember games by how they look (another win for keeping boxes!)
NOTE: We did have to place some games on the very top shelf due to size instead – they were just too tall for the other shelves. So no matter what order you choose, size will ultimately need to be considered as well!
Step 6 – Enjoy Finding & Playing Your Games
With your game closet now perfectly organized, it is truly a breeze to pick a game to play, get it out, clean it back up, and put it away. It’s now been a few months since I organized this closet, and our shelves are as neat and tidy as the day I snapped these pictures. I can’t tell you how great it feels to have the games organized in a way that is truly user friendly and totally maintainable!
More Great Toy Storage Solutions
Looking for more great toy storage solutions? Here are just a few of our tried-and-true favorites:
- The Best Toy Storage Solutions for Every Item In the Playroom
- Sneaky Toy Storage Ideas for the Living Room
- How to Store Tiny Toys
- How to Store Wooden Kid Puzzles
- The BEST Way to Organize Board Games
- How to Organize Small Card Games
- How to Organize Play Food
- Device Charging Station in a Drawer
- DIY Dress Up Station for Kids
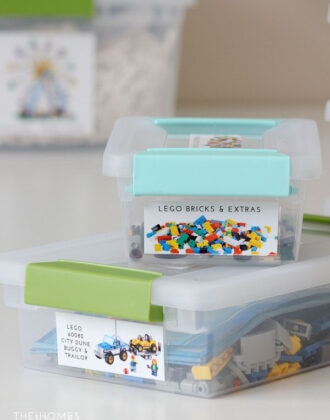
- How to Sort and Store Those LEGO Sets
- How to Store Kids’ Sports Equipment
- How to Setup a Kids Art Station
- How to Store Kinetic Sand

This project ranks among my very favorites for a few reasons. First – doesn’t this closet just look so great? I mean…who doesn’t love an organized game closet? I may or may not just open it for a moment of zen from time to time!
But more importantly, I feel like I really took the time the figure out the right board game storage solutions. I could have tossed all the boxes and invested in some containers (that may or may not have worked out) just to have a beautiful display. But instead, I thought about how games really need to be stored in order to be played, and found inexpensive products that ultimately provided the order we needed.
I genuinely hope the ideas and strategies I employed here give you some fresh perspective on organizing your board games once and for all!
Megan
27 Comments on “The BEST Way to Store Board Games (Without Ditching the Boxes!)”
We store all of our games vertically, like books on a shelf. That way when you pull one out, it doesn’t affect the stack and send games toppling. We can adjust the shelves and sort the boxes by height so it also decreases wasted space above the games. I love the idea for a pull-out basket for all the pesky small games though!
Also, if a game is missing an essential piece, you can often contact the company for a replacement. We have the same Richard Scarry Busytown game and lost the little magnifying glasses. The company has a website where you can look up the specific game and request replacement pieces. Sometimes they’re free, sometimes a small fee, but it saves having to throw away the whole game. This is also useful if you pick up an incomplete game at a thrift store or garage sale.
Thank you, I like that idea best.
I’m cleaning out our game cabinet this week, so this post couldn’t have come at a better time. Adjust the shelves? Such a simple, yet game changing tip!! And I just found a whole stack of other games in my youngest son’s closet…why were they there? Thanks for the great tips!
Oh, boy- I needed this! I wanted to tackle that game cupboard but didn’t know where to start. After sorting and measuring (and looking through the house to see if I had baskets or bins to use to corral some items), I’m off to the Dollar Store, Joann’s and Walmart to find what I need. Woohoo! 🥳
I love that you have Azul! My Mum bought this to give to my sister’s family last Christmas, then found out at the last moment my brother had the same idea. So she kept it and we played it over the holidays. I love that it’s complex enough to be interesting but doesn’t take hours to play.
I am really enjoying your blog! We are not a military family or live in a rental, however I can still use your ideas! Thank you for creating this blog and most importantly, thank you to you and your family for sacrificing so much for our freedoms.
Agreed!
Hello! Love your blog! Where did you get the white basket with the lid? Thank you!
Hi there!
Thank you so much! The baskets with the lids were from Target a few years ago, but unfortunately they don’t carry them anymore 🙁
Sorry I can’t be of more help!
Megan
Loved this post! Great tips for organizing games! Where did you get the cabinet? Thank you 🙂
So glad you found these tips helpful!
The cabinets were just storage cabinets built into our house. Sorry I don’t have a source for you!
Thanks,Megan
As I look in the corner of the playroom where there is a giant stack of board games just waiting to topple over, I was thinking I needed to make a change! Thanks for the tips 🙂 We have a kallax style cube unit that is used for some games, but some of the boxes are just not the right size. I do have one bin for single player games (like the laser maze game or rush hour), one bin specifically for 2 player games (like Connect 4 , Square Up and Gobblet), and One bin for those small card games (but that is a mess). I do have a closet that has some games in the rectangular boxes, but opening the door leaves space on each side so it’s impossible to use the full shelf to slide things in and out easily the full width of the shelf. We also have some games in our entry closet (why?). I think we need to do a full review of what we have and where we can put it. These tips should come in handy!
Use clear packing tape (heavy duty if you have it) to reinforce the corners of boxes, especially the lids. Just wrap it around the corner and fold down or trim off the excess width. It’s a good idea to do this while the box is still in good condition, *before* the corners tear apart.
Keep small pieces in a clear plastic zip baggie, either sandwich or snack size, and keep the bag inside the box.
There’s some really cute examples online of framed game boards. Some are just for display, some might have the pieces stored on the back side of a deep frame or in another box elsewhere. There are probably instructions on how to make these.
I would love to know what the large blue straight-sided basket with wooden handles is called and where to get it. The link under it takes you to Target’s woven-strap basket. While I like those, they have slanted sides and the handle is simply a cutout place where you can grab the top wire bar. Could you please share where this actual basket shown can be bought? Thank you.
Hi Jim!
Unfortunately, the blue baskets shown in the pictures were a HomeGoods purchase years ago. There is no brand on the basket itself, and the tags are long gone. Since I am not able to point you to an exact product, I tried to include a link to something similar.
Sorry I can’t be of more help here.
Megan
Okay, thank you so much. That is an awesome basket. You wouldn’t want to sell it, would you? 🙂
Seriously, as a (slowly) recovering hoarder, I love your ideas and advice.
Megan –
I love your ideas, but there is one missing category — travel games (especially those little “pocket” games). I camp a lot with Cub Scouts, so I keep those games in a clear zipper-closure box-shaped container that has a carry handle that a small blanket or pillow came in.
Having the clear “box” allows us to see the games inside, while the zipper closure keeps the contents clean while not losing the “top” (because t is attached) and soft sides make packing easier, and the handle makes it easy to grab and go! Any games that have small parts include a snack bag for the parts, marked with the game name.
Thank you so much for this amazing article with great photos and guidance on how to store board games in a more beneficial way. I am going to use so many of your ideas. This is awesome. I especially love the idea of storing board games on their sides and using the extra large rubber bands to hold the games sealed. I am looking forward to reading more of your articles.
Hi! Love these ideas! Some of our. Pads games are long, like candy land, and others square bows like Zingo. I feel like I cannot stack Candyland like a book because it our shelf is not deep enough. Any suggestions? Thanks!
Unfortunately the 3 sorted sized baggies are not available anymore! Can you share the sizes you used or a new link? Thank you!
Hi Taylor!
Ack – that’s SO annoying, but I appreciate you letting me know!
This pack is comparable to what I purchased (I just didn’t have the 3×3″ size).
Hope that helps!
Megan
For reference, my bag sizes were:
2.5×3.5″
3.5×5″
4×6″
Hallo Meghan, dein Scvrank sieht wirklich toll aus. Trotzdem gebe ich zu bedenken, dass Gummiband zwar praktisch sind und helfen in dieser Funktion. Leider büßen sie an Elastizität mit der Zeit ein und können sich zum Teil auflösen. Nicht wenige Spiele, insbesondere Spielkarten haben wir deshalb schon entworgen müssen.
Eine wirklich perfekte Methode gibt es wohl nicht, aber alles in Zipbeuteln wäre eine Möglichkeit. Bei der Schachtel könnte es auch zu Schwierigkeiten beim rausgehen kommen, wenn die Gummis sich aufhalten.
Wir haben auch viele Spiele und einige stehen, einige liegen und viele könnten besser verstaut sein.
Viele Grüße Andrea
Thank you! I started entertaining the idea of tossing the boxes and you saved me from this.💛 Did you have any strategies for storing longer boxes like Monopoly or Risk? Or the ones that are just a bit too deep for the shelf? I have a few of these and they’re getting to me 🥴
How deep is your closet that you can store long games, like Risk, on it’s side? My shelves 12″D, so I’m wondering if you have another solution up your sleeve?
Hi! I Iove how you organized your board games! I really need to get my family’s board game collection into a more organized and tidier system. Question about the rubber bands–when you pull out a box, do you find that the rubber band prevents smooth sliding of the box? I’m wondering whether the rubber bands cause some resistance.
Hi Cindi!
Yes, there can be some resistance. But not much. I find the resistance is worse when the games are packed really tight together. But it’s still not really a deal breaker for me, personally. I didn’t like the look of the bands facing out, but you could arrange them that way so the bands aren’t in contact with the shelves.
Hope that helps!
Megan