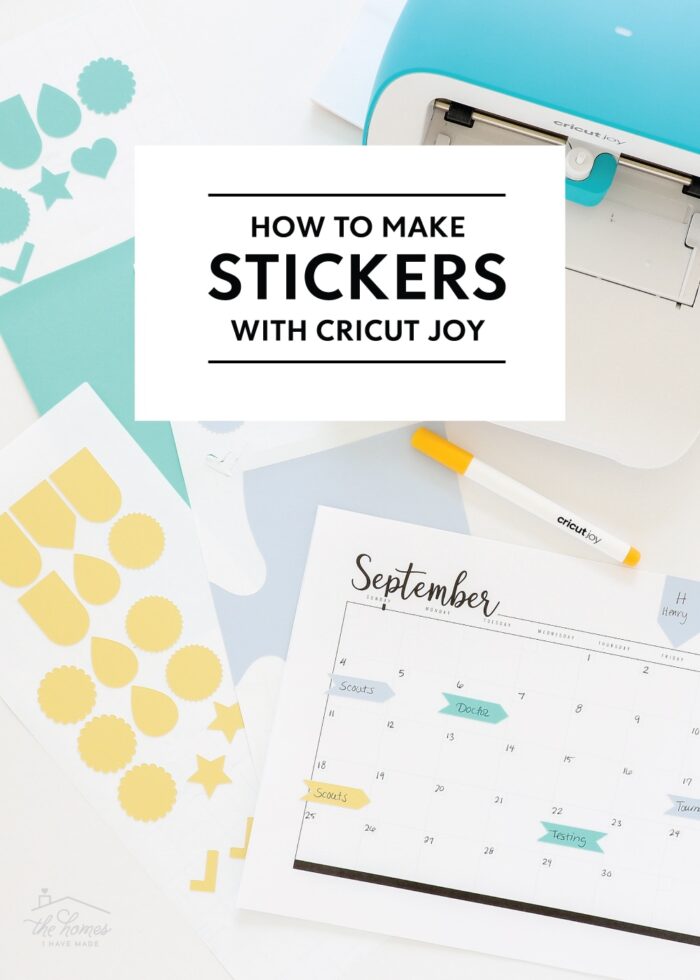
2 Easy Ways to Make Custom Stickers with Cricut Joy
One of the most popular projects to make with a Cricut machine is stickers! Whether you’re a planner addict or are looking to make stickers for invitations or announcements, being able to customize the design and cut them right from home has immense appeal. But if you have a Cricut Joy machine, you might be stumped on how to make them, since most sticker tutorials feature a function unique to the Cricut Maker and Cricut Explore machines. Making stickers with Cricut Joy IS possible, but it requires slightly different techniques than the larger machines. So let me break down two really easy (and super fun!) ways to make stickers with Cricut Joy!
How You Can’t Make Stickers with Cricut Joy
Making custom stickers with a Cricut machine is an incredibly popular project. However, most tutorials you come across, Cricut stickers are made using the Print Then Cut function (you can see my full tutorial here: How to Make Stickers with Cricut Print Then Cut). And while using Print Then Cut IS the best and easiest way to make gorgeous, custom stickers right from home, there is one major limitation: Print Then Cut is ONLY available on Cricut Explore and Cricut Maker machines.
Yep, you read that right. Unfortunately, the Print Then Cut function is NOT possible on a Cricut Joy…so you cannot print stickers out on your home printer and have Cricut Joy cut them out. I know…bummer bummer.
But! If you’re a sticker lover and a Cricut Joy owner, hope is not completely lost. While you can’t make printed stickers, there are lots of other great ways to make stickers using both the Fine-Point Blade (the one that comes on your Cricut Joy machine) and Cricut Joy Pens in conjunction with a whole host of gorgeous materials.
I’ve broken this post into two different tutorials:
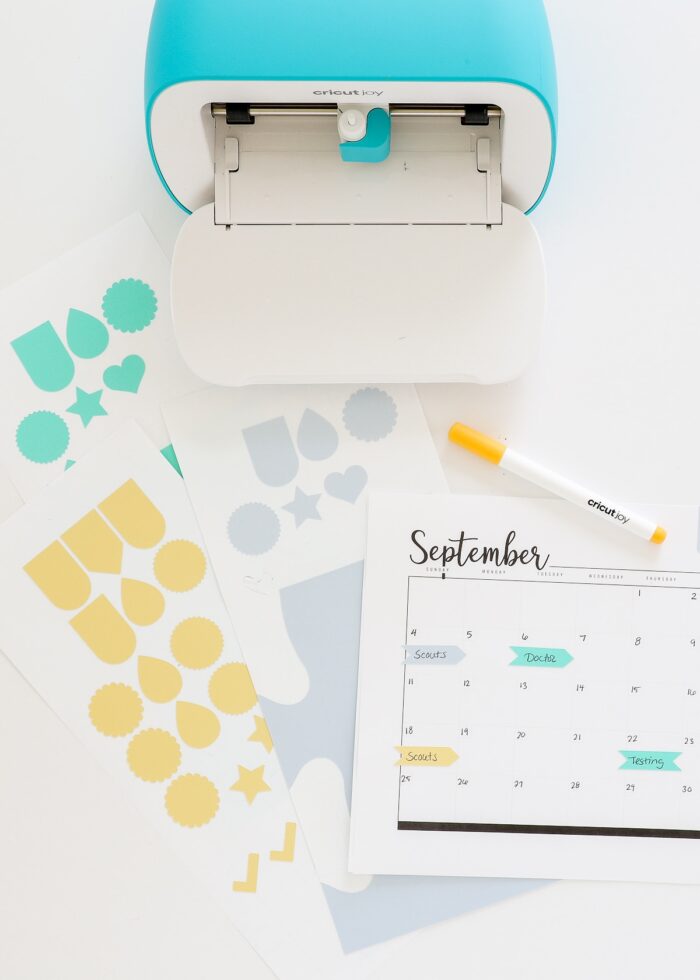
- Cutout-Only Stickers – Solid sticker shapes with no drawn details, best cut from sticker paper, Adhesive-Backed Deluxe Paper, or Smart Paper Sticker Cardstock.
- Cut+Draw Stickers – Sticker shapes with letters, words, and other drawn details created with Cricut Joy Pens, best made from Cricut Joy Smart Label, Smart Writable Paper, or Smart Paper Sticker Cardstock.
How to Make Cutout-Only Stickers with Cricut Joy
The first (and easiest!) way to make stickers with Cricut Joy is to simply cut out basic (and fun!) shapes from any sticky-backed material such as sticker paper, Smart Paper Sticker Cardstock, etc. And thanks to a really wide range of FREE shapes available in Cricut Design Space, making these stickers is not only fast but inexpensive too!
Supplies Needed
- Cricut Joy with Fine-Point Blade
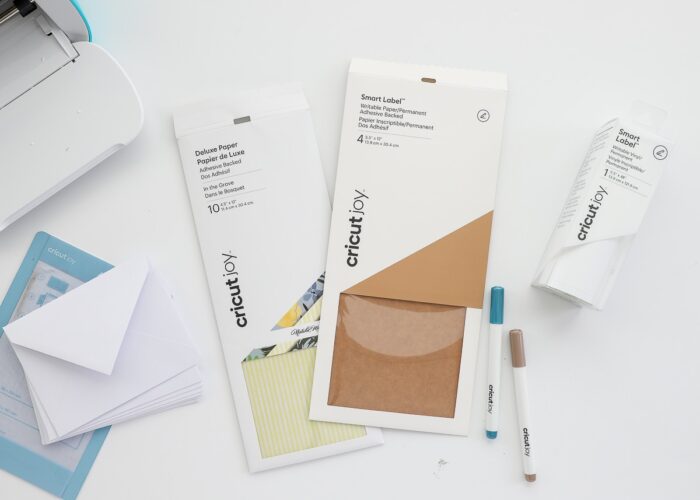
- Adhesive-Backed Materials* such as:
- Printable Sticker Paper – white is readily available, but consider using fun versions like Holographic Sticker Paper or Glitter Sticker Paper
- Smart Paper Sticker Cardstock – available in solid colors only
- Adhesive Backed Deluxe Paper – available in a wide variety of patterns and coordinating sets
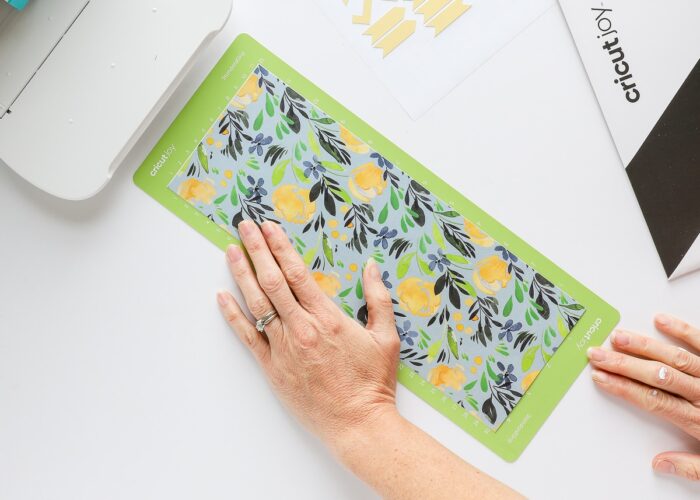
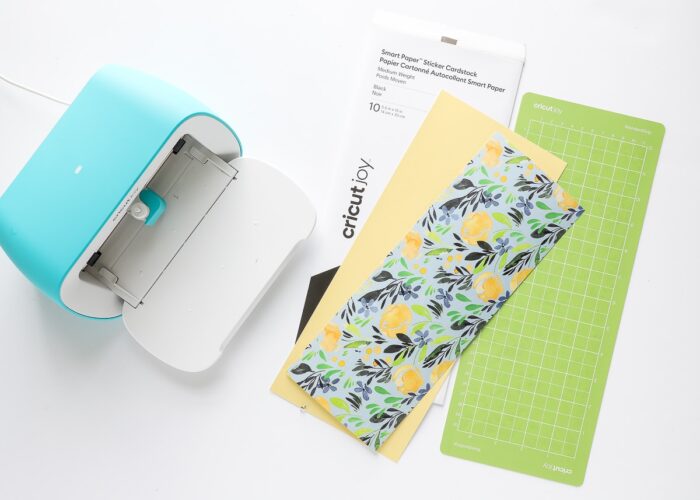
- StandardGrip Cricut Joy Mat
Why I Don’t Recommend Adhesive Vinyl for Stickers
You can technically cut stickers out of any material that has a “sticky” backing. Sticker papers and cardstocks are my top recommendation because they cut beautifully and pull off the paper backing easily.
Standard adhesive vinyl technically qualifies as a “material with a sticky backing,” but I don’t love it for sticker projects. Vinyl isn’t the easiest to pull up with just your fingers (like you would a typical sticker), as it usually requires a weeding tool, scraper, and transfer tape in order to place them wrinkle free. (See More: How to Cut Adhesive Vinyl with a Cricut)
If you do want to use vinyl to make stickers, I recommend using “sturdier” versions such as glitter vinyl, foil vinyl, or holographic vinyl, as these materials hold their shape better and can likely be placed onto your projects without needing transfer tape.
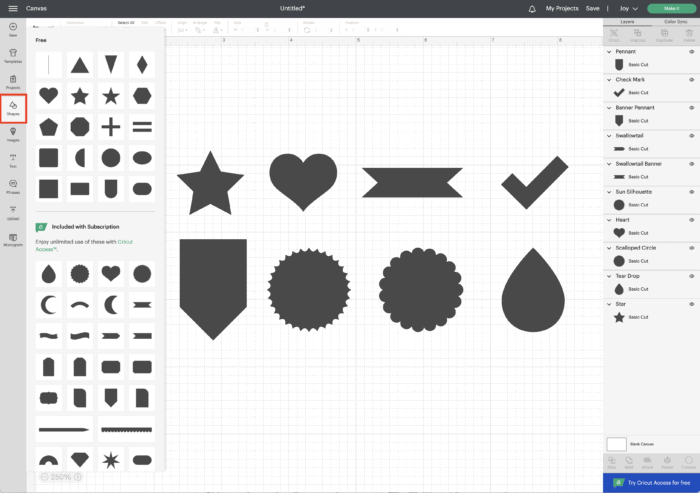
Step 1 – Design Sticker Shapes in Cricut Design Space
Like every Cricut project, you’ll start designing your stickers in Cricut Design Space. When making stickers, you can technically pick any shape you like from the Image Library, but keep in mind that the more intricate designs you pick, the longer they will take to cut and the harder they will be to put on your planner, calendar, envelopes, etc.
Cricut has recently expanded the free basic Shapes menu, and it now contains dozens of cool shapes that are perfect for stickers. You can access this collection by clicking the “Shapes” icon on the left toolbar. For my stickers, I just grabbed a few images I liked and sized them to about 1.0-1.5″ each.
Once you have your sticker designs set, click the green “Make It” button to send them to your Cricut Joy.
Step 2 – Cut Stickers with Cricut Joy
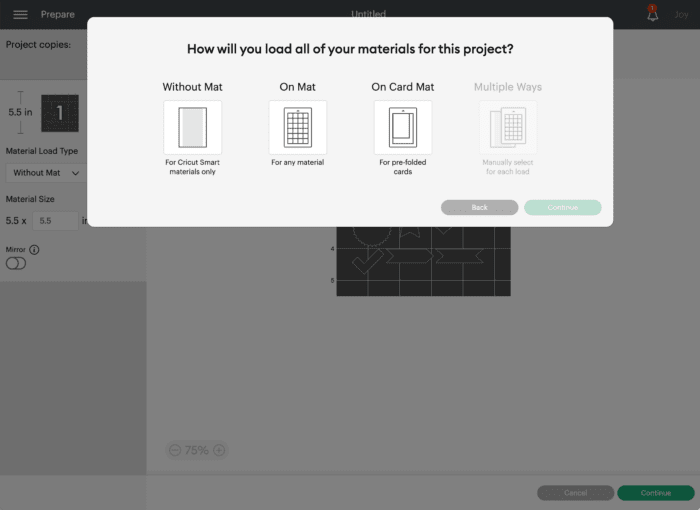
Mat Selection
On the very first cut screen, you will be prompted to select how you want to cut out your stickers (with or without a mat).
- If using Smart Materials (e.g., Smart Paper Sticker Cardstock), click “Without Mat”
- For any other materials, click “On Mat”
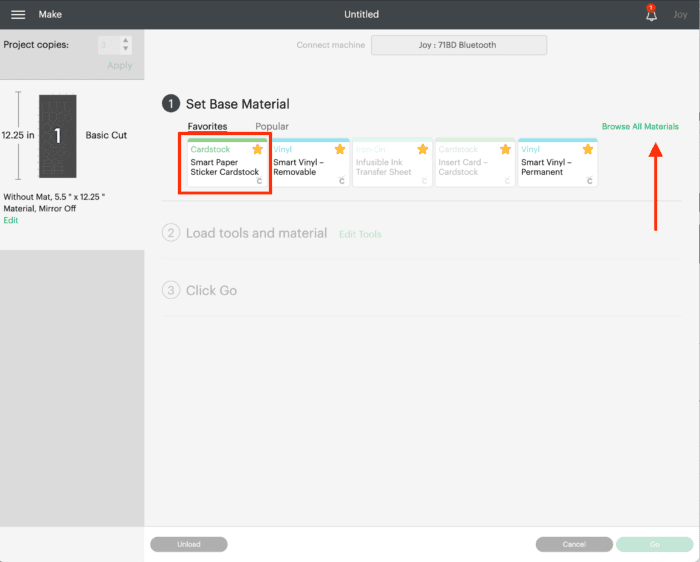
Project Copies
When making stickers, you likely want to cut a bunch at once so you have them at the ready whenever you need them. As such, I recommend increasing the Project Copies until your mat or material is completely filled. For my project, I increased my copies 3 times to make a total of 30 stickers at once.

Material Selection
On the final cut screen, you will be prompted to select your material. Click “Browse All Materials” to find the exact material you are cutting into stickers. In my case, I selected Smart Paper Sticker Cardstock.
Cut Out Your Stickers
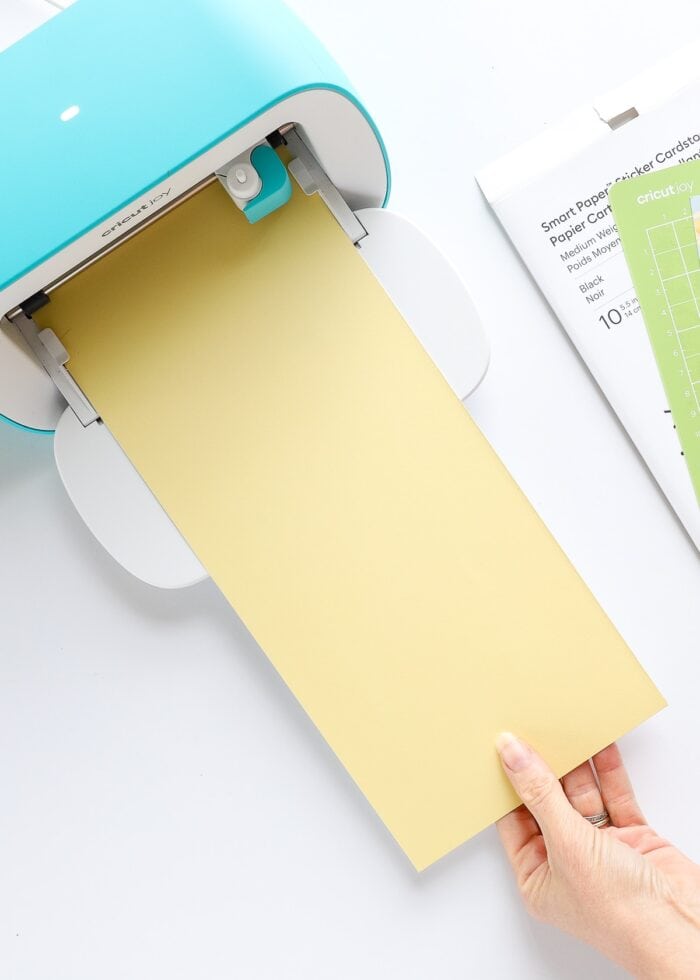
Now that you’ve made all the proper selections, it’s time to follow the on-screen prompts to load your material/mat into Cricut Joy and cut out your stickers. Simply follow the instructions in Cricut Design Space (or the app) until your project has finished running and your stickers are complete!
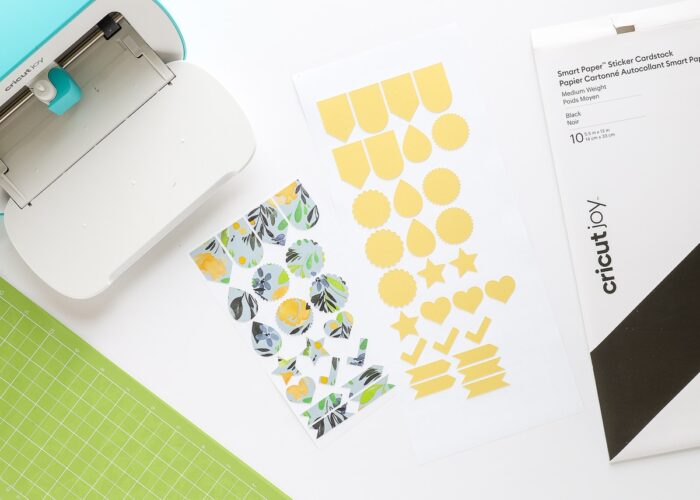
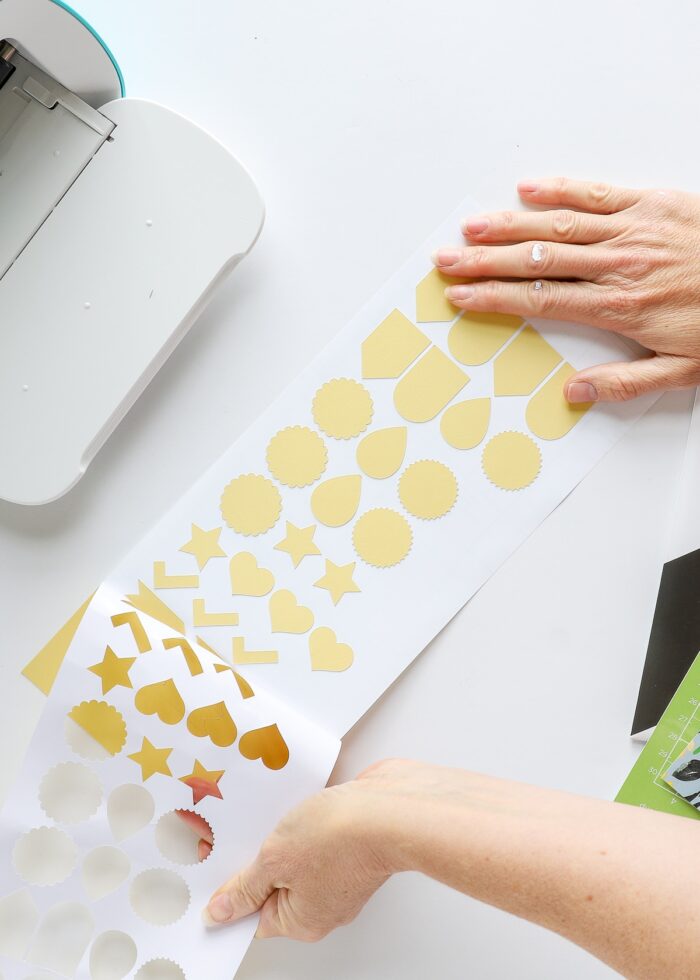
Step 3 – Remove Excess Material
Once you unload your material/mat from Cricut Joy, there’s one final step before you can use your stickers. So that they are easy to peel off the paper backing and put onto your projects, carefully peel the excess paper away from around the stickers. If you selected the proper material, the surrounding paper should peel away effortlessly, and you’ll be left with a sheet of stickers ready for using!
Step 4 – Use Your Stickers
The last step is to use your stickers wherever and however you want! Whether it’s sticking them to a planner, calendar, or some other project, they are ready to simply peel and stick!

TIP! The flowered stickers above were made by cutting out the same basic shapes as the yellow stickers but on patterned Adhesive-Backed Deluxe Paper!
How to Make Cut+Draw Stickers with Cricut Joy
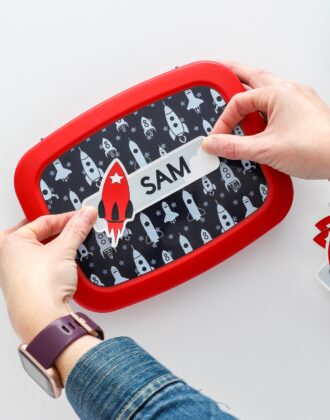
Okay, so now that we have some sticker “basics” out of the way, are you ready to take your custom stickers up a notch? Because by using Cricut Joy Pens, you can create all sorts of fun stickers including monograms, planner stickers, return address labels, fancy designs, and so much more!
Supplies Needed
- Cricut Joy with Fine-Point Blade
- Cricut Joy Pens – I personally recommend using Fine or Extra Fine-Point Pens for sticker details (so they are nice and crisp) but any Cricut Joy Pens or Markers will also work.
- Writable* Adhesive-Backed Materials* such as:
- Cricut Joy Smart Label Writable Vinyl – a vinyl-like material that is only available in white and can be cut mat-less
- Cricut Joy Smart Writable Paper – brown writable paper that also loads without a mat
- Smart Paper Sticker Cardstock – thick, sticker cardstock available in solid colors only
- Adhesive-Backed Deluxe Paper – thick, sticker cardstock available in a wide variety of patterns and sets
- Standard Grip Cricut Joy Mat
*In order to add pen (drawn) details to your stickers, you need to use “writable” materials with Cricut Joy. This obviously includes any matte, paper-like products such as Smart Paper Sticker Cardstock or Adhesive-Backed Deluxe Paper; but also includes writable vinyls like Cricut Joy Smart Label. If you choose to use a different type of paper or vinyl to make stickers, be sure to test the Cricut Joy Pens first to ensure they don’t smudge or smear.
Step 1 – Design Stickers in Cricut Design Space
Pick Your Shapes
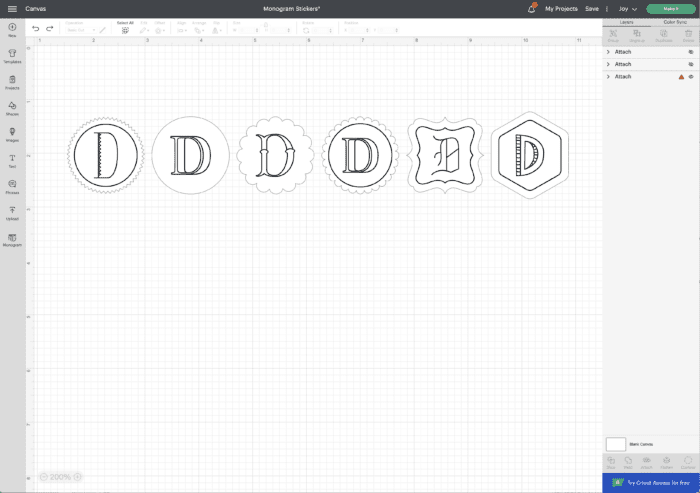
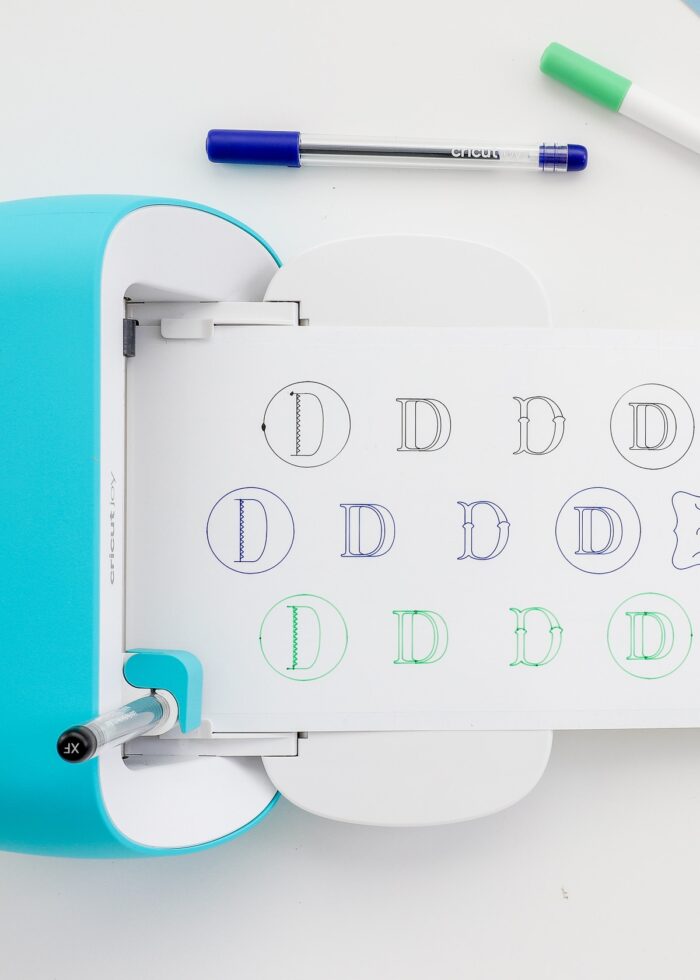
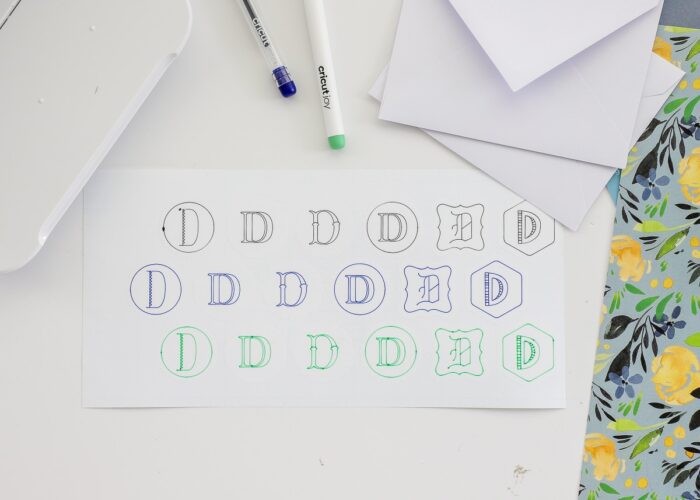
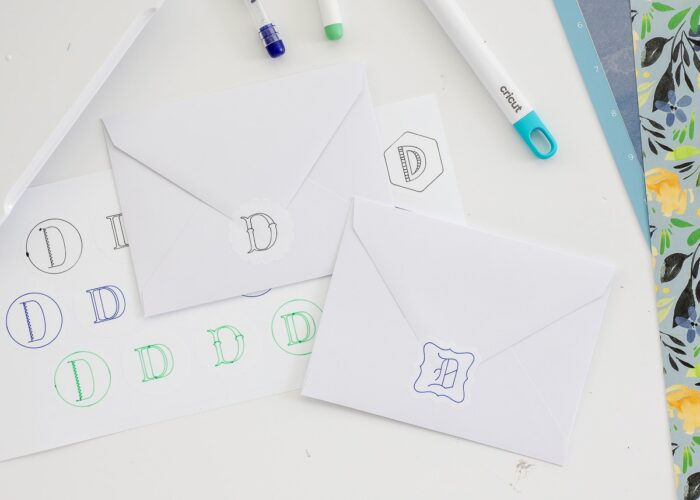
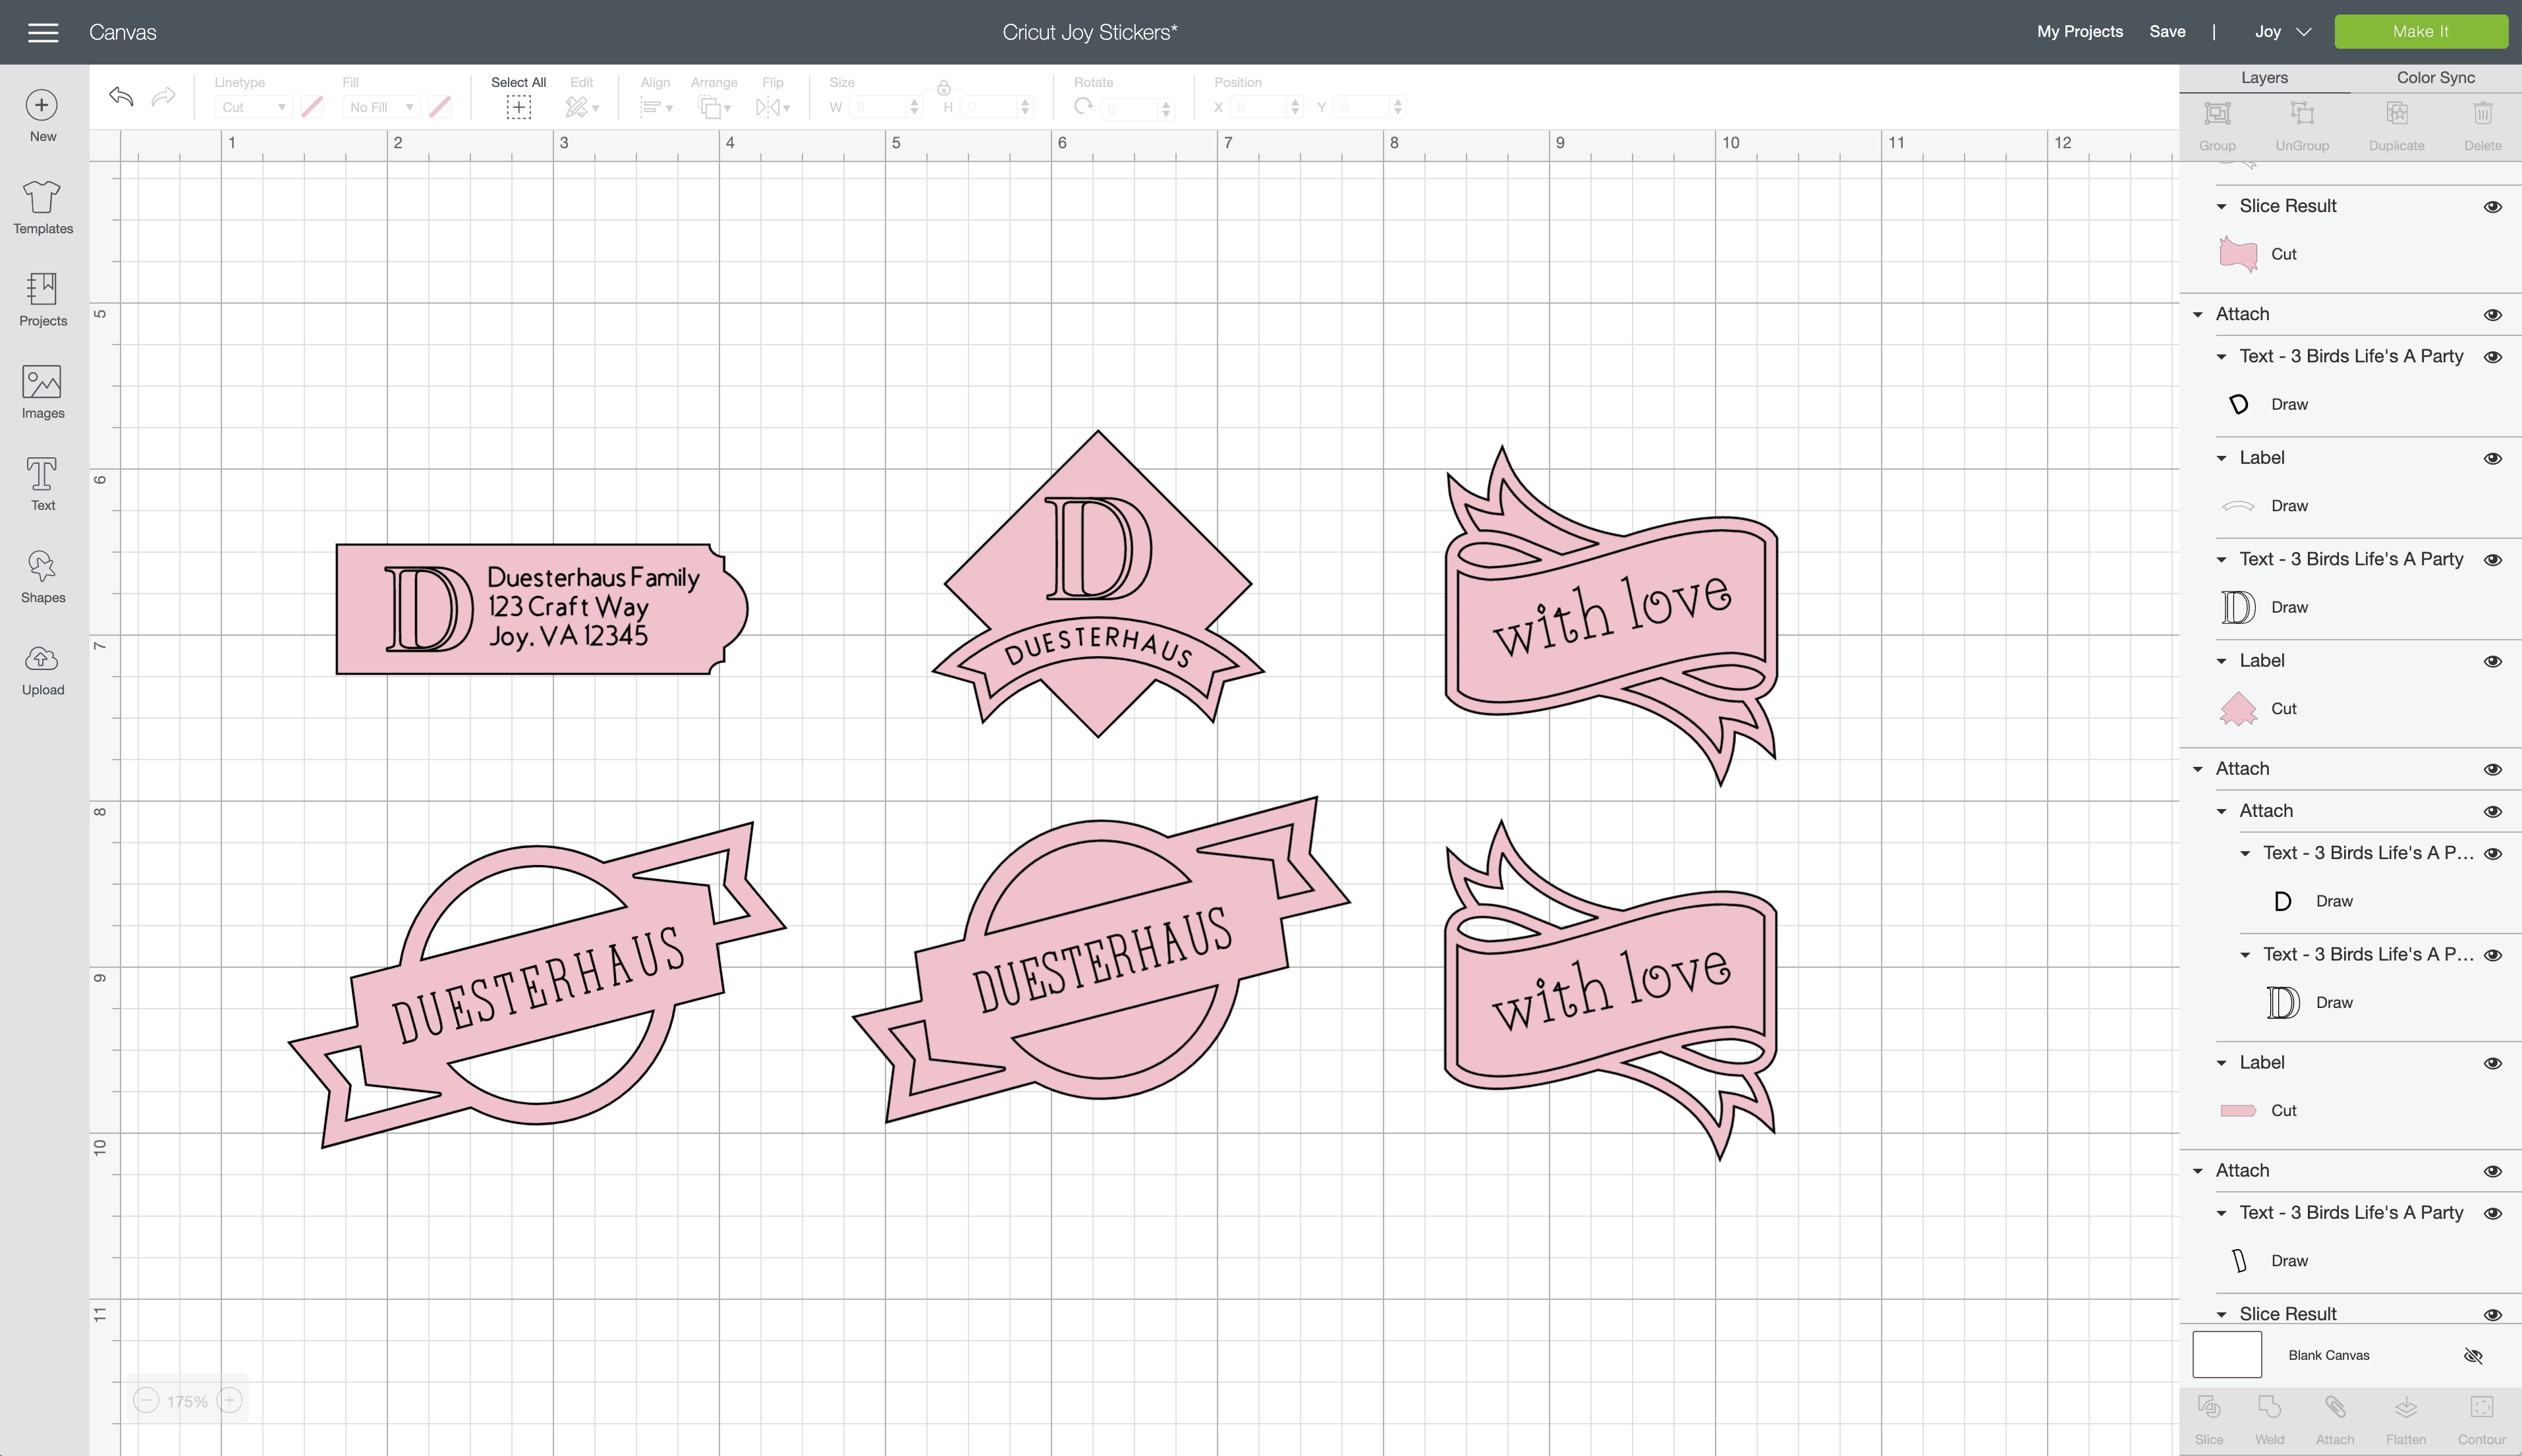
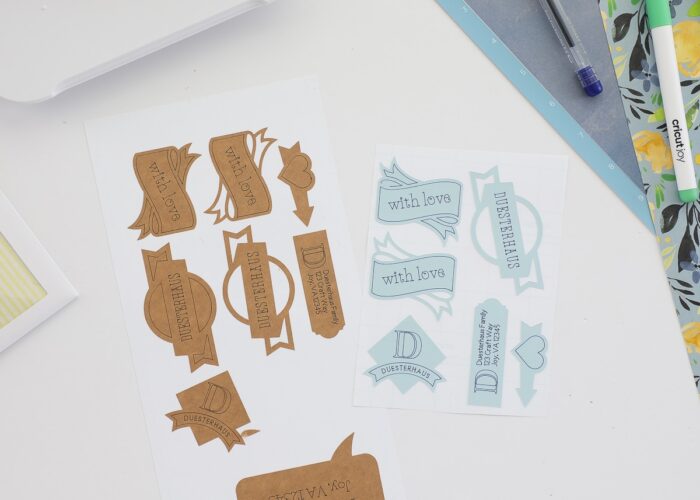
Just like in the basic tutorial above, start by selecting shapes for your Cricut Joy stickers. You can again use the Shapes menu or search for great designs within the Cricut Design Space Image Library. This time around, I wanted to make some fun monogram stickers for some envelopes, so I selected 6 different circle-like shapes and ensured they were set to “Cut.”
TIP! If you’d like to start with shapes that already have Pen/Drawn details added, filter your options by “Cut+Draw” in the Image Library.
Want to save this post?

Add Your Pen Details
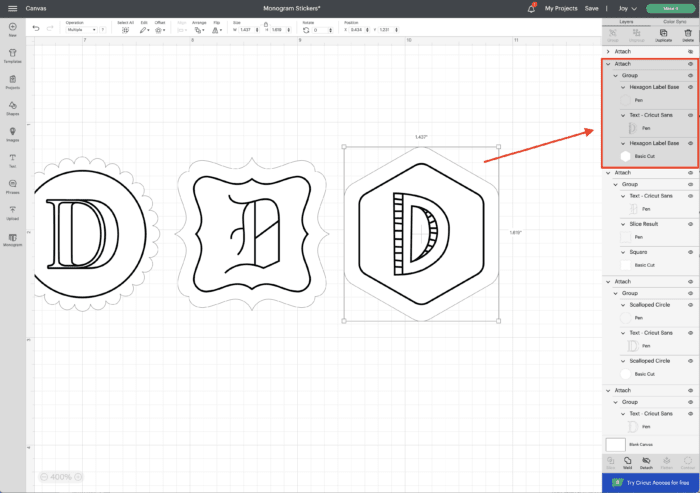
If you didn’t already select images that have Pen details, you can add your own using additional images, the Offset Tool, or even the Text Tool. Whatever additional designs you add to your stickers, be sure to change the operation of these layers to “Pen” in the top toolbar Operations Menu.
To add monograms to each of my sticker designs, I simply added a text “D” and then changed each one to a different font. If you’d like to punch your own letters into to my Monogram Decals, you can access my file HERE!
TIP! If you want to use different pen colors across a single set of stickers (like I have shown), be sure to designate each element with the correct pen color within Cricut Design Space. If you need more help designating pen colors, see my guide here: A Complete Guide to Using Cricut Pens.

Attach Elements Together
Once you have your cut and pen elements for each sticker figured out, select each and every “complete” sticker (the Cut and Pen layers together) and click “Attach.” This will ensure the pen details are completed on top of your cut sticker. (Be sure to “Attach” the layers of each sticker individually, not all stickers together at once.)
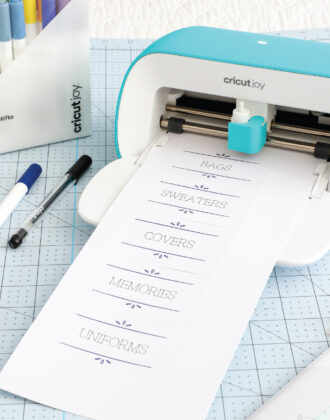
TIP! I sized and laid out these stickers to take advantage of every inch of the Smart Label Vinyl. If you need a bunch of stickers, considering filling up all 48″ worth of label material at once!
Once you’re ready to make your stickers, click the green “Make It” button.
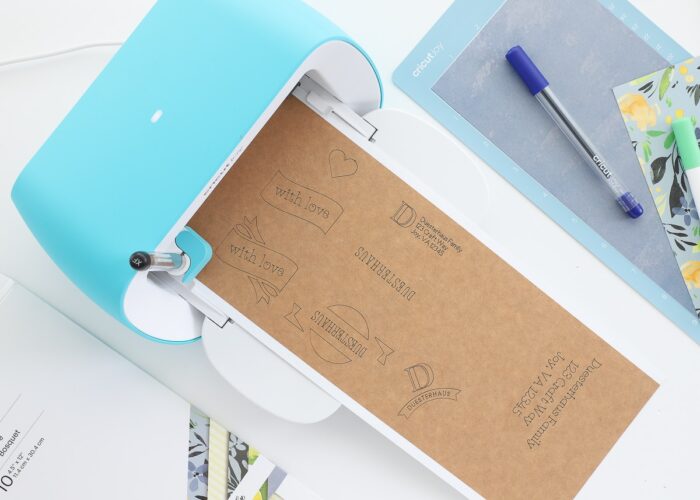
Step 2 – Cut & Draw Stickers with Cricut Joy
Once all the design work is done, all you really need to do is follow the on-screen/in-app prompts in order to make your stickers.
- Cricut Design Space will first prompt you to load your material into Cricut Joy. Whether you are using Smart Materials or sticker paper loaded onto a mat, simply feed it right into Cricut Joy.
- Cricut Joy will then prompt you to load the correct Cricut Joy Pen(s) into the clamp.
- After it completes all the drawn elements, you will be prompted to swap out the pen(s) for the Fine-Point Blade to cut out each sticker shape.
- Once both the drawing and cutting are done, you will then be prompted to unload your material from Cricut Joy.
Step 3 – Remove Excess Material
As shown in the first tutorial, in order to use your stickers you’ll need to remove the excess material around each one first. Simply peel up a corner and carefully tear away all the un-needed paper/vinyl from around each sticker. Once done, you should be able to easily see and pull up each sticker for use.
Step 4 – Use Stickers
Now your stickers are ready to be placed onto your projects! Simply peel them up off the paper backing and lay them right down!
TIP! If you’re having trouble getting the Cricut Joy Smart Label to peel up with your fingers, use a weeding tool to gently lift the lead edge. Then you should be able to pull them right up with your fingers.
Getting Creative With Your Cricut Joy Stickers
Same Design, Different Stickers
The monogram stickers shown above were made on Cricut Joy Smart Label for a crisp, clean look. But the same designs can be given an entirely different look just by swapping out what paper and pens are used.
Below, I made the exact same series of stickers but with Metallic Markers on Adhesive-Backed Deluxe Paper. By swapping out pens and papers, you can quickly churn out tons of different stickers all using the same Cricut file!
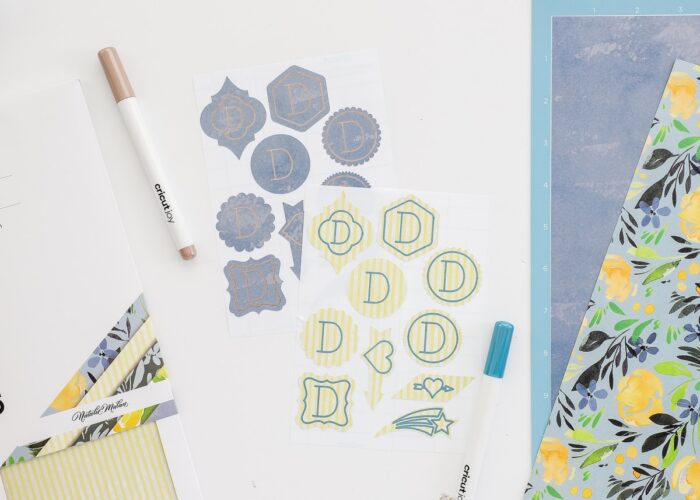
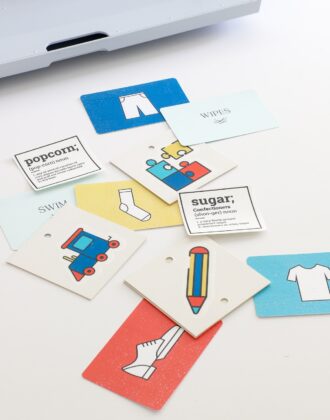
Color-Coded Stickers
If you’re into planner stickers or like to color-code different information, consider cutting the same set of stickers from several different colors (one of each color from the Smart Paper Sticker Cardstock sets, for example). Then you can color-code to your heart’s content!
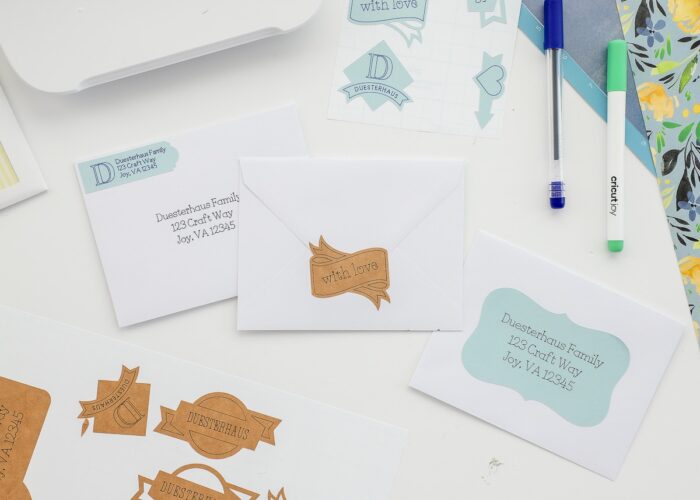
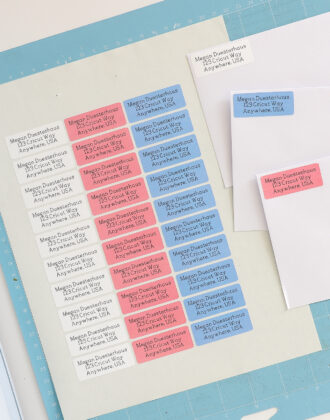
DIY Return Address Labels
Making stickers isn’t just for the planner lovers of the world. This same process can be used to make stickers for ANY occasion, including return address labels or other happy mail stickers.
How to Make Return Address Labels with Cricut Joy!
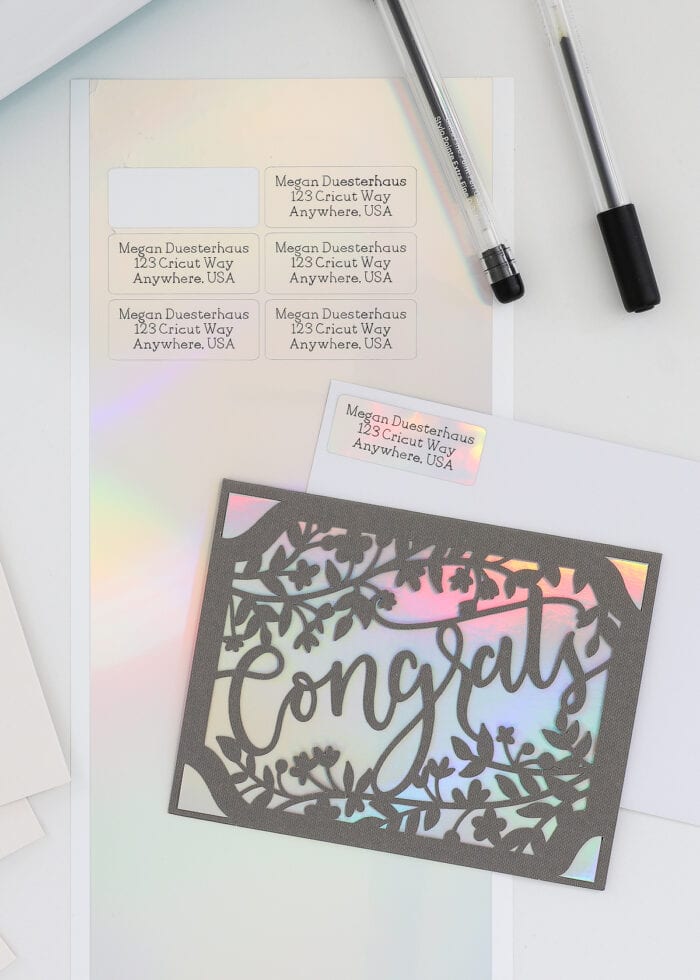
I had so much fun going through various image sets in the Image Library, just picking out cute shapes that would make fun envelope stickers (most are from the Close to My Heart – Artistry set). After choosing a variety of banners and shapes, I typed out words, names, and monograms to fit each one. If you’d like to access these Happy Mail Stickers, click HERE!
In mere minutes, I had adorable stickers written, cut and ready to go!
Wouldn’t these be so fun on wedding invitations, birth announcements, or other special mail?!? And with various papers and pens now available, the options for customization and personalization really are endless!
TIP! Want to make a full sheet of return address labels? Design your label once and then increase the project count on the final cut screen. On a single sheet of Smart Label Writable Paper, you could easily get 50 labels!
See More: How to Address Envelopes with Cricut Joy
If you are a sticker lover and Cricut Joy owner, you might have first been sad or frustrated to not be able to make custom Print Then Cut stickers like you can with the bigger machines. But I hope this tutorial shows that there are indeed lots of great options for making custom stickers with your Cricut Joy using a variety of materials and the Cricut Joy Pens. And if you combine great designs with Smart Materials, you’ll be able to crank out dozens of gorgeous stickers quicker than you can use them up! Happy sticker making!
Megan
2 Comments on “2 Easy Ways to Make Custom Stickers with Cricut Joy”
Awesome! Thanks for sharing.
These instructions are wonderful and I’m so happy with my stickers. I do have one question though. Did you make the cutting pressure less? I went with default and the smart paper sticker cardstock medium weight and it cut right though the whole thing and cut all the stickers out. Not a big problem but I fear i did something wrong.