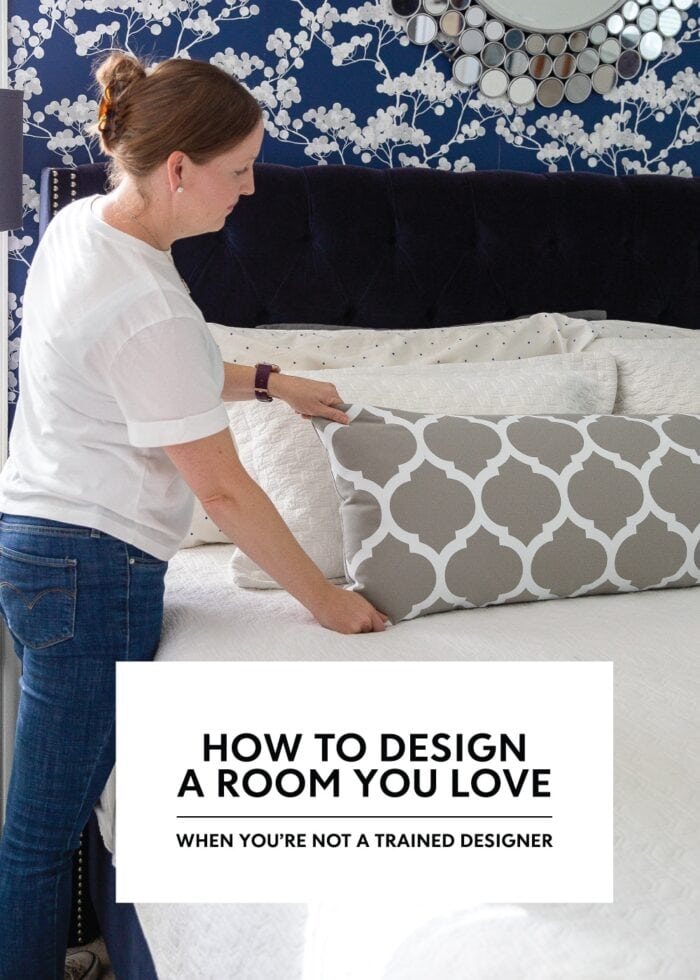
How to Design a Room You Love (When You’re Not a Trained Designer!)
Over the years, I have been asked many times how I go about designing a space. There are certainly times when I (try to) let a room evolve naturally. However, since I prefer a more pulled-together and tailored aesthetic, it is often easier to achieve when I spend a little time planning the design up front. From some basic room “analysis” and searching for inspiration images, to gathering items and actually installing my selections, I’ve nailed down a loose “system” that allows me to transform room after room in house after house…without spinning my wheels (too much!). I’m not a trained designer, but I do feel confident executing my design ideas. So today I want to show you the process I use to design a room I love so you feel empowered to do the same in your own home!
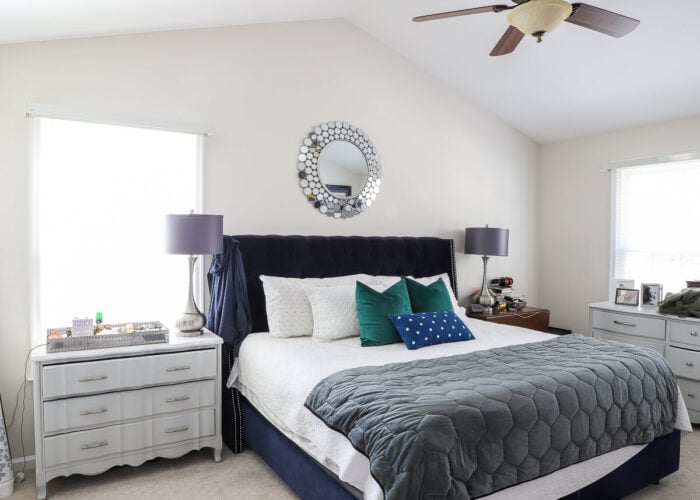
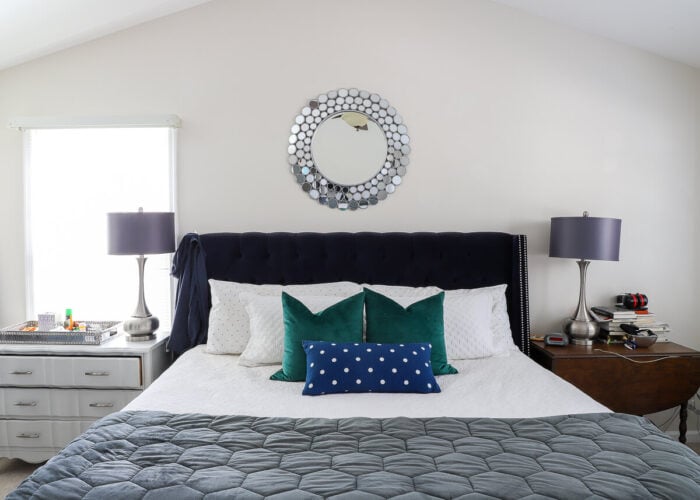
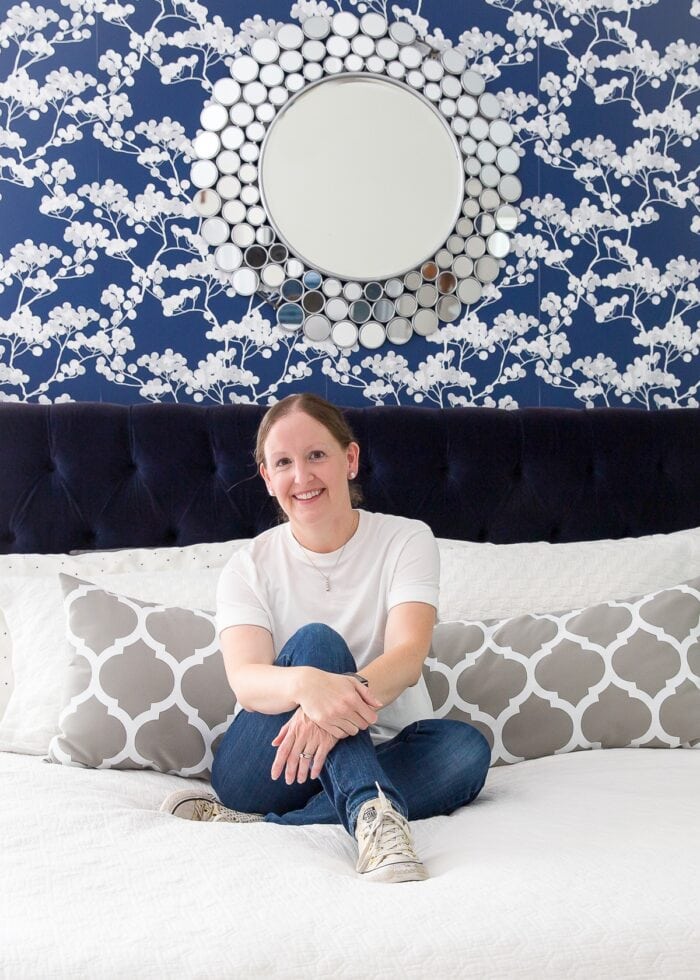
I am going to use our recently completed Master Bedroom makeover to illustrate how this design process plays out in real life; however, these steps can be applied to any space!
Step 1 – Analyze Your Current Space
Everyone’s starting point will look and feel a little different.
- You might have a completely empty room that needs everything from paint and furniture to accessories and lighting.
- You might have a mostly furnished room that’s lacking a cohesive design.
- Or…most likely…you’re somewhere in between!
Before you buy or do anything to your room (especially if you’re just moving in), I recommend spending a good amount of time in it. Only after living in a space for a little while can you figure out how you truly use it, how the lighting looks during various times of day, what the room’s missing, and the optimum room layout.
As you consider the space, ask yourself these questions to help inform the direction you want to go:
- What is the primary purpose of the room?
- Who primarily uses the room (e.g., kids versus adults)?
- Does the room need to be kid-friendly?
- Do pets have access to this room?
- What items need to stay? What items have to go?
- What can be changed? What can’t be changed?
- What functions are missing? What current functions are not being used?
- What eye-soars need to be remedied?
- Is there enough furniture? Is there too much furniture?
- What do I love about this room? What do I hate about this room?
- How do I want this room to feel?
At this stage, I also recommend taking pictures of your space from every angle. Not only is it handy to have some decent shots while you are researching ideas and out shopping, but it’s also fun to look back at them once the room makeover is complete!
Step 2 – Find Inspiration
The next step in the design process is to gather inspiration, and this process will also differ based on how big of an overhaul you are undertaking.
When You Want a Complete Makeover
For a completely blank room, when you want to do an entire makeover from scratch, or you really just have no idea which direction to head, I recommend doing a broad search on Pinterest and Google Images to find any and all images that speak to you (you can also use magazines, catalogs, and books for a paper version, but digital will give you lots more flexibility).
Start a dedicated Pinterest Board or create a folder on your desktop/device. Then pin/save any images with colors, patterns, overall looks, styles, lighting, and layouts you love. Collect as many images as you can, and don’t worry too much about how they interrelate.
Only once you’ve collected a lot of images, spend some time analyzing them for common threads.
- Is there a specific style reflected in all of them? (e.g., preppy, bohemian, traditional, modern, etc)
- Is there a certain color palette you’re repeatedly drawn to?
- Is there a pattern, light fixture, furniture placement, or other element that is incorporated often?
My hunch is there will be a some consistent elements through many of your inspiration images. Once you hone in on those elements that are “speaking the loudest to you,” refine your search again.
This time, focus on finding examples of rooms that use those elements in really strong and stylish ways. Delete saved pictures or move pins off your primary board that no longer match the design direction you’ve (loosely) settled on. Continue to refine and refine and refine your image collection until a solid direction for your room makeover starts to emerge.
When You Just Want a Refresh
If you are not starting from complete scratch (for whatever reason), your search will need to be a little more focused. When there are specific room elements that need to be considered (e.g., pieces of furniture, floor/wall colors, a specific layout, or a throw pillow you have to use), don’t just look for any picture that inspires you. Instead, look for rooms that include these elements to see how trained designers incorporated them in really effective ways.
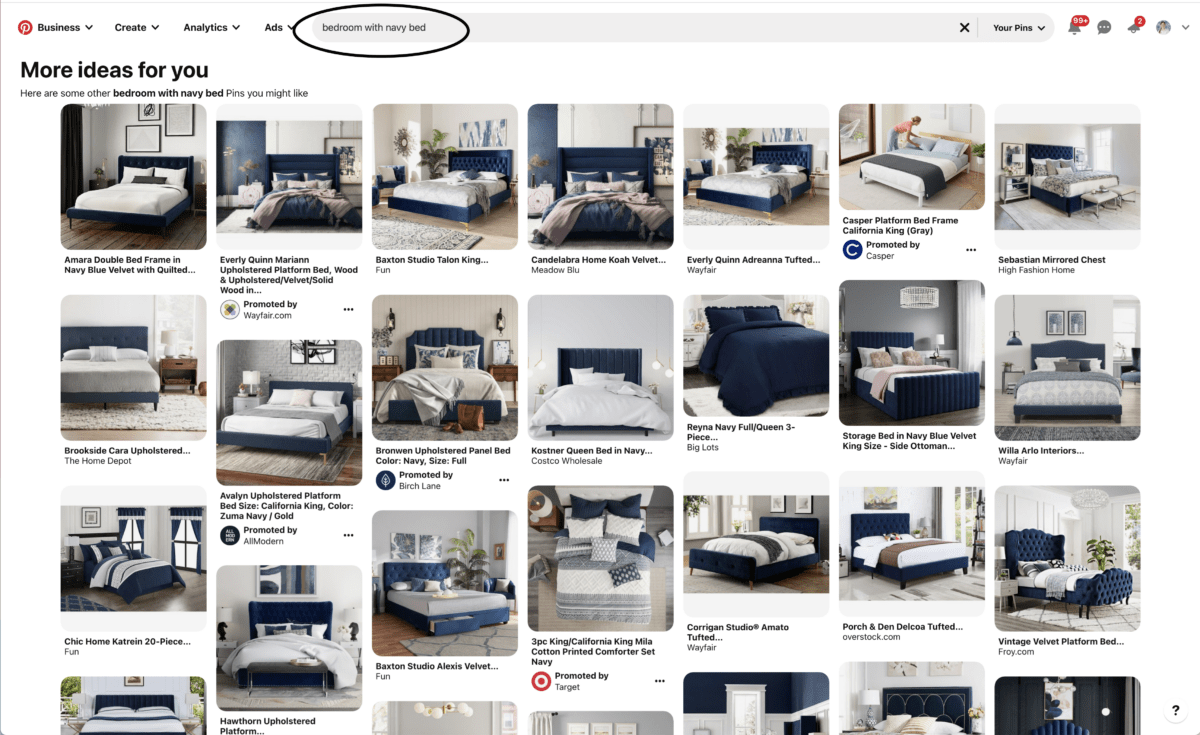
For example, I love our navy velvet bed and had no intention of getting rid of it, so I especially looked for images that included a navy bed. Not only do these inspiration images provide some visual guidance for the rest of the design process, but they can also help you view items you already have in new and refreshing ways.

Step 3 – Determine a Color Palette
It’s very difficult to design a room, no matter the style, without some sort of color palette guiding your decisions. While you might already have a concrete color scheme in mind by this point, identifying the “right” color scheme for a space is where a lot of people get stuck, so let me share three easy ways to do it.
Use Your Inspiration Images
One of the best places to start is with your inspiration images. If you’ve identified a few that really speak to you, draw potential colors from those images and see how they work together in your space.
You can do this virtually using a color picker tool on your computer (learn how I virtually collage and pick colors here). Or even grab some paint chips from the hardware store and play with different combinations until you land on one you love.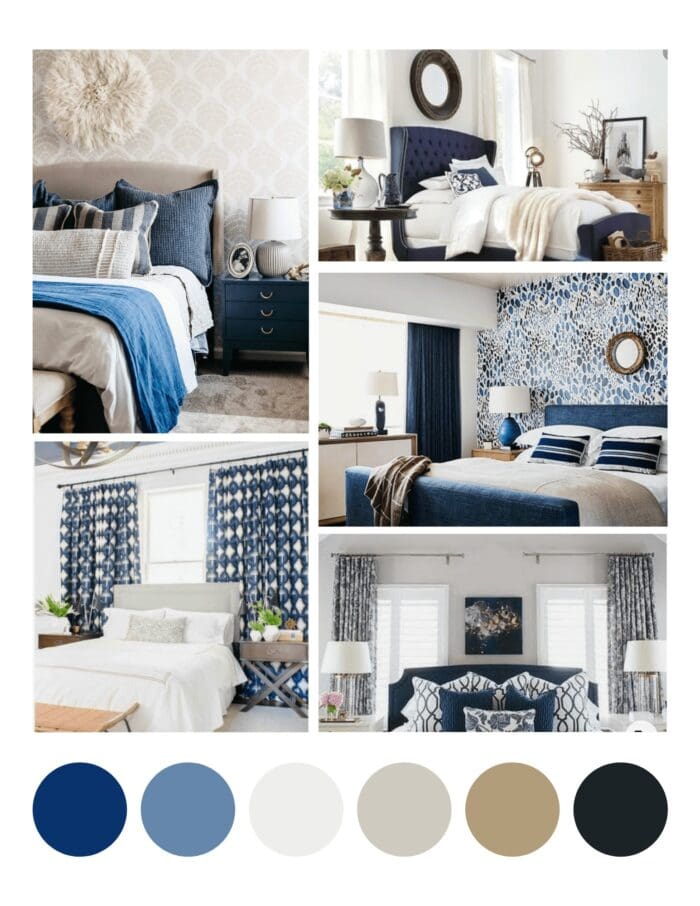
Let the Professionals Do It
If you feel particularly color challenged or are just too nervous to get it wrong (I get it…colors are tricky!), then don’t hesitate to rely on the professionals. These days, there are tons of resources available to find color palettes developed by artists and designers who really know what they’re doing. Here are some sites that can help:
I personally love using paint collections curated by designers like the HGTV Home Sherwin Williams Paint Collection. Here are detailed instructions on how (and why!) I prefer to build color palettes this way.
Look to Nature
Finally, if nothing is quite clicking for you or you just can’t find a way to incorporate a specific color, look to nature. Mother Nature never gets it wrong, and you can find almost any color represented, alongside coordinating tones, out in our world.
Once you identify colors (or groups of colors) that you love and/or work with items you already have, collect paint chips or other small items in that scheme (e.g., fabric swatches, scarves, book covers, throw pillows) and bring them into your space to see how they work with the lighting and other elements already in the room. Continue to play with colors until you find a combination you love AND truly works in your home.
Step 4 – Create a Design Plan
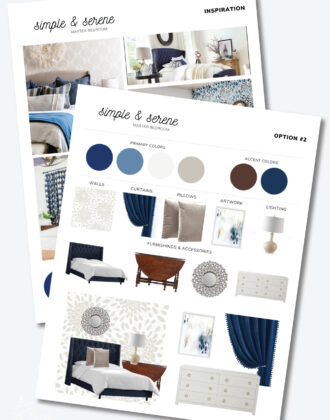
Having a design plan is a bit more than just picking a color scheme. It’s also about figuring out what items could/should be brought into the room to ultimately create a cohesive design. And the best way to do this is to create visual mood boards.
I have two very thorough and detailed tutorials to help you:
But as far as what kinds of images to look for and how to use them to inform your overall design development, here is a great process to follow:
Start with the Items You Have
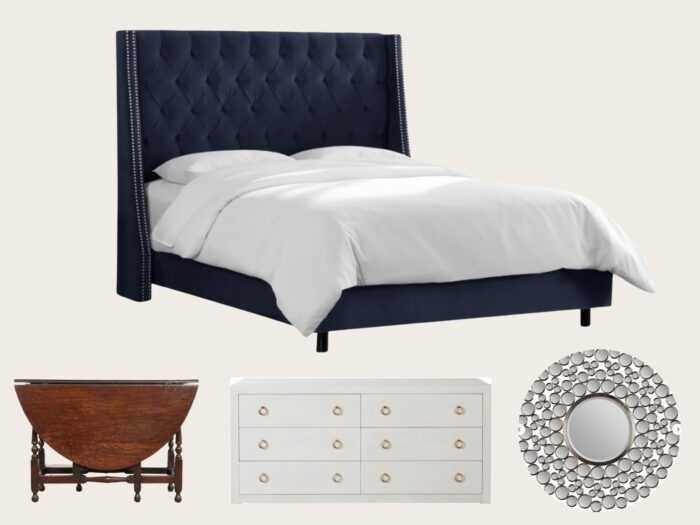
I recommend first looking for digital pictures of the items you will definitely be keeping in your space. You don’t have to find the exact same products, but rather images that visually captures the size, color, and style of your couch, dresser, area rug, etc. Having these images handy will help you visually coordinate your existing pieces with the newer items you bring in.
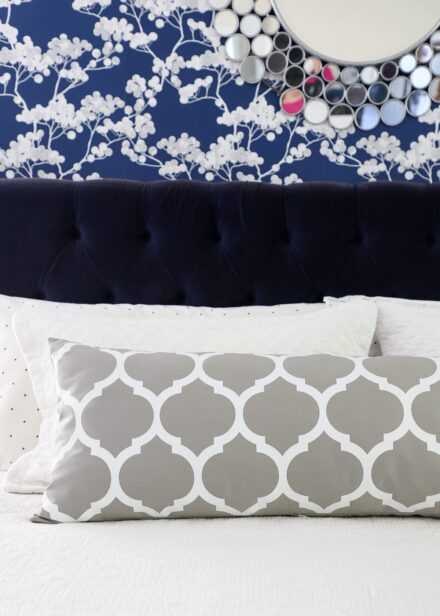
For our bedroom makeover, the foundational items I was not interested in changing/replacing were the navy velvet bed, large grey dresser, silver mirror, beige wall color, and wooden nightstand.
Source Options for Items You Need
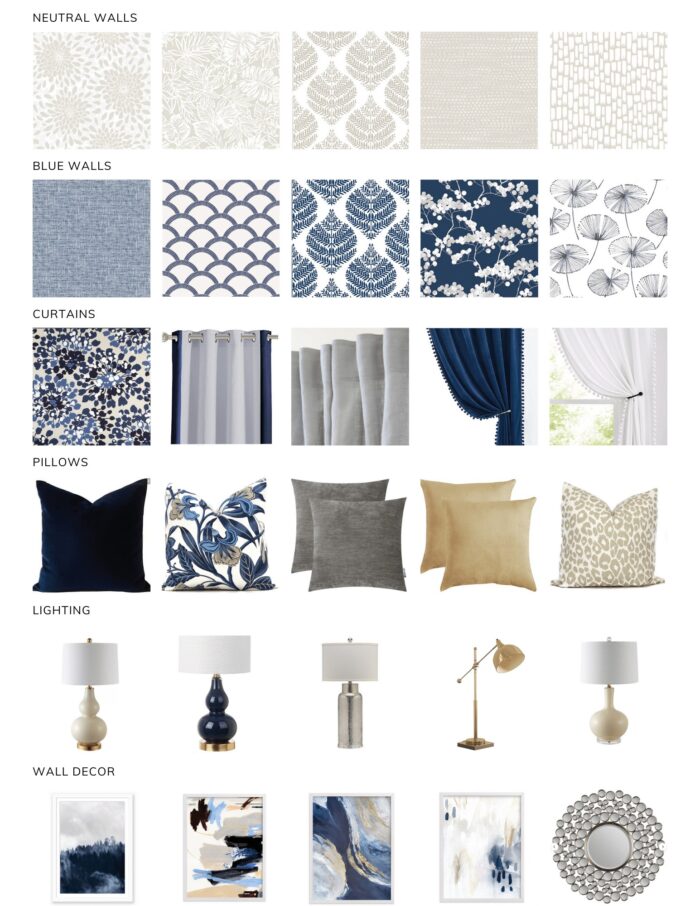
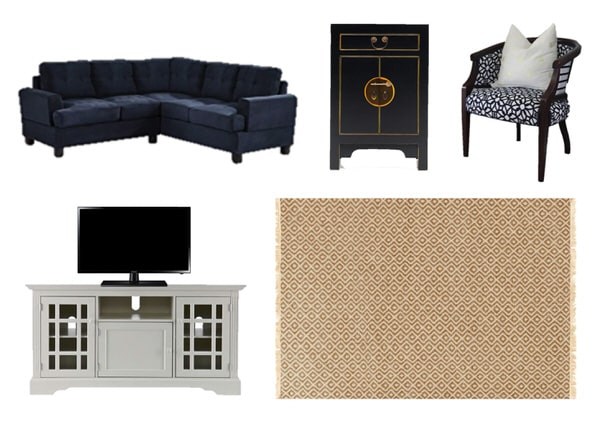
Next, source (lots and lots of) options for everything else that’s potentially needed in the room. You can reference your original inspiration images for specifics, but this will likely include lots of Target, Amazon, and Google surfing to do some virtual “browsing.”
Save options for everything from flooring and wall colors, to large furniture items and small accessories. Don’t hesitate to save any and all products you like, even if the price, size, or scale isn’t quite right. Remember: you’re not actually shopping here; rather you’re looking for representations of general design elements to experiment with on your design boards. Also be sure to save different colors/versions of the same item, so you can find the right choice in relation to everything else.
For example, I saved lots of different wallpapers, fabrics, pillows, and table lamps for our bedroom makeover because I just wasn’t yet sure how everything would come together.
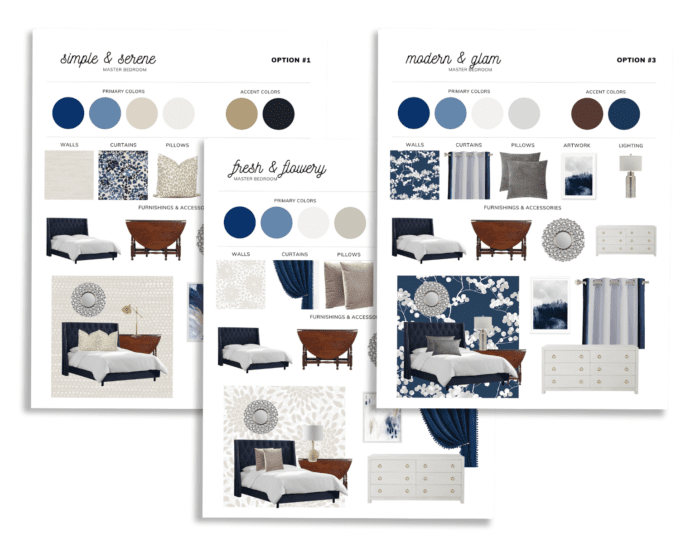
Create (Lots) of Design Boards
Sometimes just sourcing the various items for a room and seeing them all together on a computer screen is enough to get a sense for how a room will come together. But more often than not, you will need to see things side-by-side to ultimately form a plan you love.
So the next step is to simply play with all your images…over and over…swapping out rugs, paint colors, furniture items, and accessories until you find combinations that work together.
Want to save this post?
How to Make Design Boards (With Free Templates!)
Yes, there is a lot of “science” behind mixing patterns, creating a balance of colors around a room, working with busy rugs, blending various styles, etc. But the truth is: I mostly trust my eye and my gut. I keep moving items on/off boards until I find a combination that just “clicks.” Don’t stress about this. It’s your home and you picked images you love. You’ll know when you land on a combination that really resonates with you.
TIP! Even if you land on a design scheme you love the first try, I encourage you to make several design boards. It’s very easy to latch on to the first plan you make, but you might miss out on even better designs if you don’t try everything. The beauty of design boards is that you’re not actually painting walls or lifting furniture. So try to come up with as many possibilities as you can!
Settle on a Design Direction
If one design board hasn’t emerged as a favorite yet, it’s now time to pick a plan to follow for your room makeover. While common sense may tell you to simply pick the design you like best, you might also need to consider what is practical and feasible.
For example, in my design board exercise, Design Board 2 was by far my favorite. But I just wasn’t certain the grey dressers and silver mirror would work with the neutral wallpaper, and I didn’t have the beige lamps or blue curtains.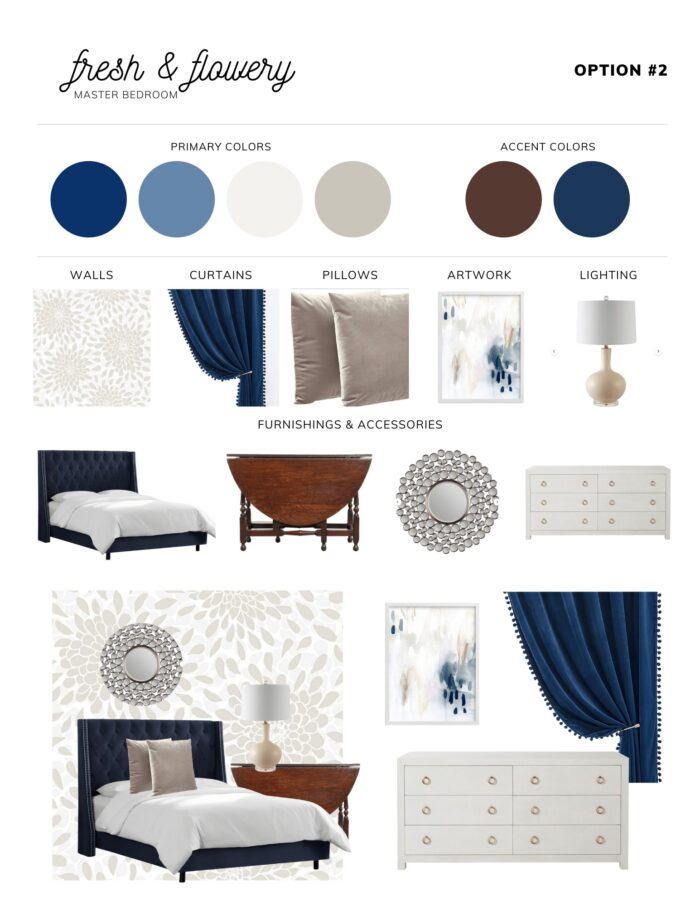
Design Board 3 on the other hand, required the least time and money commitments overall, allowing me to keep our bed, curtains, lamps, and mirror completely as they were.
If money is no object, you can likely pick based on your whimsy; but most of us face monetary and life realities that also need to be factored in.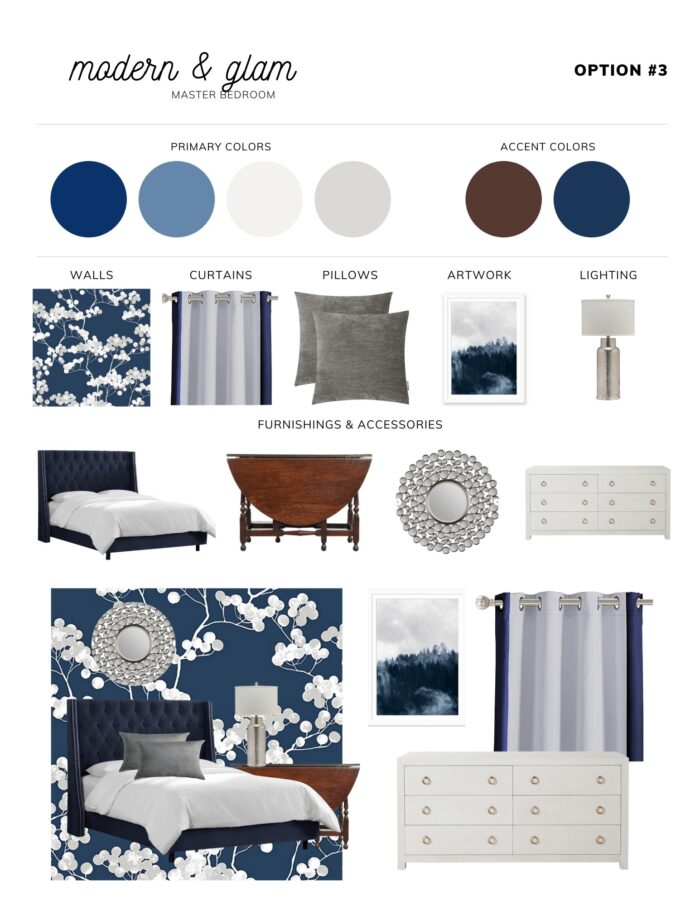
I ultimately pursued Design Board 3 because it allowed me to add some major style but in a way that was also practical and feasible for my budget and timeline.
Plan Your Room Layout
Finally, if your room makeover requires purchasing new furniture or re-arranging the furniture you already have, it might benefit you to also do some room planning in addition to your design planning. Although you can use computer programs to do fancy 3D renderings, all you really need is a pencil and some graph paper to make accurate and helpful floor plans. See my full tutorial: How to Plan Your Furniture Layout
TIP! Consider coloring the different furniture renderings different colors to get a sense of the color/texture balance in a room!
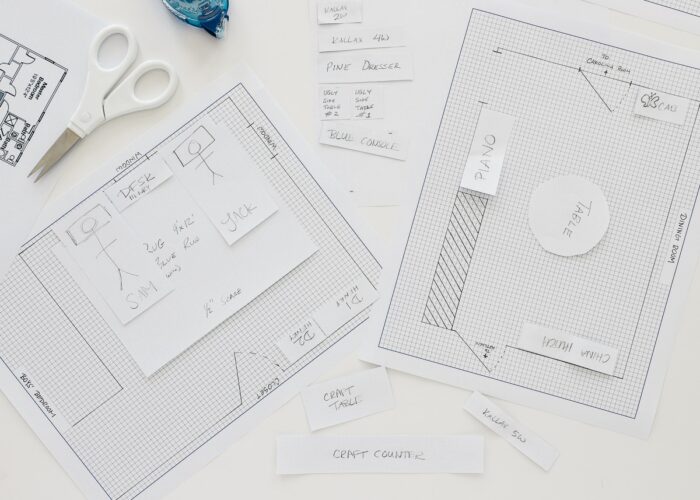
TIP! Be sure to keep dimensions handy as you start to shop for specific items such as furniture, appliances, area rugs, etc in the next step.
Step 5 – Gather Design Elements
Collect Samples
A virtual mock-up is great for ruling out certain items and figuring out which colors and patterns play nicely together. However, nothing can replace real life since it can be VERY difficult to account for size, scale, and color on a computer screen. So once you’ve narrowed down general choices for things like paint, fabrics, flooring, wallpapers, rugs, etc, I absolutely recommend finding/ordering samples before purchasing and installing anything.
What looks like a good pairing on a computer screen might not work in real life at all, and you don’t want to get too far down the road in a design if some (big) elements don’t work right. Ordering samples (or at least seeing items in person) is also a great way to finally make a decision if you are truly stuck and the virtual mock-ups don’t help. I personally find fabrics really hard to figure out on a computer; but as soon as I am holding them in my hands, I can make a decision pretty quickly!
Shop for Products
It’s important to note that while the design board exercise can help you suss out that you need grey lamps and not red ones, a wooden coffee table and not a painted one, and a dresser that is generally 80″ long…it doesn’t have to dictate what you actually purchase. Instead, use your Design Board as a general shopping guide and purchase the specific items that fit your budget and style preferences.
For example, my design board exercise showed that blue and grey artwork would work best with everything else in the room. So after extensively searching through navy art options, I picked the ones that were easily available and within my budget.
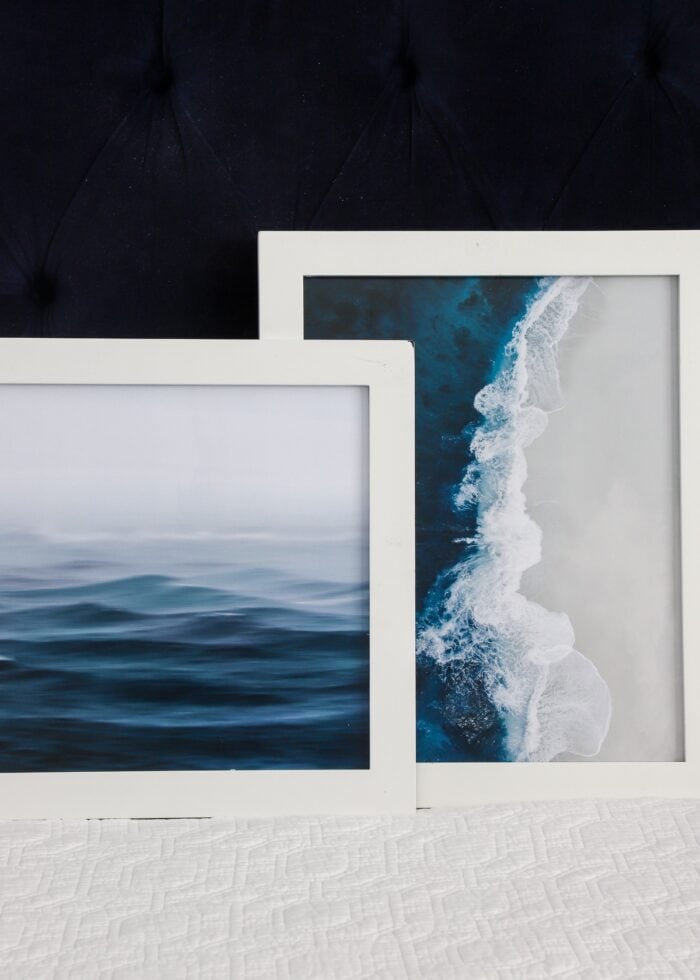
Print Your Own Budget-Friendly Artwork
TIP! Keep a copy of your Design Board on your phone so you can easily reference it while out shopping!
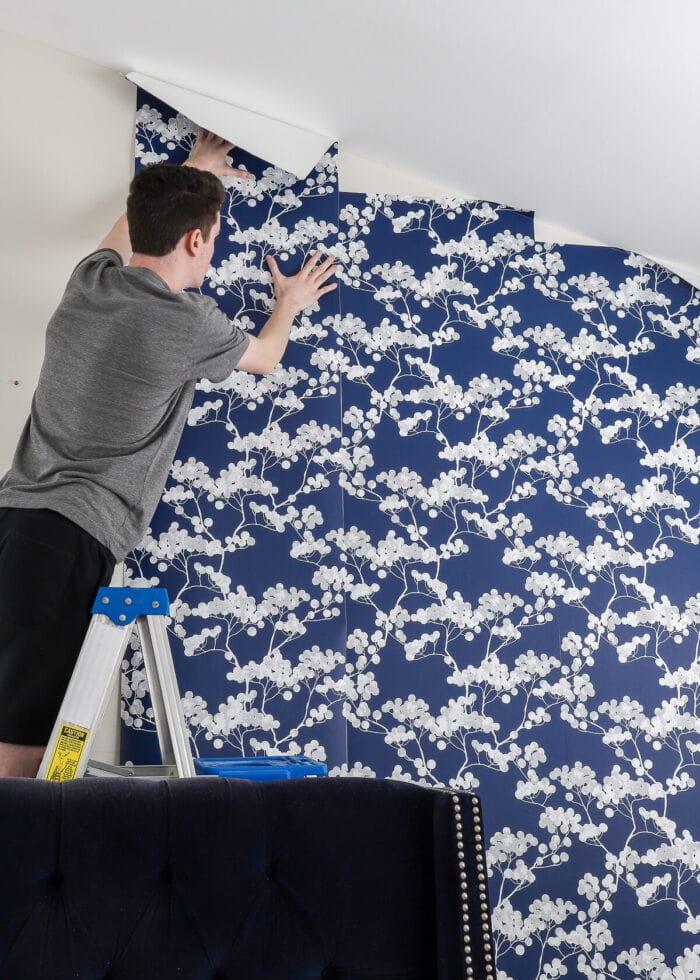
Step 6 – Start Decorating!
Planning and shopping will only get you so far. So if you’re serious and ready to finally change the look of your room, you have to actually start installing your design plan!
Take a deep breath…almost everything (well, a lot of things) can be un-done if you really feel like you made a bad choice.
Take the First (& Biggest) Step
The best way to start is to install the biggest visual element(s) in the room. Usually, this will be the floors, walls, or a really big furniture item.
I know it may seem scary to tackle the biggest elements first. But since these are the areas that make the biggest impact, you will know right away if you like the direction you’re going in or not.
Add One Element at a Time
Once you’ve made the big impact changes, start to layer in additional details from your interior design plan like curtains, pillows, bedding, artwork, lighting, and accessories. When possible, I add/swap one element at a time so I can be sure things are working together as I hoped.
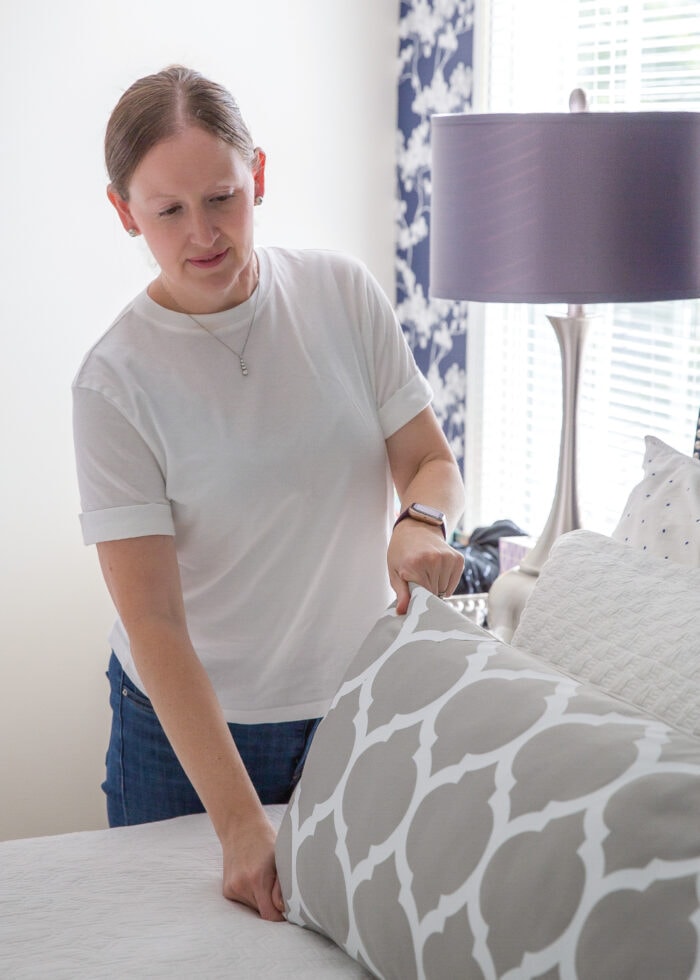
However, decorating isn’t always a straight line. Your curtains might work until you add in a piece of art, and then suddenly nothing works at all. As such, I always recommend keeping receipts of anything you purchase until you are 100% done with your room makeover.
Adjust As Necessary
As you layer items in, you may find that certain elements don’t work as you anticipated. It’s okay…almost everything can be fixed! If something keeps catching your eye in a weird way, take a pause to figure out why.
Here are some common culprits:
- The scale may be off (quite frequently, we buy items that are too SMALL!)
- There might be too much going on.
- Things might match too well or not enough.
- An item might not have a style “partner” somewhere else in the room (making it feel disconnected and random).

If you can’t figure out the problem, go back to your inspiration pictures to see how a certain element was executed by a pro (e.g., what pillow combinations were used on that specific couch) and figure out how to fix your choices so they work better. This can sometimes mean searching for different fabric options or accessories, but can also mean getting rid of something so everything else plays together nicely.
Step 7 – Finishing the Room
Designing a room is not a perfect process, and there is a lot of trial and error involved. I have certainly pulled off a complete room makeover all at once, but most of my designs are an evolution, adding and subtracting details until everything finally “clicks” just right.
While some people like to swap home decor accessories forever, only you will know when a room is done. Whether you’ve executed your plan to perfection or not, you will eventually reach a point where nothing awkwardly catches your eye and you feel content and satisfied when you walk into the space.
If you feel like you’ve executed your design plan and something still isn’t giving you that satisfying “click,” consider adding in these interior-designer-approved finishing touches that every room “should” have:
- Something alive (e.g., plants)
- Something old (e.g., antique, vintage)
- A variety of textures (e.g., velvet next to cotton, solid wood next to lacquer)
- Something unexpected (e.g., something that doesn’t perfectly match in terms of color, style, etc)
In my experience, adding in plants is usually the quickest, easiest, and cheapest way to finish off a room!

Putting a room together is a very organic, fluid process. And while this is liberating to some, the uncertainty of a good result is sometimes reason enough for people to do nothing at all.
With moving every few years, I rarely have the time to let design choices simmer. As such, I do my best to plan out my designs (exactly as I detail in this post), so I can pull them together as efficiently and successfully as possible (so we can actually enjoy them before taking everything down and moving on!)
I hope the design process I’ve outlined here gets you making decisions and executing designs in your home with more confidence!
Megan


25 Comments on “How to Design a Room You Love (When You’re Not a Trained Designer!)”
Yay, yay, YAY! Thank you Megan! I’m a big function over form person myself, so I’m with you on working out how you need the room flow before making it pretty. Ooh, ooh, now my creative juices are flowing!
WOW! This was amazing and so, so helpful – hurry, hurry with the next step, PLEASE? The technical aspects of your gorgeous mood boards are befuddling and I am anxiously awaiting your skillful explanations. LOVED this post – thank you from the bottom of my heart.
I totally needed this! My living room feels pretty blank, it has stuff in it. But is it what I really want it to look like? I need to go back to the drawing board and pick stuff I really love….not hand me downs. 🙂 Thanks so much!
I love everything about this post! I totally need to do this. You lay out everything so well. One question though…what about a budget? Maybe it should be “Step One”?
This is such an incredibly helpful post—thank you so much for breaking it down for us!!
This is super cool to see, its always so fun to see how others execute and find ways that work for them 🙂
Loving the direction with the room your going!
xx
What a great process! I need to use this to make a plan for my living room. We bought a couch/loveseat set and hung curtains in the month after moving…and it has sat just like that for four more months now! Bare walls, no rug, and the throw pillows that came with the furniture. Love your system and it gives me great direction for planning my space.
So much information! I have followed your blog for years now and this post has been my favorite. Thank you so much for the inspiration!
Hi. What do you recommend when you have a small room(9*12) and no playroom in the house for all the kids toys. I try to hide stuff in their closets but they are also small closets and its not like they have tons of toys. Any suggestions? Thank you.
Hello!
A few ideas to try:
Is there a way to separate the room, even though it’s small? In our North Carolina home, we used our sectional couch to separate off the living room from a small playroom. You can see what I mean here: https://thehomesihavemade.com/2015/05/navy-turquoise-family-room-revea/
Can you utilize storage furniture to hold toys? A storage bench ottoman as a coffee table | cube shelves/other media cabinet with storage as a TV stand | side tables with baskets or drawers
Can you move a bulk of the toys to the kids bedrooms? Toys will always trickle into the living spaces, so it’s good to have some baskets or storage furniture to catch things, but if the bulk can be moved out it might help!
Hope those ideas help!
Megan
Hi, just wondering if you ever did the part 2? I’ve done a search but couldn’t find it. Did you label it something else? Interested in the rest.
Hello!
I am actually still working on Part 2. It should hit the blog before the end of the month! Thanks for checking in, and I’m sorry about the delay!
Megan
When searching pinterest. ..just “what do you type in as a header”? I have certain elements like you said that I can’t change. I have get furniture…hardwood floors…and red is a big colour fir me. So what would I start typing in ? Then when I need to refine, refine and refine….how do you go about doing that? I find pinterest overwhelming. I get frustrated and end up giving up. Any help will be appreciated
Hi Laura!
That’s a really great question…and honestly, it just takes some trial and error until you start to see the images you need. Pinterest CAN be very overwhelming and frustrating.
I start by being as specific as possible, so in your case, I’d start with “wood floors red family room” or something along those lines. Then, as you start to see images come up that you like, you can narrow down what you type in. For example, say you find a picture of a red room with flowered drapes that you really like. You can then start to look for images using “red family room flowered drapes” and then see if you can find an image that has even more elements you love (or even specific drapes/fabric you want to use). It can be circuitous and you may not be able to find images that have EVERYTHING in one shot, but you can start to collect various images that have different elements of what you like.
One more thing to try, when you click into a pin, Pinterest now populates a bunch of pins underneath that correlate to the picture in some way. If you see a picture with a few elements you like, click into it and then surf all the related pictures underneath. It may take you down a rabbit hole but you can refine that way too!
Hope that helps enough to get you started! Let me know if you have more questions!
Megan
Love this. Great ideas. I get so stuck in the rabbit hole that I forget my original intent. I also tend to not be as good at making story boards or art or mood boards before getting into something. I know I need to take several steps (or miles) back and do that.
Did you ever do part 2? I still can’t find it and I know this is a few yrs old but still equally valuable and relevant! I love how these ideas and plans of yours are gearing up and love your ideas. It is very refreshing.
Thank you!
Hi again!
Unfortunately, I never got to the “Part 2” which is totally embarrassing – you’re definitely not the first to request it! I’d still love to circle back around to it someday…thanks for the push to do so!
Megan
Hi. I also have brown carpet in the bedrooms and some kind of tan/yellow paint on the walls that can’t be changed. How did you add the stripes to the TV wall? Thank you!
Hi there!
You can find the stripes tutorial here: https://thehomesihavemade.com/2017/05/vinyl-stripes-on-the-wall-family-room/
Hope that helps!Megan
Hi there! You so are wonderful and talented! oh how I would love to/need/hope/wish that you could show us some of the techy ways to make a mood Board, I’m sure I could make one word or maybe use publisher but I wanna show my contractor a bunch of pictures and I don’t wanna just text him numerous pictures or try to get him to get on Pinterest to join onto my pin board which probably has way more on their end isn’t as quite specific as he probably would like as I easily get sucked into the rabbit hole there’s just so much on there to like!
Honestly I would pay 510 possibly more dollars to get your advice and help with how to plan especially when relating to planning with your contractor when all of us women’s ideas come mostly from Pinterest! Just a thought I know others have already brought it up so I’m not intending to make you feel guilty I just think you have a wonderful brain and are so good at being able to see the whole picture where as I get sometimes lost in the details!
But I’ve totally gotten a lot of help from the articles you’ve already published so thank you and I mean this all as a complement!!!
Hi Aly!
Thanks so much for leaving such a nice comment. Unfortunately, creating mood boards for others is not something I can do at this time.
My best suggestion for creating a Mood Board is using this tutorial: https://thehomesihavemade.com/2017/05/how-to-create-a-design-board/
I do wish you the very best with your renovation!
Thanks, Megan
HI! Awesome board! Where do you go online to look at fabric examples/images? Is it the same site you request samples from? I usually pay a designer to do my rooms but I’m trying to do it myself after all these years and fabric is usually given to me to look at so I’m overwhelmed on where to start with it.
Hi there!
I usually use Fabric.com because they tend to carry fabrics within my price range. They also have a “digital design board” option, so you can see how fabrics all look together right on their site without having to save images or collage them together. It’s also from these listings that I grab screenshots for my Design Boards.
I hope that helps a bit!
Megan
I’ve been looking for ideas on how to redecorate an outdated, hodgepodge living room. I don’t have much decorating “know-how”. I found some help on youtube and discovered something called a mood/vision board. The elaborate explanations were impressive but felt out of reach to a non-decorator, like me.
Your explanation is so clear. Your pictures are so helpful. You have taken a complex process and made it accessible to even a beginner, like me!
Thank you so much! You’re the gifted teacher who communicates the process in simple and doable terms! I will be following your blog with great appreciation for your effective communication style !!!
Thank you so much Megan, so kind of you to share great ideas on How to design a room you love. got inspired by “plan your room layout” using pencil and a graph paper. Very helpful!
Love all your posts
Beautiful! The amazing thing about moving constantly is that you get to redesign your spaces! Love this!