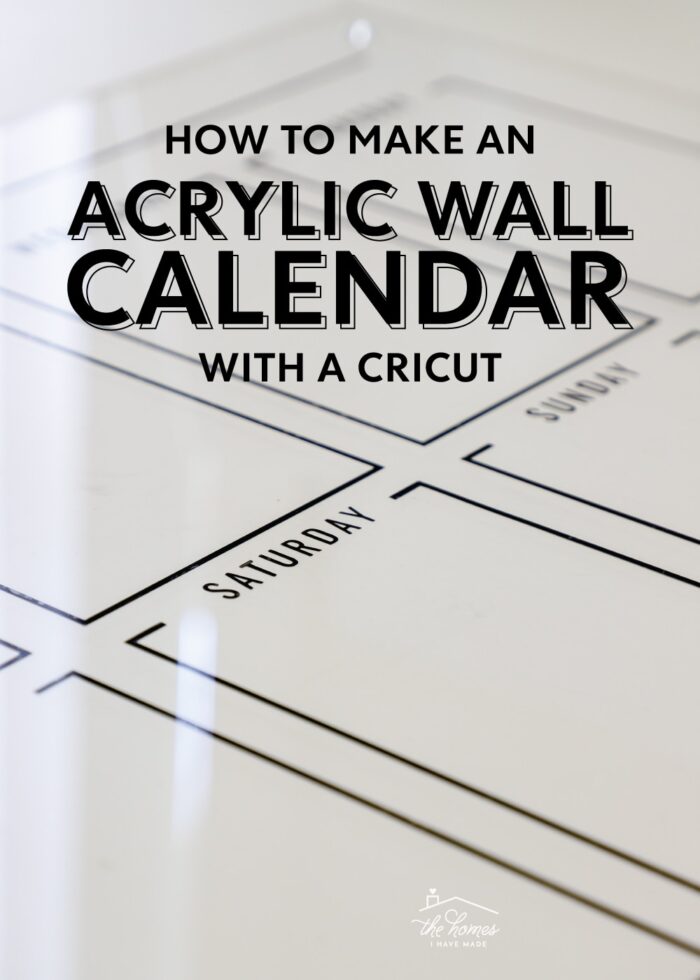
Easy DIY Acrylic Wall Calendar with a Cricut
Large acrylic wall calendars are all the rage…and for good reason! They are super stylish, can be customized in a wide range of layouts, and work wonders for keeping the entire family on the same page. But did you also know they are really easy to make with a Cricut machine?!? Yep – skip the special order and high price tag, let me show you how to make your very own personalized acrylic wall calendar…right from home!
My Favorite Weekly Planner Design
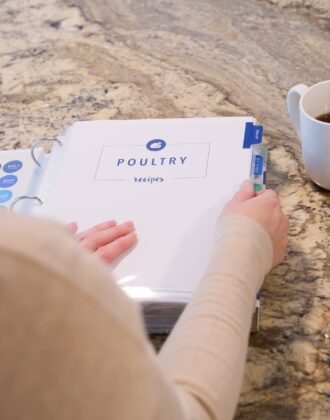
For years…literally YEARS…I have used this paper weekly planner (below) to run our household. I always have a stack printed out, ready to go inside our meal planning binder.
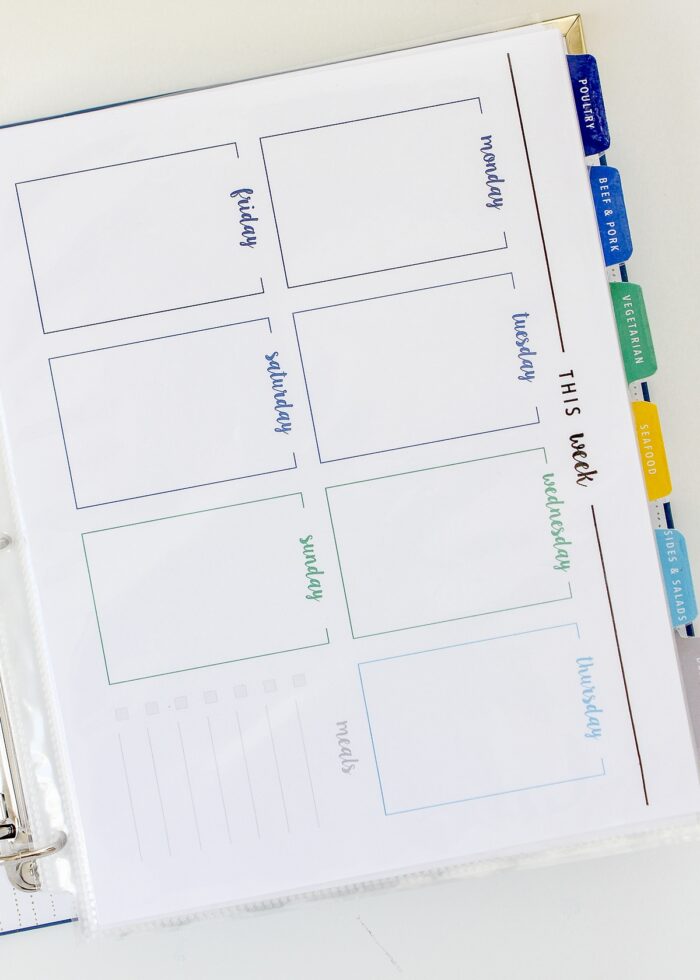
Each week, I pull a fresh one out, fill in the weekly events for each family member, and pick our nightly meals. It then gets taped to the refrigerator for the week until Saturday comes around and I start again with a fresh paper. You can learn more about my process here: Meal Planning 101 | How to Create a Habit That Sticks.
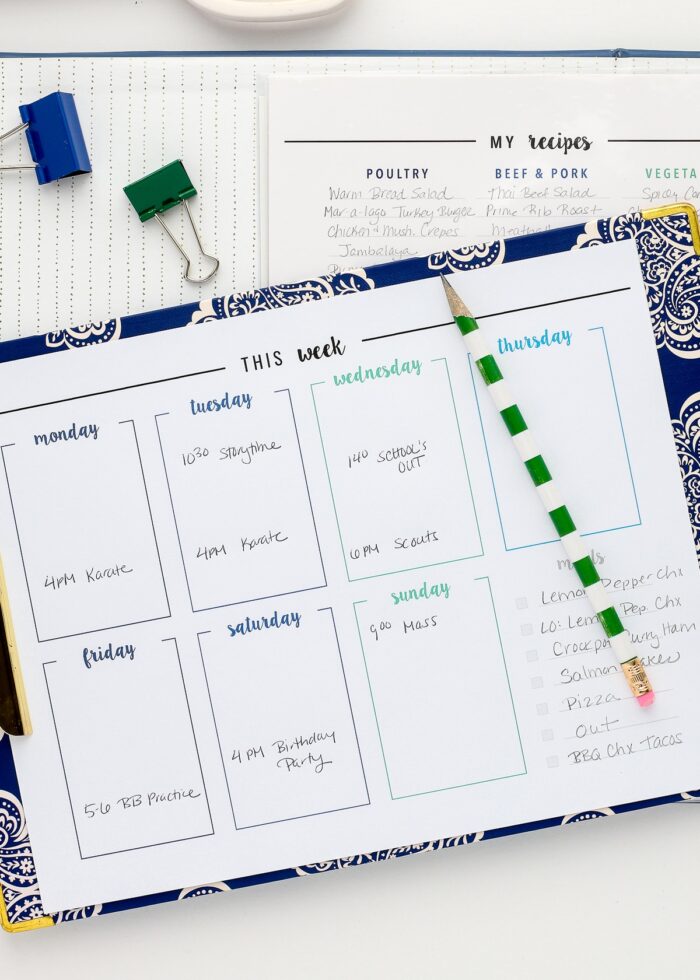
The small, paper version never really bothered me (again, I’ve been doing this for ages). But it was my 12 year old son who said, “Mom, it would be really great if we could have our small weekly calendar really big on the wall!” Little did I realize how much he (and my husband) actually referenced it!
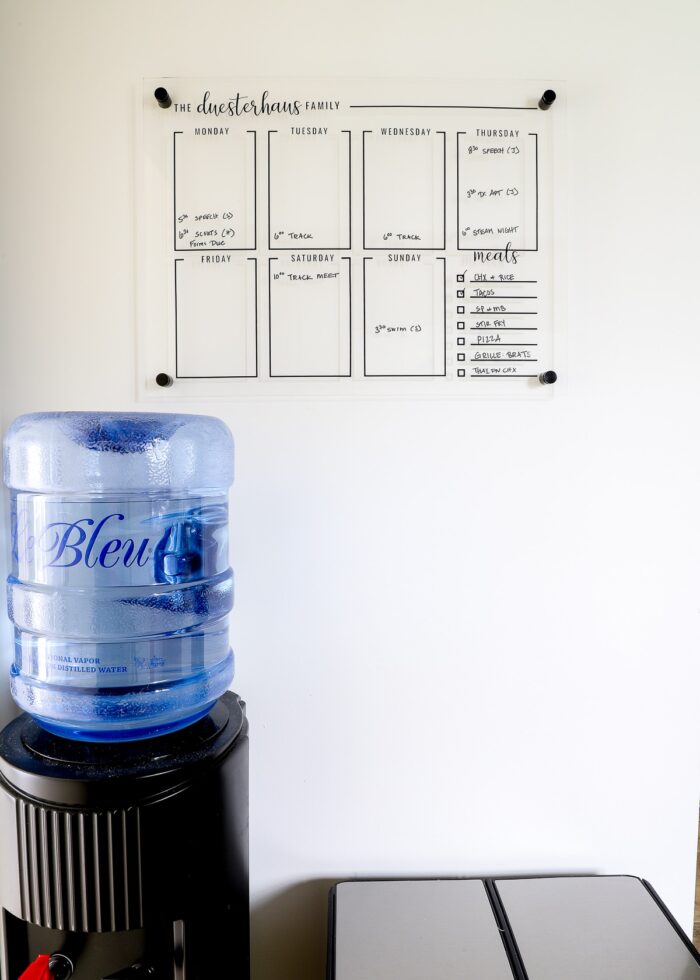
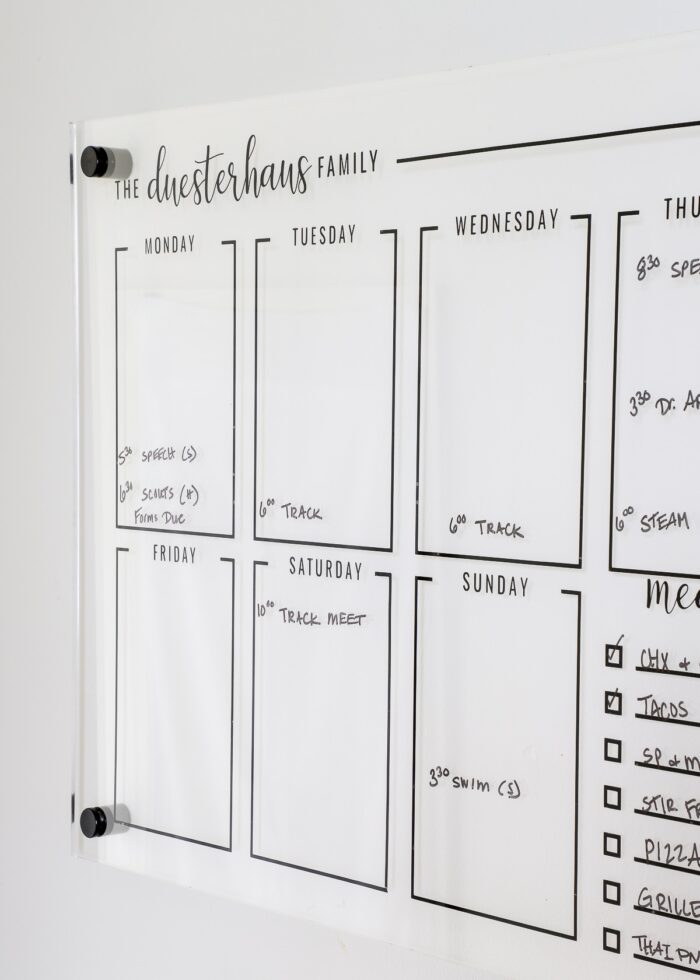
Well…I am never one to turn down a project request…so I adapted my tried-and-true weekly planner to a large, wall-mounted, dry-erase version instead!

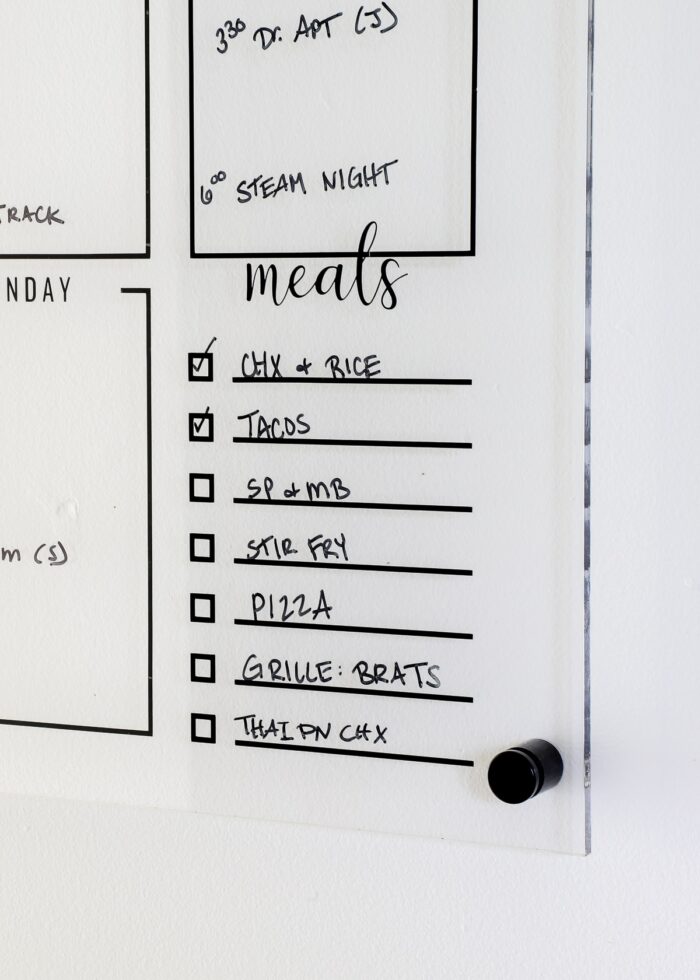
Now, our weekly plans and meals are on a nice big board in the middle of the kitchen for us all to see and use. And we are LOVING it!
Why DIY Your Own Acrylic Wall Calendar?
Dry-erase calendar boards are certainly nothing new. In fact, I’ve made custom ones for our family before: How to Create Your Own Dry-Erase Calendar with Washi Tape
But making your own with an acrylic board instead has some new appeal.
First, they are super stylish. The crystal clear surface and sleek mounting hardware look good with almost any style aesthetic.
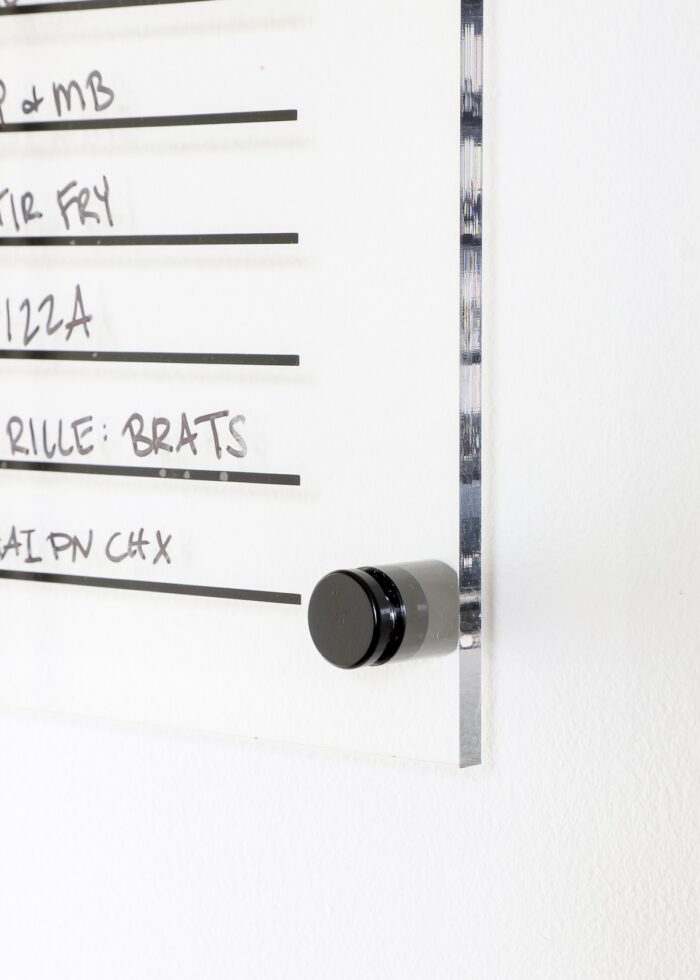
Second, acrylic boards are now easier to find than ever. It used to be that you had to cut and drill the acrylic sheet and then find mounting hardware all on your own. But now, these board kits come in various sizes (with the chunky mounting hardware!), and I am SUPER impressed with the quality!
Further, cutting your own vinyl design means you can pick whatever layout and personalization you want (e.g., weekly, monthly, to do list, etc), making it the perfect addition to your command center, kitchen, office, playroom, and more!
And finally…my favorite part?
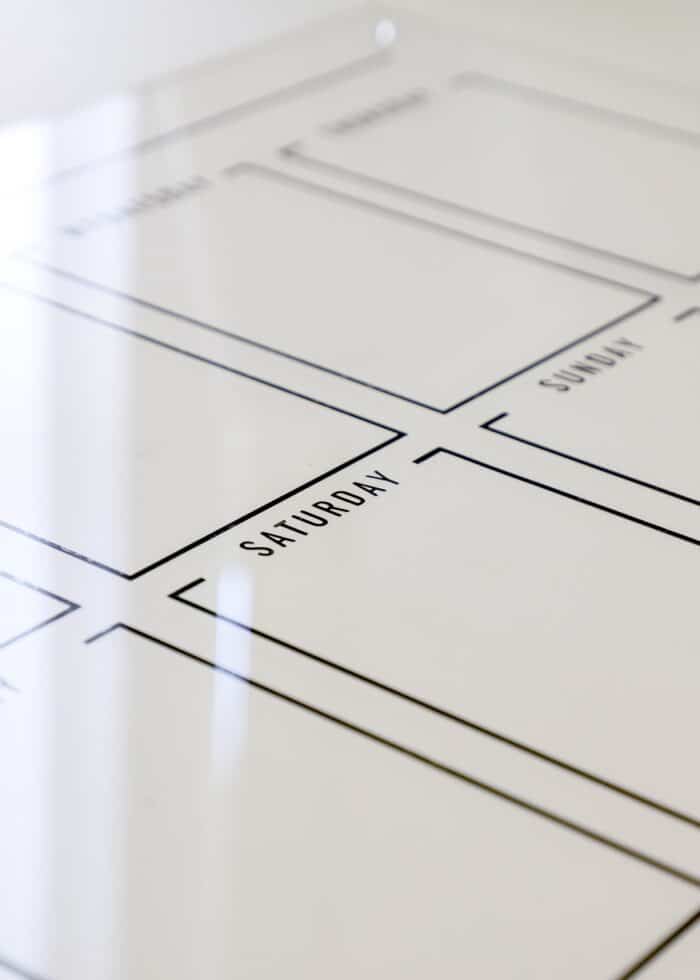
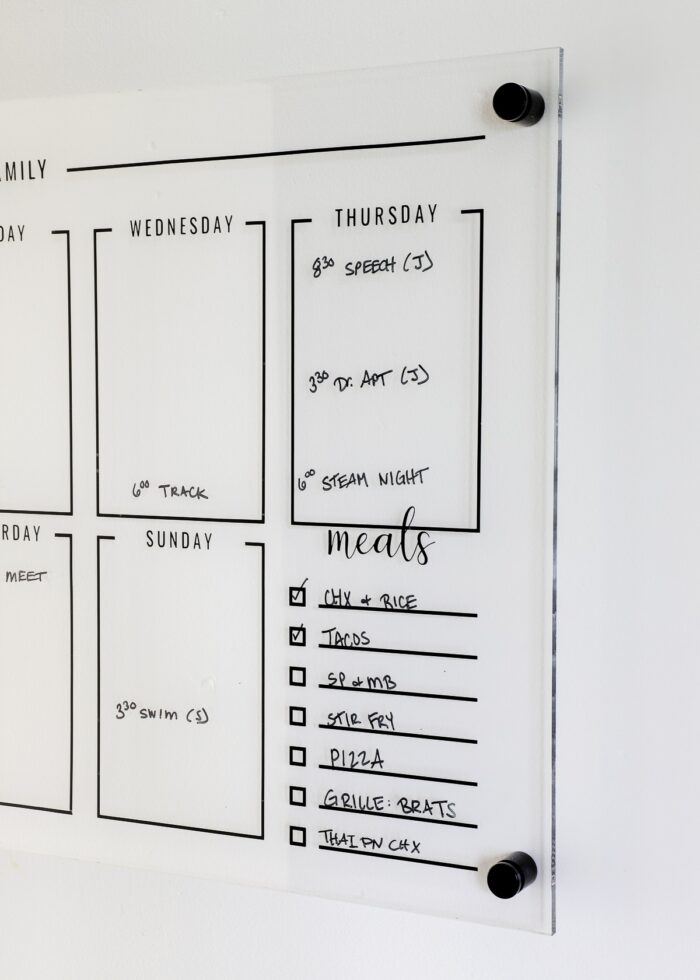
Because of that clear surface, you can apply the vinyl design to the back of the board (and it shows through to the front). Which means the top (writing) surface is completely clear, allowing you to write and scribble all over the board and not come in contact with the vinyl at all.
So unlike designs applied to the front of white dry-erase boards, it’s quick and easy to wipe clean without disrupting or discoloring the vinyl pattern!
This is a project that, admittedly, requires a bit of patience. But it’s a fun one to do with really gratifying results, so let me break down how it all comes together!
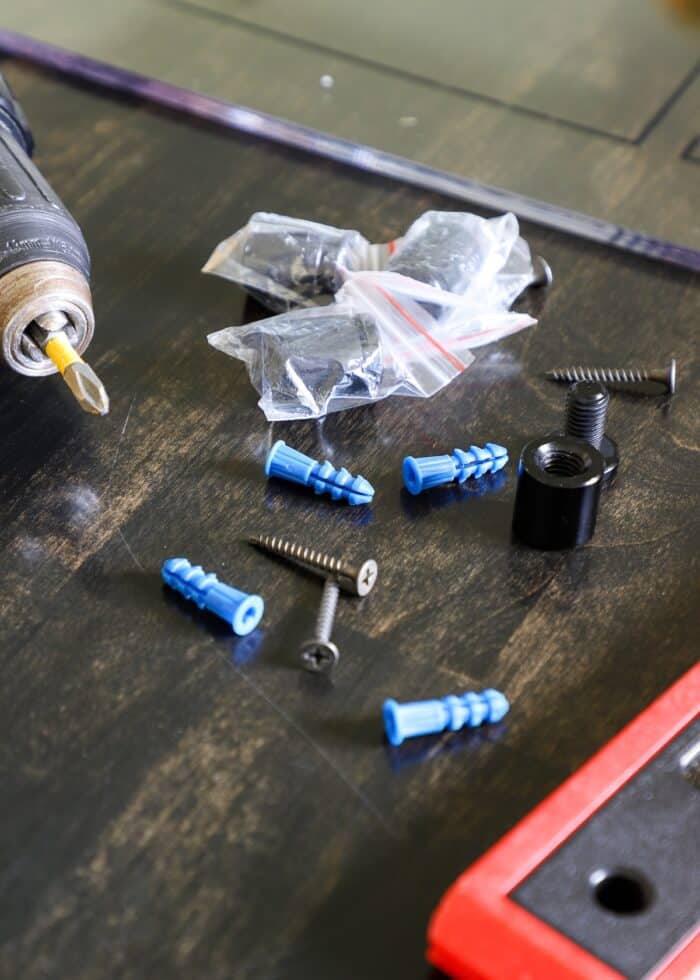
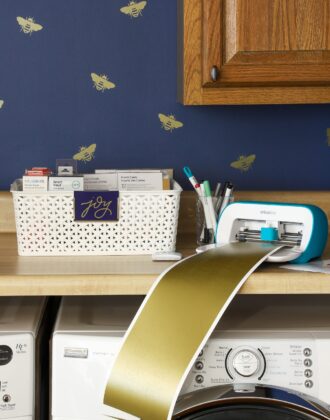
Supplies Needed
- Blank Acrylic Dry Erase Board – pick a size that works in your space; I used the 18×24″ version with black mounting hardware.
- Black Vinyl – for an 18×24″ board, you will need 48″ of vinyl
- Transfer Tape
- Weekly Planner Grid SVG File and Compatible Lilly Mae Font
- Cricut Machine (or other e-cutter) – for the 18×24″ size, I recommend using a Cricut Explore or Cricut Maker series machine; if you’d like to use the Cricut Joy, you will have to cut each calendar piece separately and re-construct on the board itself.
- 24″ Mat if not using Smart Vinyl
- Wet Erase Markers
- Other Tools
- Weeding Tool
- Scraper
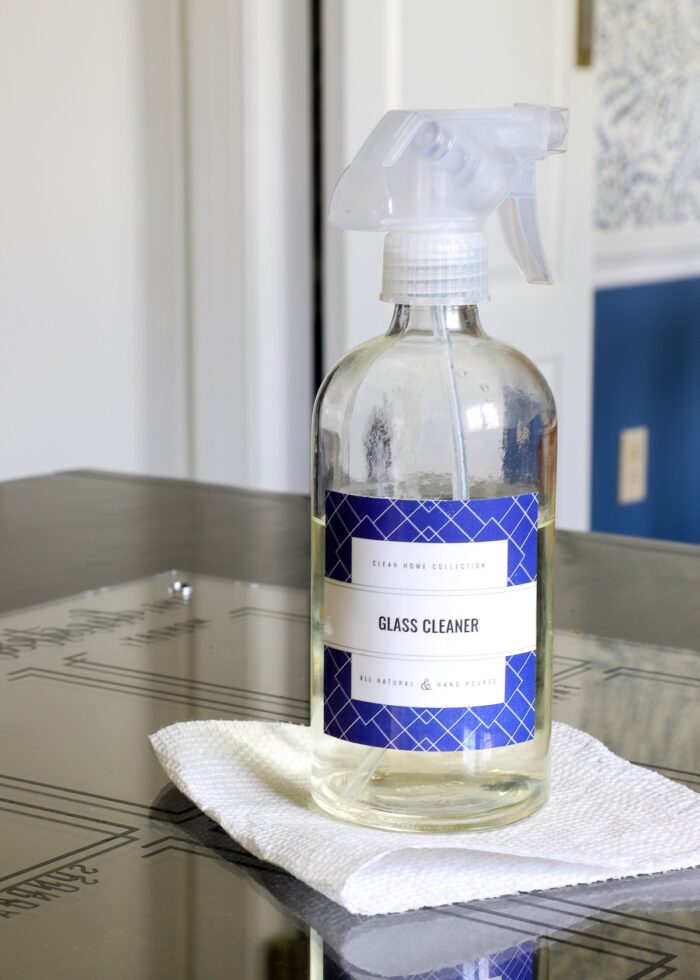
- Glass Cleaner
- Drill with Drill Bit
- Screwdriver

Video Tutorial
If you’d like to watch this acrylic wall calendar come together, watch the short video below! In full disclosure, this project is more of a “Do as I say, not as I do,” as I had difficulty with the initial text cuts and then opted to conserve vinyl instead of re-cut the entire calendar in full.
Video not loading for you? You can watch it HERE!
Part 1 – Cutting Out the Vinyl Calendar Design
Step 1 – Download Calendar SVG File
The quickest and easiest way to make a dry-erase calendar is to use a pre-designed SVG file.
You can purchase my weekly grid version HERE; or you can shop for one that’s just right for you on Etsy. If you’re super savvy in Cricut Design Space (or similar software), you can also design your own!
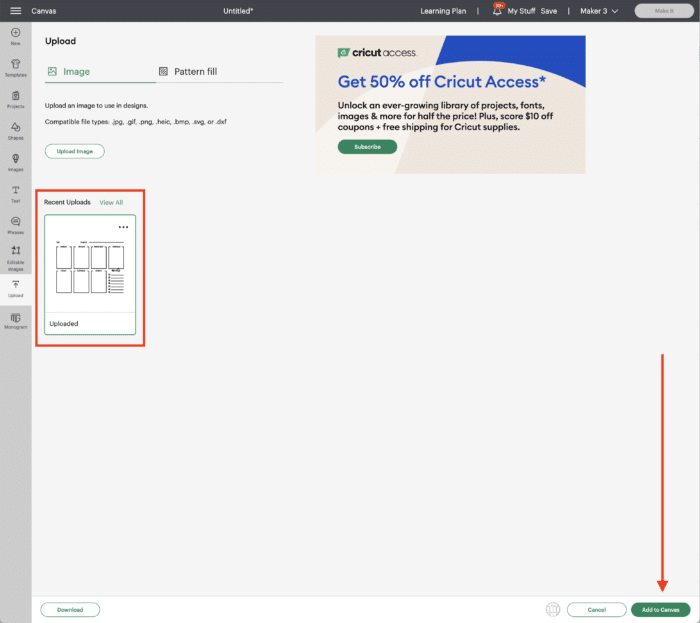
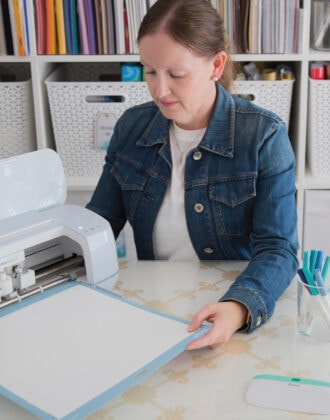
Step 2 – Upload to Cricut Design Space
Once saved to your computer, upload the SVG into Cricut Design Space (or your machine’s software). If you need help with this, see my full tutorial here: Importing Your Own Images into Cricut Design Space.
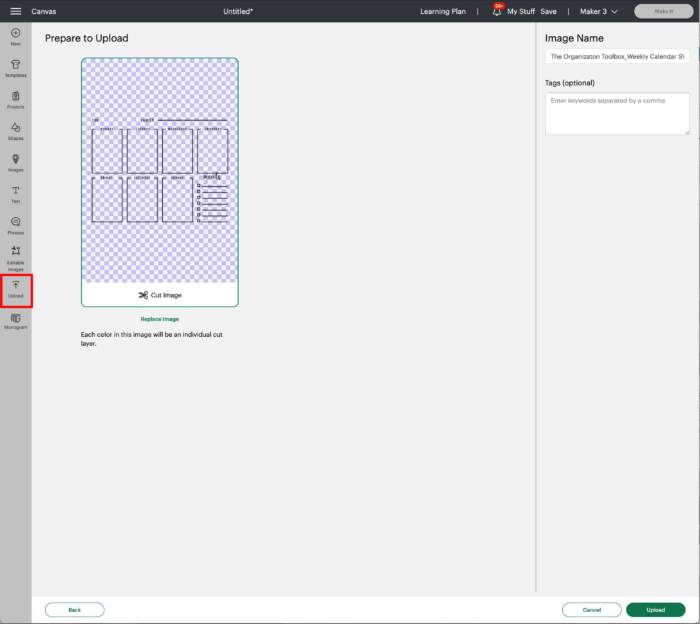
When the file is in your account, click the green “Add to Canvas” button in order to customize and cut it.
When the design first populates on your canvas, it will be sized for an 18×24″ acrylic board. Adjust the dimensions, as needed, to fit your specific board.
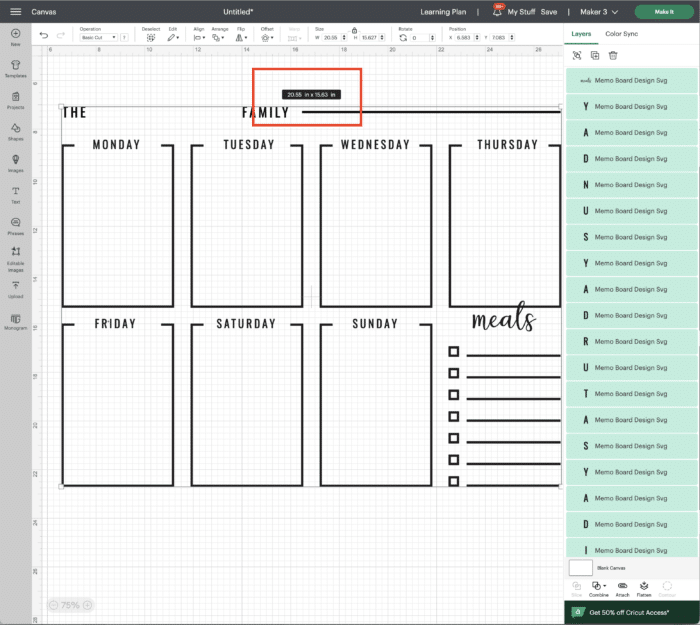
When the design loads on your canvas, it will also be automatically “Grouped” together. In order to customize it and prepare it for cutting, you will need to separate out the elements by clicking the “Ungroup” button in the top righthand toolbar.
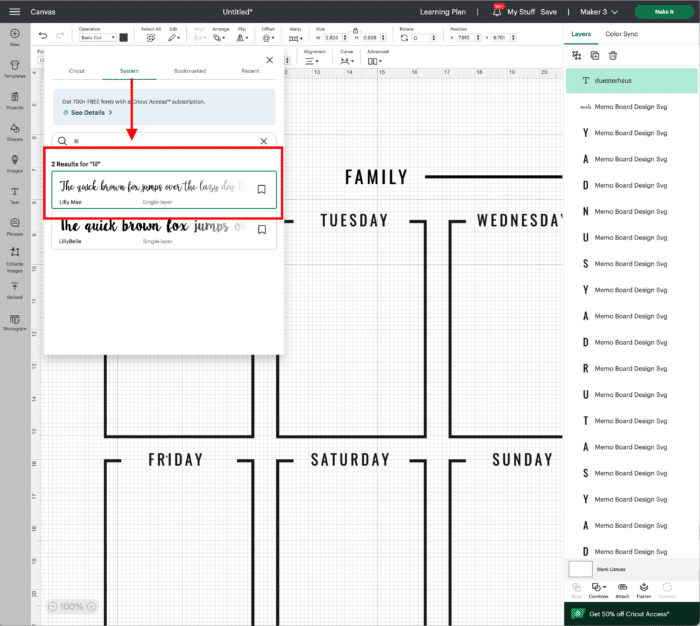
Step 3 – Personalize the Design
This SVG file leaves a blank space for you to add your own family name. To do this, add text to your canvas via the Text Tool (lefthand toolbar).
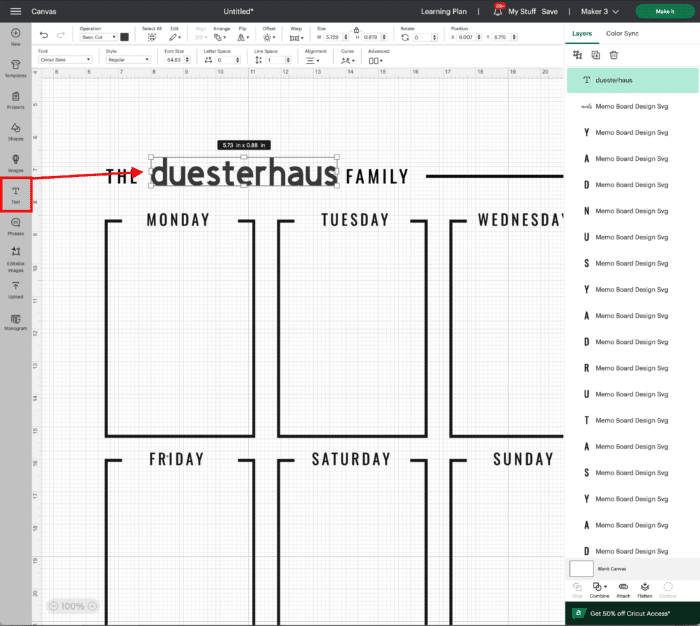
If you would like your last name to match the fonts already in the design, you will need to download them to your computer:
To change the last name to your preferred font, be sure to highlight “System” within the font menu in order to find the font on your computer.
Then re-size and position the text to fill up the blank space.
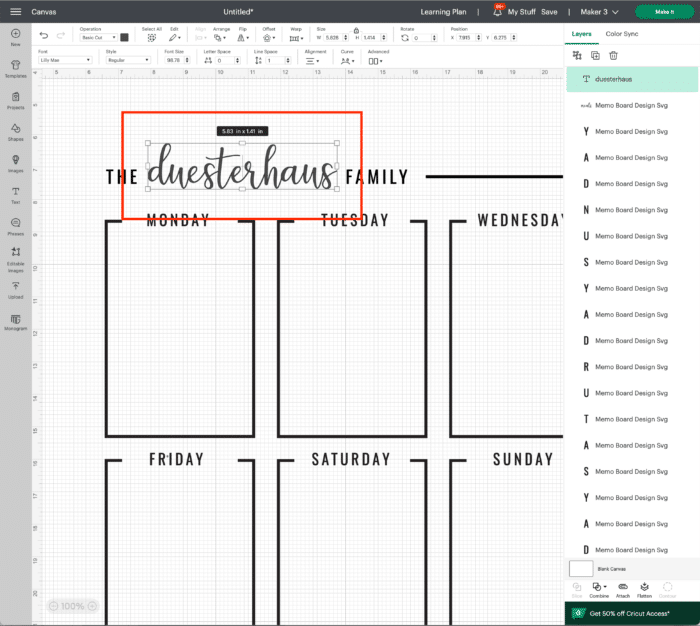
TIP! If your last name is just too small to fill up the provided blank space, you can easily adjust the positioning of “FAMILY” and the horizontal line to your preferences!
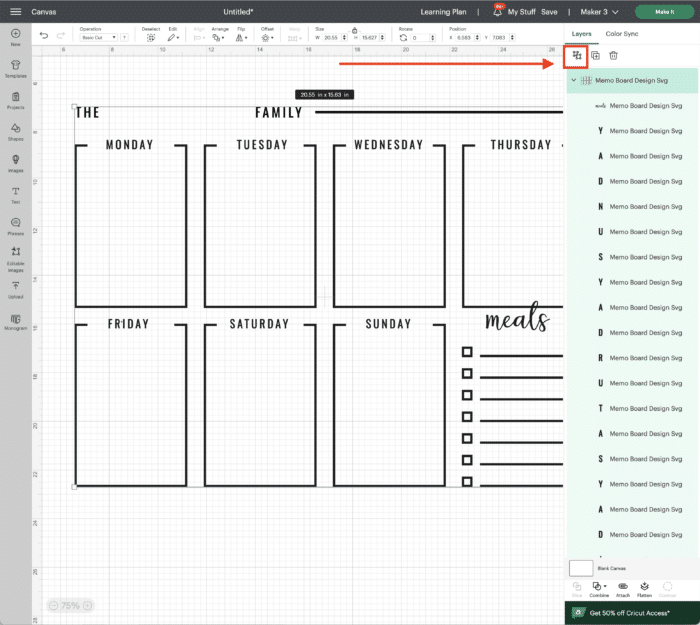
Step 4 – Prepare the Design for Cutting
In order to size the design so that it can actually be cut with your machine but also make laying out the calendar as easy as possible, you will need to “attach” specific elements together as follows.
Select the entire header and the top row of calendar blocks all together (just use your mouse to drag and drop around the entire upper half of the calendar design). Then click the “Attach” button in the bottom righthand toolbar.
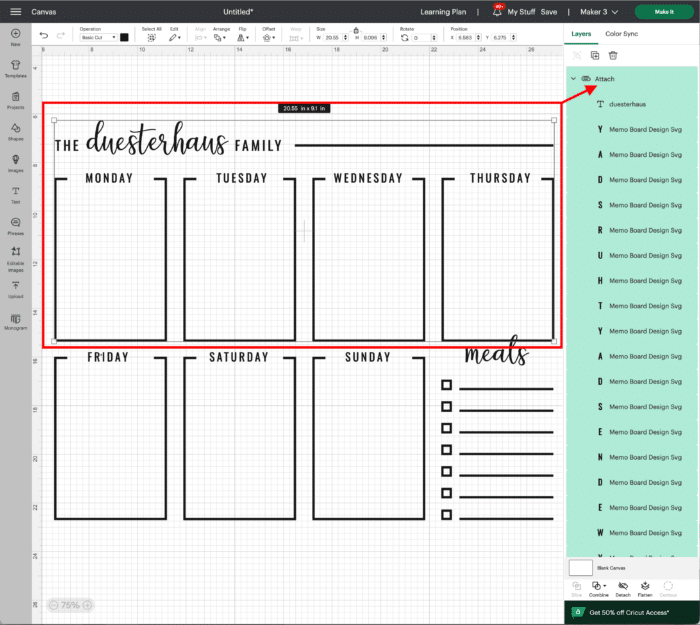
Next, select the entire lower half of the design (to include the meal column) and attach it together in the same way (Attach button in the bottom righthand toolbar).
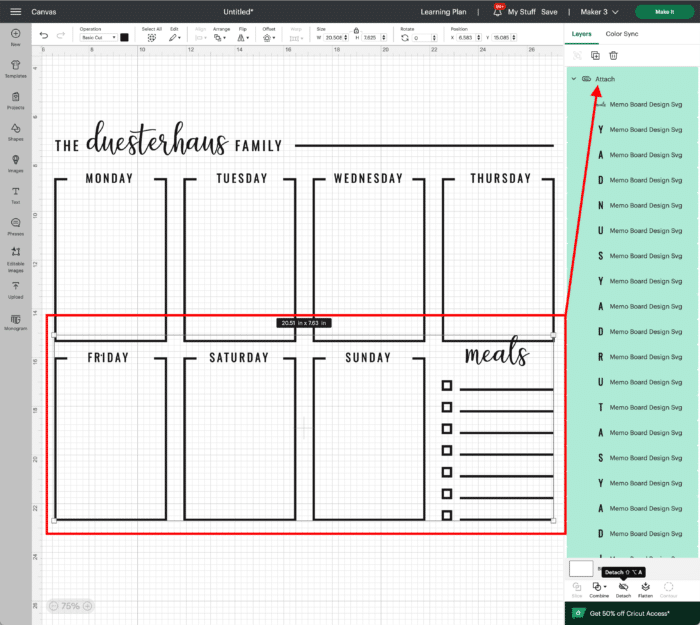
Now, when you send the design to your machine, you will have two distinct cuts that will fit on your vinyl but the alignment of the blocks and words are maintained.
Step 5 – Mirror the Calendar Design
On the Prepare screen, you will see your two different cuts arranged either on mats or down a long cut of vinyl (if using Smart Vinyl). Before sending to your machine, you must flip the design by clicking the “Mirror” toggle under each mat. This will cut the entire design in reverse so you can apply it to the back of the acrylic board.
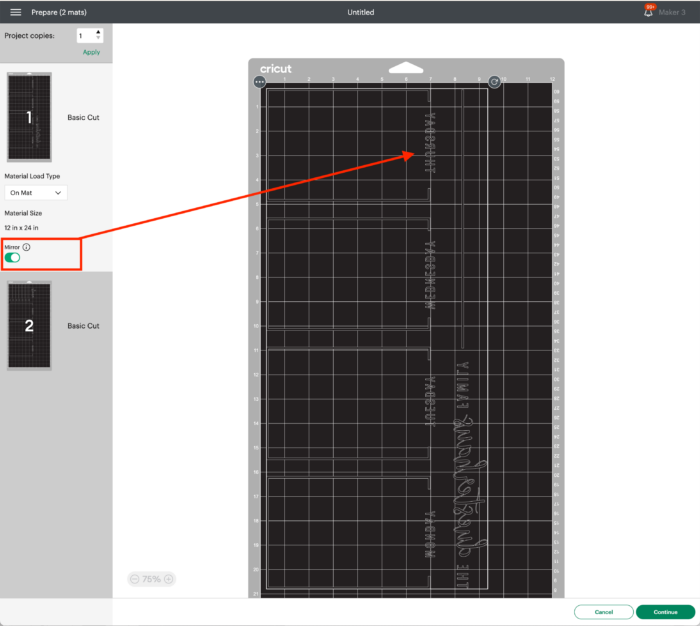
On the Make screen, select the exact vinyl you will be using for your project to ensure precise cutting results.

Step 6 – Cut Out Calendar Design from Vinyl with Cricut
Feed the correct amount of vinyl into your Cricut machine (either via mat or Smart Materials) and cut out the wall calendar design.

Want to save this post?
Part 2 – Assembling the Acrylic Wall Calendar
NOTE: As mentioned above, it’s imperative that you apply the vinyl calendar design to the back of the acrylic board. As you’re working, constantly check yourself that you are placing things in the correct position so that it looks right when the board is mounted to the wall.
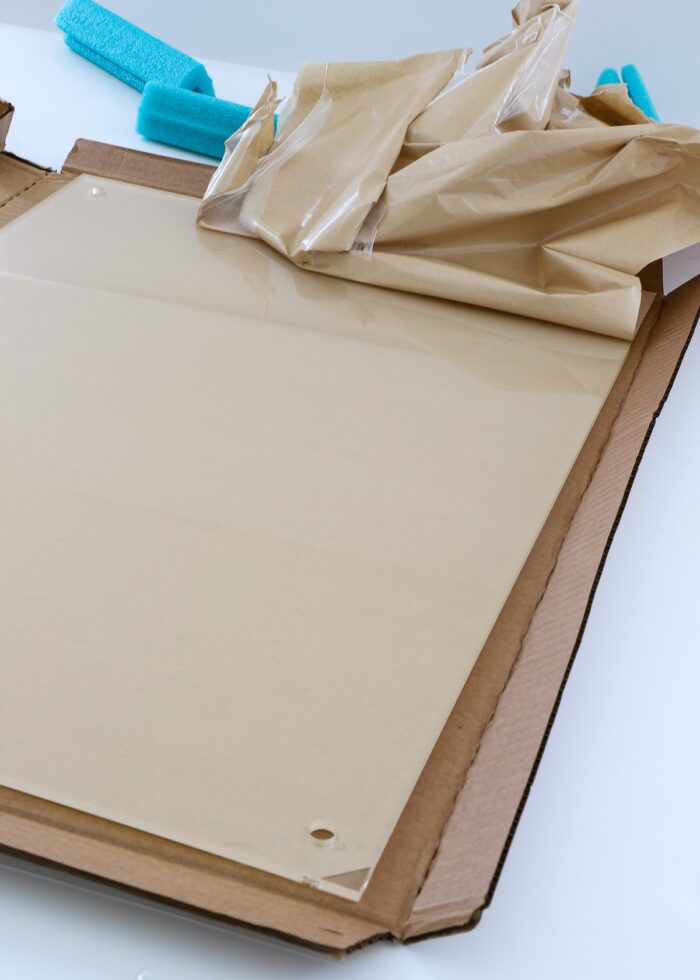
Step 1 – Remove Protective Covering from Back of Acrylic Board
Most acrylic boards will come covered in a protective paper. Remove the paper coating from just the back of the acrylic board.
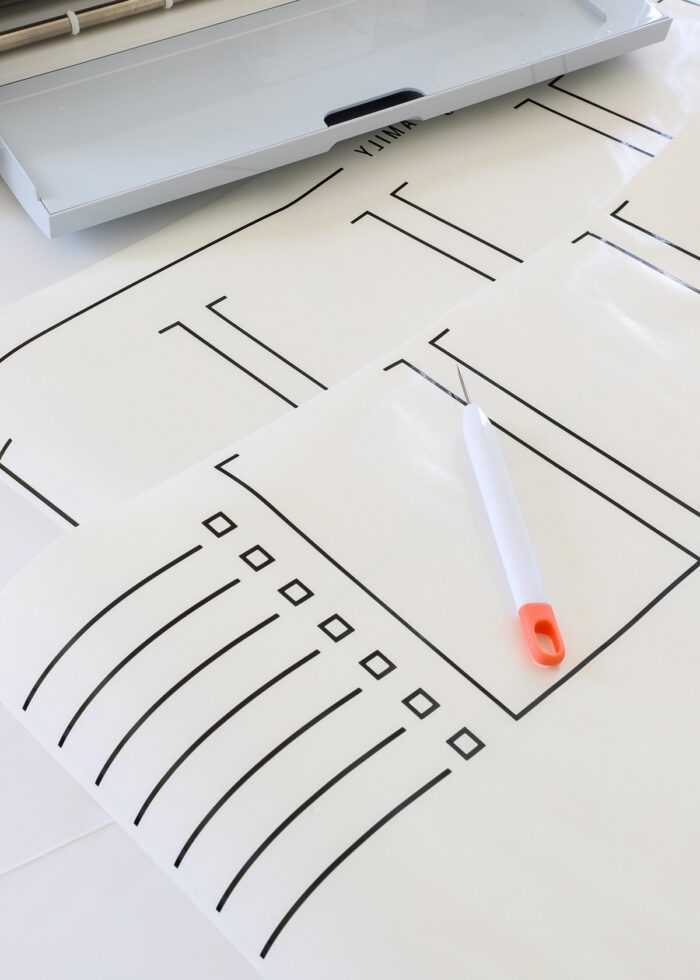
Step 2 – Weed the Calendar Design
Next, use a weeding tool to remove all the excess vinyl around the calendar design. Some of the letters and details can be quite small. Work very slowly to remove the surrounding vinyl but not pull out cuts you actually need.
NOTE: I initially had trouble with my words cutting properly, which is why you don’t see them in the photo below. To conserve vinyl, I ended up cutting and adding my words separately, after the calendar was applied to my board. If you take your time, you should be able to weed and apply the entire calendar design, words included, without much issue.
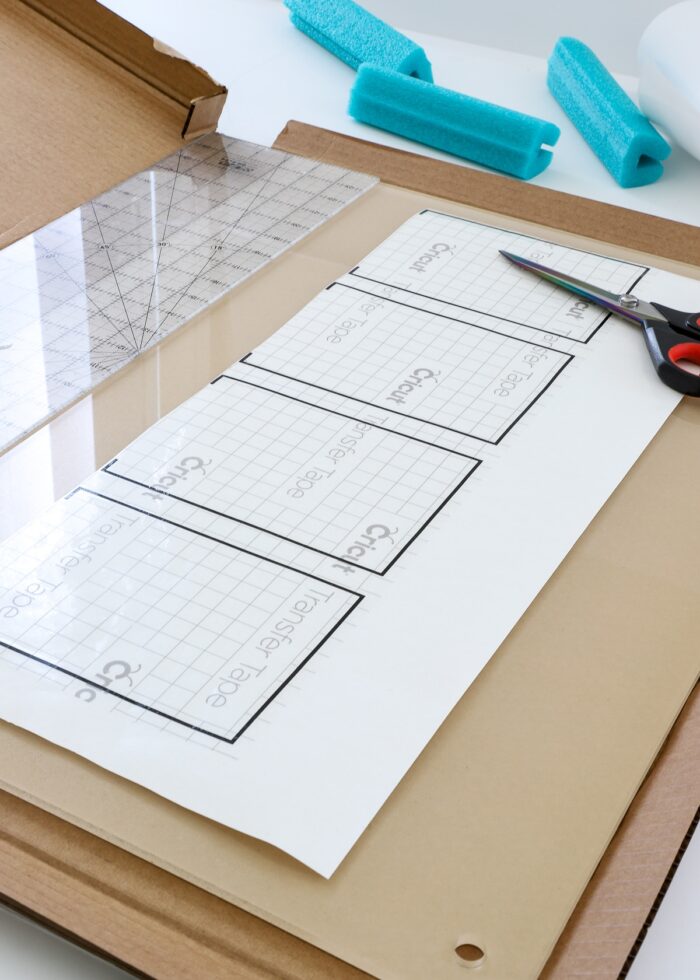
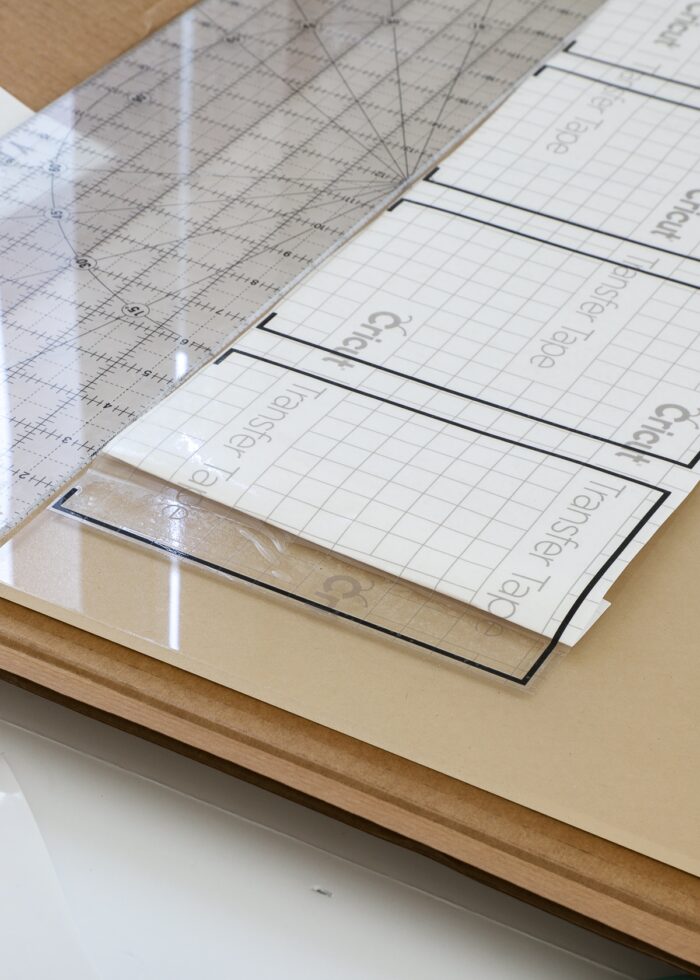
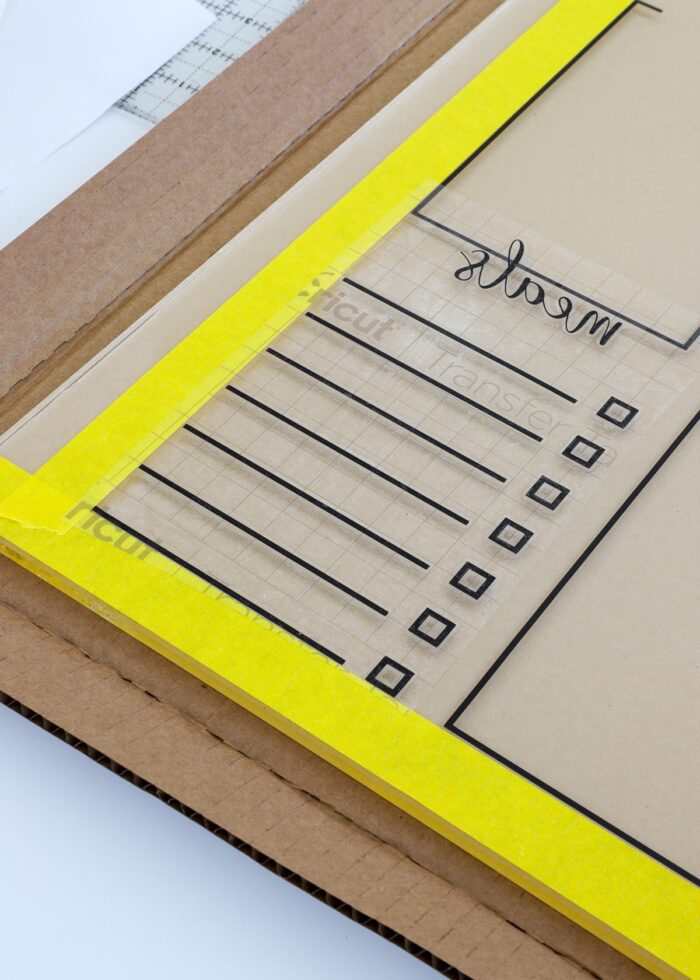
Step 3 – Pick Design Up with Transfer Tape
Next, cut a piece of transfer tape to completely cover the first cut of your calendar design. If you need help with this process, see more instructions here: Your Complete Guide to Cutting Vinyl with a Cricut
Step 4 – Place Vinyl Design Onto Acrylic Surface
Instead of completely removing the paper backing, fold back just an inch or so to reveal the transfer tape+vinyl design combination (see below). Then use a ruler (as needed) to position the design on the board.
Once you have the leading edge of the design exactly where you want it, remove the rest of the paper backing and smooth the transfer tape+vinyl design combination down onto the board.
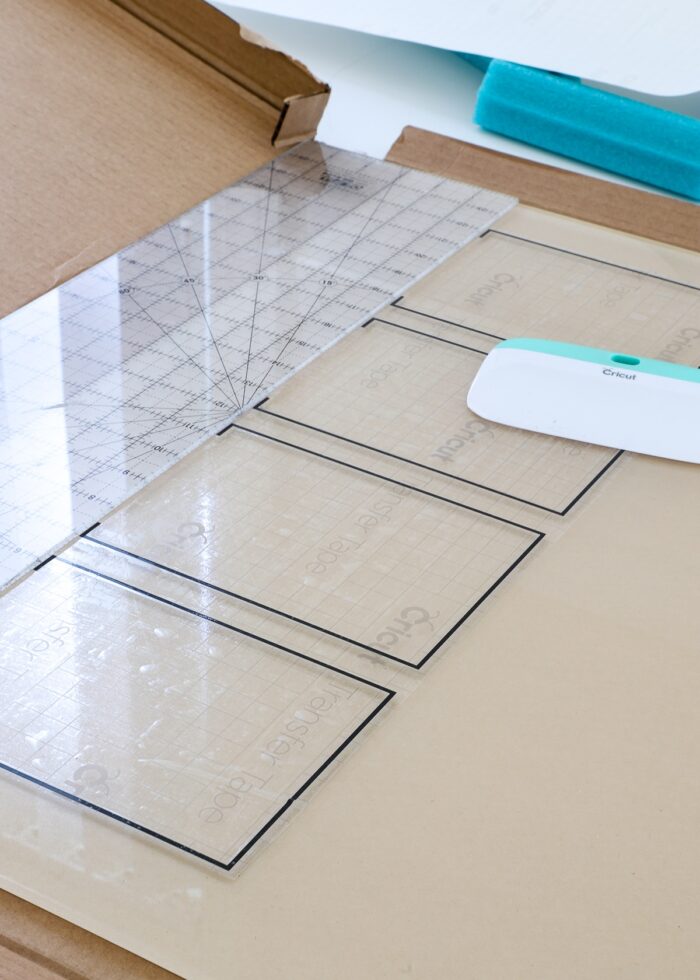
Carefully remove the transfer paper to reveal your calendar design adhered to the board.
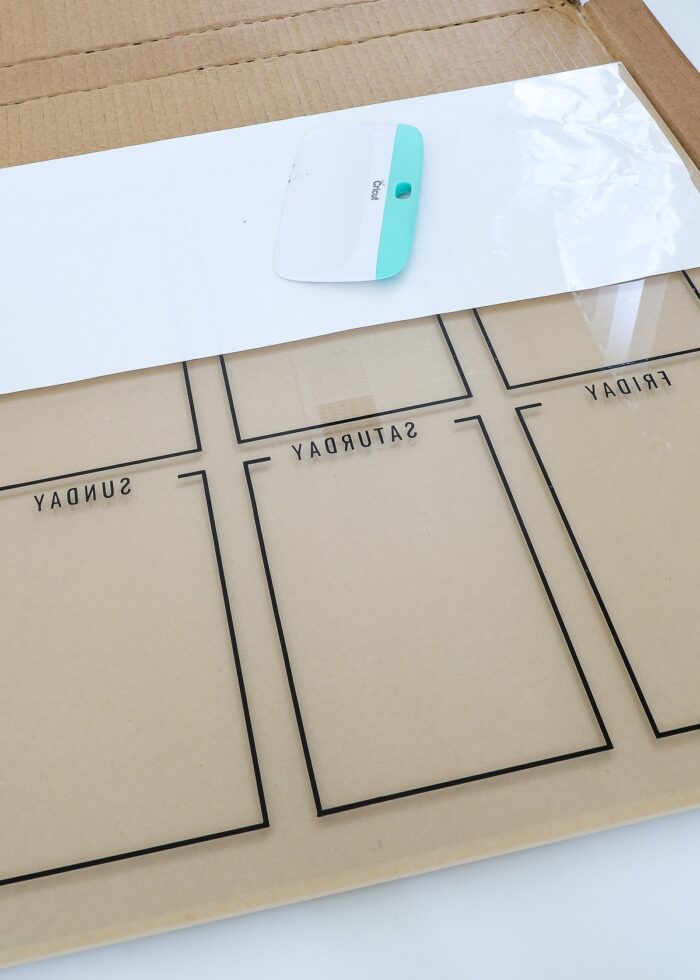
Repeat the process to place the lower half of the design onto the board. To ensure it perfectly lines up with the top part of the design, you can use masking tape or painter’s tape to create an easily identifiable boundary.
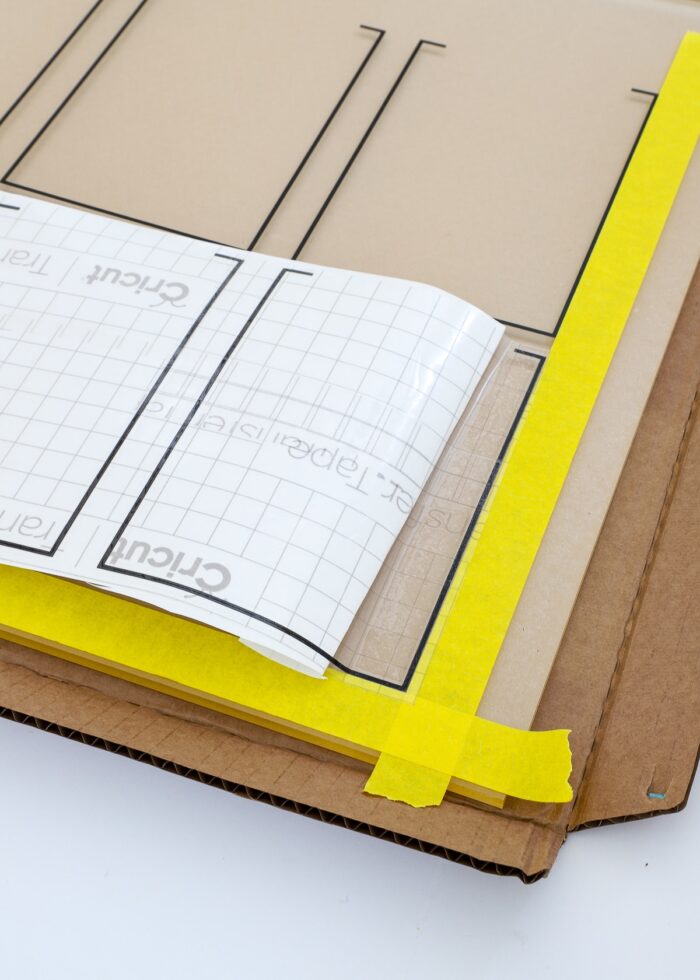
By lining up your vinyl design with the tape, you will be sure the top and bottom half of your calendar are perfectly aligned!
TIP! Vinyl can be tricky to work with, especially a large project with lots of small details. If some part(s) of your calendar design doesn’t transfer right (like my letters), don’t panic! It’s easy to re-cut and re-apply individual elements as necessary. While it really is best to place everything at once to ensure perfect alignment, you can use more lengths of tape to help with placement of individual details, as needed.

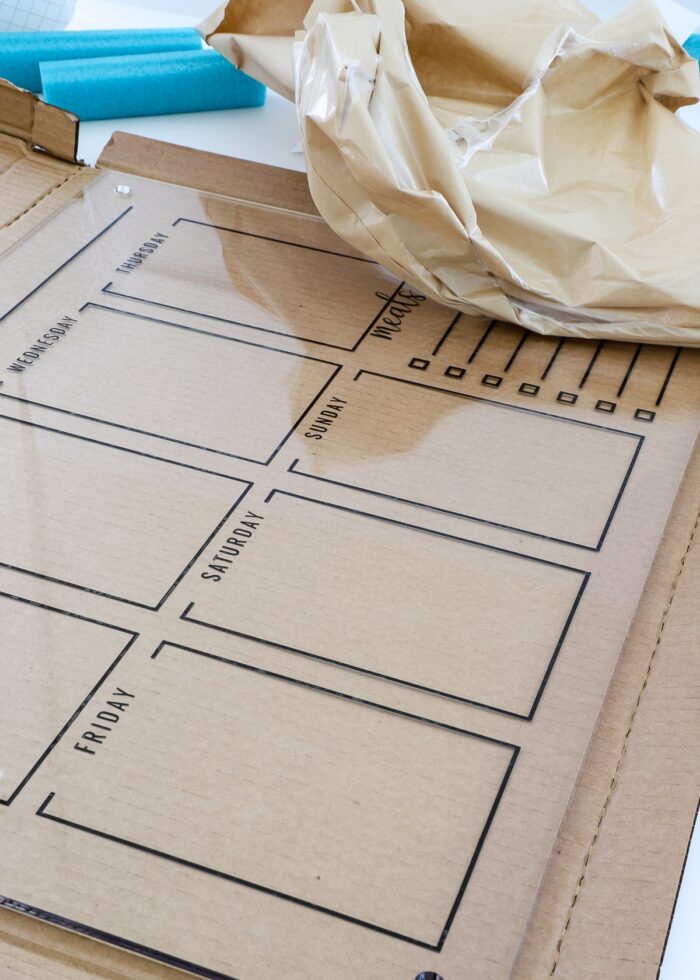
Step 5 – Vigorously Adhere Vinyl to Acrylic Board
Anywhere the vinyl isn’t fully stuck to the board can appear lighter in color once you flip the board over to the front (remember, we’re on the back of the board!) So to ensure the vinyl is fully stuck to the board (and therefor looks solid black from the front) use some leftover paper backing (from the transfer tape) to vigorously rub all the vinyl details with a scraper. Your goal is to get that vinyl as smooth and stuck as possible to the acrylic surface.
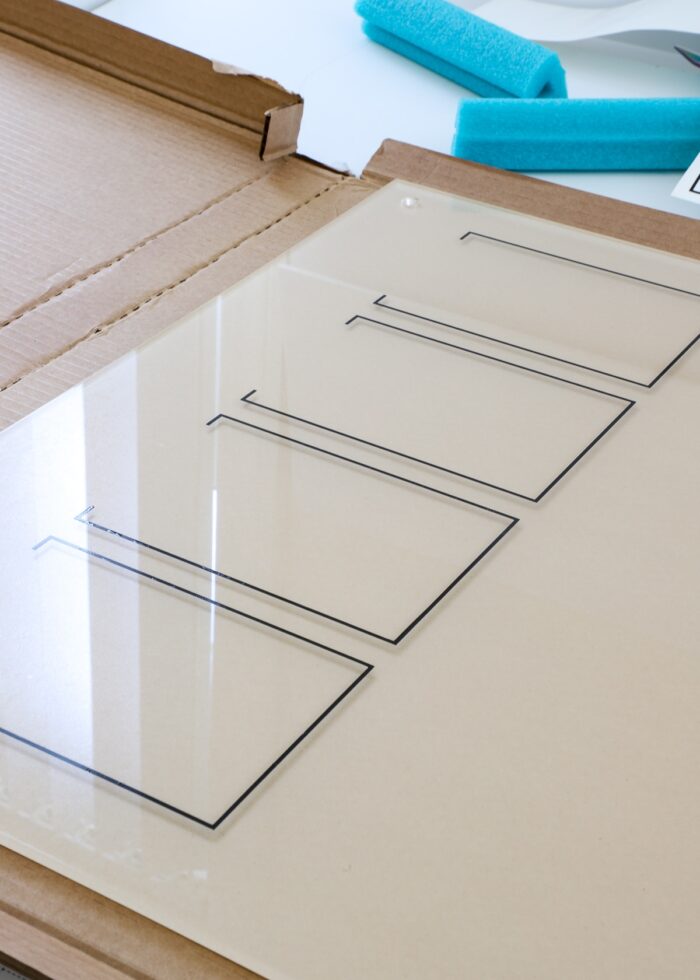
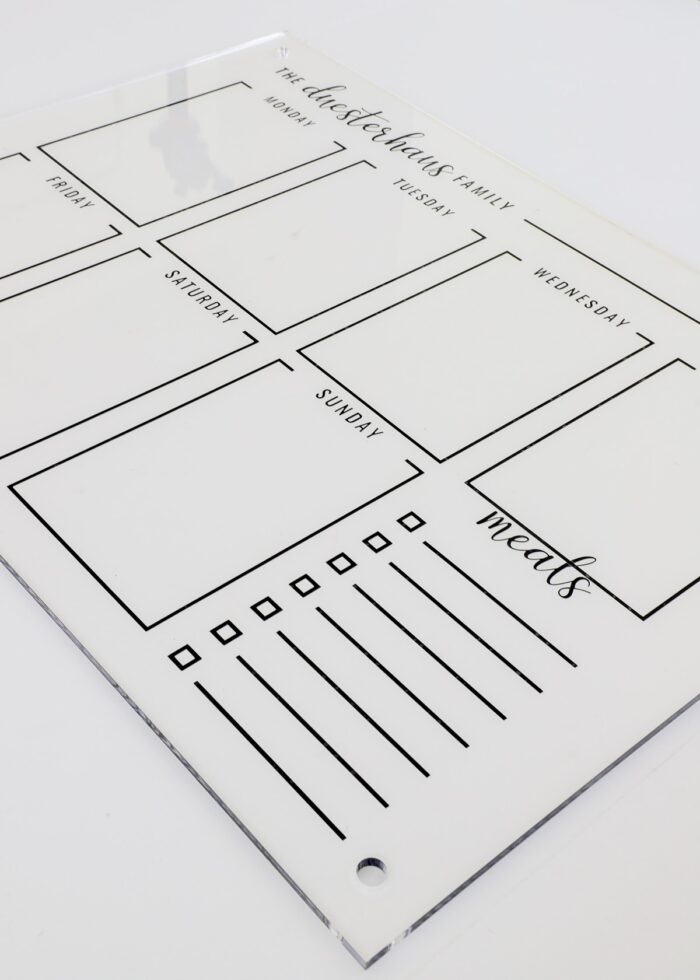
Step 6 – Remove Protective Covering from Front of Acrylic Board
Here’s the most exciting part!
Flip the acrylic board over and remove the protective paper coating from the front of the board. This will reveal your beautiful calendar design all ready to go!
From the front, it will quickly become apparent if a part of the design isn’t quite right or fully stuck down. Fix or smooth various aspects, if needed, before moving onto the final step: hanging it on the wall!
Part 3 – Hanging the Acrylic Wall Calendar
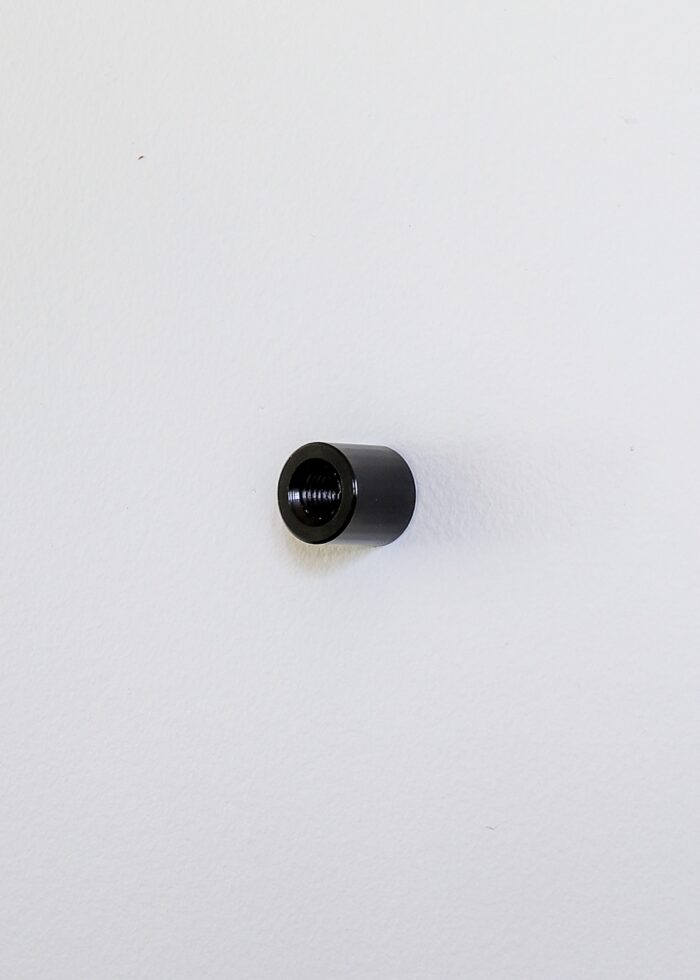
Once upon a time, you had to pre-drill acrylic sheets and source your own floating mounting hardware. I am so impressed that this acrylic dry erase board set comes with everything you need (even the drywall anchors) to mount the board on your wall!
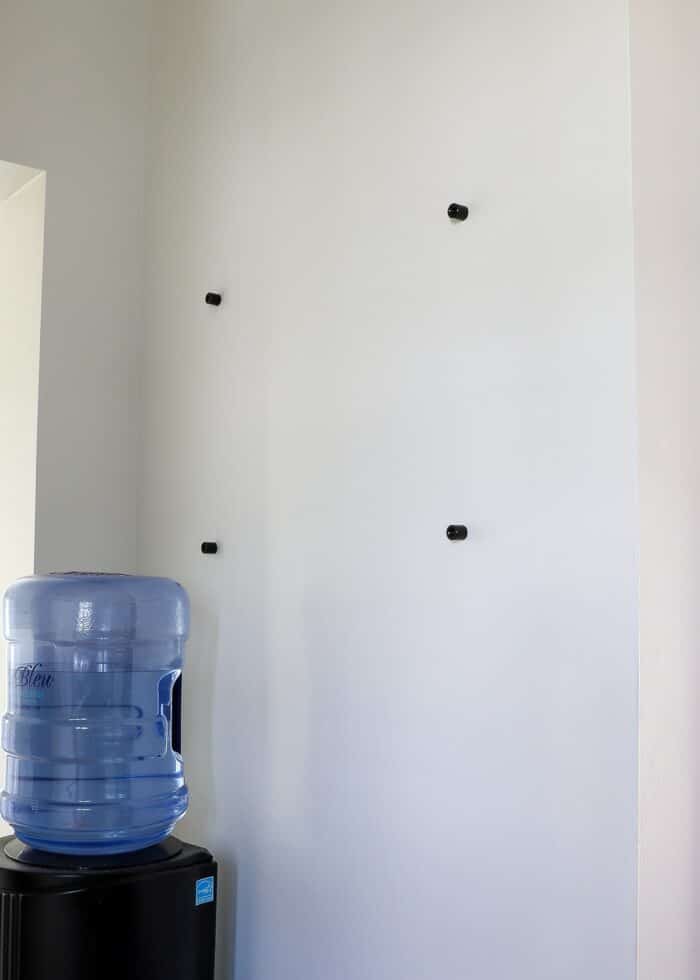
Step 1 – Secure Mounting Hardware to Wall
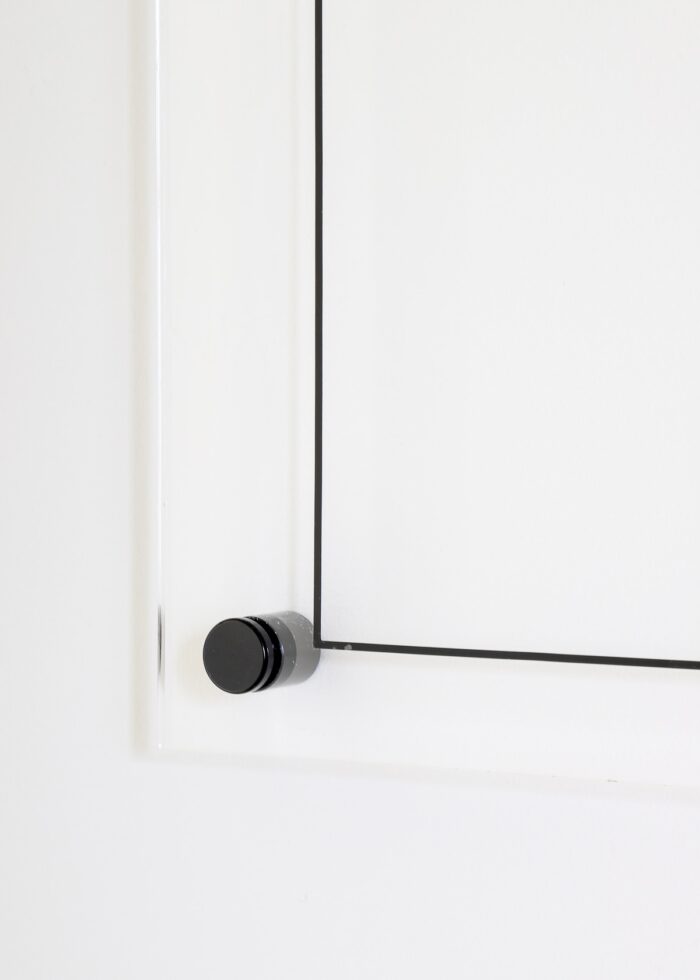
Mounting the completed calendar board is actually the quickest and easiest step! Once you decide where you want it on your wall, use a pencil to mark where each pre-drilled hole is located.
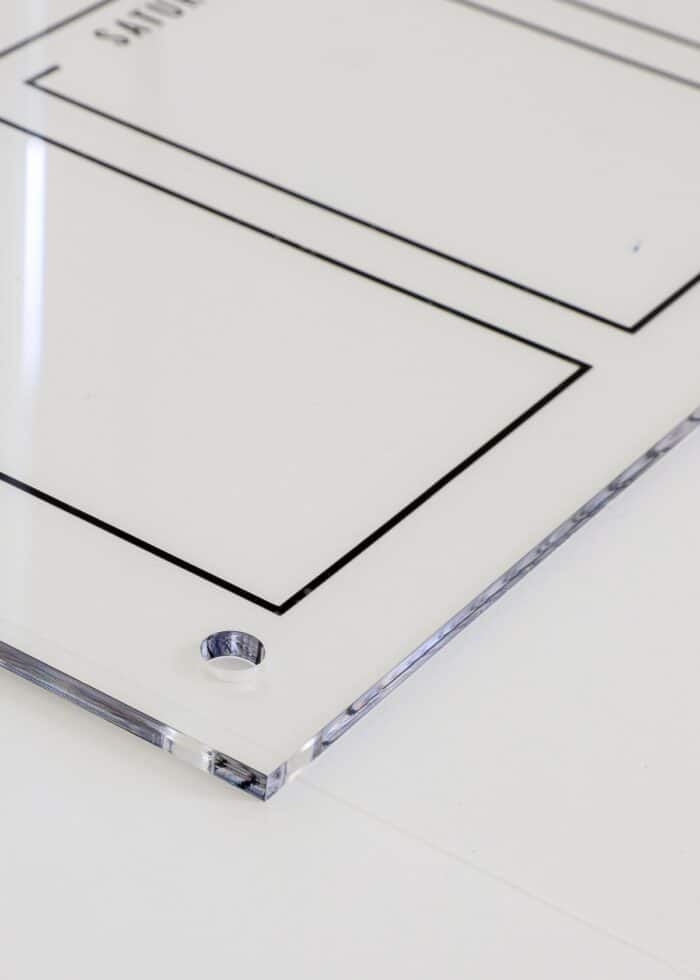
Use a drill with drill bit to install a drywall anchor first (not shown), and then screw the mounting posts into the anchors.
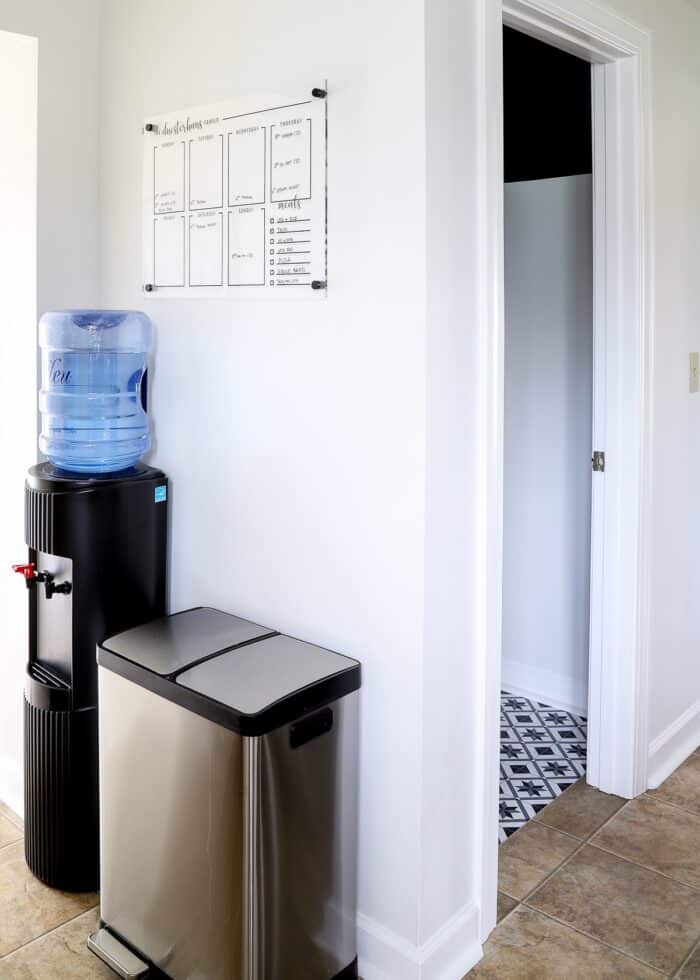
Here is how the four posts looked on our kitchen wall.
Step 2 – Clean Back of Acrylic Board
There’s a very good chance your fingers have touched all over the acrylic surface during assembly. Wiping down the front of the board is easy once it’s up, but not the back!
So before mounting it to the wall, carefully clean the back of the board (yep, where the vinyl is) with some glass cleaner.
Step 3 – Secure Acrylic Calendar to Mounting Hardware
Securing the board to the hardware couldn’t be easier!
Simply line up the board with the mounts and screw in the caps from the front of the board. Once all four corners are secure, your board is ready for use!
Step 4 – Fill Out Acrylic Wall Calendar
Your board will be nice and sturdy, so go on…fill in all those important family details!
I personally like to use wet erase markers on my dry erase boards because they don’t smudge and the text is nice and crisp to read.
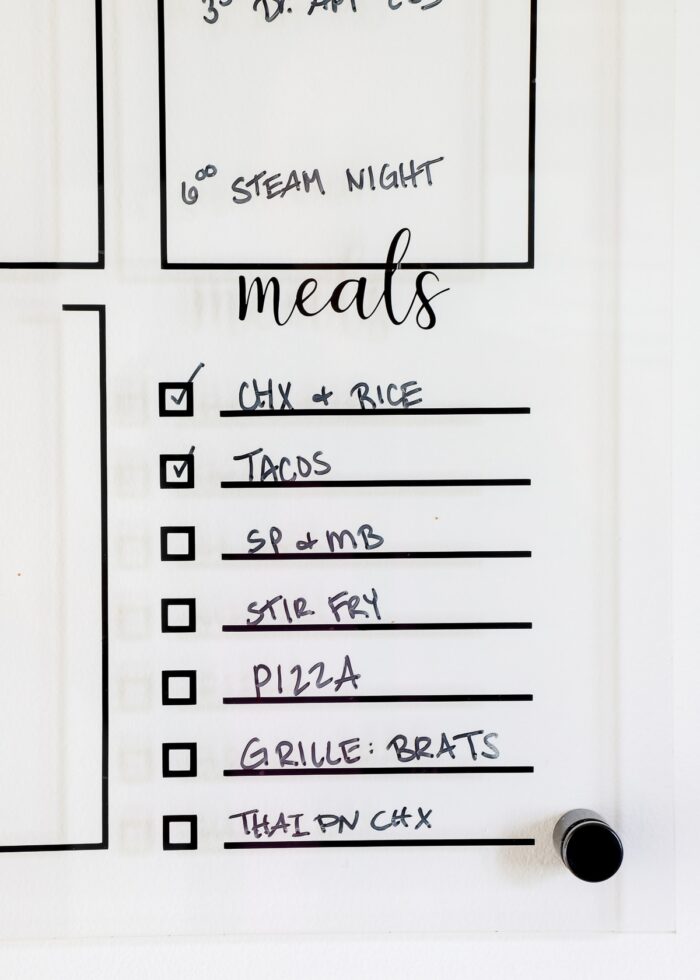
At the end of each week, we just wipe down with more glass cleaner and start anew!
My family has been seriously LOVING be able to see the plans and meals for the week. I just love it when they request something, and I am able to make it all on my own!
Other Great Organizing Projects with Your Cricut!
Ready to get even more organized with your Cricut machine?!? Here are some other great projects to try next:
- DIY Hanging Closet Dividers with a Cricut Maker
- How to Make DIY Binder Dividers on a Cricut Machine
- How to Make Box or Drawer Dividers with a Cricut Maker
- Easy DIY Cord Keepers (With FREE SVG File!)
- DIY Magnetic Bookmarks with Cricut Vinyl
- Aaaaaaall the Labels!
I realize our acrylic wall calendar isn’t in the most picturesque spot (this really is the best spot in our kitchen from a flow/visibility perspective). And while our trash can and water cooler are nothing special to look at, you should be able to see a bathroom sneak peek that will hit the blog soon!
If you’ve been loving the acrylic wall calendar craze but just haven’t been able to find a design, size, or cost you like, I highly recommend making one yourself. Although working with a fairly large, complex vinyl design does take some patience, you will really be stunned by how sleek, professional, and gorgeous your calendar looks in the end!
I’m so thrilled my kiddo made the suggestion, because this turned out to be one of the best projects I’ve made in a long time! I hope you give it a try!
Megan
2 Comments on “Easy DIY Acrylic Wall Calendar with a Cricut”
Test Test
This looks so doable–thanks for the great pictures and thorough explanation!