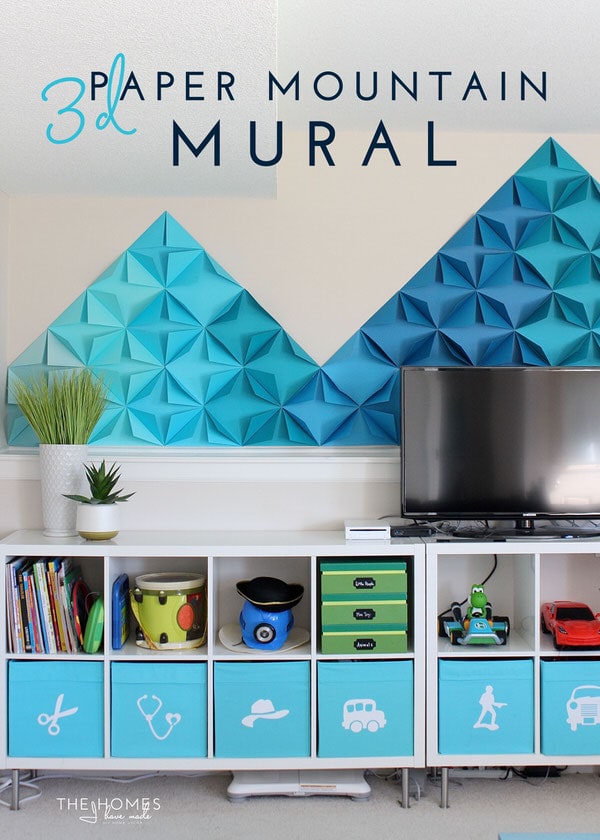
Renter-Friendly Walls: A 3D Paper Mountain Mural
I get into this funny spot in the weeks before a move. After months of being relatively at peace with all that has been accomplished in the house, I look around and see all these ideas and projects that 1) I never got to or 2) just occur to me. Most sane people would just let the good ideas go or save them for the next house…but me? For whatever reason I am compelled to make the rooms as complete as possible before taking them all apart, even if that means knocking out a few last-minute projects. Today, I am going to share another installment of my “Renter-Friendly Walls Series” and show you how to make a 3D Paper Mountain Mural. As fun as it is, you might be surprised to hear how this one came about!
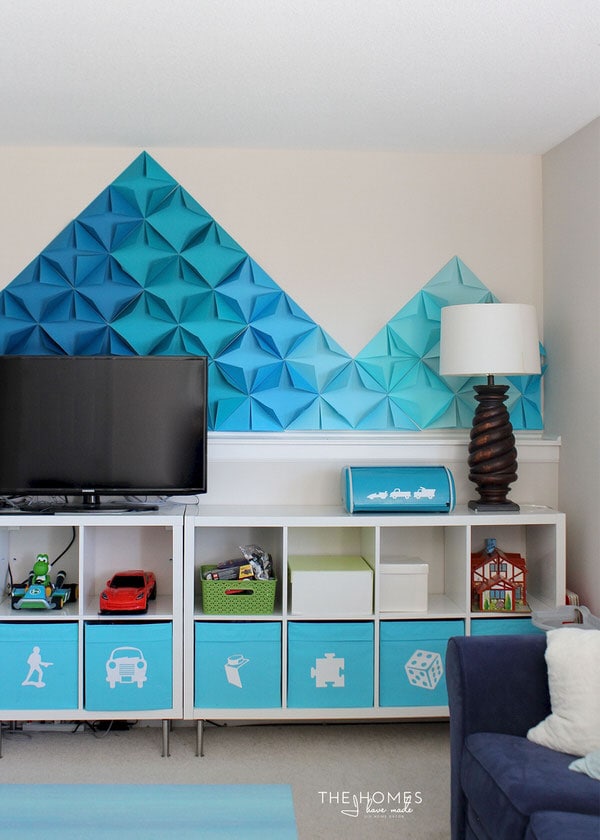
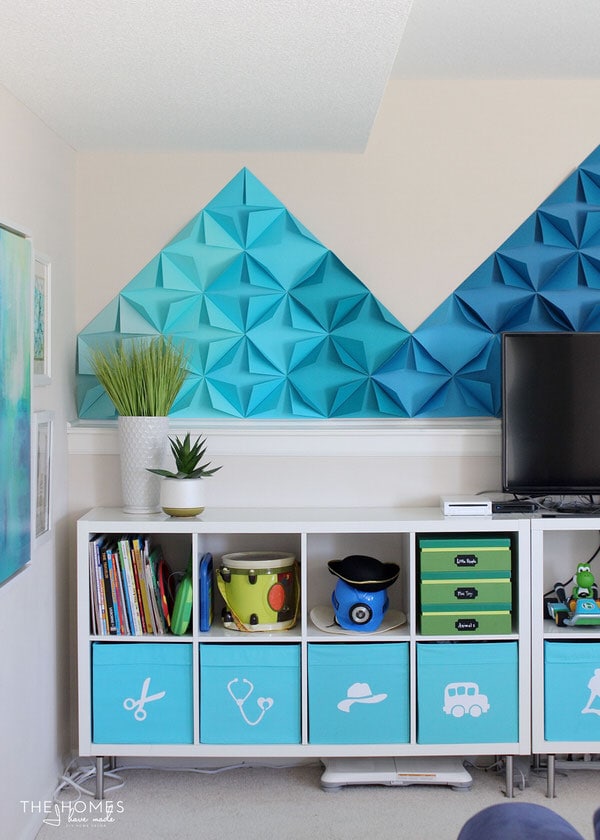
Last week, when I was shooting photos for the magnetic basket labels, I was looking at our 3D paper art installation and kinda hung my head in shame. The wall art installation you see in the photo below was a project I did back in the Fall for ForRent.com. It was never intended to be on this wall or in this room long-term; in fact, it was put up purely to take photos and then was supposed to be taken back down. But then it kinda grew on me…and I had no other grand idea for this wall…so it stayed up all these months.

But it always felt so unbalanced and incomplete to me. It looked great in photos, because (as you might notice) all the photos are zoomed in. But since it only occupied one corner on a huge wall, it looked so random in the room as a whole. My original plan for this art installation was for it to be much, much bigger (but I could never get it to look the way I wanted it)…so I actually had a ton of blue folded squares sitting in my craft closet waiting for inspiration to strike. The other night after Henry was in bed, I didn’t want to sit at the computer and was feeling creative. So I turned on the TV, pulled out the blue squares from my craft closet and got to work re-doing and expanding the original concept…
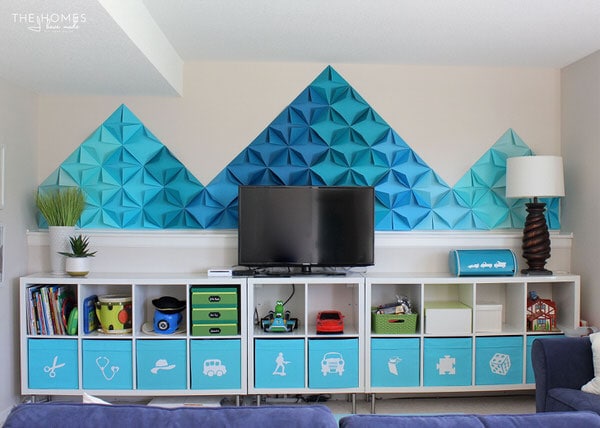
Within an hour, I ended up here! (Remember, all my paper was sorted and folded already!). Even this isn’t where I thought I’d end up but it sure looks pretty cool so I thought it was worth sharing!
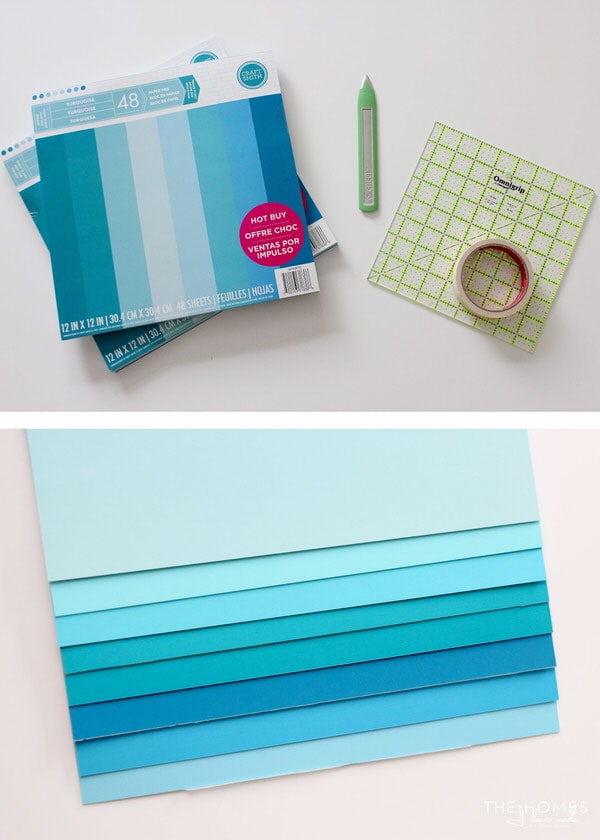
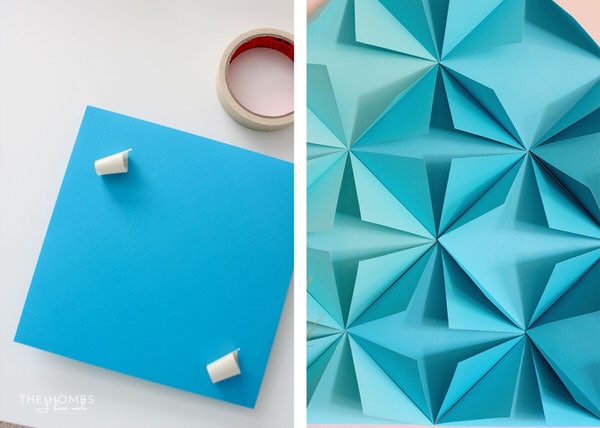
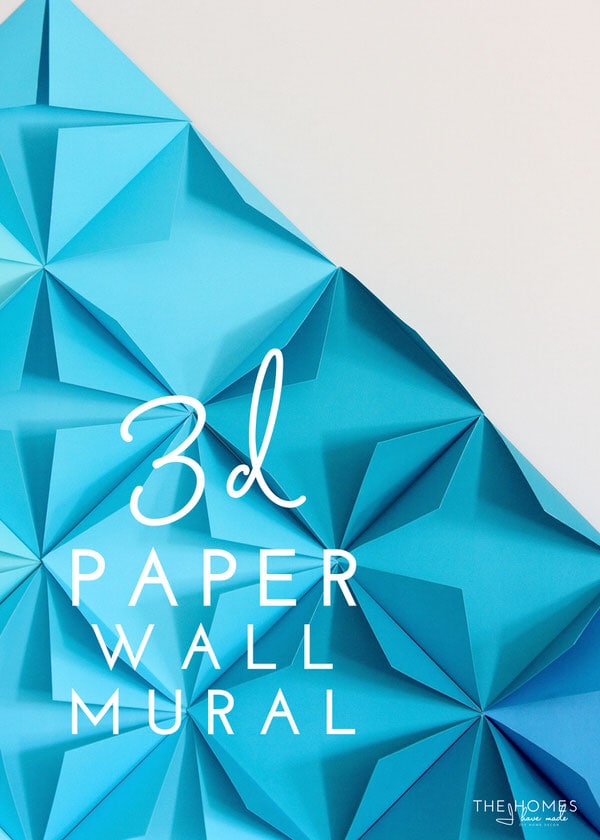
This mountain “mural” (as I’m calling it) is super easy and super inexpensive…and is completely renter-friendly/removable! All you need for this project is colored cardstock and masking tape. A scoring tool and a ruler certainly help but are not required.
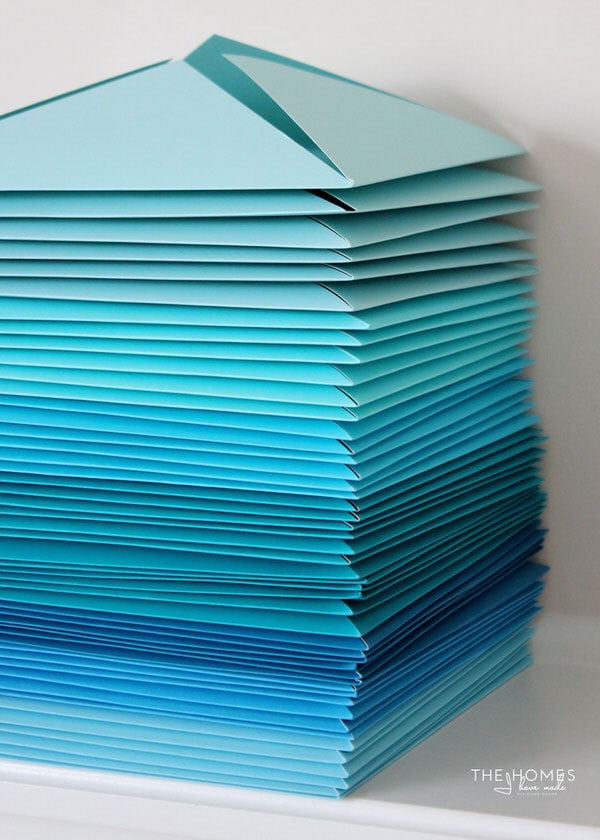
To achieve the ombre look, pick out different shades of paper in the same color family. This was made super cheap and headache-free by buying these color paper packs at Michaels for $5/each. Yep – this whole wall cost me about $10! They have these packs in almost every color family so pick out whatever color(s) work with your decor.
Since I originally did this project for ForRent.com, I’m going to refer you over there to see how easy it is to fold up the paper. It’s a great way to keep your hands busy while catching up on re-runs or watching the kiddos play. I DO recommend keeping your colors sorted, as it will make getting your design up on the wall MUCH easier!
With the paper folded, all you need to do is secure the squares to the wall using a few pieces of masking tape. You can hang the squares horizontally (as squares) or on diagonal (as diamonds); and you can play with the ombre effect in lots of different ways (horizontally, vertically, diagonally)! Even if a mountain-scape isn’t your thing (not sure it’s mine either!), you can use this same technique to achieve any number of design and shapes. Just as I had to…play around until you find a shape/pattern/design that suits your space!
If you want to create a mountain mural as I have shown here, you will basically be making overlapping triangles in different heights. Start with one square. Then on the next vertical column, hang two squares, then three, etc (until you reach the height you want). I found having two vertical columns of each color made the ombre-effect the most obvious.
Want to save this post?
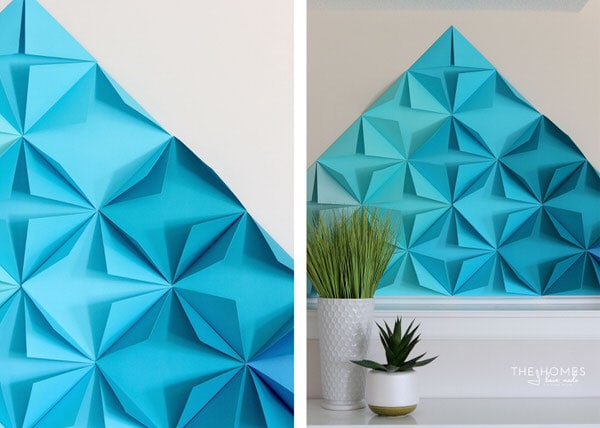
Continue working your way up and down and through your colors as you move across the wall. Do your best to line up the edges of the paper, but when all the squares are up and you “fluff: out the folds, any gaps in paper are hardly noticeable!
Finally, use a paper trimmer to trim down any necessary squares where the pattern meets the wall/trim and really fill in the pattern. You can see more how to do this here!

I originally did not set out to create a mountain pattern, but once it started becoming evident, I just went with it. It’s certainly not what I intended for this room back when we moved in, but I do think it’s a fun, vibrant, colorful and CHEAP way to brighten up this playroom!

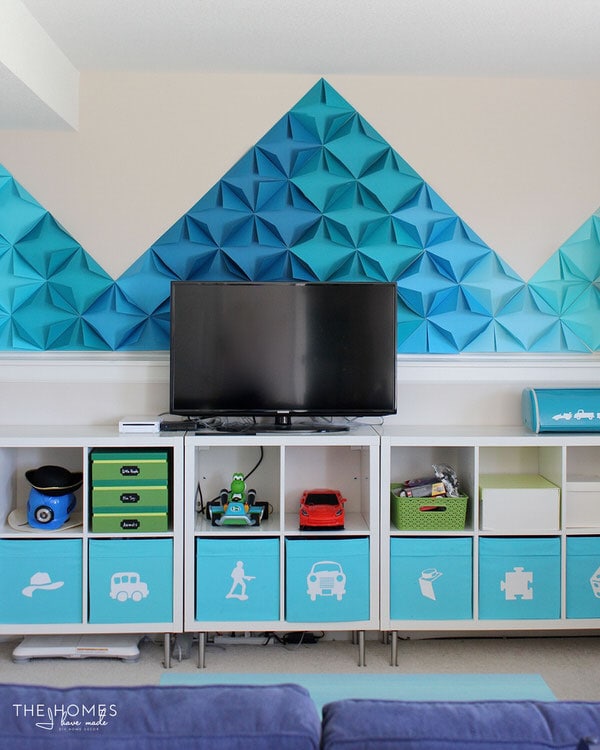
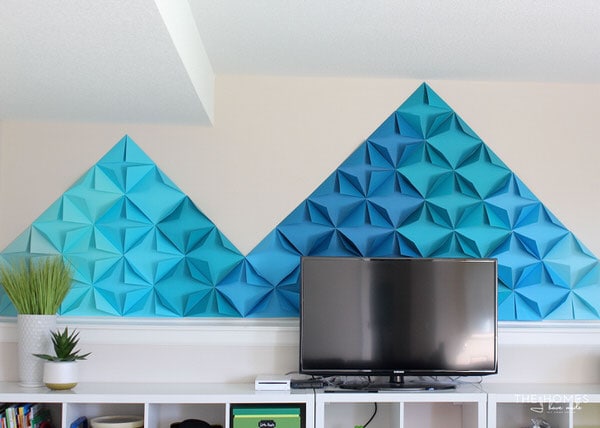
I also really like how the blue bins along the bottom shelf ground the paper display. From a pulled-back perspective, the paper and totes together look like one large mountain-scape! Maybe this IS where I should have started after all 😉
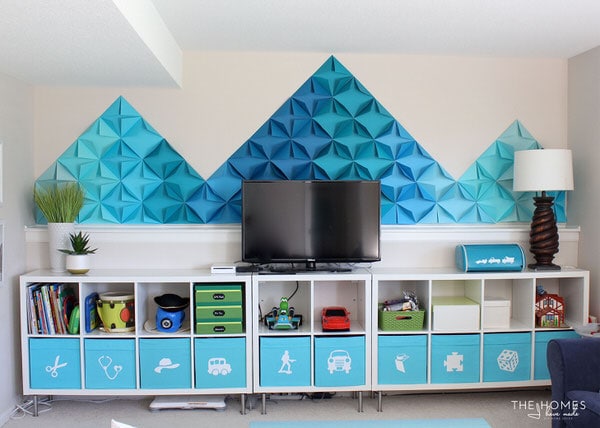
Admittedly, this wall display is a little crazy and very bold…but after months of having this downstairs room (which can be a bit of dungeon the way the sunlight comes in) feel so off and incomplete, I love seeing it bright, happy and a little more done. Every time I come down the stairs, the mountain mural is a happy surprise for my eyes rather than a reminder that I could never come up with a way to finish it!
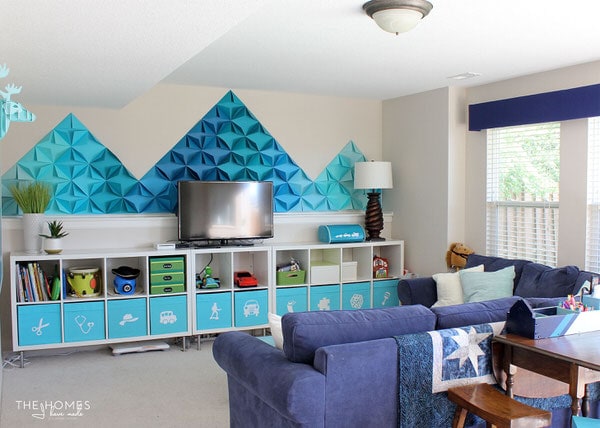
Every now in then, there are happy accidents in home decor! Sure…our impending move makes me a little more fearless when it comes to projects and design ideas…but yet again, this is an example of how my “just try it” motto can lead to some pretty fun moments around the home!
I hope this Renter-Friendly Walls installation sparked some new ideas for how you can use basic paper and tape in your home! I’d love to know what you think of this! Am I crazy? Would you give a bold wall treatment like this a try? Share in the comments below!
Megan
7 Comments on “Renter-Friendly Walls: A 3D Paper Mountain Mural”
I really love how this turned out. I live by mountains, and so this is a great feature. If I ever moved away from them, I’d have to put something like this up. The shapes you could come up with make this an awesome idea. Or a backdrop for a food table at a shower or something. How simple but so full of impact. Especially when you have the paper already to put up!
Hey Kristie!
Hmmm…such a good idea to use for a party backdrop…or even a photo booth! I wasn’t sure if I was going to keep all the squares after I pull them off the wall, but now I might!!!
Thanks, as always, for stopping by! Hope you’ve had a great week!
Megan
Hi Megan
What a lovely room with this so lovely blue wall
Yes I must admit I love blue and as I see à Mountain from the armchair I read your blog tonight
I admire you to do such a new project some weeks before moving
Have a nice week
Michèle
Happy Sunday Michèle!
Thank you so much – I am glad you all love this wall as much as I do! It was such a happy surprise when it was all done, but I am so glad I went for it! How lovely that you can see mountains from your home!
Hope you’ve had a good week!
Megan
Now this is cool! It looks great and your right those blue bins ground the whole thing, like it was meant to be 🙂
A happy accident indeed! I would totally do this in my home.
Lauren | Lovely Decor
xx
GOOD LUCK WITH DUST GUYS lol
Wow! I love that blue wall! This is so pretty and unexpected.