How to Cut Stencils with a Cricut | Everything You Need to Know!
Most Cricut projects involve cutting images out of a some sort of material and placing them onto your project. But did you know you can also use your Cricut machine to make stencils? This involves cutting a design into stencil material, painting over it, and then removing the material to reveal a design permanently transferred to your project. It’s so fun, and not at all hard to do; but there are some tips and tricks you need to know in order for your projects to turn out just right. Today, I want to show you how to cut stencils with a Cricut machine so you too can dive into this whole new world of creative possibilities!
What are Stencils?
Stencils are essentially designs (e.g., shapes, patterns, words, phrases, etc) cut into plastic material that is then overlaid onto paintable/stainable surfaces such as wood, walls, fabric, etc. Paint or stain is applied over the stencil; and when the stencil is pulled away, the relief of the design (opposite) is revealed on the surface.
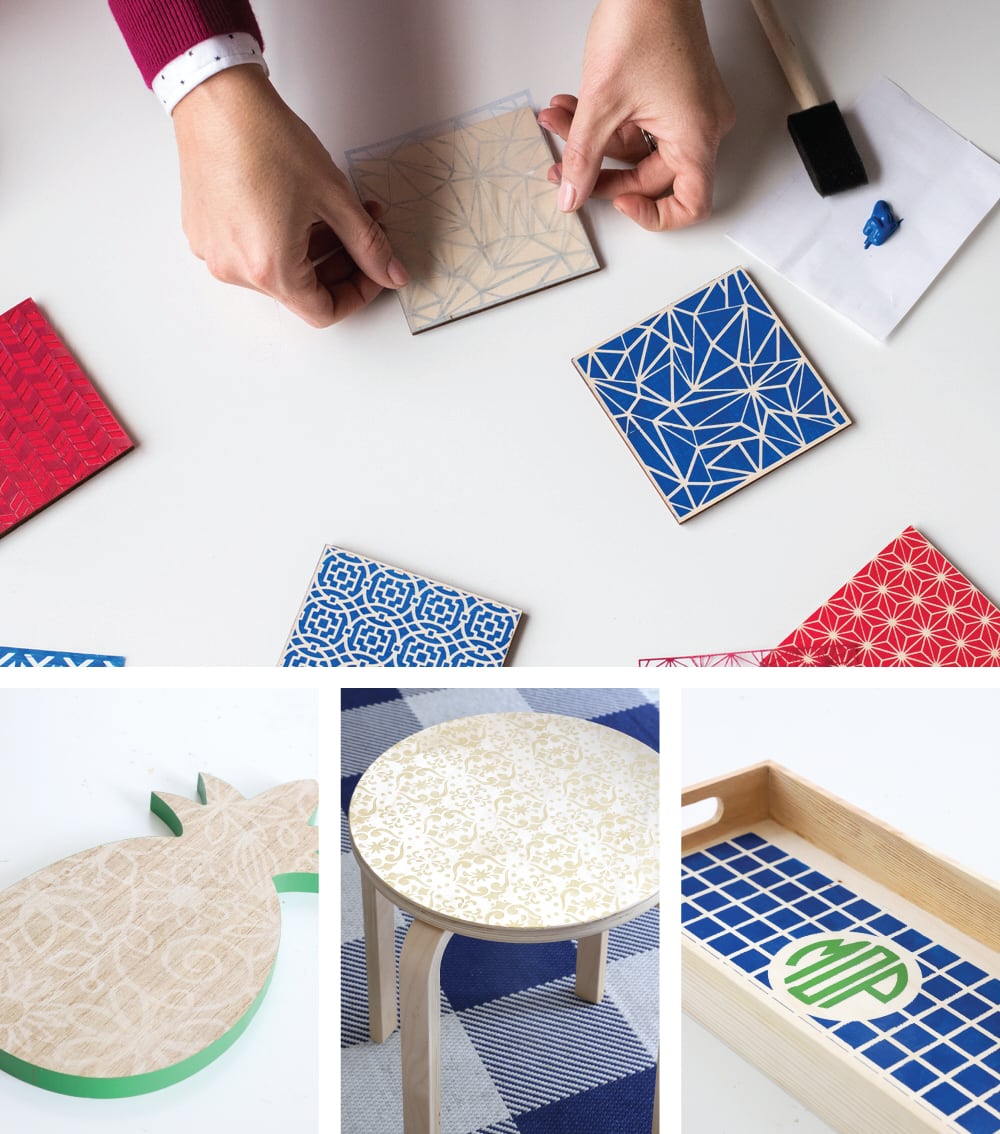
In the picture below, my hands are holding a small stencil of an abstract design. When placed on the wood, painted over and then removed, the blue design (shown to the right) is left behind.
Why Use Stencils?
These days, there are so many different ways to add patterns to home decor items. Case in point, I’ve used vinyl to make my own “wallpaper”, furniture decals, and decorative tray; and iron-on to add designs to a sign. So why go through the hassle of using a stencil (with messy paint or stain) to decorate an object?
Although adding designs with vinyl or iron-on is easy and looks great, it’s also very temporary (meaning it can be peeled off). Additionally, designs created with these adhesive-backed products will have a raised surface, making them difficult to seal or waterproof.
On the other hand, stenciling a design onto a surface makes the details permanent since paint/stain soaks into the wood rather than sit on top. Therefor, the design will be harder to remove (you’ll either need to sand it off or paint over it); and your surface will remain flat and smooth. Stenciled designs also have a more polished/professional appearance (especially when it comes to home decor) compared to details added via plastic-like vinyls.
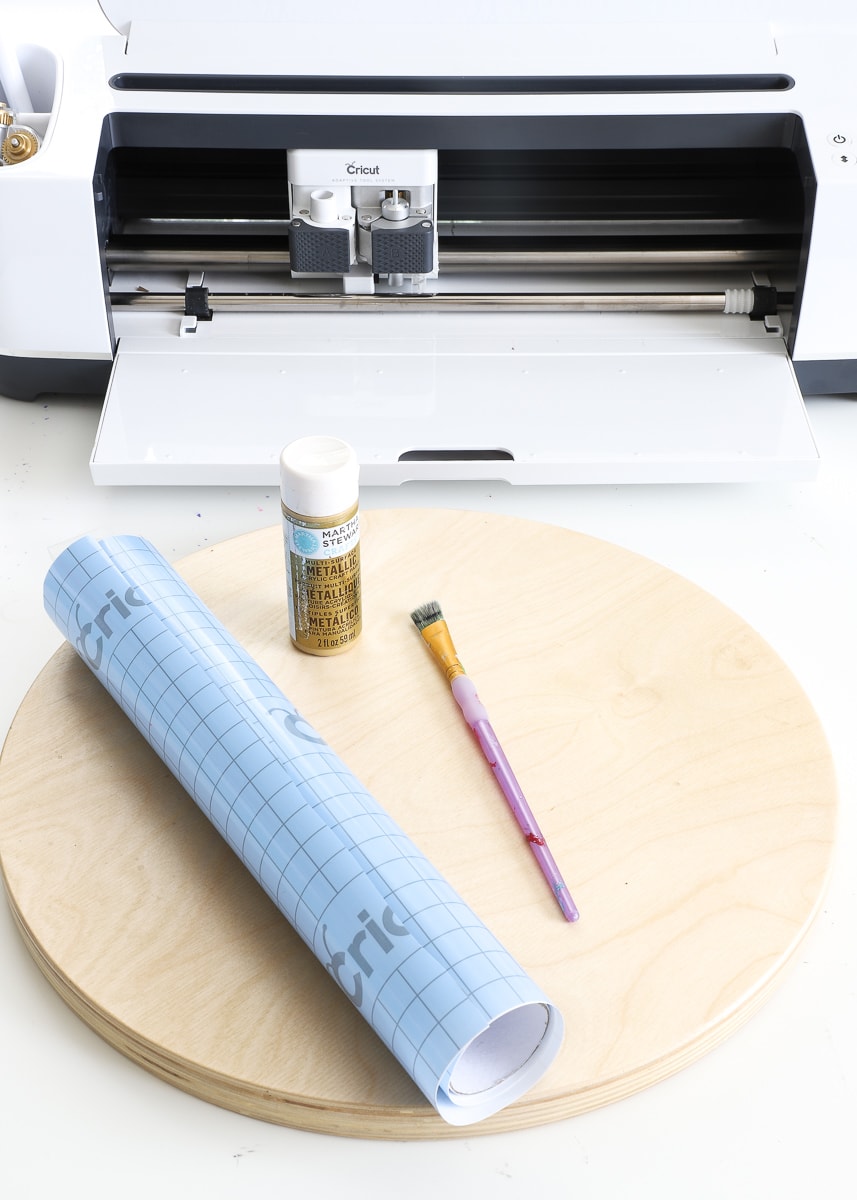
Supplies Needed
Here is what you will need to make your own stencil:
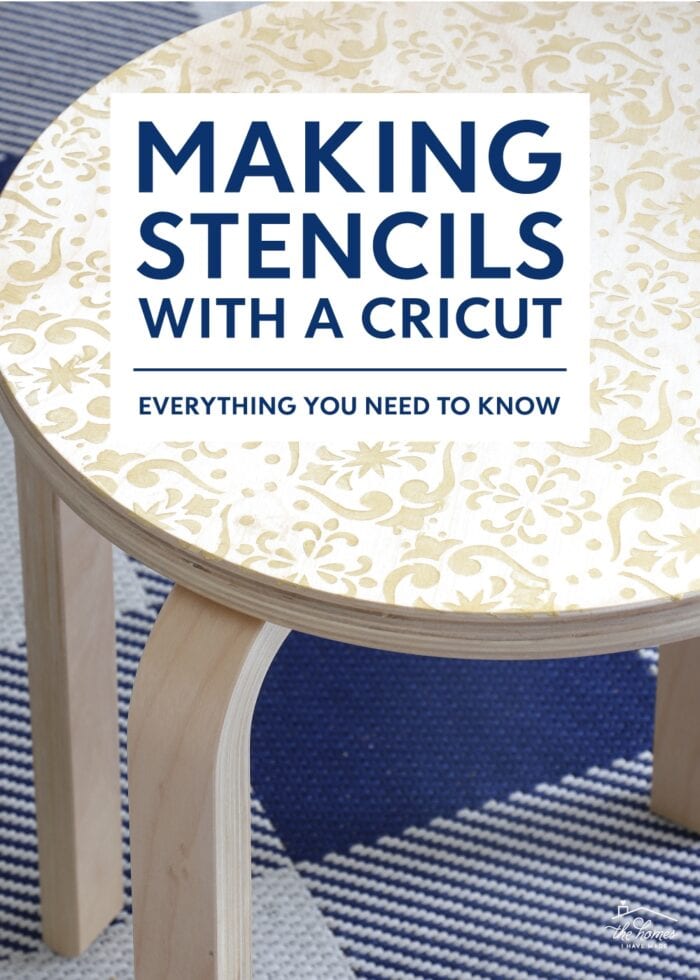
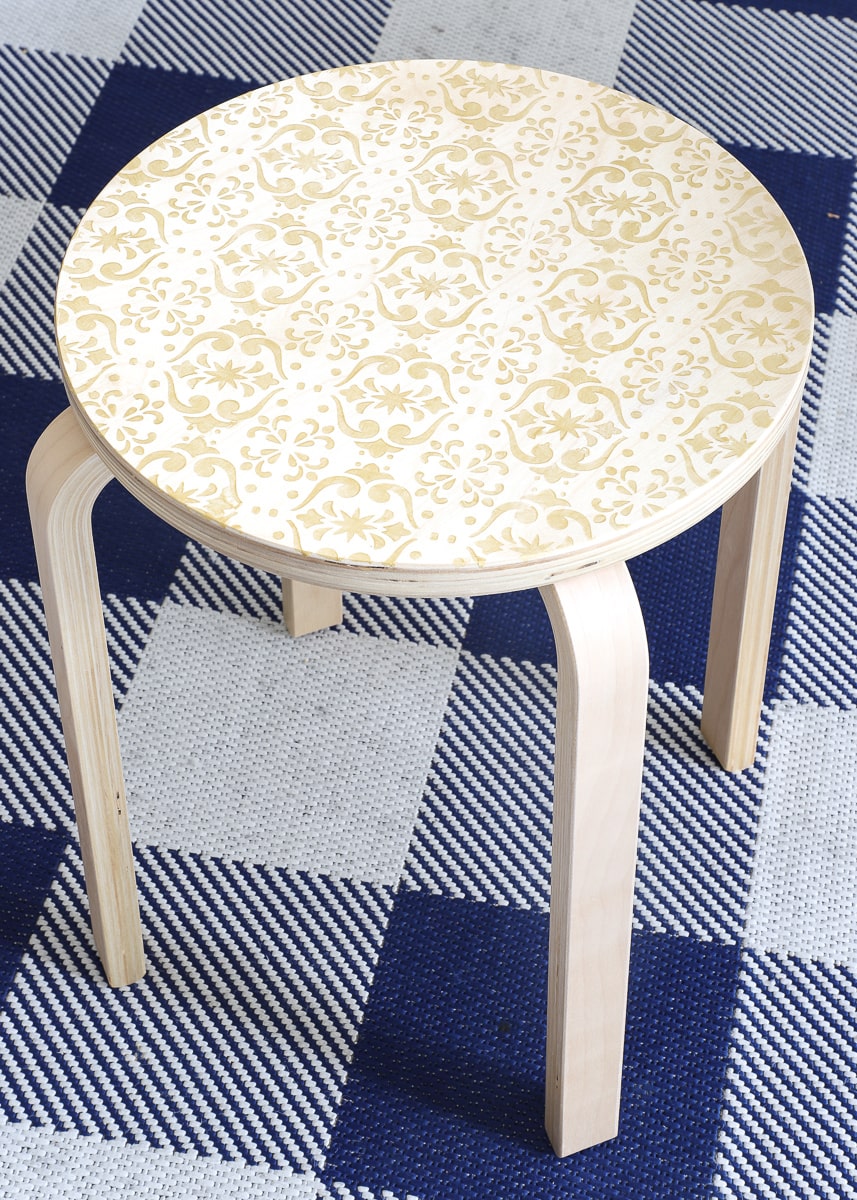
- Surface to Stencil – Walls or unfinished wooden objects work best. (This project uses the IKEA FROSTA stool, which is discontinued in the US, but here is a similar version).
- Cricut Machine – Any Cricut machine can be used for this project (Cricut Joy | Cricut Explore models | Cricut Maker models)
- Fine Point Blade – comes with your machine
- Standard Grip Cutting Mat
- Weeding Tool
- Stencil Vinyl – More on this product below
- Scraper Tool or Brayer
- Paint or Stain of your choice – Basic acrylic paint works awesome on unfinished wood surfaces, is budget-friendly, comes in every color imaginable, and is easy to use.
- Paint Brush, Stencil Brush, or Sponge Brush
All About Cricut’s Stencil Vinyl
Mylar Sheets
For a long time, the only way to create reusable stencils was with mylar stencil sheets. Any design can be cut into these plastic sheets (either by hand or with a cutting machine), but they require stencil adhesive to hold them in place on your project. And since it’s usually difficult to create a tight steal between a surface and a thicker plastic sheet, these “traditional” stencils are prone to “bleeding” (i.e., paint seeping under the edges), which results in muddy designs.
Removable Vinyls
Crafters then started turning to removable vinyl or freezer paper to create custom DIY stencils since these products can adhere tightly to the base layers. However, both of these products are single use, as they don’t pull off in one piece without significant tearing or distortion. So while these products might be fine for a one-time application, they are not ideal for larger projects where you need to use the same stencil over and over.
Stencil Vinyl
Stencil Vinyl, on the other hand, is stronger and thicker than your typical crafting vinyl. It cuts and weeds like vinyl, but it doesn’t stretch or warp (which means you can pick it up over and over again). It’s essentially the best of both worlds: an easy-to-cut stencil that sticks firmly to your project but can still be used multiple times.
NOTE: Cricut has recently released a stencil “film” which is lighter-weight than the Stencil Vinyl featured in this post. Learn more about the nuances to working with Cricut Stencil Vinyl here: Stenciling with Cricut Smart Stencil.
This Cricut tutorial is going to detail instructions for making stencils with Stencil Vinyl; however, the same process applies no matter what stencil material you choose!
Psssst – At the bottom of this post, I answer a bunch of FAQs related to Stencil Vinyl!
A Stencil Project From Start-to-Finish
Step 1 – Design Your Stencil
Start by creating your stencil design in Cricut Design Space. Every stencil design will depend on both the pattern itself and the size of your particular project. I share a bunch of design tips at the end of this post; however, no matter the size and scope of your stenciling project, be sure you consider the following:
- The size of your overall project – Is your project small enough that you can cut a single stencil to cover the entire thing? Or will you need to cut a single pattern apart (or create a repeatable pattern) to accommodate a larger project?
- The scale of the design – If you want your design small and tight, you will likely need to repeat the image over and over again and Weld it into a larger cut. If you want a larger-scale design, you can expand a single pattern to fit a bigger surface area.
- How big you can cut on your particular Cricut machine – You can cut stencils up to 11.5″ wide on both the Cricut Maker and Explore models, but you can only cut 4.5″ wide on a Cricut Joy. This will influence how you cut your particular pattern.
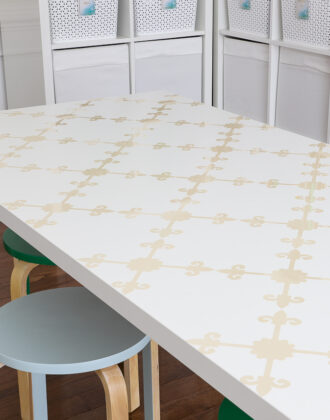
As an example: My stool measured about 14″, so I used the Slice Tool to cut my design (Floral Inlay Tile Square, #M23D2FB0) into 2 parts. Once cut and placed together side-by-side, the pattern continues perfectly.
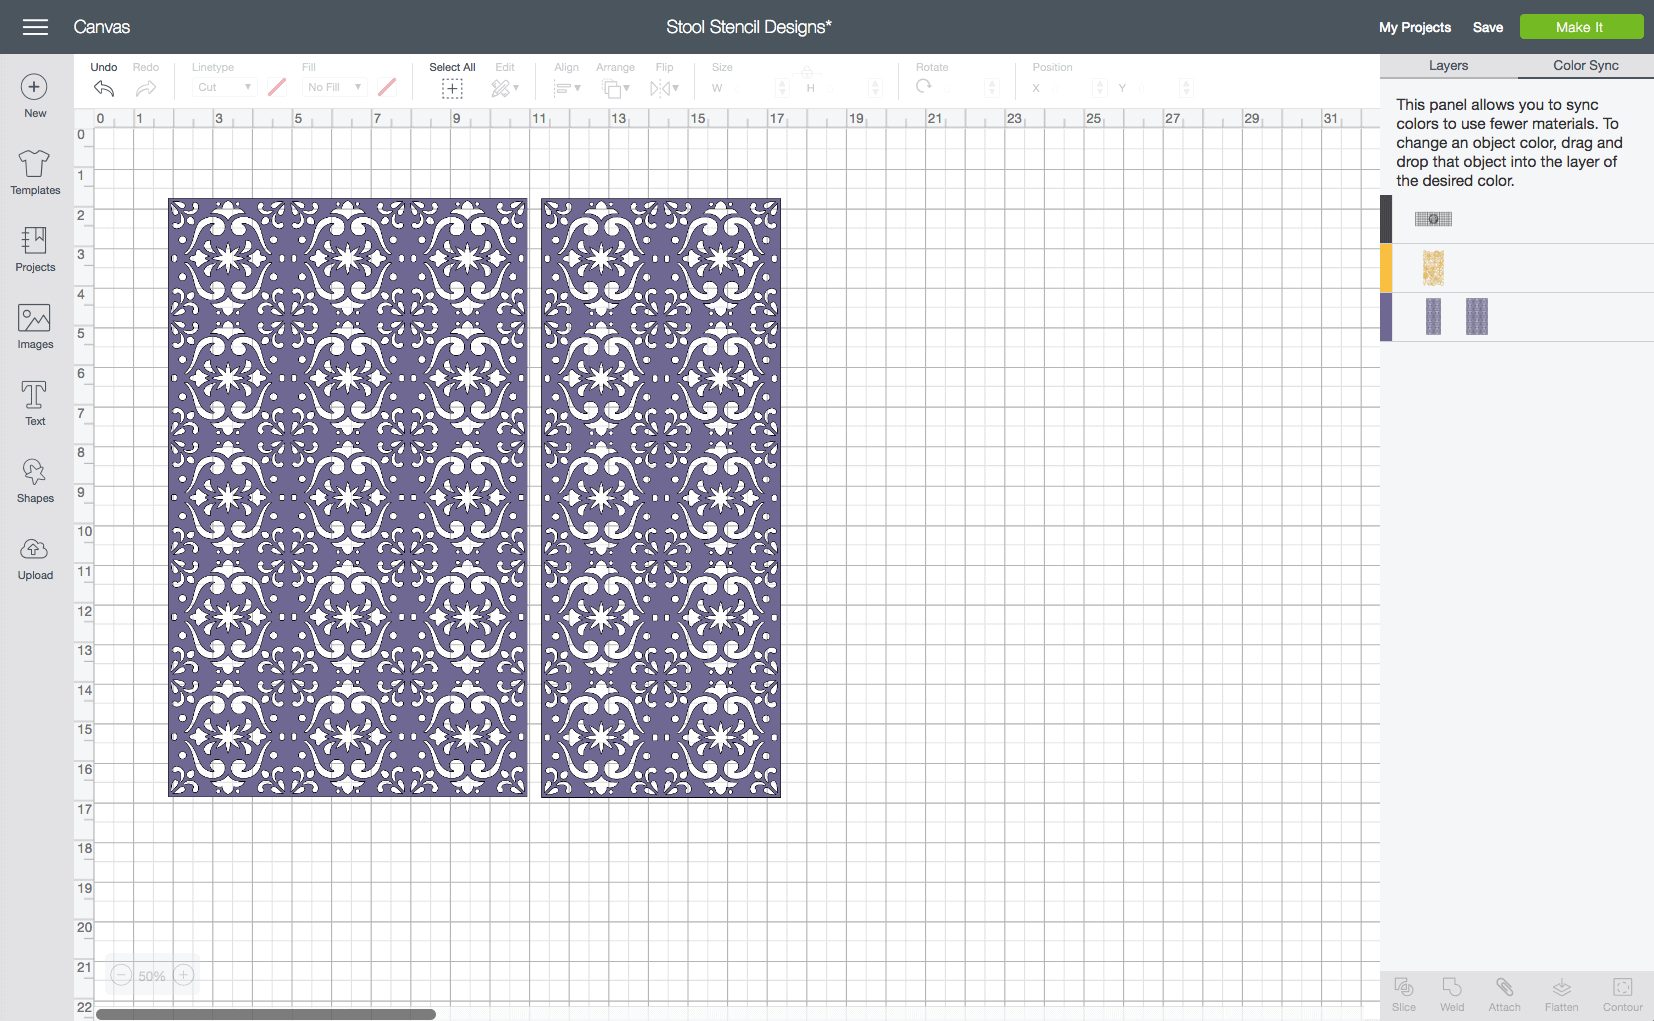
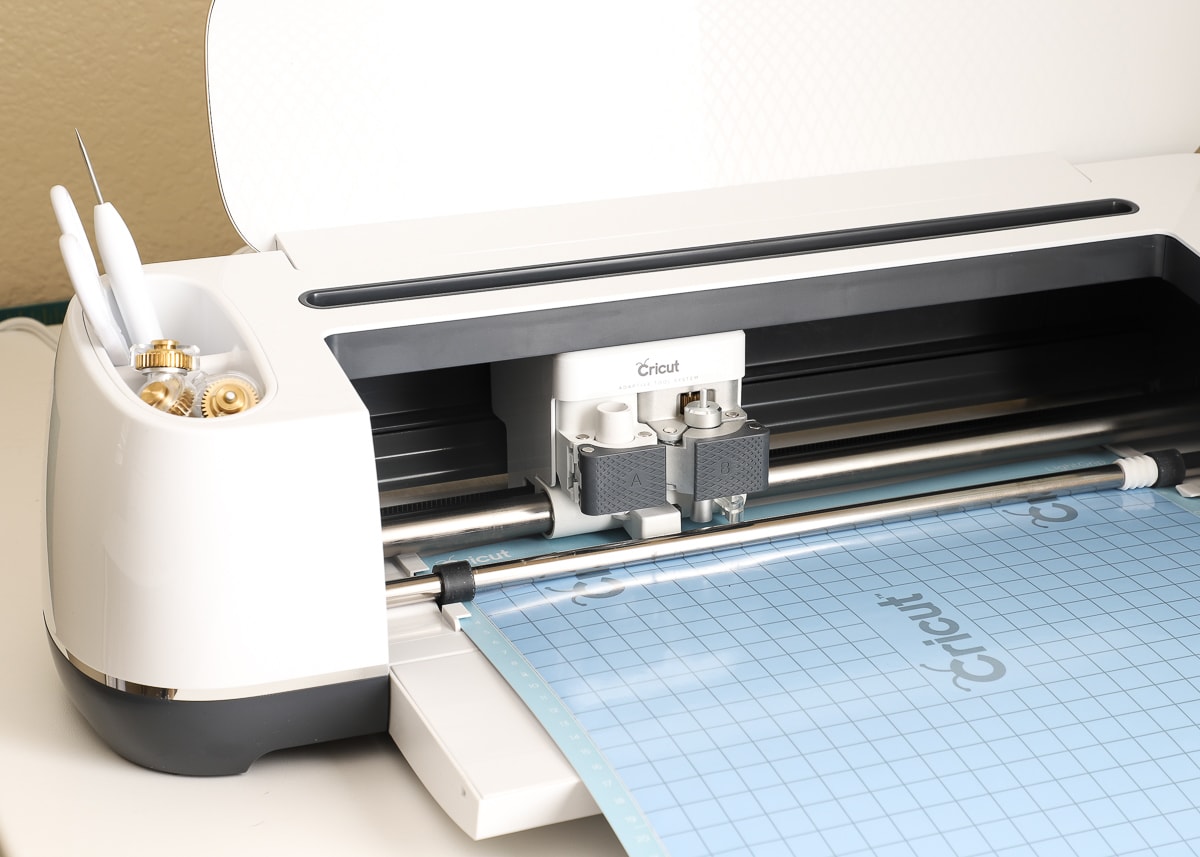
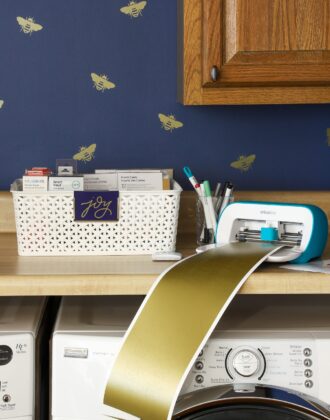
Step 2 – Cut the Design from Stencil Vinyl
Once you have your stencil design finalized, your next step is to cut it out of Stencil Vinyl. Load the Stencil Vinyl onto a Standard Grip Mat, and cut out the design with your Cricut set to “Stencil Vinyl.”
NOTE: If you are using a Cricut Explore Air, set your dial to “Custom” and then choose Stencil Vinyl from the drop-down menu.
Step 3 – “Weed” the Stencil Vinyl
With your design cut out, it’s time to remove the Stencil Vinyl design from the white paper backing.
When working with traditional vinyl, I always recommend weeding first (the process by which you remove all the unwanted parts of your design) and then using transfer tape to move the vinyl design to your project. (See More: How to Cut Vinyl with a Cricut)
But here is the wonderful thing about Stencil Vinyl: you (usually) don’t need to weed or use transfer paper! Cricut’s Stencil Vinyl is sturdy enough that you can (carefully) peel it right off the paper backing, and all the unwanted elements of your design will remain behind.
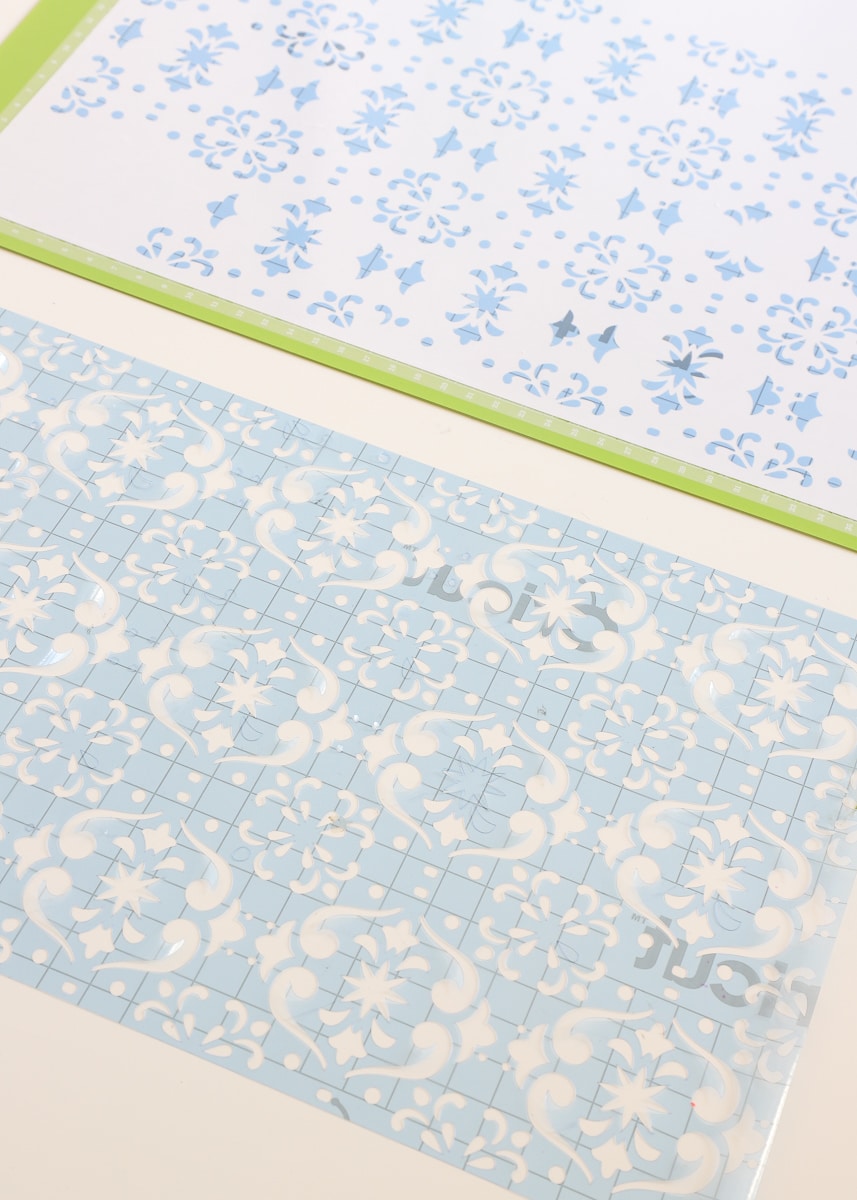
TIP! In the event a few unwanted elements remain connected to your stencil (as seen above), you can easily punch them right out with your finger or a weeding tool.
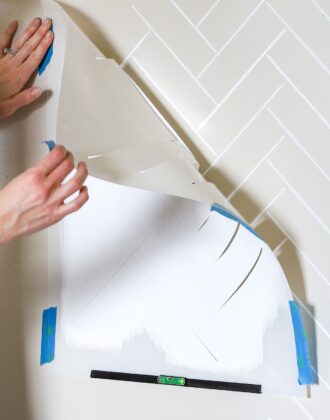
Step 4 – Place Stencil Vinyl Onto Project
With your stencil pulled up from the paper backing, place it onto your project with the sticky side down.
If you’ve worked with traditional vinyl and the thought of placing vinyl by hand makes you anxious, don’t fret! Cricut Stencil Vinyl lays down beautifully without bumps and wrinkles. And in the event you don’t like the placement or you do have a wrinkle, simply peel it up and place it down again (your design won’t warp or tear…I promise!)
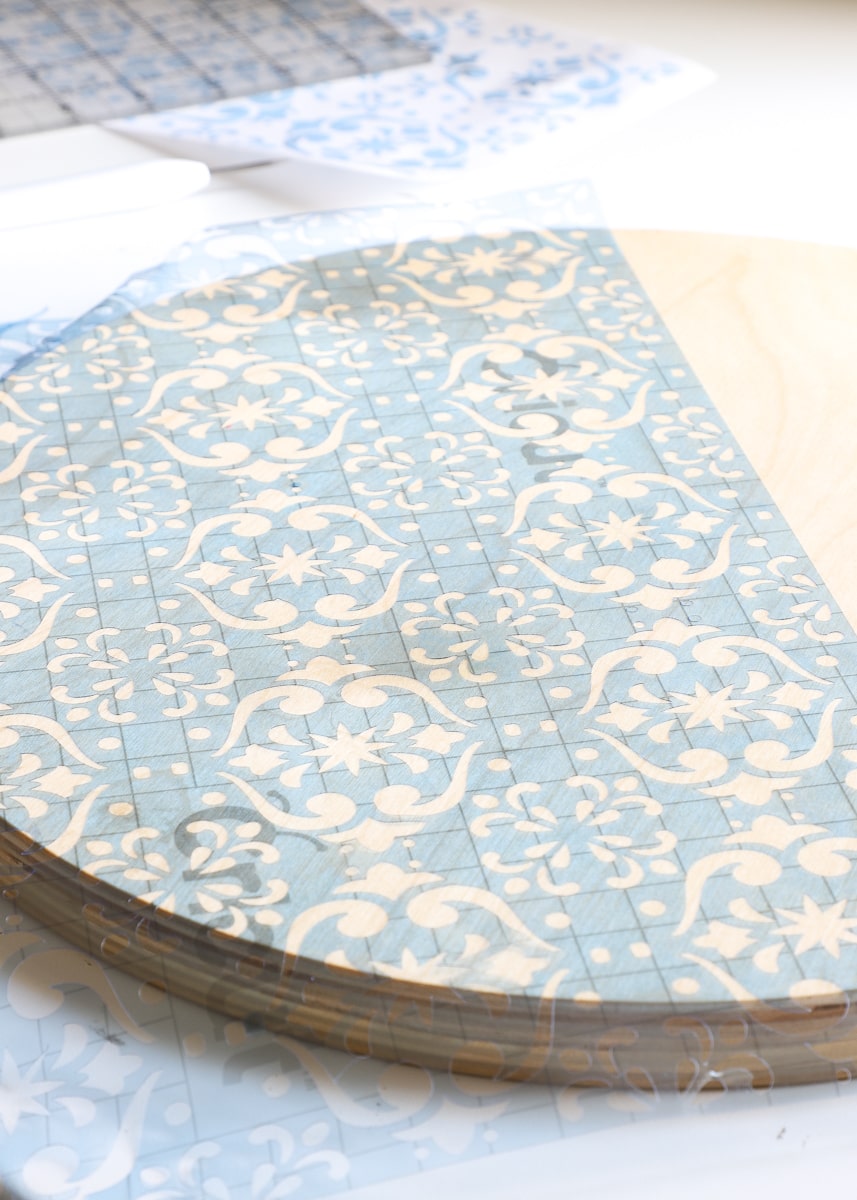
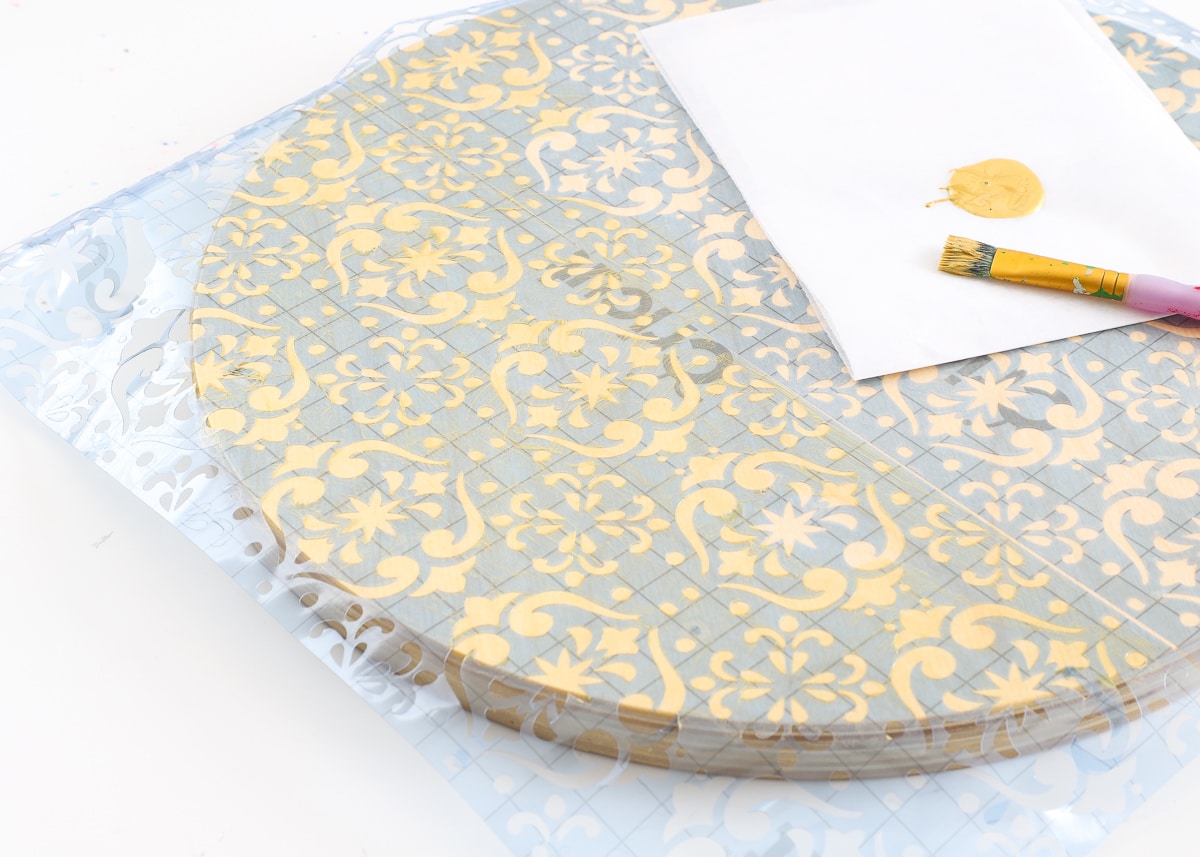
Although the adhesive on the back of the Stencil Vinyl is pretty tacky, I recommend taking the time to reeeeaaally secure it to your surface to minimize seeping around the edges of your design. My trusty craft brayer worked perfectly for this, but you can also use your fingers or a Cricut scraper. Do your best to ensure the Stencil Vinyl is laying flat and there are no puckers or bubbles.

Step 5 – Paint or Stain Design
Next, it’s time to paint or stain your design! Here, you’ll want to keep basic stenciling techniques in mind:
- Use as little paint as possible. It’s better to do 3 light coats than 1 thick coat.
- Sponges and stencil brushes work better than paint brushes (do as I say, not as I do…since I clearly used a brush on this project!)
- Add paint in a straight-down motion (like dabbing with a sponge) rather than sweeping it side to side (as it will most likely seep under edges).
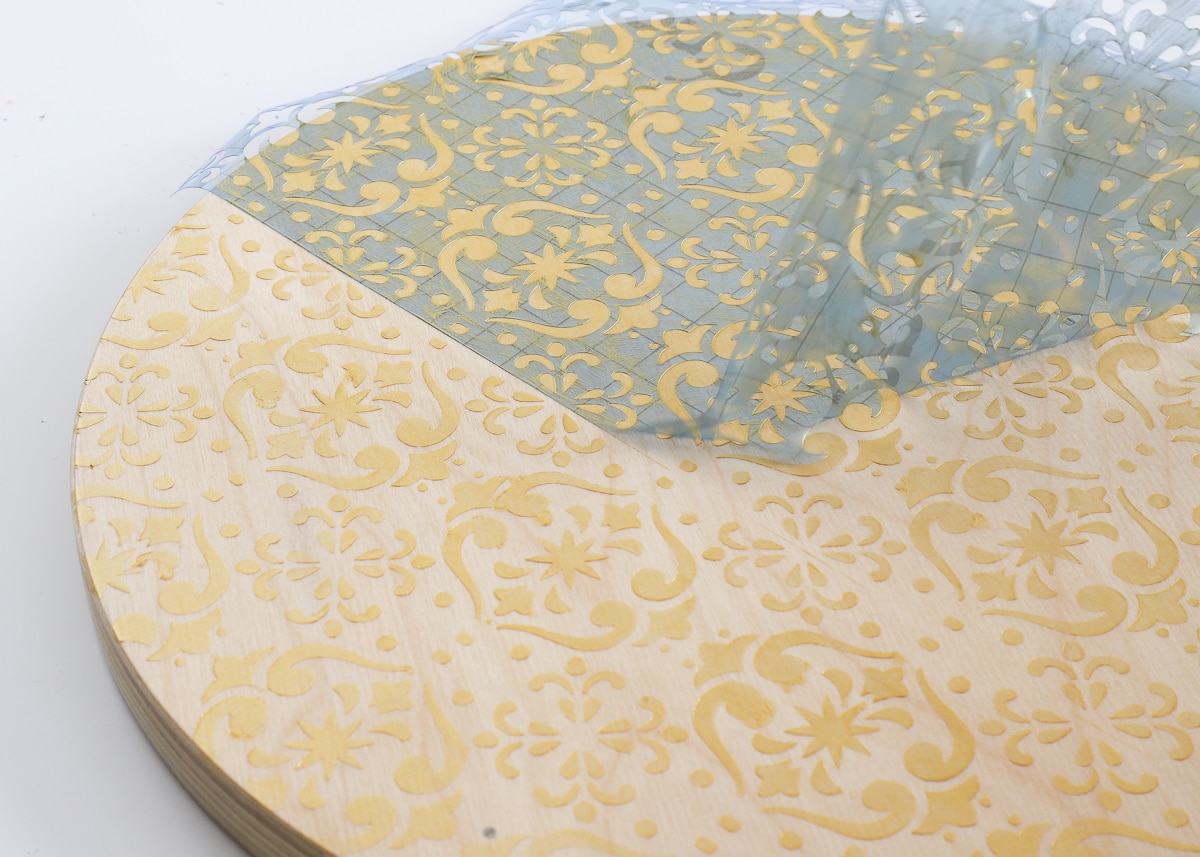
Step 6 – Remove Stencil & Repeat
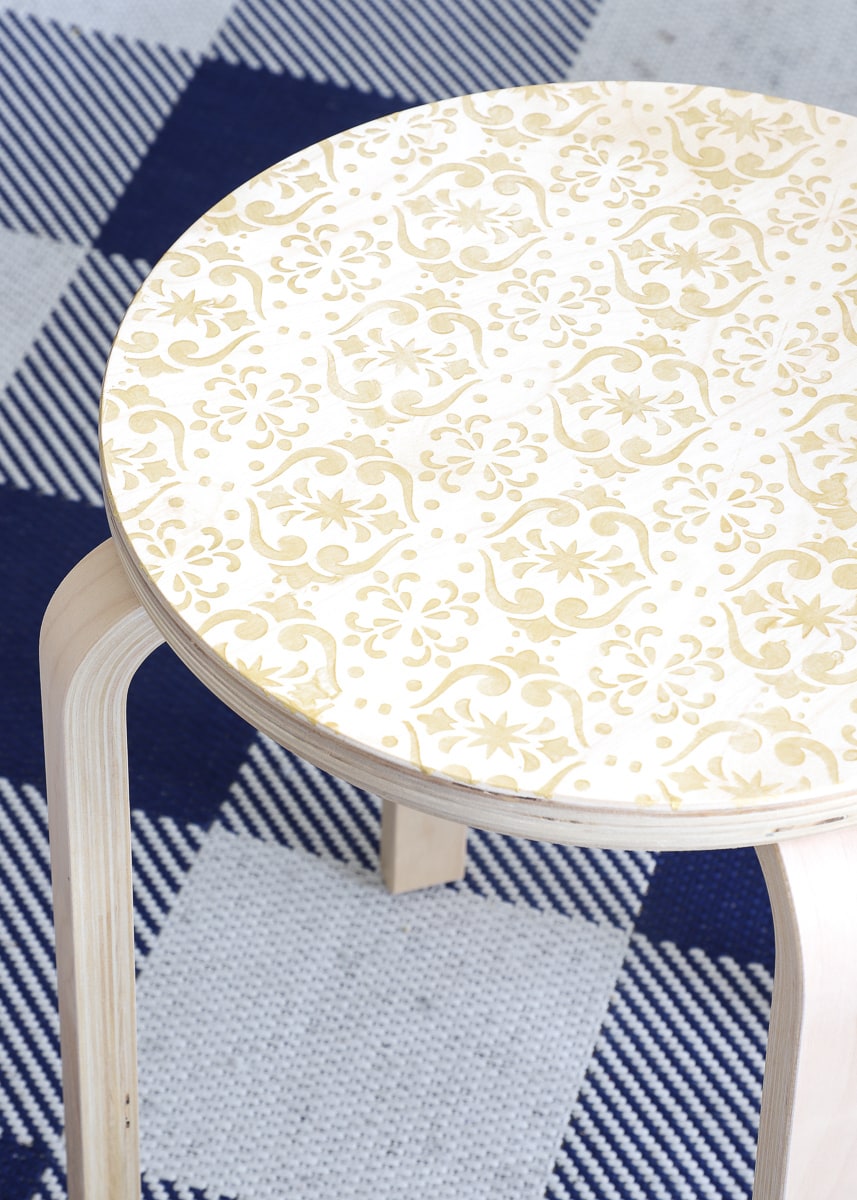
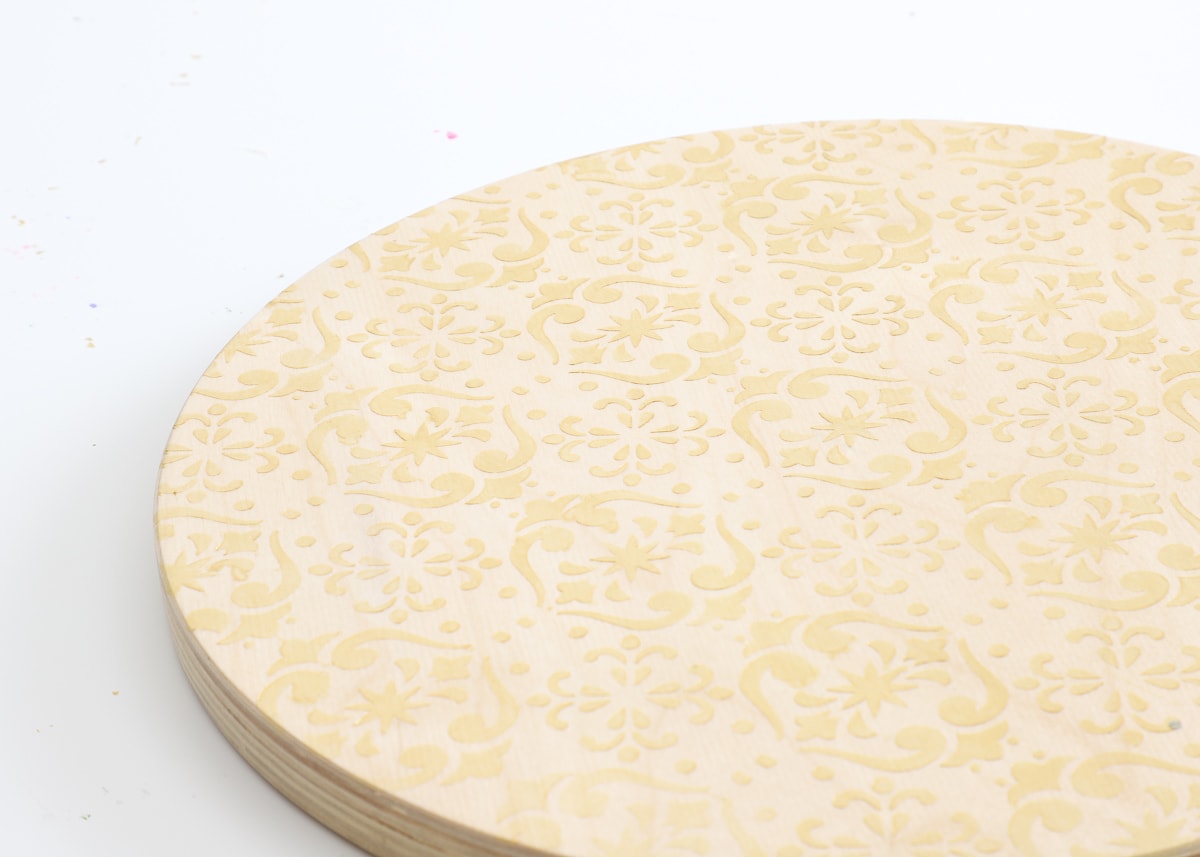
When you are satisfied with your paint/stain coverage, go ahead and remove the stencil (this is the most exciting part!) to reveal your design.
A few things to keep in mind here:
Want to save this post?
- Be sure you have everything painted/coated to your satisfaction BEFORE you remove the stencil because you will never be able to re-place the stencil in the exact same spot once you remove it.
- Whether you remove the stencil while the paint is wet or dry is really up to you. However, if you’re going to use the stencil again (either on a new surface or to continue a pattern), I recommend letting the stencil fully dry before using it again so you don’t risk carrying wet paint over to the fresh surface. If you’re doing a large stencil project (like a floor or wall), consider cutting several identical stencils so you can keep working while the other(s) dry.
- If your stencil rips and you need to keep using it, no worries. Just cut another one from more Stencil Vinyl.
- It’s pretty difficult to “fix” stenciled designs…once the paint is on, you’re mostly stuck with it (which is the main reason stenciling can be a bit stressful). Although you may be able to remove small amounts of paint with paint thinner or even chipping it off once it’s dry, the only way to fix big mistakes or really bad bleeding is to sand off the design and start over. This is why it’s REALLY important to use as little paint as possible when stenciling!
With your design complete, you can apply a clear coat as desired or call your project done!
FAQs
Now that you understand the basic process of stenciling a project with a Cricut machine, let me dive into some nitty-gritty questions related to Stencil Vinyl and stenciling designs!
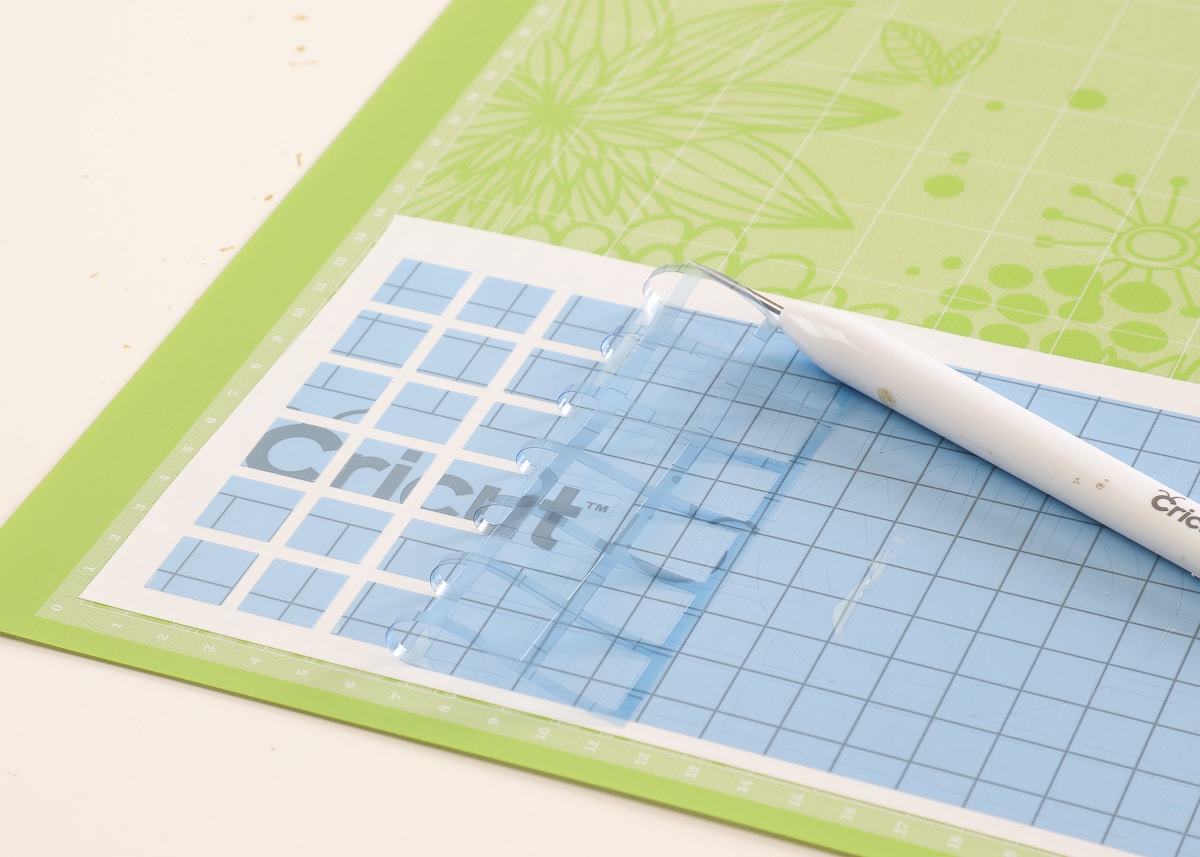
So You Never Have to Weed Stencil Vinyl?
Actually…it depends. As I mentioned before, Stencil Vinyl is stronger and thicker than your typical crafting vinyl. As such, it tends to pull up really, really nicely from the paper backing without warping or ripping. I have found that really simple patterns and designs (no curvy edges, no teeny, tiny details, etc) can be pulled right up without any weeding. In the example below, I was able to pull off my grid stencil, perfectly, without weeding first!
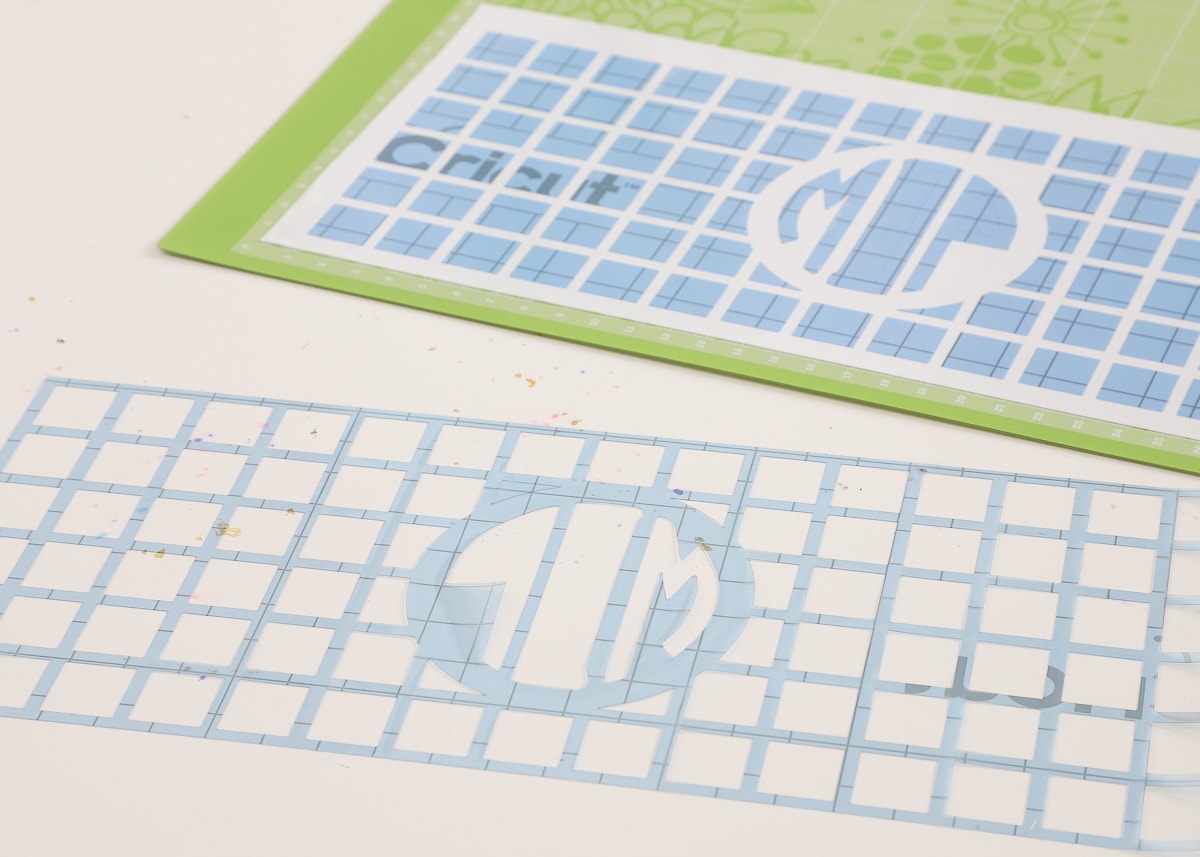
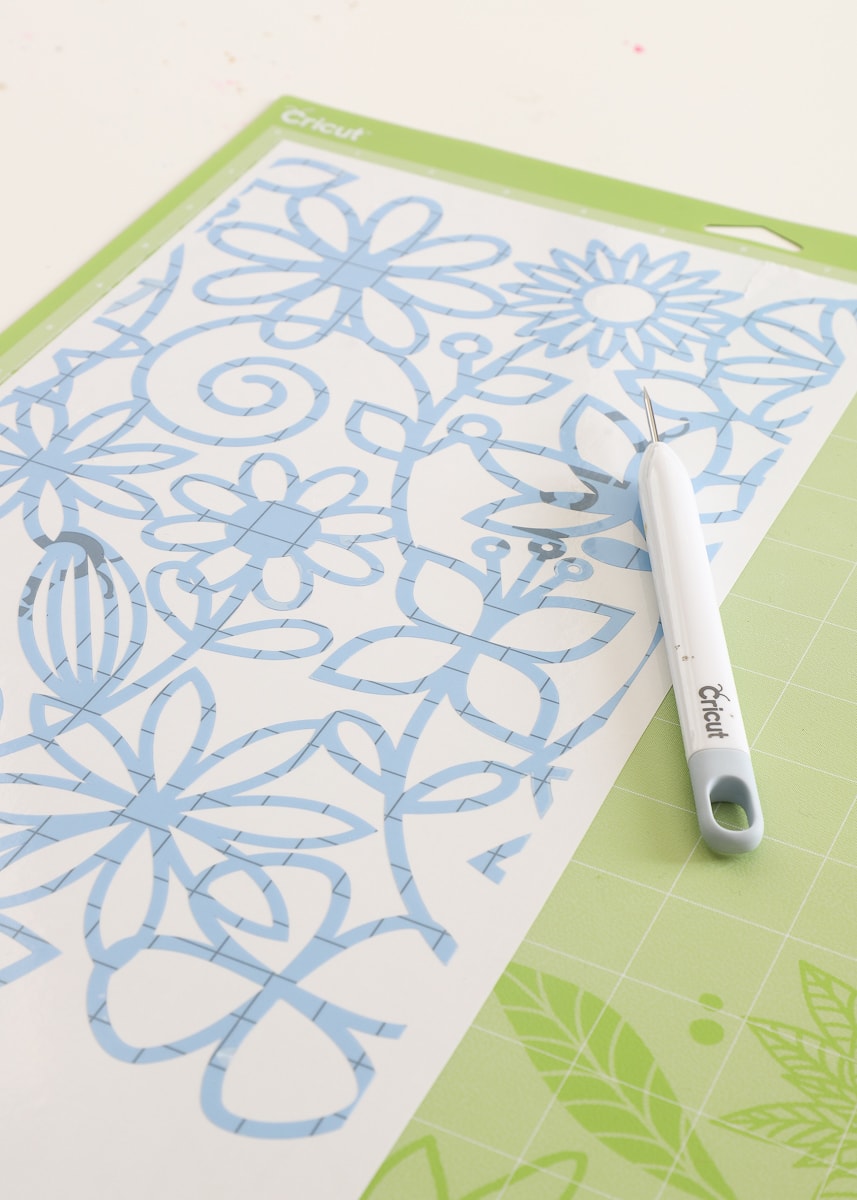
On the other hand, when I first tried to lift up this intricate design (below) without weeding, all the little petal pieces came right up with the outline. Additionally, the pattern was so irregular and “loose,” that it was ripping and warping as I tried to wiggle it all free. As such, weeding this complex design first was worth the time in order to keep my design perfectly intact.
Do You Ever Have to Use Transfer Paper with Stencil Vinyl?
In most cases, no, you do not need to use transfer paper with Stencil Vinyl. It is strong enough, as I’ve shown, to transfer nicely from the paper backing to your project without warping or tearing. This is especially true with simple, sturdy designs where there are no loose, flowing, or tiny details.
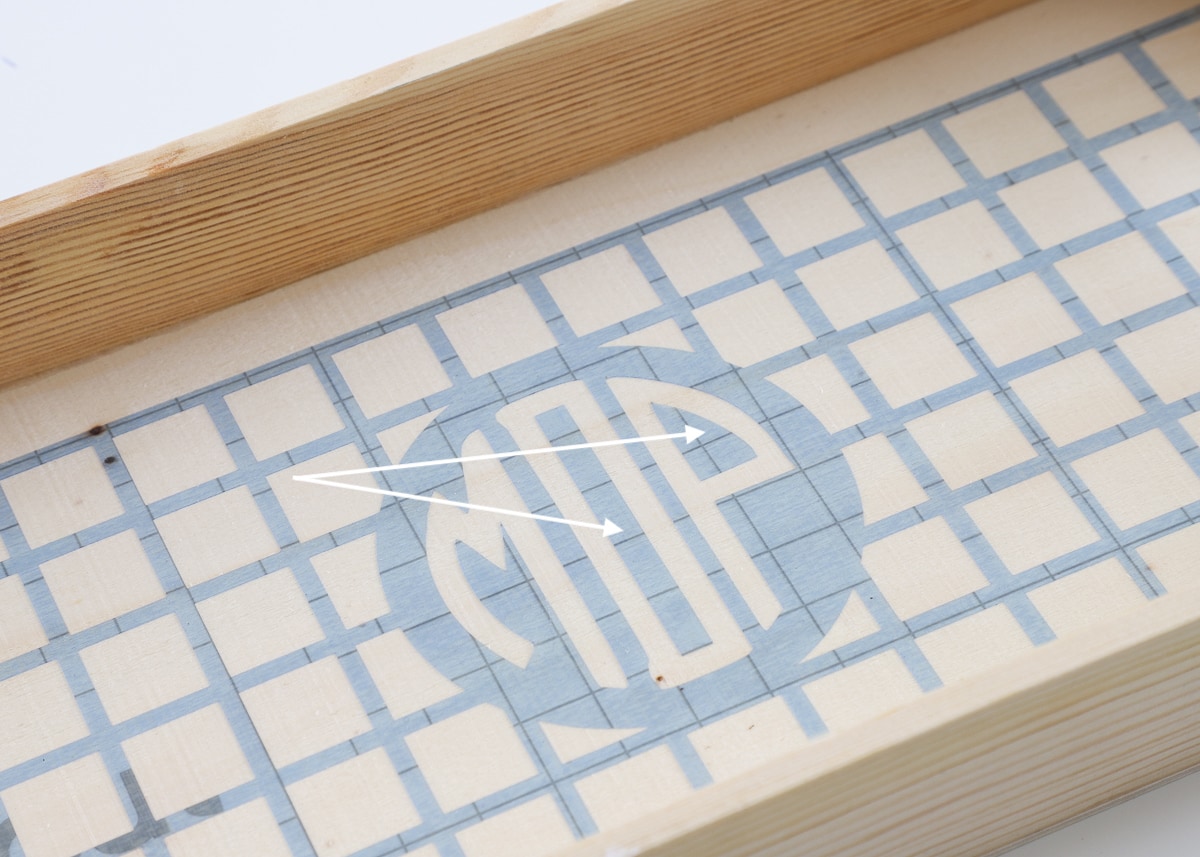
Even in the case when you need to add back in non-connected elements (like the middle of the letters, below), you can simply place these by hand. Just use the printed gridlines on the Stencil Vinyl itself to help you line them up just right.
However, you may find yourself wanting to stencil a design that is just a bit too whimsical to transfer on its own. When I first tried to transfer the very loose flower design (with lots of non-connected elements) by hand, getting each and every part of the design to lay down nice and smooth proved impossible. So I re-cut the design and transferred it to my project with transfer paper instead. (Learn: How to Use Transfer Tape with Vinyl)
NOTE: Getting transfer paper to “let go” of Stencil Vinyl is a little trickier compared to standard vinyl. Work slowly and use a scraper in order to get the transfer paper to lift off while keeping the Stencil Vinyl still on the project.

Can the Stencil Be Used Over and Over Again?
Yep! Even after you paint over your stencil and (carefully) pull it off, you will most likely be able to lay it down onto another surface and use it again.
Eventually you might find that the adhesive backing isn’t as tight as it was at the start and/or is allowing too much paint under the edges. At this point (or if your stencil rips), it’s time to cut a fresh stencil and keep going!
NOTE: This is NOT the case when using Cricut’s new Smart Stencil or Stencil Film. Find out more here: Stenciling with Cricut’s Smart Stencil

What Makes a Good Stencil Design?
This one is kind of a doozy and I could probably write a whole separate post on it, but I want to cover some nuances of stencil design here.
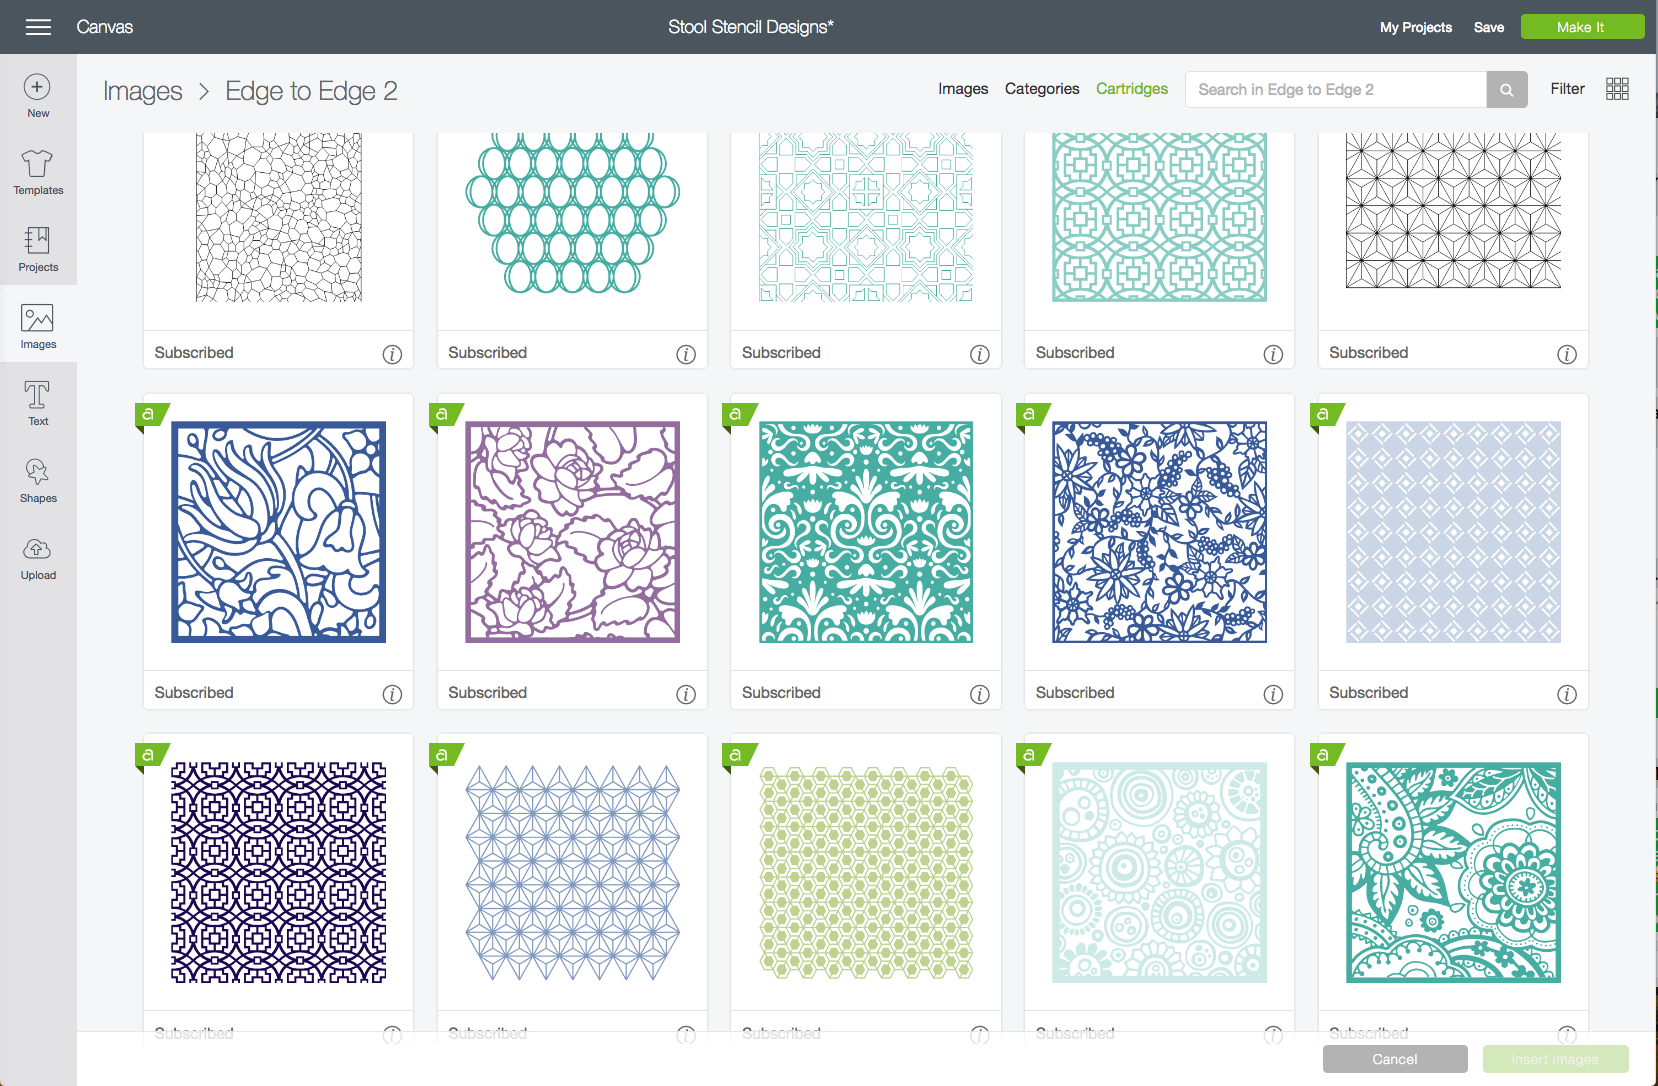
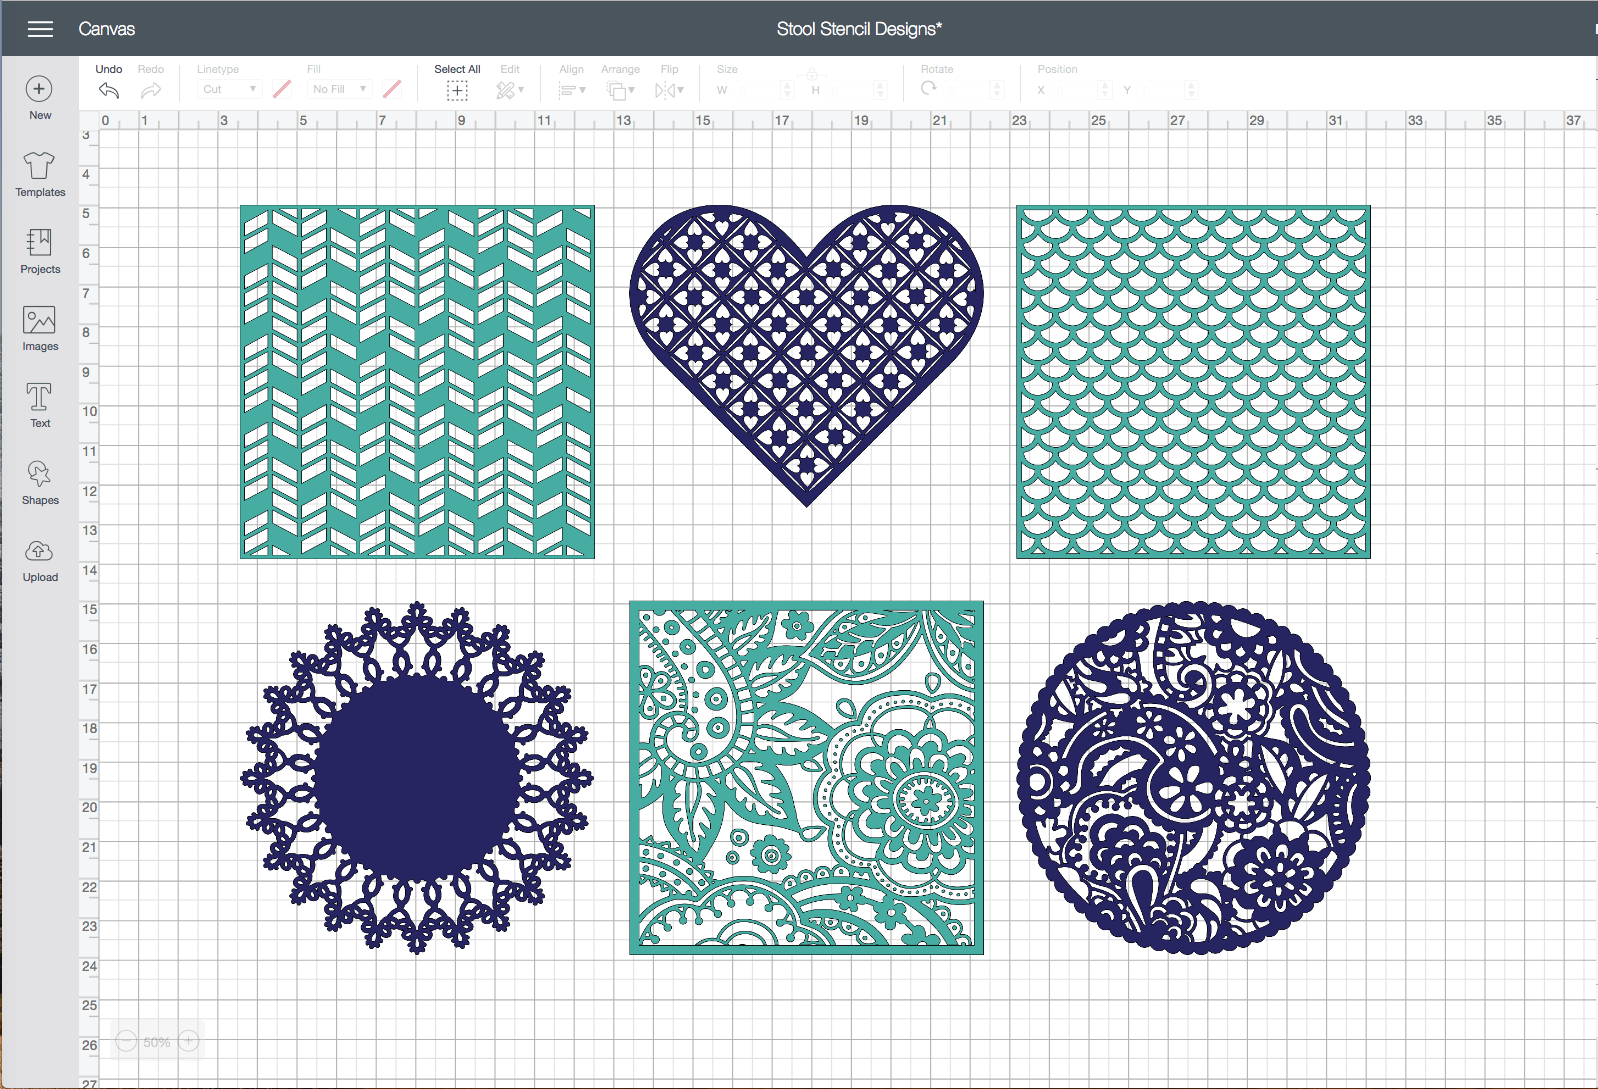
First, when looking for good designs to cut into stencils, I recommend searching “Pattern” in the Cricut Design Space Image Library. This will yield all sorts of patterns that will make awesome stencils! The Edge to Edge Image Sets are my favorite! Almost all of them can be created into larger stencils via the Weld Tool.
Next, let’s chat about the concept of the POSITIVE and NEGATIVE aspects of a design:
- The POSITIVE aspect(s) of the design:
- Are the line(s) that make up the design as you see it
- This is usually the part of the design you keep/use for your project
- The NEGATIVE aspect(s) of the design:
- Are the white space(s) that exist between/inside the POSITIVE aspects of the design
- These are usually the parts of the design that you want to remove (via weeding) or discard when assembling your projects.
Whenever you cut ANY design, there is always POSITIVE and NEGATIVE space and you can decide which to use for your stencil project.
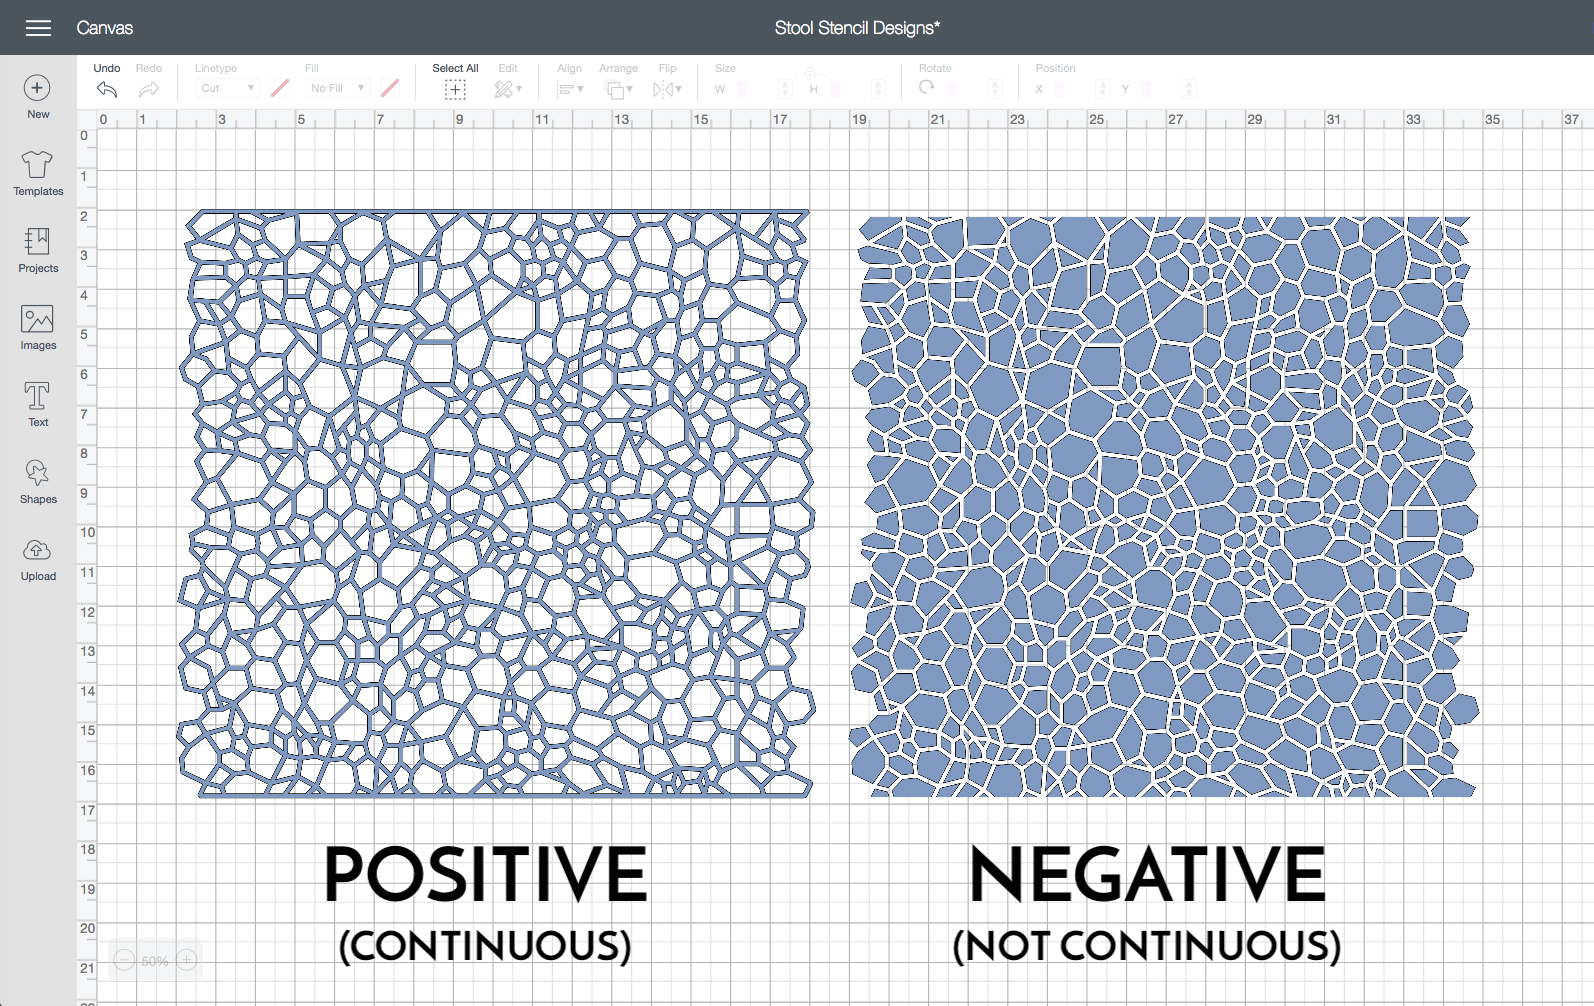
When it comes to selecting a “good” pattern to cut into a stencil, it is easiest if the POSITIVE aspect of the design is one, continuous piece (above/below left). This not only means you will be able to apply your stencil in one step without transfer paper, but it also means it will be removable and reusable.
If your stencil design is instead made up of non-continuous pieces (above/below right), you will HAVE to use transfer paper to lay it down, and it will be a one-time use stencil since you will have to remove each element individually.
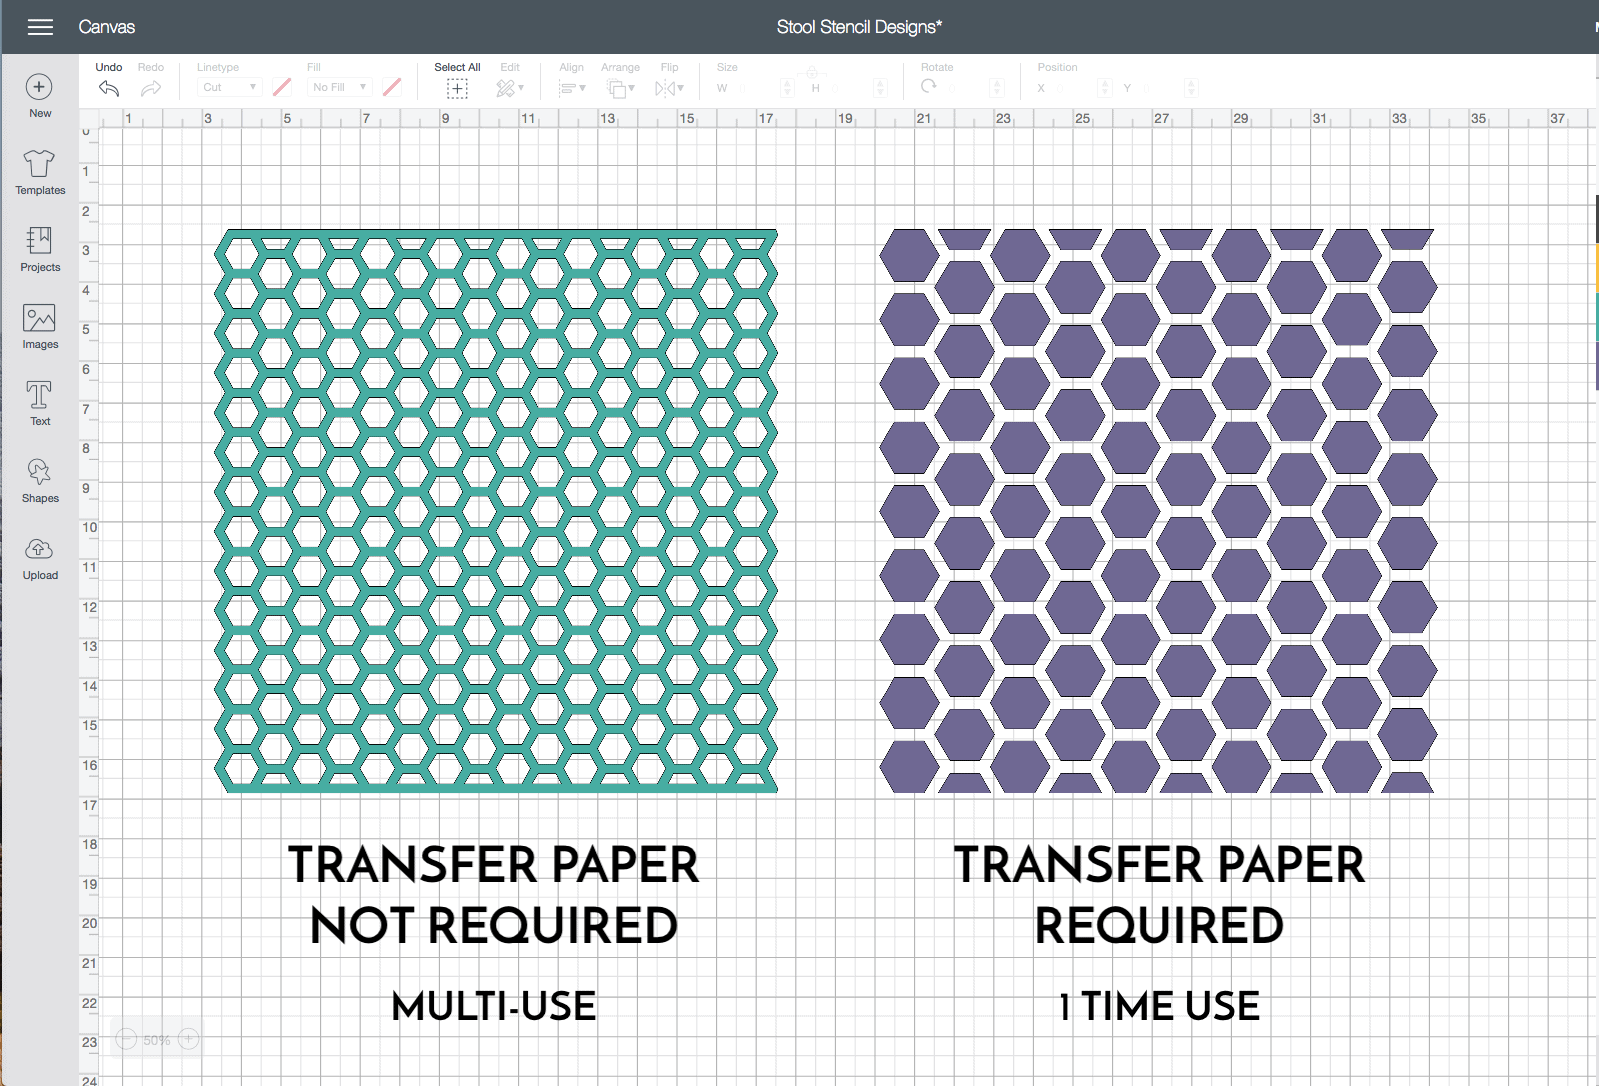
Although a continuous design is not absolutely necessary for a stencil, it’s always my preference since the entire design is one solid unit. Here are some other examples of continuous designs that would make for great stencils!
Finally, the last thing you need to think about when you are creating your stencils is how it will look once painted. Remember, the stencil design itself (the POSITIVE aspect of the design) serves as a mask, and it’s the NEGATIVE parts of the design that receive the paint. Therefore, you need to visualize how each pattern will look in reverse once painted.
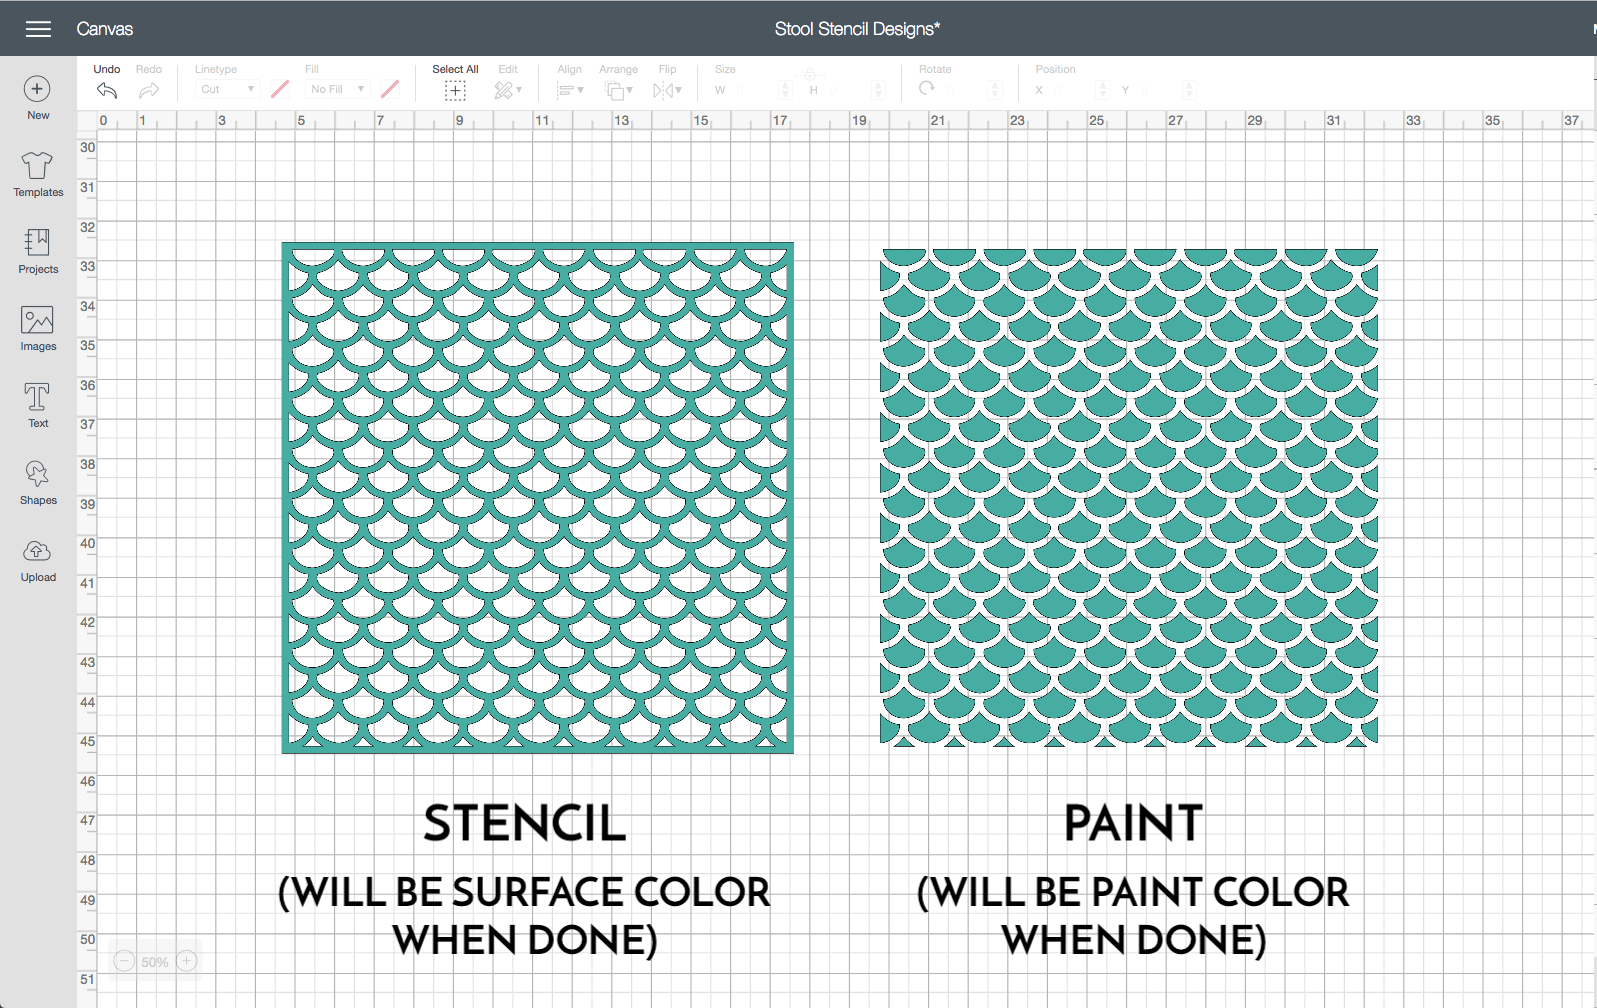
In the example above, if you use the lefthand design as your stencil, your object will be mostly painted with green scallops (as shown on the right). Should you want the scallop outlines green instead (as shown on the left), you will need to use the right-hand design as your stencil (via transfer paper).
I know…it can be a little bit of a mind game as you design your project. but it’s important to think this all through so your projects turns out just the way you want them!
Phew! I know this tutorial was a doozy…well done making it through!
Although cutting stencils with a Cricut machine is actually pretty easy (I promise!), there are lots of things to consider in order for your projects turn out just right. I hope this comprehensive overview gives you the confidence to try a stencil project; and if there’s anything that is unclear or comes up while you’re working with Stencil Vinyl, don’t hesitate to let me know and I’ll help you out the best I can!
Megan
19 Comments on “How to Cut Stencils with a Cricut | Everything You Need to Know!”
Thanks for another great article. I have some of the stencil vinyl, so now I just need to figure out something to stencil.
Thank you very much! I have a Maker and it’s still in the box. Having all these tutorials to walk me through using it will be a great help once I get to the new house and unpack it. Stenciling is one of the main things I want to do, so this was very timely.
I can not wait to get my cricut in the next couple of weeks. I have stenciled the old fashioned way for about 35 yrs. Thanks for the tutorial this cricut stuff is all new to me so I have been reading everything I can before I actually get one.
Great tips! I didn’t know there was such a thing as Cricut Stencil Vinyl. I’ve been using Contact Paper for years. It’s not as sturdy and I can see that the Cricut Stencil Vinyl would work so much better for some projects. However, I do a bit of individual image t-shirt painting for my children and nieces/nephews and the Contact Paper works great for that. No need to invest in the Stencil Vinyl for a one-time use. :0) I will look in to getting the Stencil Vinyl for decorating projects, though. It would be great for all-over designs with large sheets of stencil!
Megan, I’m new to the Maker, and stumbled upon your site. It is truly one of the most beautiful tutorial sites I have seen so far. Much applause to you! Your explanations are detailed and your graphics are spot on.
I do have a question about stencil vinyl- could I use this for glass etching or should I stick to Oracal 651?
Thank you in advance!
Hi Vivian!
Thank you so much for leaving such a kind comment! I am thrilled to hear you find my site helpful – that’s my #1 goal!
To answer your question, I have not used stencil paper with glass etching but it would be worth a try! That said, the stencil paper is a little thicker/firmer than regular vinyl, so you might have difficulty bending it smoothly around curved surfaces. And, it’s a little more expensive than a standard roll of oracle vinyl (I think!). So…I would suggest giving it a try to see if you like it better, but if you’re having luck with the oracle vinyl, I’m not sure you’ll get significantly better results!
Sorry I can’t be of more specific help but keep me posted on what you learn!Thanks,Megan
Can you design your own stencil not using the font or designs already in the cricut machine.? That is, if you have a picture of a company logo can you make a stencil for that logo?
Hi Lorraine!
You sure can! You can upload PNG/JPEG/SVG files into Cricut Design Space. Based on how your logo looks, you might need to adjust how to cut it so that it’s a stencil!
If you need help uploading your own images, you can learn how to do it here: https://thehomesihavemade.com/2016/08/cricut-explore-home-decor-part-3-importing-images/
Hope that helps!Megan
Where can I get a cricut maker /bundle package. I have looked everywhere. Plz can someone tell me? Thanks in advance
*Rebecca*
Hi Rebecca!
Inventory can be slim after the holidays since Cricut does huge business between Black Friday and New Years.
On Cricut.com, it looks like the Blue and Pink Everything Bundles are still available HERE. JoAnns has a Lilac bundle HERE.
Otherwise, keep your eye on the sights regularly because they do get restocked!
Hope that helps!Megan
Your so Wonderful thank you
You are most welcome! Glad you found the tutorial helpful!
Have a great week!~Megan
You forgot to mention in your explanation of positive and negative that-take the last example of the scallops, if you want the white scallops with the green outline you could put the green color down as the background and use white paint with the stencil- instead of having to use transfer paper… Get it?
Thank you so very much for your wonderful tutorial! Now I understand how to do a stencil the best way.
I’m so glad you found this tutorial helpful, Cathy!
Good luck with your project!
Megan
So helpful. Thanks
Thank you for the ideas and excellent project instructions.
I’d like to stencil my address on a large rock, with maybe a monogrammed letter. Any tips for working with an obviously irregular surface such as this?
Thank you for your stencil tutorial I was wondering if you have a printable version please
What kind of vinyl would I use to make stencils for journaling that I don’t need to be sticky?