How I Store AAALLL My Craft Supplies!
I am closing out May with a bang with the long-awaited look at how I store aaaaalll my craft supplies! Next to paper storage ideas (which you can see a ton of here), the most organization-related requests I get is for ideas, tips and tricks on storing craft supplies. If there is one thing crafting comes with, it’s STUFF! And you guys know I constantly fight the battle between having what I need to create projects for our home and the blog, and having too much that it’s burdensome to manage. In recent years, I’ve really taken a hard look at the types of crafts I like to do and the ones that just aren’t my thing…and have slowly and intentionally aligned my “stash” to mirror those main interests. (You can read how I got myself to purge most of my craft supplies here.) Further, I’ve worked hard to organize my craft space so that the products I use most often are easily accessible and the ones I don’t use regularly are put away in deeper storage. Today, I want to give you a tour of all the storage solutions I’ve implemented in my craft room and share some insights about why I chose each one!
There are three main places where craft supplies are stored in our home. The first two are in my home office: 1) on the 5×5 IKEA Kallax shelf and 2) inside a series of 5 cabinets and drawers underneath my craft counter. The third location is inside two cabinets out in the garage. These garage shelves hold large items I don’t use very often (like my spare sewing machine, large Easy Press 2, and the embroidery component to my sewing machine), as well as various blank vases, trays, mugs, totes, and wooden items I use for gifts and blog projects. Although there’s a decent bit in the garage, the vast majority of what I use regularly is stored inside on the office shelves and cabinets, and that’s what I’m going to show you today!
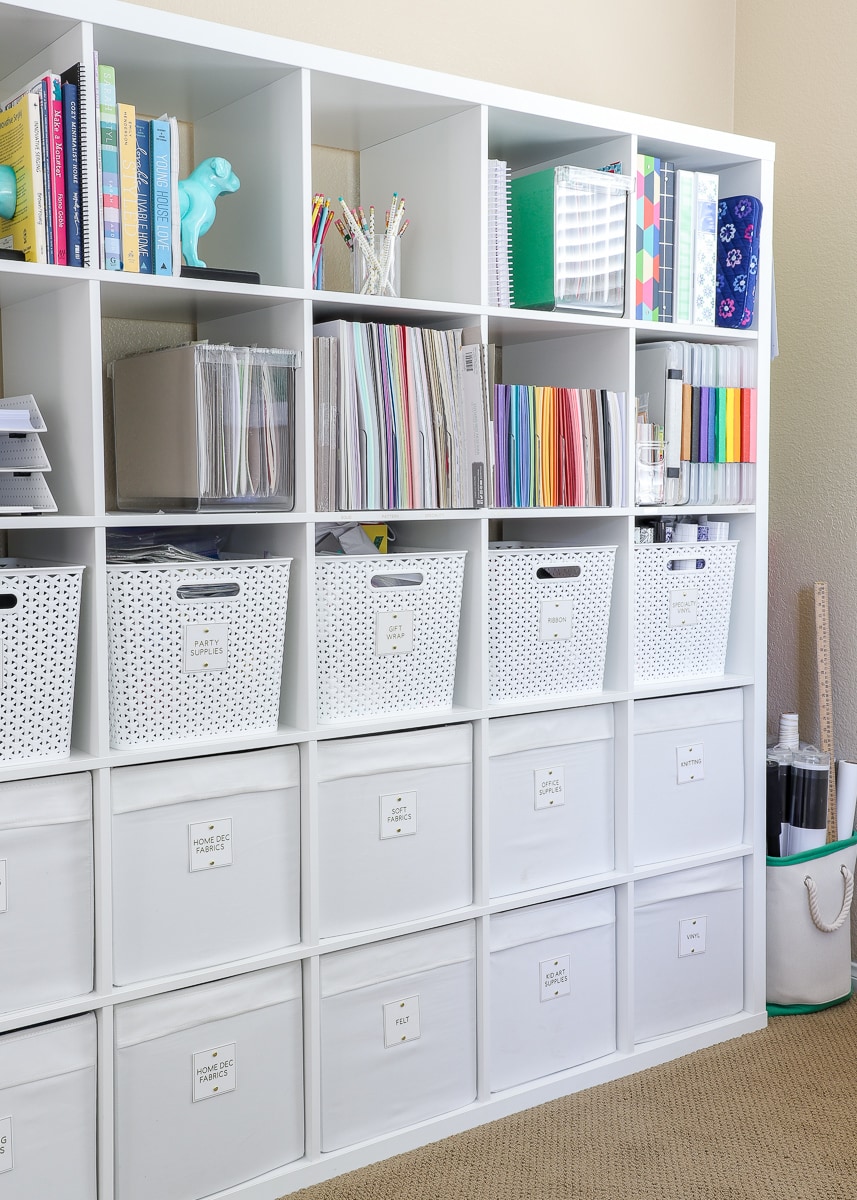
My home office has no closet, so in order to get the space to function for me and hold everything I needed it to, we invested in the 5×5 IKEA Kallax bookshelf soon after moving in. Why? It was the best/cheapest way to fill the space with lots of functional storage.
Whether you craft or not, you can likely imagine that not every type of supply can be stored the same way. There is no one-size-fits-all solution for all the various tools, notions, materials and more that a crafter might hoard store. As such, I’ve experimented with lots of different ways to best utilize this shelf and have finally settled on a combination of storage solutions to maximize every inch!
TIP! I’ve learned to use all white and clear storage bins and baskets in my craft room/office. Not only does this approach allow me to easily mix-and-match products from across a variety of stores, but it also helps to streamline what can frequently be a messy, cluttered, and colorful space. Keeping the whole room visually simple prevents me from feeling overwhelmed when supplies and projects start piling up!
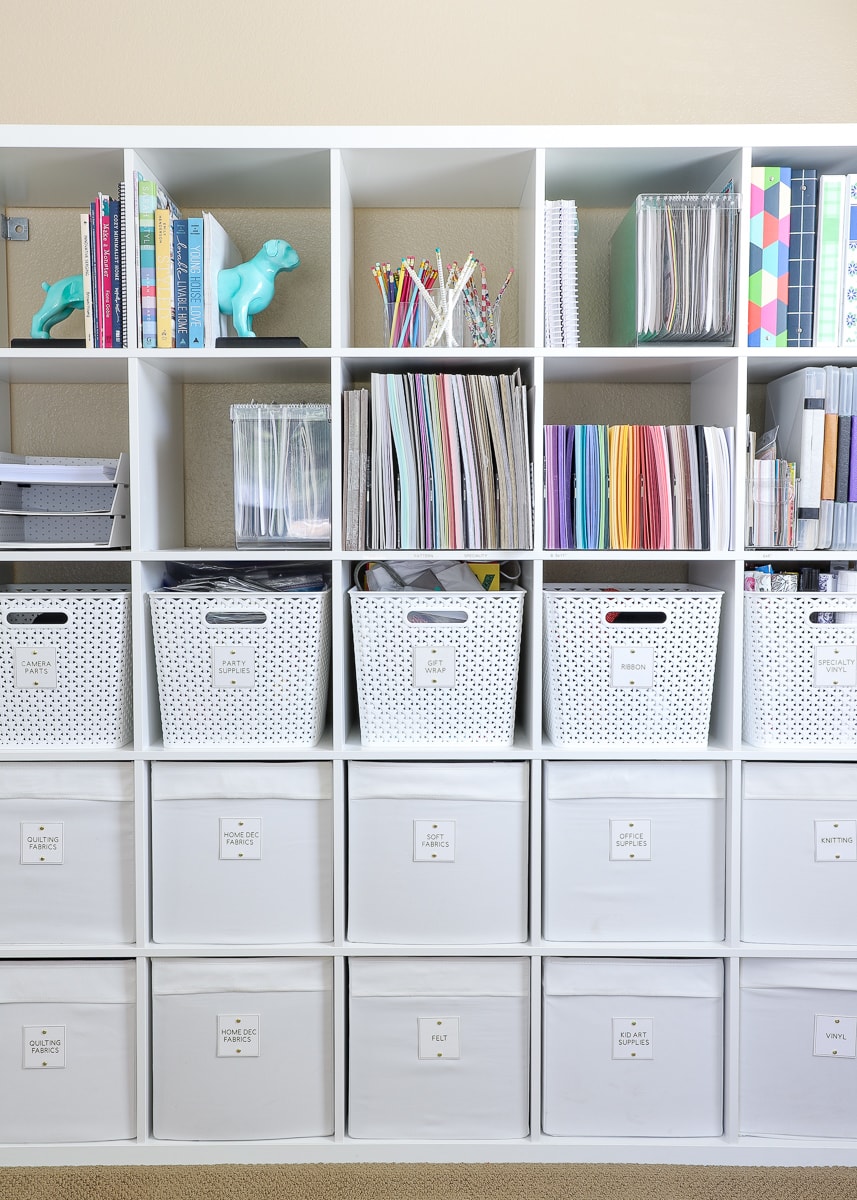
Large Bins
The bottom three rows (15 cubbies worth!) of this shelf hold large bins filled with larger, bulkier items such as yarn, fabric, rolls of vinyl, etc.
I LOVE using IKEA’s DRONA bins to store things all over our home. Not only are they really inexpensive, but their generous size allows you to use up every inch (quite literally) of the Kallax cubbies. These bins are ideal for large collections of bulky items, and in my 10 DRONA bins are:
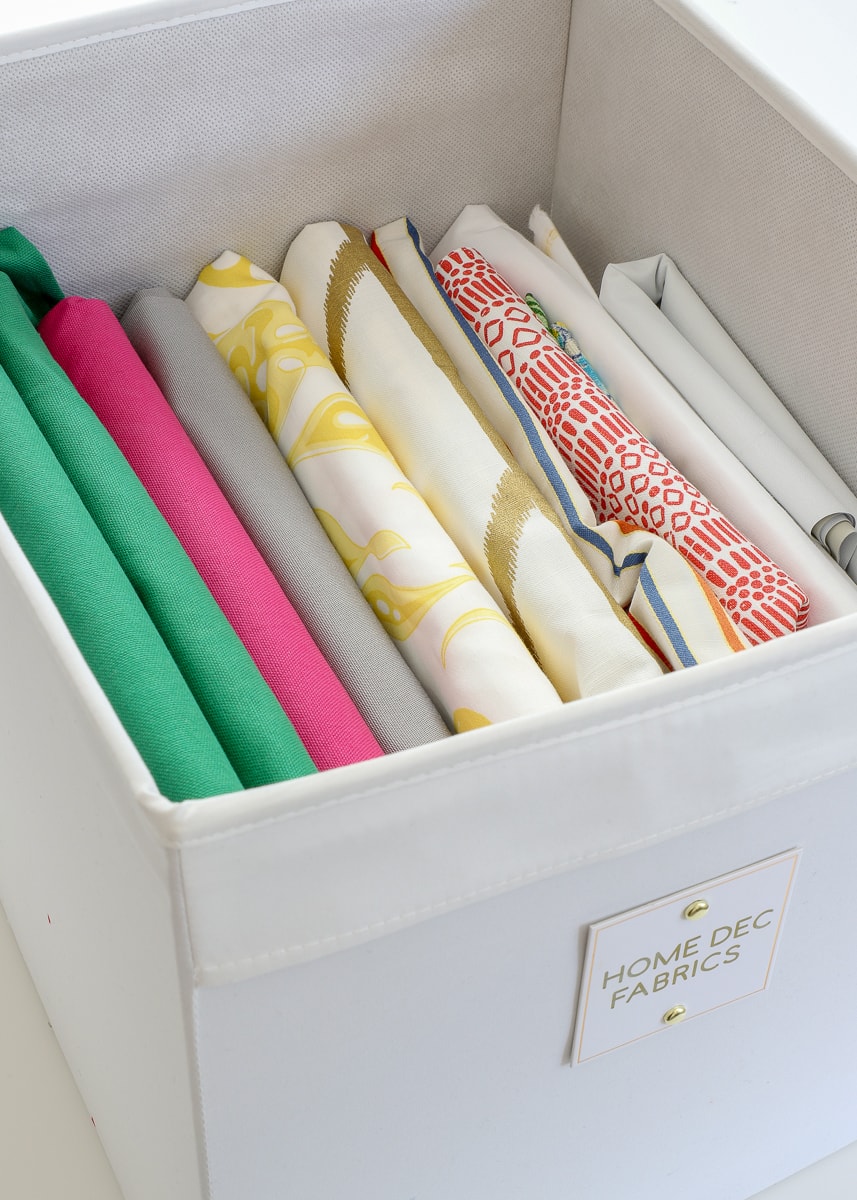
- Home decor fabric – 2 bins worth
- Quilting fabric – 2 bins worth
- Soft fabrics – minky, flannel, and terry cloth
- Felt
- Office supplies – larger items like file folders, notebooks, printer ink refills
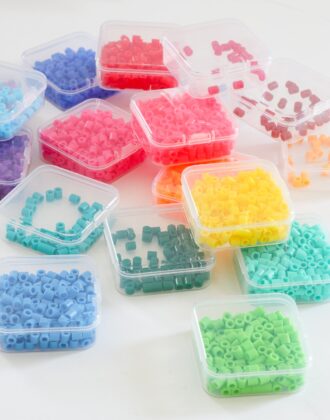
- Kid art supplies -pearler beads, Rainbow loom, etc
- Yarn
- Vinyl
Even though I still have 6 bins of fabric, that represents a serious reduction in my collection! Not only is each bin comfortably full, but I only kept items that I will truly/hopefully use. To maximize space and easily see what I have, I wrap my fabric onto cardboard sheets and store them like books (read more about this here).
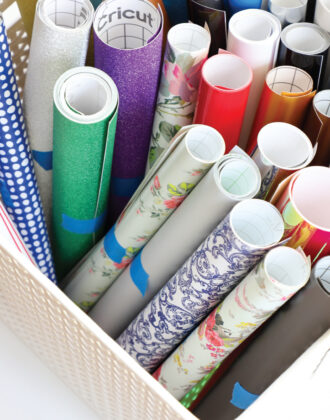
I also store my vinyl vertically within the DRONA bins. Although vinyl is something I use several times a week, I just don’t want to commit the visual and physical space to a large shelf/display of roll after roll of vinyl. Standard 12″ rolls stand up perfectly in these bins, allowing me to keep a TON of vinyl on just two shelves. Plus, the vertical arrangement allows me to easily see what colors I have when working on a vinyl project.
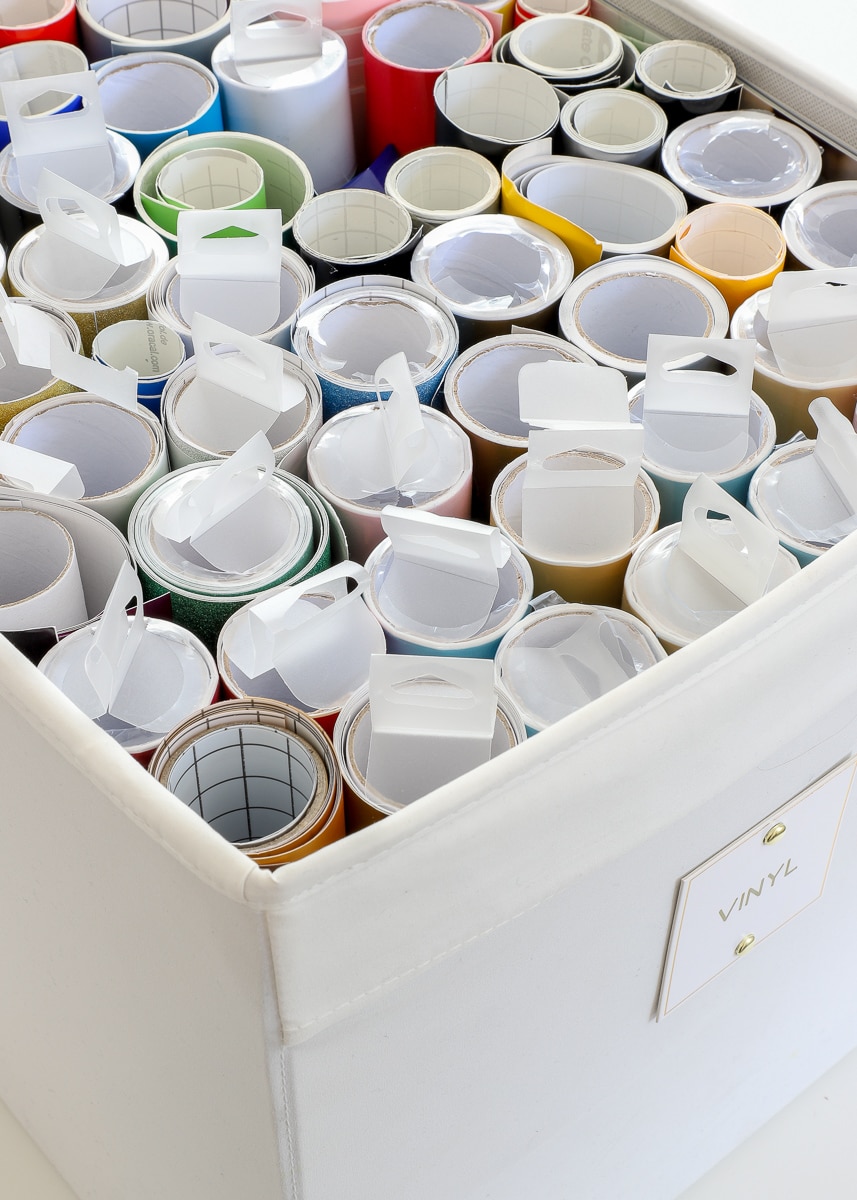
I did choose to separate out all my “speciality” vinyl (e.g., iron-on, glitter, patterned), leaving only solid colors in the larger bin.
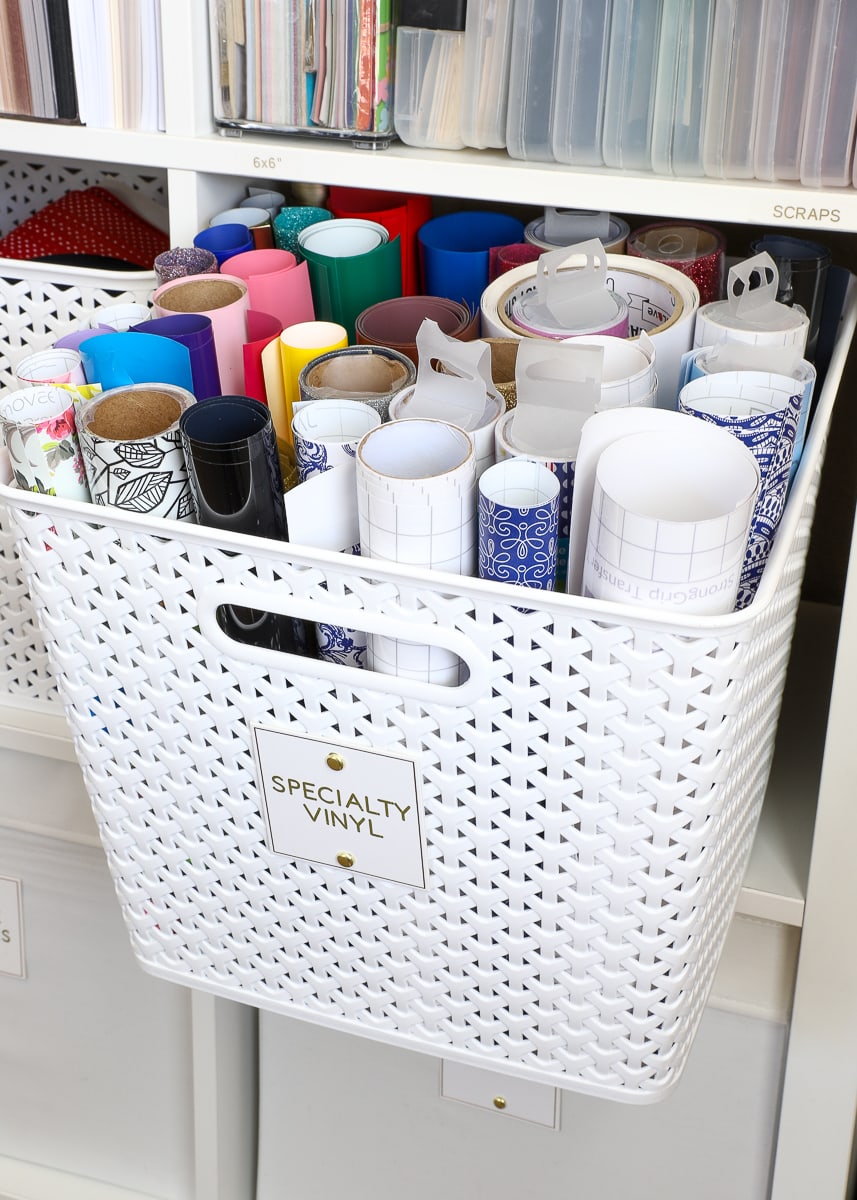
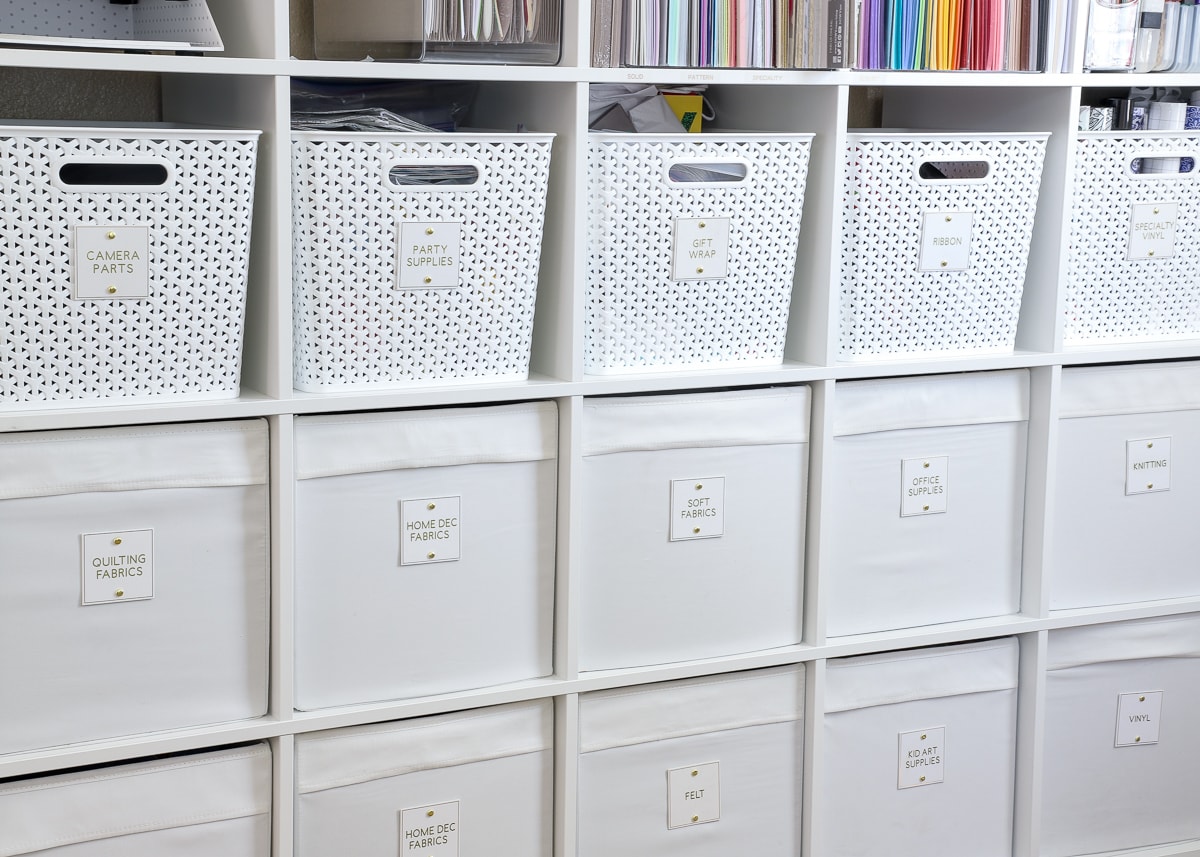
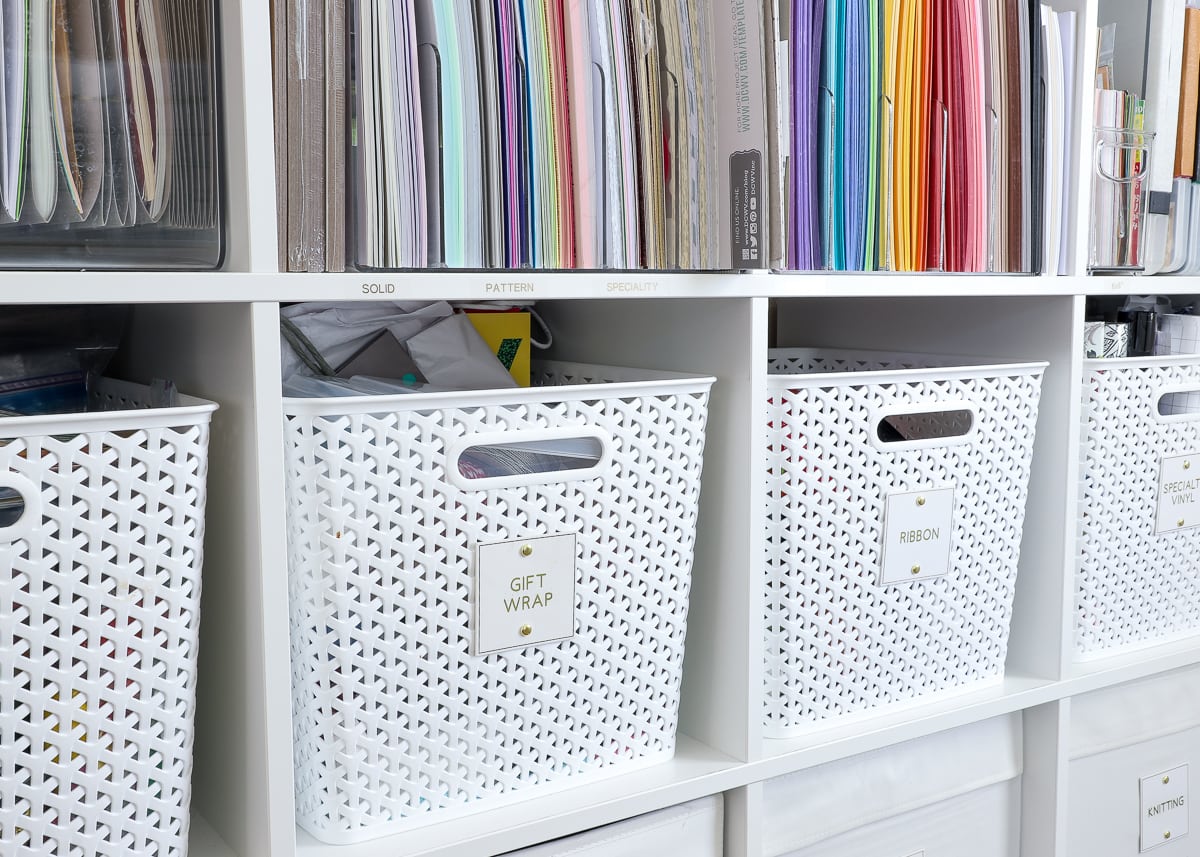
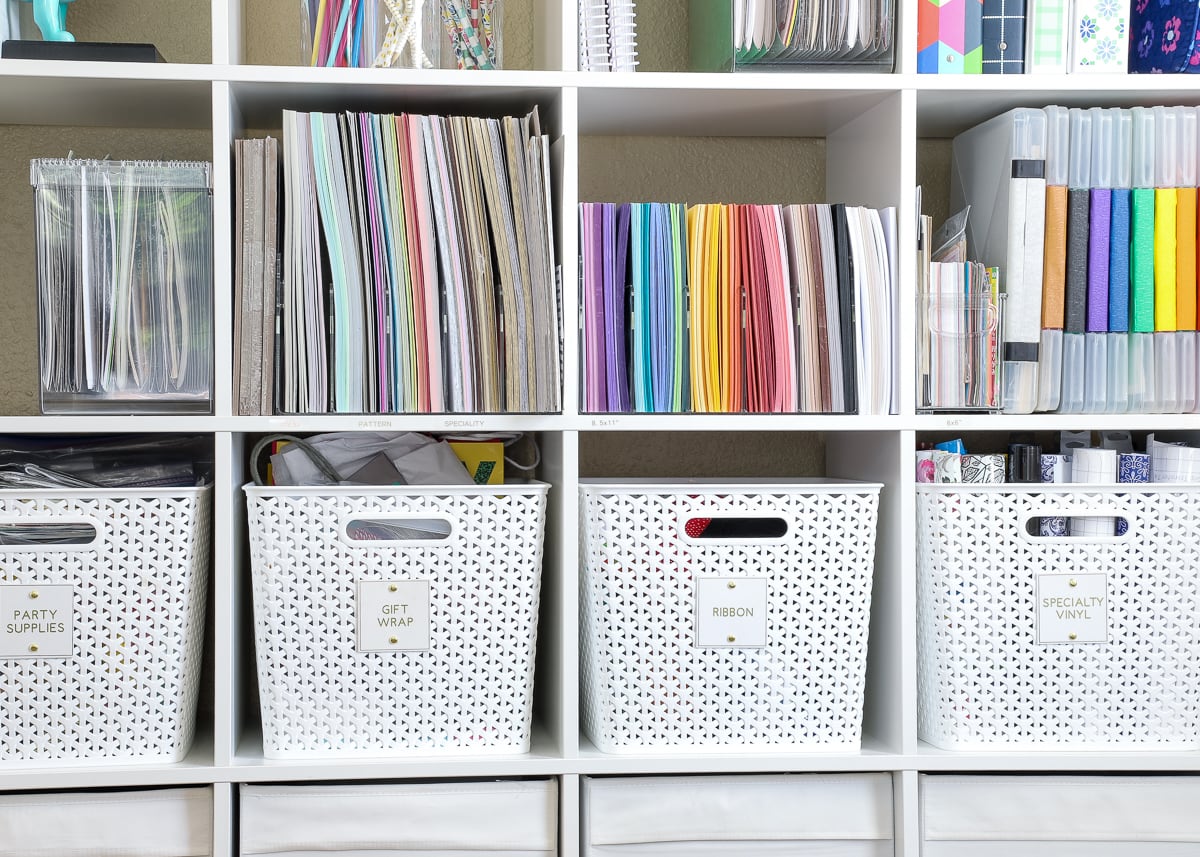
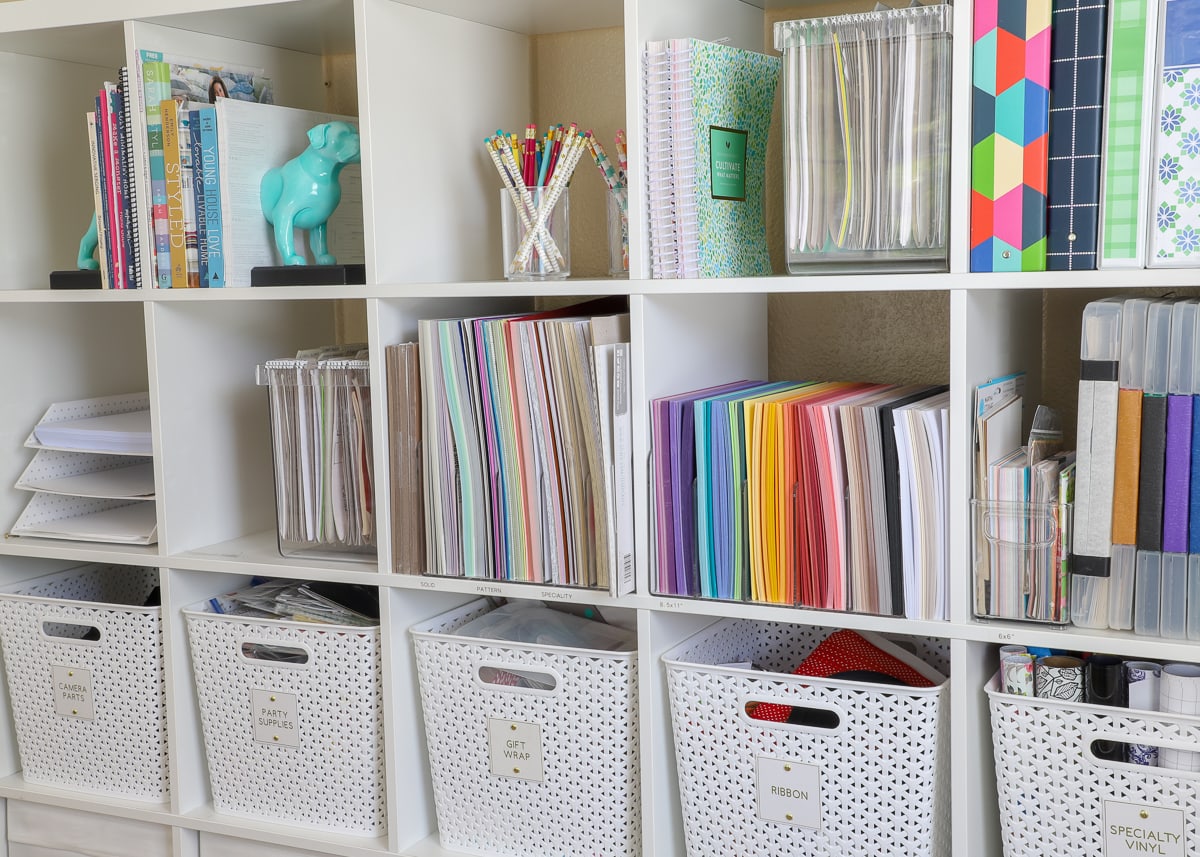
The middle shelf holds 5 of my beloved Y-weave baskets. I actually have 8 of these baskets, but Target discontinued this specific size a few years ago so I couldn’t use them across more shelves. Using just 5 was the only way I could make it look nice while still implementing something I already had. I use them for smaller collections of bulky items; specifically, they hold:
- Camera lenses and parts
- Party supplies – favor bags, blank banners, streamers, etc
- Gift wrap – bags, ribbon, tissue paper, small gift boxes, etc
- Ribbon
- Specialty vinyl
Pssssst – Want to see how I made those gorgeous white-and-gold labels? See the full tutorial here!
Paper Storage
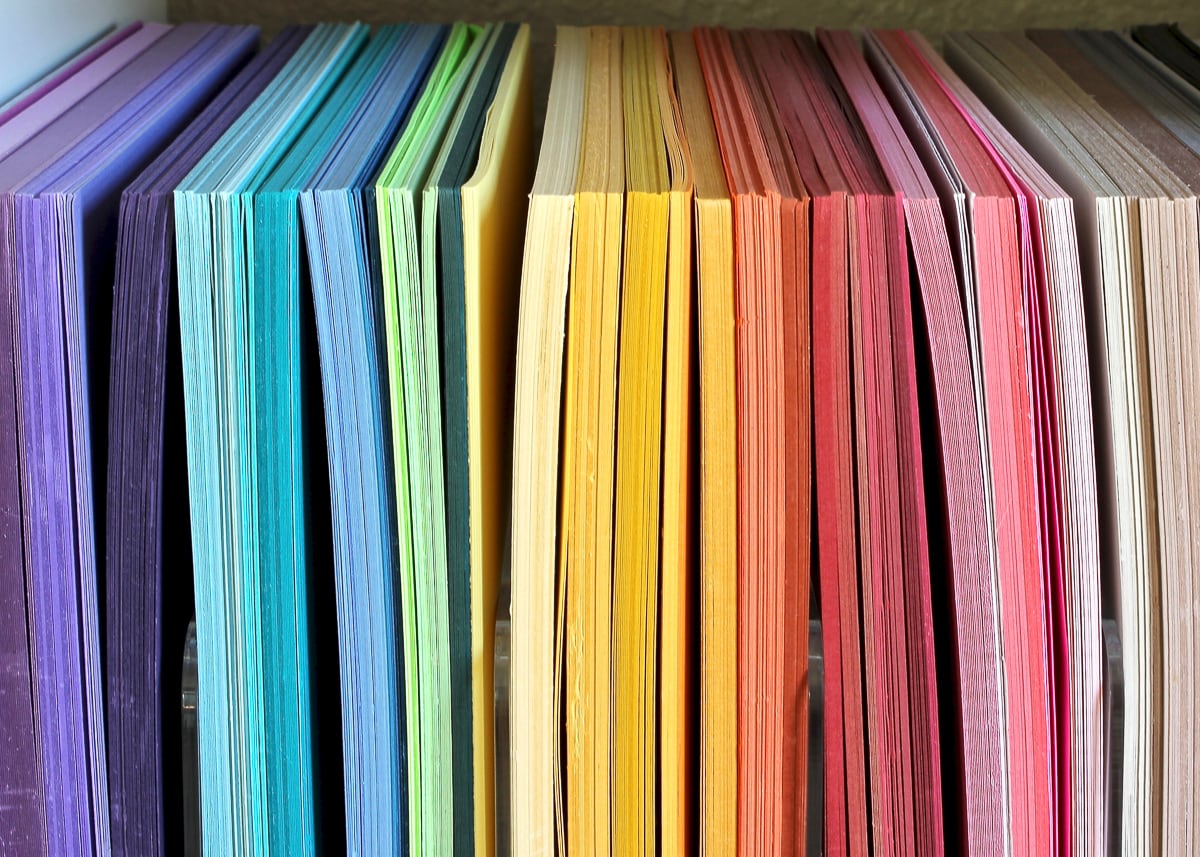
The upper two rows hold a variety of decorative objects, as well as different systems that store/contain paper – easily my most used material!
I did an entire post on how I store all the various types of craft papers in my office here, but I’ll run through them again quickly.
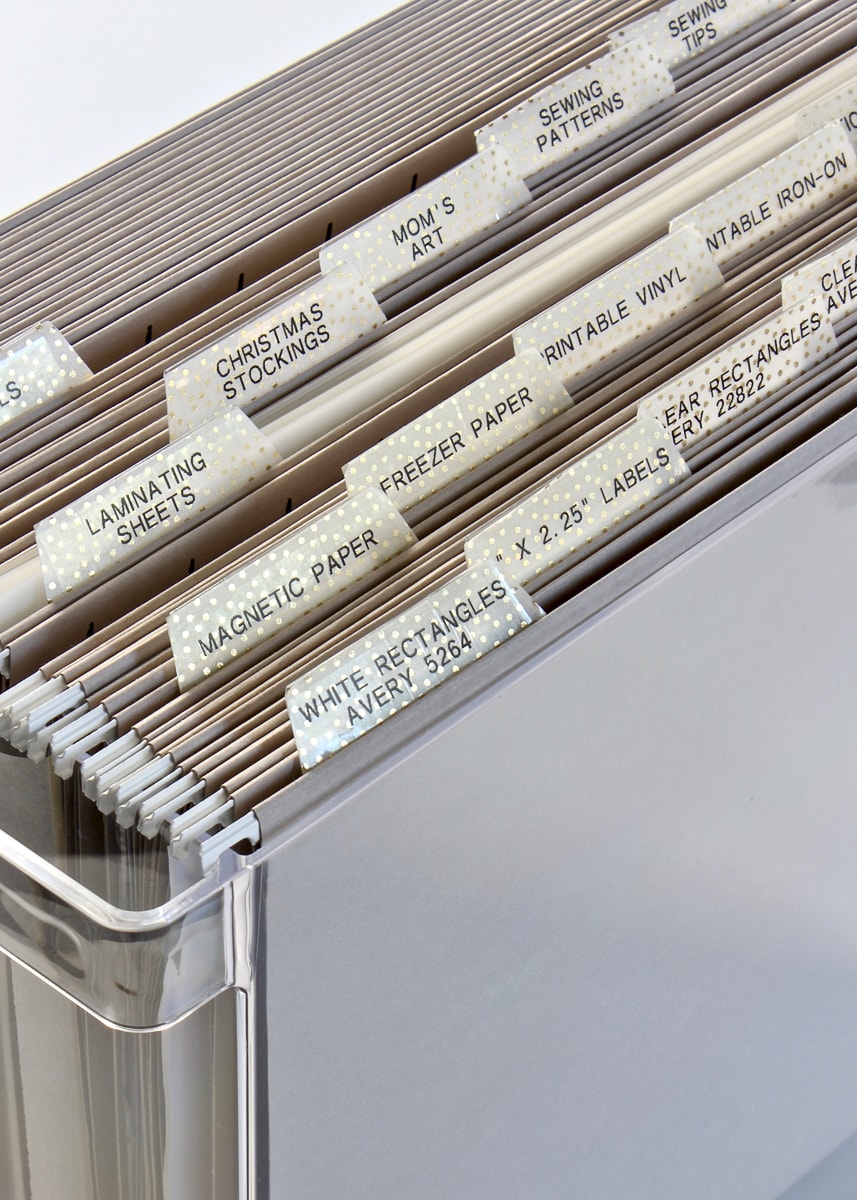
Since I use paper SO much, I find it a nuisance to open/close drawers or boxes just to fish out what I need. After a lot of experimentation, I determined that some acrylic dividers right on the shelf are a great way to keep my paper (both 8.5×11″ and 12×12″) accessible, safe, flat and sorted by color!
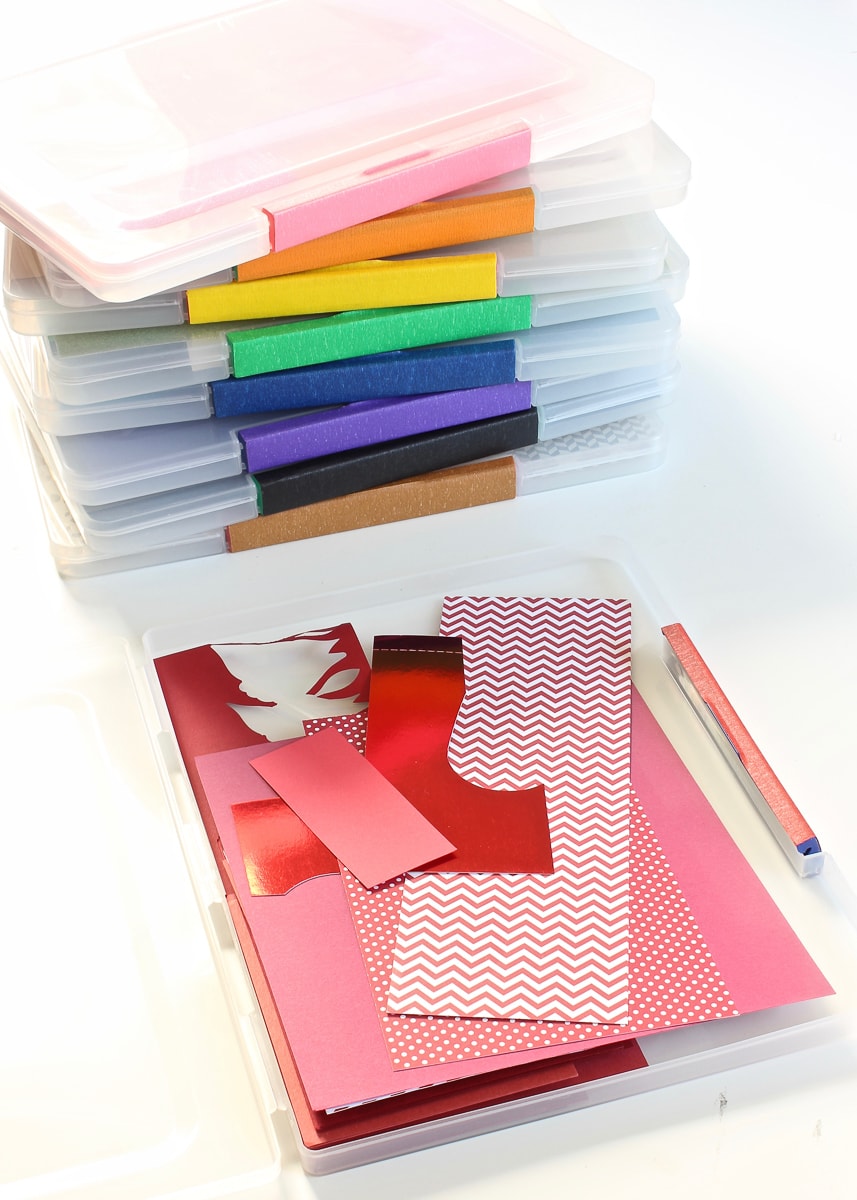
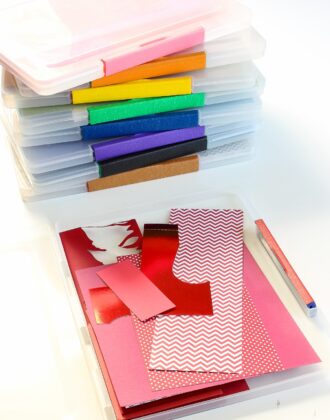
I do keep my scraps in a series of snap-close boxes sorted by color. Not only are these boxes the perfect way to keep lots of little papers corralled and sorted; but once they fill up, I know I have plenty of scraps on hand and don’t need to keep anymore. I’ve used this scrap system for years and couldn’t love it more. Read all about it here.
In addition to colored cardstock, I also use a ton of specialty papers to make my printables, labels and more. A basic letter tray holds our most frequently-used white papers (printer paper, white cardstock, and photo paper)…
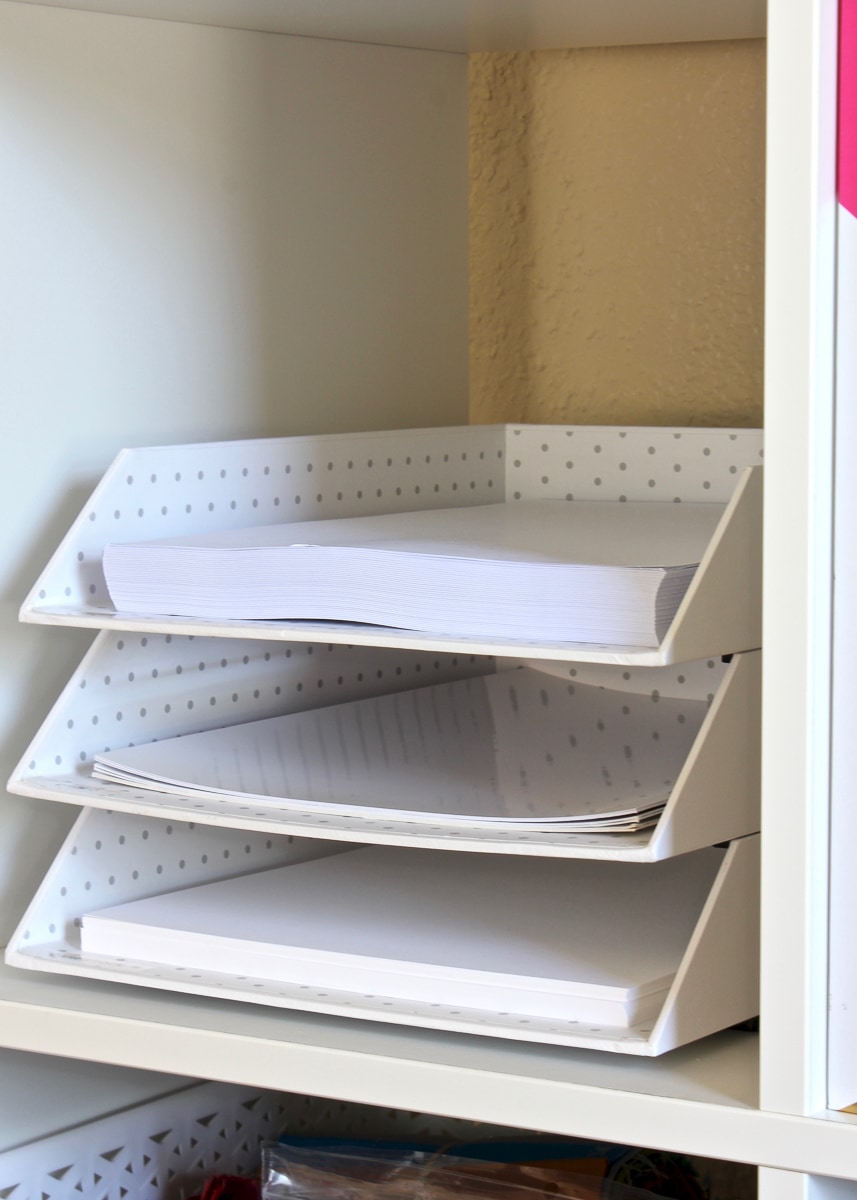
…while an acrylic file box holds my specialty papers such as printable labels, magnetic sheets, printable vinyl, etc. I always discard bulky packaging (but keep important instructions) in order to keep this file system tidy and easy to use.
Along the far side of my Kallax shelf is one of my favorite craft solutions ever. It’s super hard to see (and I actually couldn’t get a better picture because of the wall), but I have two Command hooks secured right to the shelf itself to hold all my Cricut mats (12×12″ on the top, 12×24″ below). Mats can be incredibly exasperating to store, so I can’t recommend this solution enough as a way to keep them safe and easy to grab!
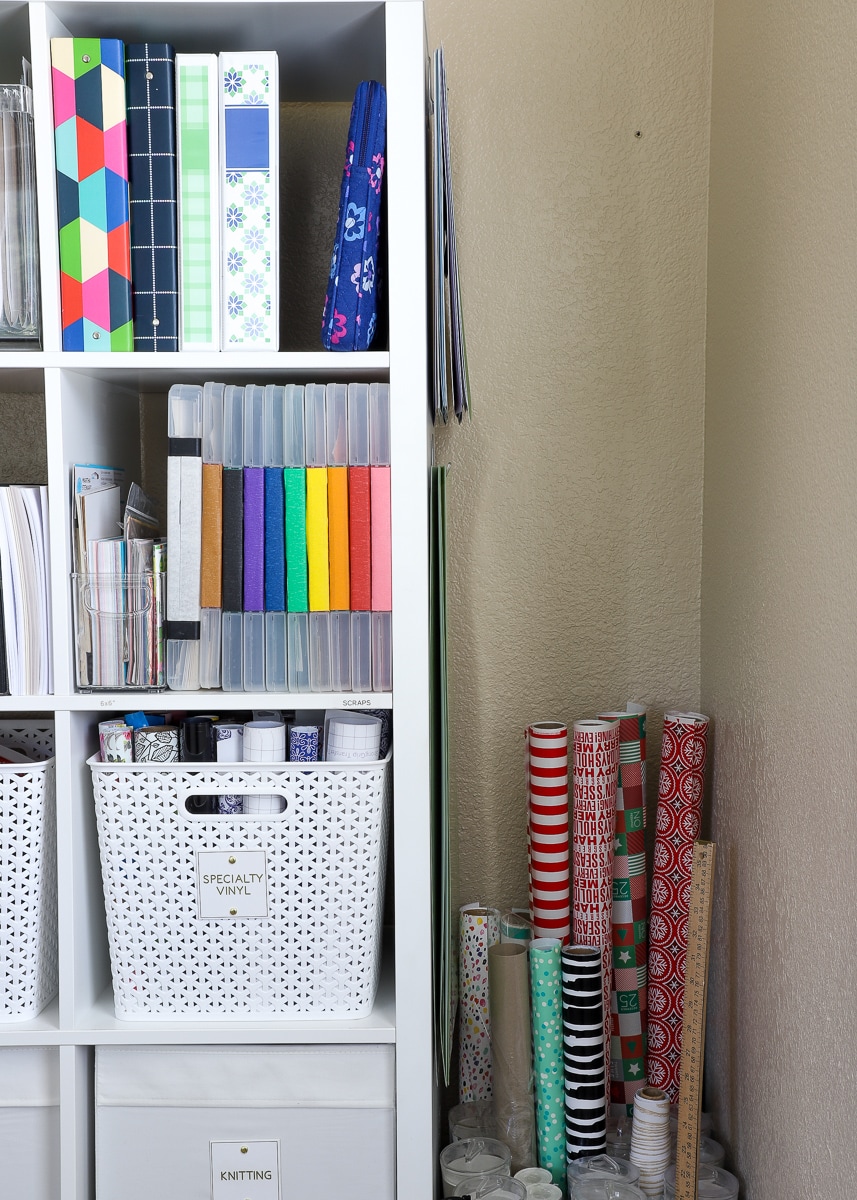
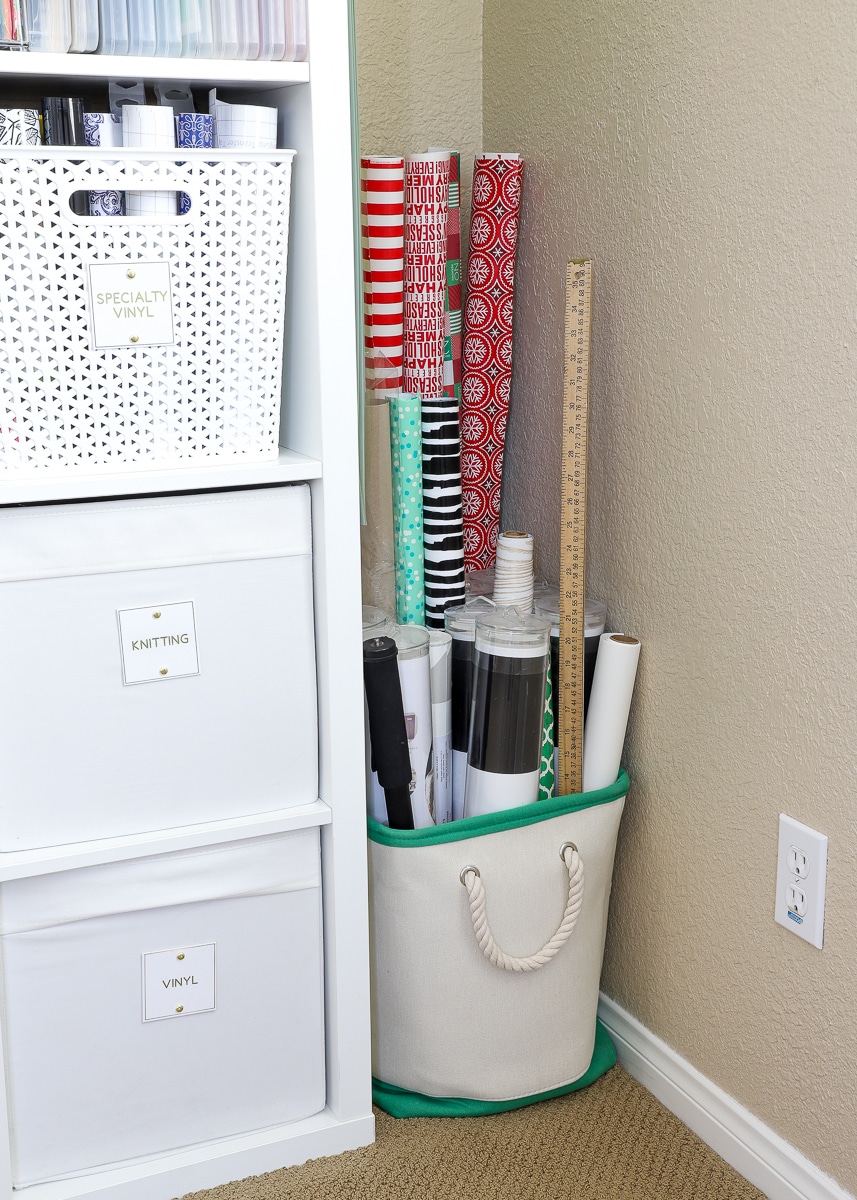
Tucked into the corner is a basic canvas tote that holds anything on large rolls. Mostly I have wrapping paper, shelf liners, and my collection of peel-and-stick wallpaper in here. The basket isn’t the biggest, which actually helps to keep these collections from growing too out-of-control!
Sprinkled amongst all the storage items are a few decorative objects, as well as many of the supplies I use for photoshoots. Having pencils, pouches, and notebooks out in the open helps make my photo shoots run (and clean up!) a little easier!
A majority of my large supplies are contained within the cubbie shelf. So tucked into the cabinets and drawers along my craft counter are the smaller notions, supplies, and materials that would get lost in such large baskets.

NOTE: I’ve gotten a few requests lately for more info about this counter setup. You can see the original post here, but briefly: we bought these stock base kitchen cabinets from Lowes/Home Depot (I honestly can’t remember which one) during a Labor Day weekend sale. They are screwed to the wall and to each other, and then are topped with inexpensive white countertops from IKEA. The entire setup comes apart pretty easily so we can move it from home to home!
Drawer Organizers
The 5 drawers that span the countertops hold most of my small, everyday supplies…items that I reach for day in and day out as I create projects and run the business. I did a full post detailing exactly how I configured these drawers with off-the-shelf acrylic organizers that you can check out here.
Right underneath where my Cricut machine sits on the counter, I have a full drawer dedicated to all the Cricut tools I reach for regularly. I’ve seen some really cute peg boards/wall organizers for storing Cricut tools around the web lately. While I certainly love the look of those, as I mentioned earlier, I’ve learned that having my tools and supplies put away (rather than on display) ultimately helps me be more creative and maintain a cleaner space. Open compartments in this nearby drawer still keep these tools accessible when I’m mid-project yet visually out of the way!
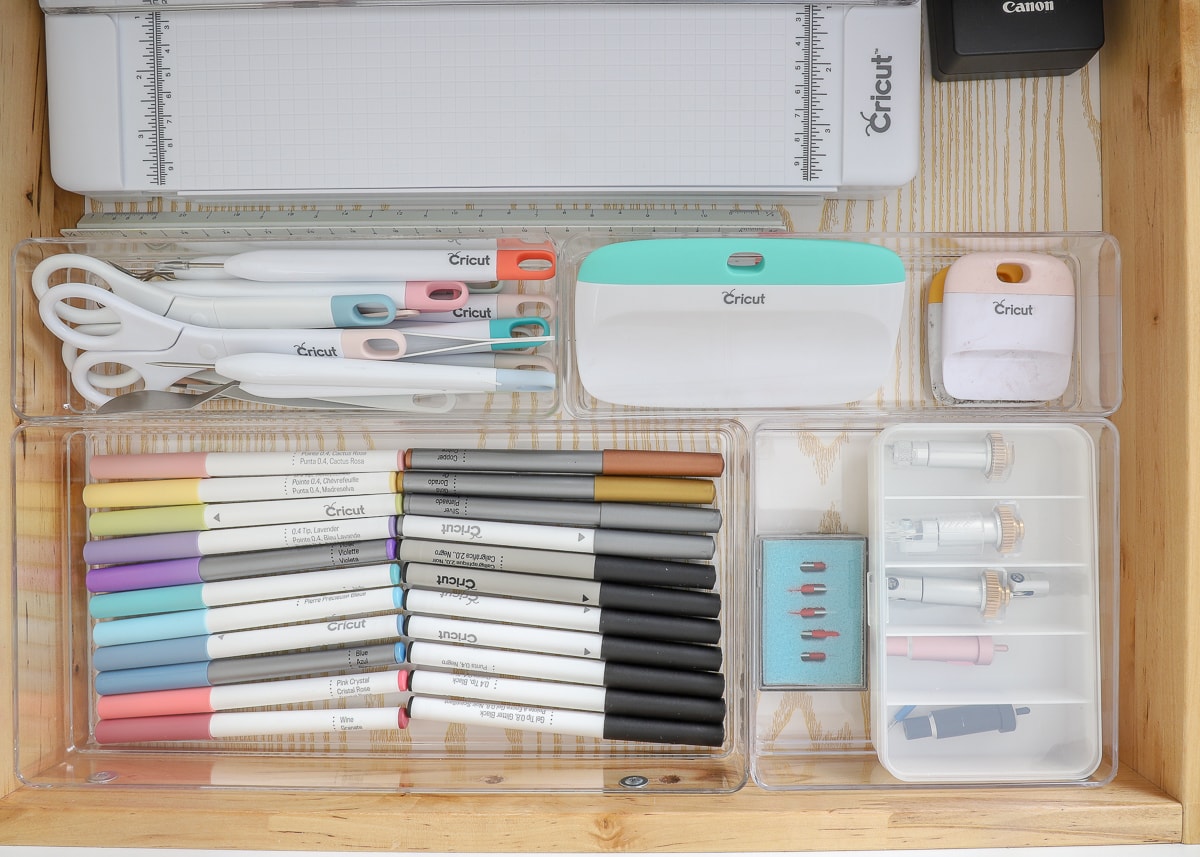
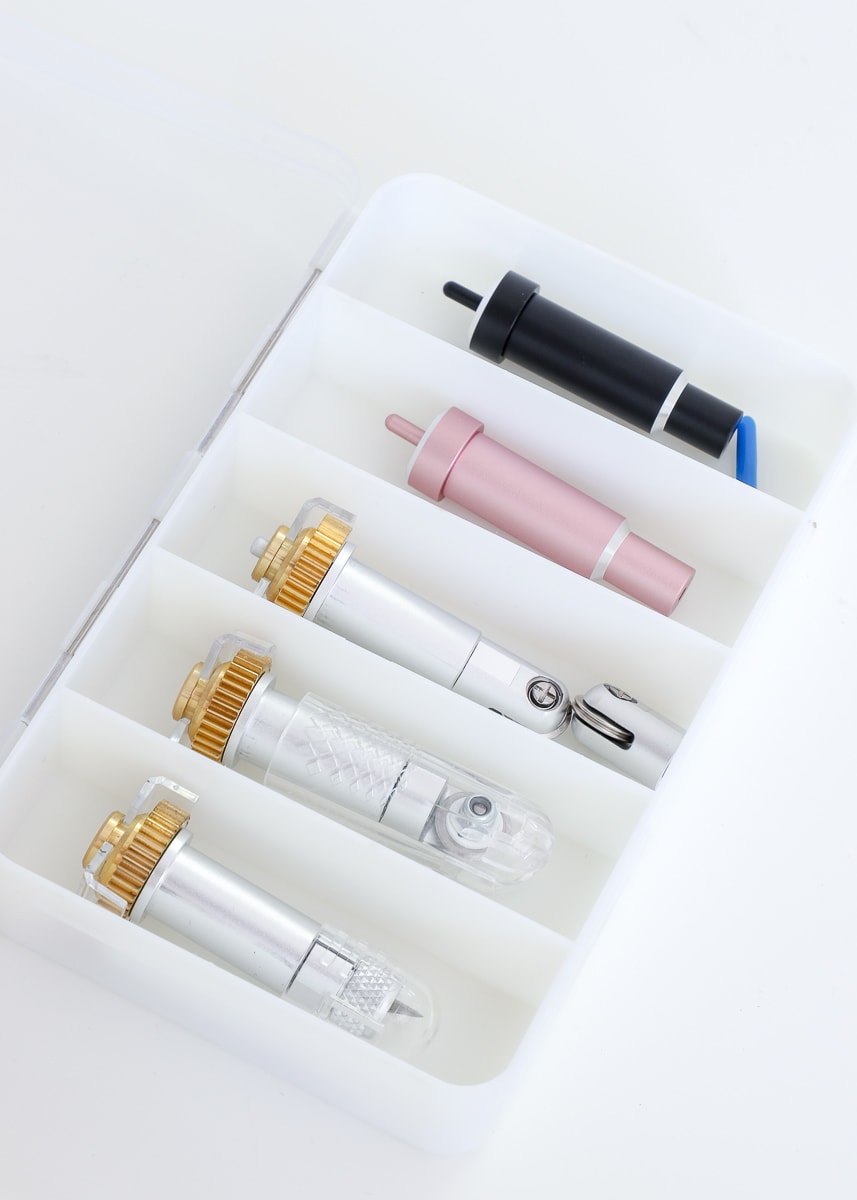
If you’re a Cricut owner, you may be struggling with how to store the various blades you keep acquiring for your machine. I stumbled upon this bead organizer at Michaels, and it holds the various blades perfectly. Although the Cricut machine has a place to store blades, I much prefer this since it keeps them safe and away from little curious hands!
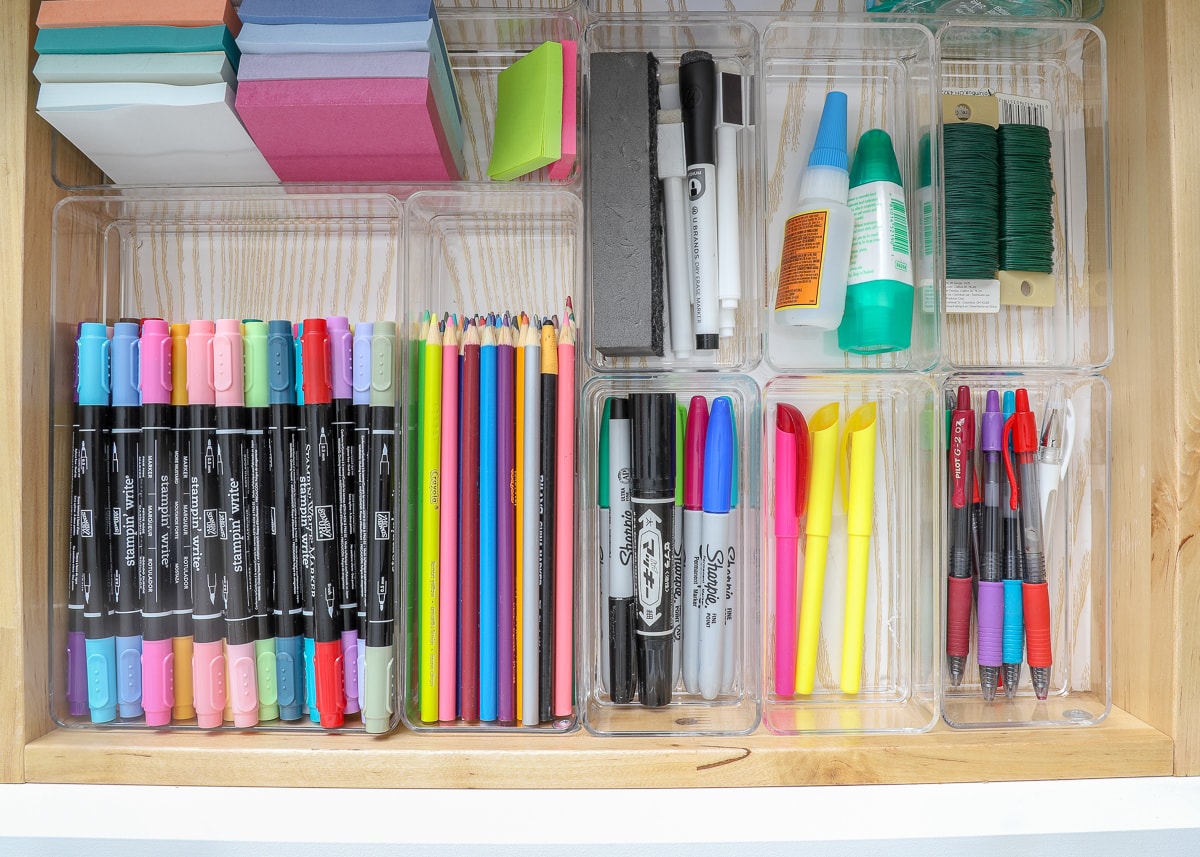
The next drawer holds all the basic sewing supplies I reach for during a “typical” sewing project…
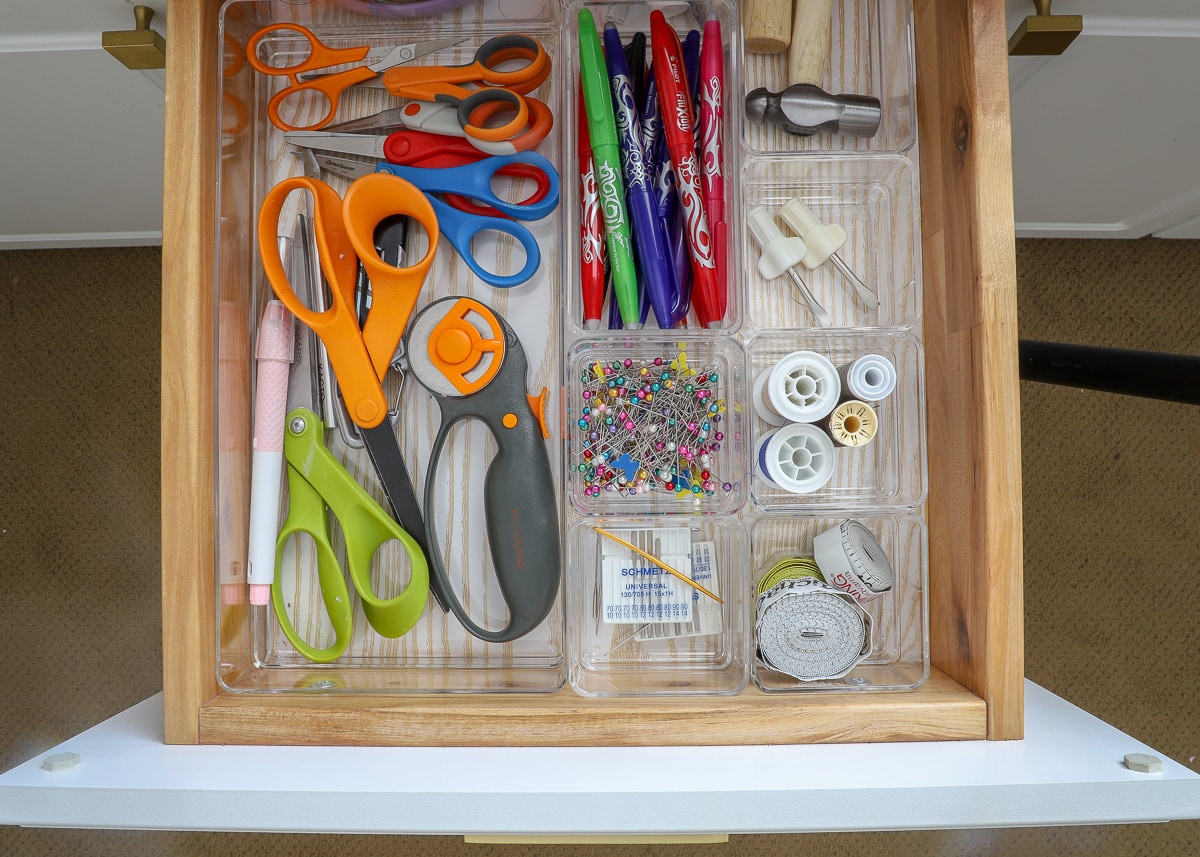
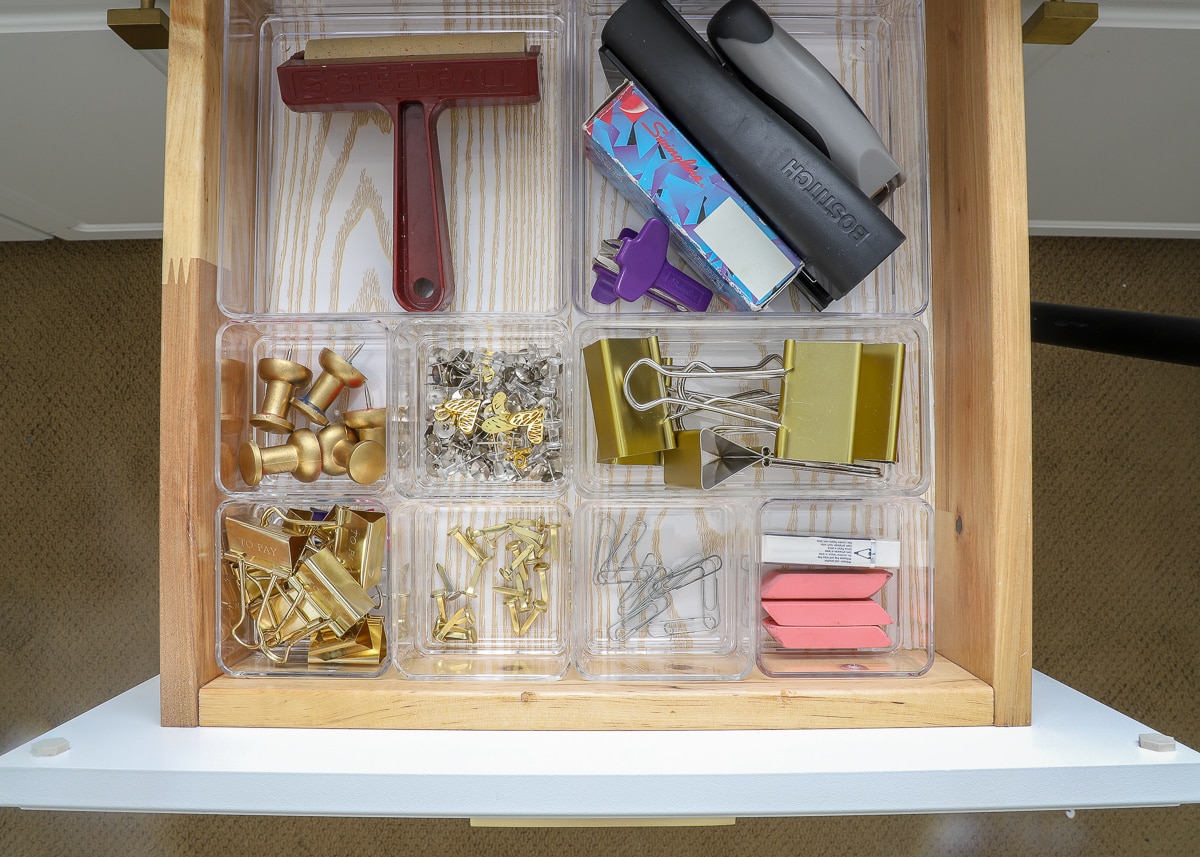
…and the next two drawers hold mostly office supplies, pens, markers, glues etc. I LOVE having these common use items so accessible, not just for me, but for the whole family who constantly wanders in needing something!
Lidded Plastic Boxes
You’ve seen all those drawers before (again, you can see them more in depth here), but I haven’t yet shown you everything stored underneath the drawers in the cabinets themselves! Let’s open up those doors!
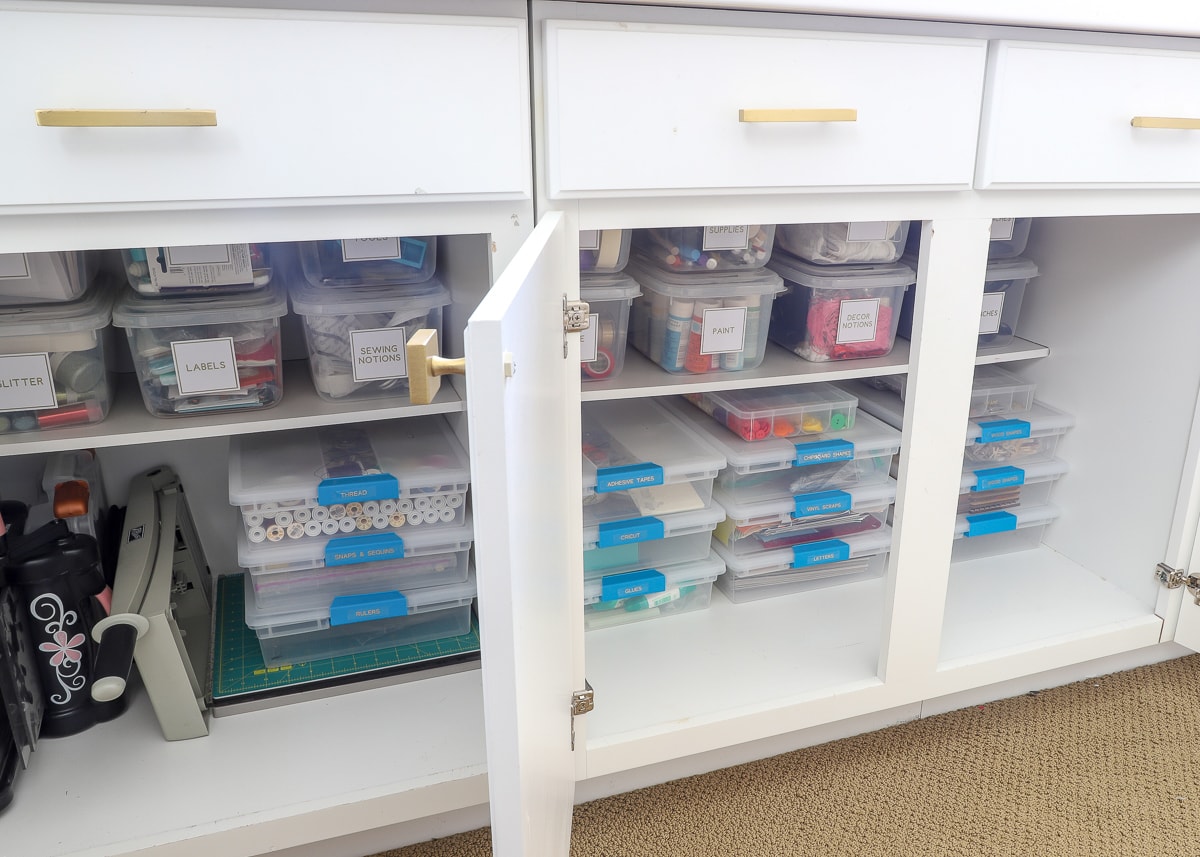
It’s under these cabinets, in a series of clear plastic containers, that a vast majority of my small supplies and notions live.
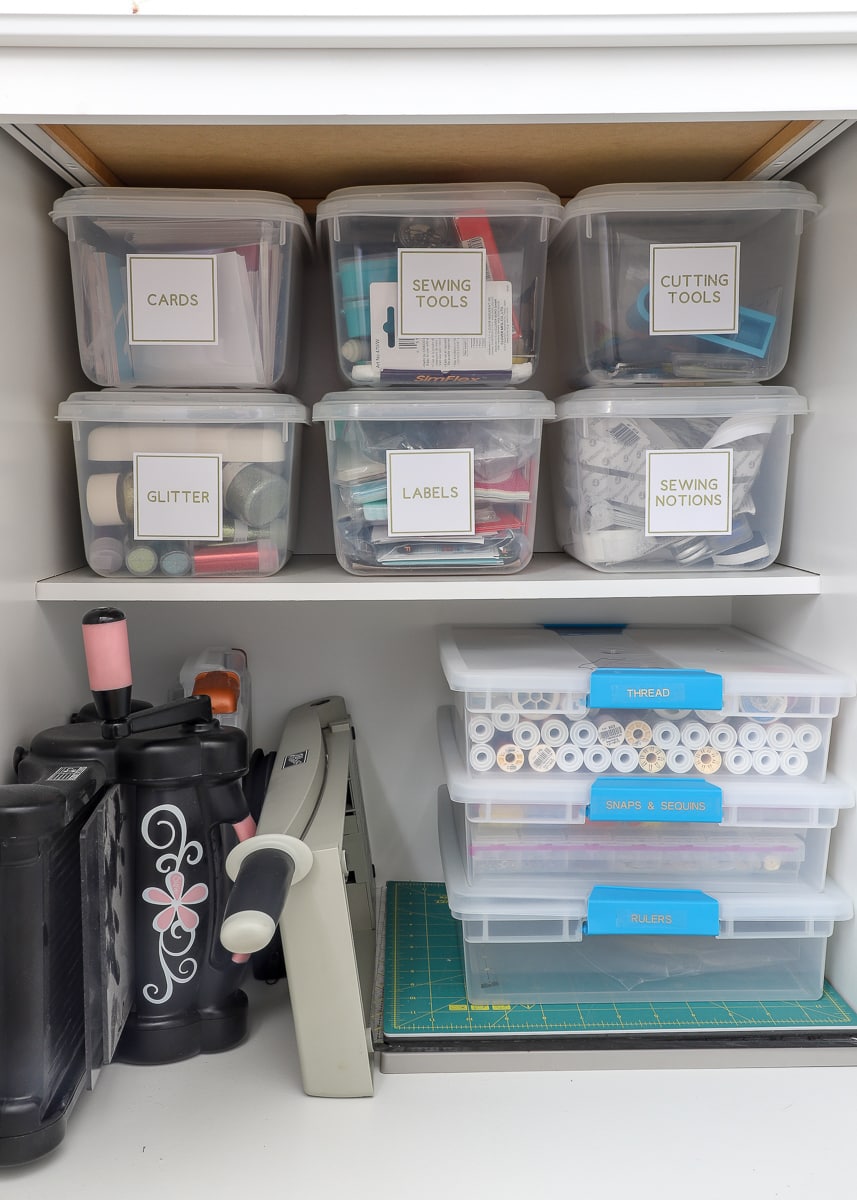
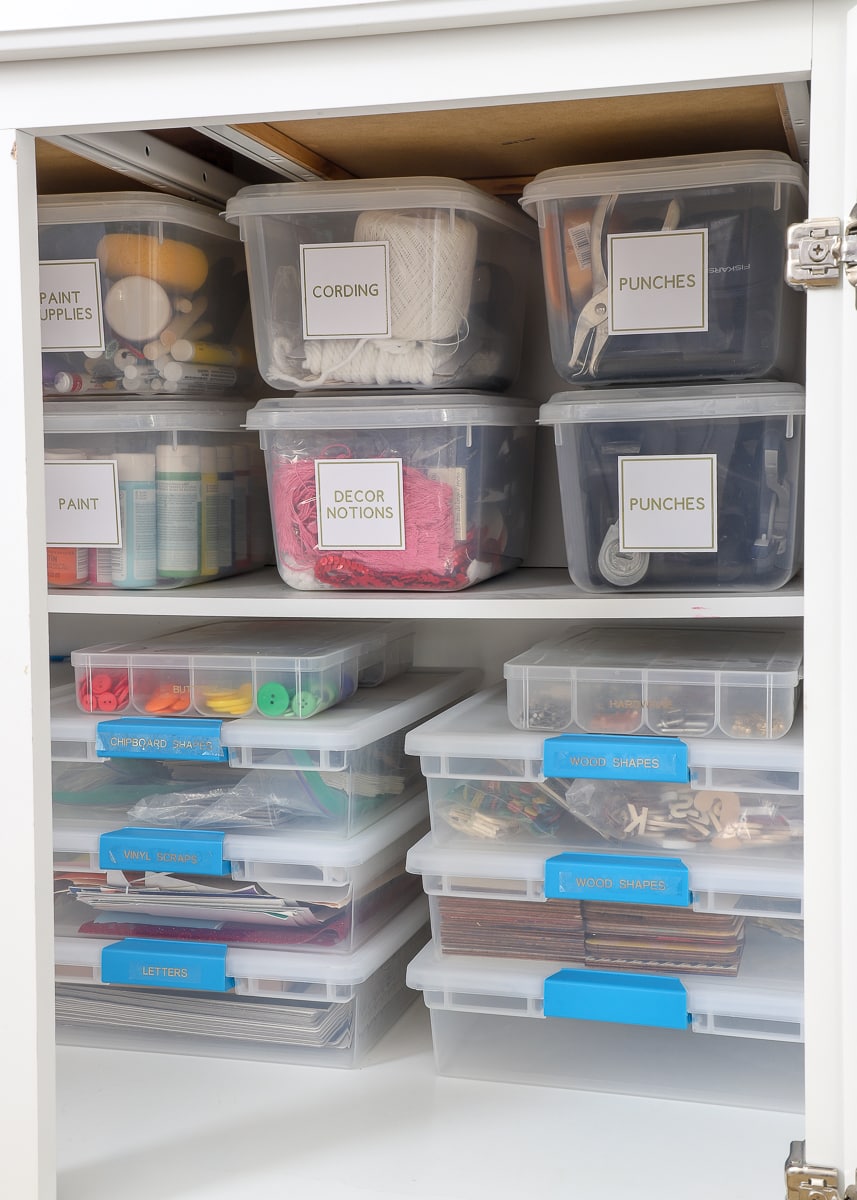
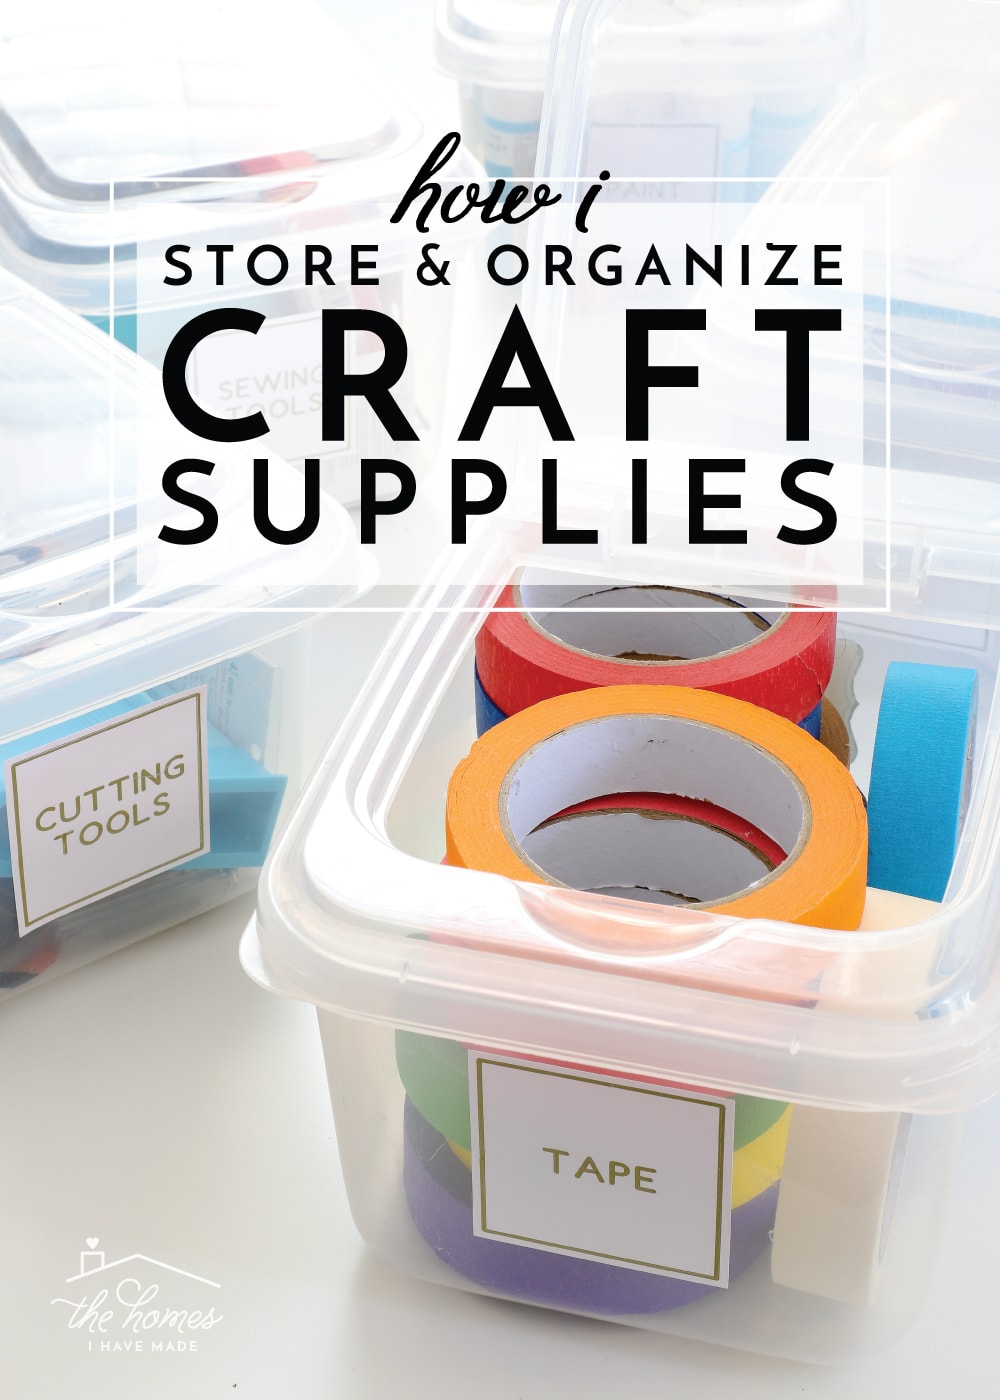
On the top shelf across three of the cabinets are my favorite lidded boxes that I bought while living in Okinawa, Japan over 10 years ago (similar size). I bought them then to hold craft supplies, and I still use them for that exact purpose now! They happen to fit perfectly on my cabinet shelves, so I am pretty sure I will forever use these boxes in this exact spot.
What’s contained in these 14 boxes?
- Cards
- Glitter
- Sewing tools – sewing machine feet, chalk markers, etc
- Cutting tools – specialty scissors, spare X-acto knife blades, etc
- Labels
- Sewing notions – Velcro, bias tape, etc
- Decorative notions – pom-pom trim, tassels, etc
- Cording and twine
- Acrylic paint
- Paint supplies – brushes, paint markers
- Punches – 2 boxes worth
- Tape – 2 boxes worth
These boxes are such a great size (roughly the size of a shoebox) for holding smaller collections (paint, glitter, etc), yet I’ve been amazed at how much I can fit into each one! I was very particular about creating logical categories, so I could intuitively find exactly what I was looking for when working on a project!
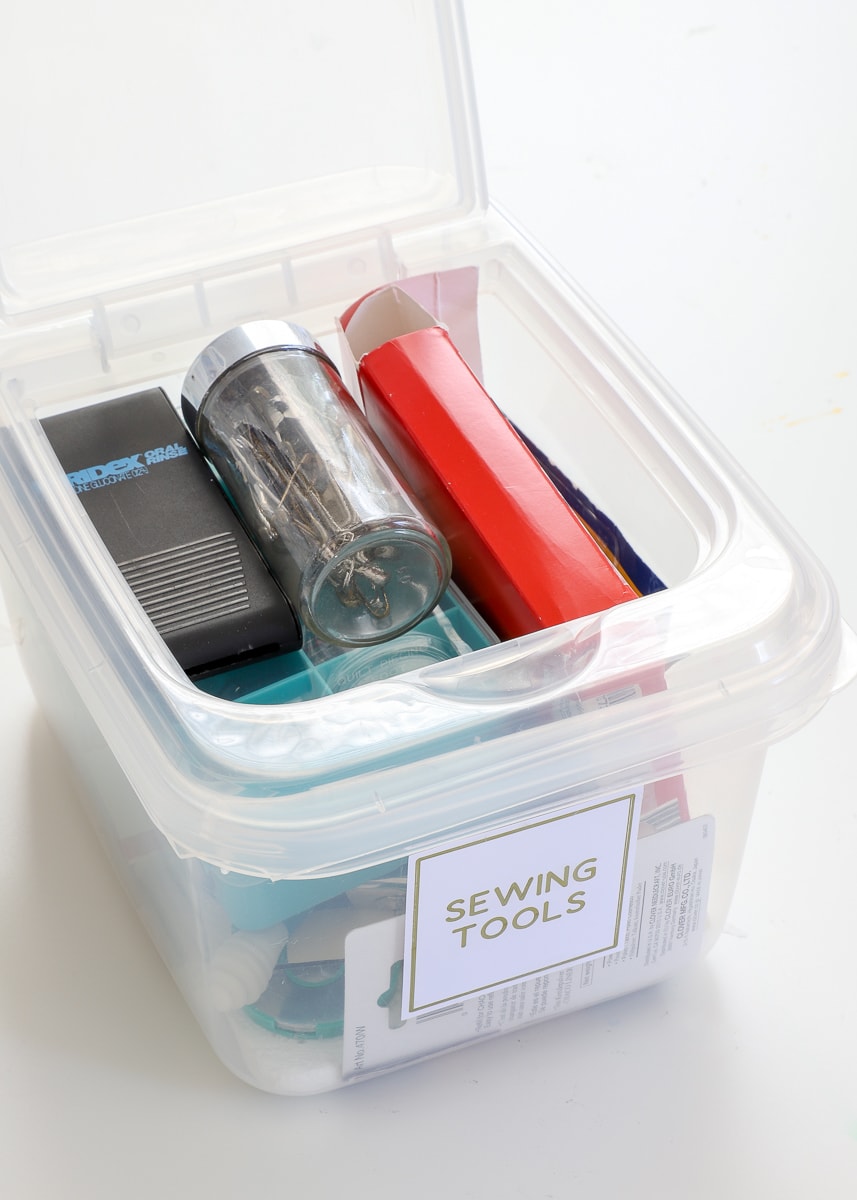
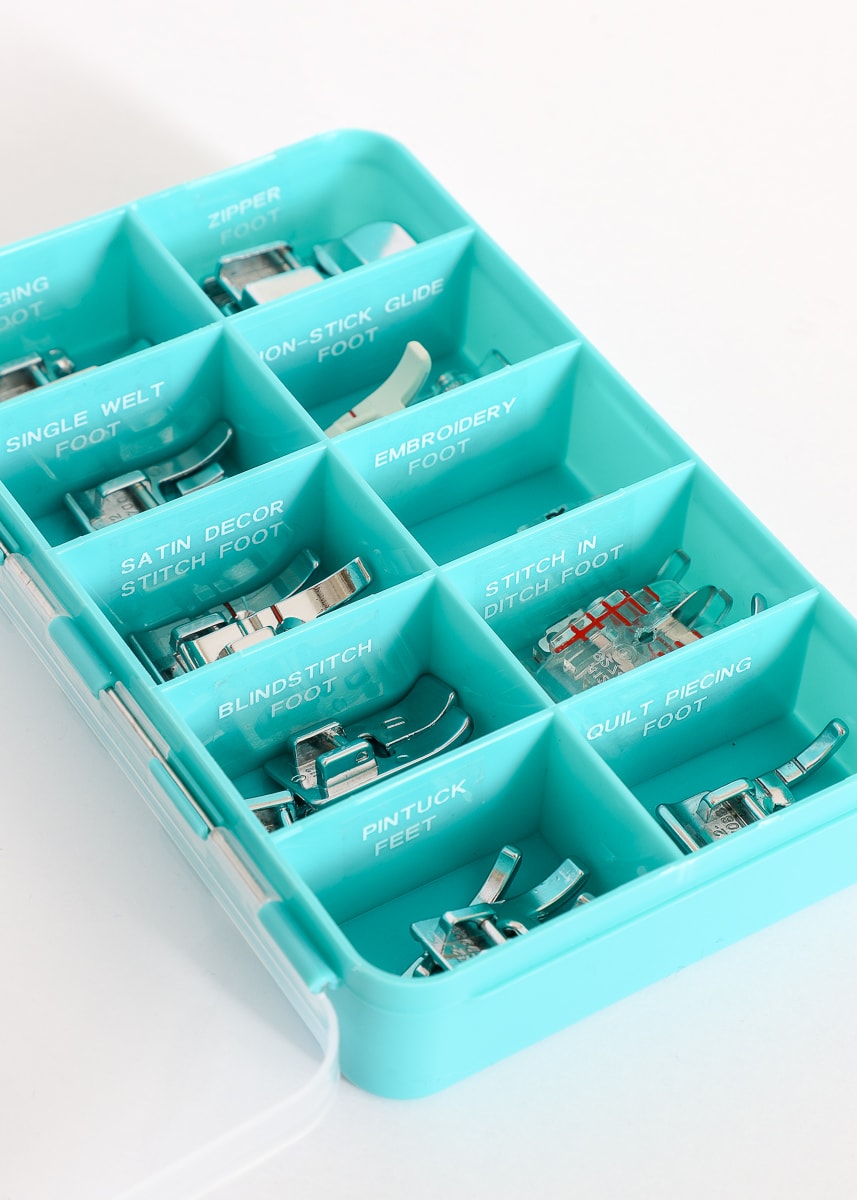
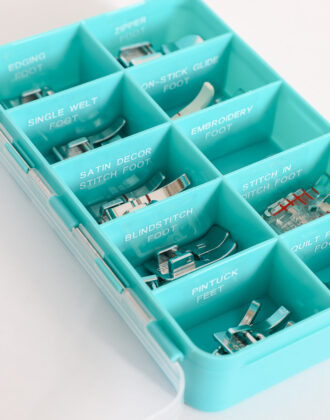
Within my “Sewing Tools” box is one of my favorite organizing projects ever: my sewing machine feet box! See how I did it here!
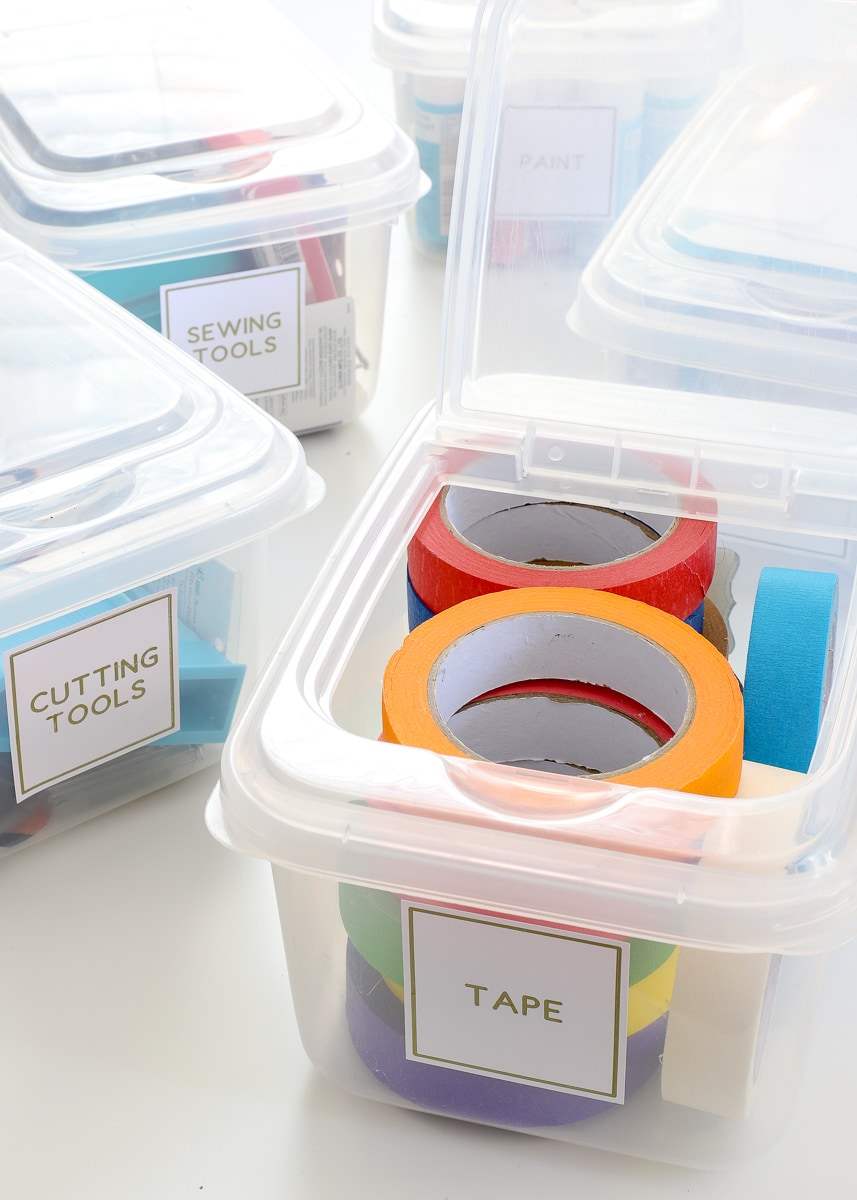
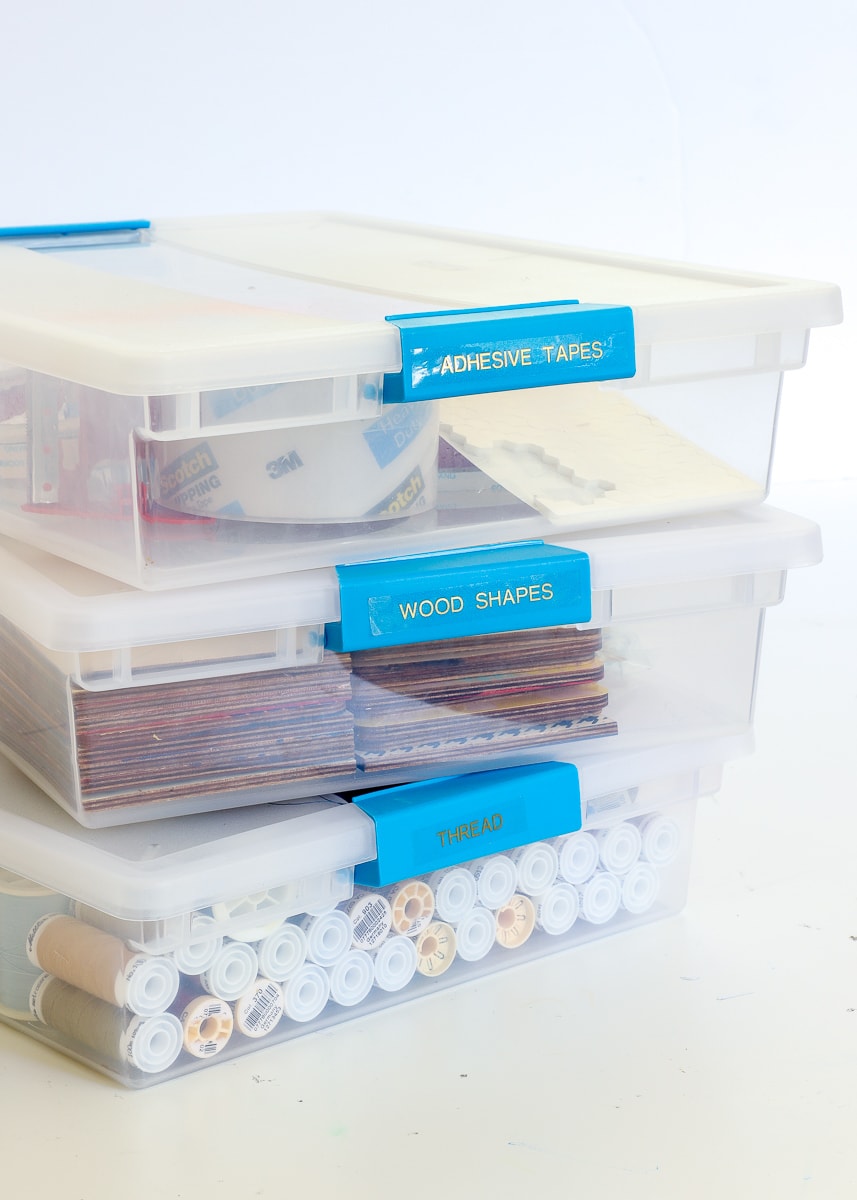
On the lower shelf of those same three cabinets are 12 of the “large” Sterlite boxes. I originally bought these boxes to organize our playroom. When I realized the snap-lock lids were actually preventing my kids from playing with their toys, I implemented some new solutions in the playroom only to be left with a stack of empty bins! When I discovered that 1) they fit under the lower cabinet shelves perfectly and 2) they actually held quite a bit….I knew I found a permanent solution for the base of these cabinets too!
These boxes are fairly shallow. And while that prevents you from storing big items in them, it also means that nothing gets lost or buried! In my 12 boxes are:
- Thread
- Snaps and sequins
- Quilting rulers
- Wood shapes (2 boxes) – hearts, squares, popsicle sticks, etc
- Chipboard shapes – labels, tags, banners
- Glues – glue gun and sticks, fabric glue, etc
- Tapes – roller adhesive refills, packing tape, masking tape, painters tape, etc
- Vinyl scraps
- Letters – stickers, die-cut, decals, etc
- And two empty ones!
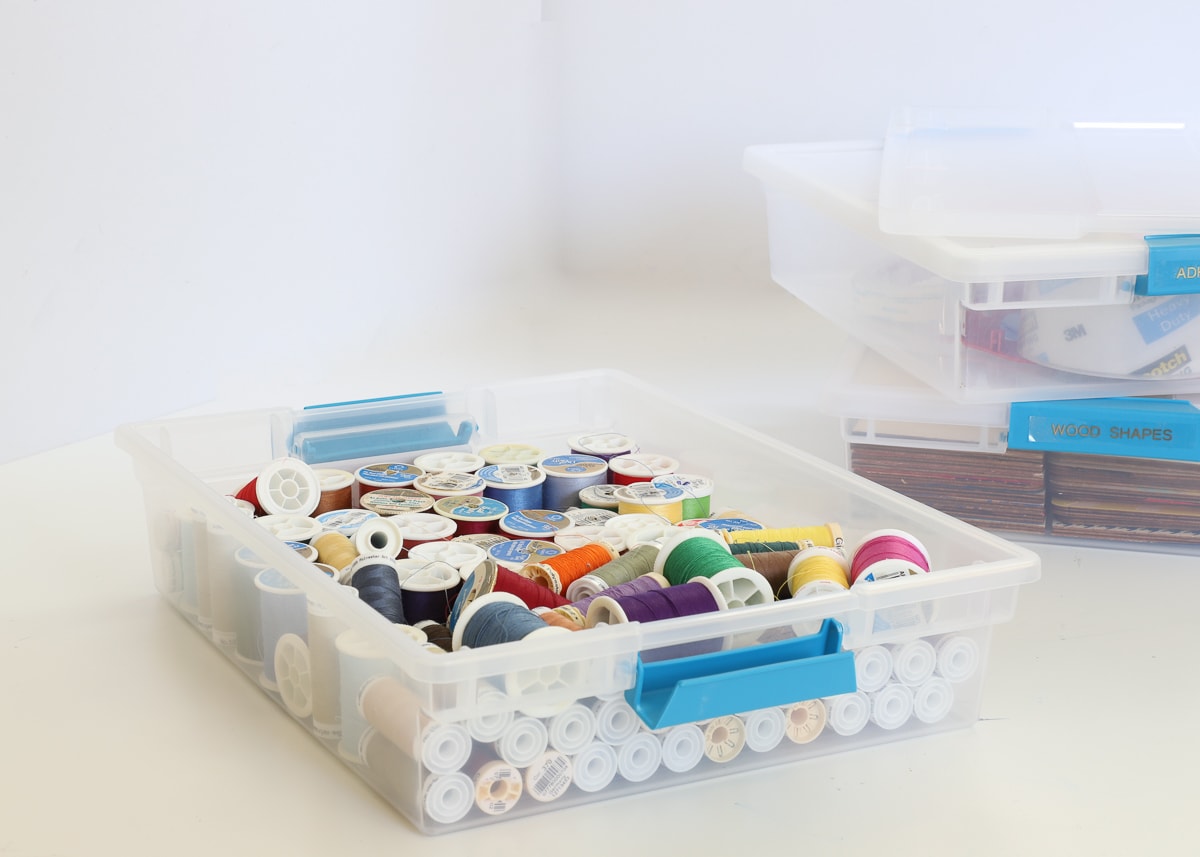
Although the clear sides make seeing what’s inside pretty easy, I couldn’t resist adding gold+clear labels to the snap handles!
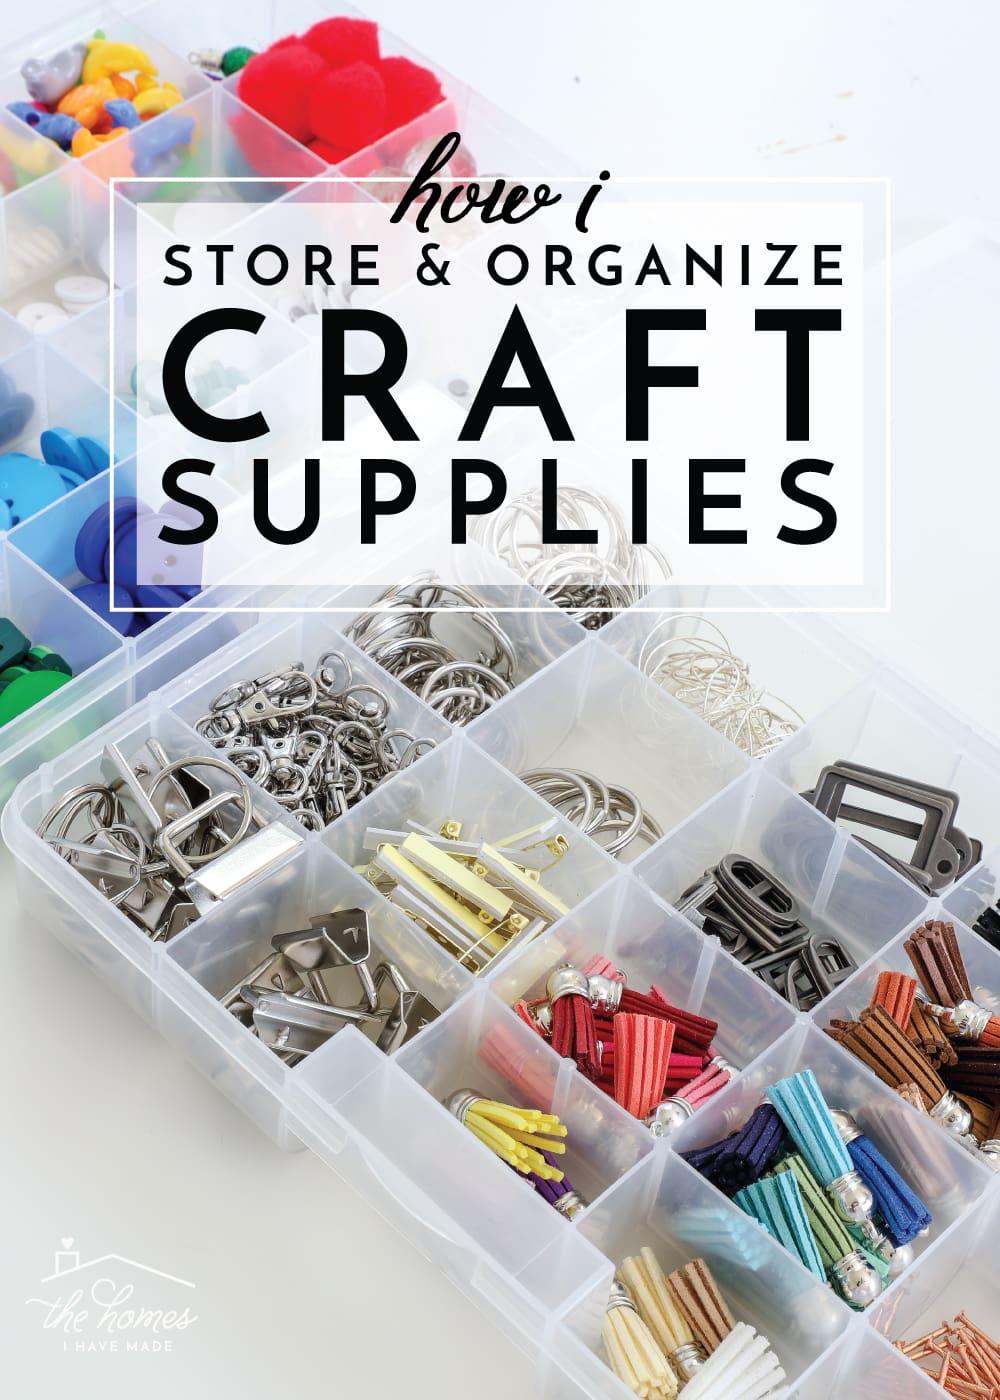
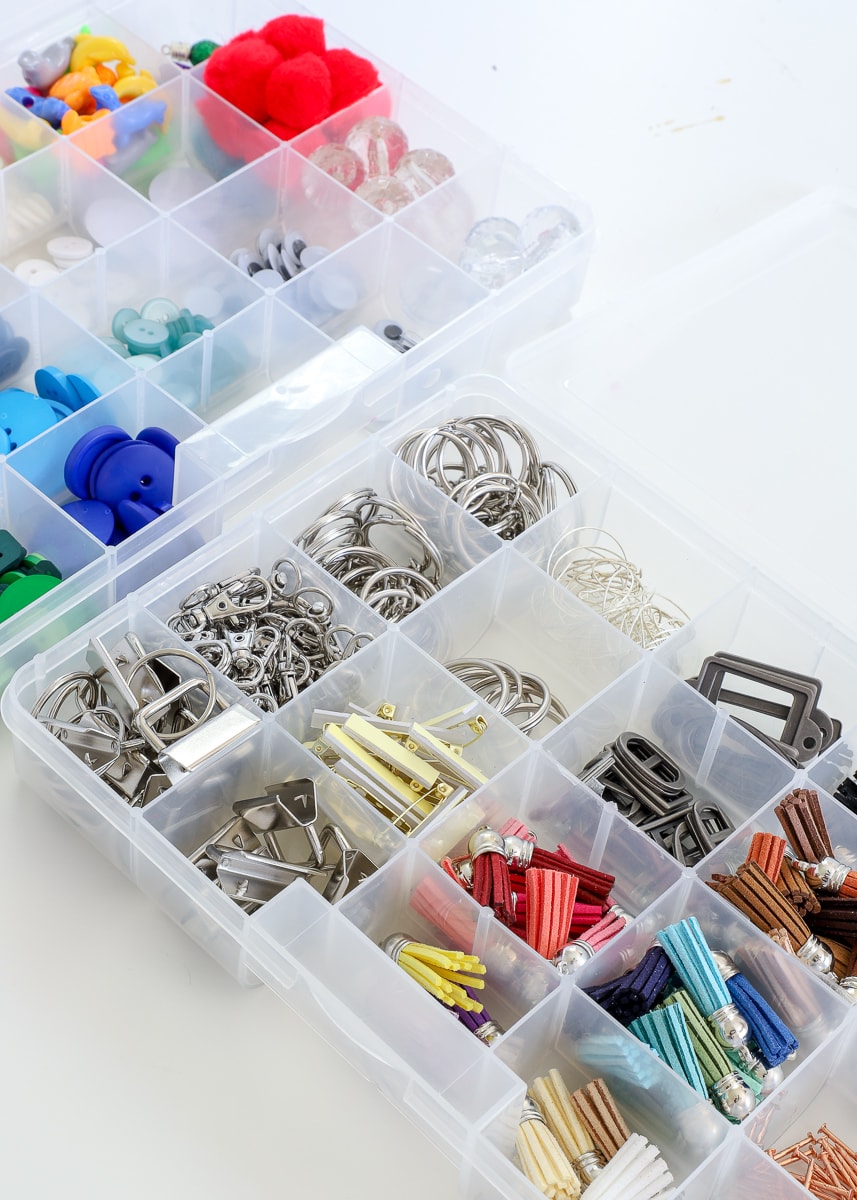
Finally, although I got rid of a lot, I still have a decent amount of really little items that warrant compartmentalized storage. Buttons, beads, googly eyes, and a whole series of hardware (mostly for keychains) are stored in basic craft organizers and kept with the lidded boxes shown above.
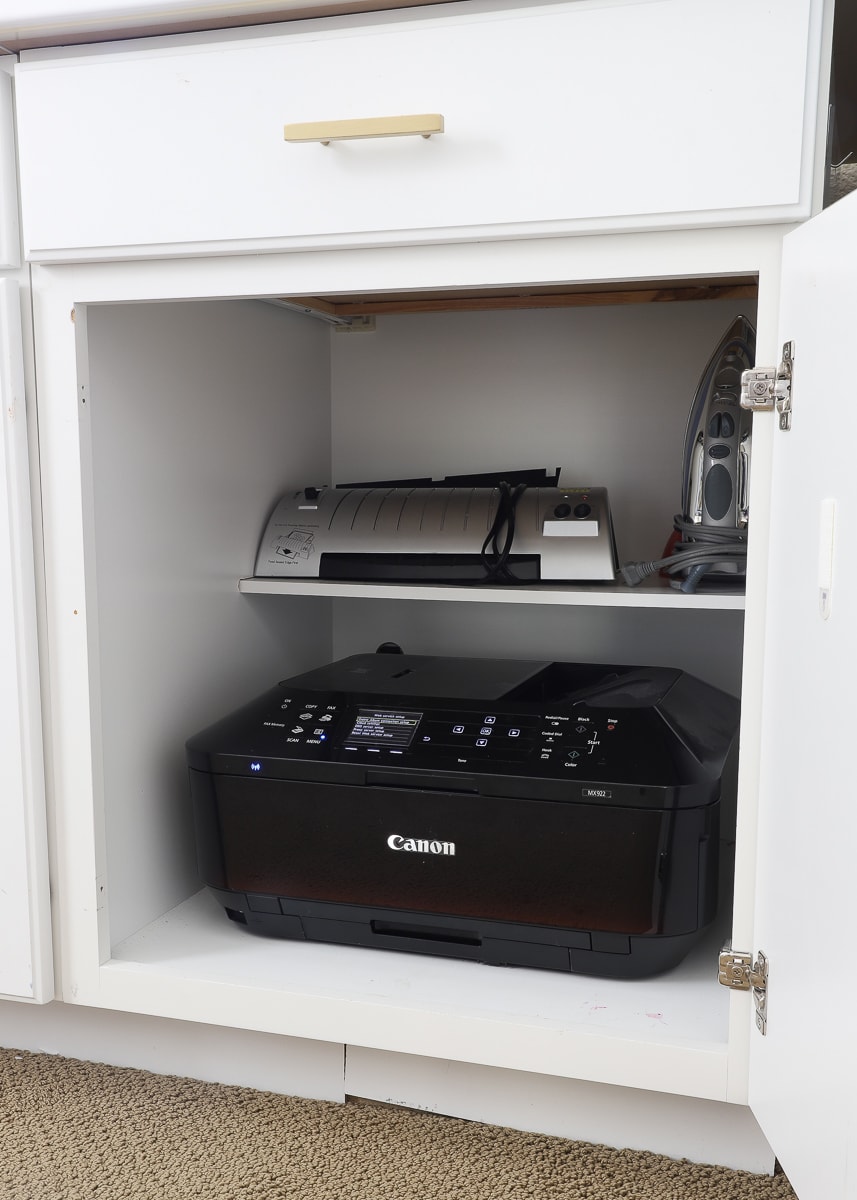
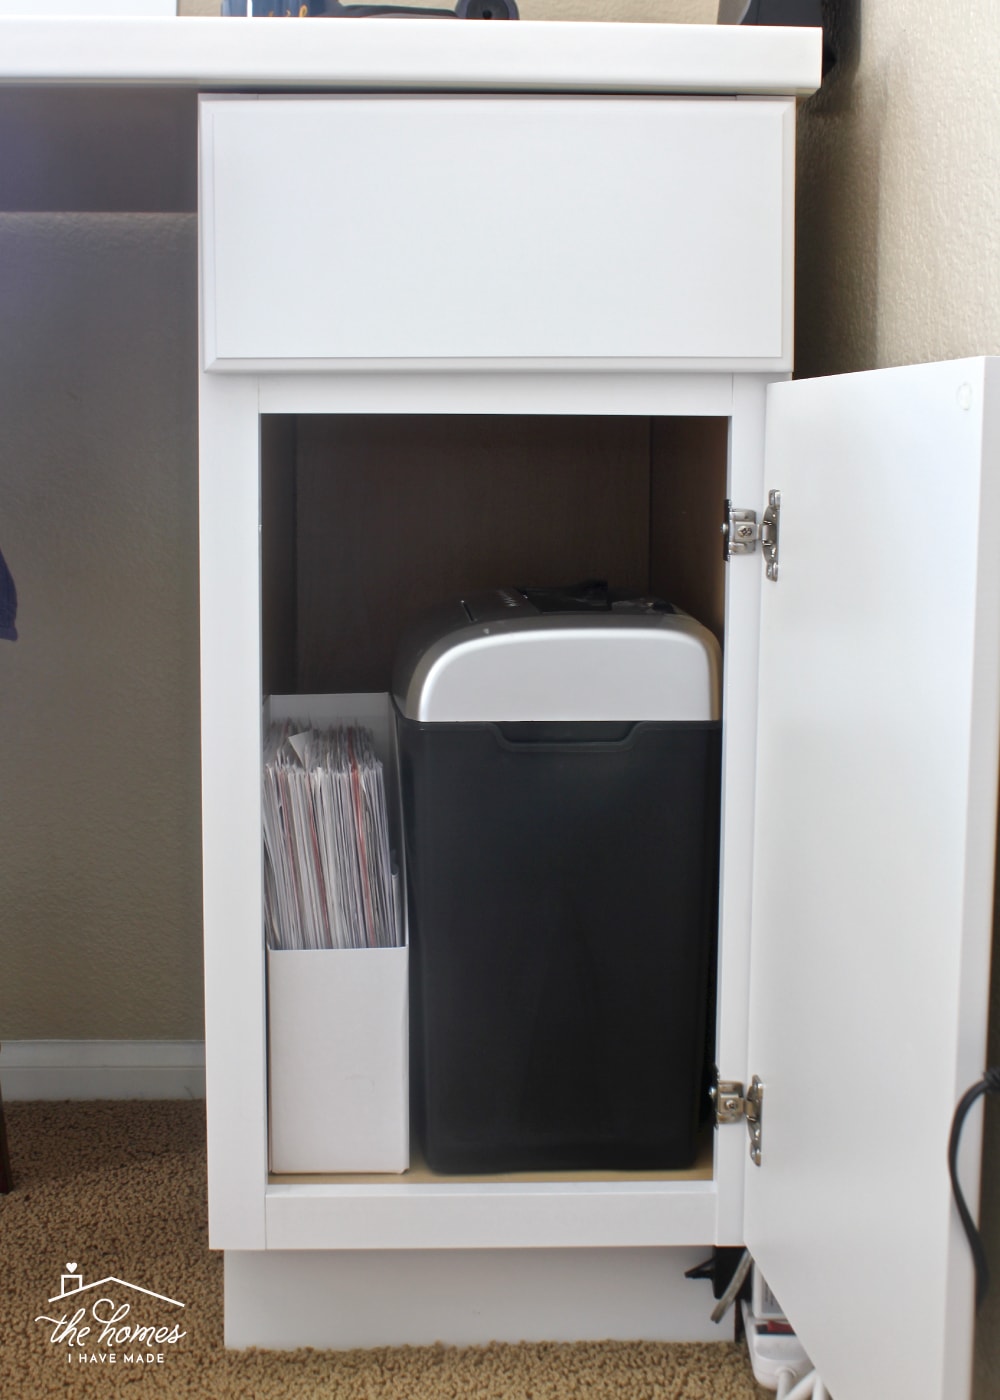
Concealed Electronics
The final two cabinets are used to store bulkier, electronic items in keeping with my out-of-sight approach. The cabinet to the left of my chair/computer holds our printer, laminating machine and iron…
…while the one to my right holds our shredder.
Although I didn’t take a picture of the contents inside each and every bin, basket, and container, by highlighting the various systems I’ve employed (and what went into each one), I hope you’ll get some ideas for storing the various items in your own craft space. Again, my biggest priorities in identifying the right organization solution for each and every item were:
- The container had to be big or small enough to perfectly hold the item/collection – I didn’t squeeze too big things into too small baskets or leave too much empty space in a box with a small collection.
- The container(s) had to fit perfectly into the drawer or shelf where they would sit – I worked hard to eliminate extra/blank space wherever possible by picking containers that fit just right.
- The container(s) needed to be white or clear so they would coordinate with each other regardless of brand/store and reduce visual clutter.
Here’s a quick round-up of most of the storage products I use in my space!

I’m a little embarrassed to admit it, but it’s taken me a good three years to not only get my craft collection to an amount I’m comfortable with but to also get it all sorted, contained, and labeled in a way that really, truly works for the way I craft! But even though we’re moving soon, I’m pretty sure all that work and effort will pay off! My next home office will have an almost identical layout as I have here, so I’m optimistic I will be able to (literally) transplant these current solutions. (I might even have space for one more shelf, so I’m hopeful I can unify all the items in the garage with everything I’ve shown you here so that my entire craft collection is in one spot! Fingers crossed!)
I tried to be as thorough as possible without making this post waaaaay too long, but if there’s something you want to see in more detail or need more info about, just let me know in the comments and I’ll update as needed! I also have plans to show you exactly how I made all the various labels throughout my craft space, as well as a final tour, before I tear it all apart! Stay tuned for those posts coming soon!
Megan

21 Comments on “How I Store AAALLL My Craft Supplies!”
I love the “in-depth” nature of this post! I actually just purchased a 4×4 IKEA Kallax for my craft room, mostly for Cricut supplies (new Maker owner here) so your post is so timely, thank you!
Wonderful ideas and very practical. Thank you, Megan.
Completely impressive!
Those square labels would be great in the organization toolbox!!!! Great post!
Thank you so much for sharing, everything is so pretty! And so helpful as I’m in the process of organizing my craft room. Can’t wait for your post on the label!
So great! I need to update and organize my home office, and I loooove your stock cabinets idea! No more tabletops on sawhorse legs! I would love to know more about your labeler – what tool do you use, and it comes with gold ink!? I’m looking forward to that upcoming post! I remember vaguely you taking about how you labeled your Drona & “y-weave” boxes, but I still love the effect of the white with gold snaps. How do I find that past post? Cheers!
Wow, can I just say that you have a little craft store of supplies at home 🙂 I always love seeing how others store their goodies, really love how clean and uncluttered it looks when it is all nicely packed away.
Megan, so organized and completely dust free environment. Storage bins/containers are much cheaper in Japan, along with stationery and cute little things. Much more affordable in US than Canada. Sterilite container costs about $25 & up; Michaels has Faber Castell Pitt Brush pens for clearance $5 but in Canada it’s $15. Even with currency exchange it’s more worth nit buying in US
I really enjoyed this post, and MANY of your others! I use a LOT of the Sterilite shoeboxes for my crafting supplies but I don’t have cabinets to put them. To get that more uniform look, I cut a piece of colored cardstock to fit the end and slip it into the little plastic pieces in the corners inside the container, then I put a label on that. It makes it easy to reorganize (which I do a LOT!) and I can easily change the color according to my mood. The containers are more than $2 a piece at the link you provided, but you can get them for $1.18 at Home Depot and you don’t have to buy in multiples. I hope that helps someone!
Wow I love your set up! I pretty much have what you have for crafting. I too love it all! So I’m doing a nice big room over the garage. I bought the Ikea kallax shelves I just bought 4 unfinished cabinets from Lowe’s which I started painting white today. I’m putting them together back to back with 30 inch opening in the middle for stools. The island will be great for sewing and cutting and using the cricut and hopefully all my sewing machines and other supplies that don’t fit in the kallax bins I love how you labeled everything with a label maker. I don’t have one so I will definitely be looking into getting one of those! Perfect idea for the feet! I’m definitely going to use little containers like you and definitely label them! There is no way to remember them for which project. I’m getting older now so remembering will be easier if I can get it all squared away now. I’m so happy I came across your website! I look forward to seeing all your posts. Happy New year! Have a blast making beautiful handmade items! Janine
HI Janine!
Thanks so much for writing, and it sounds like you have an awesome organization endeavour in front of you!
Glad you found my ideas helpful, and I can’t wait to hear how your space turned out!Megan
Gosh Megan, you did a really fantastic job of organizing all your craft items. I live in an apt so my bedroom is half craft and half bedroom. I want to redo my outside storage building. It needs the walls repaired and I wanted to take all my craft items out there. But, I have a lot of stuff out there that needs to be sorted out and I wanted to get plastic containers for all my Christmas items and then I might not have so much that I can actually redo it for a decent craft room. I need insulation and some thin plywood to put on the walls because all the sheet rock is coming down because of leaking going on.
I really like your big cabinet with all the containers and everything you put in there. I hope my craft room can look similar when I am done.
Your craft room is so organized and looks so nice. You have everything easy to locate My how I envy you. I love crafting and am trying to rework my room now. Thanks for sharing
Thank you for sharing your insight to organizing craft supplies. You have motivated and inspired me to declutter! Getting started is overwhelming, but you have explained it well! I’m downsizing, decluttering and reorganizing a room full of supplies, to a large walk in closet. I’m grateful I found your blog! I was worried I would need to just stuff it all in large bins, but I can see a better way to compartmentalize each category, which is the hardest for me. Thanks Again!
I absolutely love your layout and organization. Thank you so much for all of the detailed items. Can’t wait to try some of your ideas.
Bow down!!
Very helpful post, Megan. Thank you for this. One question… do you store bobbins in with your thread?
What great ideas! You have really inspired me!
Since you move frequently (which means packers and packing) do your approximately 375 bins get packed as filled, or boxed separately which means items may get mixed together (which I can imagine the movers may take delight in doing) and need resorting after the move. Do you pack them yourselves or do the movers pack them? What tips do you have that specifically apply to moving the items in your bins to a new home?
I loved your article. But your final list never did populate, so I wasn’t able to figure it out. This is what I meant:
Here’s a quick round-up of most of the storage products I use in my space!
Then nothing!!!!
Please, is there any way to get a copy of that list? I’m trying desperately to get things organized since almost the entire lower lever of our home has become my “ I wanna try this” catch all for the project supplies!!! My husbands about ready to get a dumpster and crate all of it up and pitch it. ( He doesn’t understand this is my therapy and my thrill. My outlet for my imagination and my fun in creating dreams into reality. 😌)
Amazing organizing! Great ideals and products!
How do you store your dollar tree wood blanks for crafting?