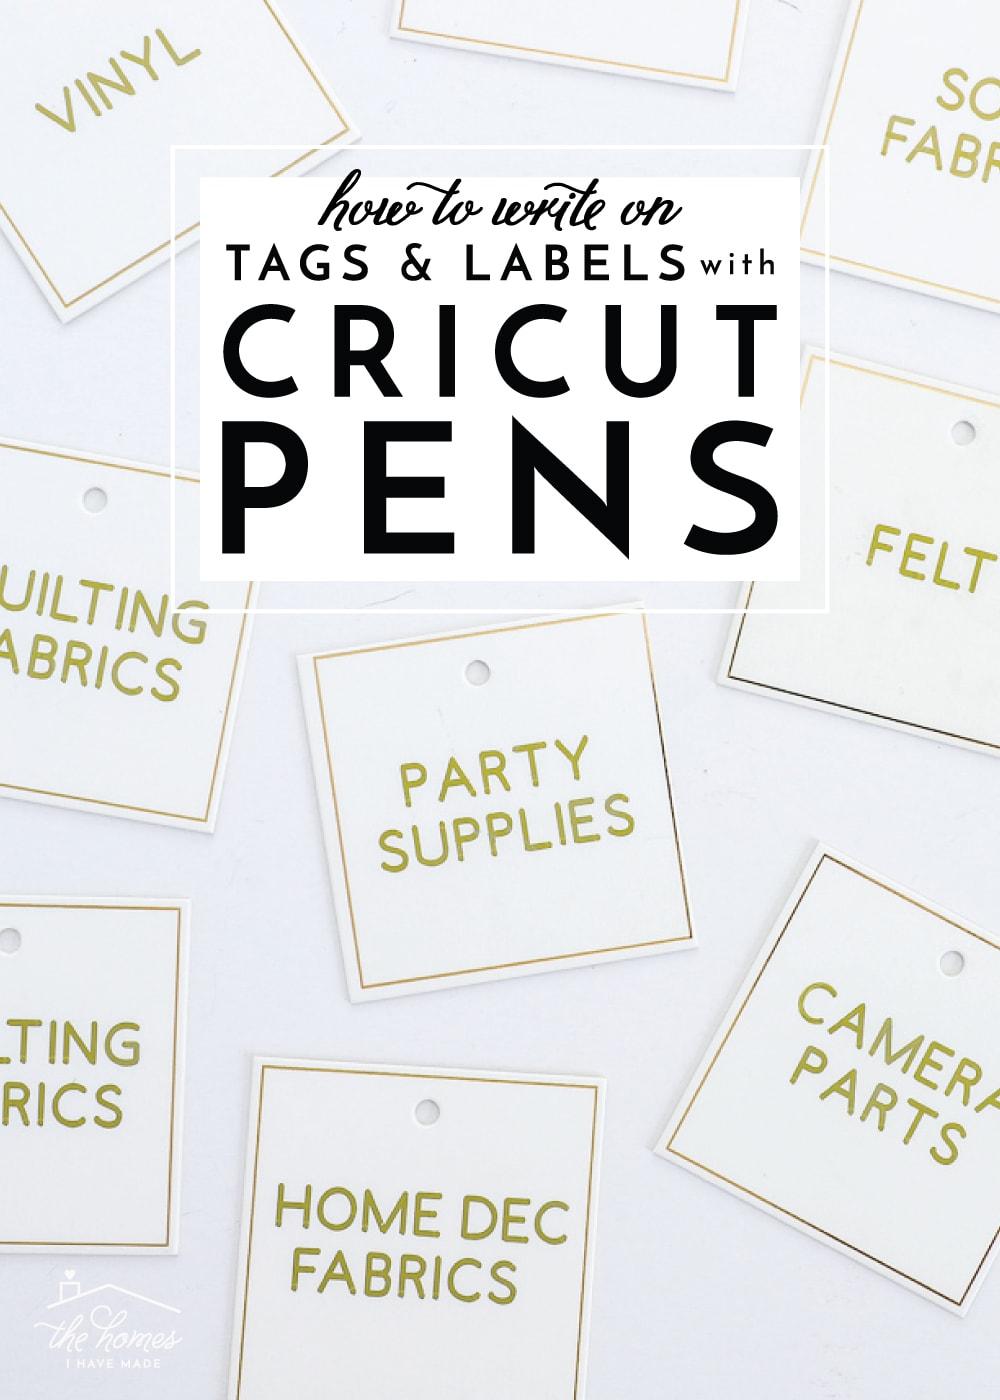
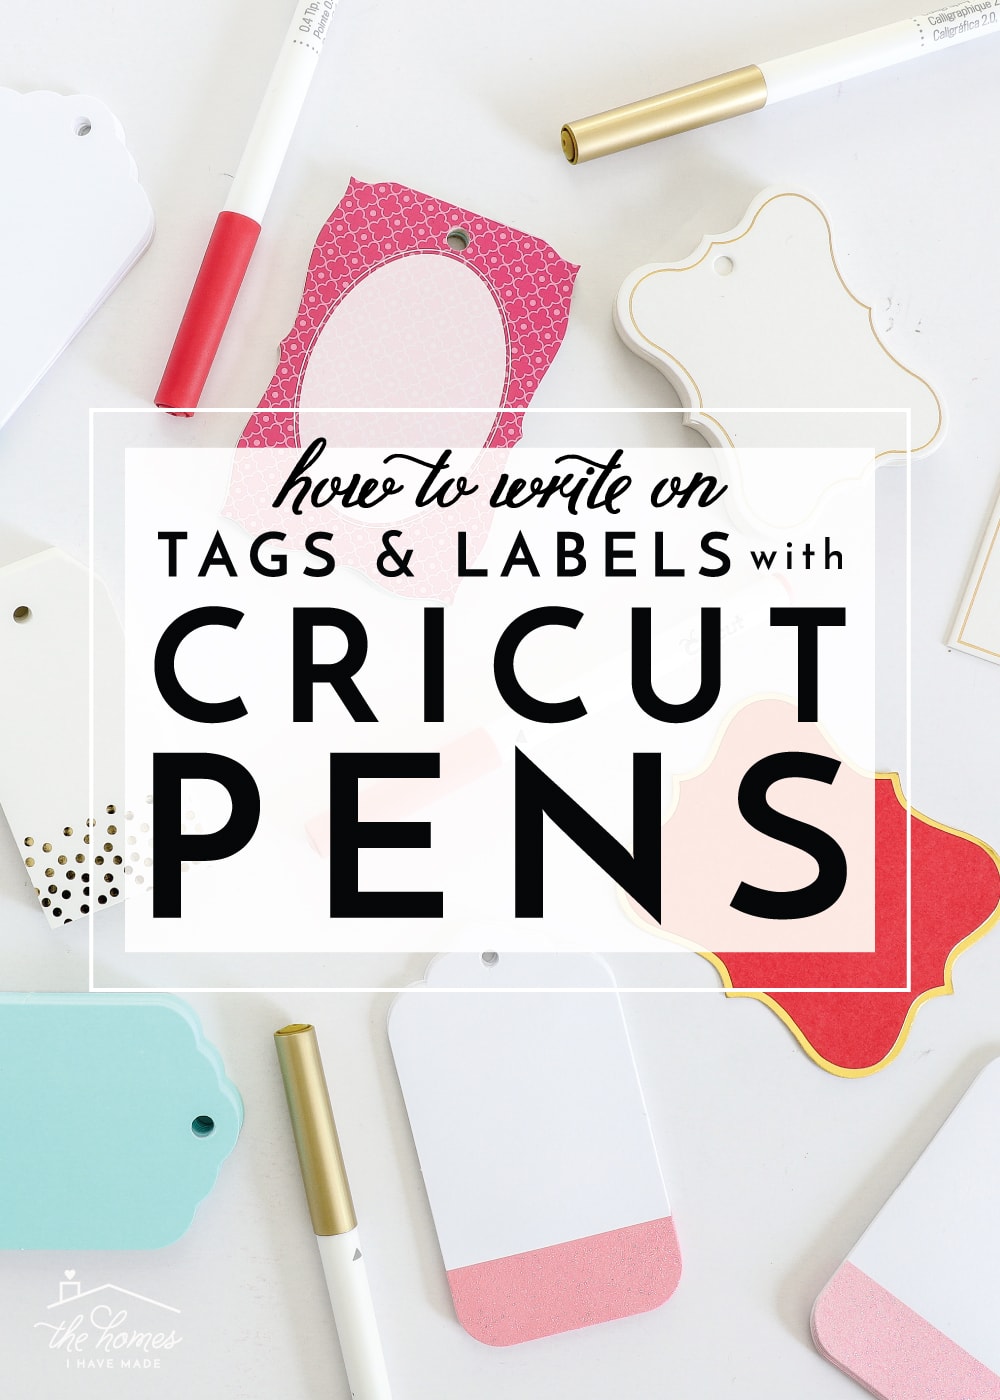
How to Write on Tags & Labels With Cricut Pens
A few months ago, I shared an in-depth look at all the different craft storage solutions I utilize in my home office/craft space. And while you guys seemed to love the organization ideas, many of you really wanted to know more about the pretty gold-and-white labels I put on all my bins and boxes! Thanks to some off-the-shelf tags from Michaels and the writing capability of my Cricut, these tags look so clean and sharp. But writing directly onto pre-cut shapes with a Cricut (and getting everything to line up perfectly!) can sometimes be a little tricky. Today, I want to show you exactly how to write on labels with Cricut Pens, and also share how to easily adapt this label idea if you don’t have a Cricut machine!
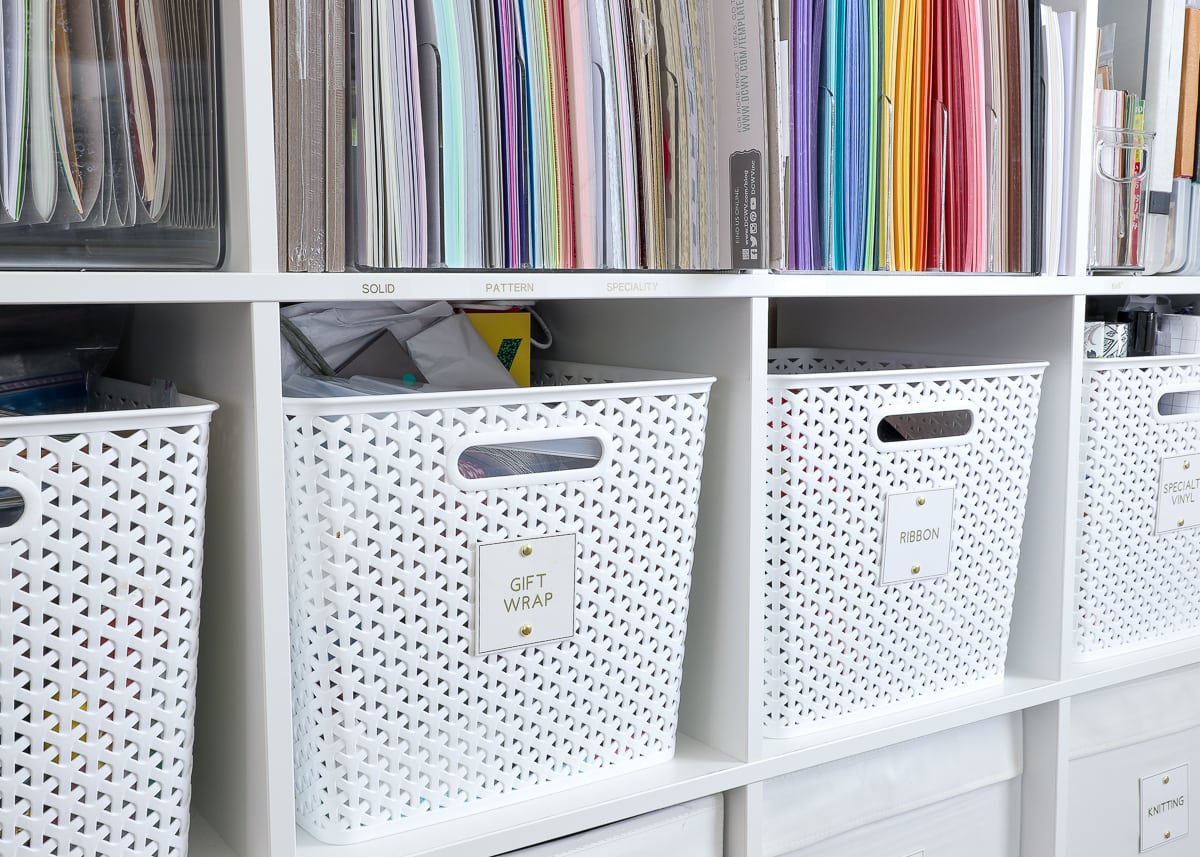
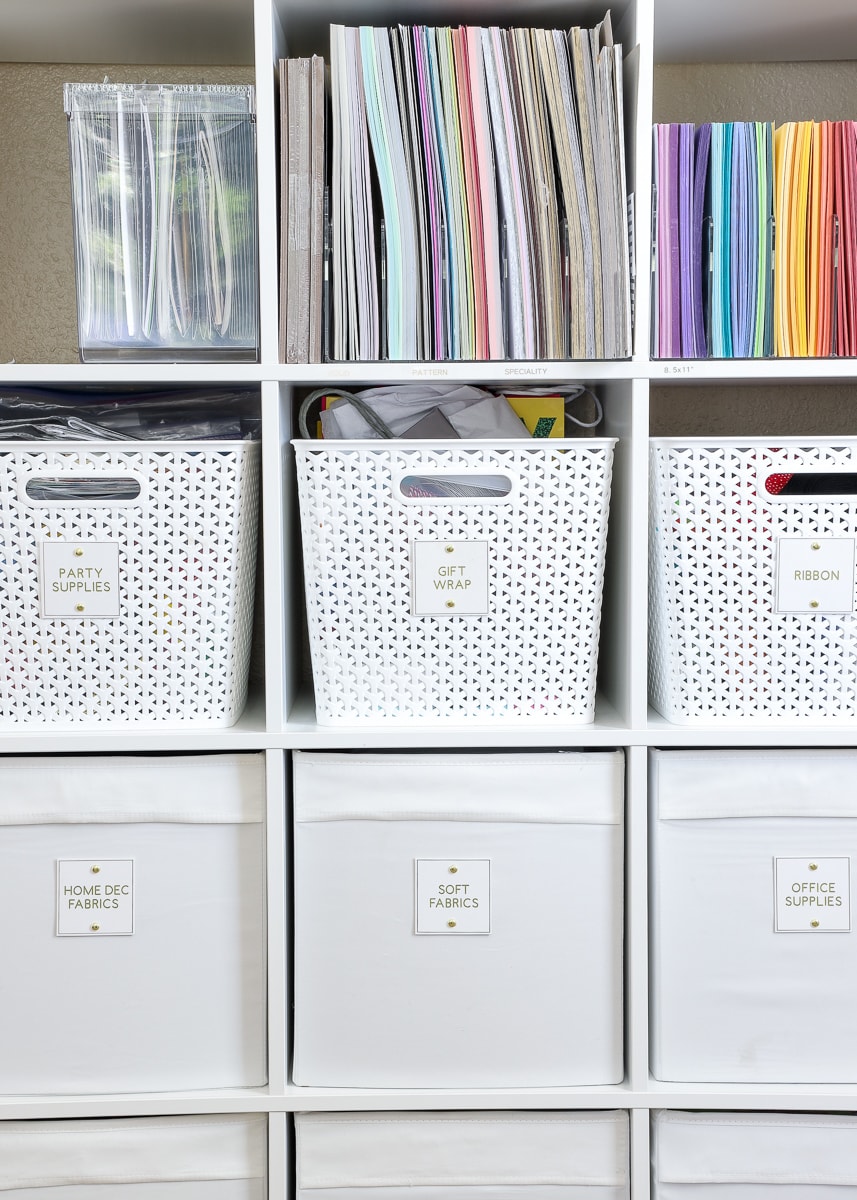
Here’s a snapshot of the white-and-gold labels on the 15 bins and baskets in my craft room. I really wanted something that was budget-friendly and easy to swap out (as basket contents change), but also looked chic, stylish and (most importantly!) streamlined!
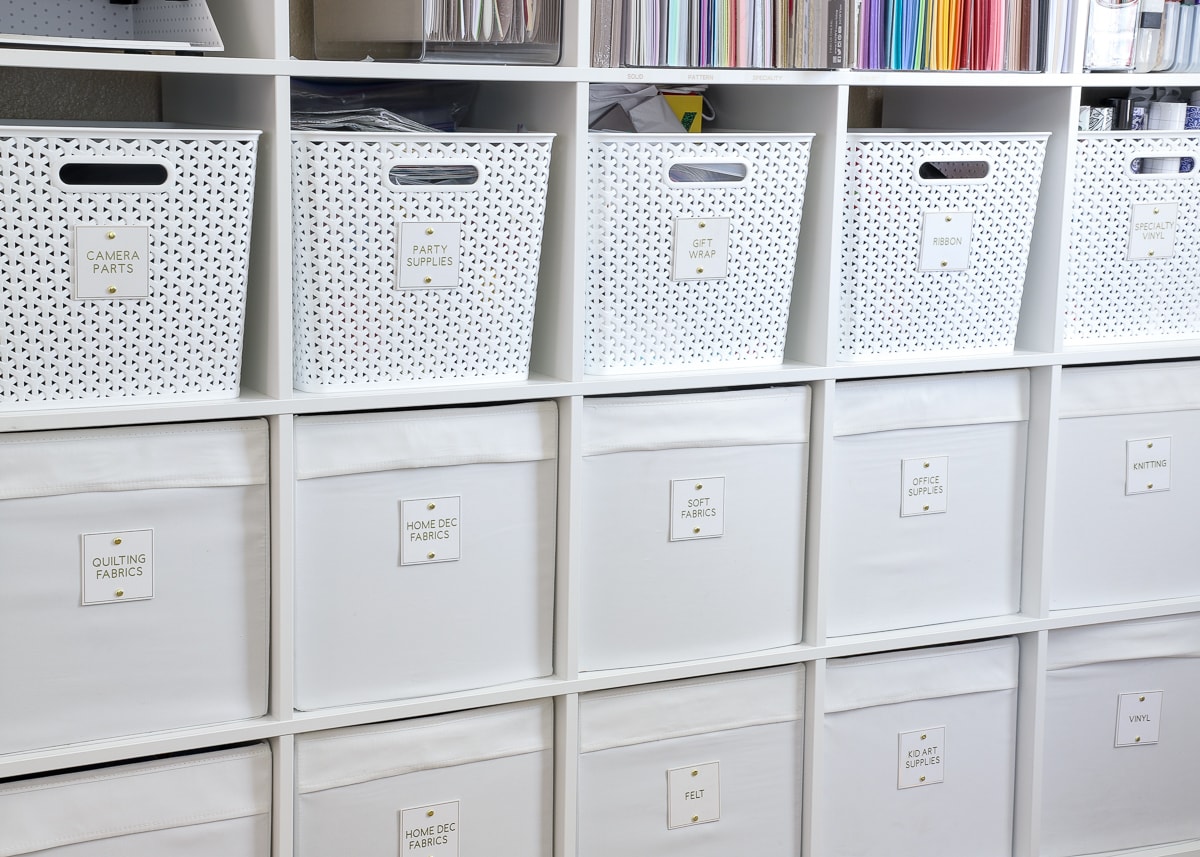
The sturdy chipboard combined with metallic gold elements provided the exact look and function I was going for…
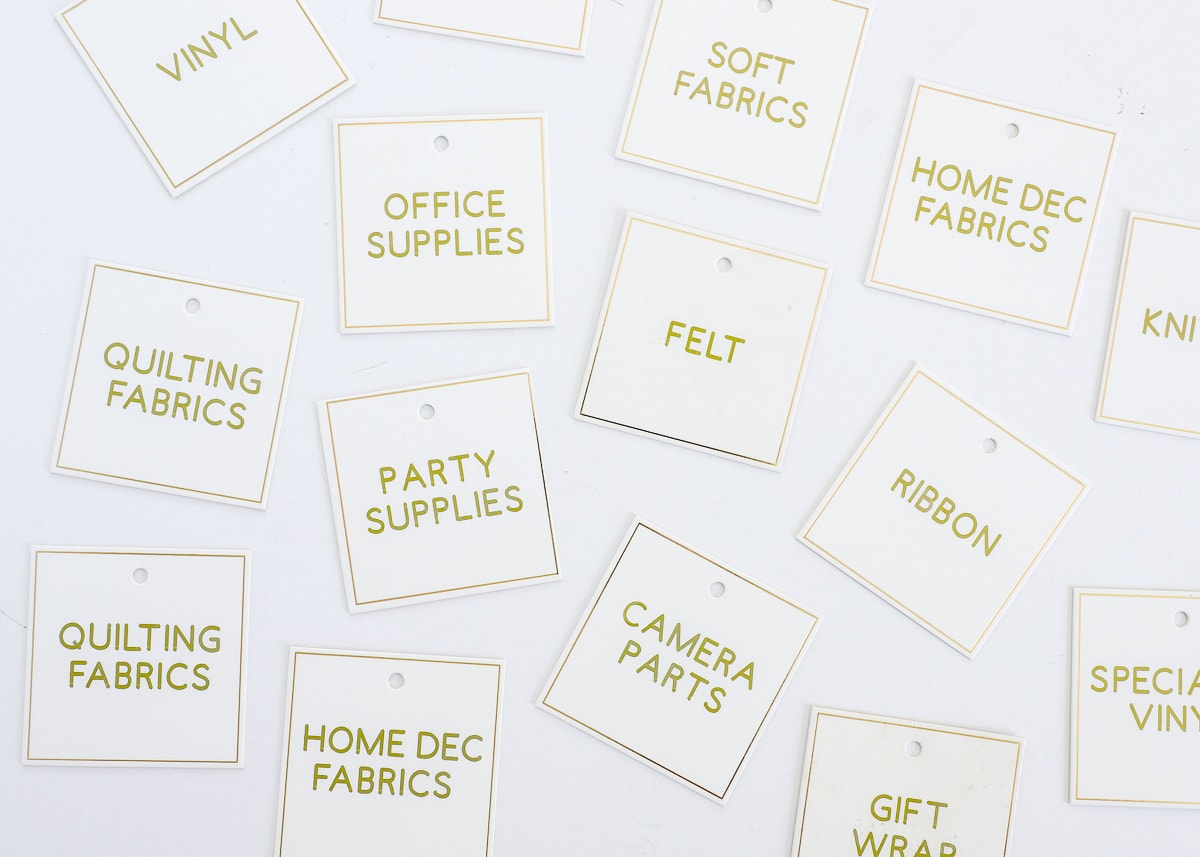
…and despite their sophisticated look, these labels really couldn’t be simpler. Why? Because they are made out of off-the-shelf tags from Michaels, written on with some gold Cricut pens, and held to the baskets using gold brads.
NOTE: Last time I was in Michaels, it appeared as though the gold+white line of tags was on Clearance. However, you can use this idea on any pre-made tag you can find – chipboard-weight ones are best!

In fact, whether you have a Cricut machine or not, you can make similar labels using these exact same supplies…you’ll just need to handwrite your words instead of having a machine do it! But if you hate the look of your own handwriting (like I do) and have a Cricut machine, using the Cricut Pens to write directly onto the tags is a fantastic solution (and honestly, one of my favorite ways to use my Cricut!)
If you are brand new to using Cricut Pens, make sure you check out my full tutorial here. Then, when you’re ready to take your pen skills up a notch, use the following tutorial to write directly onto pre-cut items!
“Pre-Cut” Items
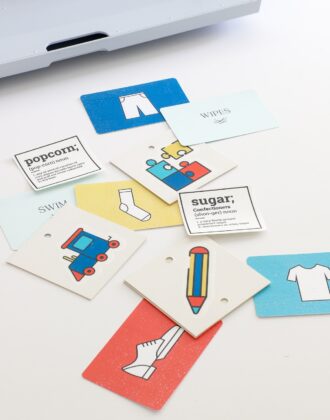
I’ve experimented a lot with writing onto pre-cut items with my Cricut. What do I mean by pre-cut? These are items such as tags, invitations, labels, banners and other paper goods that my Cricut didn’t cut and I instead picked up at Michaels, Target Dollar Spot, etc. And while using the pens to write onto a shape the Cricut itself cuts is pretty straight forward, trying to center a drawn design onto something pre-cut is a little tricker. You can certainly use the ruler printed onto the cutting mats themselves to “guess-timate” the location of your written/drawn designs, but the “template” technique I’m going to share today will yield more consistent, better, and quicker results every time! This may seem a bit tedious at first, but once you try it, you’ll be set for good!
How to Write Directly Onto Labels with Cricut Pens
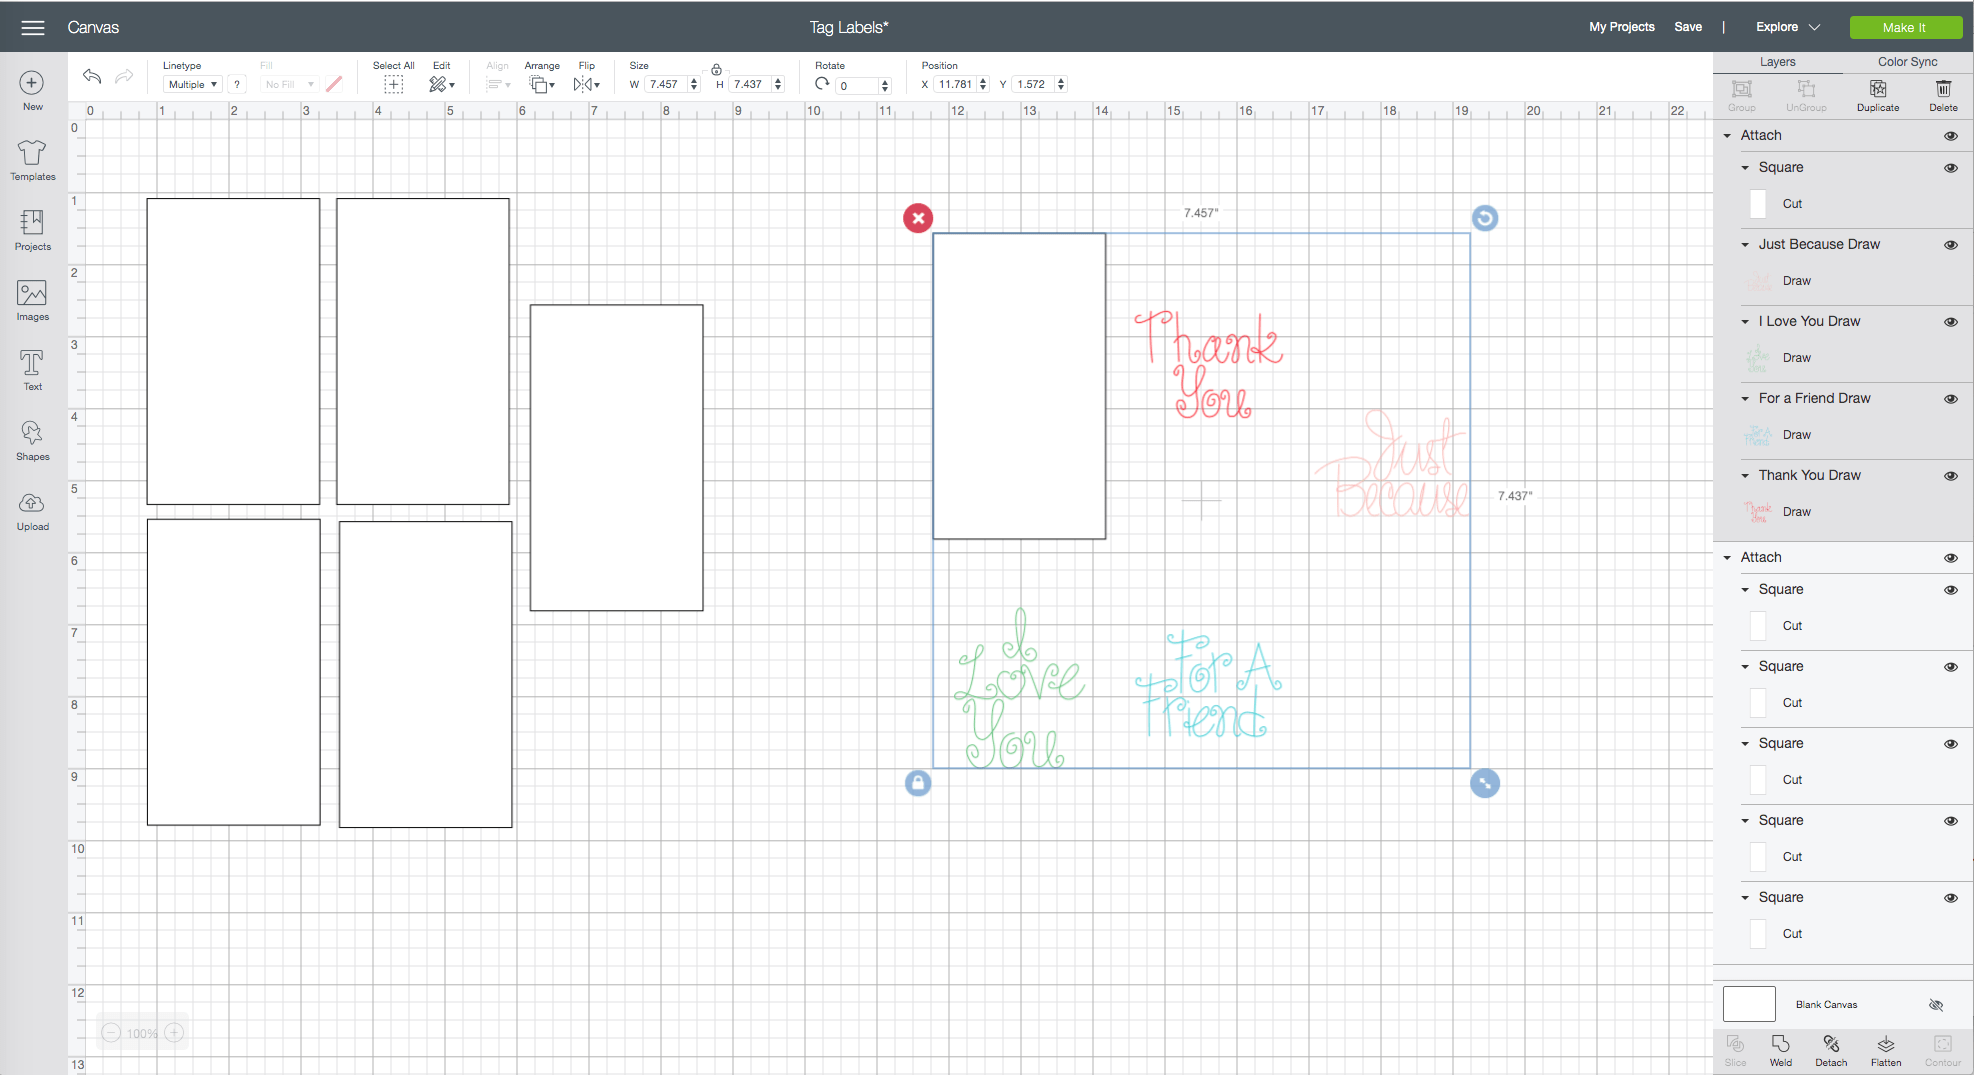
NOTE: I am going to go through this “template” method using my 3″ square labels as an example. But this technique can be applied to any tag, invitation, banner or other pre-cut item as needed!
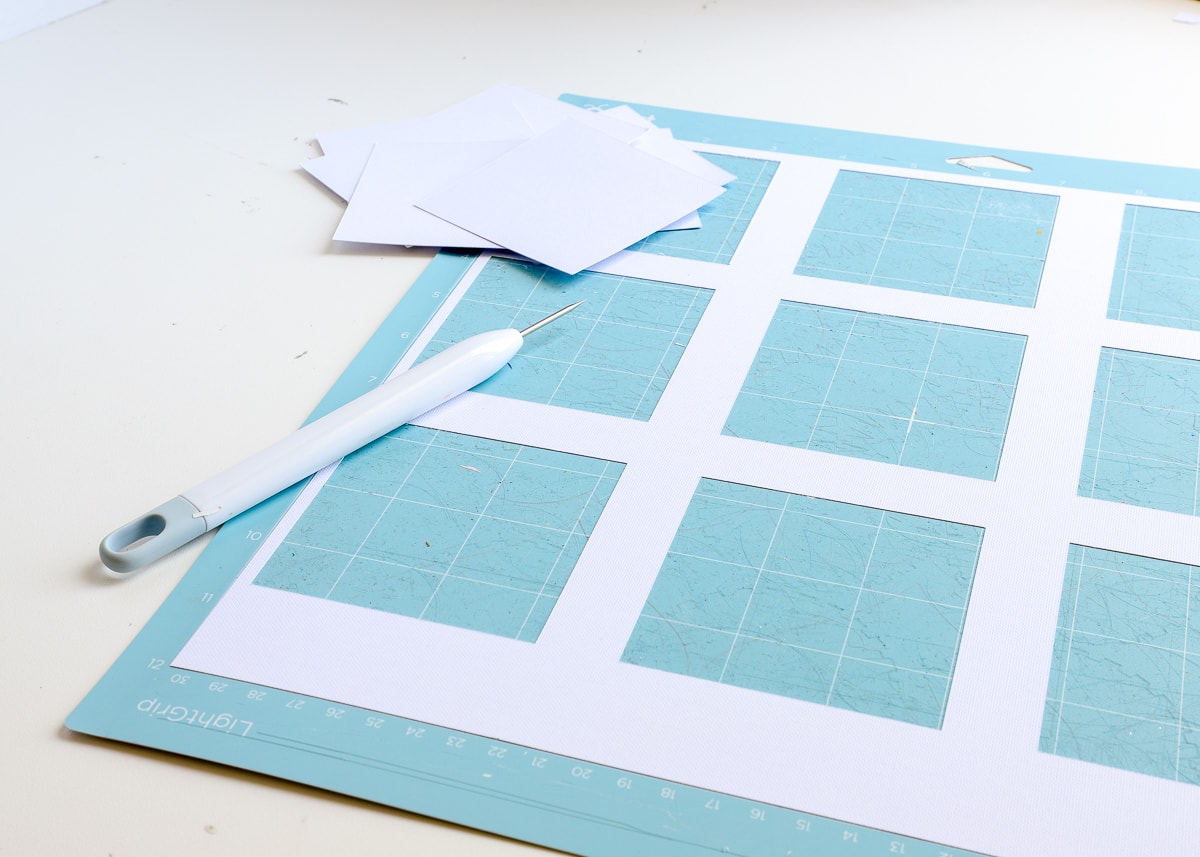
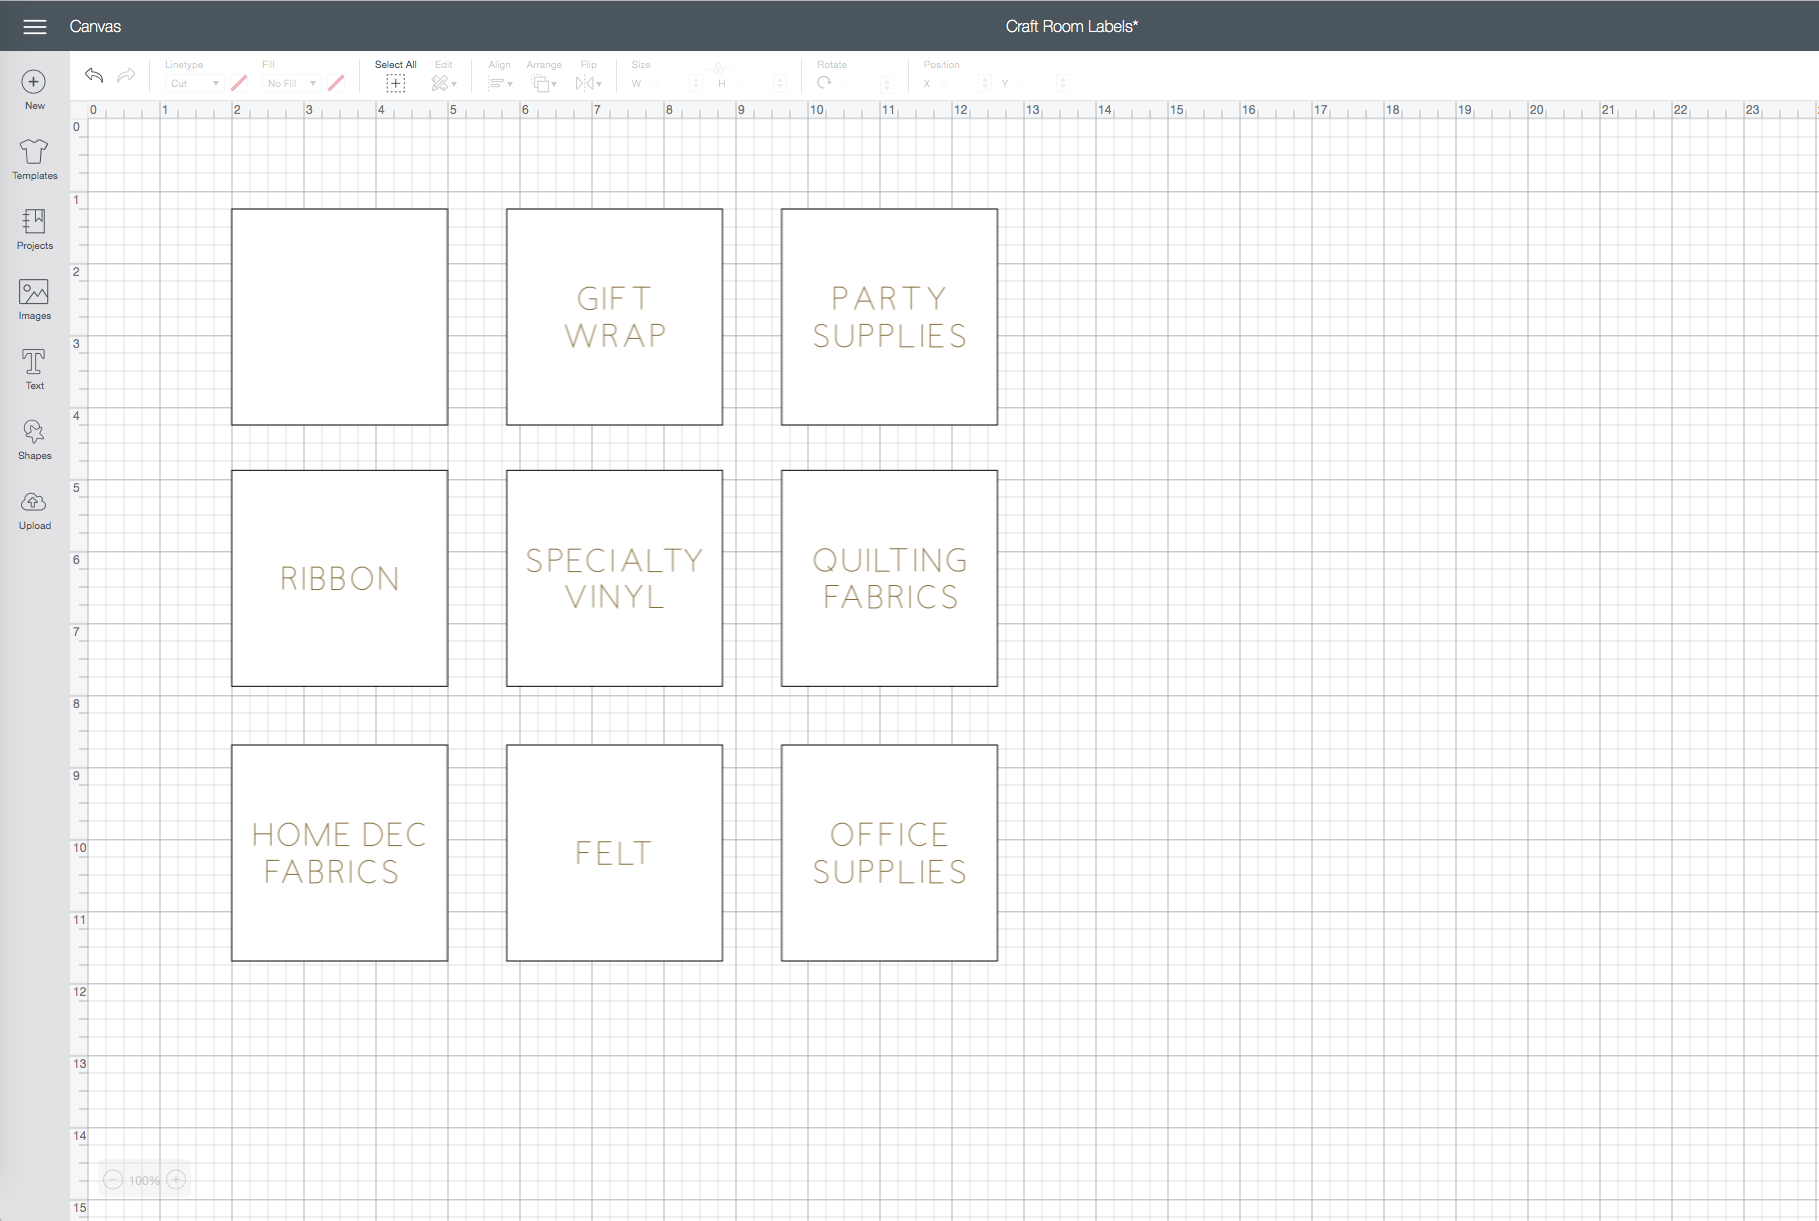
Start by measuring your pre-cut item and finding a shape in the Design Space library that matches it. In the case of my labels, it was easy. They measured 3″ square, so I placed a bunch of 3″ squares on my canvas (directly from the shapes menu). To determine how many pre-cut items you can write on at once, I suggest placing a 12×12″ green square onto you canvas (to represent the size of the mat). Then place your pre-cut shape(s) onto the green square and space them out as you desire. In my case, I added nine 3″ squares onto the mock mat and spread them out so they fit nicely.

Once the placement is set, delete out the green square and “Attach” all the label shapes together. In my case, I selected all 9 white squares and clicked “Attach” in the bottom right-hand corner of the screen. Using “Attach” ensures all my squares stay spaced exactly as shown above.
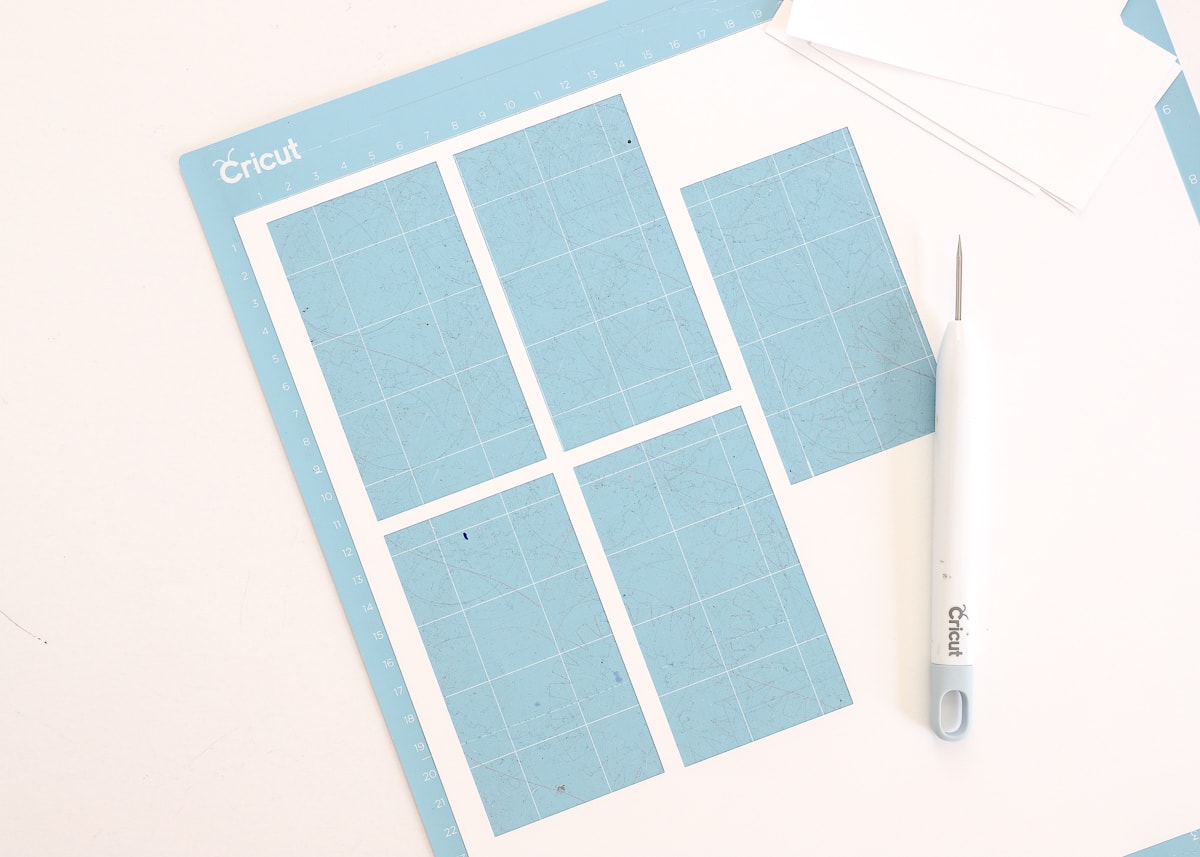
Next, click the green “Make It” button to cut out the template you just created from plain/sturdy cardstock. Then use your Cricut tools to remove only the label shape(s) from the mat, keeping the background “template” exactly in place. Set your mat/template aside and return to your project in Design Space.
Now that you have a template designed for your pre-cut item(s), you can add the design/text you want written directly onto each shape.
Use the Text and Align tools (top toolbar) to add text to your shapes. If there are elements on your pre-cut item (such as the holes on my tags), make sure you take their placement into consideration. For my labels, I just wanted the text centered vertically and horizontally.
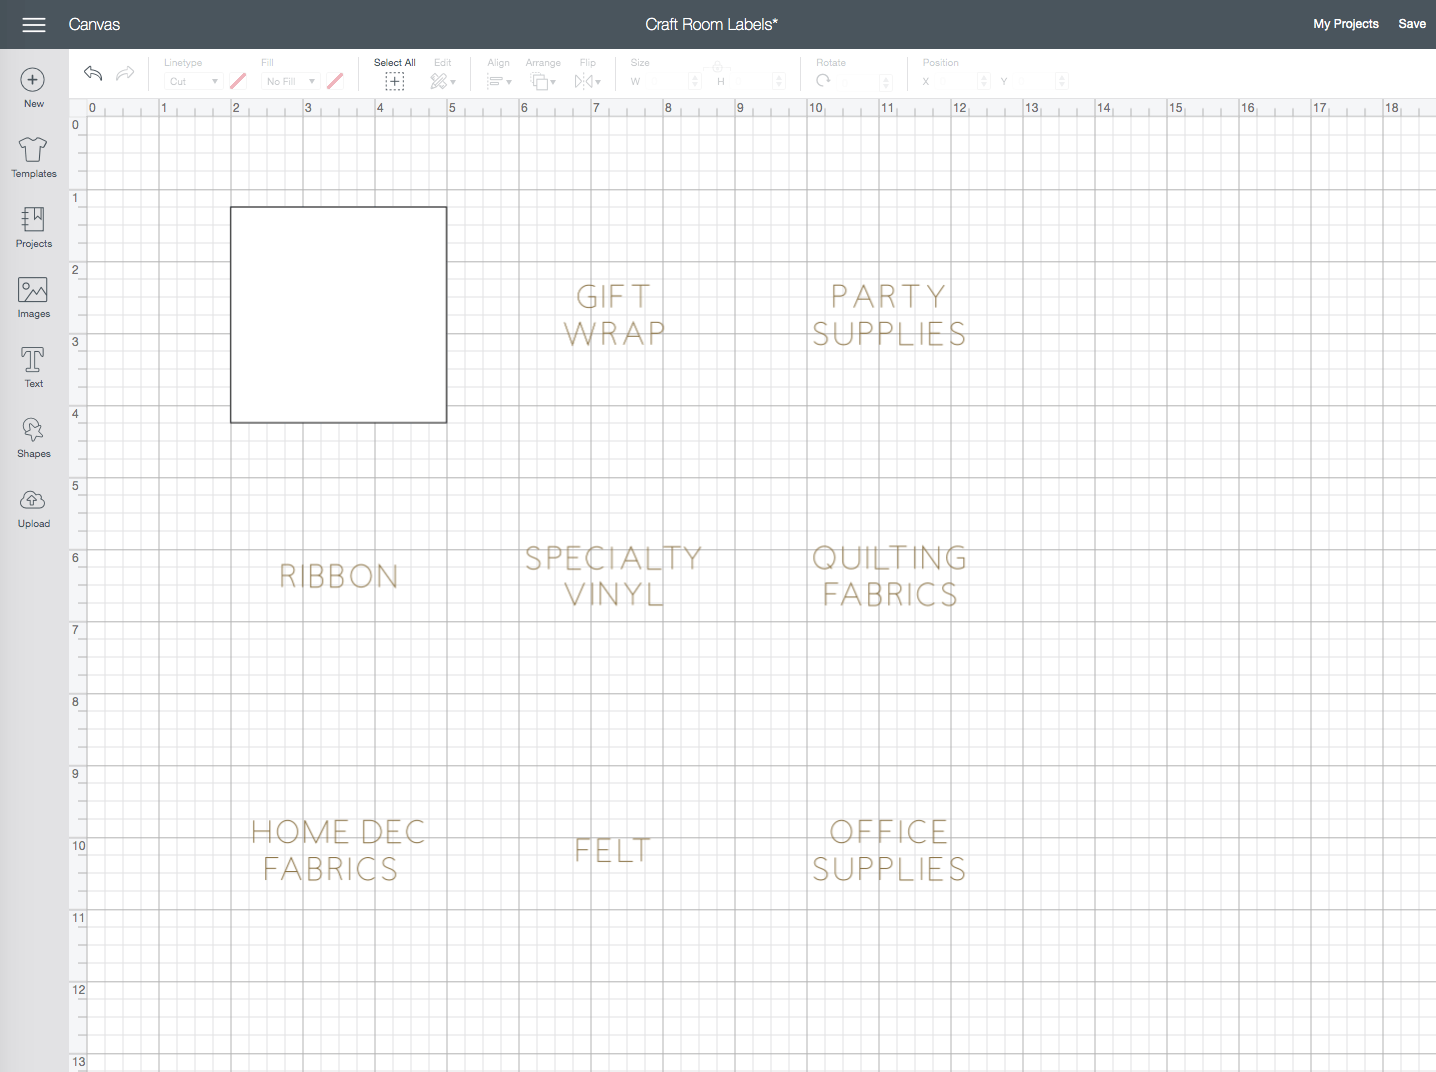
NOTE: I found it easiest/best to keep the very first shape blank. This very first shape will serve as a “registration” mark of sorts…you’ll understand why as we keep going!
Next, use the “eye” symbol (in the right-hand side Layers Panel) on all (but the first) shapes to toggle them off. You should be left with your first shape still on (in my case, the single square) and all your text still on.
TIP! Don’t just delete out the squares…hide them instead. This way you can use them again to quickly space out additional labels/tags, etc.
Before progressing, select everything on your canvas and click “Attach” (again, along the bottom right-hand toolbar). This will ensure that all your words will be written EXACTLY where you placed them.
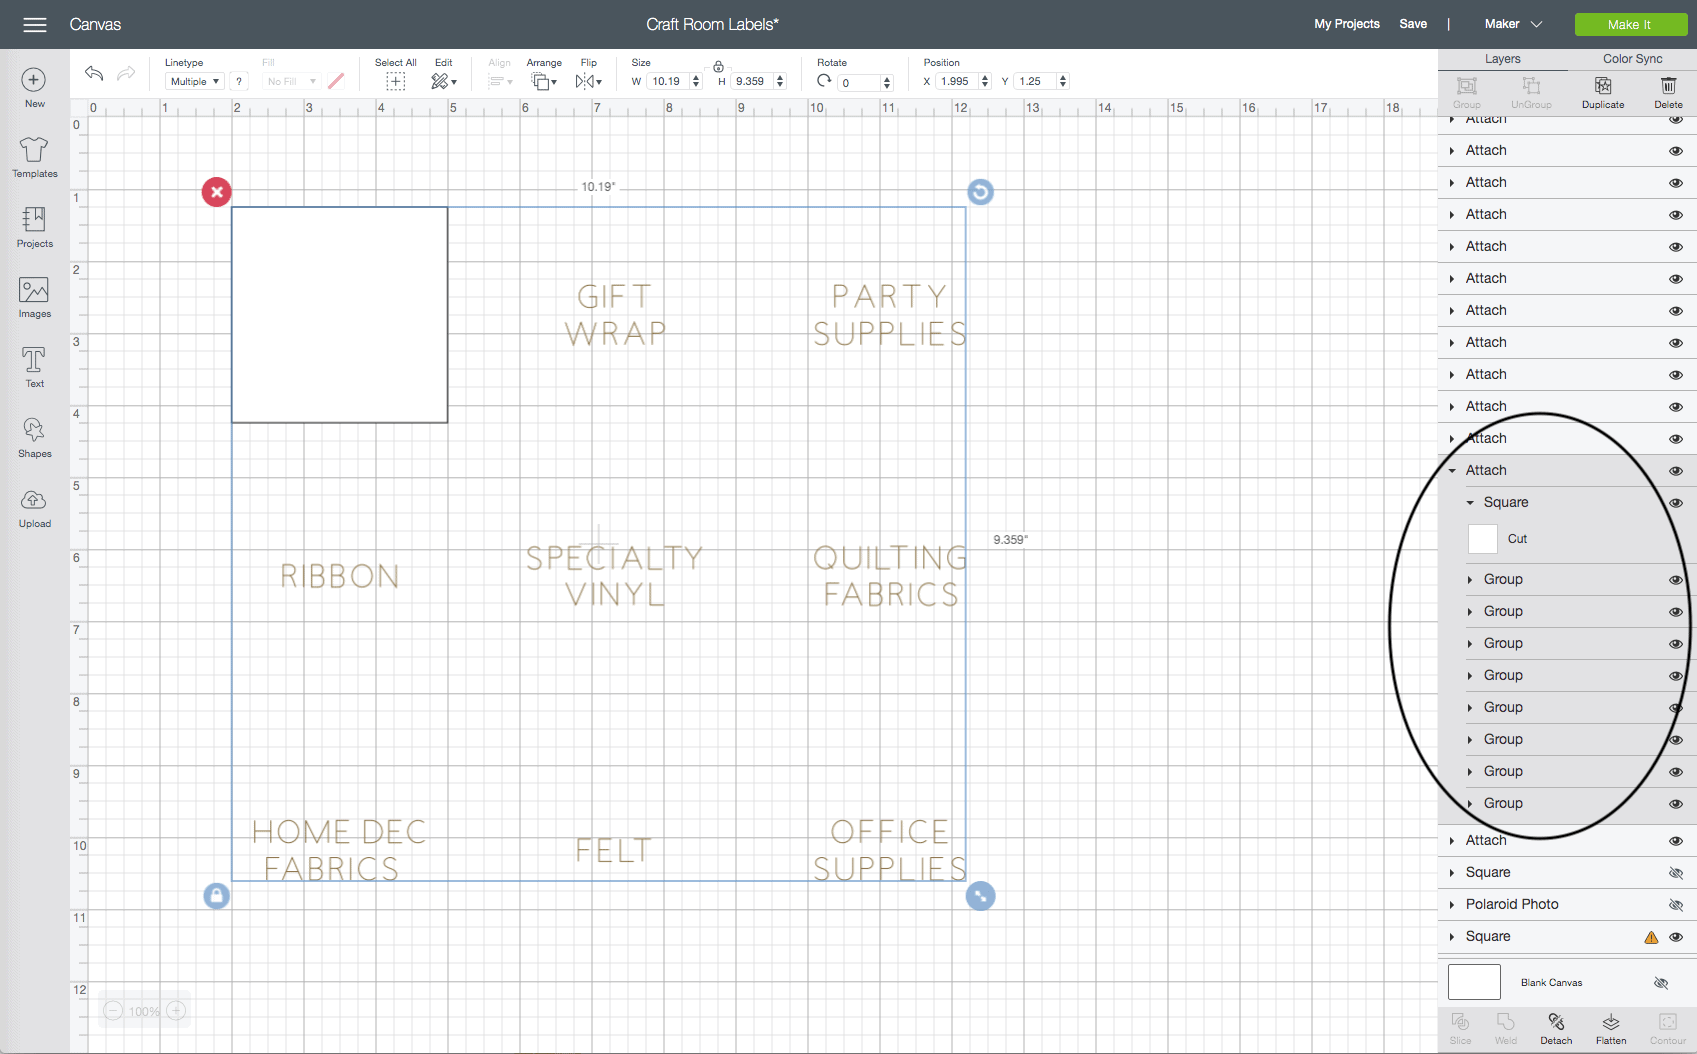
In fact, when you send your design to cut/write via the green “Make It” button, you’ll see that all your specific formatting was precisely maintained. If your words ended all scrunched together in the top corner of your mat, you didn’t “Attach” them!

Now, let’s return to your template. Load in your pre-cut items into the open slots on your mat. Notice, that like on the design screen, I left the upper left-hand square empty.

Want to save this post?
Hopefully, after you try this, you’ll understand why we left that one square blank, but here’s an explanation just in case!
- First, remember that Design Space automatically places designs as far left and up on your cut mat as possible. So if you placed text onto that square and then hid the square (like we did all the other labels), your entire group of words would shift up and left on the cut mat, making it much more difficult to line everything up correctly/exactly. By leaving a single square as a placeholder that will land in the exact same spot every time you send your design to be cut (as far left and up), you can also be sure the rest of your words will land on your pre-cut objects in the exact same spot every single time. Trust me on this one 😉
- Second, that first square is going to be cut again, even though there is no paper there. That’s okay; the blade will not go through your mat (unless you have your pressure set crazy high). But if you had a pre-cut item (like my square label) sitting there, there’s a chance the blade could cut/slice it if your alignment isn’t exact. This could potentially ruin one of your pre-cut objects, so it’s best just to leave it empty!
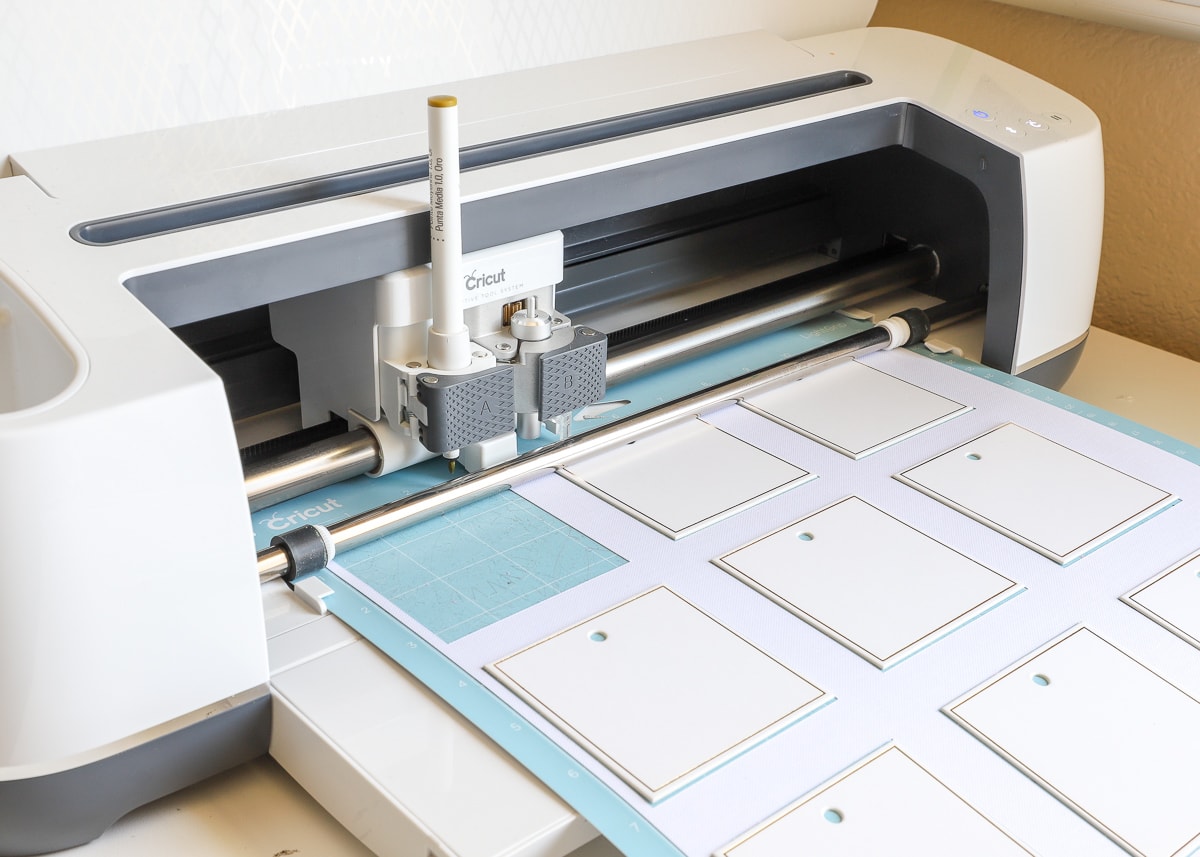
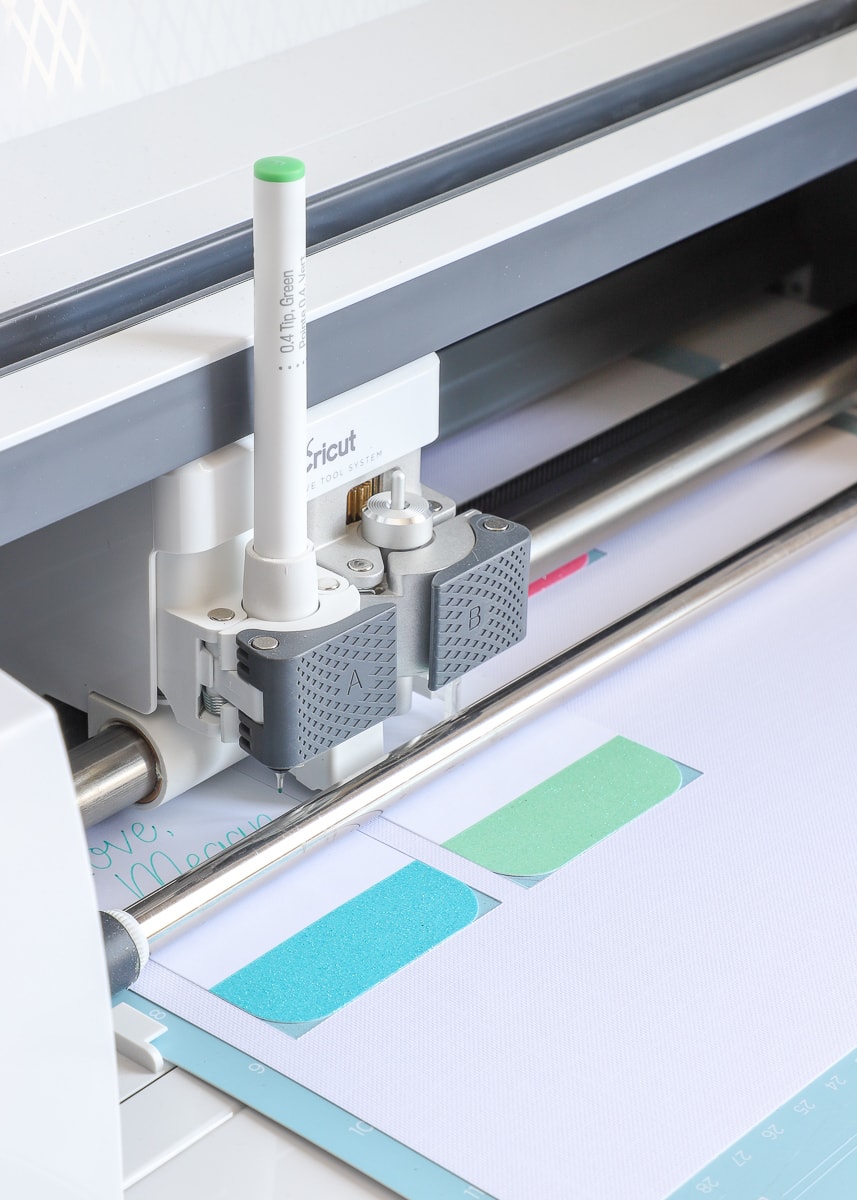
NOTE: Before you load your machine and hit the flashing Cricut button, make sure you move the star paper guides (the small white bands on the very front silver bar) to the side. These guides aren’t problematic if you are working with paper, but if you are using something that is raised/thicker (such as my chipboard tags), they will leave unattractive imprints on your items.
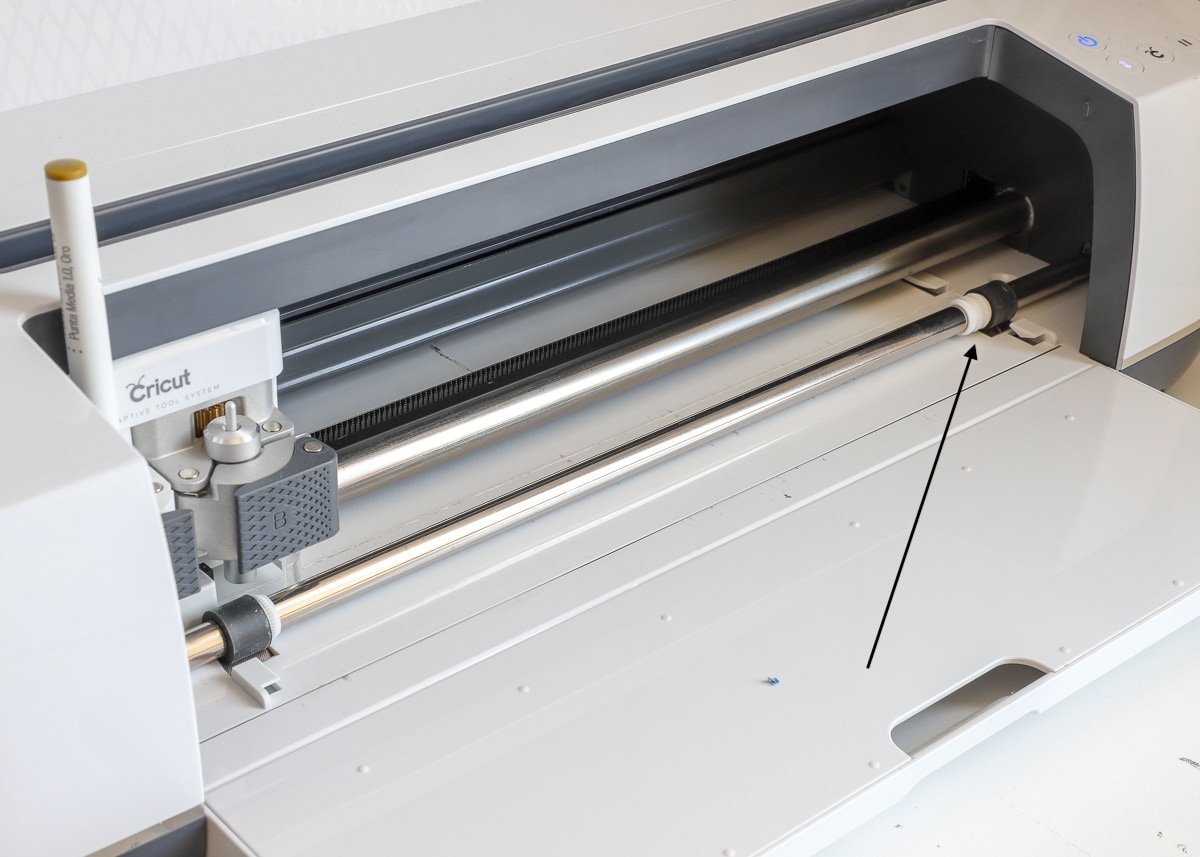
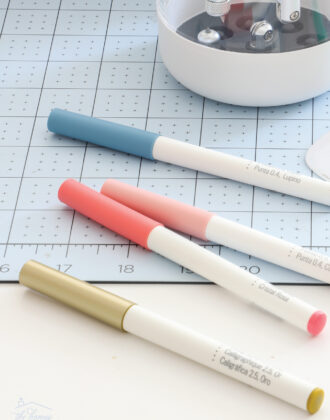
With a (gold) pen inserted into slot A on your machine (I used the 2.0 weight), load your template back into the machine and hit the flashing Cricut button. The machine will then re-cut your single “registration” mark (the upper left square) and then proceed to write directly onto your pre-cut items!
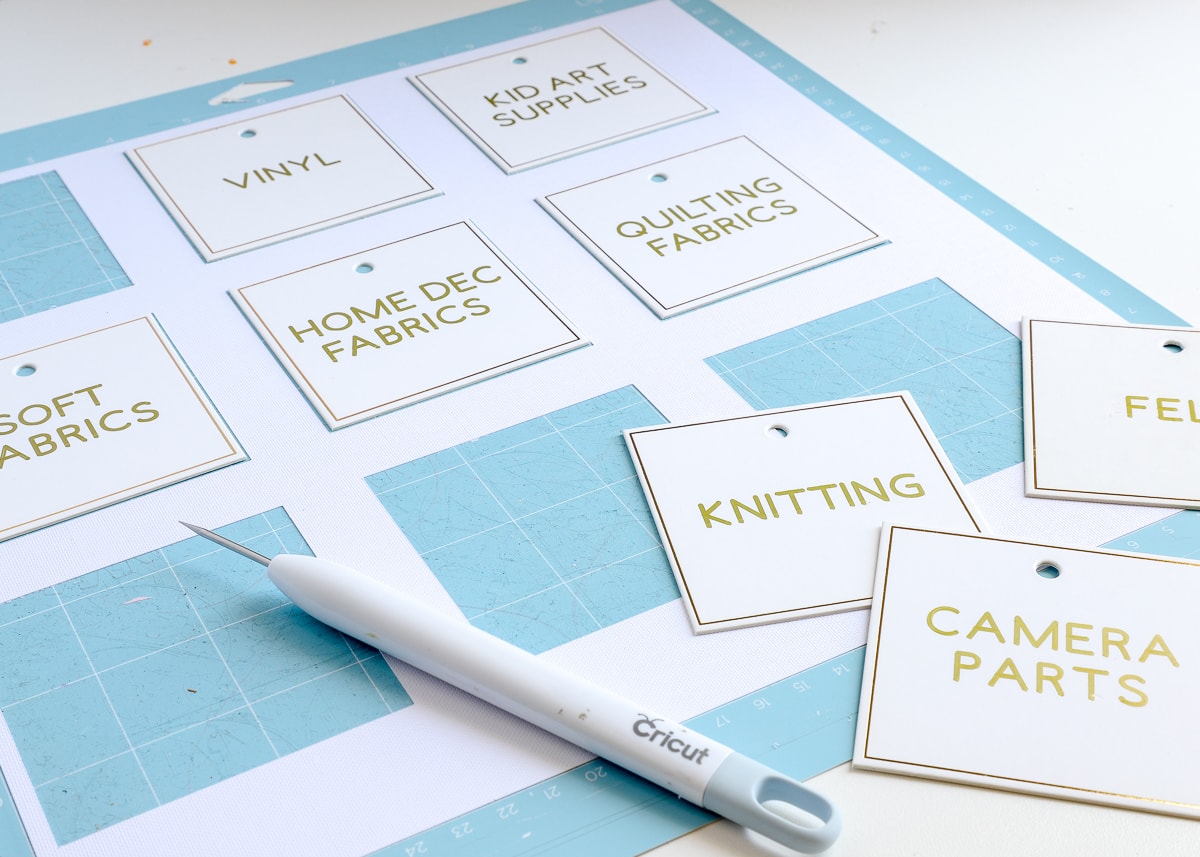
If you have lots of labels to make, simply peel off your tags, re-load your template, swap out the wording in Design Space, and run the mat through the machine again!
Attaching the Tags to the Baskets
The tags I used came “pre-holed,” so theoretically I could just attached them directly to my baskets using brads. However, Sam LOVES to come and pull these tags out (and I have a thing for symmetry), so I added a second hole to the center/bottom of each tag using my handy hole punch kit. This not only balances out the look, but makes them harder to pluck off!
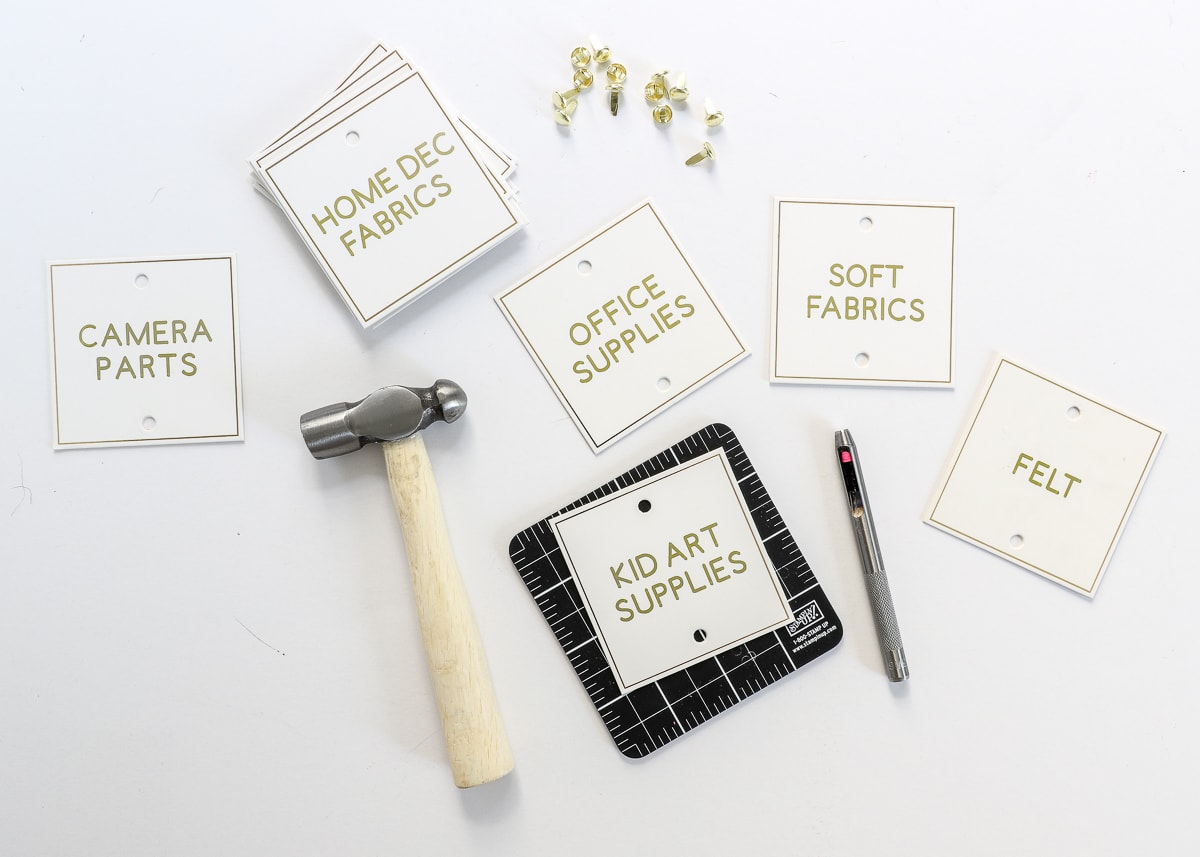
Attaching the labels to baskets with holes couldn’t be easier. Just slide the brads through both the tag and the basket and open on the inside.
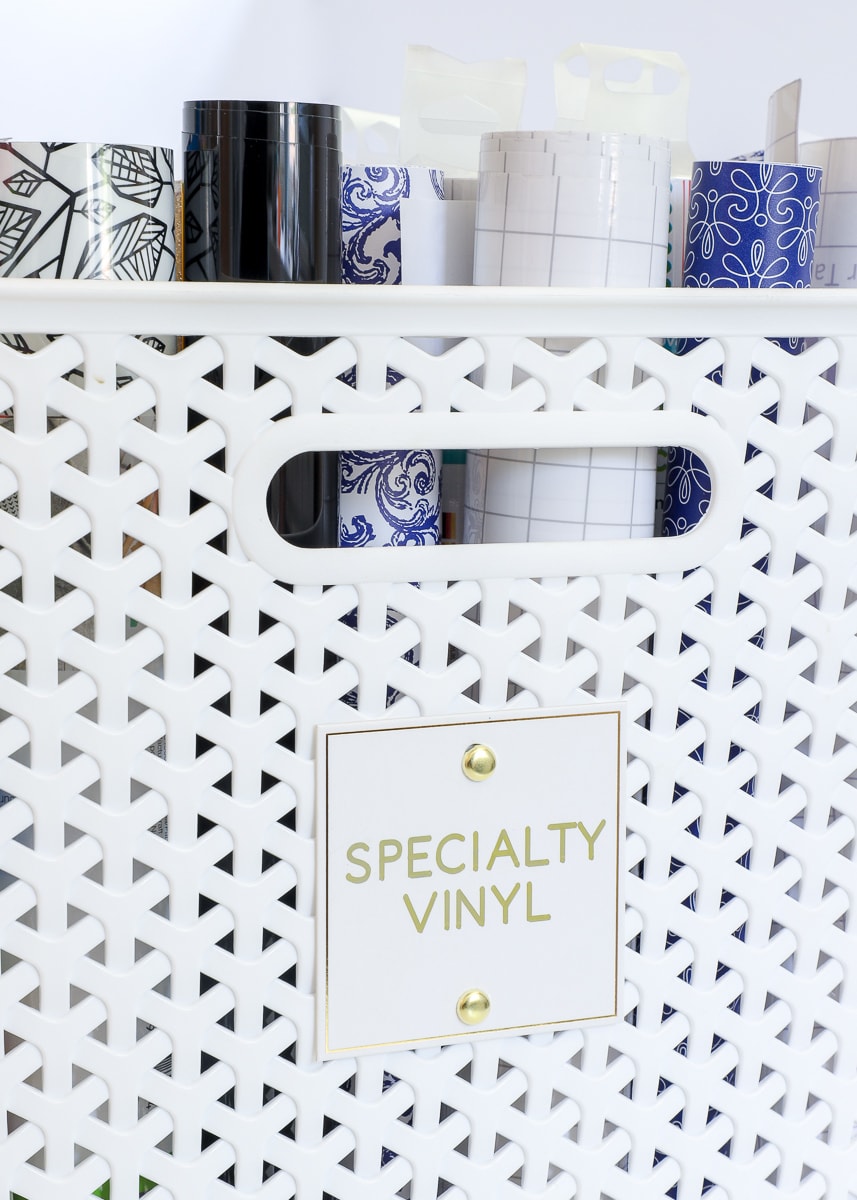
While I could have punctured holes into my DRONA bins (the solid white baskets) to attach the labels, I really didn’t want to damage them permanently (because you guys know I’m always changing my mind about things!). So instead, I just used really strong double-stick tape to attach the labels to the fronts of the bottom white bins. I still added the brads (and opened them flat against the back of the tag) before securing the labels to the bins, so they sure look like they are attached “for real.” It was kind of meant to be a temporary solution but the tape has done a great job holding the tags on, and my bins are still safe and sound!
This Works on Any Shape!
The “template” method I outline here may seem a bit overwhelming as you first read through it. But I promise, if you go step-by-step, it actually isn’t that complicated and gives great results every single time! In fact, I would use this same method to write directly onto any of these labels or tags too. Just think of all the labeling possibilities!
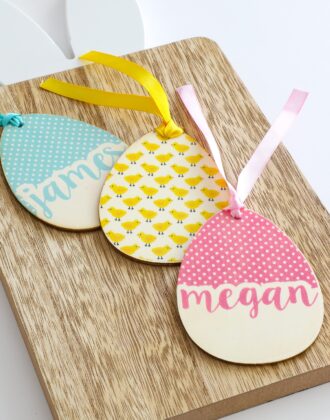
(Btw – These shown below are are all from Michaels…I tend to snag cute ones whenever I see them!)
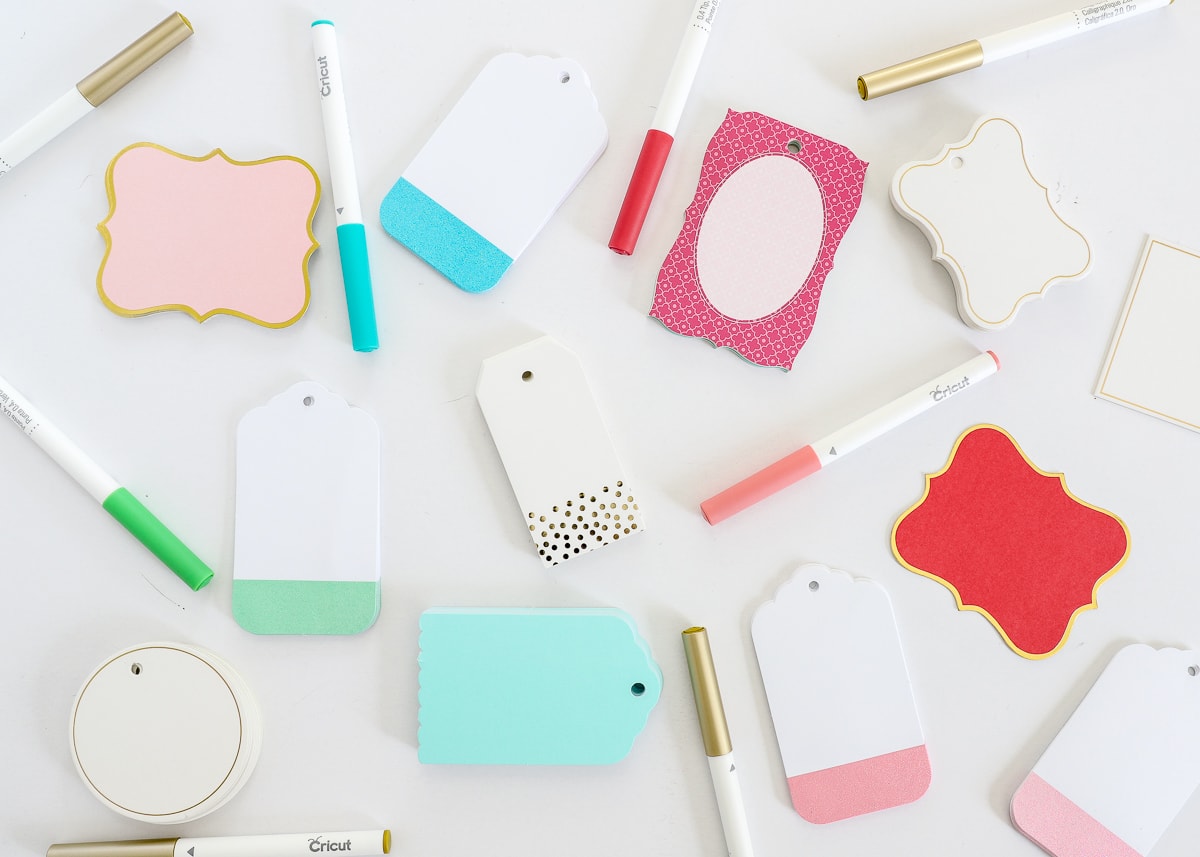
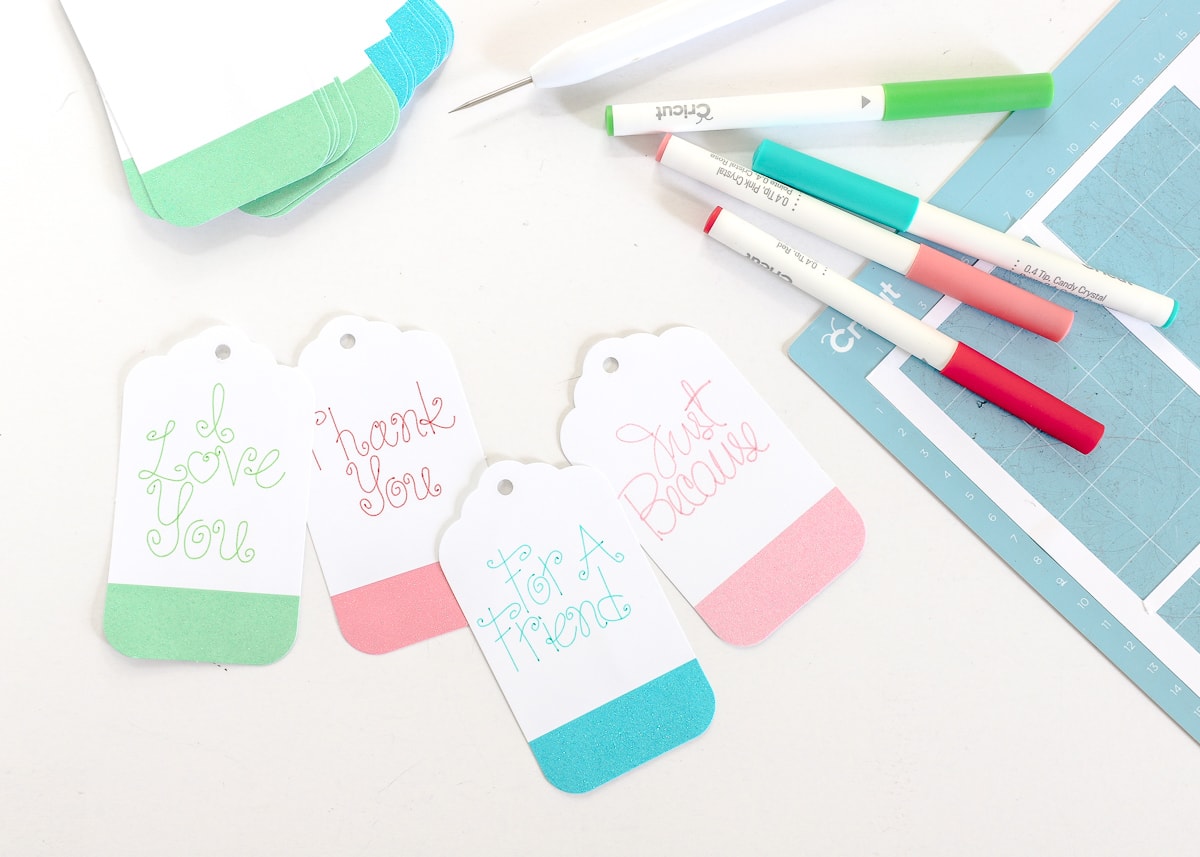
My 3″ squares were a pretty easy shape to write on, but let me quickly show you how I’d write onto a tricker shape like these gorgeous glitter tags from Michaels.
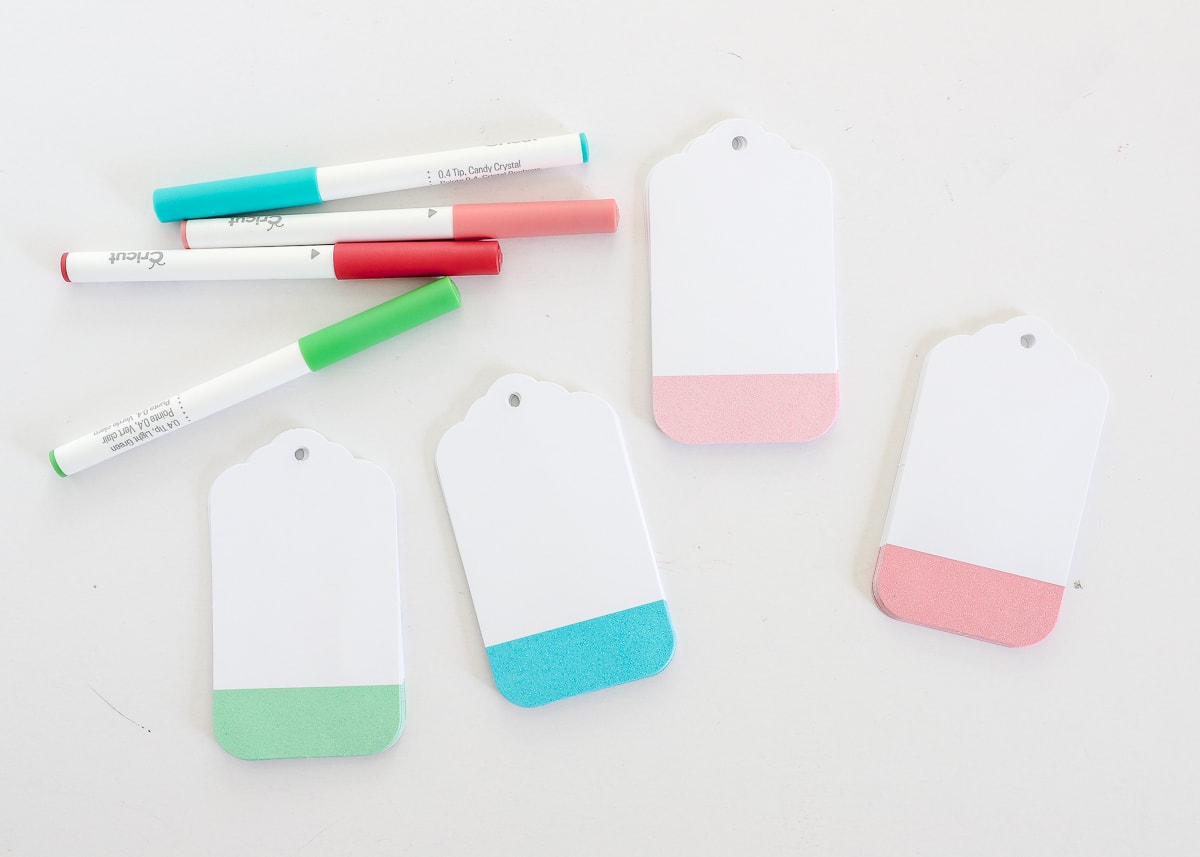
I essentially followed the exact same process; but instead of using a 3″ square, I used a 2.4″ x 4.25″ rectangle (the exact same dimensions as the tags) as my placeholder shape.
NOTE: You don’t need to find the exact shape as your pre-cut item. A square/circle/rectangle sized to the corresponding dimensions will work just great!
- I fit 5 rectangles onto my 12×12″ mat, attached them together, and then cut out the template from cardstock.
- Next, I placed my text onto four of the rectangles, taking into account the hole and glittery stripe along the bottom of each tag.
- Finally. I hid the 4 rectangles (using the eye button in the Layers Panel) and attached the single rectangle and 4 texts together…
Below is how my template looked, which I then loaded with four of my glitter tags…
…I then ran the mat through my machine, swapping my pen color each time the software prompted me to!
In a single run of my machine, I ended up with four gorgeous gift tags with perfectly-fitting and spaced writing!
I know some of you were really hoping these gorgeous craft room labels were a simple printable project like many of my other labeling endeavors. And while I made mine using my Cricut machine, don’t hesitate to pair off-the-shelf tags with pretty markers to get a similar look. Finally, if you’ve been trying to figure out how to place/center text onto something you already have cut out (like invitations, banners, etc), this template method is the best and easiest way to do it!
If something’s not clear here, don’t hesitate to leave a comment. Otherwise, I’ll see you back here on Friday with a final tour of this office/craft space! See you then!
Megan
18 Comments on “How to Write on Tags & Labels With Cricut Pens”
That is absolutely brilliant! And it has given me a good idea of how to approach another project I was thinking about. Thank you so much.
I’m still confused about why you are leaving the first square in the template blank when printing. I am very new at this Cricut thing and have only done the very basic… uploading a design and cutting it out of vinyl. I have yet to try anything else and a lot of the functions of design space are confusing to me at this point.
Tonya
Hi Tonya,
It’s a little hard to explore if you’re not too familiar yet with how Design Space works, but here’s the gist of it:
When you send a design to be cut, it automatically lands on the uppermost left, top corner of the cutting mat. While you CAN move objects around the cut mat (on the cut screen), it’s hard to do so with precision. If you didn’t have that single cut square, all the words would shift left/up and it would be really hard to make sure your labels all end up in the right place. By attaching all the words to the single square cut, the cut will move to the top/left (instead of the word) and all the words will end up centered on the remaining squares.
Again, it’s really hard to explain in words why it helps, but it does!
I know Design Space can be really overwhelming, but I promise it comes easier and easier with each project you make!
Hope that helps!Megan
This is a great tutorial! What would be your suggestion for printing on labels, like Avery labels? I was able to download a “template” from the Avery website, but it uploaded into design space as like an image. Should I just try to line it up on the mat as best as I can and then run a test paper through first to check the allignment? Or is there an easier way? Thanks so much!
Hi Sara,
There isn’t a super easy way, but with some experimenting you can get it to work! You may just need to use trial and error, but admittedly, that can be a little time consuming!
Also, try checking out the end of this post: https://thehomesihavemade.com/2017/06/how-to-print-and-use-printable-stickers/
It shows how I cut circle stickers using an uploaded avery template, which gave me pretty good success!
Hope that helps a bit and good luck!Megan
Very helpful. Your step by step instructions with the placeholder template confirmed what I suspected I would have to do to trick the machine into letting me write on pre printed invitations. You saved me a lot of time and trouble! Much appreciation from one milspouse to another!
I just wanted to say THANK YOU from the bottom of heart for posted this! I struggled finding any sort of tutorial on YouTube that walked through using the Write function with a preexisting label. Your instructions were simple, to the point, and very easy to follow. Now my wedding place cards are beautiful all thanks to you! 💛
Hi Shannon!
I am SOOO happy to hear this tutorial helped you! It’s such a nuance thing to do with a Cricut but I just knew others were struggling to figure it out! Congrats on your wedding!
Megan
Hi!
Wouldn’t this be easier with Snapmat?
I’m fairly new but I did exactly what you said and it didn’t work. Please help me.
Thank so much for your tutorial.
Can you please tell me how to write on blank Avery labels? I want to use my cricut maker and pens to customize some return address labels. Thank you!
Hi! I love your gold labels! What font did you use for this? Thanks!
Hi Kristin!
I used just the basic Cricut Sans font (just make sure you change it to “Writing” under “Style.”
Hope that helps!
Megan
This is exactly what I have been needing to know, Thank you SO much.
This is so so helpful, thank you for the details and instructions.
Well that’s super useful! I use templates in design space all the time, don’t know why I didn’t think of making a template for the mat. Awesome job!
So clever and cute! Thank you!