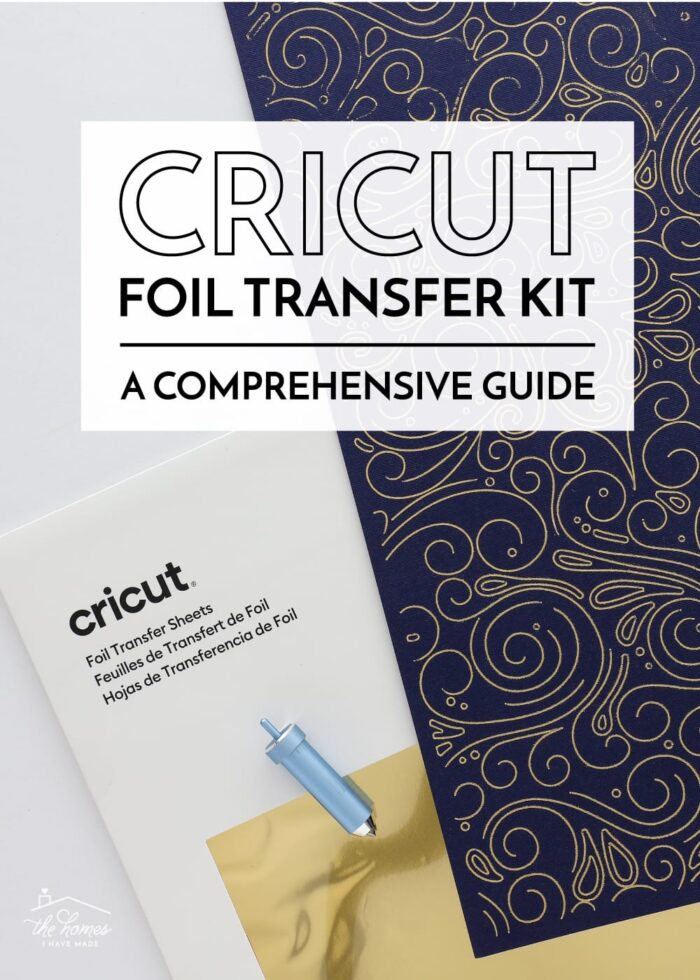
How to Use the Cricut Foil Transfer Kit | A Comprehensive Guide
I’ve got a thing for metallics. One glance around my home shows that I love hints of shiny gold/brass on everything from my frames and label holders to drawer pulls and labels themselves. For years, I’ve tried to add “true” metallic details to my Cricut projects using a variety of pens, shiny papers, and even my laminator. But the results were either “dull” or tricky and tedious to execute. Last year though, Cricut released the Cricut Foil Transfer Kit, making it possible (AND easy!) to get that true, shiny metallic detail on your projects. I’ve spent countless hours playing with this fun new product, and today I am breaking down everything (and I mean EVERYTHING!) you need to know about how to use the Cricut Foil Transfer Kit. Let’s get started!
What Is “Foiling”?
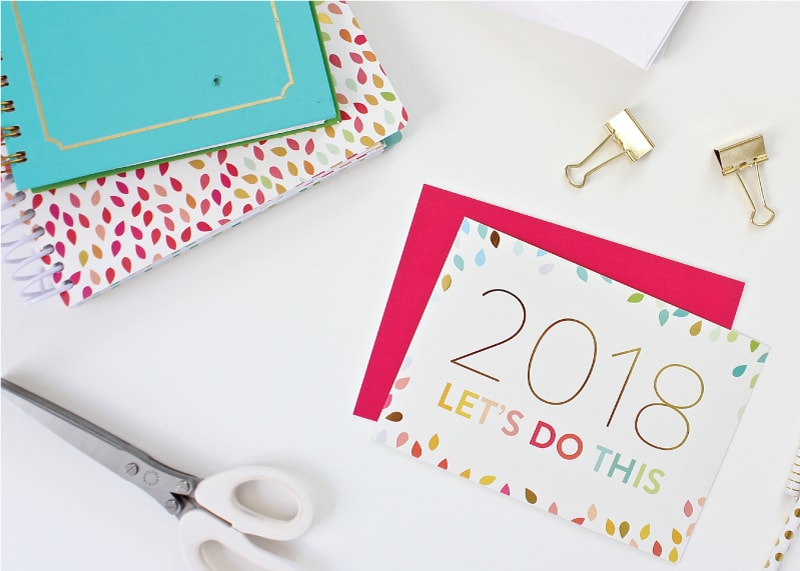
Foil details are elements on paper projects that truly look metallic. They shimmer and shine just like metal; but you’ll find them on everything from fancy calendars and planners to art prints and greeting cards.
Professionally “foiled” paper products
Foiling techniques have long been popular in the crafting, scrapbooking, stamping, and card-making worlds; and now thanks to the new Cricut Foil Transfer Kit, you can add them to pretty much ANY project you are making!
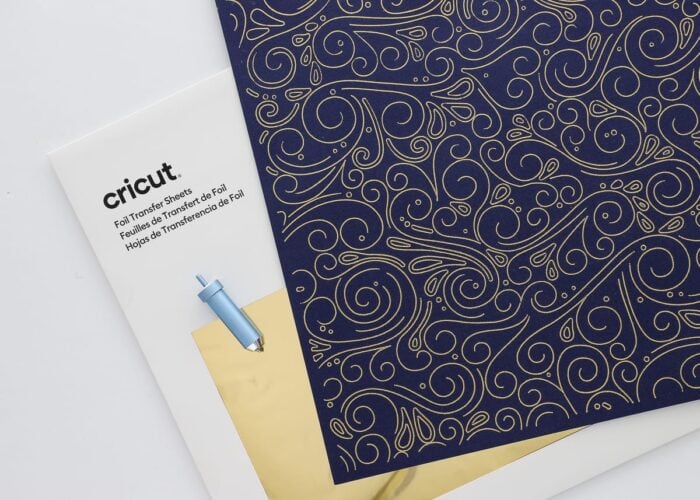
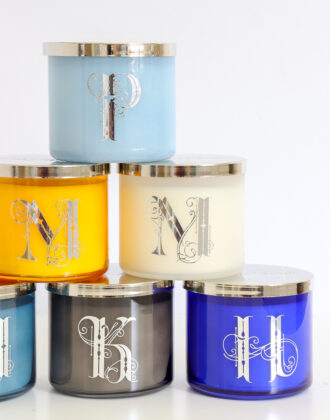
Paper design foiled with the Cricut Foil Transfer Kit
How Does Foiling Work?
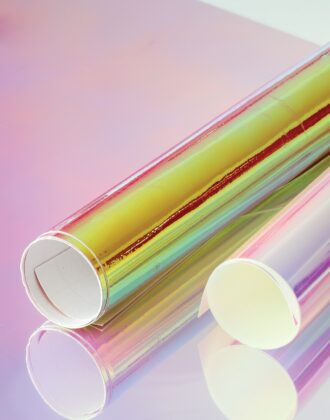
Foil accents (at least on paper) are most typically created using foiling sheets. These ultra-thin, film-like papers have a metallic surface (they are practically reflective) and come in a wide variety of colors including basic metallics (e.g., gold, silver, bronze), but also jewel and pastel hues too. The foil is typically “transferred” to paper by either glue/adhesive or heat.
Gold foil labels with heat-activated foil transfer.
I’ve done heat-transferred foiling before (see the full tutorial HERE), but the Cricut Foil Transfer Kit actually relies on pressure to add foil to your projects. The foil sheets are laid over a base material. A special “stylus”-type tool is inserted into the Cricut machine and “draws” over the foil. The foil is essentially pressed (or transferred) into your paper.
Why Not Use Metallic Pens?
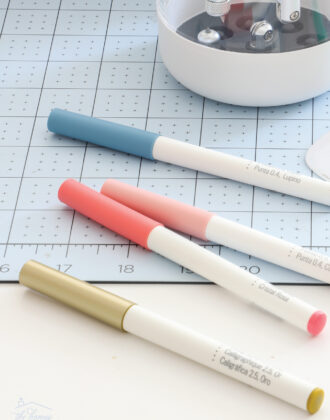
Over the years, I’ve attempted several times to get the “metallic” look on my project via Cricut Pens (specially these gold ones and these glitter ones). Although glitter pens do provide a nice “sheen,” their weight is fine enough that you can’t really see the details on labels or home decor projects. The gold pens aren’t metallic at all, and look more dark bronze or brown (see my labels below). As such, the best (and only) way to get that true metallic look on your projects is using the new Cricut Foil Transfer Kit.
“Matte” gold letters made with Gold Cricut Pens
What’s Included in the Cricut Foil Transfer Kit?
For Cricut Explore & Cricut Maker
The Cricut Foil Transfer Kit is compatible with ALL Cricut Explore and Cricut Maker models (original, 2, and 3-level machines), and includes everything you need to add foil to your projects. Inside the bright green box, you will find:
- The Foil Transfer Tool Housing
- Three interchangeable tips for Fine-, Medium-, and Bold-weight details
- Twelve (12) 4×6″ foiling sheets: 6 silver and 6 gold
- Tape
For Cricut Joy
Cricut just released a Foil Transfer Kit for Cricut Joy! This kit is for the Cricut Joy ONLY and includes:
- Joy-sized Foil Transfer Tool Housing
- One Medium-weight tip
- Twelve (12) 4×6″ foiling sheets: 6 silver and 6 gold
- Tape
Understanding Foil Weights
The Foil Transfer Kit for the Explore/Maker machines includes three tips for three different weights of foiling: Fine, Medium, and Bold. The tips essentially have different size “points,” resulting in different line widths on your project. These tips are magnetic and easily swapped; and are distinguishable via the lines on each tip:
- 1 line – Fine
- 2 lines – Medium
- 3 lines – Bold
![]()
![]()
The Cricut Joy Foil Transfer Kit only comes with one (medium-weight) tip.
Creating Foil Designs in Cricut Design Space
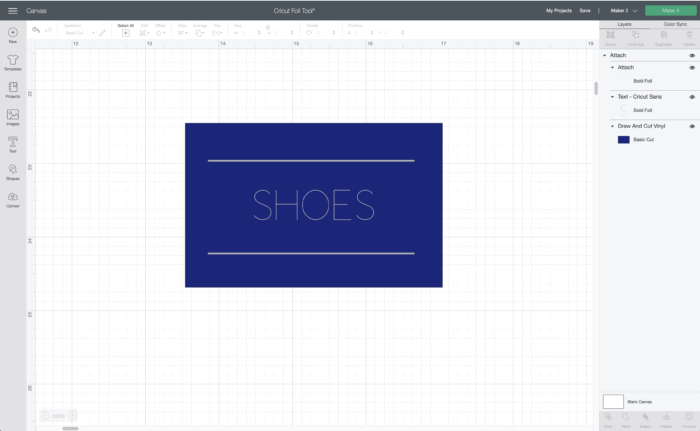
The biggest thing to remember when desinging projects with foil details is that the Foiling Tool functions exactly as a pen would “Draw” or the scoring tool would “Score” (essentially, anything that is a line). For example: if a card has a “Draw” element, you can change that to “Foil.” Instead of creating that fine line detail with a Cricut Pen, it will instead create it with the Foiling Tool.
Finding Good Images for Foiling
When you are just getting started with using the Cricut Foil Transfer Kit, the easiest way to find good images is to look for either “Draw Only” or “Cut+Draw” designs. (You can filter these along the lefthand side in the Image Library). Any image that already has a “Draw” layer (typically designed for pens) can be easily changed to “Foil”.
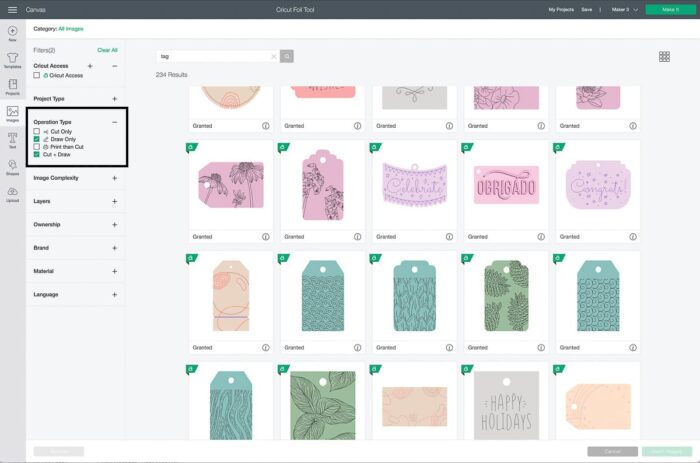
Although these specific images will quickly and easily yield you gorgeous foil designs, you can really set ANY layer on ANY project to be foiled. Keep in mind though, the Foil Transfer Tool only foils lines and does not fill in solid areas with metallic coating.
How to Set Layers for Foiling
Once you place an image on your canvas, here is how to change it to “Foil” to be used with the Cricut Foil Transfer Kit:
- Select just the layer you want foiled in the right-hand layers panel.
- Click on the “Operation” dropdown menu in the top toolbar.
- Under Foil, select the “weight” tip you want to use (more on this below).
- If desired, click on the colored square and change it to the foil color you want to use (more on this below).
- Notice in the right-hand layers panel that that specific layer is now set to “Foil.”
- Repeat for additional layers if needed.
- Finally, if your design is not already “attached,” you will need to select both your base layer and any foil details and “Attach” them together (learn why HERE).

NOTE: Although I am showing how to change from “Draw” to “Foil,” you can technically change pretty much any layer (e.g., Engrave, Cut, etc) to “Foil” as well.
Designating Foil Weights in Cricut Design Space
When you have an Explore or Maker machine selected within Design Space, you will be given the option to designate Fine, Medium, or Bold weight. This designation is VERY helpful if you are using different weights on a single project. In the example below, notice that I have each word and matching flourish set to each weight.
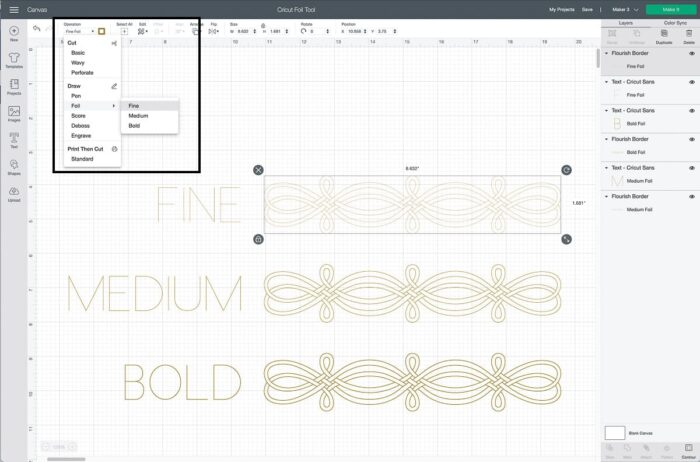
Assigning these weights on the canvas forces Design Space to prompt you to swap tips at the right time (see below). However, it’s important to note that your machine does not know which tip you have inserted. So you can easily override these settings (intentionally or accidentally) by placing whatever tip into the Foil Tool Housing.
Designating Foil Colors in Cricut Design Space
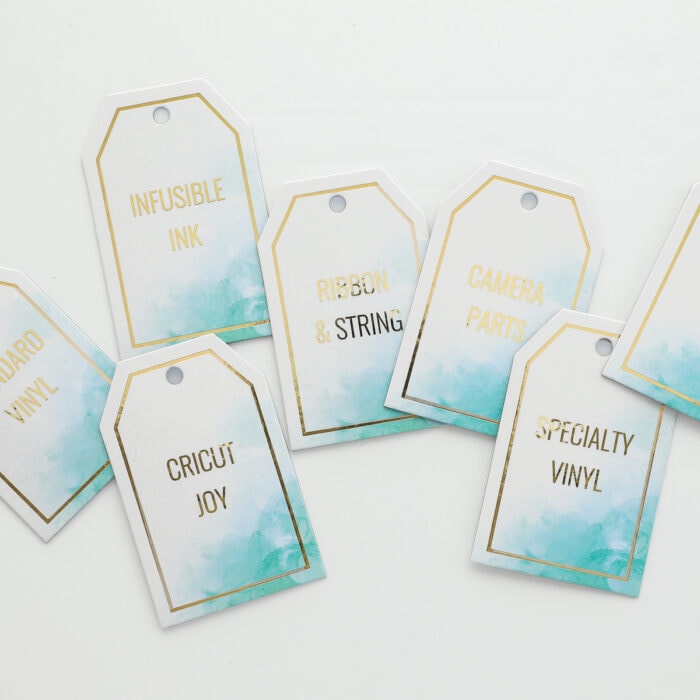
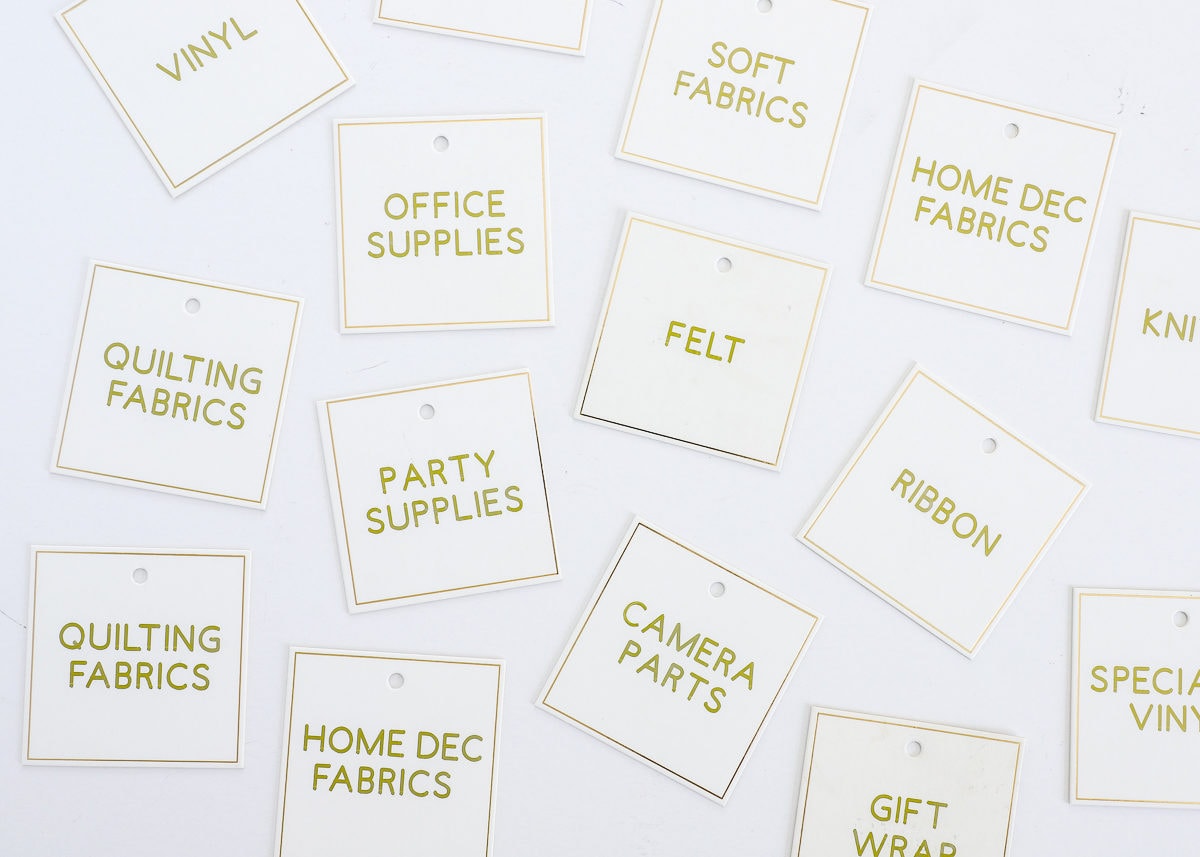
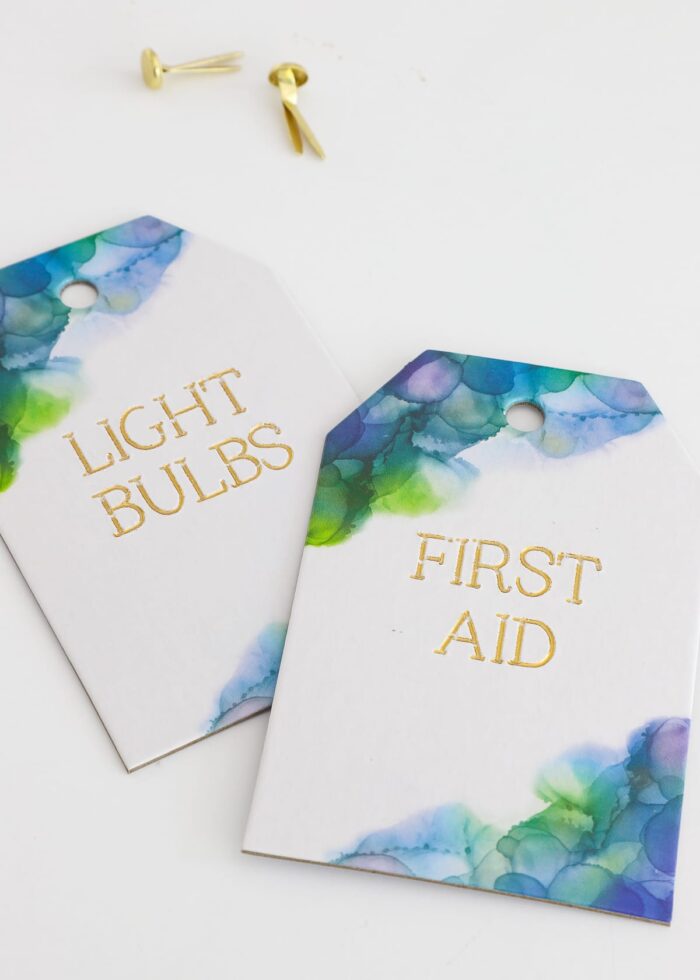
Similarly, you can designate what color foil transfer sheet you want for each layer by clicking and changing the colored square within the Operations menu. Like the foil weight, this is really helpful if you want to use different foil colors within a single project (e.g., like the four gift tags below).
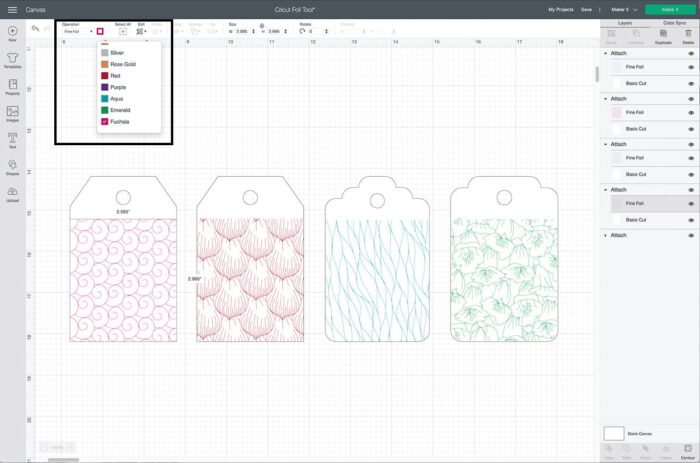
When you designate the color foil, Design Space will prompt you to change the foil sheet at the right time so that the correct detail is foiled in the right color.
![]()
![]()
But like the foiling tips, your machine doesn’t know what color foil you have taped down on the mat. So even if you have it set to Gold (the default), you can easily place a red sheet down instead. Essentially, if you are foiling a single color, the color designation is not important. If you want different parts of a single design in different colors, be sure to set the color by layer.
Supplies Needed for Foiling Projects
To add foil to any project, you will need the same set of materials:
![]()
- Cricut Explore, Cricut Maker, or Cricut Joy
- Cricut Foil Transfer Kit – be sure to get the correct kit for your machine
- Base material – Usually paper, cardstock, posterboard, but you can also use this tool on faux leather, writable vinyl, and more.
- Foil Transfer Sheets in whatever size/color you want*
- 4×6″ Foil Transfer Sheets
- 12×12″ Foil Transfer Sheets
- Tape**
* The Foil Transfer Kits DO come with 12 foil transfer sheets in gold and silver so you can make some projects without buying additional foil sheets.
**Also included with the Foil Transfer Kit AND any packs of Cricut Foil Transfer Sheets
How to Use the Cricut Foil Transfer Kit on a Project
Okay! I’ve covered all the foundational elements of creating foiled projects. Let’s walk through a project from start-to-finish so you can see how the Foil Transfer Tool actually works on a project!
Want to save this post?
Step 1: Design Your Project
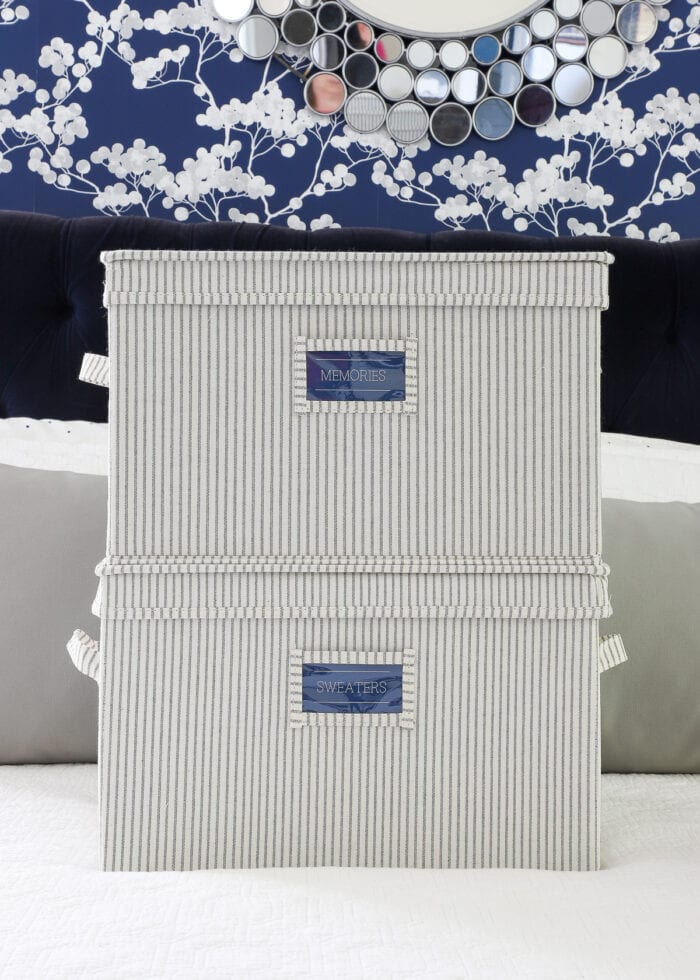
Start by creating your foil project in Cricut Design Space. I’m going to use my recent master closet labels as an example. It is very important that you designate the correct “Operation” for each and every layer. In the project below, notice how my words are set to “Foil” and the outside shape of my labels set to “Cut.”
Step 2: Prepare Your Mat
Once your project is ready to be created, you need to prepare your mat in a very specific way for foiling. Your Cricut machine will ALWAYS foil first (before any other operation), so you will need to do the following:
Place your base material onto the correct mat for your project (e.g., Cardstock onto a Green mat, paper onto a Blue mat, etc). Next, use a scissors or paper trimmer to trim down a single Foil Transfer Sheet to a size that will perfectly cover your design.
![]()
NOTE: If you are doing a large design, you might not need to trim down the foil.
Place the trimmed Foil Transfer Sheet on top of your base material, ensuring that it is in the exact same area(s) as the foiled elements of your design (refer to your Cut Preview screen in Design Space if necessary). Then, use the included tape to secure the Foil Transfer Sheet to the mat all the way around. When possible, stick the tape to the mat and not your base material.
![]()
TIP! Because of static cling between the tape and the foil sheet, it can be tricky to get the foil to lay perfectly smooth. Don’t hesitate to peel up the tape and re-lay everything flat. Even if you do have a little wrinkle, you can still run the project through your machine.
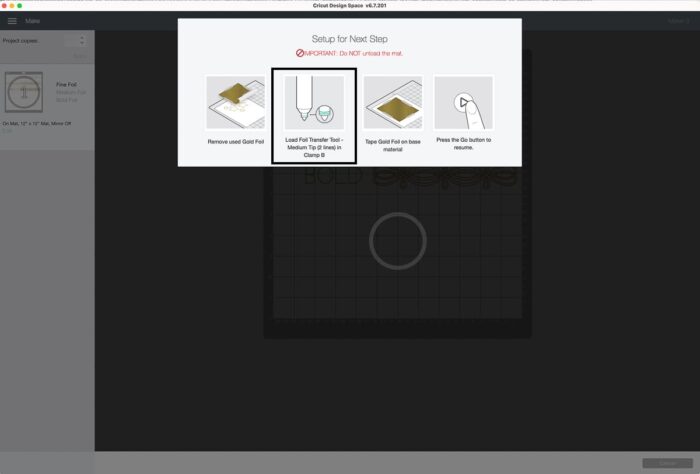
Step 3: Load the Machine
Follow the prompts from Cricut Design Space to load the Foil Transfer Tool and prepared mat into your machine. Make sure you have the correct tip inserted into the Transfer Tool Housing.
![]()
Step 4: Run the Foil Tool
When prompted, click the flashing “Go” button to run the foiling operation of your design. When complete, you will see your entire foiled layer “pressed” into the foil transfer sheet.
![]()
Step 5: Remove the Foil Transfer Sheet & Foil Transfer Tool
This next step is the most important part of the entire foiling process. Without unloading your mat, un-tape and remove the foil sheet from your project.
![]()
Also remove the Foil Transfer Tool from the machine.
![]()
Step 6: Continue to Follow Design Space Prompts
The foiling step of your project is now done. To complete your project, continue to follow the prompts in Cricut Design Space. In most instances, this will involve inserting the Fine Point Blade and clicking the flashing “Go” button to cut out the remaining elements of your design.
![]()
Step 7: Unload the Mat
Only once all the various operations are complete (e.g., foil, draw, cut, etc), you can unload the mat from the machine and finish/assemble your project!
![]()
Tips & Tricks
I’ve spent a lot of time over the last few weeks experimenting with the Cricut Foil Transfer Kit on a variety of projects. In addition to all the steps outlined above, here are some other things to try in order to get your projects to turn out perfectly!
Design Position On the Mat
Sometimes the tape/foil transfer sheet can be hard to remove (mid-project) if they end up under the machine’s feeders/rollers. Since you must remove the Foil Transfer Sheet from your project without unloading the mat, I found it best to position your design on the lower part of the mat (when possible). This way, no tape is caught under the machine and the foil sheet can be easily removed without unloading.
![]()
My Foil Lines Aren’t Smooth, What Did I Do Wrong?
If your foil lines don’t end up clean and smooth, it is most likely due to a wrinkle/bubble in the Foil Transfer Sheet. For this reason, do your best to get the Foil Transfer Sheet perfectly flat against your base material. You can also try increasing the “Default” pressure for the Foil Tool setting.
Do I Really Need to Tape the Foil Transfer Sheet All the Way Around?
Yes! I learned this the hard way. I like to conserve both material and time whenever I can, so I attempted quite a few projects with only partially taping the foil down. Sure enough, the pressure of the Foil Transfer Tool dragged the Foil Transfer Sheet right along with it, resulting in horrible transfer. To get the best/cleanest results, tape all the way around the foil transfer sheet.
![]()
Can I “Re-Foil” a Project?
In the event that you aren’t satisfied with a particular part of your project, you can attempt to re-foil it only if you haven’t unloaded your machine. You will first need to let your entire project complete (to include cutting, drawing, etc). Once the project is done, do not unload your mat. Lay a fresh piece of foil in the correct areas and click the flashing “Go” button to re-start the entire project again. Once the foiling is complete, unload the mat without running the cut/draw operations of the project.
![]()
The Tape Is Tearing Up My Paper
The tape that comes with the Cricut Foil Transfer Sheets is super sticky. When possible, adhere the tape directly to the mat (off your project). If you need to stick the tape directly to your paper, first “de-stick” the tape slightly by sticking it to your shirt, pants, or scrap paper before sticking it to your project.
What are the Best Color Combinations?
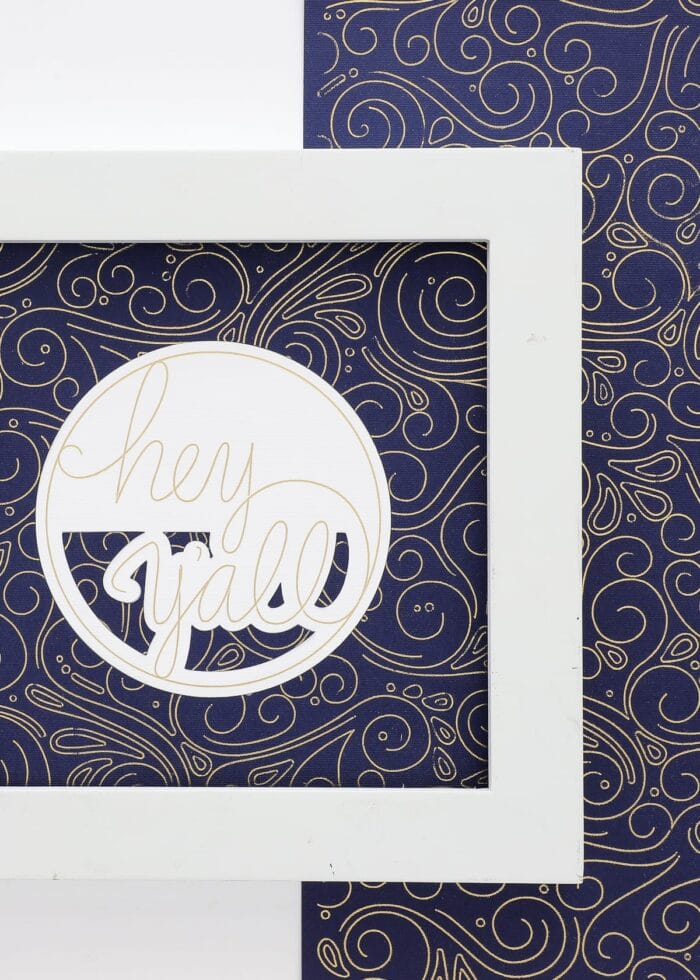
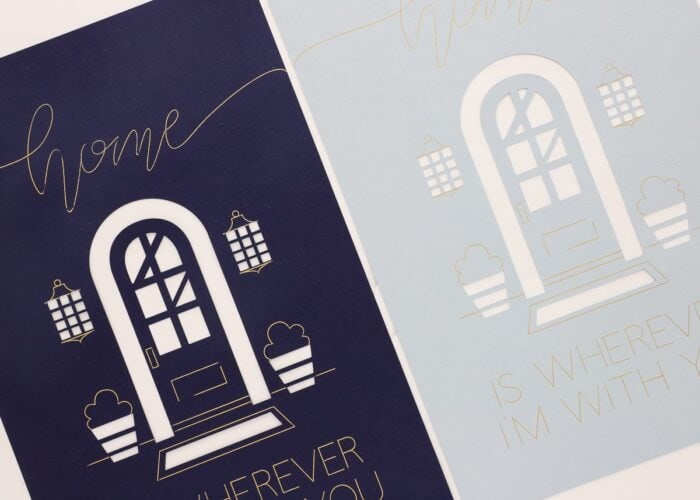
You can technically transfer any color of foil onto any color of base material. And while you can technically “see” the gold foil on any color when the light shines a certain way, I did find that you get the best results when there is high contrast between the foil and the base material. For example, below I did the exact same design on navy cardstock and light blue cardstock. Although the line thickness is exactly the same, the foil details show up much better on the darker paper.
I Forgot To Switch Blades, What Do I Do Now?
Unlike other blades on the Cricut Maker, the Foil Transfer Tool is not “detectable” by the machine detection tool. As such, if you aren’t paying attention, there’s a chance you’ll forget to swap your blade. Do your best to follow the prompts in Cricut Design Space before ever clicking the flashing “Go” button. But if you do forget to replace the blade, you can try the following:
- Let the entire project finish with the Foil Transfer Tool or no tool inserted
- Don’t unload your mat
- Take all tools out of the machine and re-run the project by clicking the flashing “Go” button. The machine will re-run the foil operation with no tool in the clamp.
- When prompted, then insert the Fine Point Blade to finish cutting the project.
What Happens If the Foil Sticks to My Mat?
If the Foil Transfer Sheet accidentally comes into contact with a mat, the stickiness of the mat will pull the foil off and onto the mat. Simply use a Scraper to remove the foil and continue to use your mat as normal.
![]()
FAQs
What Machines Can Use the Foil Transfer Kit?
- All models of the Cricut Explore and Cricut Maker can use THIS Foil Transfer Kit.
- The Cricut Joy can use THIS Foil Transfer Kit.
Do I Have To Use Cricut Brand Foil Sheets?
I believe so. Most non-Cricut foil sheets are heat activated (rather than pressure activated) and will likely not give you good results. I have a bunch of Deco Foil Sheets, which are designed to be heat activated. I could not get them to transfer to paper using the Cricut Transfer Tool.
Can I Re-Use Foil Transfer Sheets?
You cannot re-use areas of a Foil Transfer Sheet that have been “used,” meaning there is no longer foil on the area the machine drew. You can certainly cut away clean/un-used areas on bigger sheets to use on smaller projects.
Can I Use the Foil Transfer Kit “Matless” with the Explore 3/Maker 3?
No. In order for the pressure and settings of the Cricut Foil Transfer Kit to work properly, Cricut recommends stabilizing any Smart Materials on a mat first.
Can I Only Foil Paper?
The Foil Transfer Kit is best used on paper products. I’ve successfully used it on paper, Smart Paper Sticker Cardstock, posterboard, and chipboard.
I did a test on Smart Label (writable vinyl) and my sample label turned out pretty good (below); and I’ve also seen it used on Faux Leather. However, I tested foiling regular vinyl and the letters didn’t transfer at all!

I am so excited about this new capability to add gorgeous metallic details to my projects. I tried my absolute best to cover everything you need to know when using the Cricut Foil Transfer Kit. If you have any additional questions or run into issues, don’t hesitate to leave questions/comments below and I’ll help the best I can! Happy foiling!
Megan
15 Comments on “How to Use the Cricut Foil Transfer Kit | A Comprehensive Guide”
Bless you for this post!!!!! I was ready to pass on my foiling kit after some disastrous results last fall. You have given me the confidence to give it another try!
If you ever experiment with foiling on leather or fabric, please share your findings, tips and tricks. My first (and only) attempt at foiling was on leather for some last-minute Thanksgiving napkin rings. The foiling “skipped” – the lines were not solid using all three tips. I would love your advice before I try leather again.
Thanks for another great blog post!
Hi Jill!
I’m so glad you found this post helpful and that it motivated you to try the Foil tool again. I have not yet tried it on anything other than paper. But when I do…I will definitely keep you posted what tricks I figure out!
It can be a little “temperamental” in general, so keep working at it until you find some techniques that work for you because the results are so great!
Thank you for the tip to place the project at the bottom of the mat. I have run into the problem of removing the foil from my project when it is at the top. Why didn’t I think of that 😊. Thank you for troubleshooting all angles of foil transferring.
@Jill – I forgot to mention that I have never tried the Cricut foiling kit on leather, but I have used iron-on metallic vinyl on leather to make a bunch of personalized gift tags for a women’s group and they turned out awesome! The font we wanted to use was thicker than any of the foil transfer tips could produce. I was afraid the heat might hurt the leather (which was real leather we purchased from Tandy Leather) and it had no ill effects at all. However, after looking at all of the beautiful designs Megan used in this post, now I’m itching to go find a scrap of the leather (which has a pretty smooth finish to it) and try the Cricut foil transfer kit on it!
Oops it looks like my original comment didn’t go through! Thank you, Megan for such a great post! You thought of everything! I’m so grateful for your time and efforts.
Help! I’ve been struggling to use the foil transfer sheets on different types of cardstock papers, like textured linen cardstock paper. I really love the foil tool kit and how it looks on my designs, but it sucks that I am limited to one type of texture. Is there any way to solve this issue without transferring foil in alternate ways?
p.s. I adjusted the pressure to from “normal” to “more” and still made no difference. If anyone else encountered this issue, please help!
Hi! I have a very exact project that needs the foil to be in the exact position and even though I’m attaching its millimeters off?
In the top example — gold foil on navy cardstock — it looks like you have a border that isn’t foiled. I am trying to use a pattern that sits side-by-side in order to fill the space and not have the design be huge. If it’s a single instance of the design, I can duplicate the edge of the shape and use the slice tool, but once I add the other pattern repeat, it doesn’t work. I’m assuming, in that swirly design at the top, you had to piece a couple images together at the pattern repeat.
What am I doing wrong?
Hi Melissa!
So sorry for the delay in getting back to you here! Were you able to get this figured out? If not, I’m having a bit of trouble picturing your project. Can you send me some more details?
Thanks,Megan
Hi
I have used bold tip for first time, and it was working very well, but in second time to make same thing, it didn’t transferred image as it should be, and it outputted very weak (it is not complete image, some outlines are missing), and I tried for several times to make it, and in every time I taut my foil sheet very well to ensure no any winks or any bulges , putted all star wheels on right side, and putted tape around all 4 sides with whole pieces of tape strips, and although I have tried to replace tip with new one, but the problem is still as it, form where the problem do you think?
Hi Ayman,
Sorry for the late reply but did want to get back to you with a few thoughts.
First – the Foil Tool can be VERY temperamental, so it working on one run and not the other just seems to happen sometimes.
Another thing to try is switching which Design Space you’re using. Lately, I had a really big issue with a print-then-cut design, and the only way I got it to work properly was run the project from the app and not the desktop version. I have no idea why there was a difference but it might be something to try.
Finally – have you manually adjusted the pressure of the foiling tool (on the final cut screen)?
Hope that gives you some help – keep me posted!Megan
Hi! Have you tried using the Cricut foil transfer tool/kit with a Maker 3 on bonded fabric?
I know fabric (except faux leather) is not listed on Cricut’s suggested materials for the foil transfer (not heat transfer foil- but the foil Cricut tool) and I’m really surprised by it. So I was wondering if you had experimented with it and whether it worked.
Thank you!
Hello! Love the information you’ve provided. Question though, my cricut maker 3 goes for pen first then foil. Is there a way to change the order?
Thanks!
Hi! Could the foiling tool be used to score?
Your foil info is great. I haven’t seen anyone give such wonderful hints and suggestions in such a cohesive form.
Thans so much.