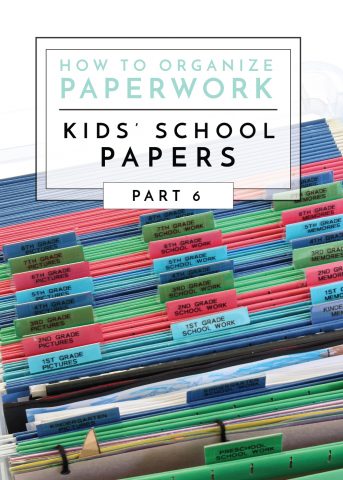
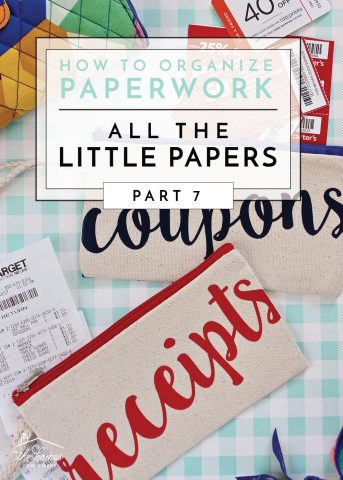
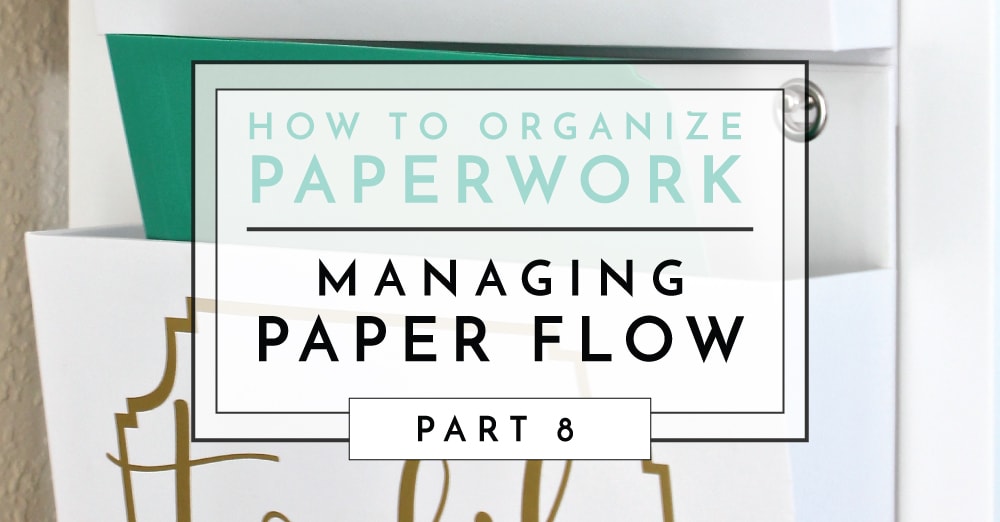
How to Organize Paperwork | Part 8: Managing Household Paper Flow
At the beginning of the summer, I launched a blog series to help you conquer all of the paper clutter in your home. To date, we’ve worked through household files, craft papers, important documents, kids’ school papers, kitchen papers, shopping papers and sentimental papers. If you’ve been following along and keeping up, by now all the paper in your home should be sorted, purged, assessed and contained into perfectly suited storage systems. You should know where everything is, how it’s organized, what’s on the label, and how to access it…and all the remaining papers should have long been trashed or shredded. All of the papers in your home are now organized…or are they? In the time since you started this journey, have new papers come in? Is there a stack of mail sitting on counter? Registration paperwork from this year’s school activities piled on your desk? A recipe you just tore out of a magazine clipped to the fridge? Probably. Because although we’ve thoroughly worked through all the papers in your home, we haven’t yet talked about how to manage the new papers that come in each and every day. In order to truly have your paperwork under control and into the systems you’ve worked so hard to create, you will need to setup a system to manage your household paper flow…that is, how a paper gets from the door to where it ultimately belongs. Let me show you our “Household Inbox” system and walk you through setting up a similar system in your own home!
Getting It Wrong
Over the years, I have been somewhat “known” for my command centers. I’ve setup up some pretty cool ones over the years, and there’s even a good chance you are reading my blog today because of features of my command centers somewhere else on the web. I always designed our “command centers” to be our family’s central spot for corralling not only hats, bags, and shoes but also important paperwork, to-do’s, our family calendar and more. In each and every center, I always setup a super cute mail/paper organization system that usually featured files or dividers for each family member as well as other important categories such as shred, trash, file, catalogs, receipts, etc.
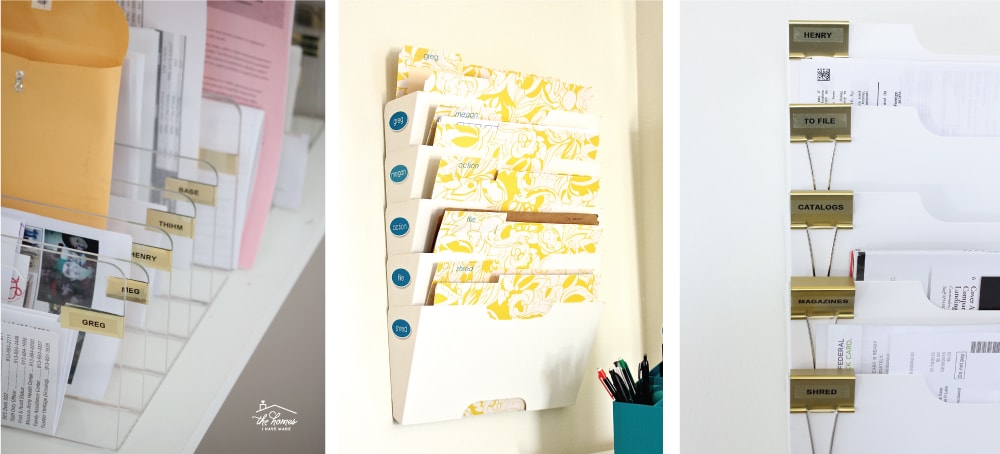
Kansas Command Center | North Carolina Command Center 1 | North Carolina Command Center 2
But can I tell you a secret? Despite the best of intentions to keep up with my super adorable files, I never did. Either incoming papers (from the mail, school bags, etc) were placed into their correct folders and then stayed there, or papers never made it into the too-tedious system in the first place (and just piled up on the counter as a result). In the end, these systems never amounted to much more than pretty pictures and un-used clutter in our homes.
As I look back at these systems, it’s not that their setup or functionality was all that off-base. Rather, they were just more complicated than they needed to be. I placed too many steps between the door (where papers came in) and their final place (filing cabinet, trash can, shredder, etc). Instead of placing papers right into the trash, they were put in a “Trash” or “Shred” folder. Because the folders were so specific, I could never really remember if Henry’s school registration was put into the “Henry” folder or the “File” folder! As a result, papers just sat in these command centers piling up rather than being really dealt with and ultimately organized and accessible.
Does this sound familiar to you? Somewhere along the way did you buy some cute mail sorting system but could never make it work? Does it have a dozen or so papers from a year ago in it and nothing else? Or maybe it’s empty? It’s okay…I did this too…several times even! Let’s fix it into a system that works and will be used!
Reduce the Paper
Before we get into the nitty gritty of managing the paper that does come into the house, let me first briefly discuss reducing the amount of paper you have to deal with. More and more things are becoming available in digital formats, and I suggest you embrace them whenever possible. From bank statements and bills, to school flyers and activity registrations, travel documents and reservations to receipts and transaction history…when you have the option to sign-up for paperless billing or electronic communication, do it simply to reduce the amount of paper you ultimately have to manage.
Step 1: Create a Single Household Inbox
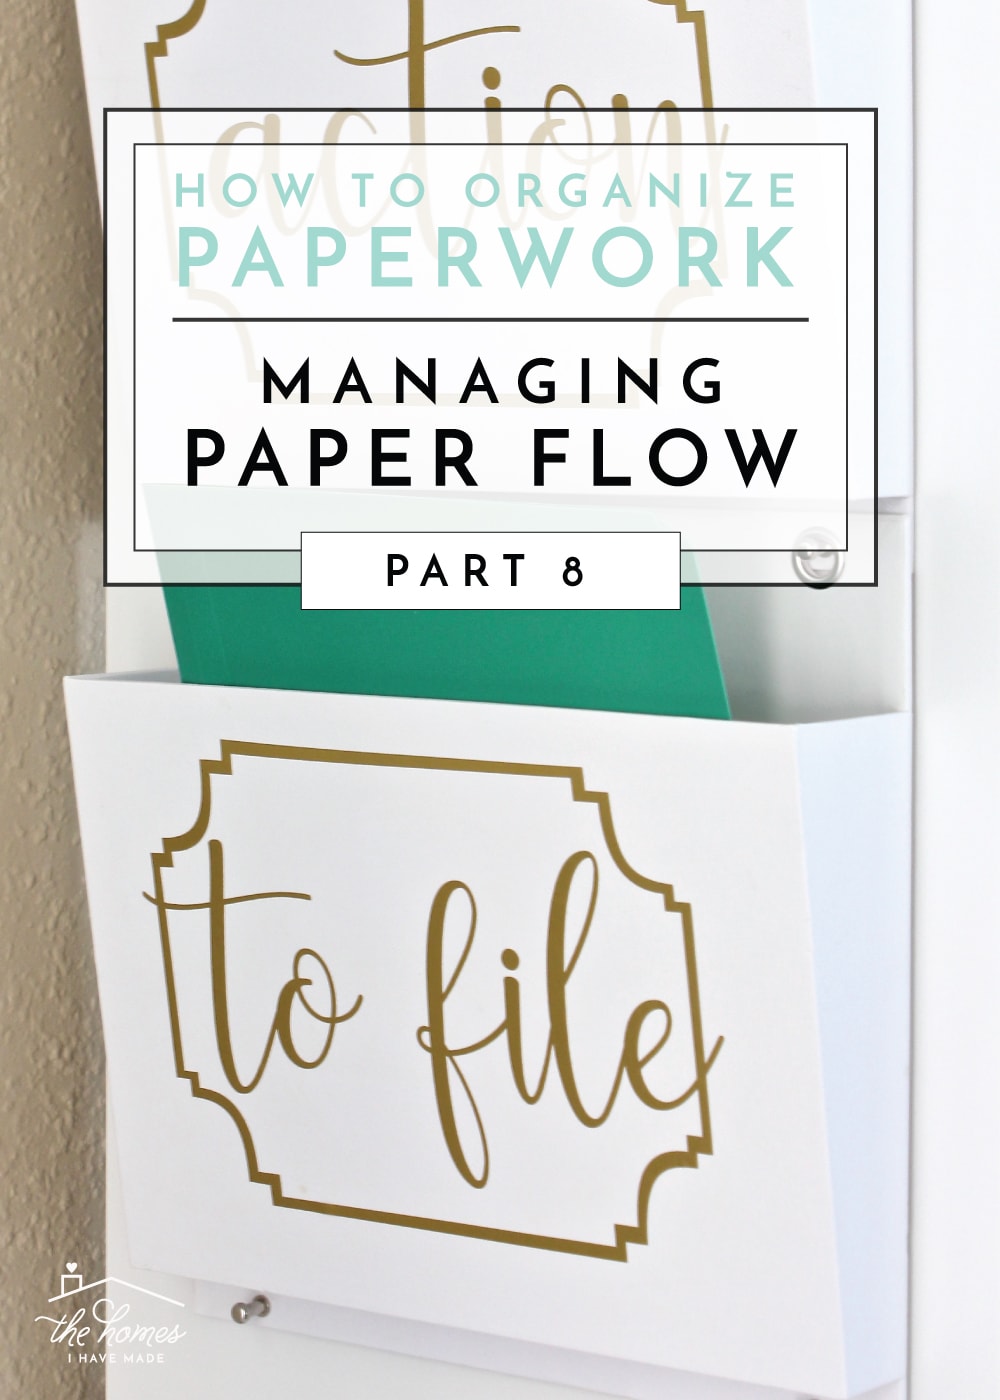
Even with your best efforts to go paperless, there will still be papers that come into the house and you will need to figure out how best to deal with them. You all know I had really, really mixed feelings about Marie Kondo’s book, The Life-Changing Magic of Tidying Up. But one concept that truly clicked with me, and I’ve embraced whole-heartedly ever since, is the concept of a single “Household Inbox” with only two super simple categories: “To Act” and “To File”. When it comes down to it, any paper that truly needs to be kept either should be filed away for good (like into one of the systems we’ve worked so hard to create) or acted upon in short order (like a bill that needs to be returned). There really is no need for further sub-categorization at this point. By funneling all paperwork to one central spot in your home (and then putting it away from there), you’ll save time and headaches by always knowing exactly where new papers are at any given instant.
In our current home, I abandoned the “traditional” command center scheme because, as I said, many of the systems I previously relied on were never used (you can see our current house setup here). However, just off the front door is my office, which is the perfect spot to for our “Household Inbox.” I simply used command strips to secure two of these hanging file boxes to the side of my IKEA Kallax storage shelf. I labeled them with vinyl and my Cricut Explore to denote the two simple categories.
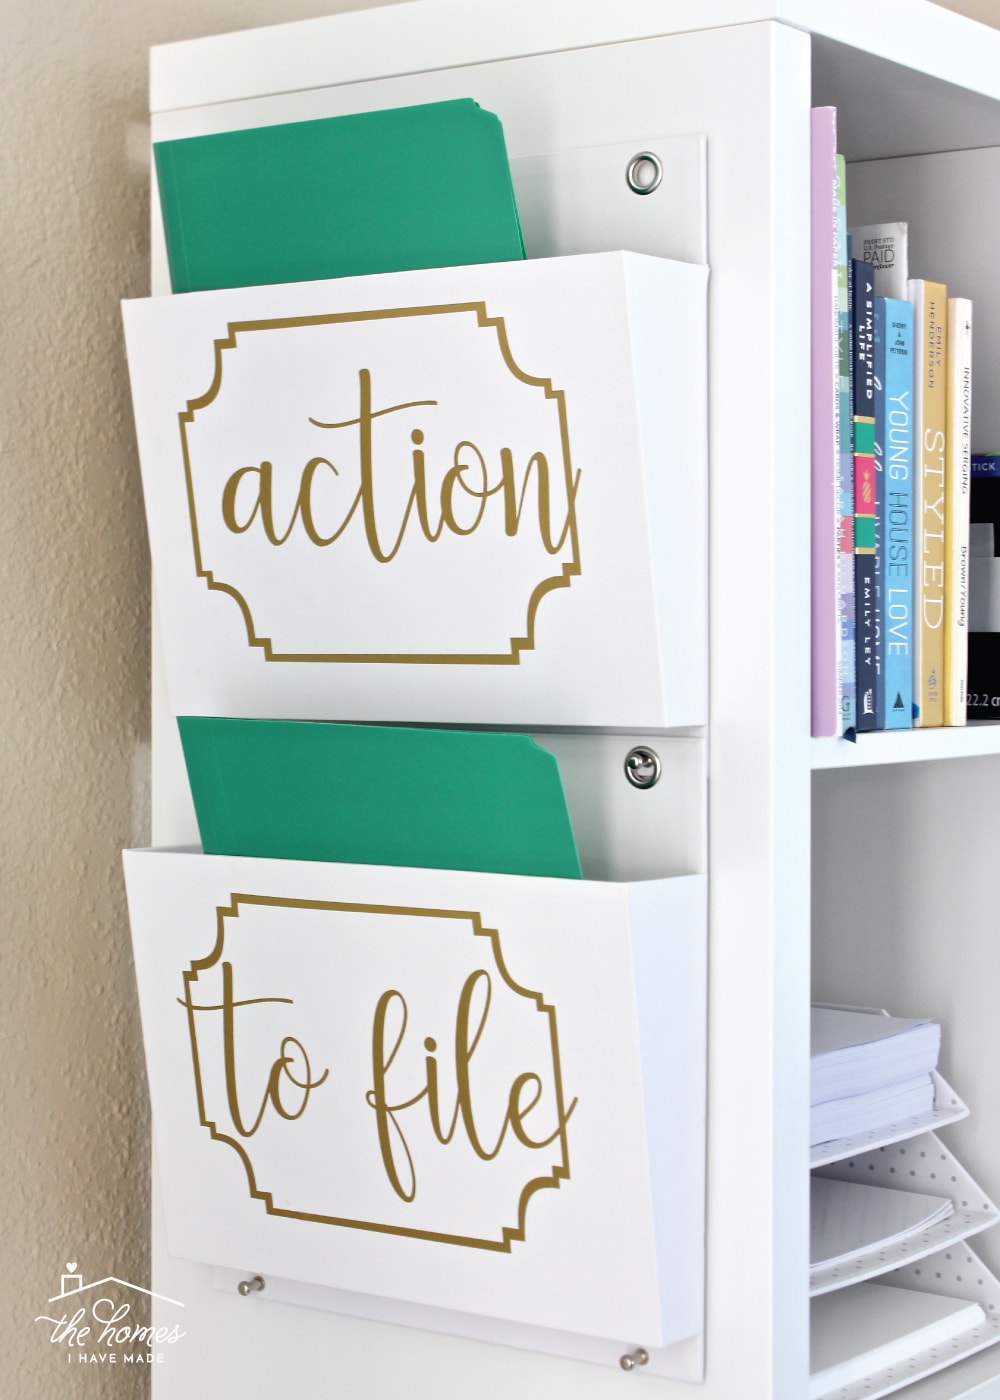
Step 2: Make Trash Accessible
What you can’t see in the picture above, just below the two hanging folders, is a trash can. This seems like such an obvious solution, but boy does it make all the difference in keeping paper from piling up. Instead of setting aside papers to go into the trash, we can trash anything that doesn’t fall into the “To Act” or “To File” categories immediately. #gamechanger

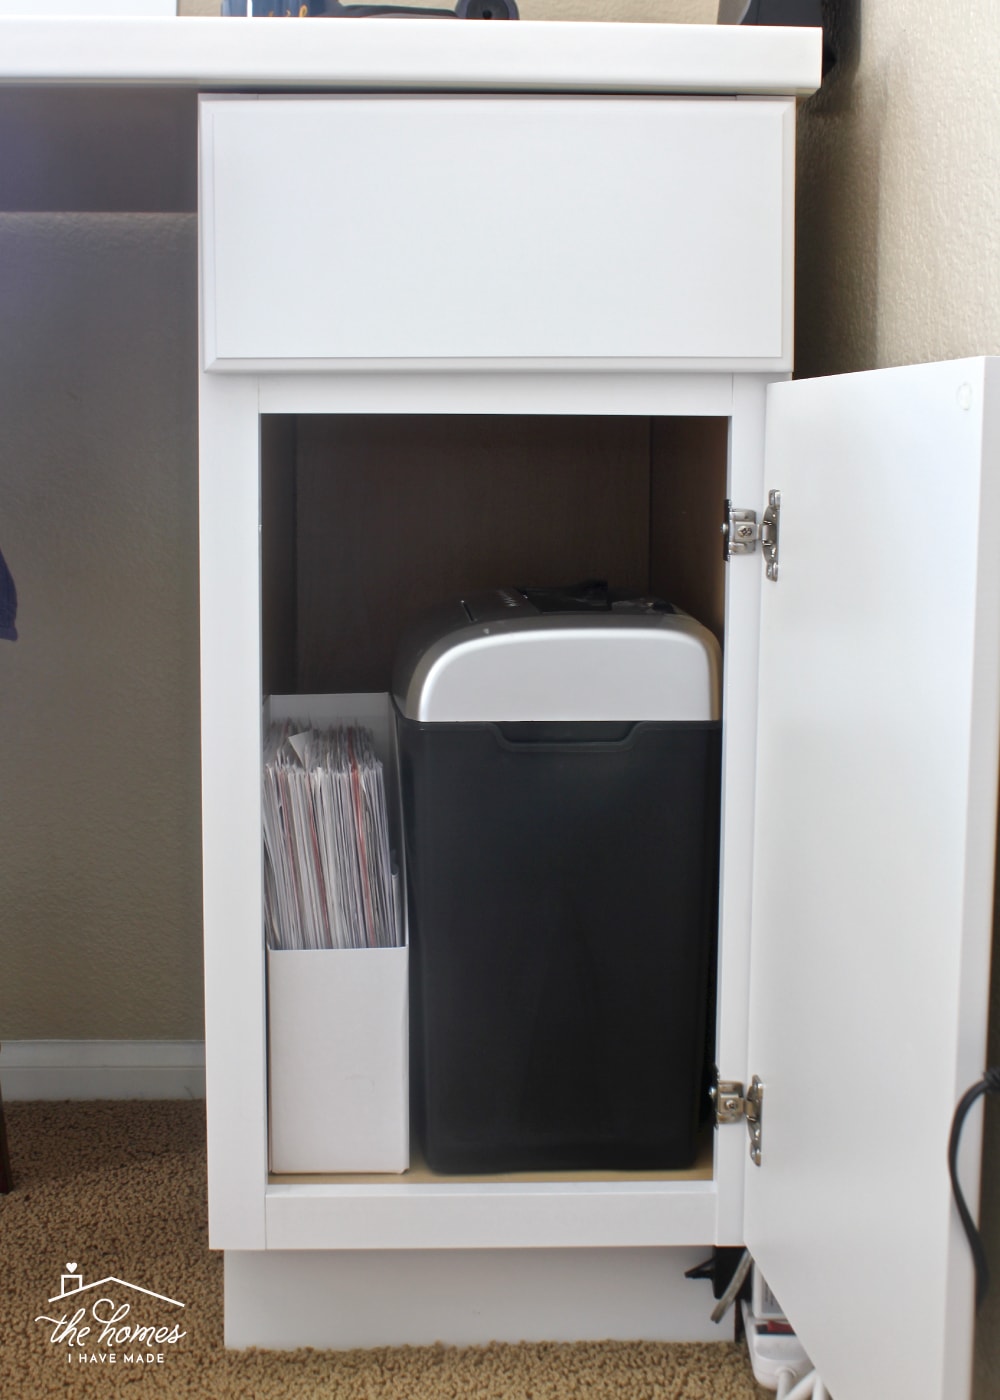
In the same way, we wanted to make any papers that need to be shredded a little closer to their final destination too. So about 4 steps from the file/trash setup is our paper shredder tucked into a cabinet in my desk. Slowly but surely we are getting better about shredding items as soon as they come in, but if we just don’t have the time (or feel like emptying the shredder!), we have a file box next to the shredder to catch anything for the next shred session.
Want to save this post?
Having an inbox, trashcan and shredder in close proximity is a surefire way to keep paper piles from stacking up in unwanted places!
Step 3: Tend to the Inbox Regularly
Within the corner of my office, we now have a single Household Inbox for all the incoming paper to funnel to, as well as the trash can and shredder close by for immediate paper disposal. But like any other organization system, it will only work and keep working if it is regularly tended to and maintained. As such, the next step of managing your household paper flow is to tend to your To Act and To File folders on a VERY regular basis.
Once a week (I recommend doing this when you’re creating your meal plan or filling in your planner for the week), tend to BOTH Household Inbox folders. Start with all the actionable items (because those are usually more time sensitive) and sign, mail or return anything in the folder. Then, remove all the contents of the “To File” folder and move them to their final, more permanent destination. Permanent destination? You know…all those beautiful, streamlined and functional systems we’ve already created like our household files, school storage boxes, important documents binder, kitchen binder, etc. Because you’ve now already done all the hard work of creating perfect storage systems for every kind of paper, putting away anything you find in the stack of “To File” papers should only take you a few minutes each week!

You could argue that the “To File” folder within the Household Inbox isn’t necessary at all, leaving only a “To Act” folder. Depending on your household, that might very well be true. If your more permanent paper systems are quick and easy to access, you can certainly bypass the “To File” folder all-together and put keepable items away as soon as they come into the house. But part of creating a household paper flow system that truly works is also knowing yourself. I know…for a fact…that I am not going to run up and file away keepable papers each and every day. Sure, Henry’s permission slip will likely get put into the Family Activities binder as soon as it comes home. But in general, anything that needs to be kept, revisited or filed away more permanently will just lay around wherever unless I give it a dedicated home. By having a centralized Household Inbox with both a “To File” and “To Act” component, I am able to keep important papers off my kitchen counters without feeling like I am constantly shuttling papers away day in and day out.
The point here…keep it simple…really simple…but also do what makes most sense for you, your home, and your family!
Step 4: Build Habits Around the New Routine
Although my previous paper collection systems were a bit too complicated, I will also admit that I skipped the final and most important step: build new habits around the paper flow routine. This final step cannot be overlooked because even with one central inbox, your papers will eventually get out-of-control if you don’t regularly tend to them. As such, in order to truly get a grip on paper in your home and conquer paper clutter for good, you MUST build these new filing/trashing/shredding/tending steps into your weekly household routine. To do that: schedule it into your planner, set an alarm on your phone, establish visual triggers (like if the file is too full, you need to spend an afternoon emptying it). Whatever works for you…get used to moving your papers from your Household Inbox to your final storage solutions on a very regular basis. Additionally, if you have a family, you need to train teach them your new system and work at it together until everyone is doing their part to file, trash, shred and put away items as needed.
What Does our Household Paper Flow Look Like?
When mail or any other random papers come out of my purse or Greg’s bag, they immediately get taken to the office. Trashable papers are dealt with immediately, and the rest are filed away as “To File” or “To Act.” Henry’s school papers are dealt with slightly differently. Anything important is indeed put into our Household Inbox, but his completed school work is immediately put in his own dedicated “inbox” basket to be sorted and organized separately (you can see more how I do it here). Each Sunday, while I am putting together our meal plan, ordering groceries and updating our calendar for the week ahead, I tend to both files in our Household Inbox. Action items are dealt with first, and then I put away anything in the “To File” folder. Like with having all the laundry put away by Sunday night, my goal is always to start Monday fresh with empty inboxes!
Household Inbox Products I Love
These are the products I used (and love!) to assemble our household inbox!

Here are some other products to consider when establishing a paper flow for your home!
 Other Strategies for Establishing Paper Flow In the Home. Every household has unique needs and requirements for controlling paper flow. As such, I’ve rounded up some of the best article and tips I could find from my friends and fellow bloggers. If you need more ideas for managing paper flow, check out these posts below.
- A really great overview of all papers…from coming in the door to finding their forever storage by Kaitlin at The Simply Organized Home.
- A system similar to mine but simplified even more by Jenn at Clean and Scentsible.
- If you need a dedicated place to track and pay bills:
- A simple box by Jen at I Heart Organizing.
- A gorgeous bill paying “center” by Toni at A Bowl Full of Lemons.
- More DIY wall-mounted file holders:
- Love these easy baskets by my friend Karen at a House Full of Sunshine.
- Gorgeous wood versions by Jenn at Build Basic.
- A simple countertop station to sort all the things by Becky at Clean Mama.
 Homework. I know many of you are ready to dive in right now, so I will give you a “Homework Assignment” of sorts each week. Take the next 6 days to accomplish everything I have outlined here to complete your paper organization journey!
This week:
- Examine any paper organization systems you already have setup in your home. Where are they? Are they working? What are they catching? What aren’t they catching? How can they be improved?
- Think about where and how paper comes into your home. Think about where and how papers pile up in your home. Think about where and how you could setup a single Household Inbox.
- Order/find supplies to assemble a Household Inbox. Also consider where to place trash/shred receptacles.
- Establish a clearly defined paper flow for your home. Teach it to anyone who lives with you.
- Identify a regular date/time to tend to your Household Inbox and stick to it by creating reminders.
- Really CELEBRATE because you have now sorted and organized ALL the paper in your home AND identified a system for dealing with new papers. You have officially conquered your paper clutter!
HOW TO ORGANIZE PAPERWORK BLOG SERIES


Alright my friends, this is the final post in the How to Organize Paperwork series (yayayayayay!!!!). I’m going to do a quick recap next Friday, but then we’re going to move on to other fun things like pantry organization and Henry’s bedroom makeover that I finally finished! In the meantime, I have a fun post planned for Tuesday to show you what my house really looks like these days! See you then!
Megan
3 Comments on “How to Organize Paperwork | Part 8: Managing Household Paper Flow”
My hubby hates dedicating space to paper files so we have done away with paper files for most things – as much as possible we scan then shred the paper! And a lot of information enters the house in electronic format only. Then it is a matter of setting up a hierarchy of folders in the computer and a relatively consistent naming scheme to handle all the filing. The work flow is pretty much like what you describe except “to file” means “scan, shred the paper & file the PDF” for us. Some paper must be kept but much of that would have been in the fire-proof file to begin with.
Thank you so much for your series on paper! I have loved it and now that the kids are back in school I plan to get to work. I am already partly paperless, but my hold up is my digital organization . I feel like things are all over the place. Any tips? Maybe another series to come? 🙂
Hi Megan
I have a lot of posts to read, I only read the two first ones so maybe should I begin by the paperflow rigt now !