How to Assemble a School Memory Box (With Printable Labels)
One of the best things we ever did for our oldest child was to assemble him a School Memory Box: a dedicated place for all the awards, pictures, report cards, and school work that comes home year after year. When I recently went to assemble similar boxes for my two younger children, I refined our original system even more. Today, I’m breaking down the best way to organize kids’ school papers, as well as sharing some printable labels so you can easily do the same!
Why Assemble a School Memory Box?
Although it was almost a decade now, I clearly remember cleaning out my childhood home after my mother passed away. I recall encountering pile after pile, drawer after drawer of random schoolwork and art projects from my childhood. But the sheer amount of it and lack of organization made it practically impossible for me to go through or even appreciate.
Fast forward to when my first child became school age, and I was taken aback at how much stuff came home from school (throughout the year, but especially at the end). While I had a new appreciation for why my mother just stuffed it all away, I also knew that with a bit of forethought and discipline, I could assemble a “capsule collection” of my son’s childhood and education…but in a way that was curated, consolidated, and compact.
By taking on this project early, I am not only able to conquer (and keep control of) the school paper clutter that inevitably comes home year after year. But more importantly, I will (eventually) be able to hand each child a single, well-organized box of the very “best of the best” of their childhood…all preserved in a way that they will truly be able to look through and (hopefully) appreciate.
Whether you’re drowning in kids’ paper projects, want to figure out the best method for preserving school memories, or both…assembling a School Memory Box is a totally do-able and quite effective solution!
Supplies Needed
Here is what you need to assemble a School Memory Box (be sure to multiple supplies for each child you have!)
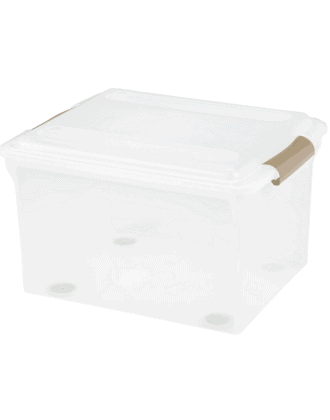
- Plastic File Box – there are lots of options; picking a weather-proof version can give you peace of mind if these items are especially sentimental to you.
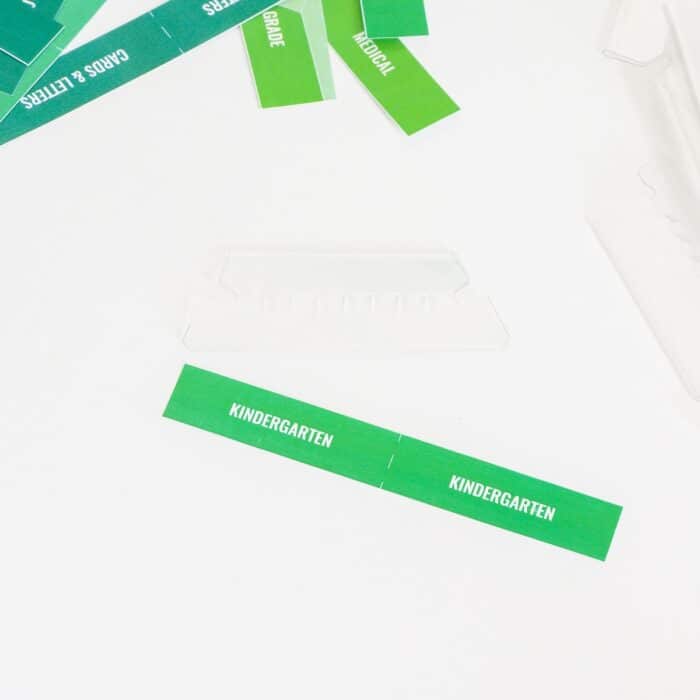
- Hanging File Folders with Plastic Tabs
- School Memory Box Labels
- Home Printer
- White Copy Paper
- Paper Trimmer
- Patience – this project can be a big one, especially if your kids are older and/or you have a lot of school papers piled up. Take a deep breath and work one step at a time!
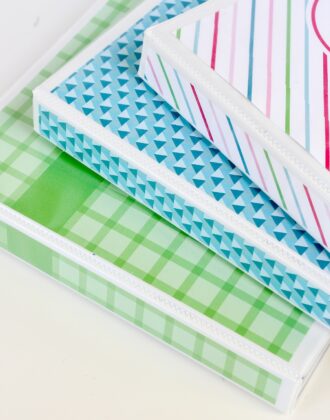
The School Memory Box Labels Printable Kit
What’s Included
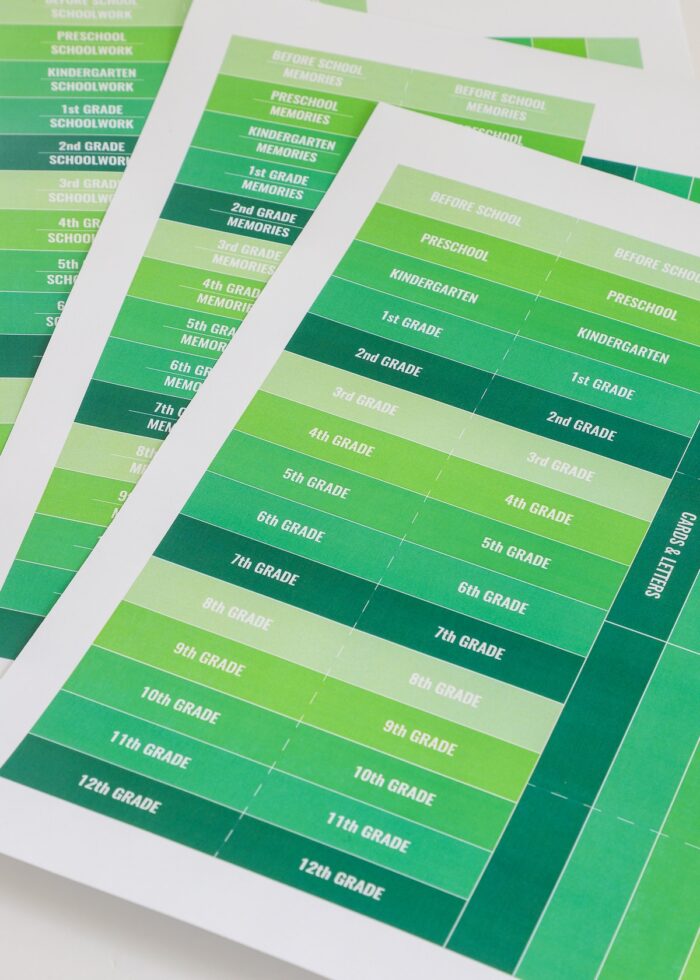
My School Memory Box Labels kit includes everything you need to assemble your boxes using nothing more than your home printer and a paper trimmer (or scissors).
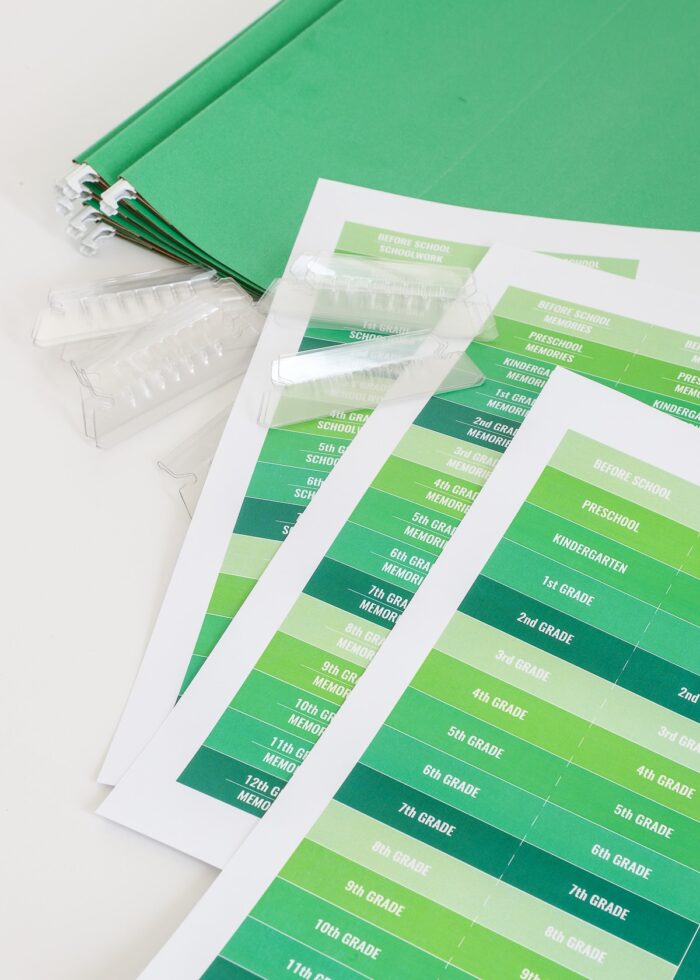
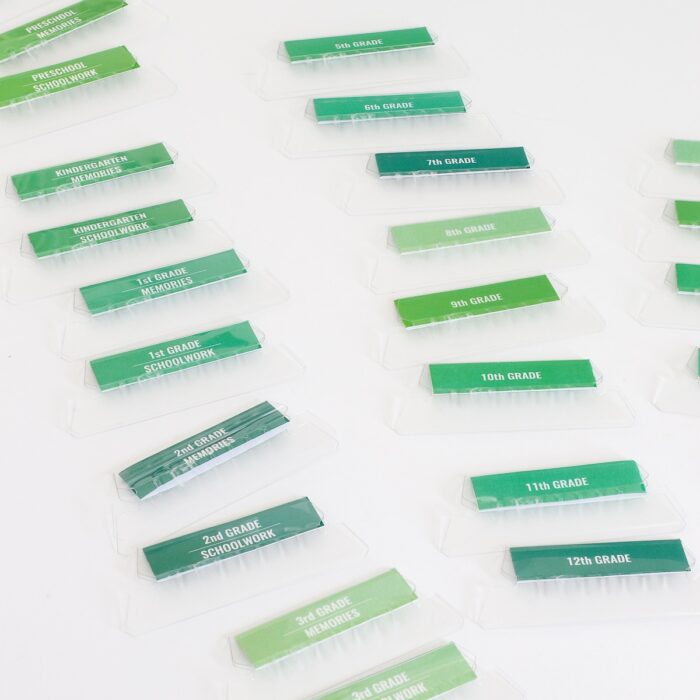
- Four pages of (editable) File Tab Labels
- Pre-K through 12th Grade Single Line Labels
- Pre-K through 12th Grade Double Line Labels
- Blank Single Line Labels
- Blank Double Line Labels
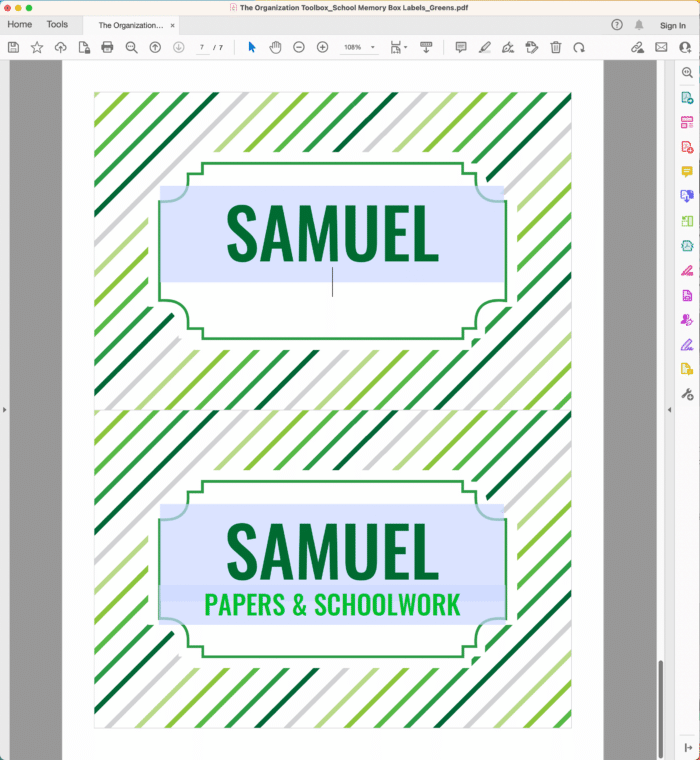
- Two pages of (editable) Box Name Labels
- Single Line Box Labels (2/page)
- Double Line Box Labels (2/page)
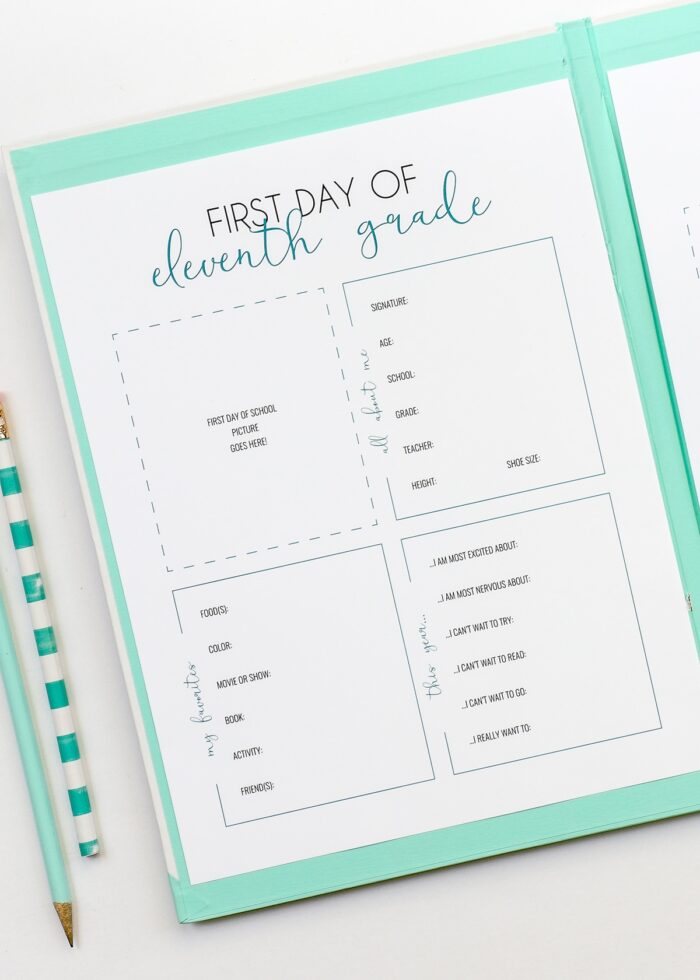
- First/Last Day of School Signs and Interview pages for all grades
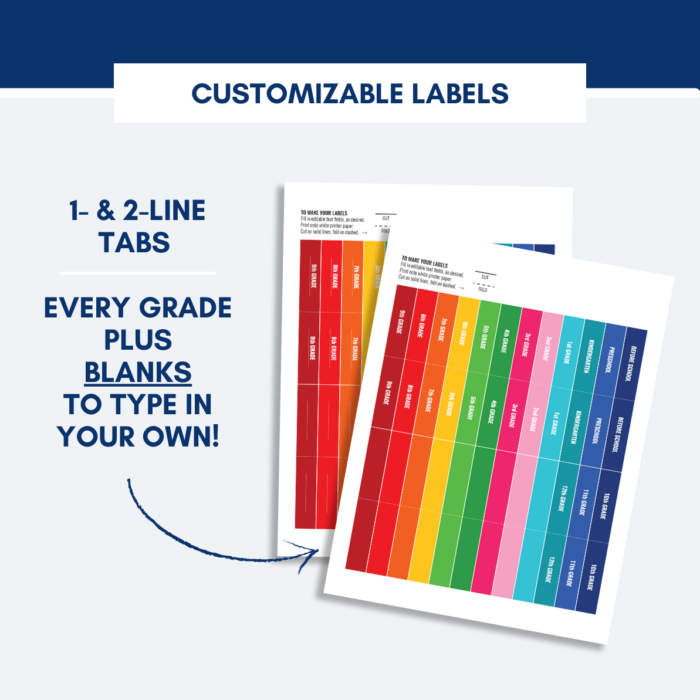
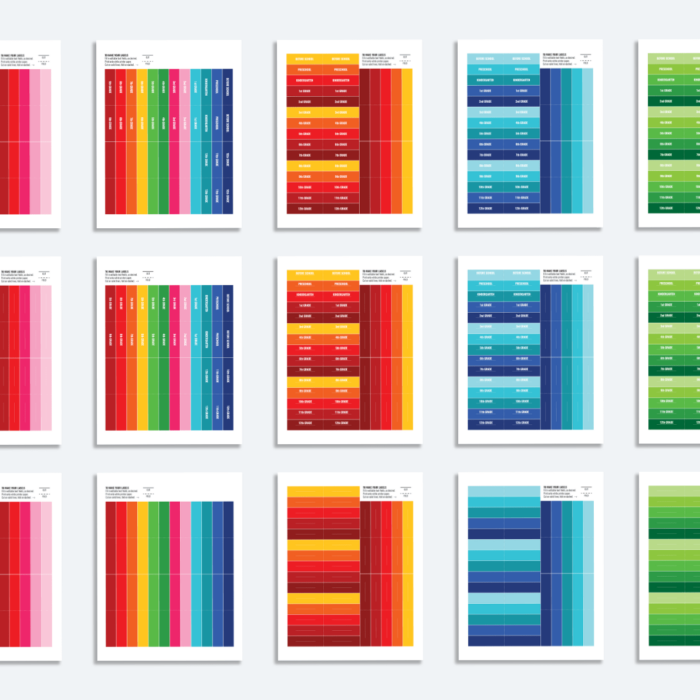
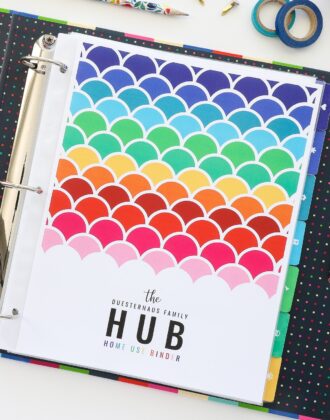
All the labels are completely fillable using the FREE version of Adobe Acrobat Reader and come in 5 different color schemes: Rainbow, Reds, Blues, Greens, and Pinks.
Whether you want basic grade labels (i.e., First Grade, Second Grade, Third Grade) or prefer your own labeling conventions, this labelling kit makes it easy to create the precise organization system you need!
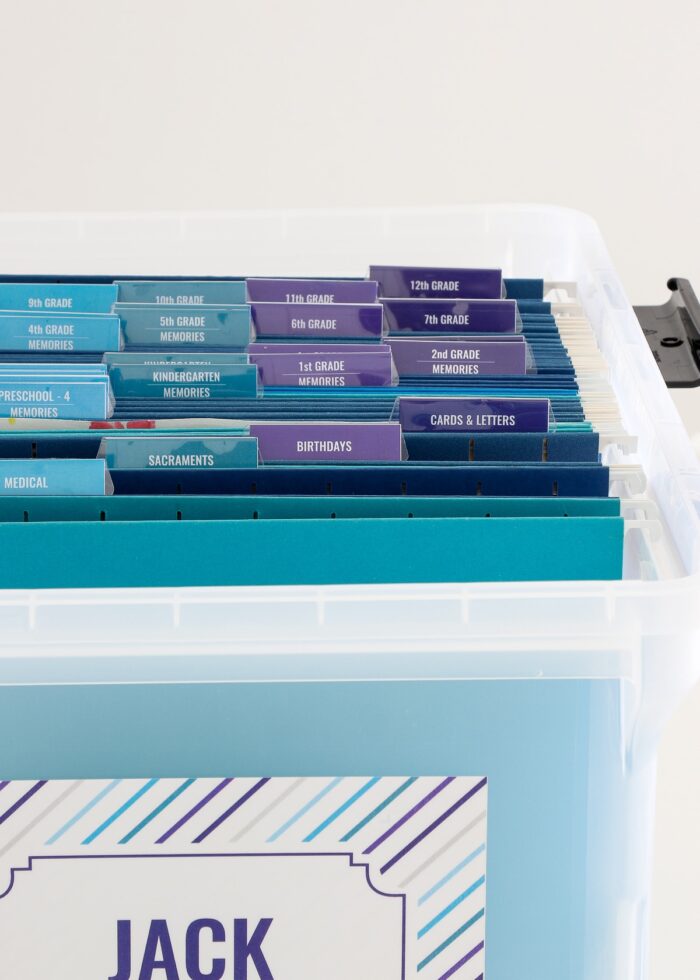
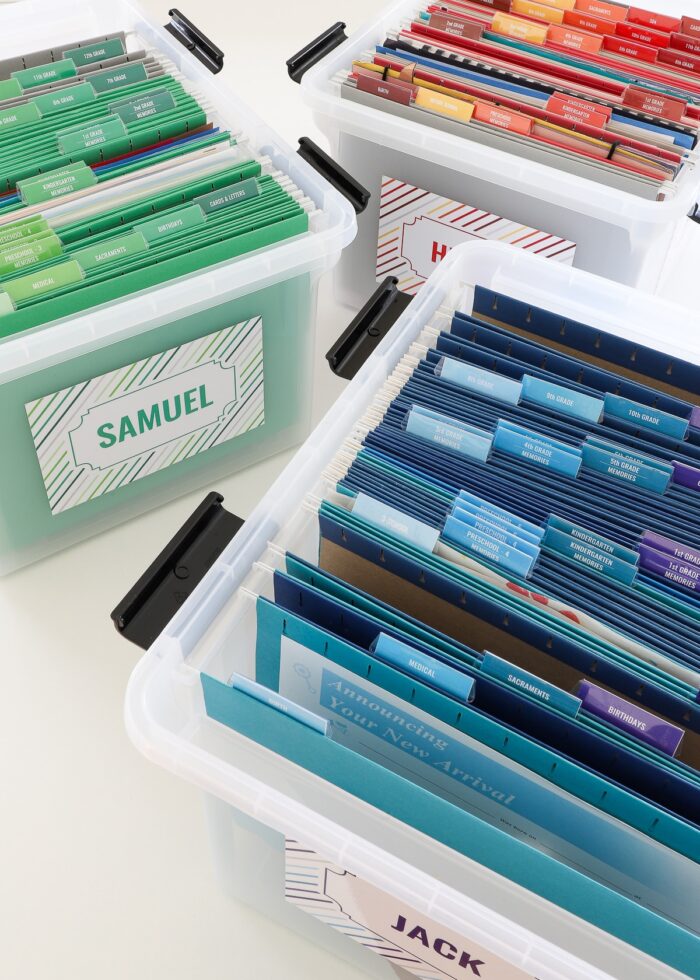
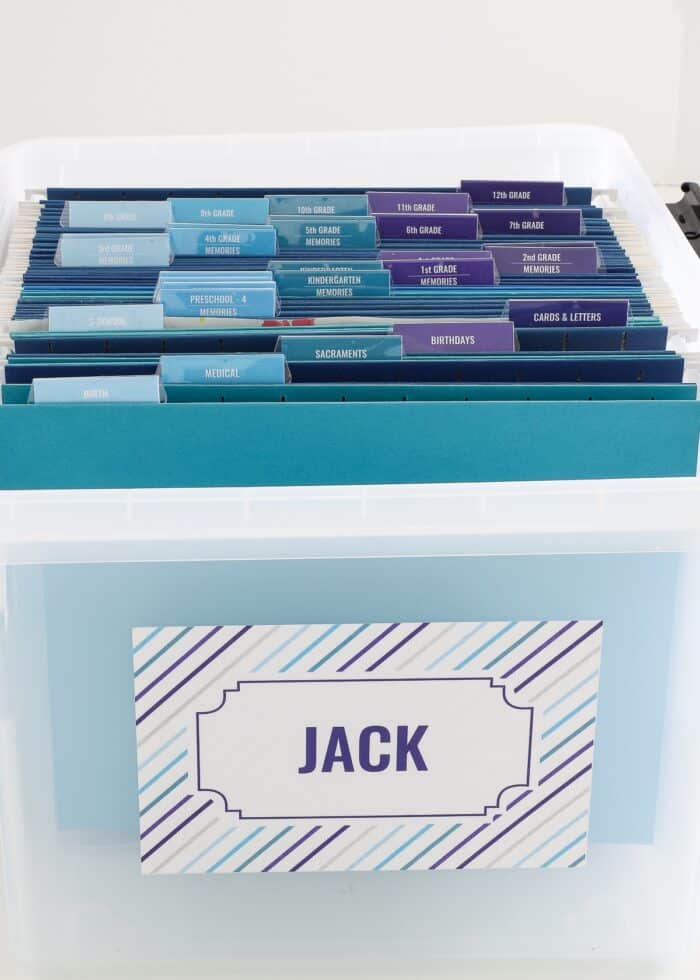
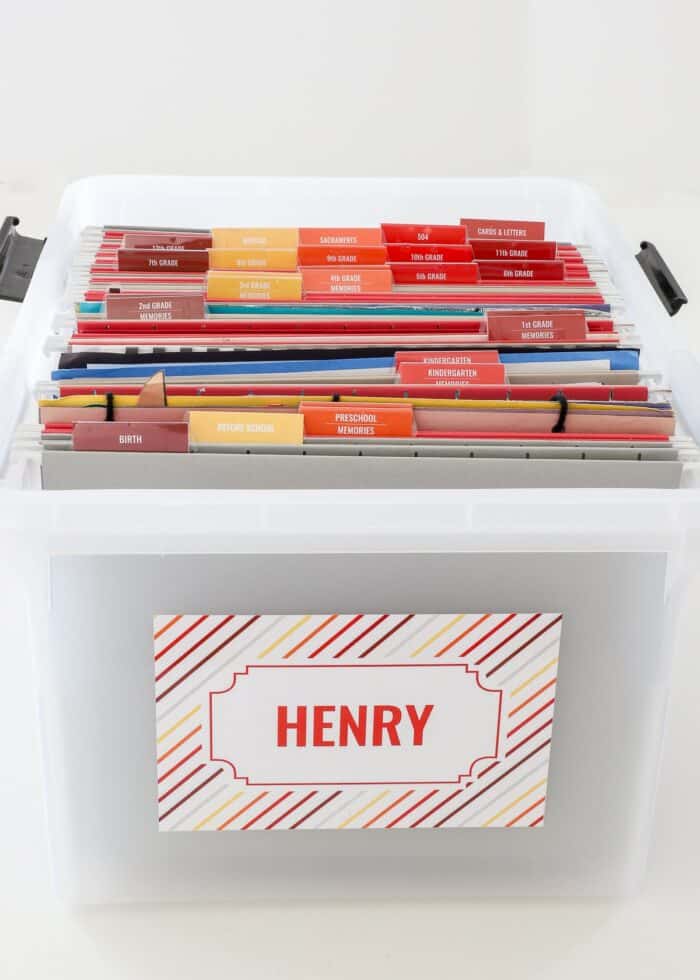
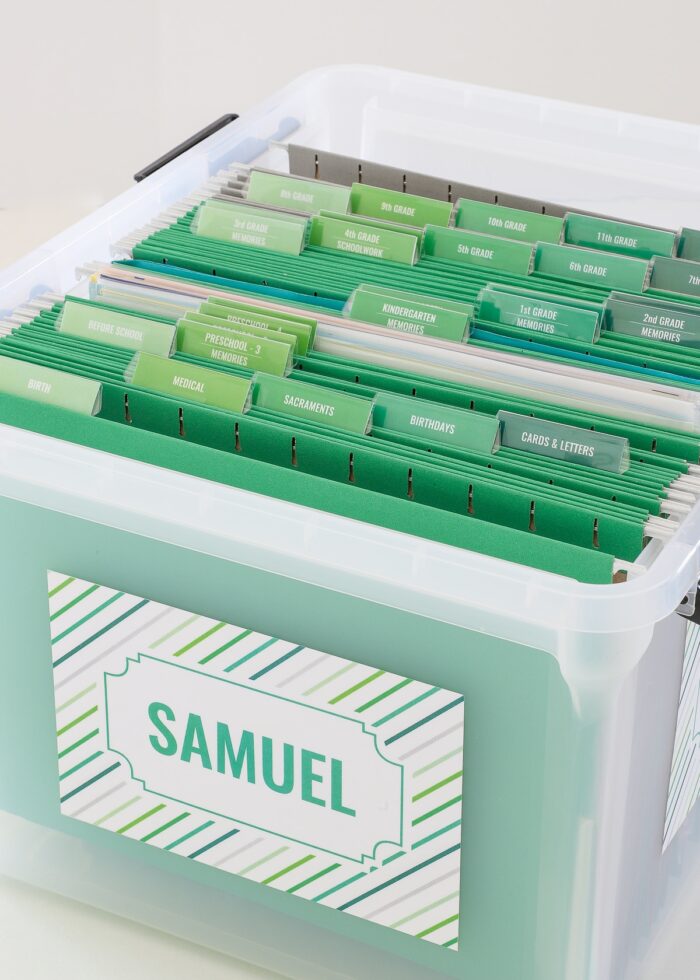
Consider Color-Coding
Although not required, you may want to consider color-coding all your supplies (especially if you have multiple children). I love these colored hanging files and paired red, blue, and green sets with my printable labels.
Yes, this was mostly to satisfy my geeky obsession with color-coding, but it also helps when you (or your kids) are trying to quickly identify which box belongs to who.
Video Tutorial
Watch how the green School Memory Box comes together from start-to-finish in this short video tutorial! (Video not loading for you? You can watch it HERE!)
How to Assemble a School Memory Box | Step By Step
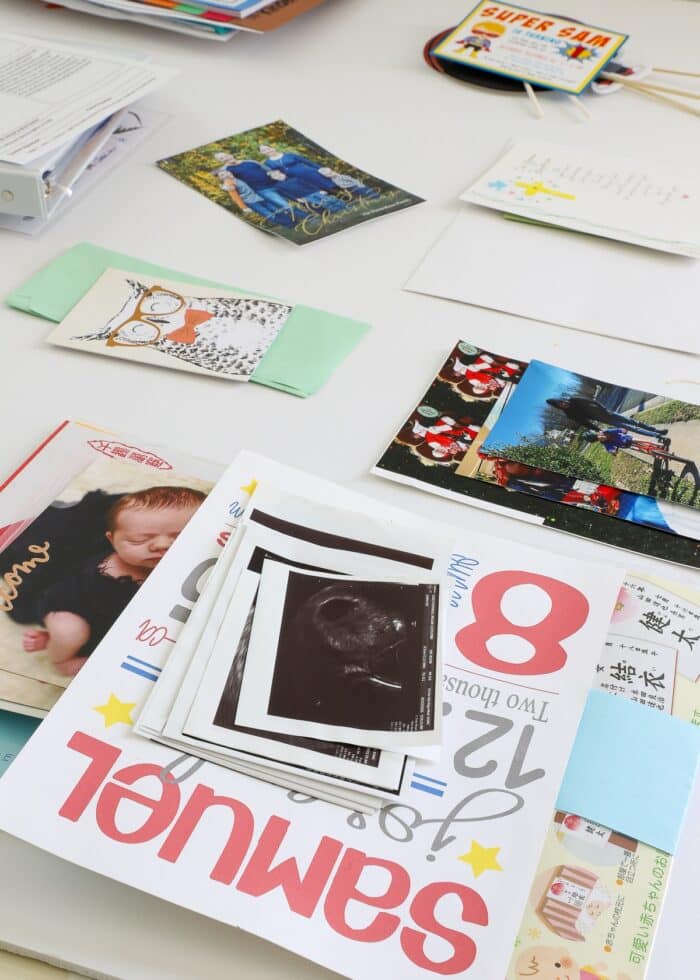
Step 1: Gather All Child Papers
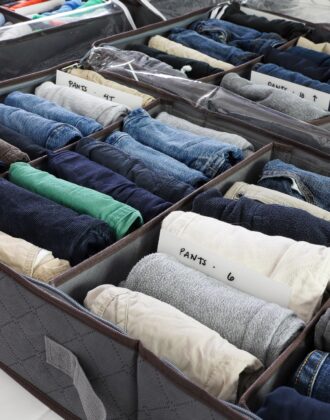
Start by gathering all (yes all) of your kids’ papers, including: schoolwork, art projects, coloring pages, memories, photos, letters/cards, certificates, etc.
Although I’m calling this a “school” memory box, we’ve chosen to assemble ALL of our children’s “special” papers (e.g., ultrasounds, sacrament certificates, yearly Christmas cards) into this one single box so everything is all together.
Step 2: Sort Papers Into Broad Categories
Next, sort all the papers into “simple and intuitive” categories. By child and then by stage/grade is the usually the most logical approach, as shown below:
- Child A
- Pregnancy
- Before school
- Preschool
- Kindergarden
- First Grade
- Etc
- Child B
- Pregnancy
- Before school
- Preschool
- Kindergarden
- First Grade
- Etc
- Child C, etc
TIP! It might be easier to work through one child at a time rather than doing all of your kids at once.
During this initial sort, your goal is to move quickly and get your original pile of papers down into more manageable groupings. Don’t linger over anything (unless there is obvious trash), don’t make any tough decisions yet, and resist the urge to further categorize at this point.
Step 3: Purge All Papers
Next, revisit each and every stage/grade pile and consider each and every piece of paper, project, note, photo, etc. Only you can determine what warrants keeping and what doesn’t. Unfortunately, there is no quick-and-easy checklist to help you through this, but here are some thoughts to consider.
I will fully admit that I am not particularly sentimental over our children’s creations. Part of it is because they make SOOOO much; it just isn’t practical or necessary to keep every single thing. I also go back to my childhood home, when…in the end…it all got tossed anyway.
As such, I try to carefully choose only the items that are truly special, unique, highlight a specific skill, or are a pinicle project our child did during that year. Yes, a lot of the “amazing” things they make get thrown in the trash; and no, I don’t take pictures of the discarded items first. In the end, all that remains is the very best that represents that particular stage/year.
I personally believe this “best of the best” approach allows us to walk down memory lane and appreciate our childrens’ development without being overwhelmed by amount and redundancy. It also goes without saying that the less you keep, the easier it is to store in a more functional and manageable way.
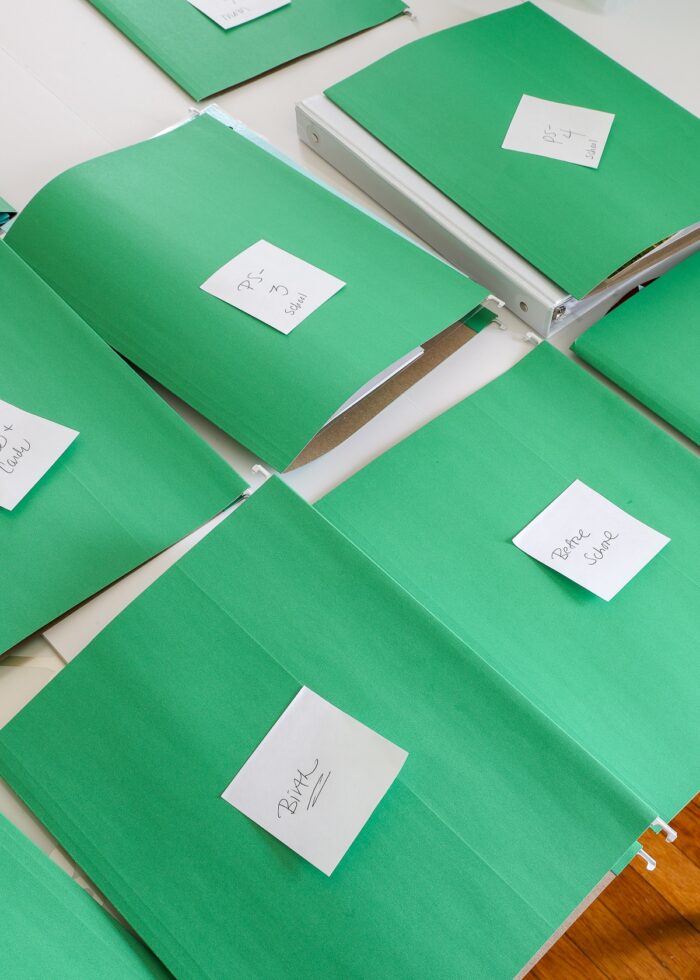
Step 4: Identify File Categories
Next, revisit each stage/grade pile and refine it even further, if necessary. While creating sub-categories can help you quickly locate items, I caution you against creating so many sub-categories that your system becomes cumbersome and complicated.
If you would like to sub-categorize each grade/stage, here is what I recommend:
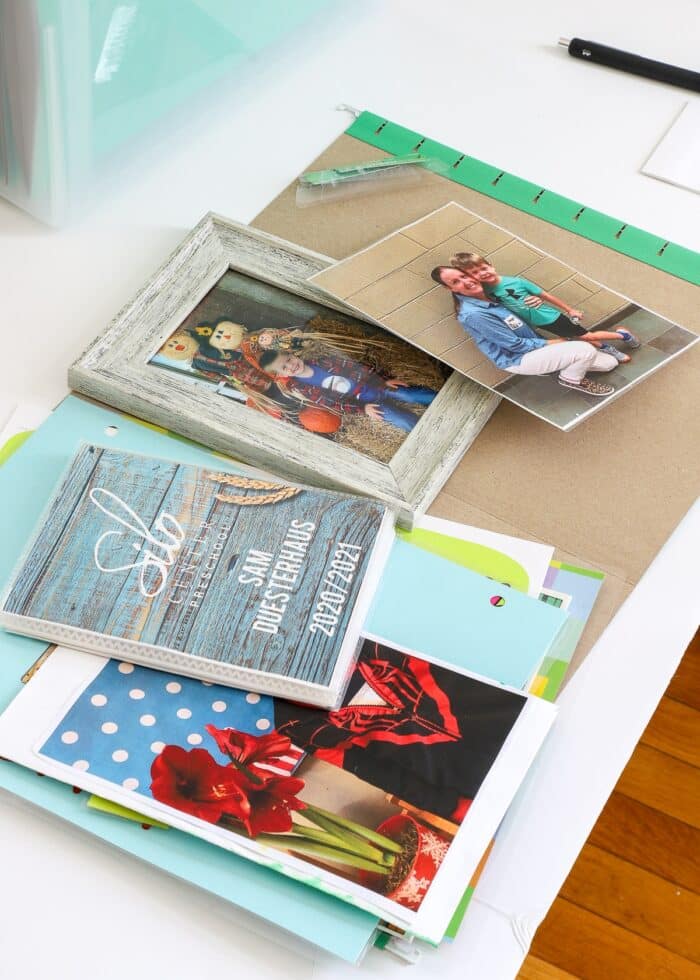
Pictures
In this sub-category, place any (good) pictures from throughout the school year. This includes school picture, sports/team photos, as well as pictures from the classroom and other activities. I don’t scrapbook (physically or digitally) so this is my approach to easily ensuring each child’s photos are stored and generally organized.
Schoolwork
In this sub-category, only keep those papers and artwork that are really good, the child worked really hard on, is super proud of, or demonstrates a particular skill.
Memories
In this sub-category, place random notes, cards, papers, and awards that you think the child would enjoy re-reading as they get older. These are mostly hand-written letters from classmates and teachers, drawings and birthday cards from special friends, an extra copy of the birthday party invite that year, and end-of-the-year awards, etc.
Are Sub-Categories Even Necessary?
It’s now been 5+ years since I first assembled my oldest’s School Memory Box. Here is the original version:
I’ve since learned that as kids get older, there tends to be less schoolwork, less memories, less items to store. While the sub-categories are very much needed for younger grades (when there seems to be so much to keep), I noticed all the sub-category folders for 3rd grade through current (7th grade) were practically empty. As such, I opted to condense the higher grades into a single folder.
Don’t hesitate to break out really large stages/grades into sub-categories if the quantity of items warrants it. And vice versa; don’t stick to the sub-category system if it means you’ll have empty file folders taking up space in the box.
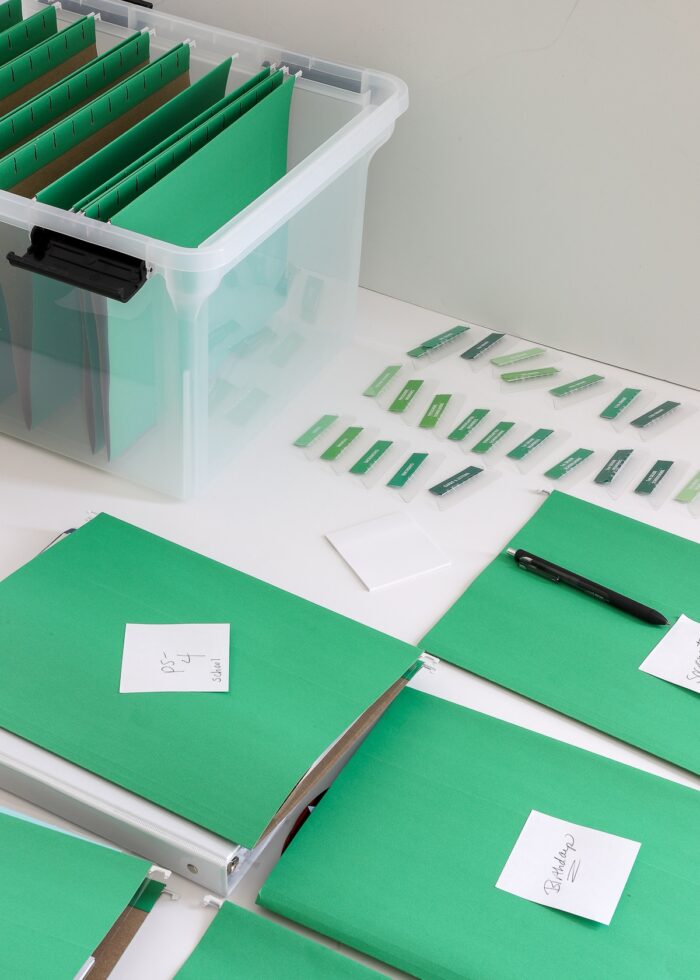
As you identify categories, use Post-It Notes to temporarily label each group of papers.
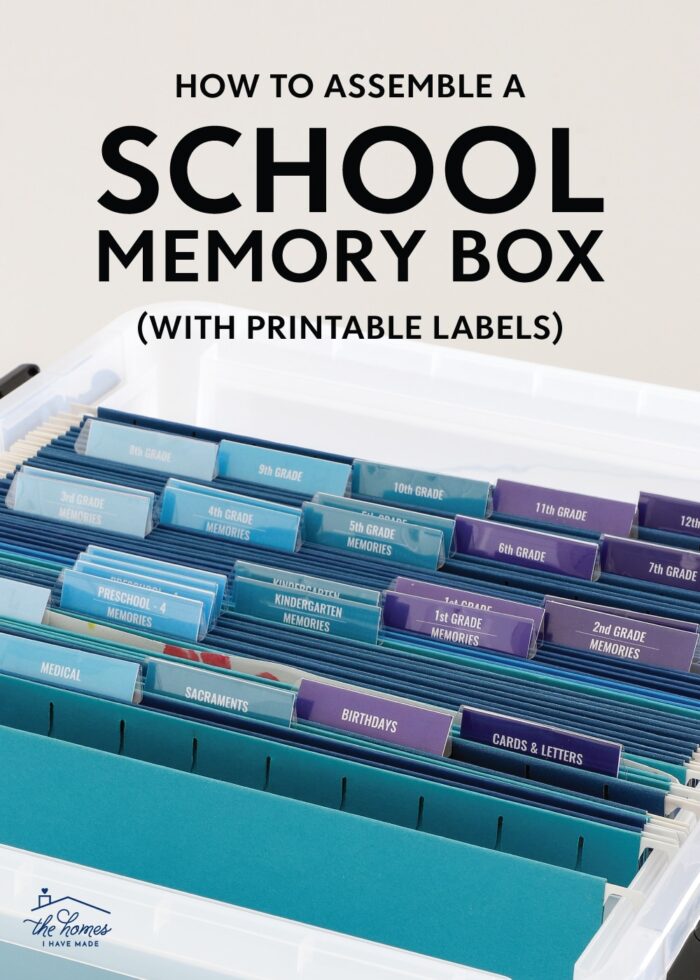
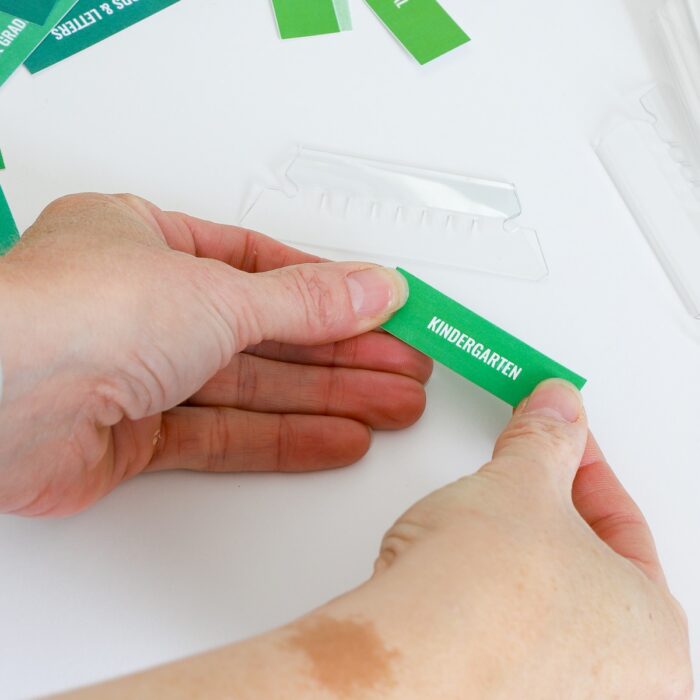
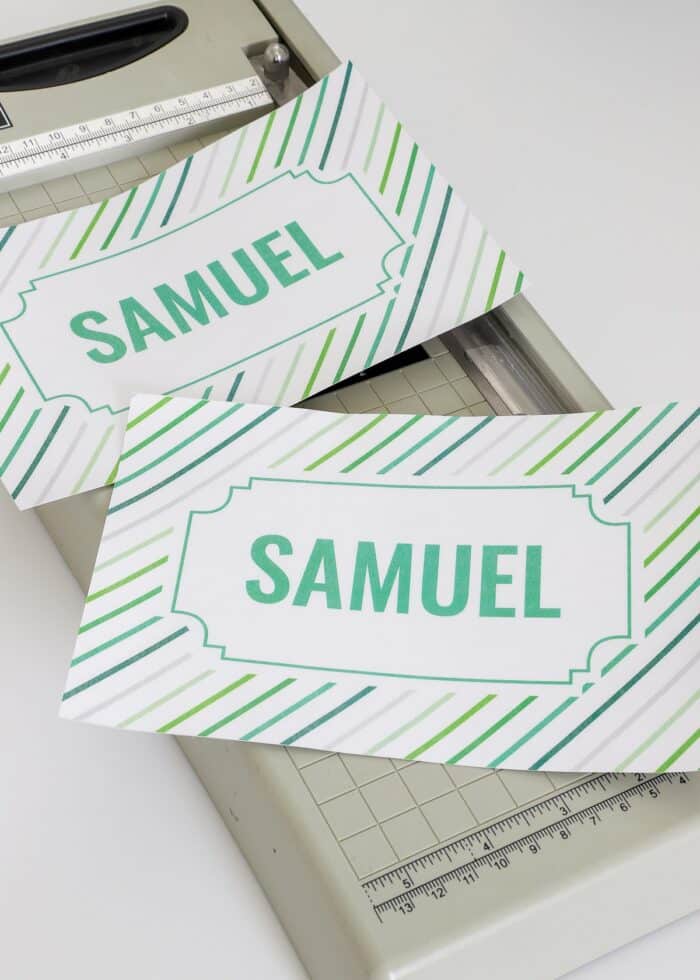
Step 5: Customize File Tab Labels
Once you have all your folders identified, download the School Memory Box Labels kit in your preferred color-scheme; and open the PDF with Adobe Acrobat Reader.
If you only want basic grade-by-grade labeled tabs, you can print out the pre-filled label sheet and proceed.
However, if you want to add your own file names or sub-categories to the various grades (i.e., Photos, Memories, etc), click into any blue box in order to add your own text.
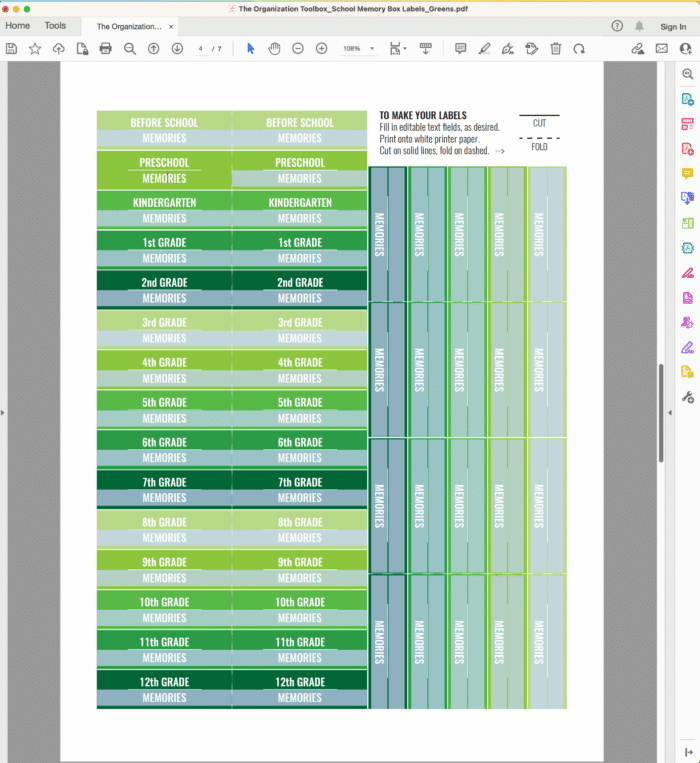
TIP! While the files include basic school years, you might want to include additional categories such as Pregnancy, Toddler, Daycare, PMO etc. Further, you can use these same tab labels to create other helpful categories such as Medical, Sacraments, Dental, etc. Your various paper piles should dictate what exact labels you need to type up.
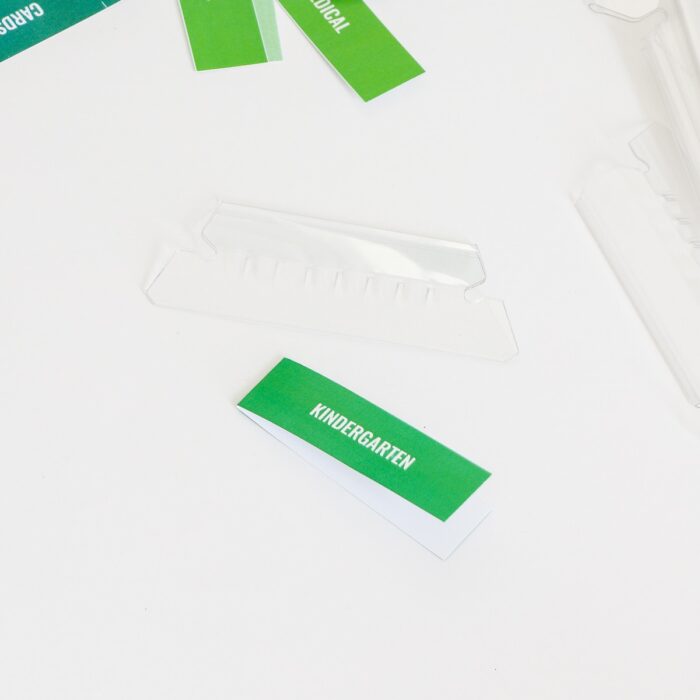
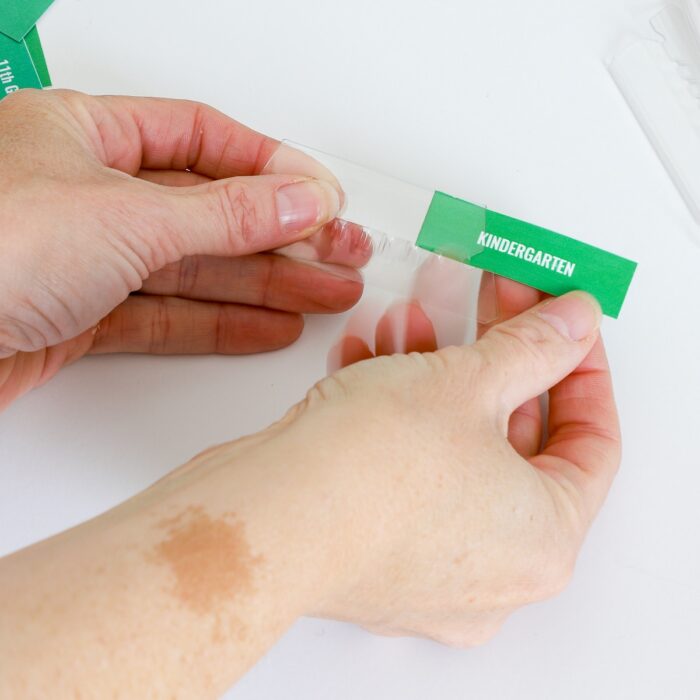
Step 6: Print & Assemble File Tabs
Once you are satisfied with the labels, print the pages at 100% resolution onto white printer paper using a colored printer.
Want to save this post?
Then use a paper trimmer to slice apart all the various labels along the solid white lines.
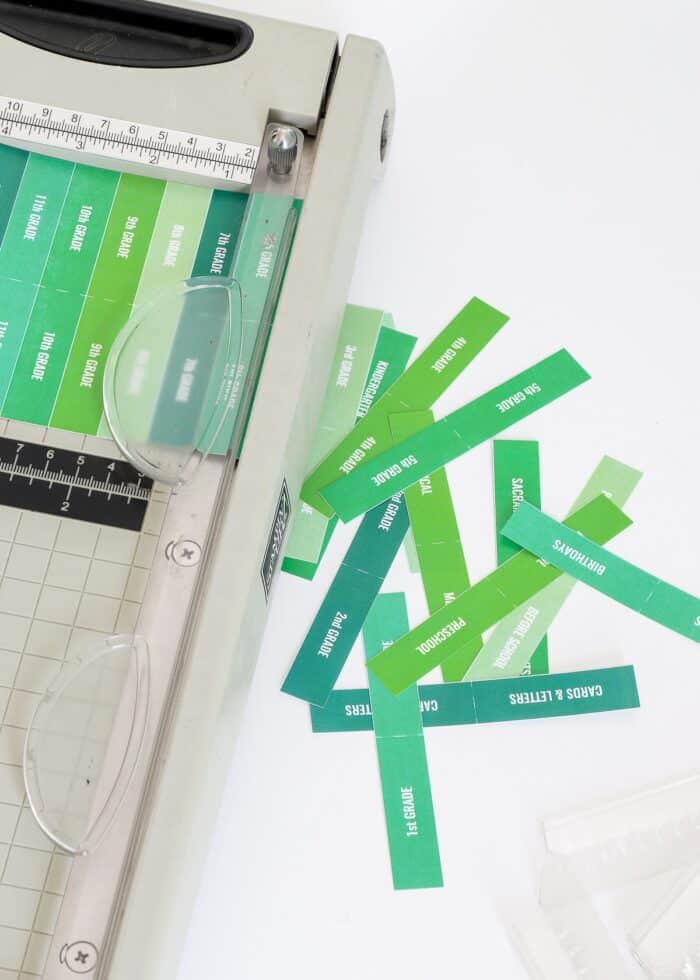
Then, assemble the file tabs as follows:
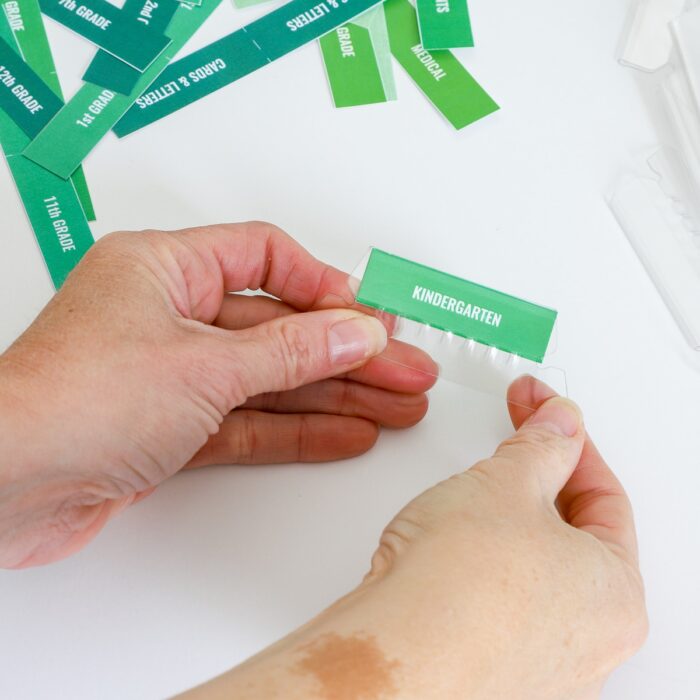
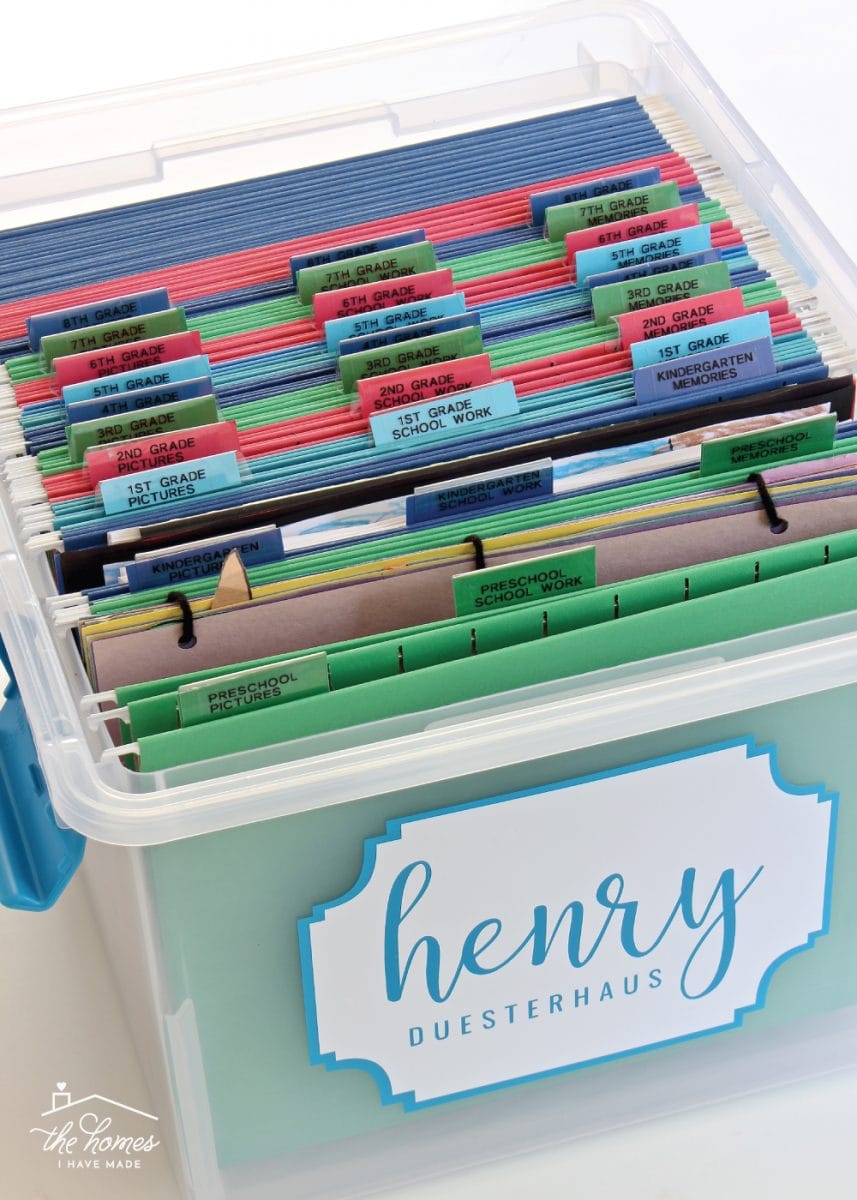
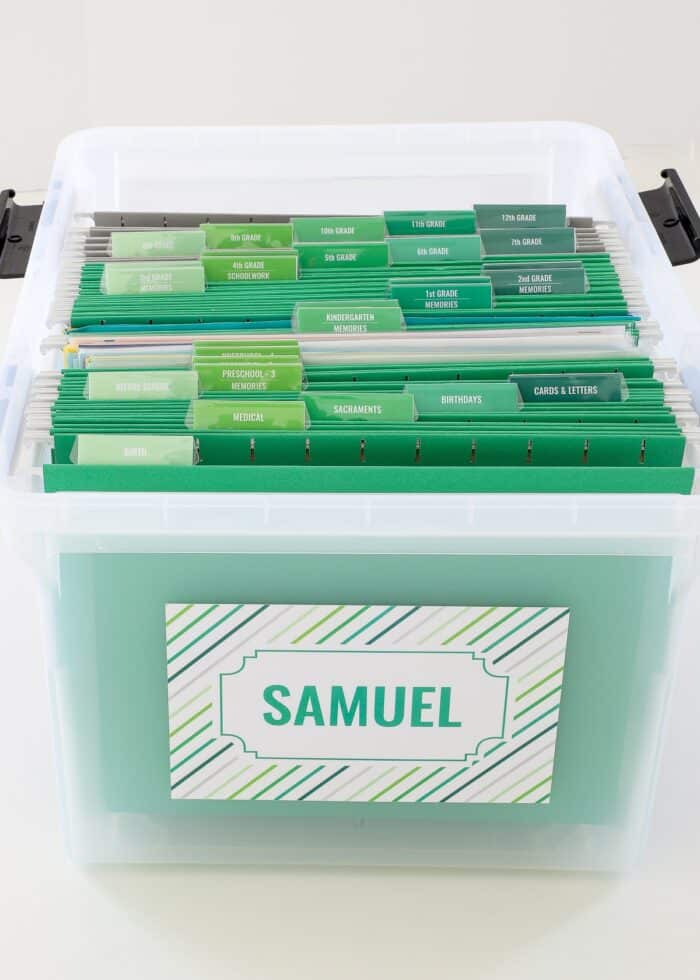
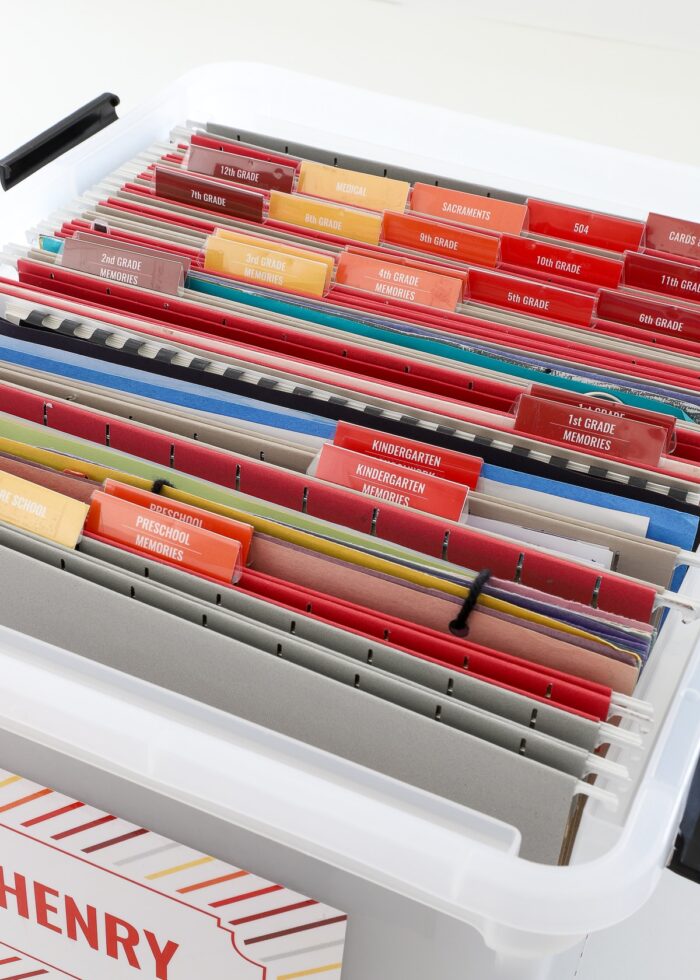
Step 7: Load Up the School Memory Box
You’ve now done all the hard work, and all you have to do is assemble your (colorful) memory box! Working in chronological order from front to back, load each hanging folder into the box and add the correct plastic tab (as identified by the Post-It Note).
You can arrange the tabs anyway you like; I personally like stacking up each stage/grade so that all the file folder tabs follow an ombre-effect across the box.
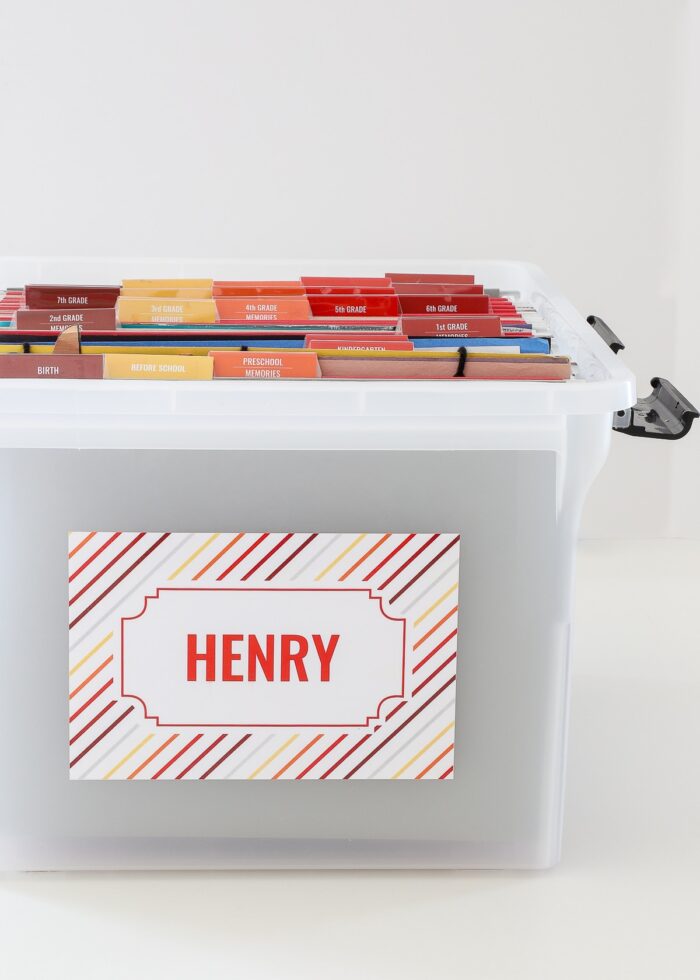
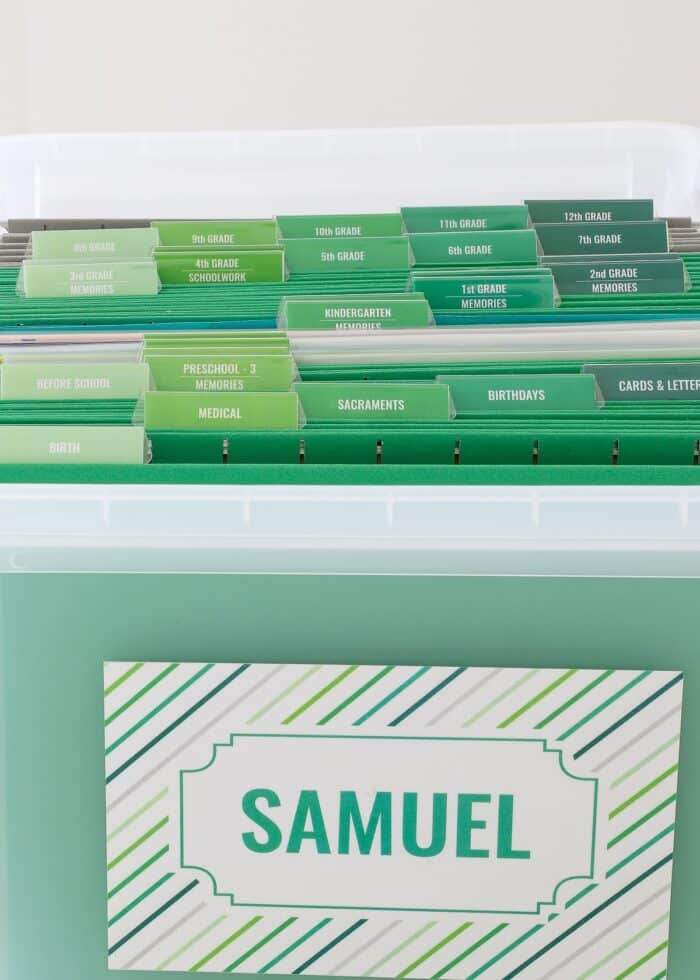
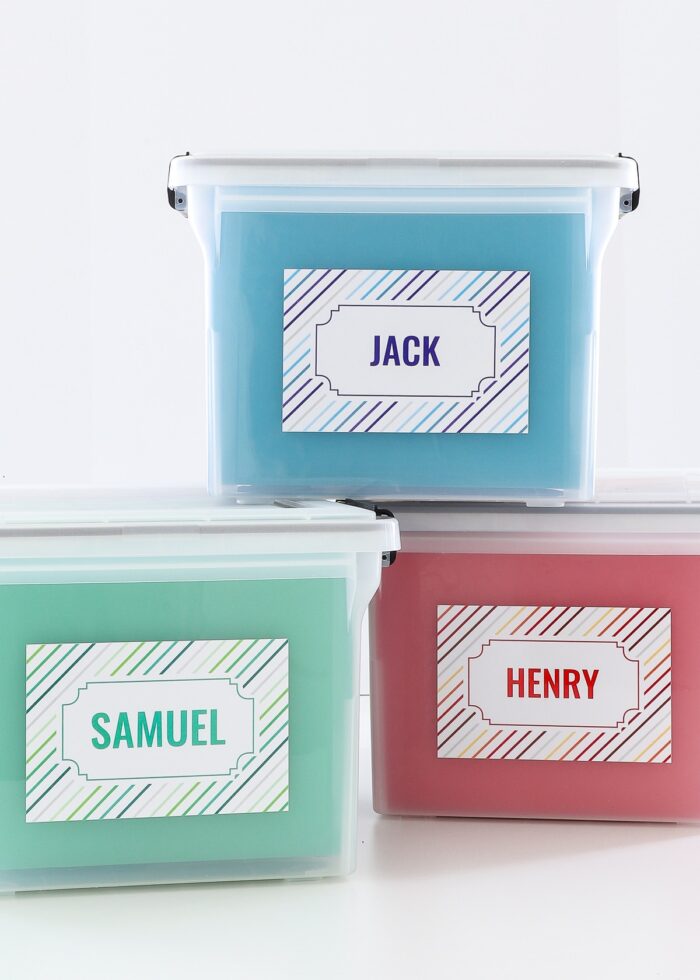
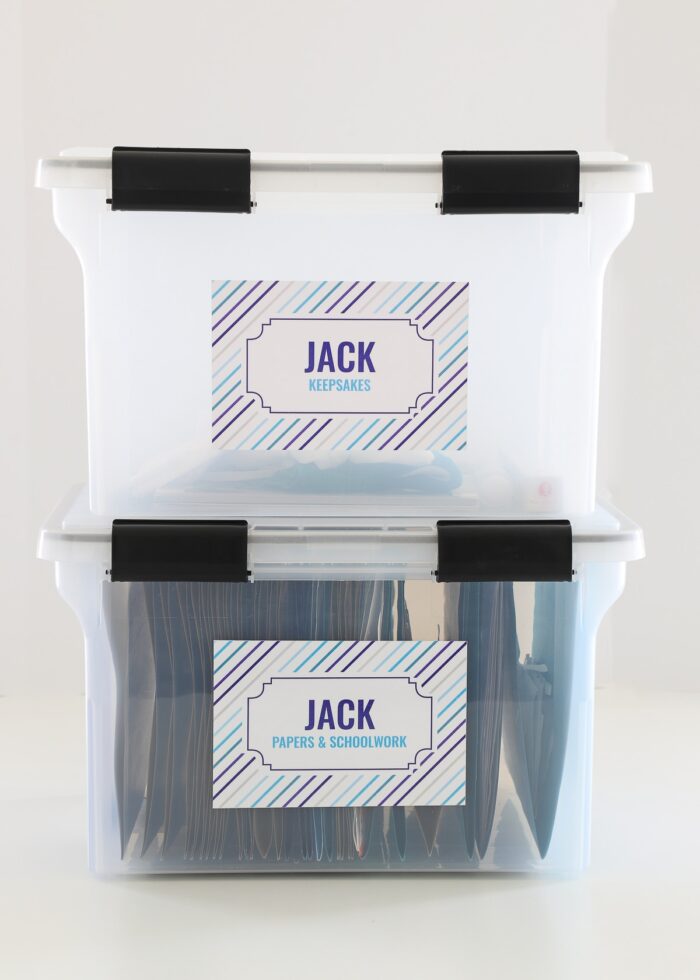
Step 8: Add Box Labels
Last but not least, you’ll want to add a name label to the outside of the box (especially if you have multiple children).
Again, open the School Memory Box Labels PDF with Adobe Acrobat Reader. Type whatever name/description you want into the blue text fields (there are single and double-line options).
When satisfied, print the labels onto white sticker paper and cut down to size with a paper trimmer. Although not required, you may want to laminate the labels to make them more durable.
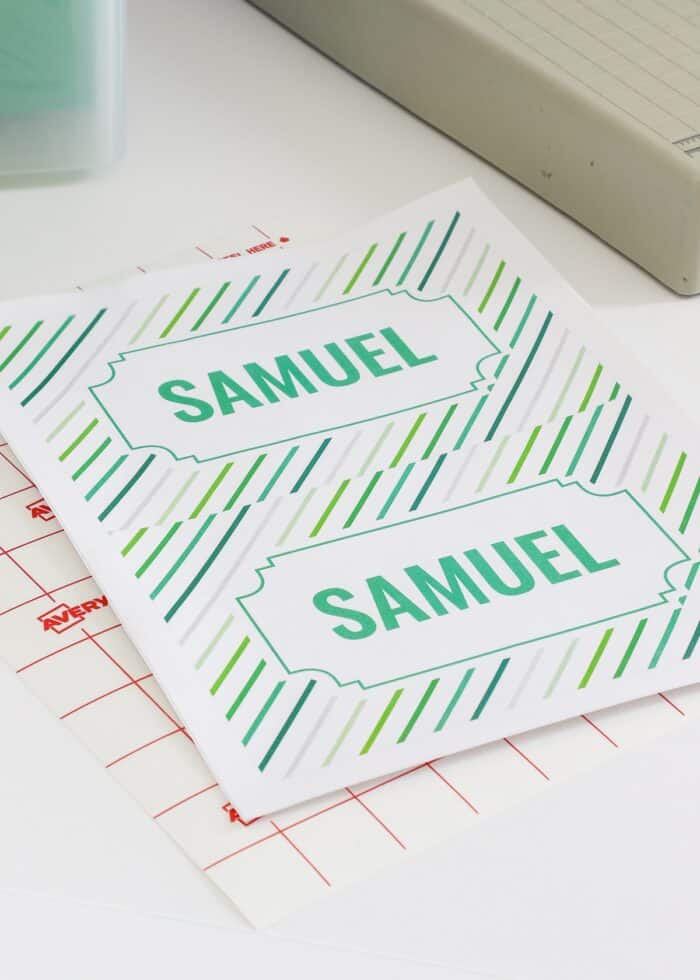
Stick the label to the front or side (or both!) of the box so that it’s always visible.
Step 9: Repeat with Additional Children
If you have additional children, repeat the entire process (yes, the whoooole thing) for the next child.
Step 10: Add to the Boxes Routinely
This might sound a little crazy, but when it comes to kids papers, I highly recommend waiting until the end of the school year to go through it all. Yep…all of it. Here’s why.
Doing an entire year of papers and projects all at once might seem overwhelming, but I actually find this approach allows me to better make decisions about what’s truly worth keeping. By seeing everything at once, you not only appreciate the sheer volume, but you are better able to identify the very, very best.
How do I manage this logistically?
We have a single lower kitchen cabinet that collections all the kids’ papers that come home from school and other activities. I toss obvious trash immediately, but almost everything else gets piled into the cabinet. At the end of the school year, I pull everything out and go through it all at once. Again, seeing all the not-so-good stuff really helps you hone in on the school memorabilia worth keeping.
TIP! I usually only collect school papers throughout the whole year. Birthday cards, report cards, special notes, etc typically get filed away as they appear.
Other Tips & Tricks for Organizing Kids’ Papers
Go Broad
You’ll notice that I added additional categories to our boxes such as Birth, Sacraments, Medical, etc. I used to keep these “non school” papers in a separate file box; but over time, it has felt redundant and tedious to maintain two different filing systems.
By adding these other categories to this larger box, everything for each child is contained in one easy-to-find spot.
Do It All At Once
When I first assembled our oldest son’s school memories box, I only went up to 8th grade. Oh boy, time flies! While I was thankful to have an opportunity to re-visit the project and refine it before we got into high school, it also would have been nice just to have it all done.
So while you are printing and cutting and hanging folders, go ahead and make folders through 12th grade. You can adjust as needed, but having your entire system setup at an early age means you’ll be more likely to use it along the way!
Keep Extra Labels In the Box
Even though I determined we no longer need the Photos, Memories, and Schoolwork subcategories for the higher grades, I didn’t just toss those extra labels into the trash. I printed the full page of labels and tucked the extras into an envelope and put them in the bottom of the box so that I can pull them out if needed.
Break Apart Bulky Items
It has been our experience that, in lower grades especially, the kids come home with “collections” of work. Journals, binders, frames, calendars, etc. Clearly these are things that were added to all year long; and oftentimes, teachers will bind them together into a single “book.”
If these items fit nicely into the hanging file folders, leave them be. But if they are bulky and won’t fit, down hesitate to break them down, take them out of binders, un-bind them, etc.
Keep the Boxes Accessible
Adding papers and memories to this box will only be successful in the long run if you can easily access the box. So I don’t recommend putting the box(es) up in the attic or other hard-to-reach spot. You’ll want to be able to grab these boxes and add to them whenever you come across something worth keeping.
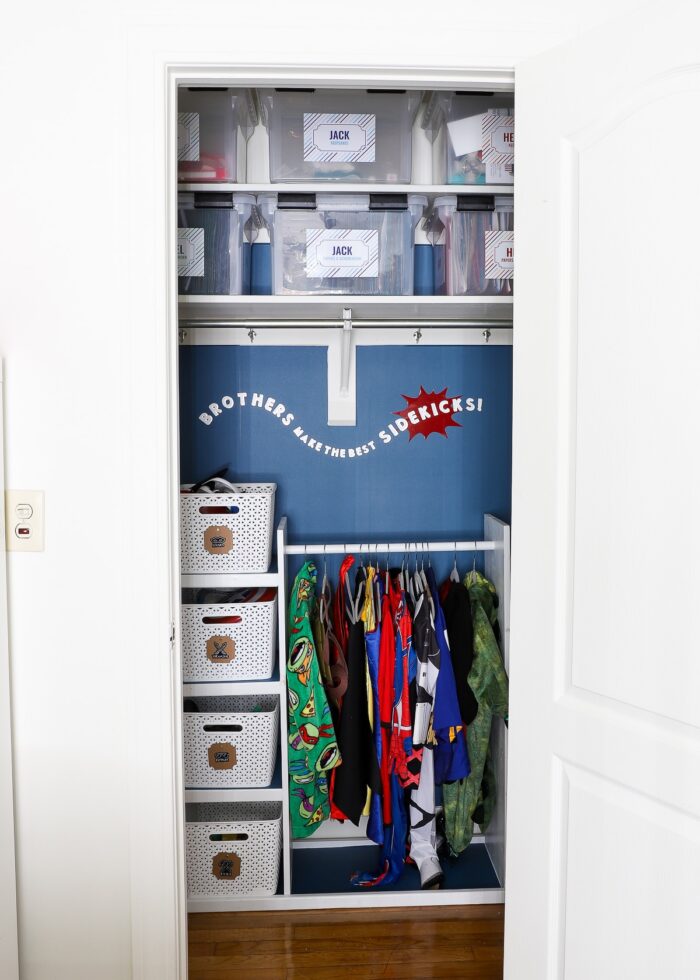
Our boxes are all tucked into the top of the younger boys’ dress up closet.
What About Non-Paper Memories?
This file-folder system obviously only works with flat paper-related memories. So what about trophies, ribbons, medals, Pinewood Derby cars, and child’s artwork that don’t nicely fit into hanging file folders?
We have identical plastic file boxes for each child that hold these bulkier items. I love that these bins are weatherproof and stack nicely; but best of all: they force us to maintain a manageable level of keepsakes! If the lid doesn’t fit, it’s time to re-look at everything in the box and make different choices.
Prep Those First/Last Day Resources Now
Finally, I am notorious for printing our First/Last Day of School signs and interview pages at the very last minute (if I get to them at all!) If you love the idea of capturing those quintessential memories every year, print out the signs and interview pages now while you’re printing and assembling everything else. Then, tuck the pages into the corresponding (matching!) file folder so they are ready-to-go whenever you need them!
More Paper Organization Projects
Nothing feels better than getting nuisance paper under control. Once your School Memory Boxes are assembled, check out these other great paper solutions:
Although our original School Memory Box system had to be tweaked just a bit, I’ve still loved having this box setup for our oldest son all these years. Whenever report cards, birthday cards, Honor Roll certificates or anything else comes home, it really is easy to just put them right away (instead of letting them pile up). Now having boxes setup for our other two sons, I’m much more confident we’ll be able to keep a handle on their paper clutter too!
This project is one of my all-time favorites; and if you have kiddos, it’s definately a must-do. I hope you give it a try!
Megan


10 Comments on “How to Assemble a School Memory Box (With Printable Labels)”
This was so well-laid out. I agree with you that the sheer volume needs to be tamed – if everything is kept, nothing will be looked at again! I have such good intentions of going through everything, but still haven’t set it up (8 year behind, maybe???!!). I, too, love Jen at iheartorganizing… Thanks for pulling this together! Great inspiration.
Can you please specify the size of the box you used? The sizes on Amazon don’t seem like the right height for files.
Hi there!
I’m starting to make my daughter’s school memory box. I’m so glad I found your site!! Where can I find those colorful filing folders and the labels??
Hi Pollyana,
Most of the products I used and recommend are shown at the bottom of the post. You can also shop my favorites HERE.
Hope that helps!Megan
Great idea, thank you! A question…what to do with all the large projects, volcanoes, etc, the kids have done over the years?
I had found your original post just as my daughter was starting Pre-K (she’s in second grade now) and I am SO THANKFUL for it! I have two of the weather-proof boxes prepped all the way up to her senior year. It makes it so much easier for everything to have a place to land when it comes home each day rather than just putting everything in a big stack to deal with later. Thank you so much for sharing this system!
I love this! I teach middle school/high school students and we cover Career Exploration and Research. In 8th grade, they set up a personal file system to keep track of all the experiences, extracurriculars and all the things to compile into a high school resume. Most scholarships require some record of activities that an applicant has participated in or received recognition for and it’s difficult to recall what exactly a student has done if they have not kept records. Leadership opportunities, academic achievements, sports team involvements, awards, volunteering, church activities, 4-H, Boy Scouts, Girl Scouts, etc. all matter. These can and do translate to give a picture of a well-rounded student and can mean being awarded scholarships. Keeping those records for verification and having the student be responsible for storing them, can translate into valuable scholarship dollars and teach them priceless adult life skills. It is never too early to teach these skills.
Wow, Pamela! What great insight. My kids are still in lower elementary grades and I’ve not really thought about future scholarships. But I agree having this organized box is a beautiful way to teach them with an example of organization.
Megan! This Sunday short email tip came to me at the perfect time. I’ve spent hours sorting through the paperwork art that my kids have brought home this year. And I have some of previous years saved in big stacks around the house. I plan to send some of it in an ARTkive box, but the book that I get in return will fit nicely in this box. Hugs!
Hi, this is a great way of organizing all the memories. I’m wondering if you would by any chance sell the boxes ready….? If yes, I’d love to buy two boxes (one blue and one pink) all with the folder and labels in place. Let me know. Thanks!