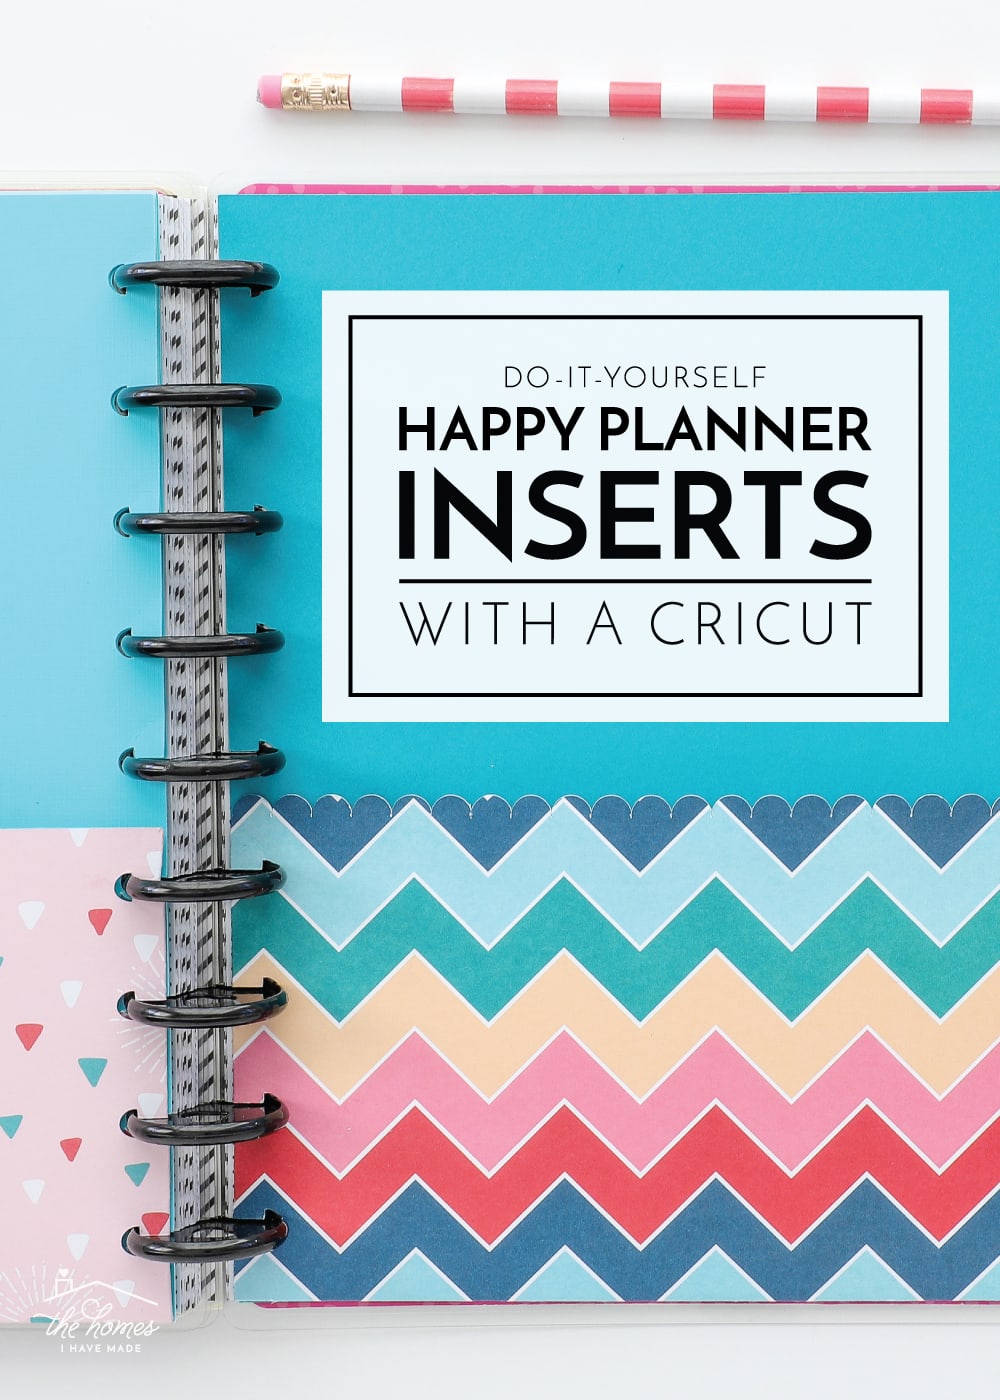
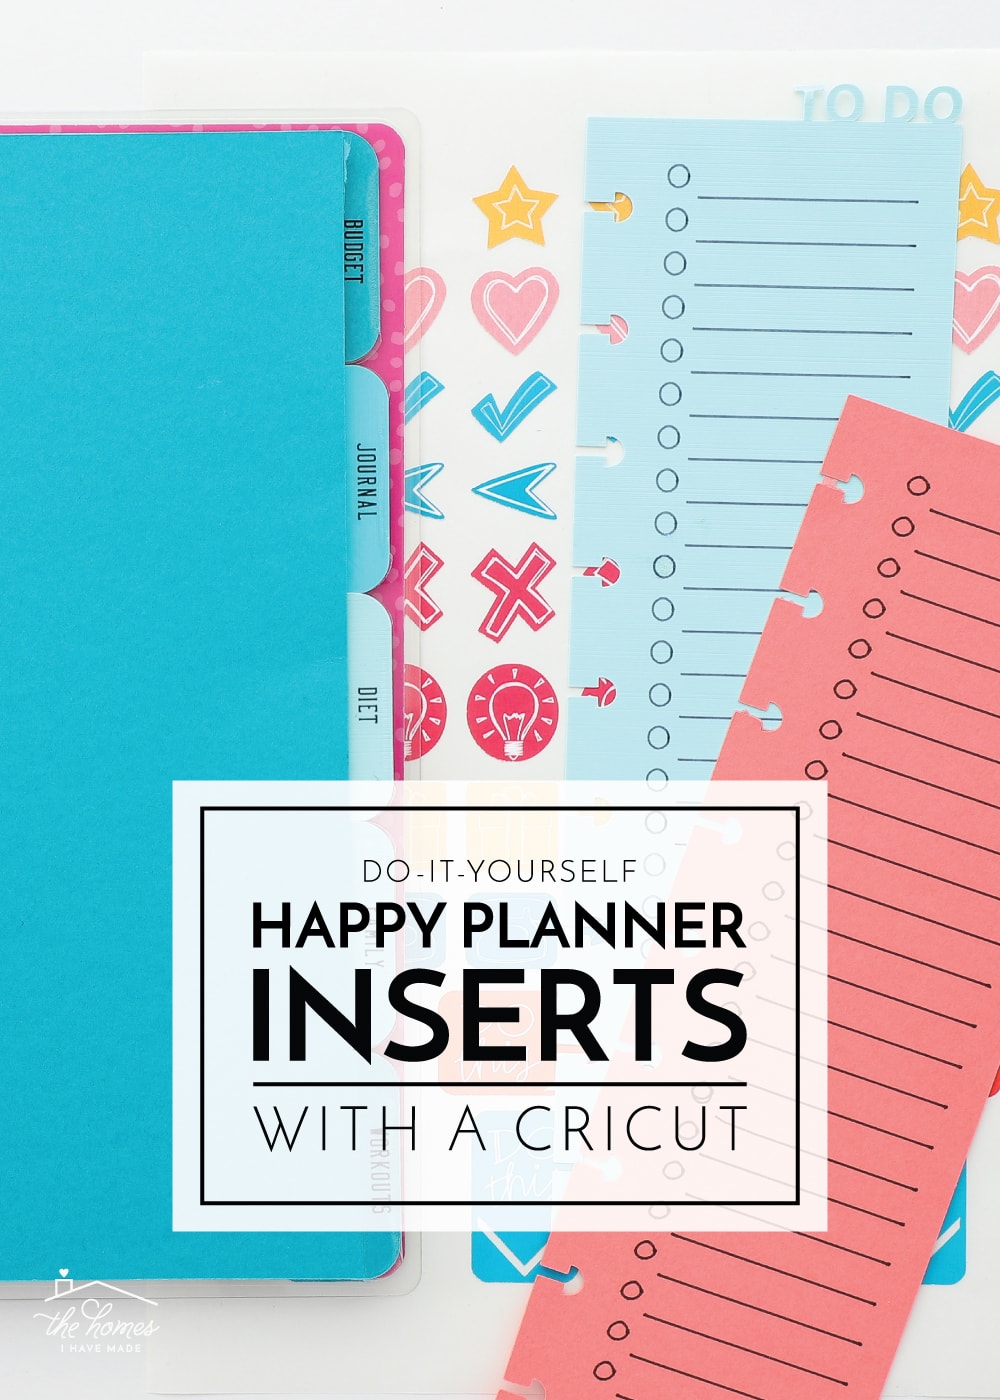
DIY Happy Planner Inserts with a Cricut
In recent months, one of my favorite ways to use my Cricut machine has been to create custom planner accessories (such as Magnetic Bookmarks, Planner Pouches, and even Planner Stickers!). Today, I want to show you how to make your own Happy Planner Inserts with a Cricut. This is a really fun way to customize your planner with inexpensive materials…adding doses of color and whimsy while ensuring you get the organization and functionality you need! Let me show you how fun and easy this project is!
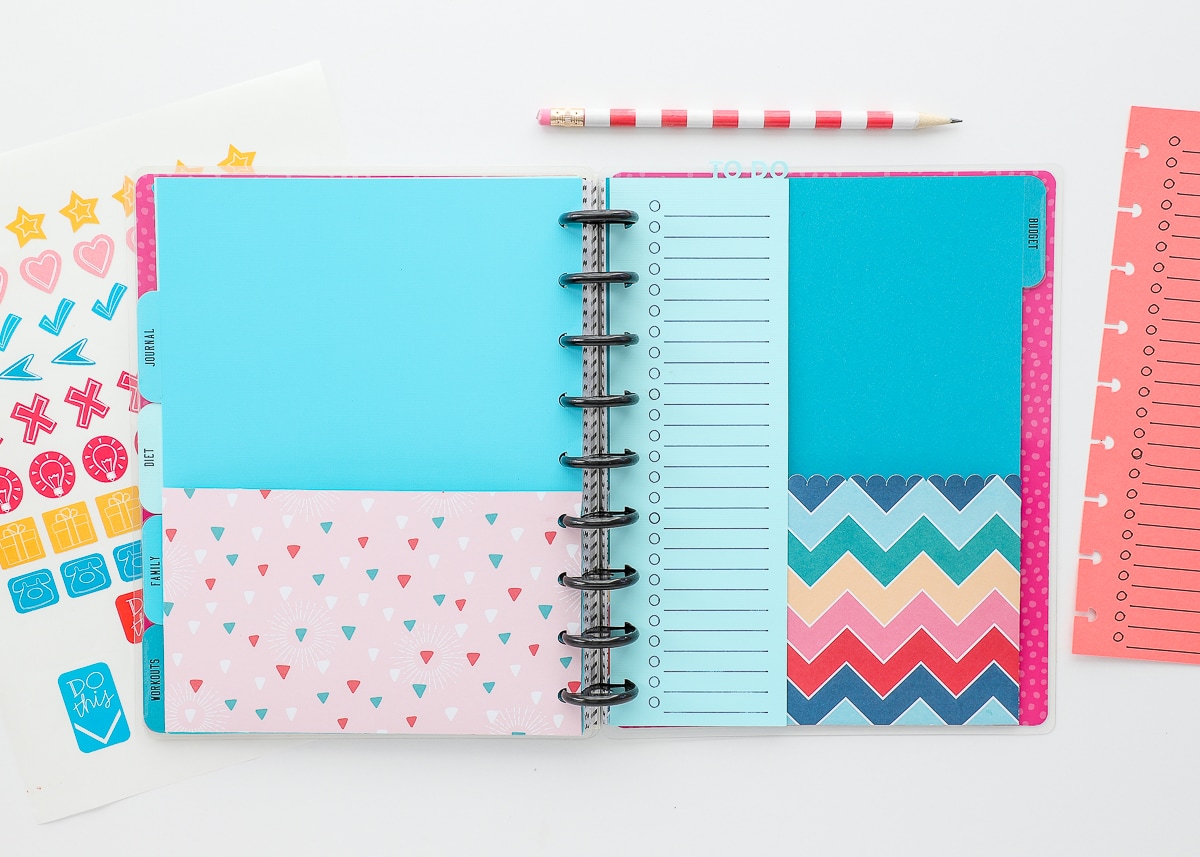
DIYing your own Happy Planner Inserts with a Cricut is a great way to not only make your planner function just right for you, but it can also save you money on costly accessories while letting your style and personality shine through. Any disc-bound notebook system (like the Happy Planner!) make it oh-so-easy to insert your own dividers, tabs, bookmarks, and more!
Through a little bit of trial-and-error, I created my own set of insert designs for both the “Standard” 9-disc-bound planner (like Happy Planner) and the 8-disc-bound planner (such as the Sweet Life Planner). With my FREE files and some pretty papers, you can whip up a set of folders, tabbed dividers, and bookmarks in mere minutes!

9-disc (“Standard” Happy Planner)
8-disc (Sweet Life Planner)
Supplies Needed
To make your own custom DIY Happy Planner Inserts with a Cricut, here is what you need:
- Cardstock in the colors/patterns of your choice (consider choosing coordinating papers to make a mix-and-match set; I used this paper set)
- Cricut Explore or Cricut Maker (the Cricut Joy cannot cut the size needed for the Happy Planner but might be able to accommodate smaller planner sizes.)
- The Fine-Point Blade and Scoring Wheel (Maker) or Scoring Tool (Explore) will also be needed.
- Favorite paper adhesive (I like this tape and this glue)
- FREE SVG files – click the link to get the files for both the Happy Planner (9-disc layout) and the Sweet Life Planner (8-disc layout)
- Optional:
- Scraper or bone folder (to make the creases tight)
- Clear sticker paper (my favorite paper to make crystal clear tab labels)
- Printer (to make tab labels and list bookmarks)
- Cricut Pens (to make tab labels and list bookmarks)
Video Tutorial
See how these DIY Happy Planner Inserts with a Cricut come together in just minutes! If the video isn’t loading, you can watch it HERE!
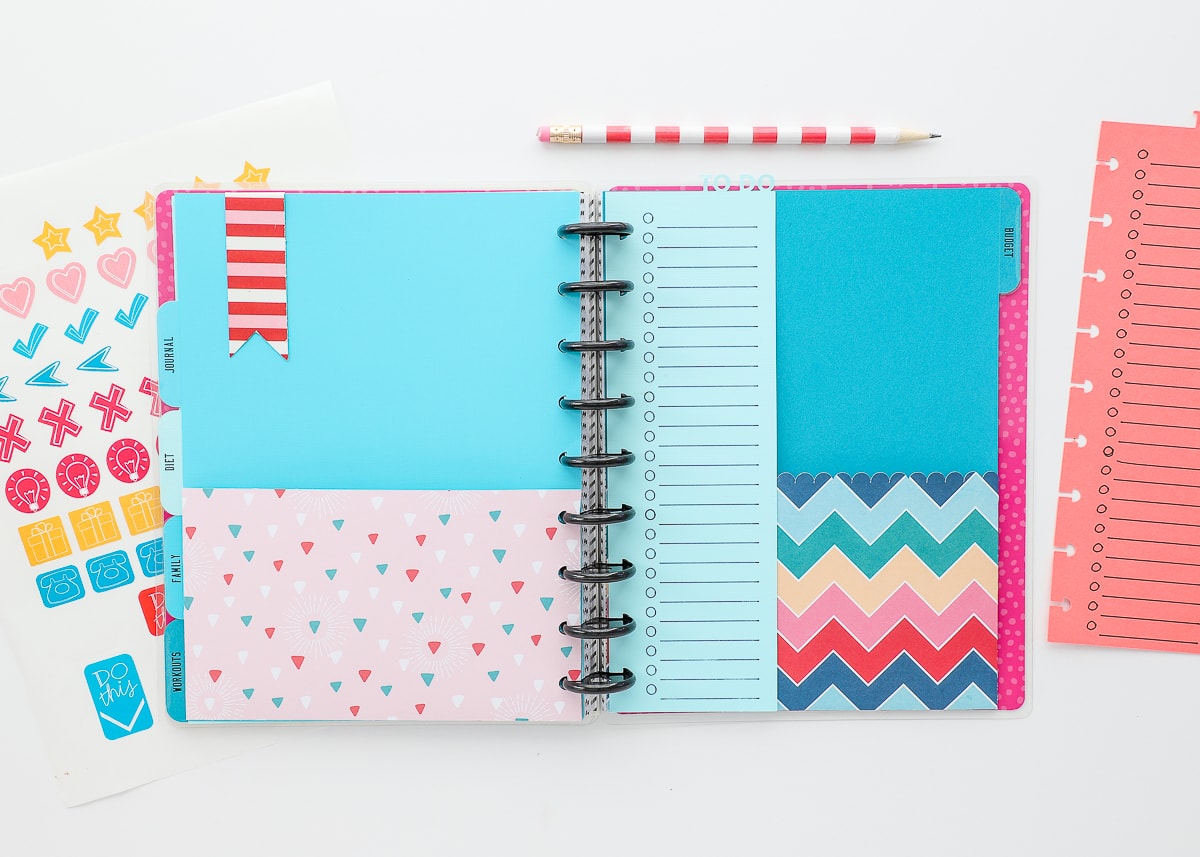
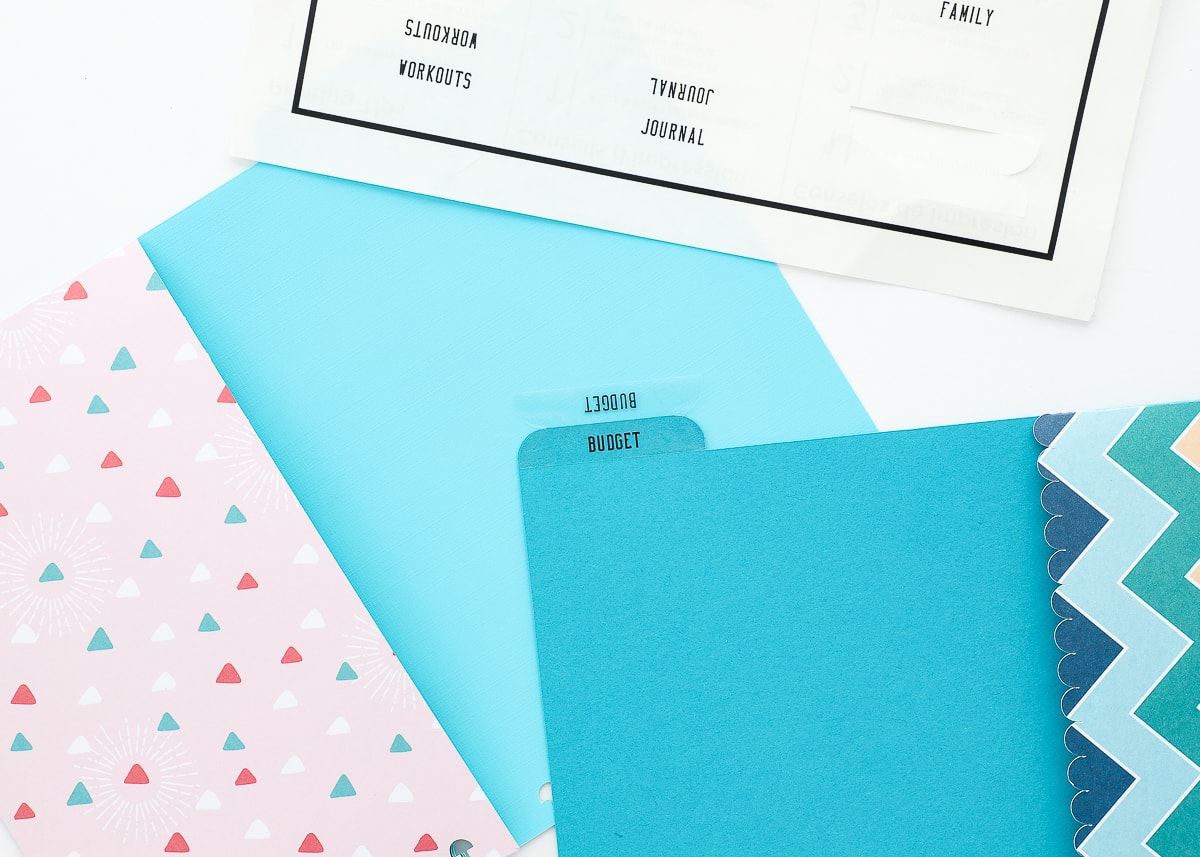
How to Make the Pocket-Style Inserts
Let’s start by making some pocket inserts for the Happy Planner!
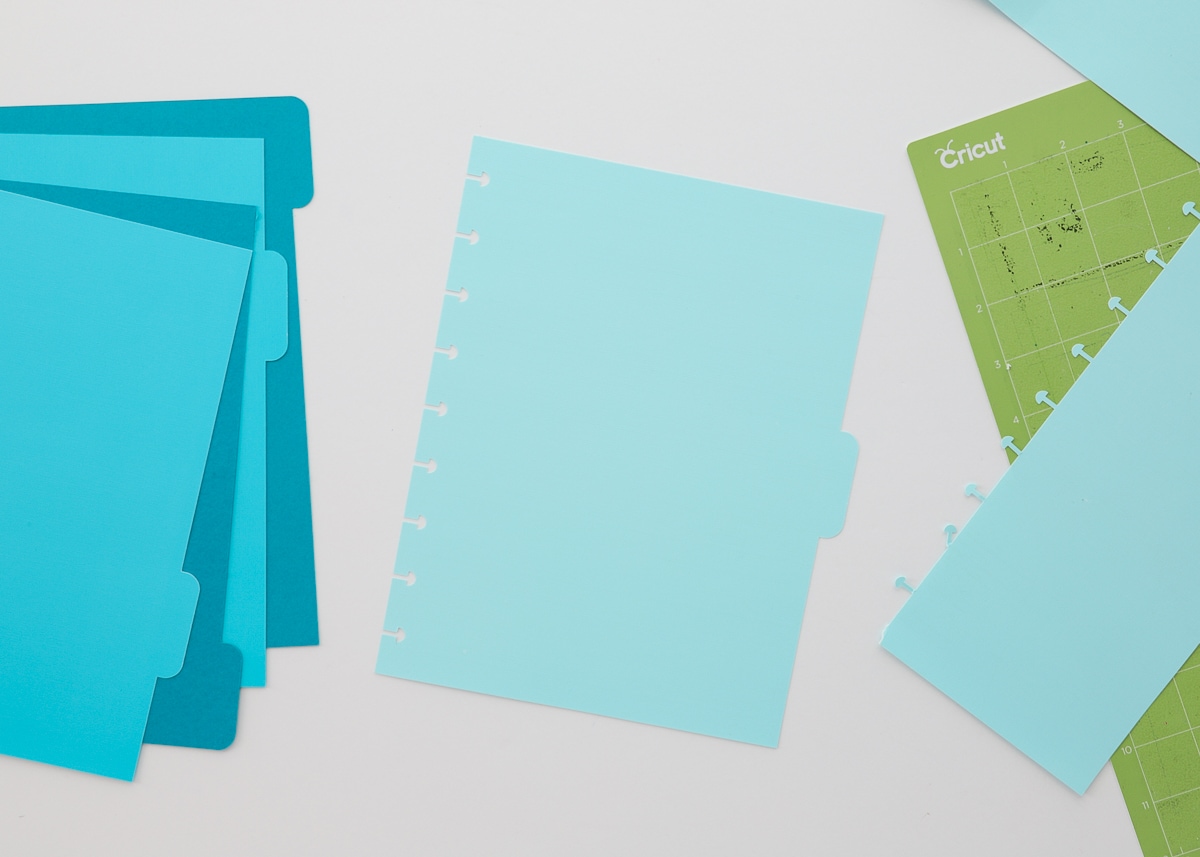
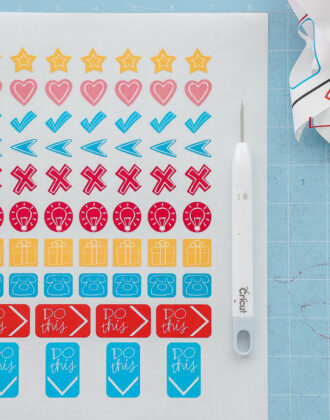
Once you grab my free SVG files, upload them to Cricut Design Space (if you need help, use these directions: How to Upload Images to Cricut Design Space). Once uploaded, you’ll see there are several designs included:
- A No-Tab Divider (used to make a basic pocket insert with no tab OR a basic planner page)
- Pockets (in two styles)
- 5 Tabbed Dividers
- Tab Label
- Bookmarks (in two styles)
You can group/ungroup, hide, duplicate, and delete any elements of the file by using the tools in the top of the right-side toolbar.
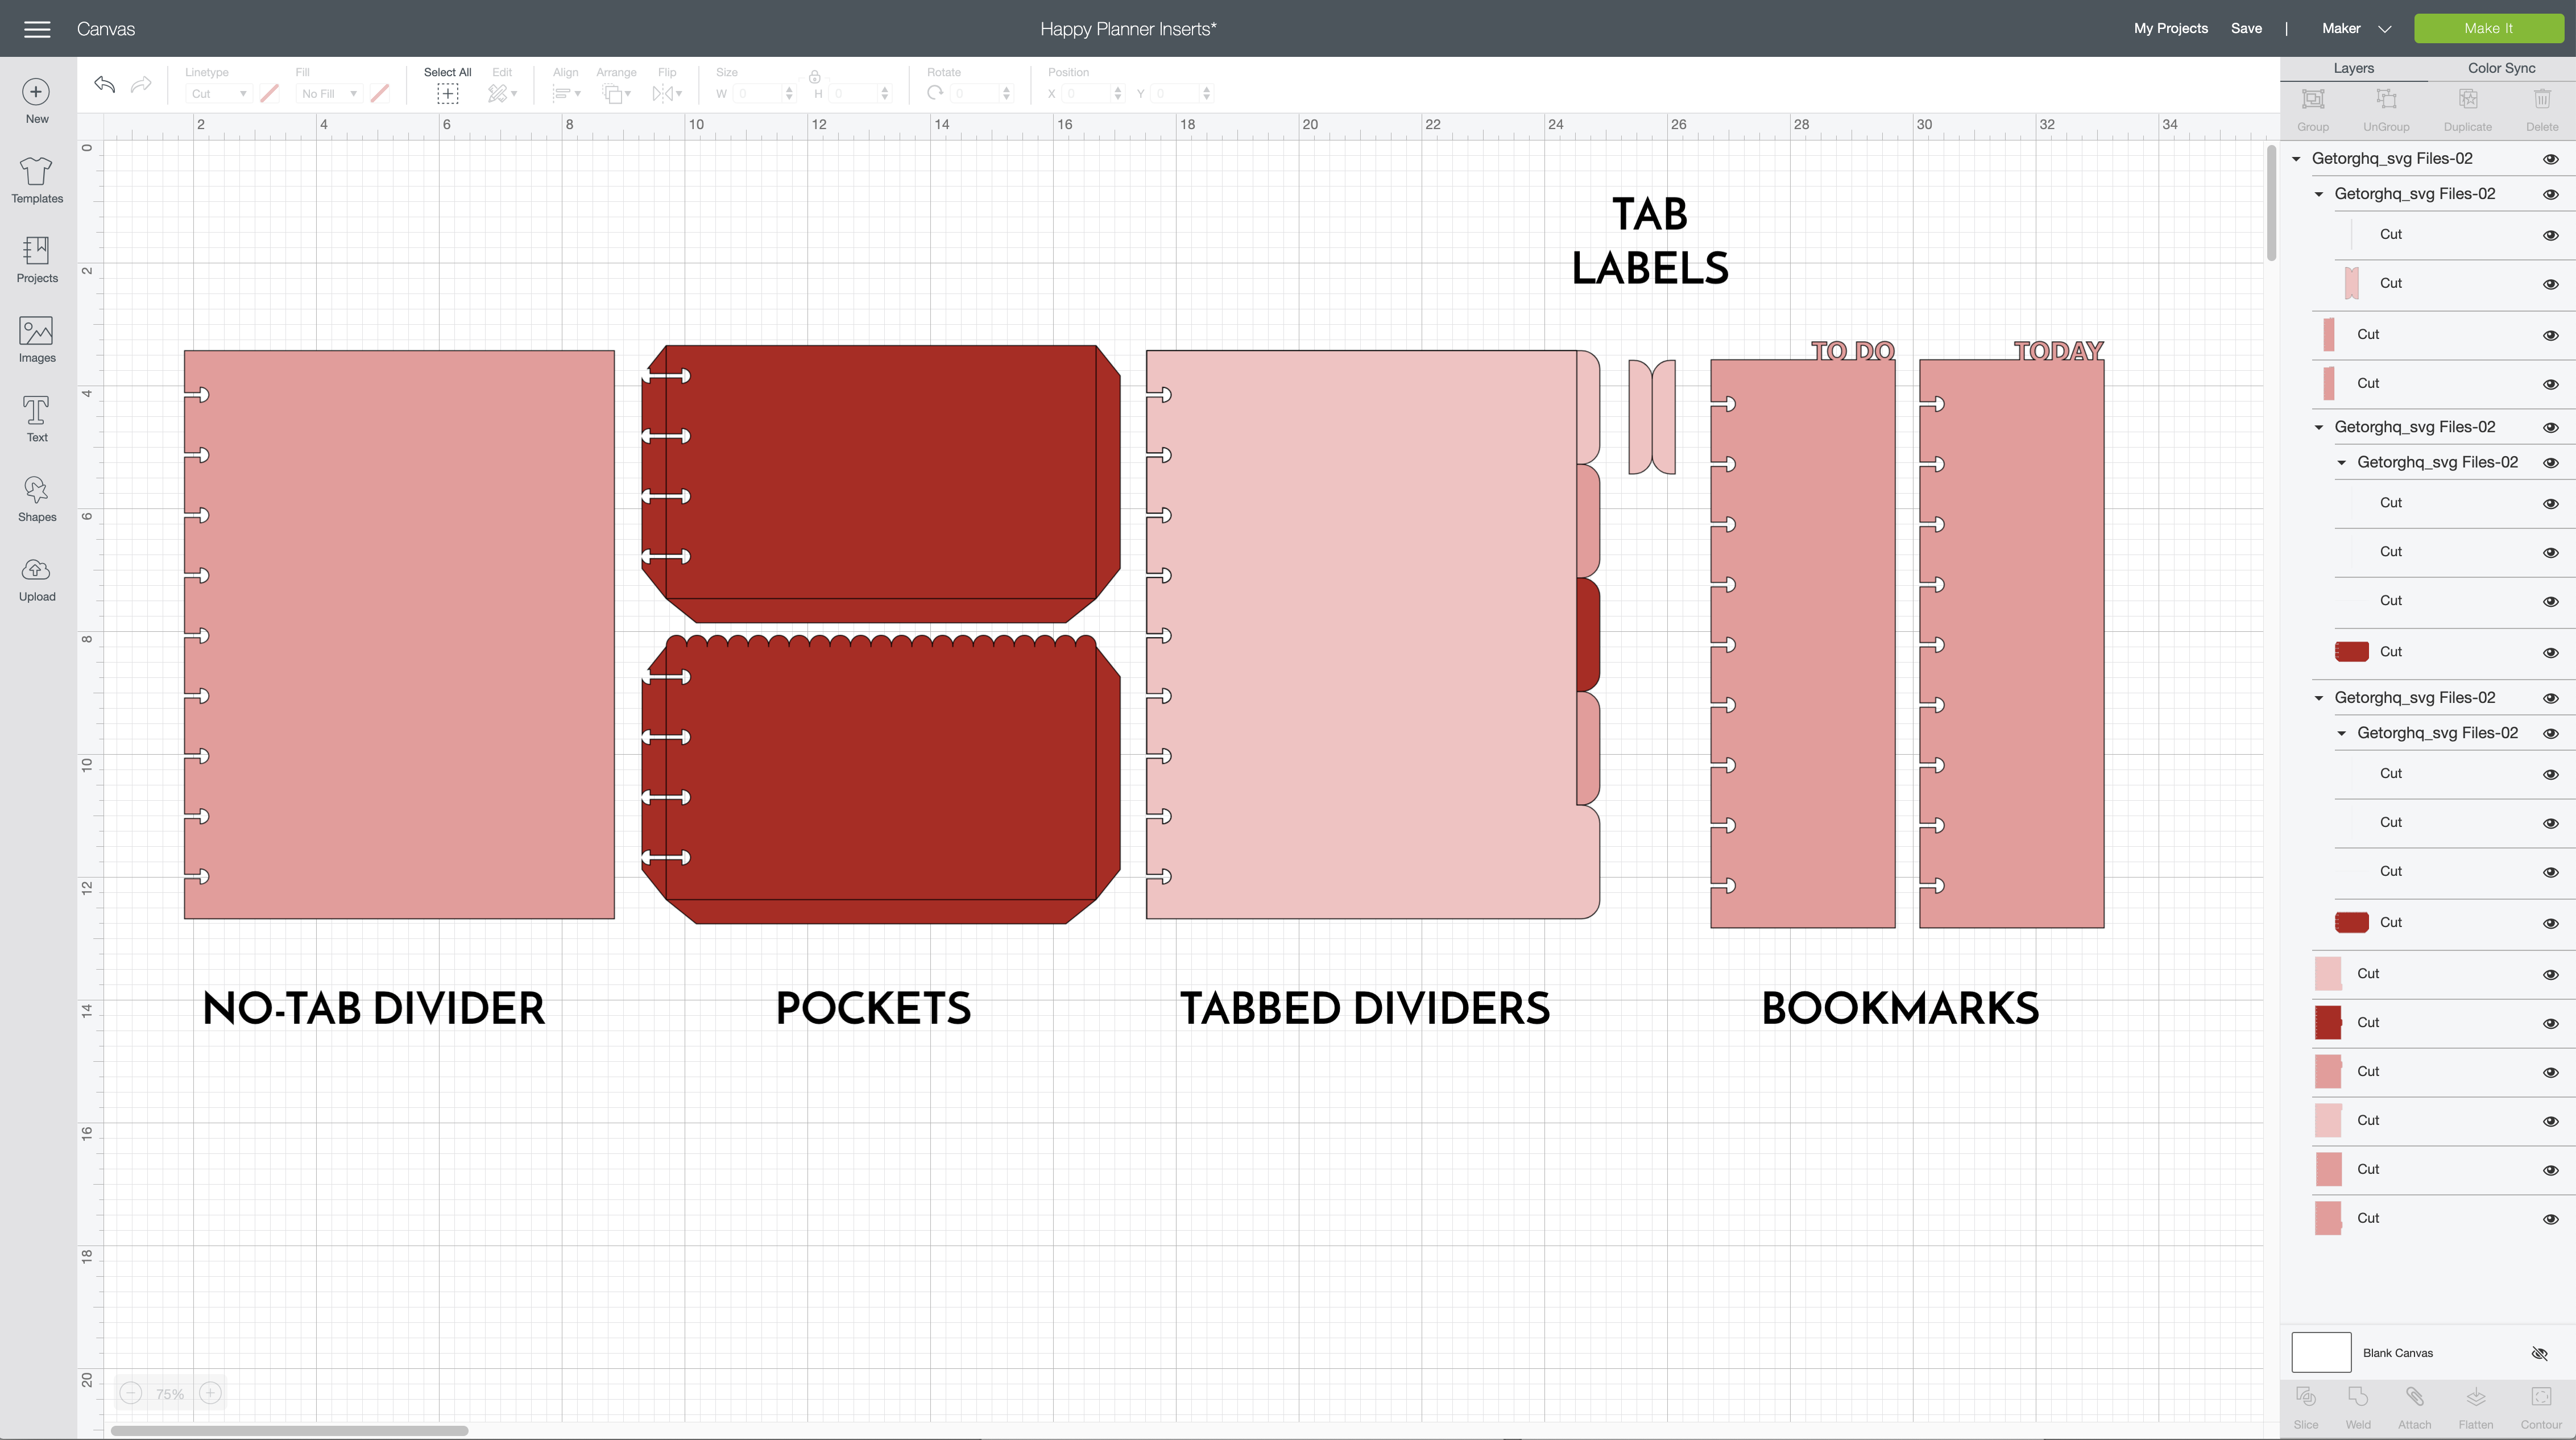
All the files are pre-sized for the “Standard” Happy Planner, so you will not need to re-size them (unless you want to do so for other planner sizes).
However, when the file is uploaded to Cricut Design Space, the Score lines on the pockets will first appear as Cut lines. To fix this:
- Select the 3 Cut lines (use the right-hand side panel to select each one) and change them all to “Score” using the Operations menu on the top toolbar
- Then, select the three lines and the pocket shape and Attach them together (to understand why, read more here: Understanding Attach In Cricut Design Space).
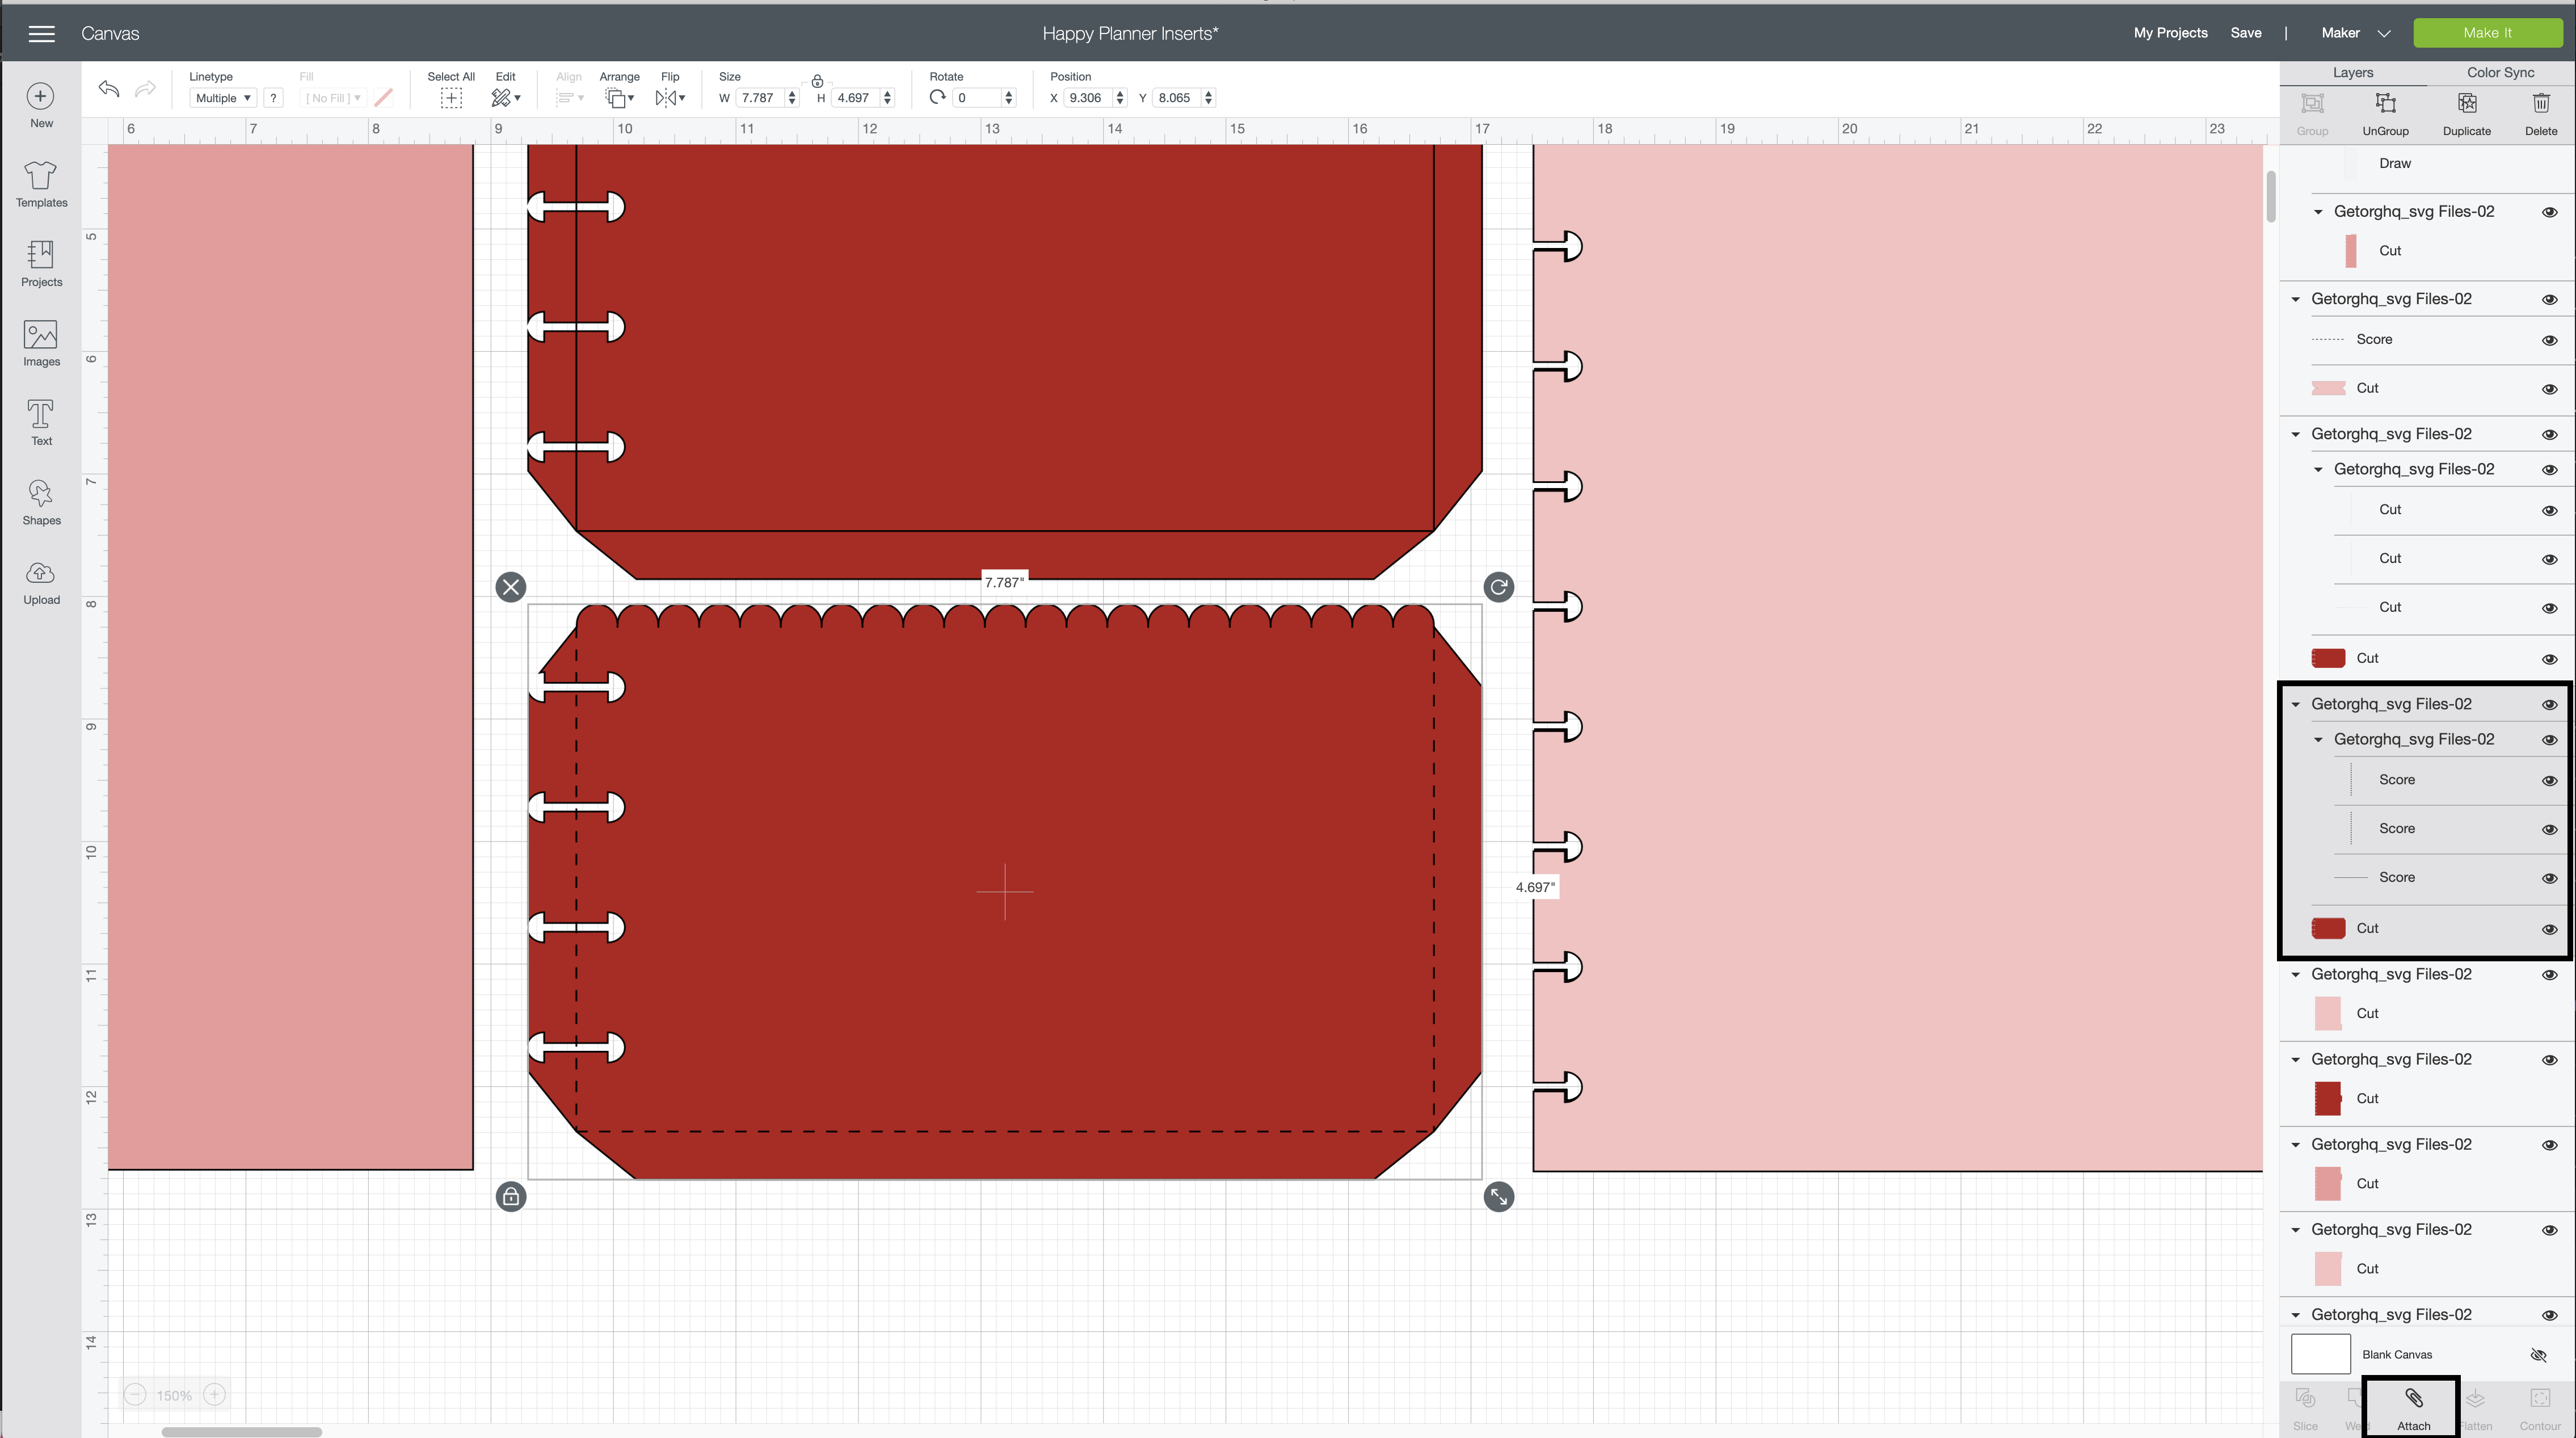
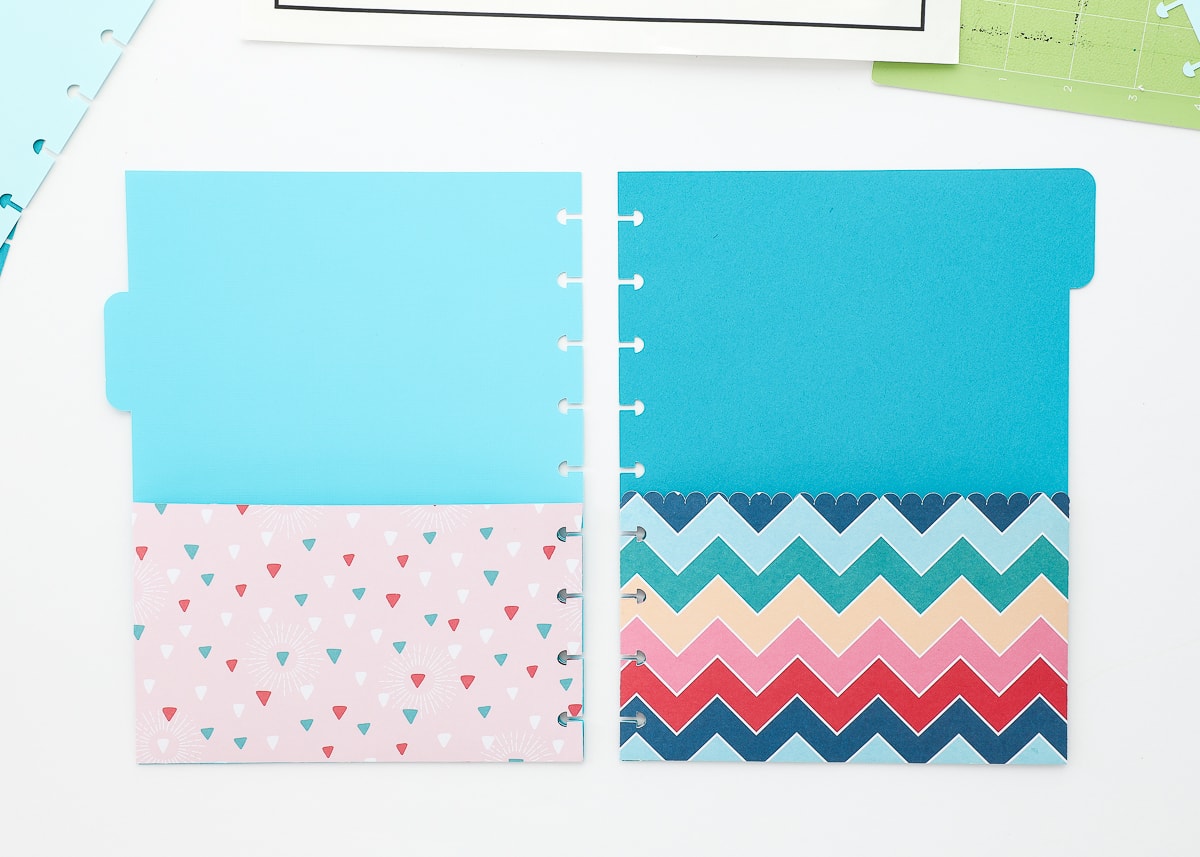
When you’re ready, cut out either the No-Tab Divider (just to make a pocket insert) OR a Tabbed Divider (to add a pocket to one of your tabs), plus one of the two pocket designs (straight or scalloped).
TIP! If you’re using patterned paper, make sure you think through which side of the divider you want your pocket on so you cut the papers in the correct direction!
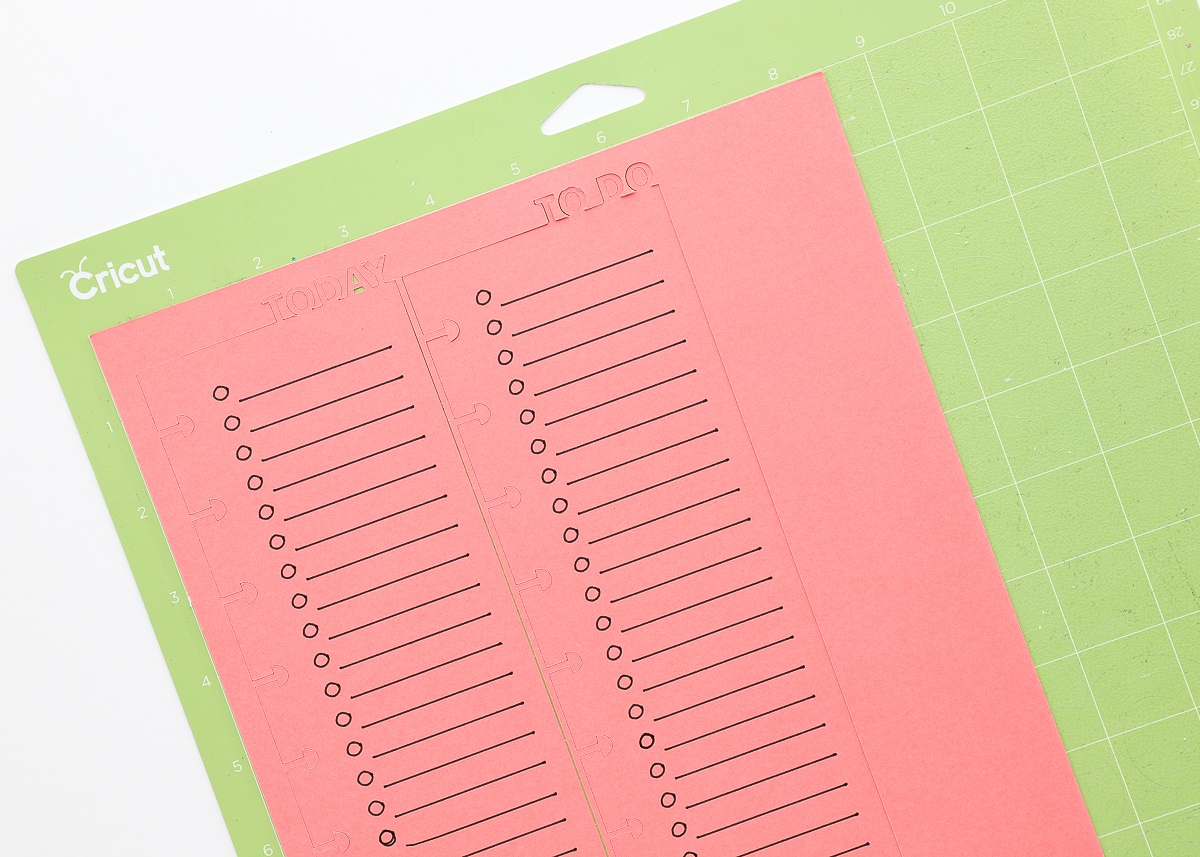
Your Cricut machine will first score the lines on the pockets, then cut out the shapes. Once you remove the various cuts from your mat, is should look something like this:
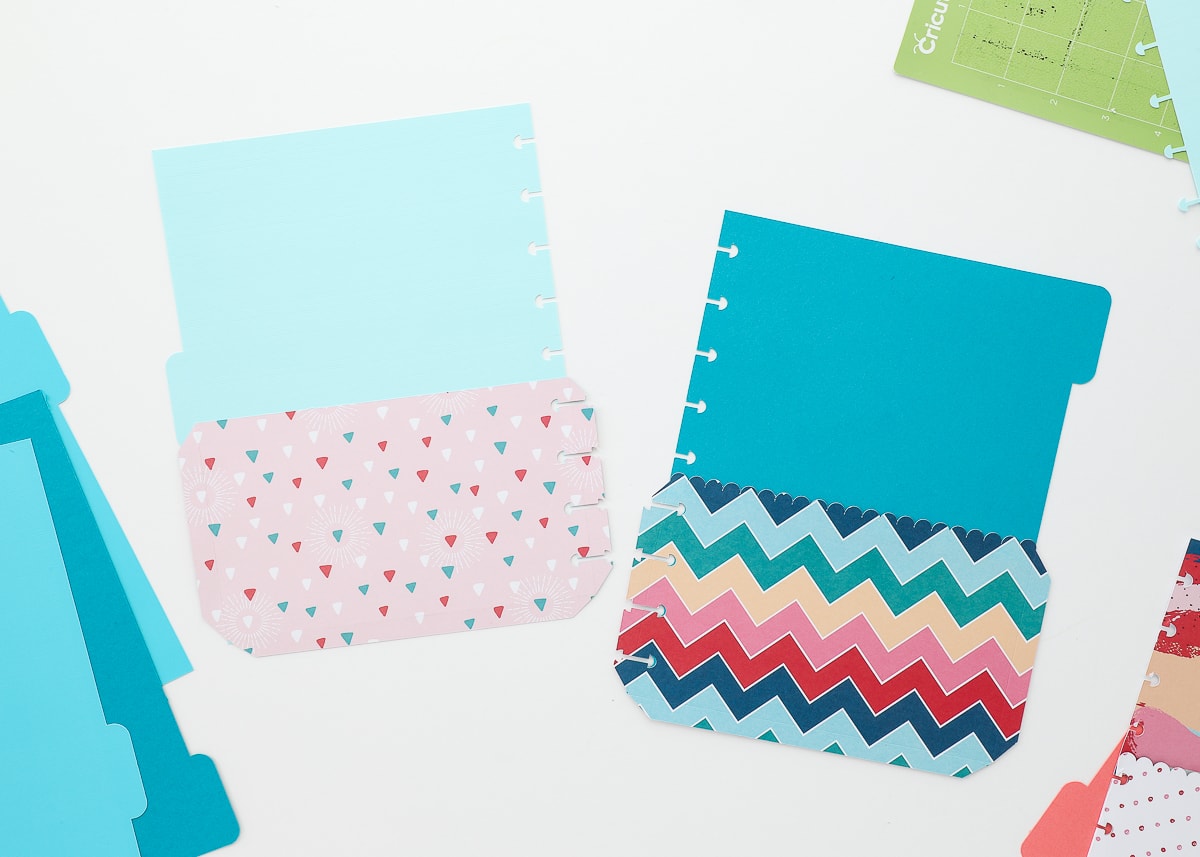
Next, fold the three edges of the pocket toward the back, along the score lines. If you have one, use a scraper or bone folder to make the folds nice and crisp.
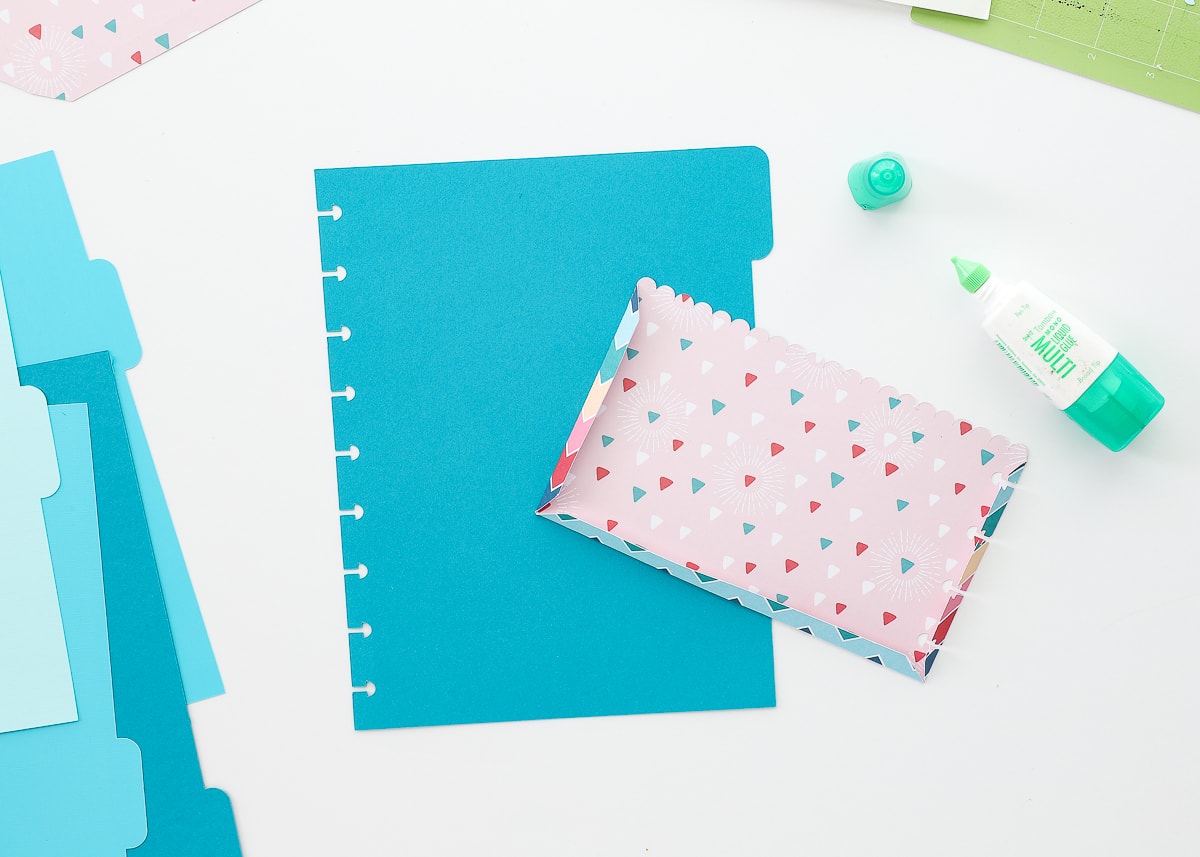
Then, use your favorite adhesive along the entire folded edges (including between all the disc holes), and place the pocket wrong-side down onto the divider. Be sure you line up all edges perfectly before allowing your adhesive to set.
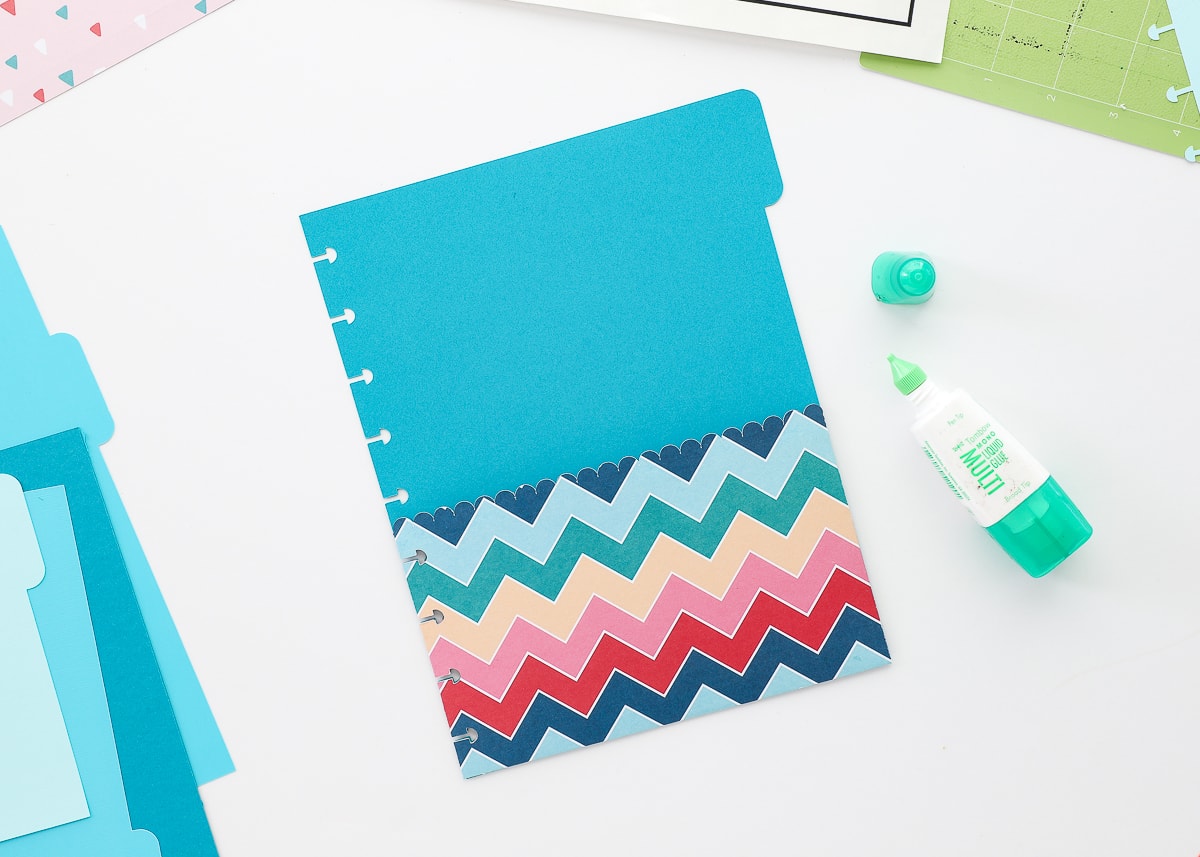
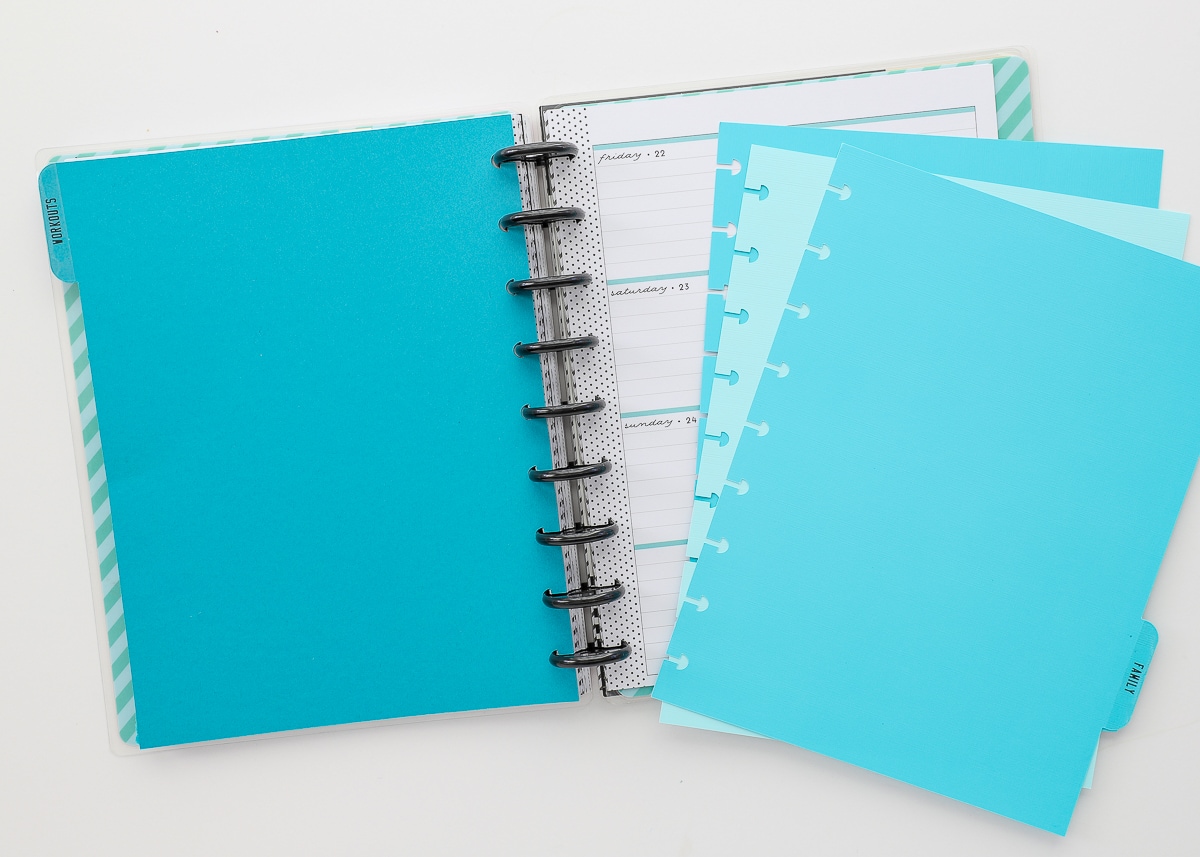
The pocket divider is now complete and can be loaded right into your planner using the disc holes along the side!
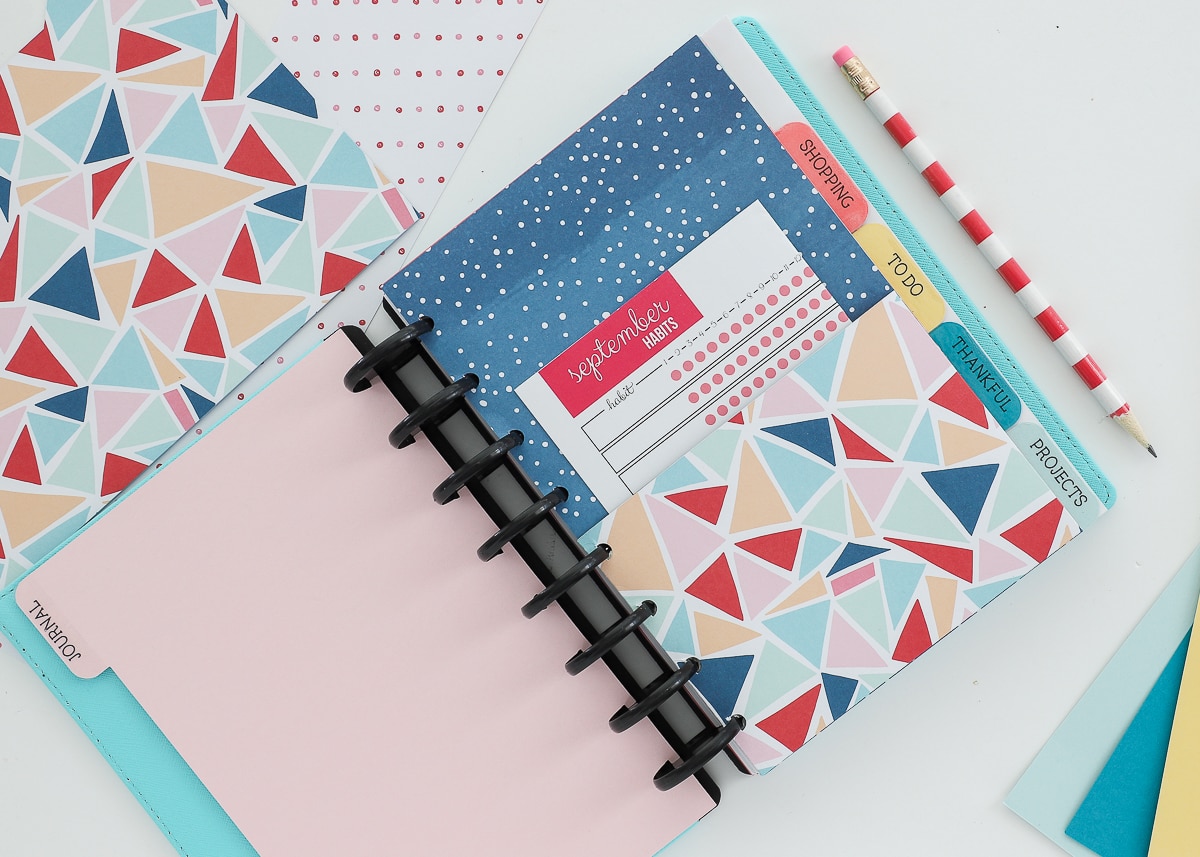
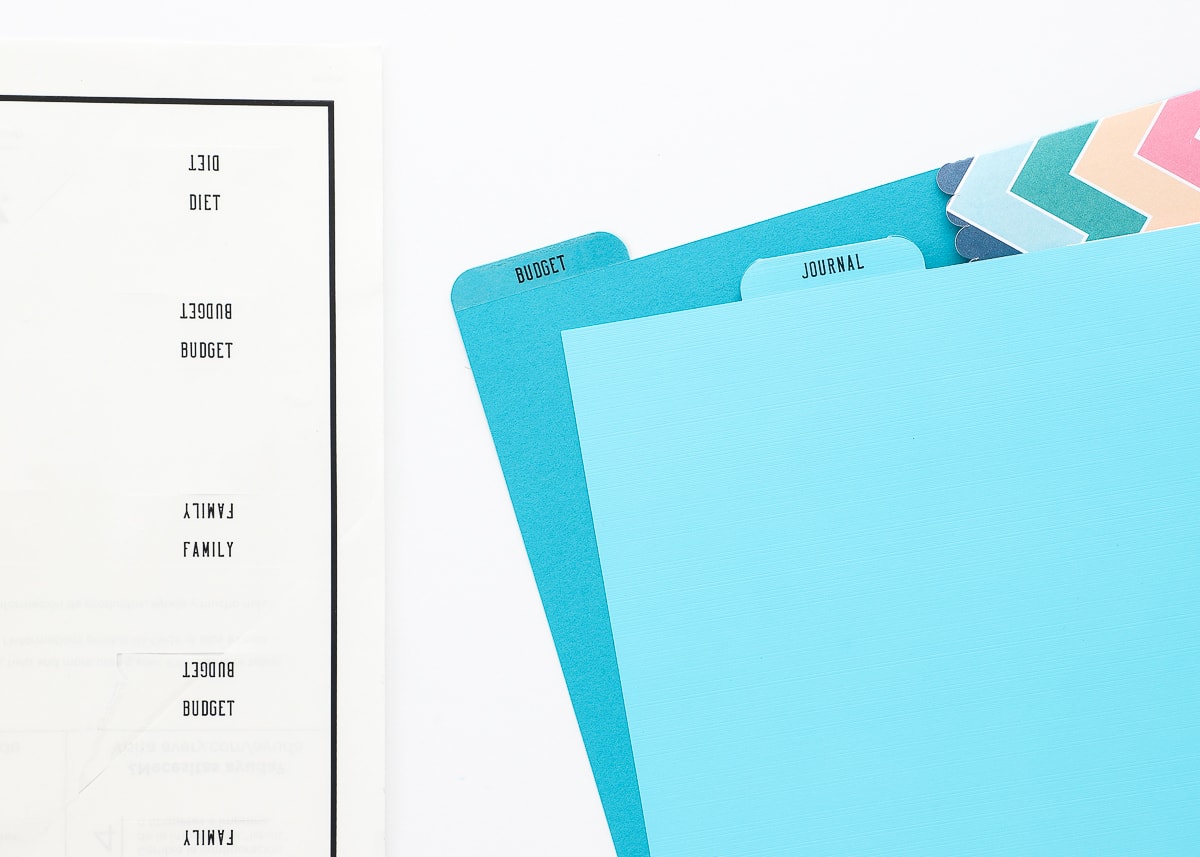
How to Label the Tabbed Dividers
Let me show you how to add labels to the tabbed divider inserts. While you can technically add words directly to the tabbed divider itself (via the Text Tool and Cricut Pens), this will only allow you to label one side of the divider. If you want the label on both sides of the divider, using labels (made from sticker paper) is much quicker and easier!
Start by cutting out as many tabbed dividers as you need.
Want to save this post?
Next, locate the tab label design included in the free SVG files. This file is perfectly sized to fit onto the tabbed dividers, so don’t re-size it in any way.
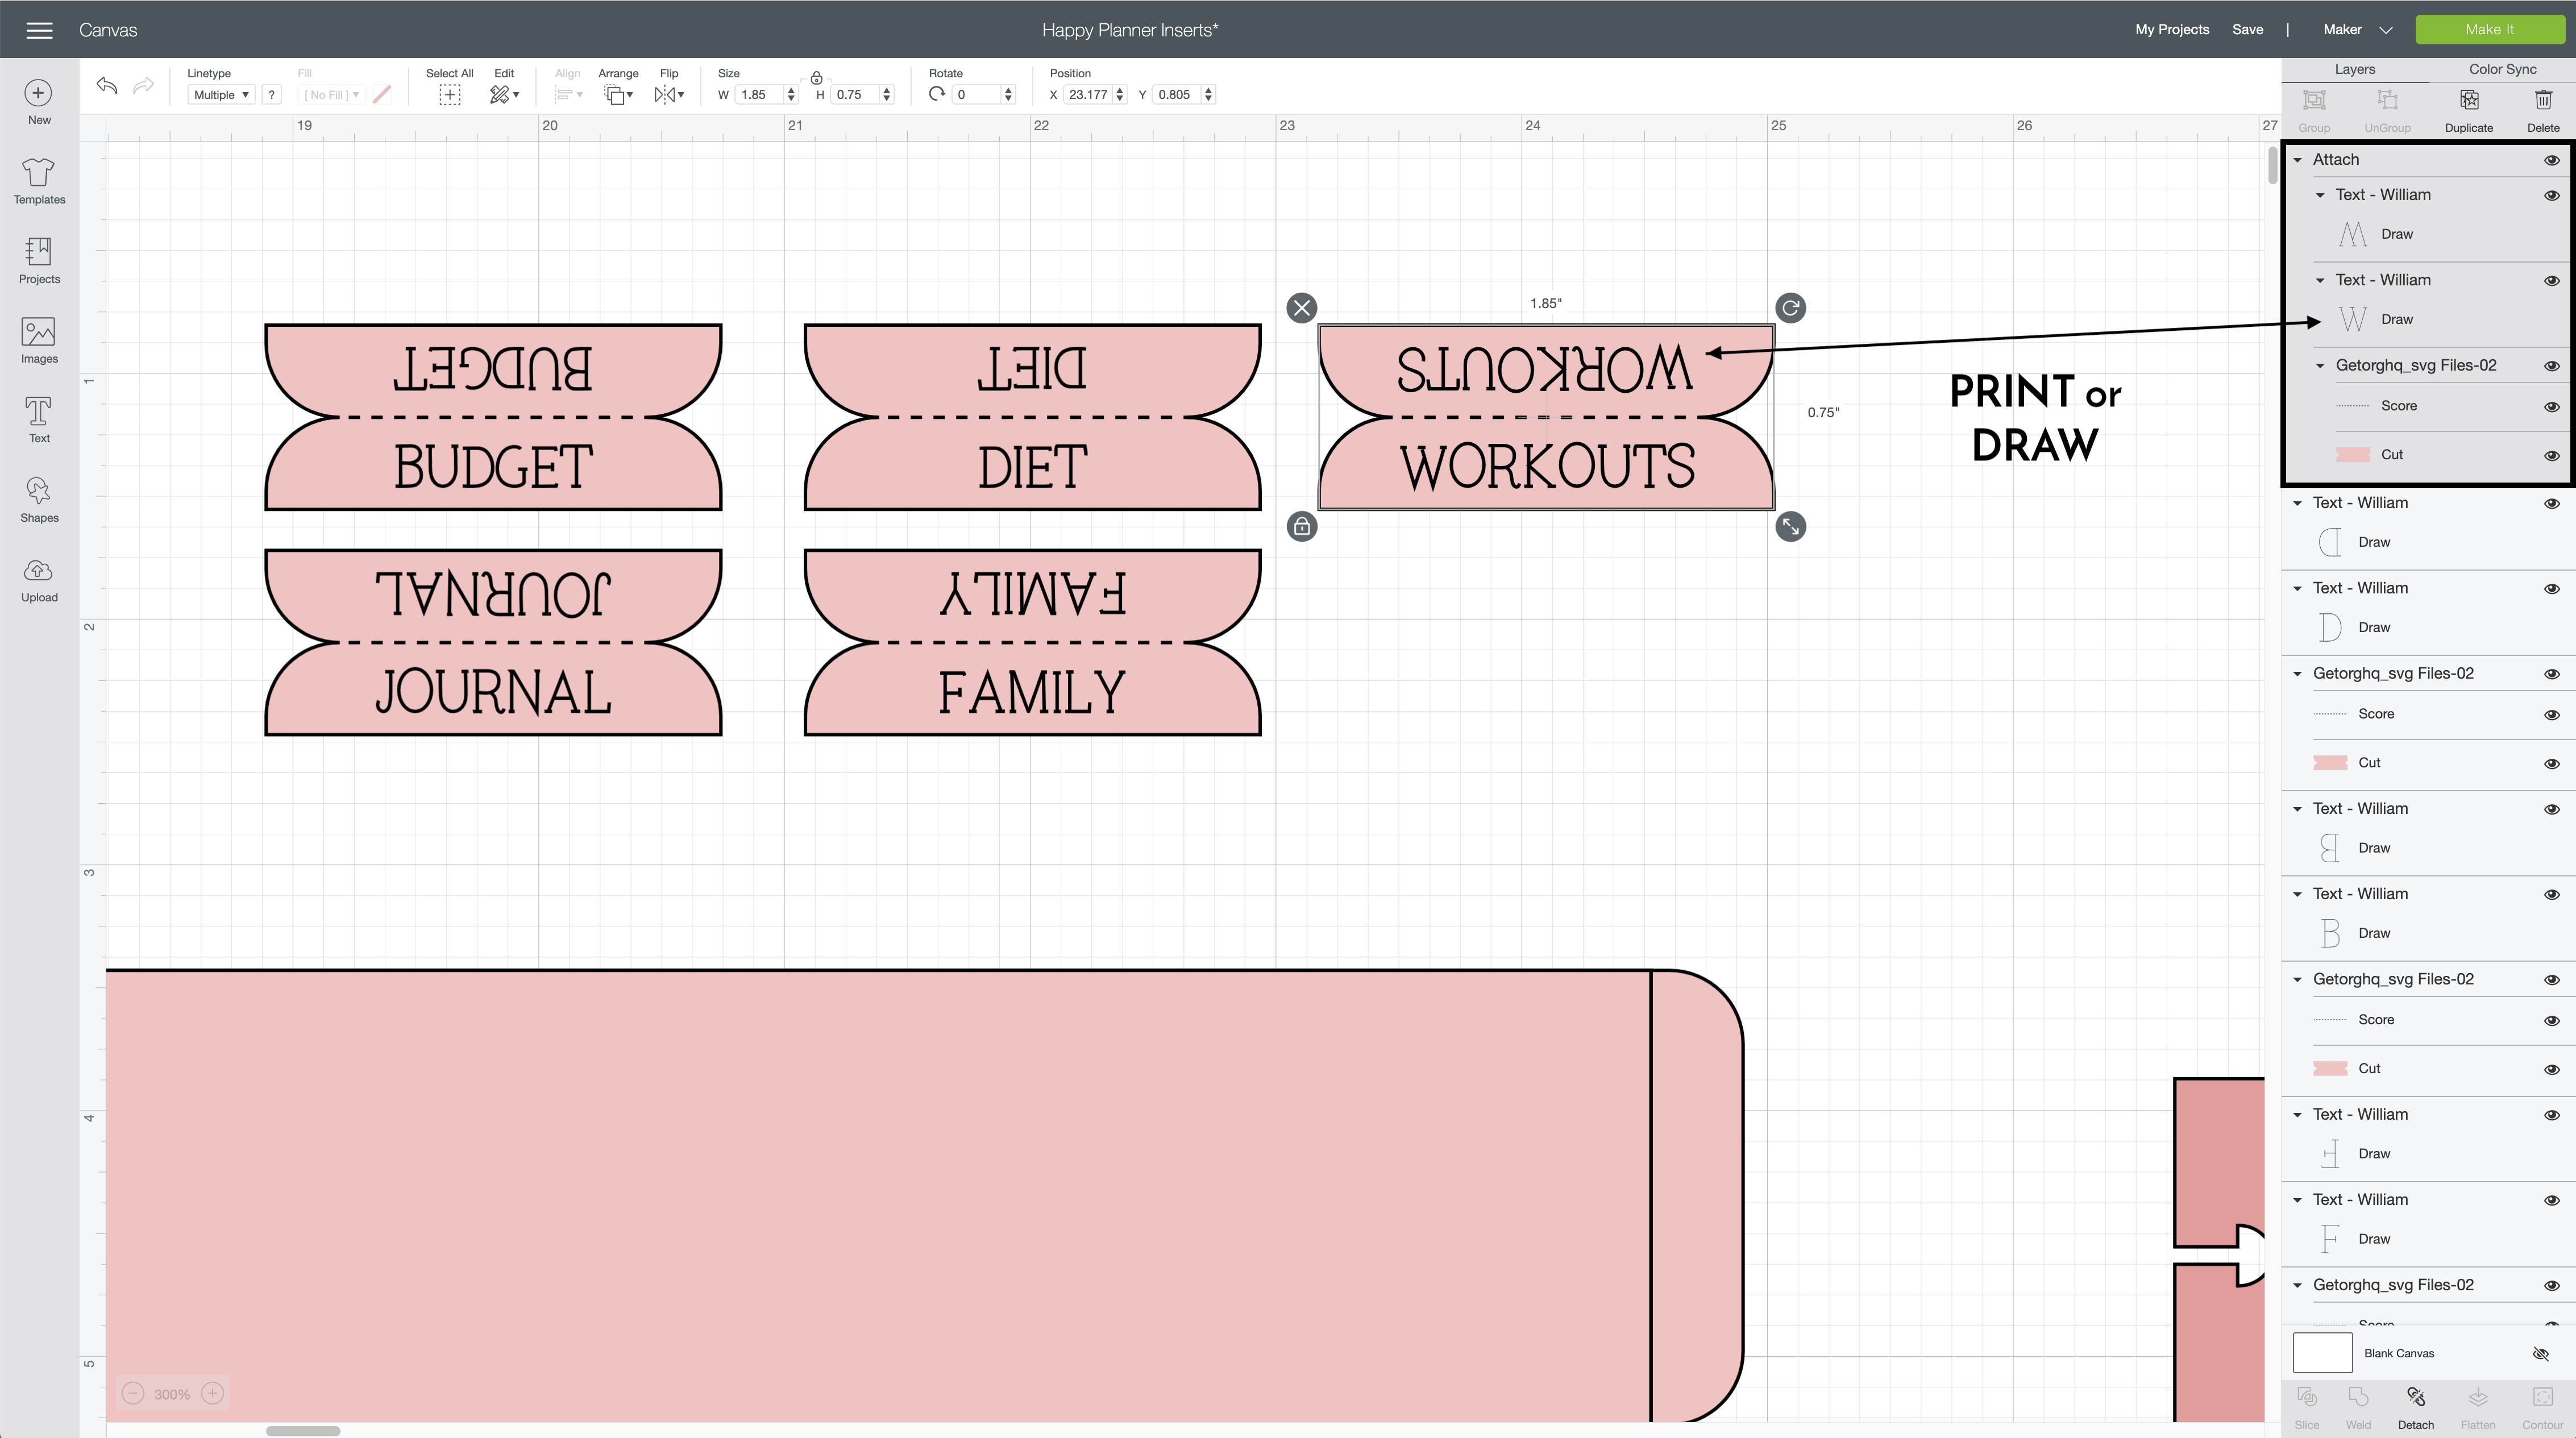
To customize the tabbed labels, you will need to do the following:
- Add text to the bottom of one of the tab labels; be sure to choose a font, spacing, and sizing that will be easy to read at-a-glance.
- Duplicate the text and rotate it 180 degrees; place this text on the top half of the label.
- Change the center Cut line to “Score”
- Select all four elements (the label, two sets of text, and the score line) and click “Center” in the Align menu (top toolbar).
- Finally, with all four elements still selected, Attach them together (button is on the bottom of the right-side toolbar.
Repeat for as many labels as you need for your tabbed dividers.
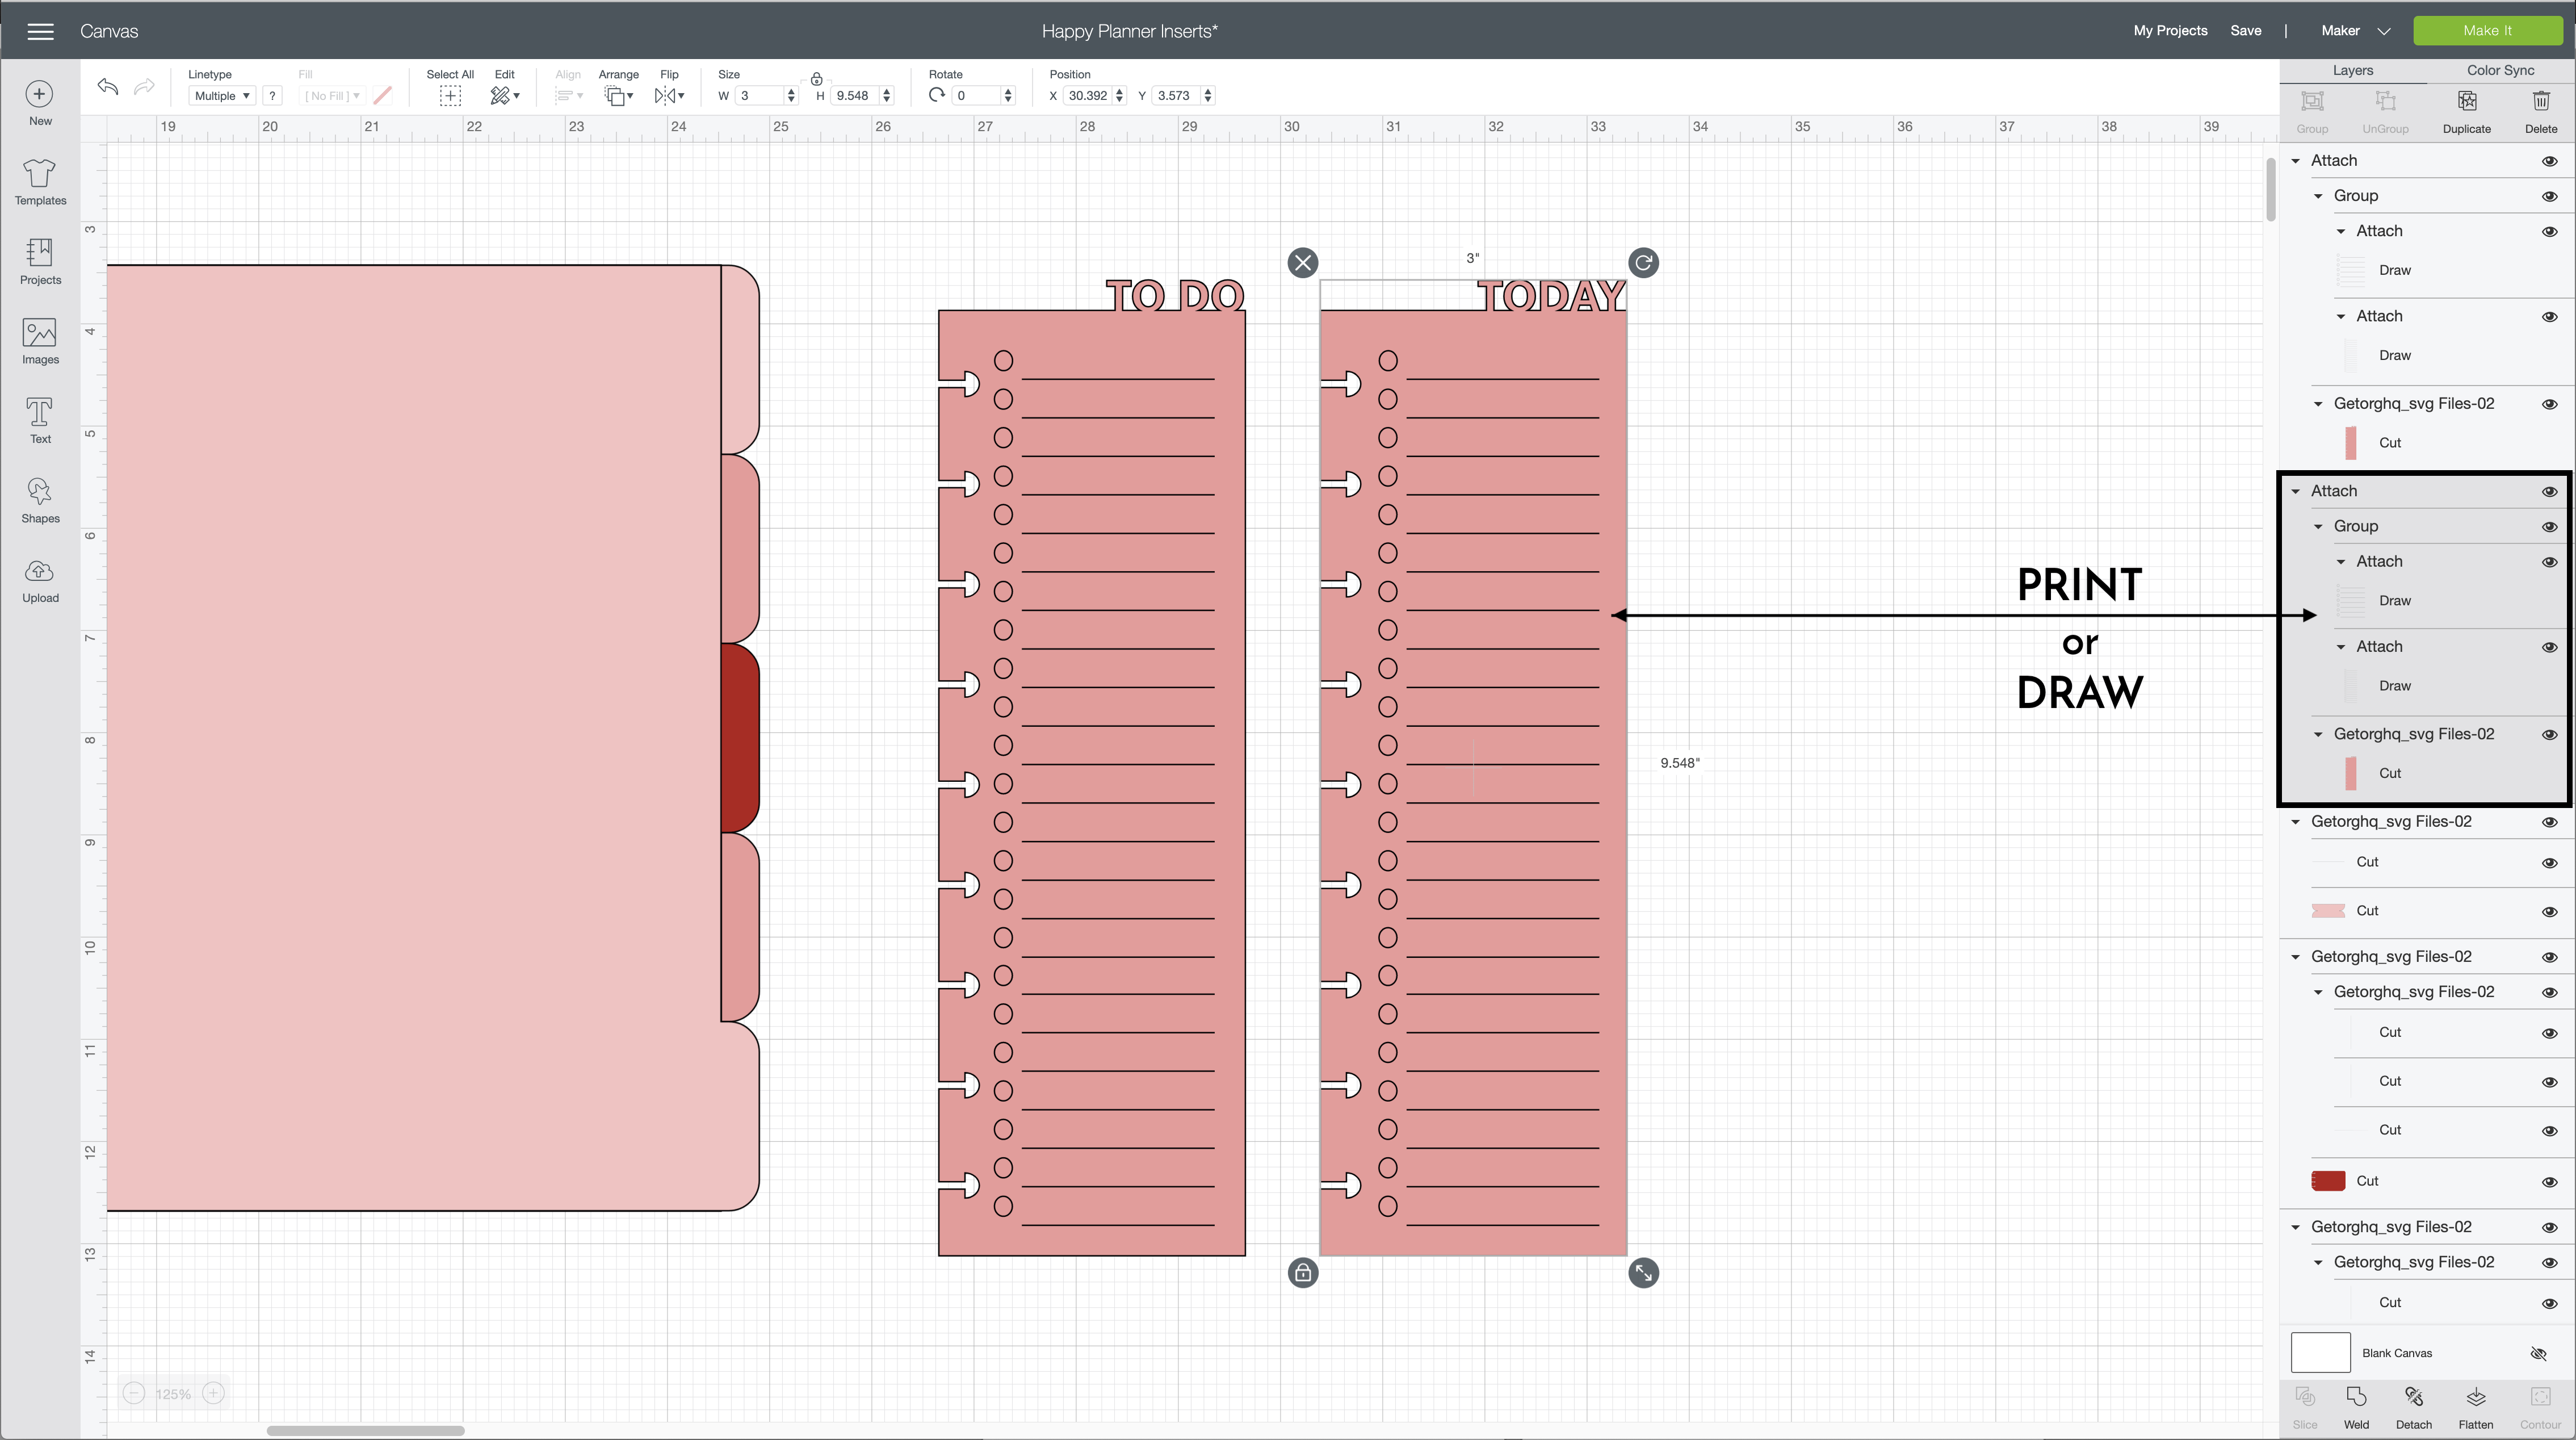
DRAW vs. PRINT
I want to quickly chat about the two different ways you can make these tabbed labels with your Cricut.
The first option is to set your letters to “Draw,” and then use the Cricut Pens to add the words to the labels before cutting them out. If you choose this route, be sure that the sticker paper you use is compatible with the Cricut Pens (or use the writable vinyl!), and also ensure you use fine-point pens so the words are clearly legible.
However, to make really clean, clear labels, my preference is to use the Print-Then-Cut feature of your Cricut instead. Not only is this quicker (the Draw function using the Pens can take a little while), but it results in a much more professional result.
To make your labels printable, simply “Flatten” each one using the button on the bottom of the right-hand panel. (If you need more help with Print-Then-Cut, see my full instructions here: How to Use Print-Then-Cut on a Cricut.)
NOTE: You will need to “Flatten” the label shape and text boxes together before “Attaching” the Score line.
Once ready, print your tabbed labels onto clear sticker paper with your home printer (this clear, glossy paper is my favorite) and then cut them out with your Cricut.
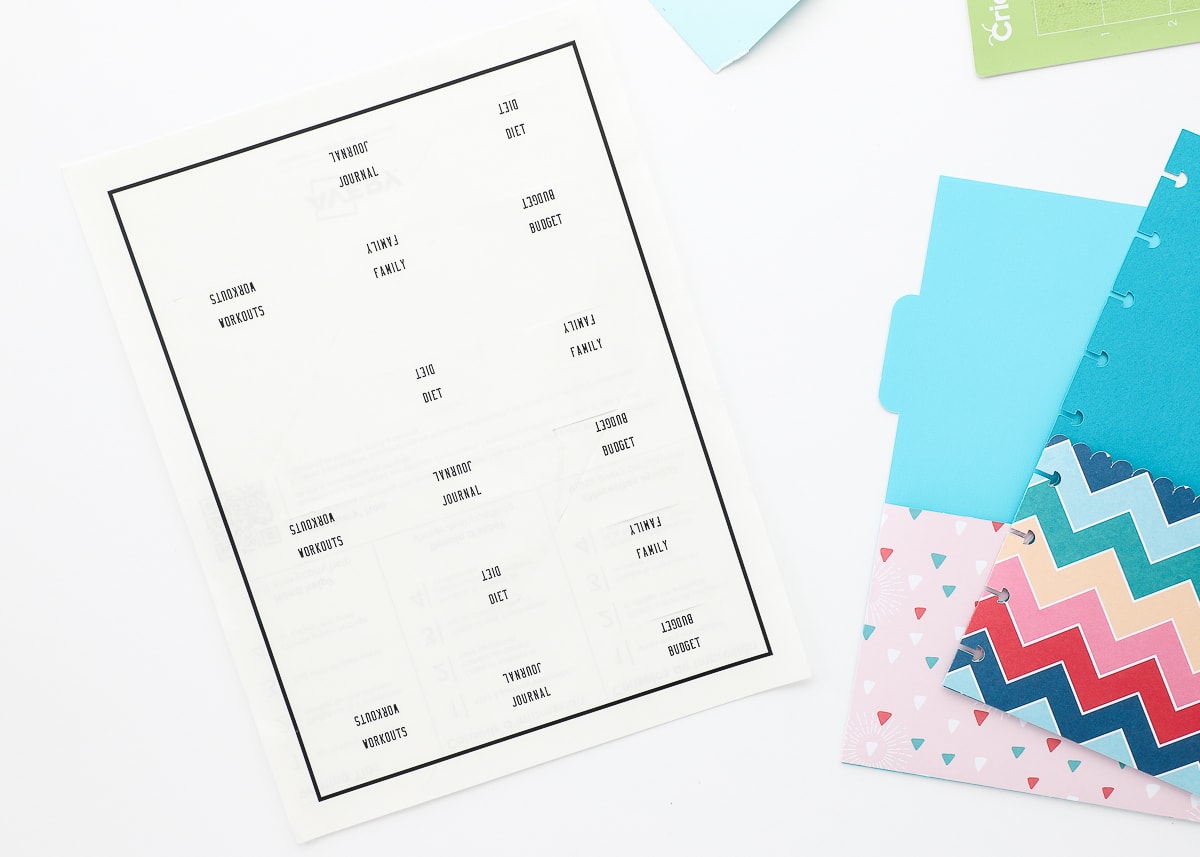
With your labels printed and cut, all you need to do is remove each one from the sticker sheet and fold it over the tab on the divider. You usually get one shot at placing sticker paper, so take your time to get it nice and centered!
In addition to the clear background and neat text, the other reason I like to use labels on tabs is that it gives a laminated finish to the cardstock. Since the tabs are where you usually touch, pull, flip, etc, having extra reinforcement here will keep your DIY dividers in good shape all year long!
The final step will be to pop the labeled tab dividers into your Happy Planner just where you need them!
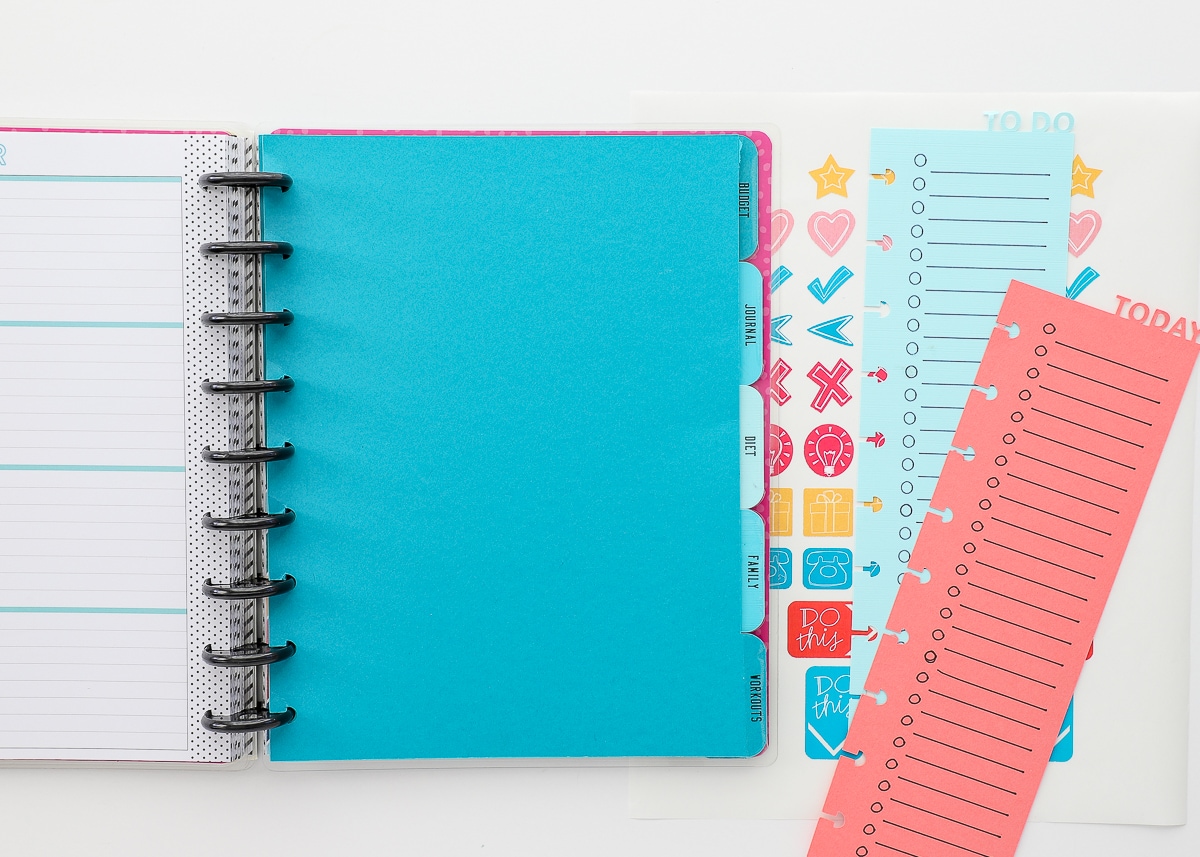
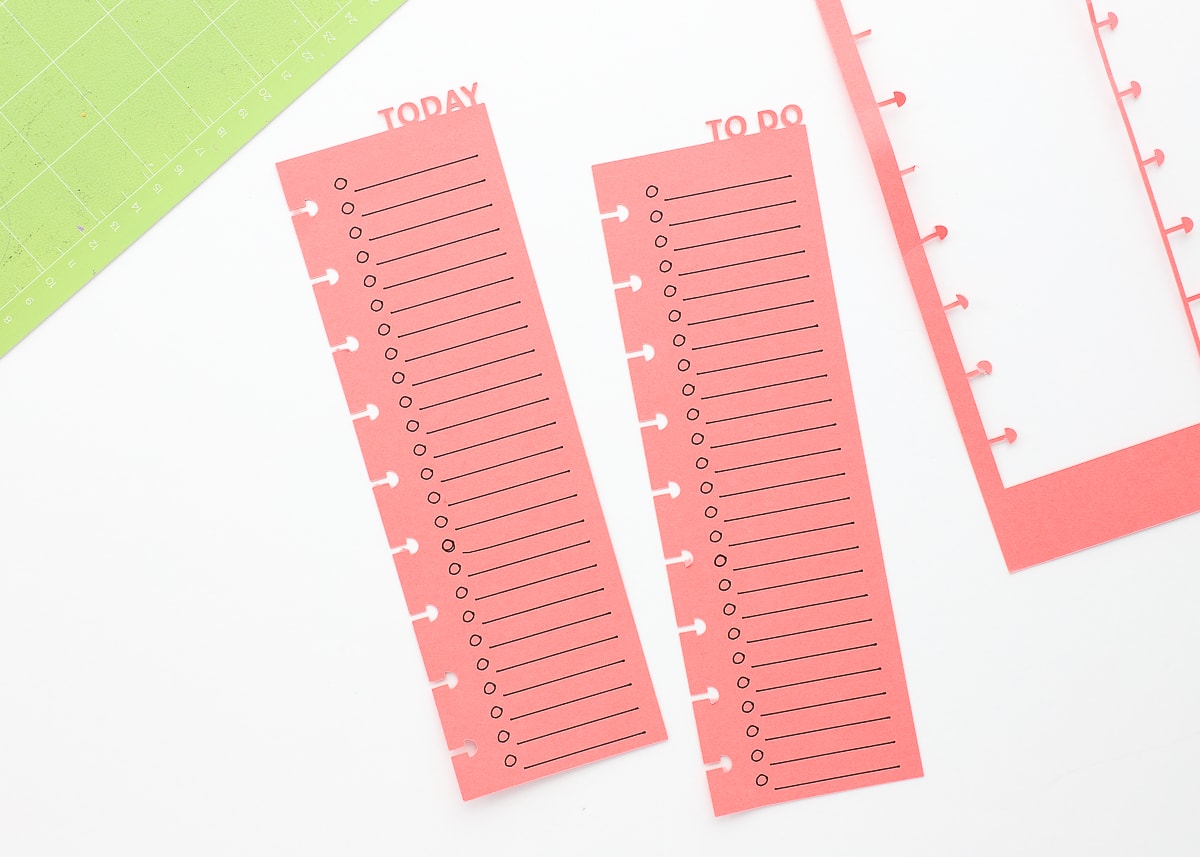
How to Make the List Bookmarks
Finally, let me show you how to make the list bookmarks for your planner!
Find the two bookmark images included in the free SVG files. You’ll notice right away they are blank. You can add anything you want to these bookmarks (including nothing at all!). If you’d like to add the checklists I have shown, they are image Blank List #M2296381 in Cricut Design Space.
Just like with the tab labels above, you will need to set any lines or text to either “Draw” (with Cricut Pens) or Print (via the Flatten button). Then Attach everything together before hitting the green Make It button.
This time around, I used Cricut Pens to add the lines and circles to my bookmarks.
Once done, simply remove them from your mat and add them to your planner wherever needed!
Beyond just showing you how to make Happy Planner Inserts with a Cricut, I hope this post gives you some easy ideas for accessorizing an off-the-shelf planner to work better for you! Beyond the projects here, don’t forget to see how I made Planner Pouches, Planner Bookmarks, and Planner Stickers!
Have you tried DIYing your own planner accessories?!? It’s really fun (and cost saving too!) so I hope you give it a try!
Megan

22 Comments on “DIY Happy Planner Inserts with a Cricut”
Thank you so much for these! How would you suggest tweaking the To-Do and Today half-page inserts so they don’t have the words at the top? I didn’t know how to use the half-page adhesive cardstock that came with my first Classic Happy Planner sticker book, and now I need to make more, but trying to use a paper cutter to make straight-edge pages plus the HP punch has resulted in some… not so nice pages, hence why I’d love to use the Cricut for this!
Thank you again for these; they’re so helpful!
Hi Azurite!
So glad you found these helpful!
The words on the bookmark inserts were actually created with images within Cricut Design Space, so they aren’t included on the SVG files themselves. That means you can add anything you want to them or cut them completely blank!
Have fun and hope they work out for you!Megan
Hi again,
Thanks for responding so fast!
I meant the words “To Do” and “Today” on the top of the bookmarks, rather than the circles/lines that make up the checklist. It seems as though those words are part of the SVG itself, and I can’t think of how to remove them, short of cropping the entire top off in an SVG editor of some kind.
How did you create the mushroom punches for the inserts? I understand the rest of your steps, just not that part. I tried to create them, but I cant get them to match correctly. Thank you for this great tutorial!
Hi Laurie!
Did you download my SVG files and cut them out? To make the punches, I scanned a page in and created my own template. Every cut I made fit just right!
Hope that helps!
Megan
Hello Megan,
Will these files work for the TUL brand junior size 8 disc notebook?
HI Misty!
Honestly, I’m not sure. When I was first figuring how to make these, I learned that every system is a little different. If you already own the planner, I recommend downloading the free cut file and give it a try!
Sorry I don’t have a better answer here, but good luck with your planner!Megan
Megan, you are a GEM for sharing the instructions and download. I was just looking to add more to both my 9 and 12 disc notebook and planner (teacher here) and I am an avid Cricut user. I am IN LOVE with the Happy Planners.
Thank you Thank you!
For the person asking about JUL, if it will work with that system. No. The spacing is a bit different.
Looking forward to seeing what you have done.
Thank you so much for creating these directions, and these resources to us! I appreciate it so much!
I am wanting to create my own bookmark – without the words at the top, and with a regular tab.
I am wondering if you would ever make ones without the words at top? I would be happy to purchase a custom SVG from you!
Alternatively / additionally, I am wondering if you wouldn’t mind sharing how you were able to get the punch shapes in the design.
Thank you in advance!
Hi Alex,
Thanks for reaching out about this!
At this time, I don’t have any plans to revisit these files…but I do have a hack for you!
Simply use the “Slice” tool to take the words off the existing bookmark. Line up a basic square along the top of the bookmark (covering the text); then slice it all apart and delete out the text. You can do the same thing on the divider to make your own set of punch shapes 🙂
Let me know if that isn’t quite clear and I can provide even more directions!
Thanks,
Megan
Thank you so much!!! I have been looking for something like this!!! Thank you thank you!!!!
You are very welcome! Enjoy!
I have the Big Happy Planner (11 discs) so the SVGs you have won’t work for mine. I saw where you said you just scanned a page and put it into Design Space so that you’d have the hole punch parts so I can do that for the regular pages and the tabbed pages but I’m not sure how you made the folders with the extra parts on the sides to make the folds. Can you explain that part?
Hi Maddy!
I created my files in Adobe Illustrator, so I had a bit more options for customizing/desining than in Cricut Design Space. That said, I can give you some general steps:Once you have the page scanned in, use the “Slice” tool to crop it in half (or 1/3 or however tall you want the folder pocket).Then use some “Shapes” to make some “tabs” for the three sides (two sides and bottom). Refer to my pictures to help you size them.Weld the tabs onto the pocket using the Weld tool.If needed, add score lines where the tabs meet the pocket for easy folding!Does that make sense?
Megan
Just wondering how difficult it might be to make an 11” one?
OMG- you are a Godsend! Like truly! I was doing it myself with the Happy Planner hole puncher, and many more steps that will take too long to list. I do have a question though, do you have a template for a cover?
Thank you so much for these designs and steps! I did want to ask if there’s a way to remove the coloring from the tabs? When I print them, they retain the green color that was on them when I downloaded them. It’s very clearly there when I apply them over my different tab inserts. 😒
Hi!
You can easily change the color by selecting it then using the color tool along the top toolbar.
For it to print “colorless”, just change it to white!
Hope that helps!
Megan
Hello, I love all of your ideas and tutorials. I have a Cricut question on the Happy Planner tabs. Can this be adjusted for a 7-disc mini Happy Planner? Thanks in advance!
This is so awesome you can cut out your own pages! I have an 11 ring planner, do you have any patterns for that? Thank you!
You are amazing! I love all the photos and detailed instructions. I use a Happy Planner, so this weekend I’ll be busy making this with the Cricut. Thank you so much for sharing your knowledge! Have a blessed day. 🙂