DIY Polka Dot Wall | An Easy 1-Hour Project!
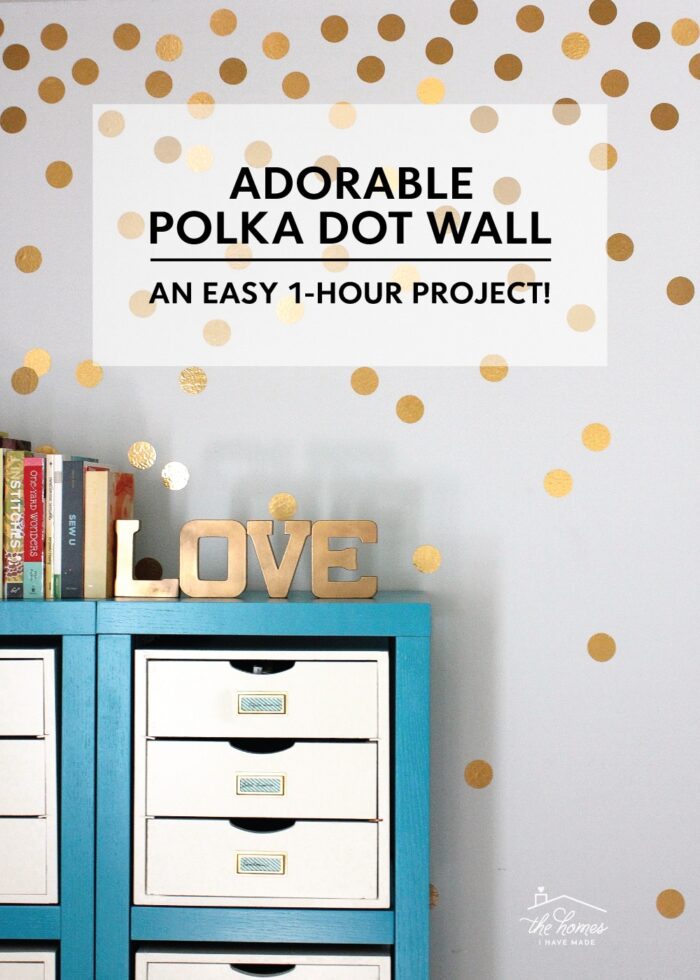
One of my all-time favorite “renter-friendly” wall upgrades I’ve ever done was the gold polka dot wall treatment in my office of our (first) North Carolina home. But in the (almost 10!) years since I first made this DIY Polka Dot Wall, Cricut technology has come a really long way, making this 1-hour wall upgrade even easier than before. If you’re ready to give a room a punch of fun (really quick and on the cheap), this is a great project to try!
Years ago, gold polka dot walls were a popular trend born from the minds and hands of home decor bloggers. The sparkly feature walls were popping up all over the Internet and were widely considered a stylish statement for a bathroom, playroom, hallway, and more.
At the time, cutting machines (e.g., Cricut) weren’t nearly as mainstream as they are now, and peel-and-stick wallpapers weren’t anywhere to be seen. As a result, Etsy shops and Amazon retailers started selling ready-to-stick decals in every size, color, and shape you can imagine.
But not only do pre-cut peel-and-stick decals cost a pretty penny, it’s actually really difficult to gauge what size you need (and how many!) through a computer screen…causing you to likely under-buy or over-spend just to create the effect you want.
But now…you might have your very own cutting machine. And if you don’t, there’s a good chance your neighbor, friend, or family member does. Which means making your own DIY Polka Dot Wall is not only easy but really inexpensive too (just the cost of a roll of vinyl!) In fact, I bet you can transform an entire wall…exactly as you want it…in just about an hour (even if you don’t consider yourself handy or crafty!)
Why Use Polka Dot Wall Stickers Instead of Paint?
Before we dive into how to DIY a polka dot accent wall, I want to quickly highlight the benefit of polka-dotting your wall with vinyl decals versus paint. While you can cut a circle stencil and use paint to add shimmery polka dots anywhere you want, polka dot stickers have a few unique advantages:
- They are mess free…just peel-and-stick!
- They are fast…stickers go up much quicker than filling in a stencil with paint and a sponge.
- They are perfect circles...no excess paint bleeding under your stencil, creating imperfect edges.
- They are fixable…you can easily reposition the decals if you don’t like their placement.
- They are removable…tired of your polka dots? Just peel them off!
Supplies Needed
To make a DIY Polka Dot Wall, these are the products I recommend:
- Electronic cutting machine, such as a Cricut or Silhouette
- Cutting Mat – needed only when not using Smart Materials; I recommend a 24″ cutting mat if your machine supports it.
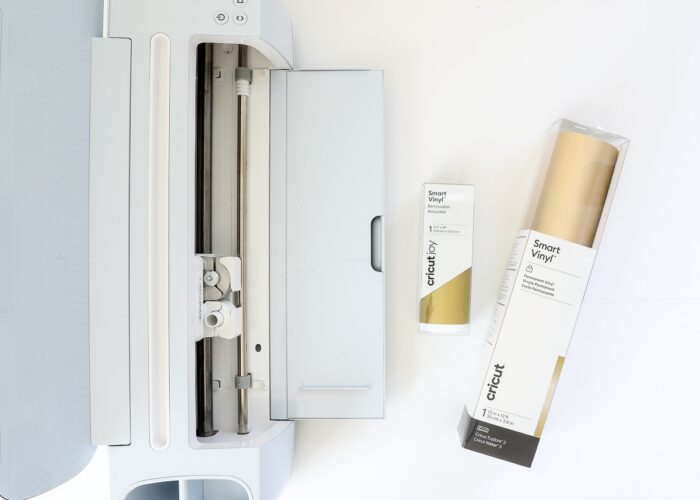
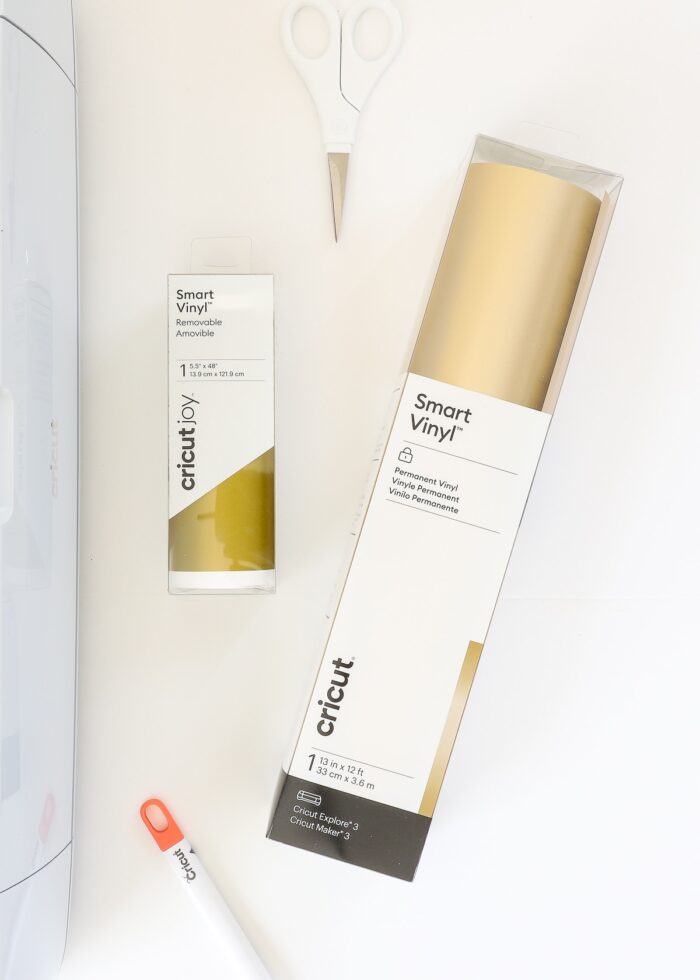
- Gold Vinyl or Gold Contact Paper – below are the ones I like the most:
- Smart Gold Vinyl – for matless cutting only, see more below
- Standard Gold Vinyl – for standard mat cutting
- Gold Contact Paper – for standard mat cutting
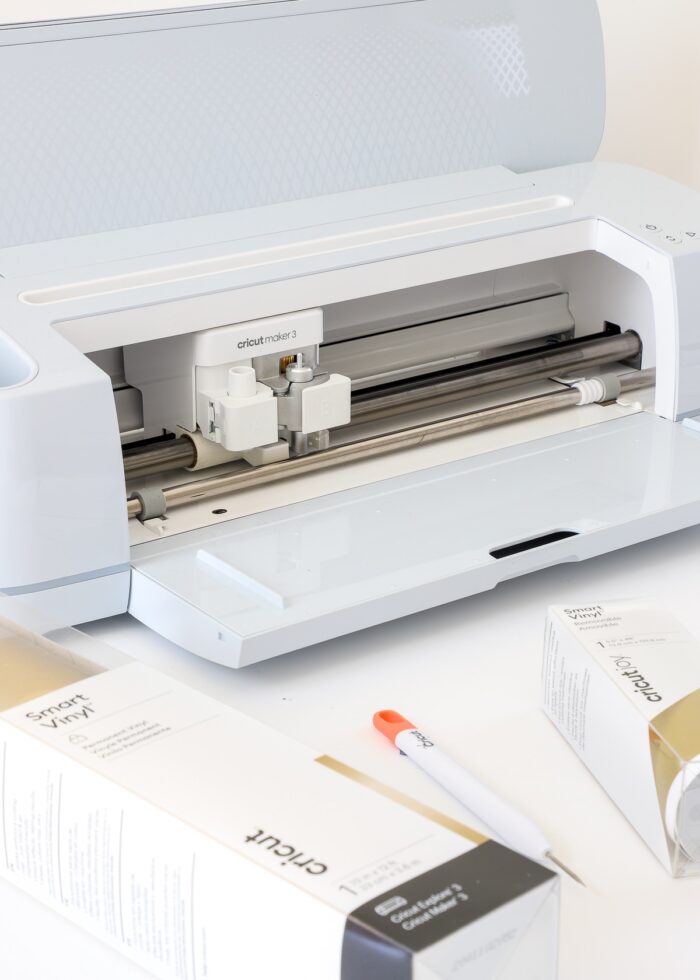
Why I Recommend a “Smart” Cutting Machine
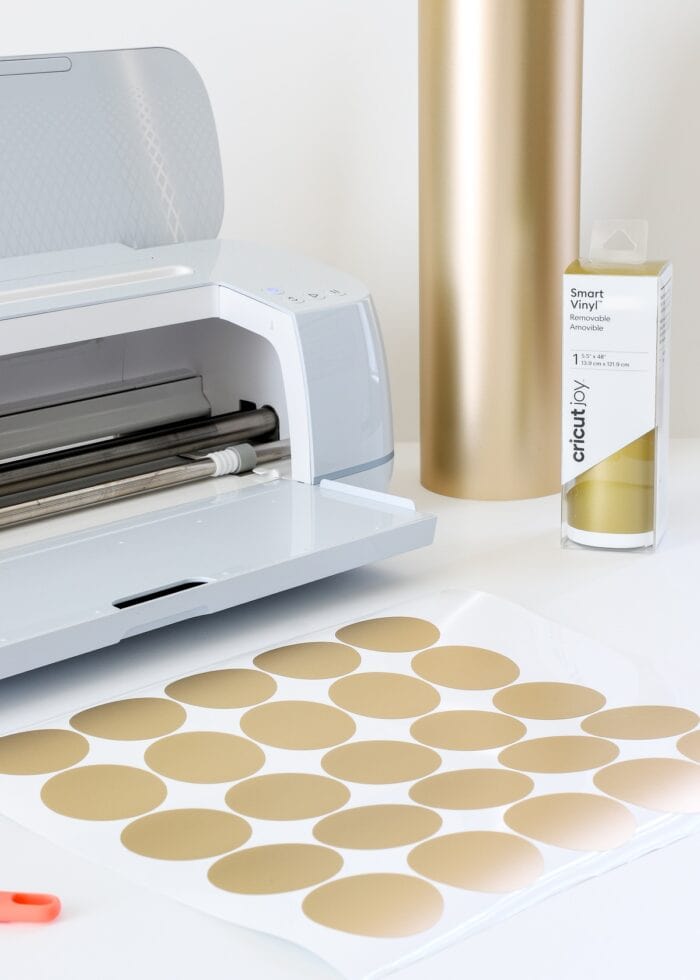
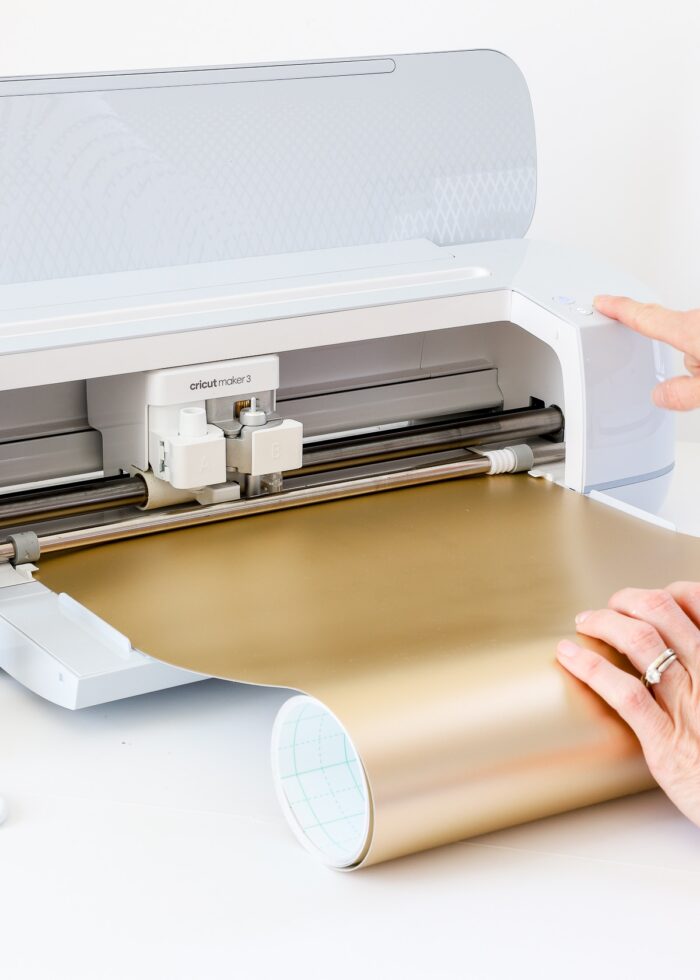
In recent years, Cricut has introduced the concept of “Smart Materials,” vinyls that load into a machine and are cut without using a mat. Since mats aren’t required, the materials come in long rolls ranging from 24″ to 72′ (yes, you read that right…72 FEET!) This means that it is now quicker and easier than ever to cut out a lot of polka dot decals all at one time.
So while you can certainly use this tutorial to cut out polka dot wall decals with any electronic cutting machine, I highly recommend doing so on a Cricut Joy, Cricut Explore 3, or Cricut Maker 3 in conjunction with “Smart” vinyl. This will allow you to cut all your stickers at once, no matter what size or how many you need for your wall!
To get a sense for how long stretches of Smart Vinyl work, watch this video HERE!
Do You Have to Use a Cutting Machine to Make Polka Dot Decals?
Technically, no! You can also cut polka dot stickers with a circle punch or a die-cut machine such as a Sizzix Big Shot. If you choose to go this route, there are two things you should know ahead of time:
- You will only be able to cut/punch one decal at a time, making this a much more time-consuming project (but it’s still do-able!)
- These cutting methods will cut through both the vinyl and the paper backing. While this isn’t a big deal, it will mean you’ll have to pull the paper backing off each decal as you go!

How To: DIY Polka Dot Wall
Step 1: Determine the Size of Your Polka Dots
There is no hard-and-fast rule about what size your polka dots should be. Most (including mine) are in the 2″ diameter range. When deciding how big to make your polka dots, here are a few things to consider:
- How big is your wall? Bigger walls and higher ceilings will do better with larger dots, while nooks might look better with smaller dots.
- How “full” do you want your wall? Bigger dots will cover more wall space than smaller ones.
- Do you want all the dots the same size or varied?
If you’re having a hard time visualizing your wall, consider cutting out a few sample sizes and putting them up to see how they look in real life.
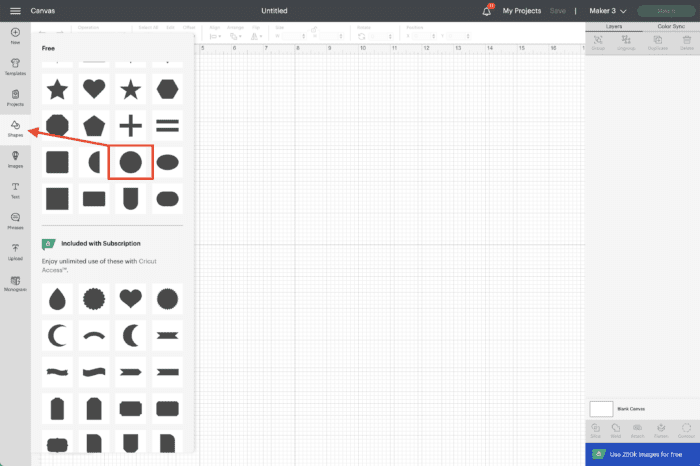
Step 2: “Design” Your Polka Dots
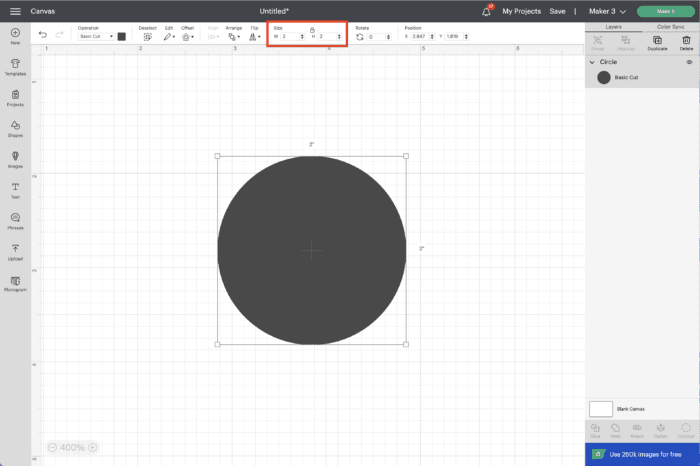
Once you have your size figured out, “design” your decals in Cricut Design Space (or your machine’s software). Since polka dots are just circles, this is as easy as placing a circle onto your canvas (using the Shapes Menu if you’re in Cricut Design Space) and sizing it appropriately.
Step 3: Lay Out Polka Dots for Cutting
Cutting on Smart Material
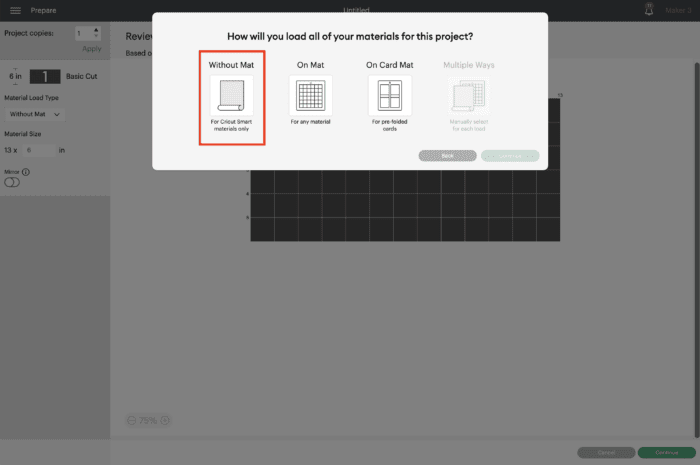
If using a Cricut Joy, Cricut Explore 3, or Cricut Maker 3, select “Without Mat” on the Prepare Screen.
Want to save this post?
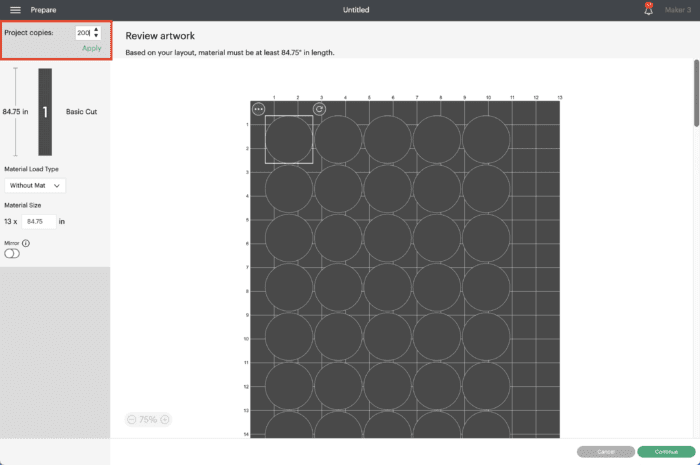
Next, increase the Project Copies to the number of decals 1) you need or 2) will fit on your Smart Material.
In my example, 200 2″ gold polka dots uses up about 84″ of vinyl, which isn’t even half of my 12-ft roll!
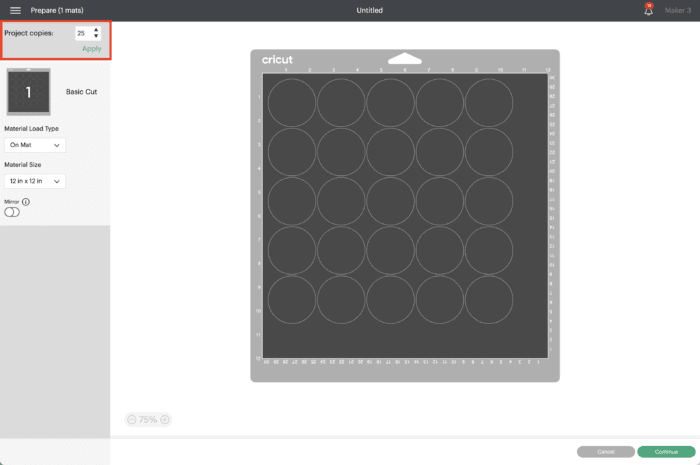
Cutting on a Mat
If not using Smart Vinyl, select “On Mat” on the Prepare Screen; then choose which size mat you will be using. A 24″ mat will allow you to cut more vinyl decals at one time compared to smaller versions.
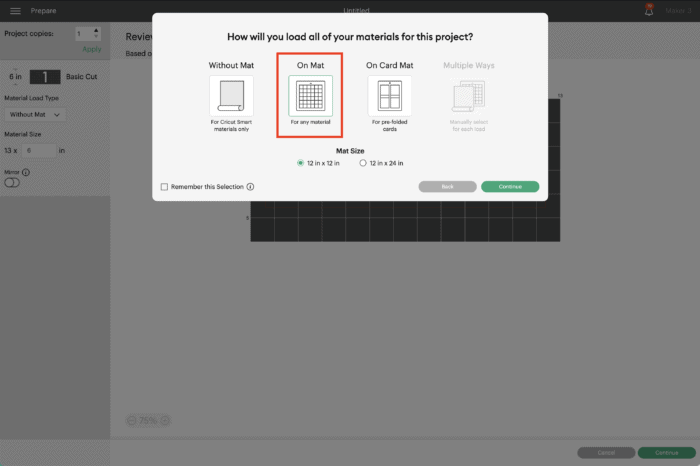
As described above, increase the Project Copies to what can fit on your mat. At 2″, you can get about 25 circles per 12×12″ cut of vinyl; and 55 decals per 12×24″ cut.
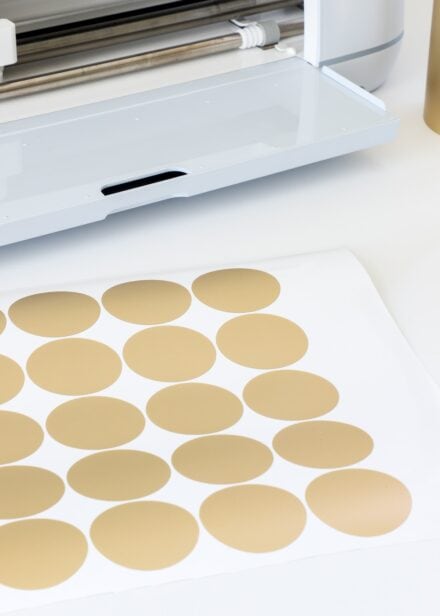
Step 4: Cut Out the Polka Dot Decals
On the final Make screen, choose whatever vinyl you are using from the Browse All Materials menu. Then follow the on-screen prompts to load and cut out your polka dot decals!
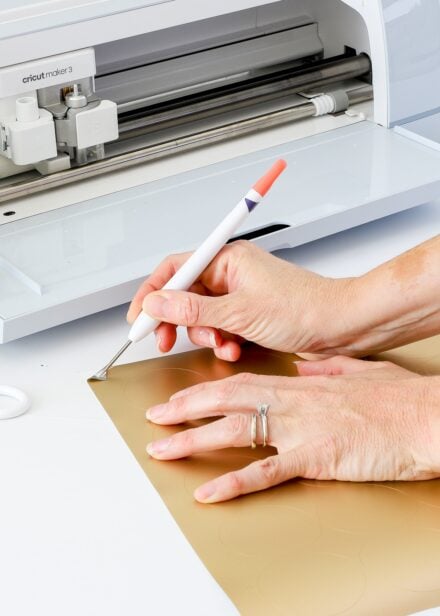
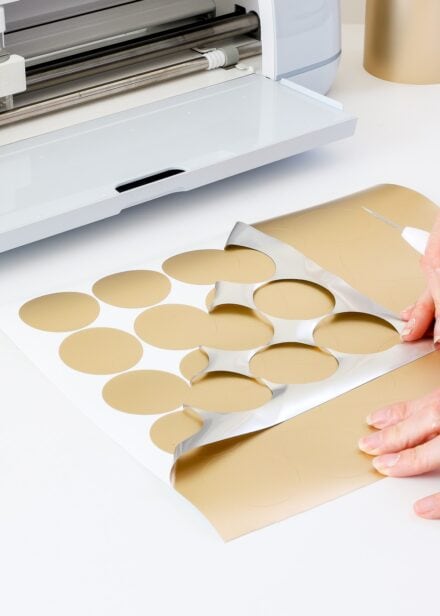
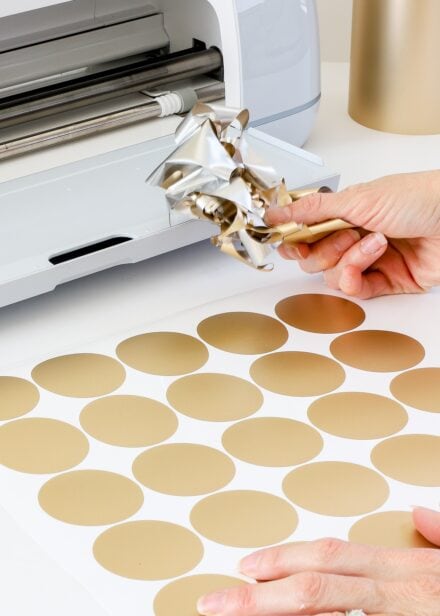
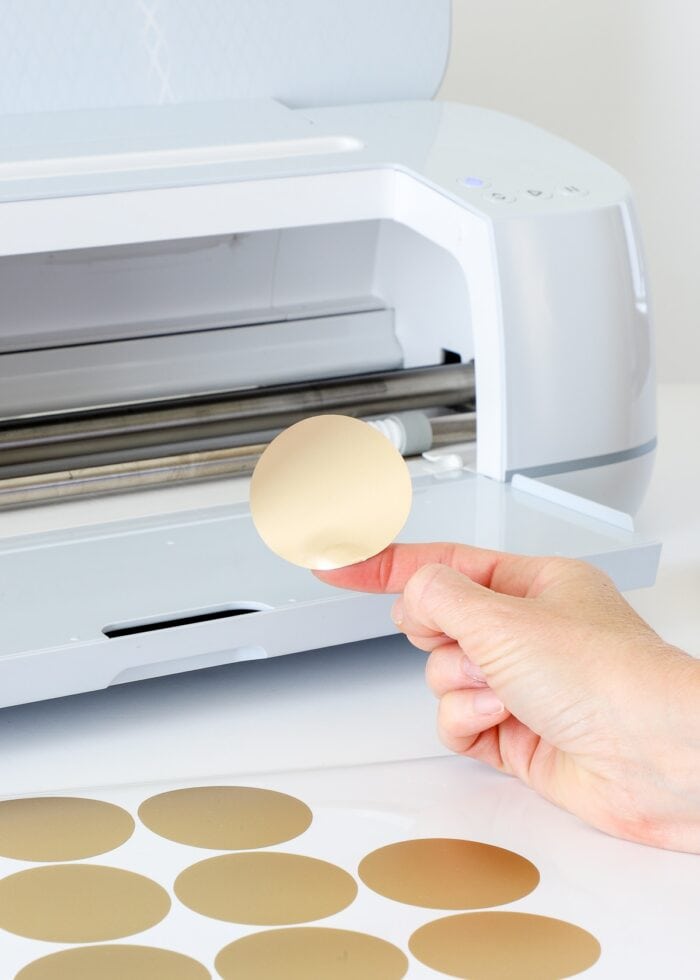
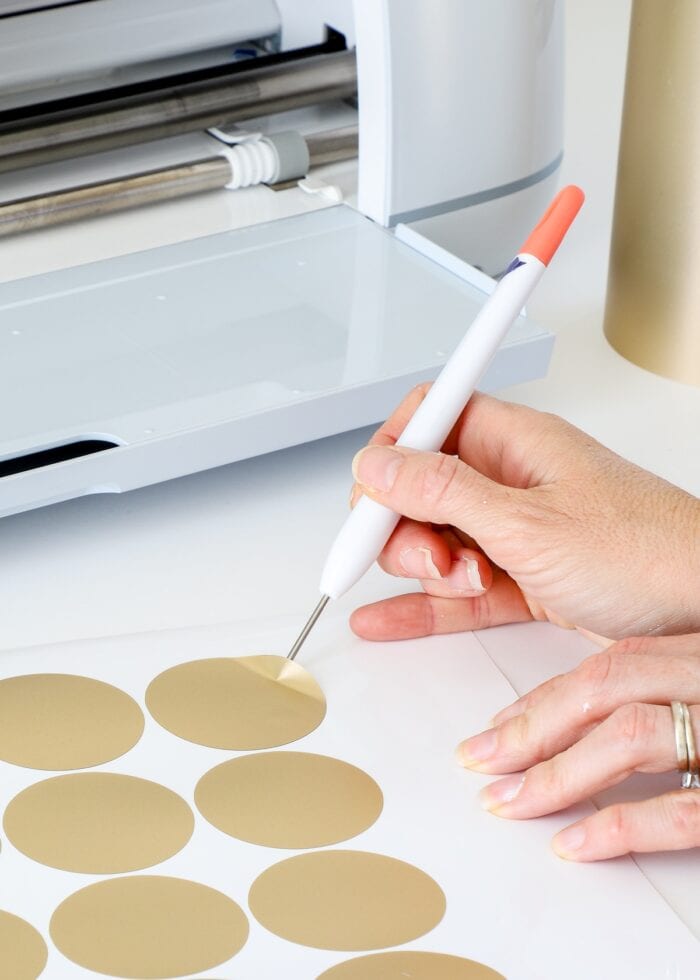
Step 5: Remove Excess Vinyl
Before you can place your dots on the wall, remove the excess vinyl from around the decals by lifting up a corner of the vinyl and gently peeling it away. This will make it easier to pick up each polka dot as you apply them to your wall.
Step 6: Peel and Stick the Polka Dots on the Wall
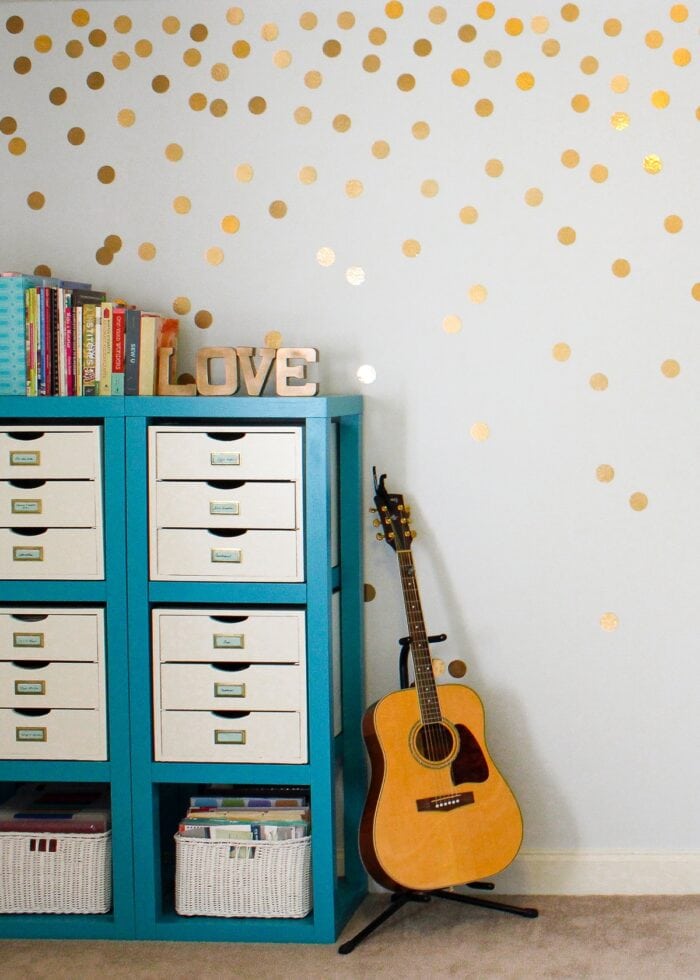
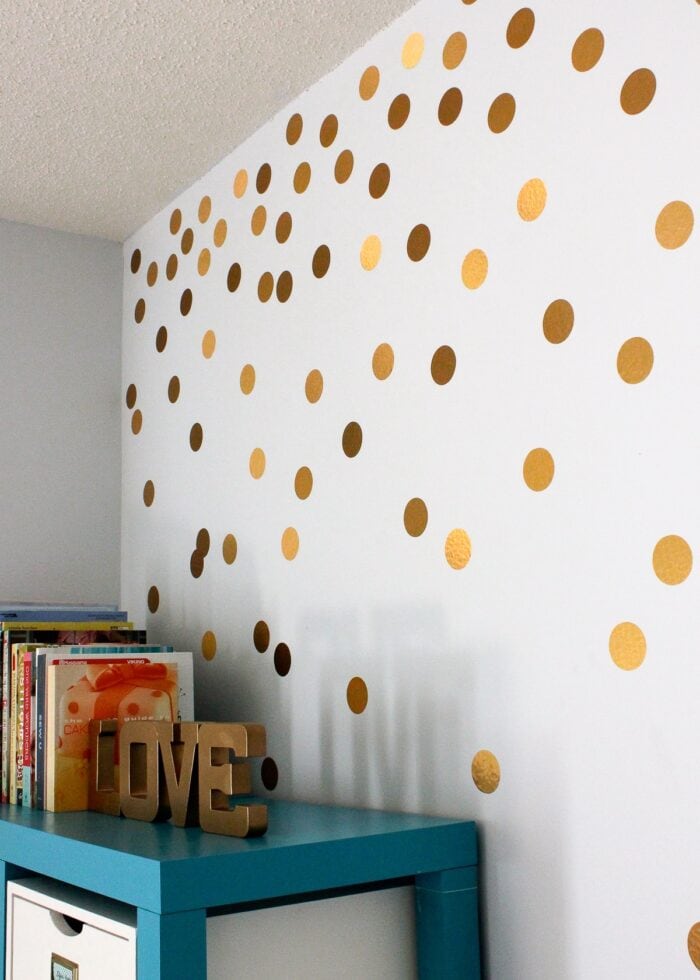
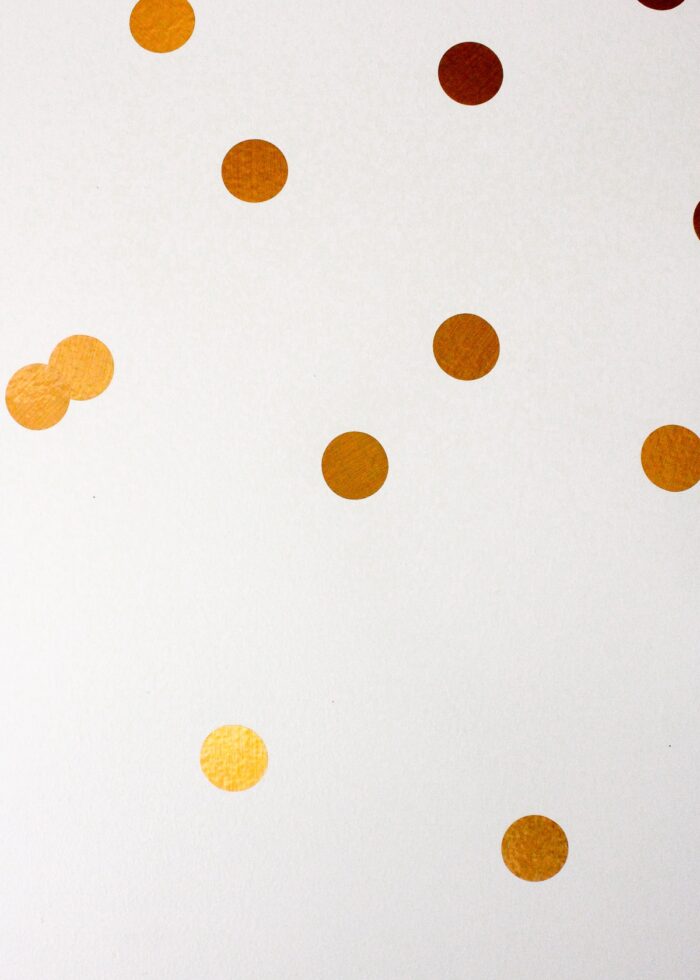
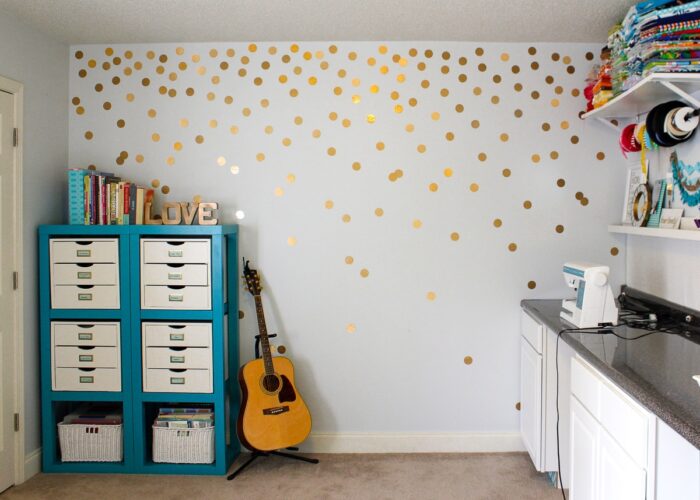
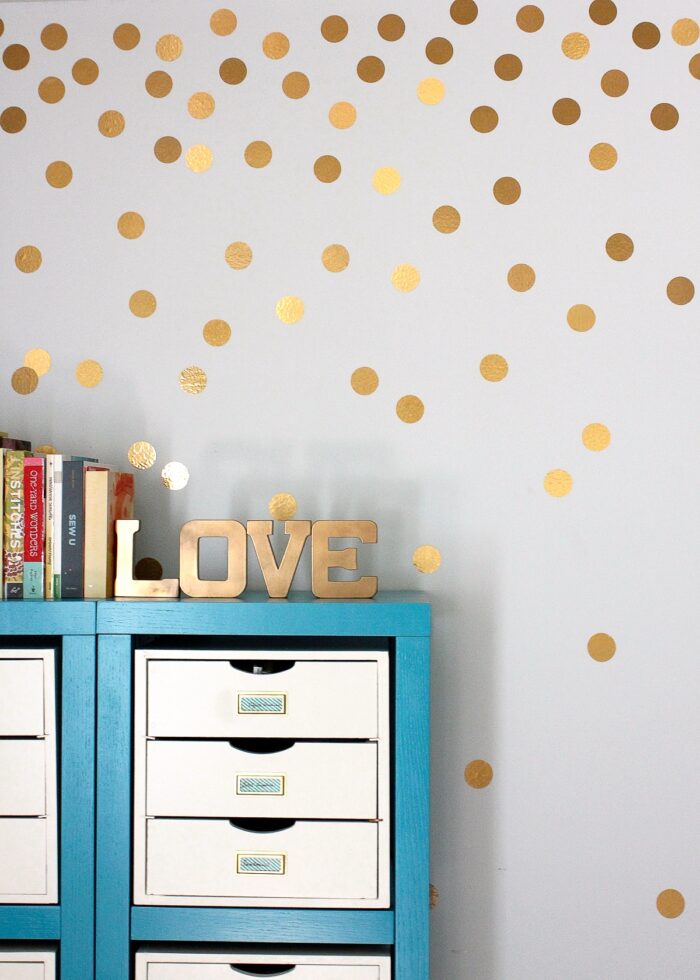
Once your first batch of decals is ready, start applying the dots to the wall. You can place them in any layout you like, including a very precise pattern or in an organic “confetti” display.
I placed my dots in a random pattern, more concentrated along the top of the entire wall and then less concentrated down toward the floor. Don’t overthink the placement too much; but do step back every now and then to ensure the whole arrangement is balanced and exactly as you want it. If some dots look a little off, just peel them up and re-place them!
Having trouble peeling your dots up off the paper backing? Some vinyls “let go” better than others. I find a weeding tool is helpful in lifting up a lead edge on stubborn vinyls. Once lifted, you can then peel the rest up with your fingers!
As needed, load up your machine with more vinyl and let it cut while you continue placing circles on the wall. Within an hour or so, you will likely have a fully transformed wall. Take a look at this Before and After! Not bad for 1 hour and a $10 roll of vinyl, wouldn’t you say?!?
I’ve done a lot of neat feature wall installations over the years, but this simple DIY Polka Dot Wall is still among my very favorites ever. It’s such a simple and inexpensive update that has major impact…and best of all, it’s mess free and can be done in an hour or so.
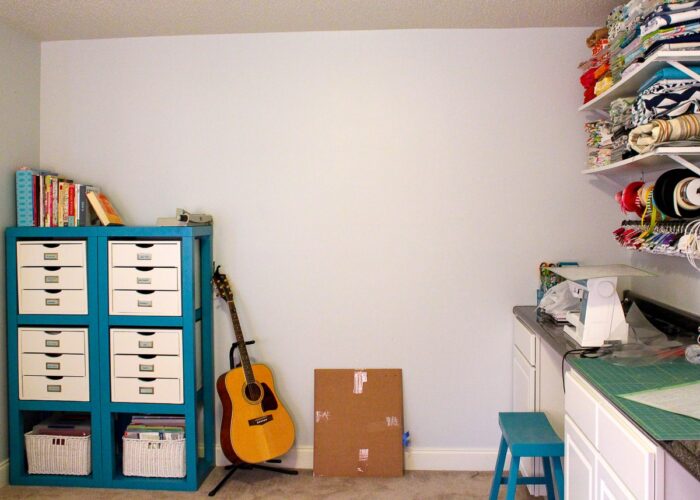
If you have a blank wall that is just screaming for something fun, grab an inexpensive roll of vinyl and give this project a try. After all…if you don’t like it…the polka dots come back down even quicker than they go up!
Megan
61 Comments on “DIY Polka Dot Wall | An Easy 1-Hour Project!”
I love it Megan! It brings such energy to the room! Can't wait to see what you've done with the rest of the space!
Megan, I love this idea and the room looks great with the gold dots! What a fantastic project! Pinning and if you have time, I would love you to share this great project at our Best of the Weekend party tomorrow night. Thanks for sharing and have a wonderful upcoming weekend.
Yep, I'm with ya!!!! Just ordered some gold metallic stickers to do exactly the same thing you and other bloggers have done cause I just love it!!! And who says we have to be the first one to come up with a brilliant idea ourselves anyway 🙂 Great job!!
I love this idea, and I need to try that autofll on my Cricut (I've only used it a few times…)
Love this idea!! Its even better that its contact paper and can be easily removed! Pinning! Jenna @ Rain on a Tin Roof
Love this idea… found you on Best of the Weekend Link Party.
Okay…I'm totally crushing on your wall! LOVE IT SO MUCH! The contact paper is genius because it would be so easy to remove! Pinning this for sure!
genius! i love the look and contact paper on amazon…i didn't know that!
This is so awesome! So pretty and fun. If you get a chance, please link up to my Linky Party: http://suburbsmama.blogspot.com/2013/07/sunday-linky-17.html
Megan this is fantastic!!
Thanks so much for sharing this at our "Best Of The Weekend party"! I have pinned it to our party board and to another big board too. I will be sharing it on FB & Twitter in a few hours. We hope to see you again at the next party!
Have a great weekend!
xoxo – Claire
FYI – This was FEATURED at our Best Of The Weekend party that went live tonight!! yay! Hope to see you back again soon and please share about our party. We would so appreciate it! 🙂
xoxo
I love the wall! It looks amazing, as does the whole space! My first thought was- i have gold duct tape! But i then had to very forcefully stop myself from sticking duct tape (of all things) to my wall.
CorinnaAshley.com
Oh, this is so lovely! I just bought some gold contact paper, based on your link. Thanks for sharing!!
Amy
Your gold polka dots look beautiful!!! I really, really want to do this too – thanks for posting your how-to and I've got this linked to my polka dots post as well today!
Can you please share the paint color on the wall that you gold "dotted" it shows differently in diff lighting but is so pleasant- thanks!
Hi Traci! Yes, I know, it looks so different in various lights, which is really neat. I've used in in various places around my house; in some rooms it looks grey, but in this room it looks very very light blue. The color is Martha Stewart's Cumulus Cloud. Hope that helps!
Awesome! Ill grab a sample today, really appreciate your response!
We are closing on our house in the next month & my little girls' room will be the first room I work on! What brand of contact paper did you purchase! This idea is something I'd love to do! Thanks!
This is so cute!!! Doing this on my daughters ceilings today!
I am doing this to my bathroom with metallic craft paint. I am also in a rental, but this covers very quickly with white semi-gloss. It is less expensive for me. I just use my sponge pouncer and it is working brilliantly! Just another idea to share. I don't care who all is doing the dot thing, I love it too!
Just love this idea; bought some sheets of multi coloured decal dots today, [marked down to less than half price too!] No foil ones to be found, so I am going to spray paint the sheets gold, let em dry then follow you lead. Thank you so much for an affordable and cute idea.
Hi Megan, it has been nearly a year since you posted this. Can you share if it was easy to remove or if the contact paper left any residue behind? I want to do this in my apartment, but I'm nervous it will take off the cheap paint (it has no protective coating) and I'm also not sure how to remove it. Thank you!
I haven't taken any off the wall yet, as we don't move for another year. BUT, whenever my son starts to peel one off the wall, it comes off with no problem and leaves behind no sticky residue! Not sure what another year will hold, but I will keep you all posted! Hope that helps!
how many dots did you cut for this wall? just curious how many I would need to buy for my daughter's room…i love this idea too!!
Hi Jen! Thanks for your comment! I don't have an exact number, but I would say it was in the ballpark of 250 circles. Hope that helps!
can you tell me the length of the wall space that you used. trying to figure out if 250 dots is enough for a 13 ft wall.
approx. how many dot decals did you need to create to finish this wall? just curious as i would like to do this for my daughter's room ! looks great!!
HI Megan,thank-you for sharing this wonderful idea,i hope that amazon will ship to New Zealand.,as the dots have transformed the room.Take care ,kind regards Stacey
Hi Megan,
Love this idea and I would like to do that for our baby's nursery. However I can't find the contact paper on amazon. Any tips on where I can source that from??
Much appreciated,
Natasha
Hi Natasha! I went to buy some more of that paper the other day and discovered it was out of stock too – boo. I have some Oracle 651 Metallic Gold Vinyl ( http://www.ebay.com/itm/1-Roll-24-X-10-Gold-Metallic-Oracal-651-Sign-Cutting-Vinyl-/220901974140) which is a bit more heavy-duty, a little more expensive, and a little more yellow-gold…but it's a good alternative! Good luck!
Hi Megan,
Love this post and happy to see that you're still replying to questions and comments. 🙂
I would like to use my Cricut to print out letter stickers to put on card stock. Do you think the Oracle 651 Vinyl would be too heavy for it?
Thanks!
Nellie
HI Nellie!
Not at all! Although the Oracle 651 says it's "heavy duty", it's still super light weight and flexible, just like normal vinyl. I am sure it would be fine on cards! Hope that helps!
Megan
can you tell us the length of the wall. trying to see how many dots i would need. thanks
ok I'm going to try this one more time. I have tried 3 times to comment and its looks like its not going through. If they did I apologize and just respond to this one please! can you tell me how long that wall is? I have a 13 ft wall that I'm trying to see how many dots i will need. i know you said you used 250 but not sure on the length of your wall. Thank you!
Hi Kally! I hope you check back here for the answer to your question! Your email wasn't attached to your comment so I can't quite get back to you. The wall with the dots on it was about 12 feet long. I hope that helps and good luck!
Megan
I think Amazon caught wind of the awesomeness. The gold paper is now fifty $57 with shipping. Off to ebay I go. Thanks for the great idea!
Pingback: 27 Insanely Inexpensive Ideas for Your Walls - DIY Projects & Crafts For Teens | Cool Ideas