Cross-Hatch Vinyl “Tile” Backsplash!

One of the hardest places to infuse some personality in our military housing unit has been our kitchen. It’s a tiny cave of a kitchen that gets little-to-no natural light. It has cabinets on three of the four sides, leaving me with a lot of wood and few options for decorating. Somewhere along the way, I became obsessed with the idea of a whimsical, colorful backsplash (oh thank you, Pinterest!). However, since we are essentially renting this house, I had to come up with a solution that was low-cost and more importantly, removable. My solution: paint and A LOT of vinyl rectangles!

This project is not hard, just a little time consuming. It is not for the faint-of-decorating-heart though; it does require some attention to detail, perseverance, and flexibility (literally! reaching corners and under cabinets required some contortionist positions!) Hopefully, through all my trial and error, I can save you some time (I’m not going to tell you how many times I applied, peeled off, and re-applied my “tile” 😉 but depending on the surface you are “tiling,” this project will take some time – just a fair warning!
Before we get started, here is what you’ll need:

The first part here is optional. I wanted a tone-on-tone look to my backsplash so I painted the wall first. This wall treatment can certainly be applied to a white wall (or previously painted wall), in which case, you can skip to Part II.

1. Prep the surface for painting. Prepare your surface for painting by removing outlet plates and taping off cabinets, counters, etc.

2. Paint the walls. Using a brush or roller, cover your area with the paint of your choice. I used two coats of Martha Stewart’s Lagoon in Eggshell.

3. Define areas as necessary. On both sides of my kitchen, I had to artificially stop my backsplash because I didn’t want to paint the entire kitchen. Tape a straight line in order to mask out the areas you want to define as your “tile” surface.

It is best to let your paint dry for a few days before you apply your vinyl wall treatment. Inevitably, you will have to remove or re-position some of the vinyl and you don’t want the paint to peel off with it!
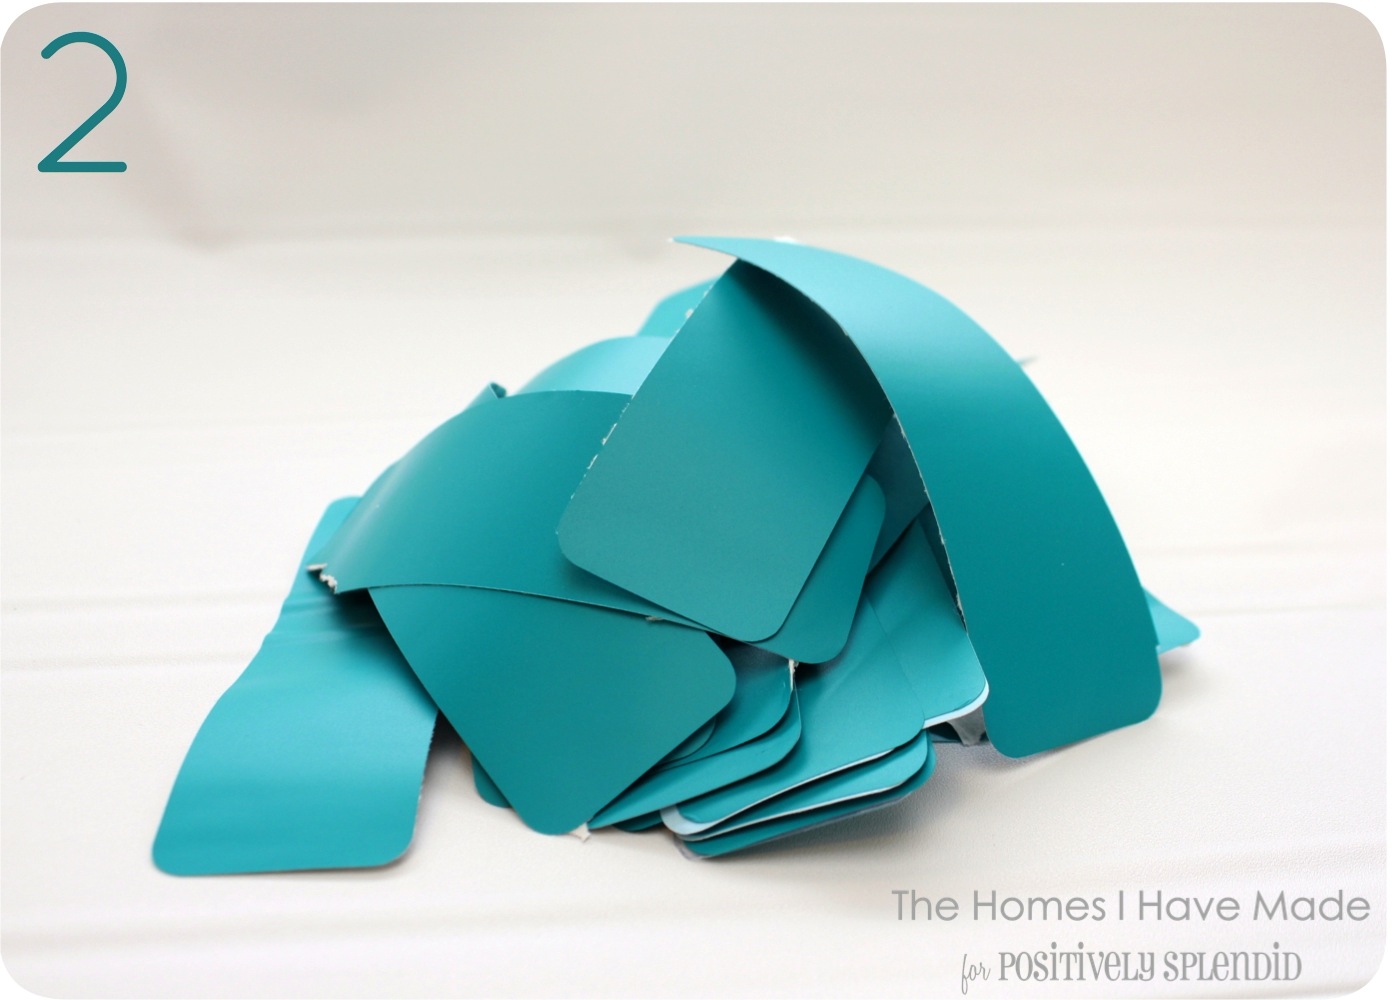
While your walls are drying, prepare all your vinyl!

1. Cut vinyl rectangles. Using a die-cut machine (or a regular ol’ scissors), cut out your rectangles. I used the rounded-corner rectangle on the George and Basic Shapes cartridge with the auto-fill function on my Cricut. My rectangles measured 5″ long by 1.5″ wide.

2. Cut more rectangles. Cut lots and lots of rectangles 🙂 I don’t have an exact calculation for you, but our kitchen backsplash runs about 25 feet. I cut out well over 300 rectangles from ~15 feet of vinyl.
Next, make a template (from painter’s tape) to help you apply your rectangles to your wall. (Just go with me here, this will make sense when it comes time to put the rectangles on the wall!)
3. Lay out 2″ wide strip of painter’s tape. On a wide ruler or cutting mat, tape out a strip of painter’s tape to achieve a 2″ wide strip.

The tape I had on hand was skinny, so I overlapped three strips to make it 2″ wide.

4. Cut tape into 2″ square. Then, using your rotary cutter and a ruler, cut the 2″ strip into a 2″ square.

Here’s my “perfect” 2″ square of painter’s tape.

5. Measure out 1/4″ margins. Using a ruler and a pencil, draw a line 1/4″ in from the edge of the tape on all four sides.

Want to save this post?
Here’s my square with the 1/4″ lines on all four sides.

Okay…your wall is painted, you have tons of vinyl rectangles cut, and have made your painter’s tape guide…let’s get those rectangles on the wall!
(NOTE – I am sure there are lots and lots of different ways to get this vinyl pattern up on the wall. I tried several different methods including measuring, a “stencil,” transfer paper, and eye-balling it. I ultimately found that this method (below) was the best combination of ease, efficiency, and vinyl conservation. However, please feel free to come up with your own creative way to put your rectangles on the wall!)

1. Choose a place to start application. Pick the focal point of your kitchen (or whatever surface you are “tiling”) and place your tape square in the center (rotated 45 degrees). Use a level to make sure your corners are in line.
This is important: applying the “tile” builds outward from a starting point. You can’t start in one place and move to another location when you get bored, tired or frustrated…the chances of your pattern meeting up is slim-to-none. Center and start your “tiling” in the most noticeable area of your kitchen!

2. Align and place one rectangle. Align the SHORT edge of one rectangle with the 1/4″ line you drew on the tape; align the LONG edge of the rectangle right next to the tape. Smooth out the rectangle on the wall.

Continue applying your rectangles as follows:
- a. Place the second rectangle same as the first: align the SHORT edge with the next 1/4″ line; align the LONG edge with the tape square.

- b. Repeat with the third rectangle.
- c. Repeat with the fourth rectangle and remove the tape square.
- d. Line up the square with two “available” rectangles, using the edges of the tape and the 1/4″ lines as your guide.
- e. Continue to place rectangles and move the tape square to build your tile pattern.
Once you get your initial pattern established, I found it easiest to start at the top and move down the wall in columns. Use the level to ensure your square stays level and in-line with the previously applied rectangles. Be diligent about lining up both the square and the rectangles EACH TIME! If you find that your pattern is drifting or not lining up…STOP…go back and figure out which one(s) are not lined up just right. The pattern will only unravel more the further you go! (That’s why you use re-positionable vinyl!)

- f. Continue moving outward from your center point; when you reach the edges of your tiling surface, go ahead and just leave the ends. You’ll clean up all those edges at the end!

- g. When you come across an outlet, apply your rectangles using your square tape template as best you can. Carefully trim away all the excess vinyl with a scissors before replacing the plate.

3. Tile entire kitchen (surface). Very diligently and carefully, continue placing and re-placing your square and vinyl rectangles until your entire tiling surface is covered!
4. Trim all excess edges with an exact-o-knife. Using a sharp exact-o-knife, carefully cut off the excess vinyl at all edges and intersections.

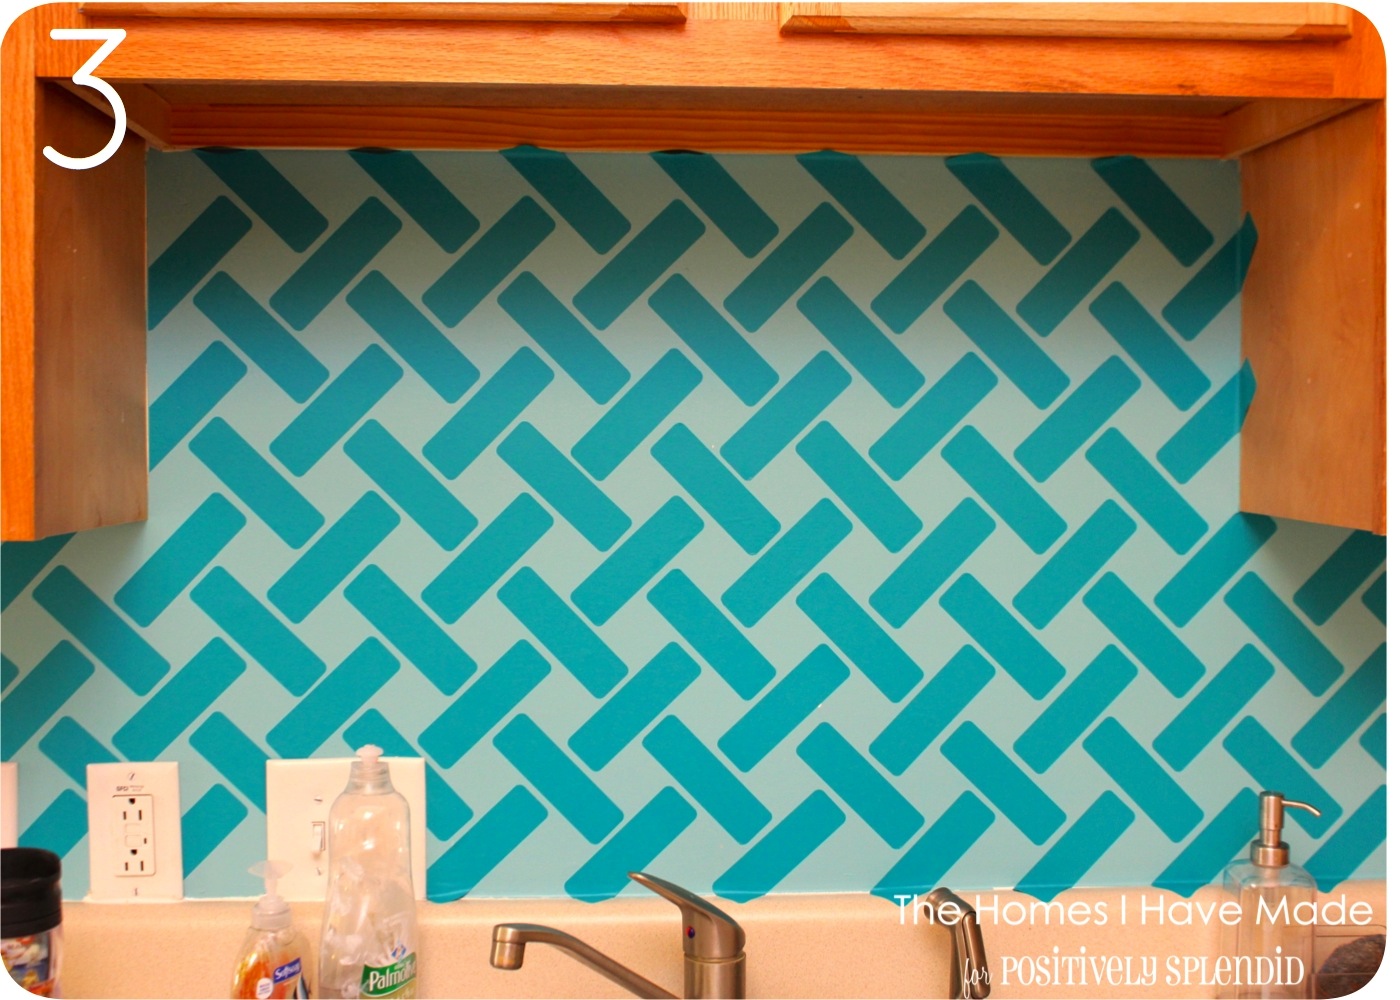
And that’s it! Now you can step back and squeal in excitement at your new backsplash!

It was a lot of work to get all the rectangles up, but the final effect is stunning! My kitchen cave is now bright and happy and a fun place to cook and clean!

In case your curious about behind the stove: I did a “test run” with the vinyl before I even began this project. I used both the stove and oven at various temperatures and for various durations. The wall and vinyl never even got warm much less hot. I don’t have any concerns about the vinyl near the oven, but I recommend a test run before you try it in your home!

It’s no easy task to get a decent picture of this whole kitchen due to size and lack of windows, but you can get a sense for how the kitchen looks with it’s new fancy wall treatment!

Alrighty friends, I’m out for this week! I’ll be back Monday with a BIG project reveal I’ve been working on for quite some time now!

Megan
6 Comments on “Cross-Hatch Vinyl “Tile” Backsplash!”
It looks amazing! You must have the patience of Job to get all those tiles in place.
It really looks amazing in person. I was stunned. Then she told us it was vinyl cutouts and I just stood there in amazement. It was awesome.
Your backsplash turned out beautiful, I love that pattern!!! I've got this post here linked to my DIY backsplashes too today, well done!
All I can say is WOW! great job!
I recently discovered your blog. OMG you are a genius. I am obsessed with your inspirations. We rent a 3 bedroom house with a 1 bedroom apartment in the basement. I have lots of walls to decorate, all temporarily. Thank you for your ideas and expertise. I look forward to following you for a long time to come.
Christine W.
Hi Christine!
I’m so glad you found me too! I’m slightly obsessed about updating our rental walls so be sure you poke around the site (a lot of my rental ideas are HERE)
Also, if you haven’t already…subscribe for my free Rental Decor Guide HERE.
So glad to have you following along!
Megan