How to Assemble a Recipe Binder (Using Printables!)
Whenever I do my “best of the best” organizing posts, this Recipe Binder project is always at the very top of the list. That’s because it’s easily one of the best organizing projects I’ve ever tackled. Not only has it stood the test of time (going on 5 years of the exact same system!), but this Recipe Binder saves me significant time and reduces meal-time stress…meal after meal, day after day. Today, I want to show you how to organize your recipes into a binder using my most popular printables ever: the Ultimate Kitchen Printable Pack. Get ready to move this organization project to the top of your To Do List!
Why Organize Your Recipes
These days, recipes are everywhere aren’t they?! It’s not uncommon to have recipes that you love or want to try printed in cookbooks, hand written onto recipe cards, printed out from your favorite blogs, or stored digitally on Pin boards, Instagram profiles, and even specialty apps.
With recipes saved in so many different places, it can a total hassle (not to mention time consuming!) to hunt down a specific recipe…whether it’s for a special occasion or a normal Tuesday night dinner. As a result, most of us make the same things over and over again, forget about particular dishes we love or meant to try, and/or begin to dread preparing meals for ourselves or our families.
But it doesn’t have to be that way!
Think about what it would be like to have ALL of your recipes (the ones you love, the ones you remember, the ones you hope to make someday) gathered into one spot. What if they were categorized in a way that not only made perfect sense to you and how you cook, but were also easy to reference, update, and maintain?
Would that be a meal time “game changer” for you? It was for me!
The Relationship Between Recipe Organization & Meal Planning
There are lots of household routines I don’t have on lock. But if there is one thing I do make time for…every single week…it’s to plan our meals and make a corresponding grocery list. Doing this one task helps our entire household run a little lot smoother, ensuring that 1) I know what I’m putting on the table every night AND 2) have the ingredients on hand to do so.
But would you believe me if I told you this routine takes me all of about 10 minutes each week? Yep…10 minutes to both plan out our weekly meals AND populate a matching grocery list. That’s because I have 100% of my recipes organized into a single, categorized, easy-to-grab Recipe Binder.
There’s no remembering what recipes we like or haven’t made in a while. And there’s no hunting through cookbooks, Pin accounts, or Instagram feeds for something I’ve been meaning to try. Filling both my meal planner and grocery list involves simply flipping through the pages (or referencing the Recipe Inventory under the inside cover) to find dishes that sound good for the week and transferring the needed ingredients right onto my printed grocery list.
Curious to see exactly how I meal plan? Learn my tried-and-true meal planning method!
I’m not exaggerating when I say that having your recipes organized into an efficient and simple Recipe Binder system is the key to establishing and maintaining a good meal planning routine.
Organizing your recipes may seem like a big undertaking at the start. But once they are all sorted, organized, and at your fingertips whenever you need them, you will reap the time- and sanity-saving benefits week after week!
Why a Recipe Binder?
Before I dive into the “how to” of assembling a Recipe Binder, I think it’s first important to talk about the value of paper recipe organization versus digital methods. Above all, this is very much a personal choice.
If you are a digital lover for all things and just prefer to keep your paper footprint to a minimum, this Recipe Binder approach is likely not for you. Instead, I suggest you explore digital recipe organization methods such as Big Oven, ChefTap, or even Evernote.
Personally, I am a paper girl through and through and prefer to flip through an actual book when looking for recipes and read actual paper when making dishes. (I don’t like how small the font is on my phone and how it goes to sleep between steps).
If this is you too, using a well-categorized, three-ring Recipe Binder is the perfect solution (although it’s important to note that you will need to get all of your recipes into easily-fileable paper form, which can mean lots of printing).
Supplies Needed
Organizing your recipes is not hard, but it can be a time-consuming project. Here is what you need to get it done:
- 2-3″ Heavy Duty Binder – Any binder will do, but you likely want it to be thick and very sturdy.
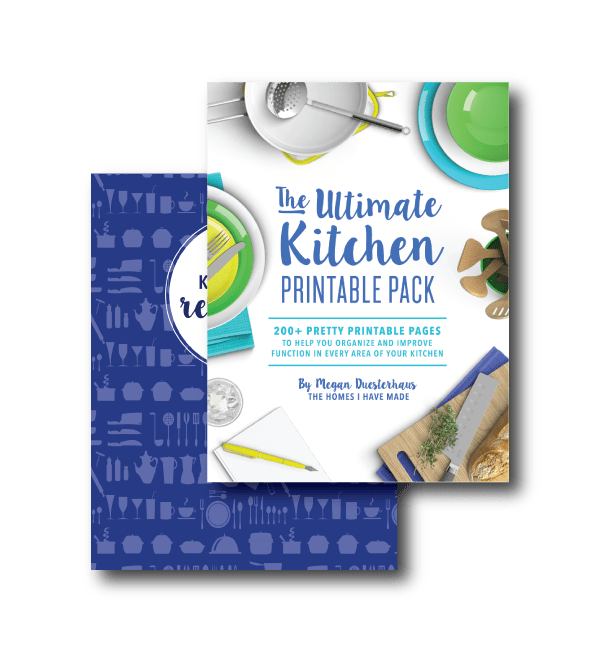
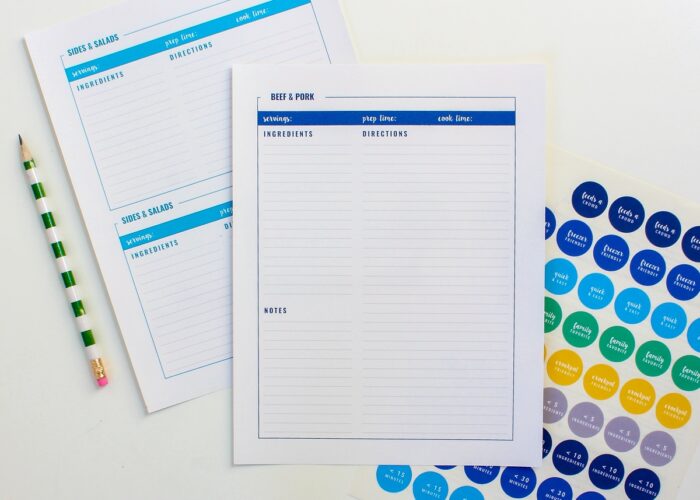
- The Ultimate Kitchen Printable Pack – digital files to organize your Recipe Binder, more info on these files below
- Plastic Sheet Protectors

- Papers & Labels
- White Cardstock – for divider covers and tabs
- Avery 6450 Stickers (Optional) – for the round recipe labels
- Avery 5264 Labels (Optional) – for the freezer labels
- Tools: Tape, Scissors, Craft Adhesive, Clear Packing Tape

 ,
, The Ultimate Kitchen Printable Pack
From divider pages and tabs to inventories, labeling stickers, recipe cards, and more, my color-coded, fully customizable Ultimate Kitchen Printable Pack features all the digital files you need to create and organize your Recipe Binder. Click HERE to learn more about this printable recipe binder kit or download it immediately by clicking below!
Have an All Access Pass to The Organization Toolbox? Login HERE to get this download!
Step 1 – Gather All Your Recipes
The very first step is to gather all your recipes…yep, all of them. Depending on the state of your recipes, this will likely be the most tedious and time consuming part of the entire project.
Finding all your recipes is about more than collecting print outs from around the house and pulling cards from a recipe box.
This may also include:
- Printing off recipes you have saved to the computer.
- Going through your favorite cookbooks and photocopying any you want/need regular access to.
- Browsing through digital cookbooks you own and printing out recipes you love or want to try.
- Going through your Pinterest boards, saved Instagram posts, or meal apps to print out recipes you want to have visibility on.
Your goal is to gather up all the recipes you always make, want to make, or don’t want to lose.
Step 2 – Purge Your Recipes
While you are gathering and sorting through your recipes, this is an excellent time to purge out ones you likely will never make again.
Our tastes and preferences change over time. So just like you can get rid of clothes you’ll no longer wear, don’t hesitate to trash any recipes you won’t make again. Your goal is to be left with only the recipes you make, want to make, or want to keep for whatever reason (e.g., family recipes, hand-written recipes, etc).
Step 3 – Categorize Your Recipes
Your next step is to sort your recipes into categories that make the most sense to you. You want to be able to instantly find a recipe, not flip all around wondering which category you put it in. My best recommendation is not to over think this and instead use your gut.
Ask yourself: “When looking for this recipe, where would I go first?” Your immediate reaction indicates which category it should go in.
Keep It Simple
I have been emailed countless questions over the years about how far down to organize recipes. Because let’s be honest…you can make your recipe-categorization system super detailed. But keep in mind: there is an inverse relationship between complexity and time saved. The more complex you make your categorization system, the less intuitive it will be and the more time you’ll spend hunting down recipes.
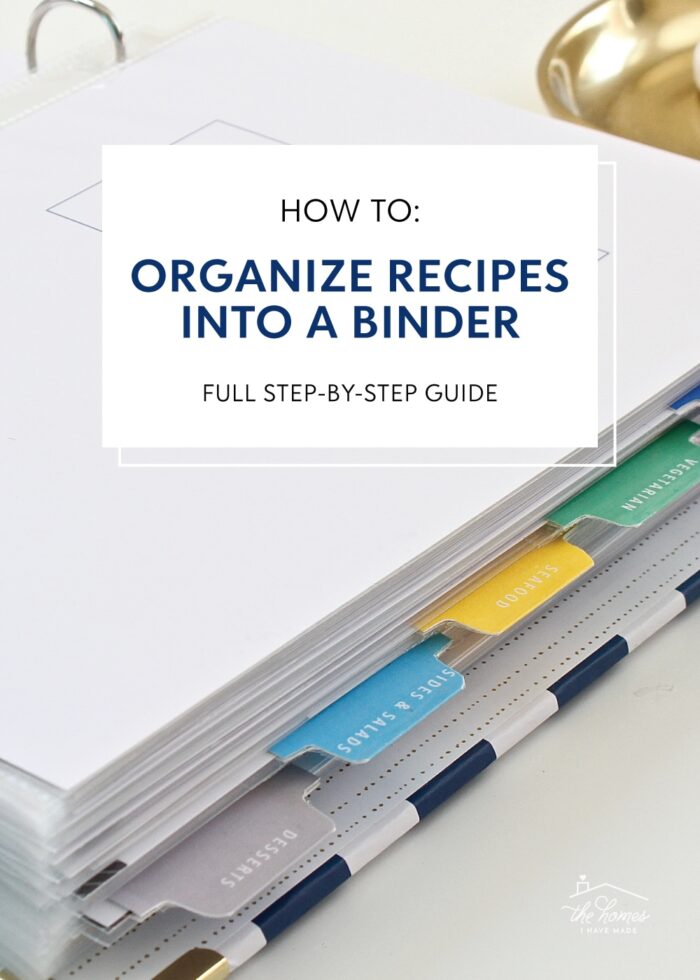
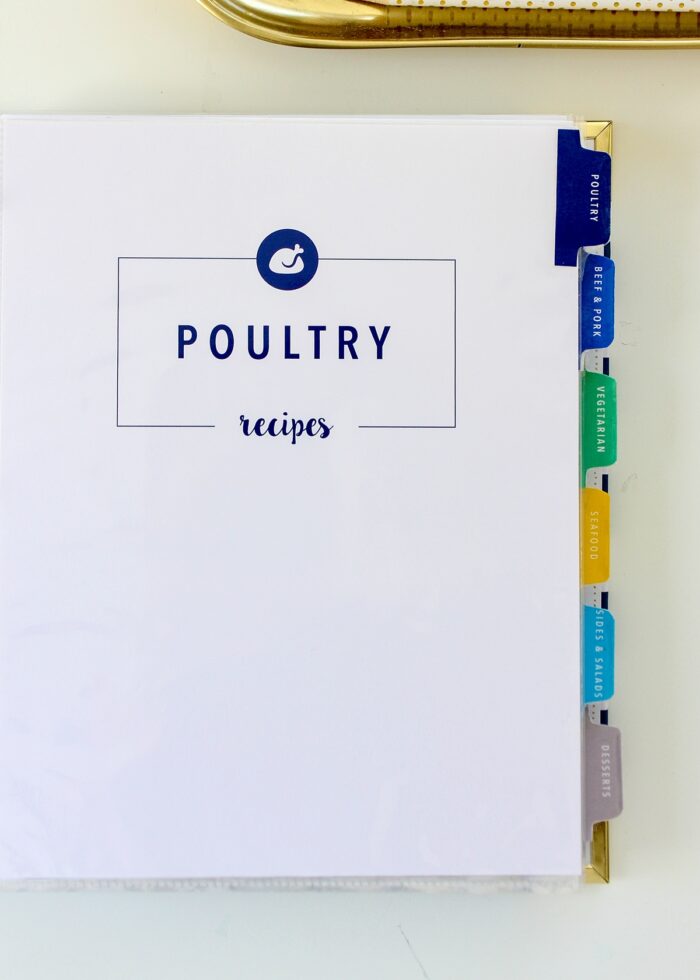
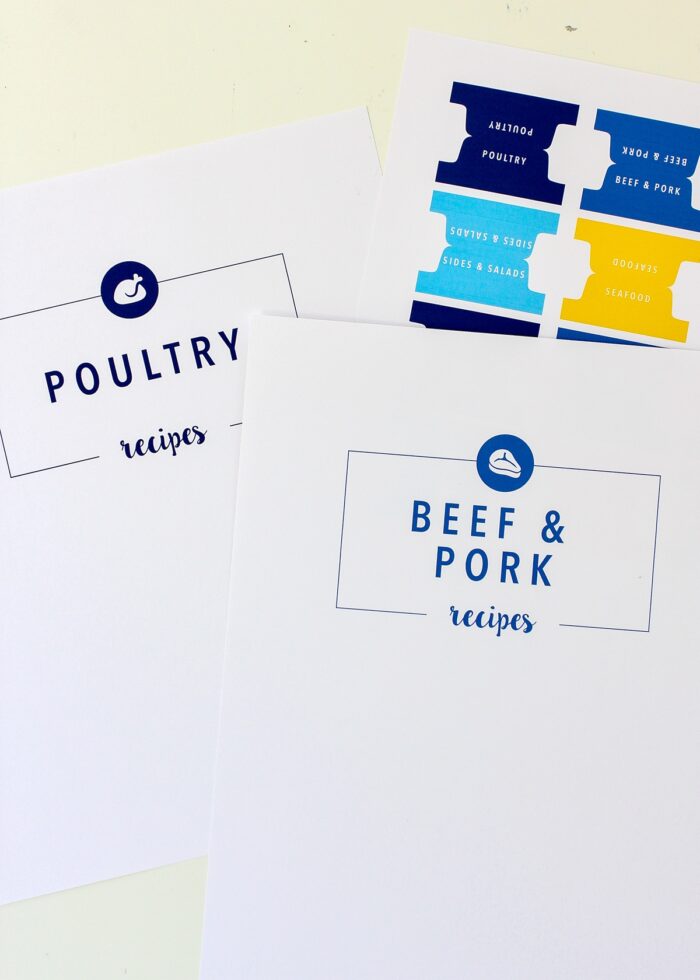
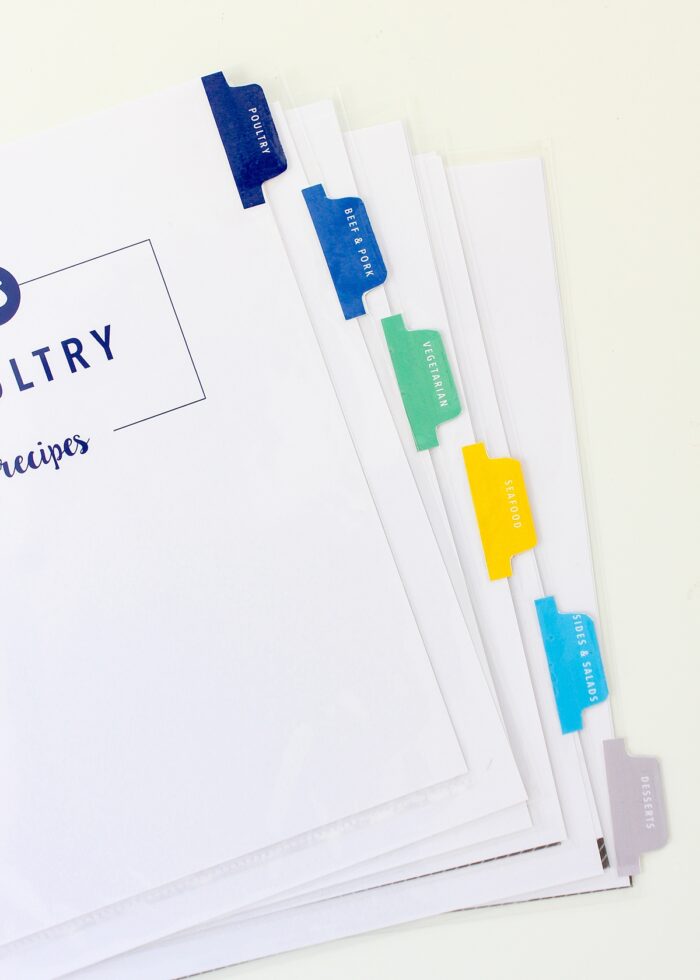
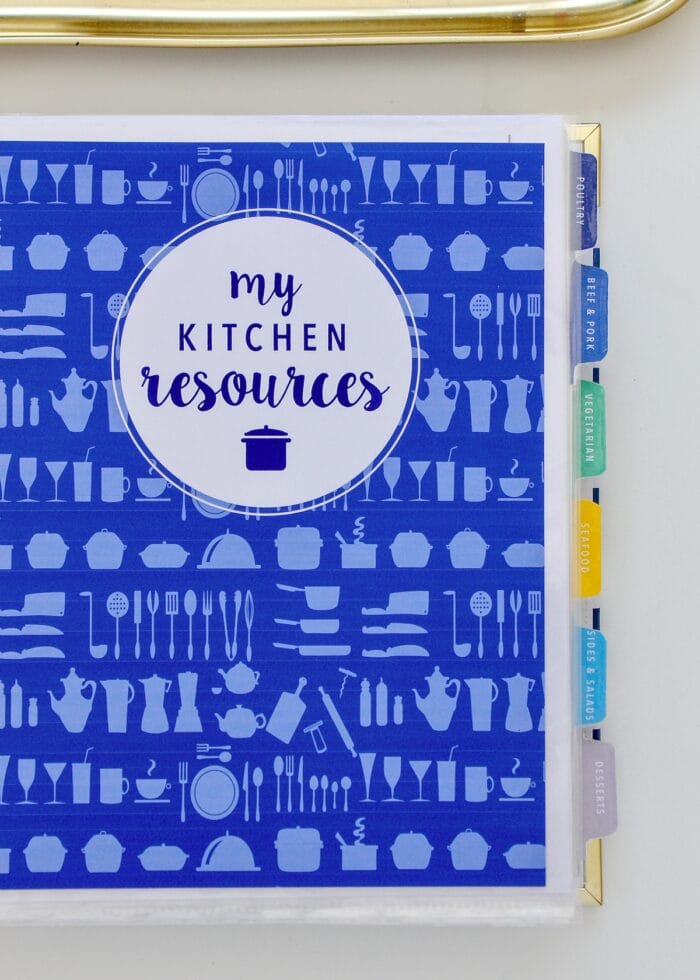
For over 10 years, I have organized my recipes into the following 6 categories:
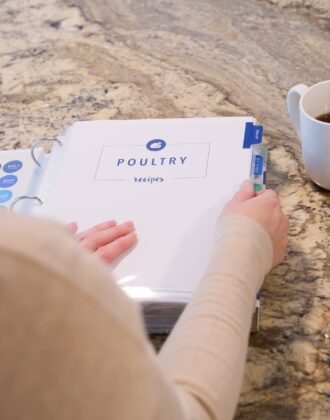
Poultry | Beef & Pork | Seafood | Vegetarian | Sides & Salads | Desserts
In general, this categorization is by protein type with extra categories for Side Dishes/Salads and Desserts (just so I can find them quickly). I don’t bother with dinner versus breakfast, appetizers versus main dishes, or even separate out casseroles versus roasts versus soups. My categories are incredibly concise, intuitive, and simple. That said, don’t hesitate to use whatever and as many categories that make sense for your brain and your particular collection of recipes.
Pile By Category
As you sort and purge your recipes, simply pile them up by category. Take your time refining and defining the piles until you are sure you have a system that is as intuitive as possible and all your recipes are categorized accordingly.
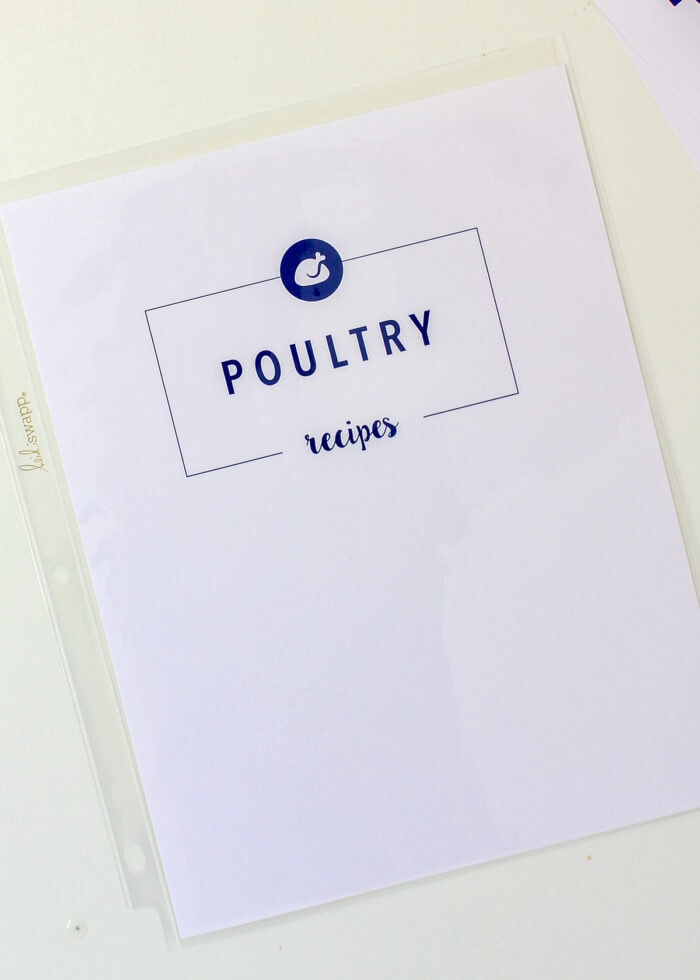
Step 4 – Load Recipes Into Page Protectors
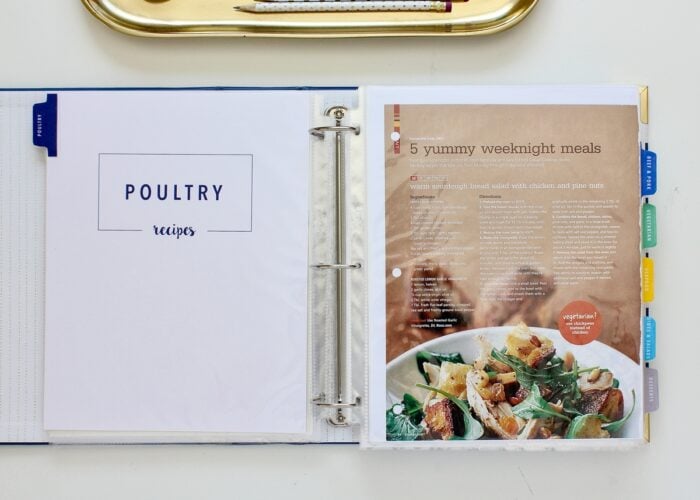
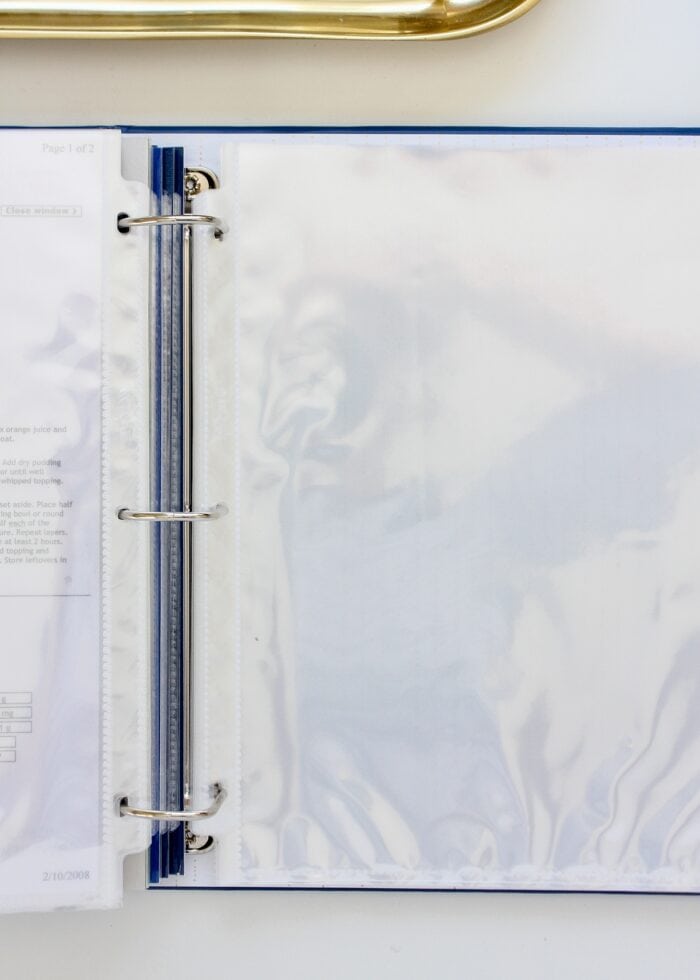
Once your recipes are fully purged and sorted, it’s time to load them all into page protectors. This not only keeps them clean from spills while cooking, but the plastic sleeves make this entire paper system more durable.
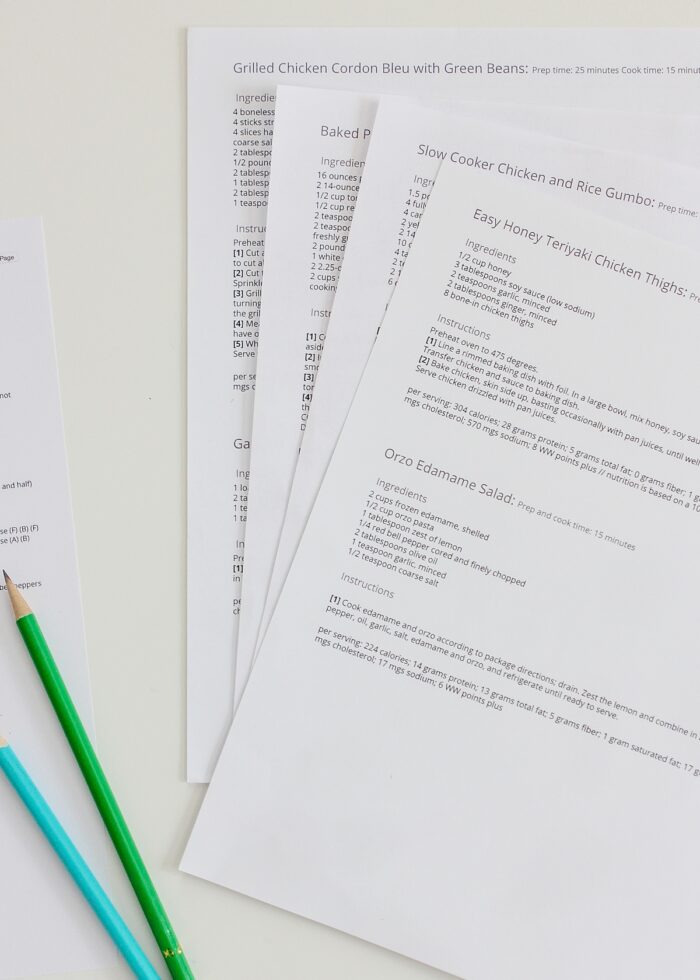
- For recipes already on a full single sheet, load them directly into page protectors.
- If the recipe is double sided, place the single recipe into a single page protector.
- If the recipe is single sided, place two recipes back-to-back in a single page protector.
- For recipes on cards, clipped from magazines, or scratched onto small pieces of paper, tape them onto sheets of printer paper before loading into page protectors. This allows you to “collage” multiple recipes together onto as few pages as possible.
TIP! If you need to be able to read the back of a recipe card, only put tape on the left side of the card as you secure it to paper. When making a recipe, it is easy to slide the page out of the protector and flip the card over. If you have a lot of recipe cards, you might want to consider loading them into page protectors designed for recipe cards instead!
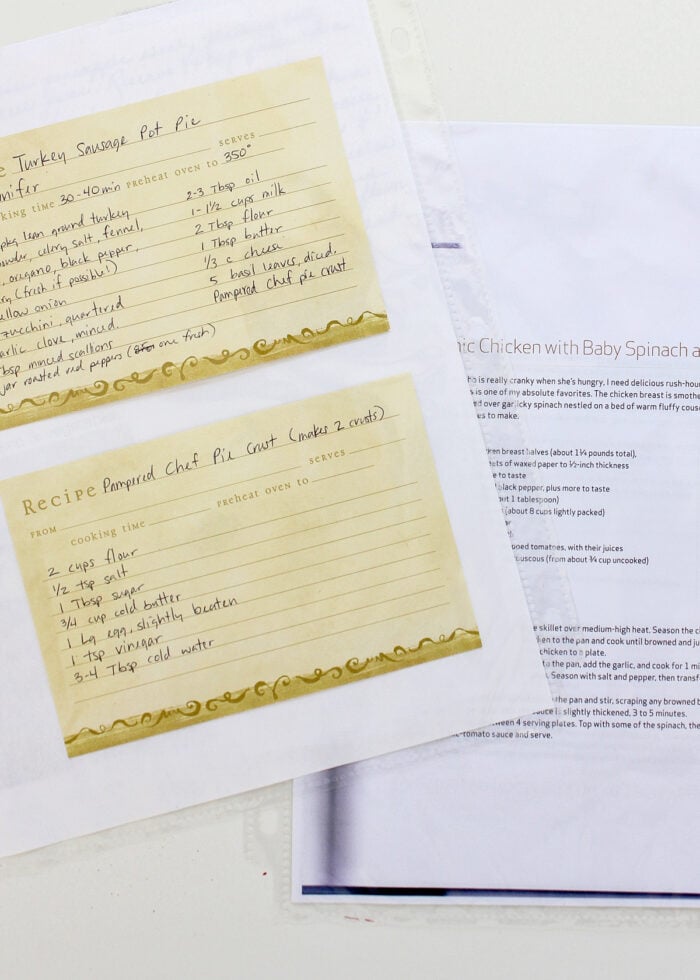
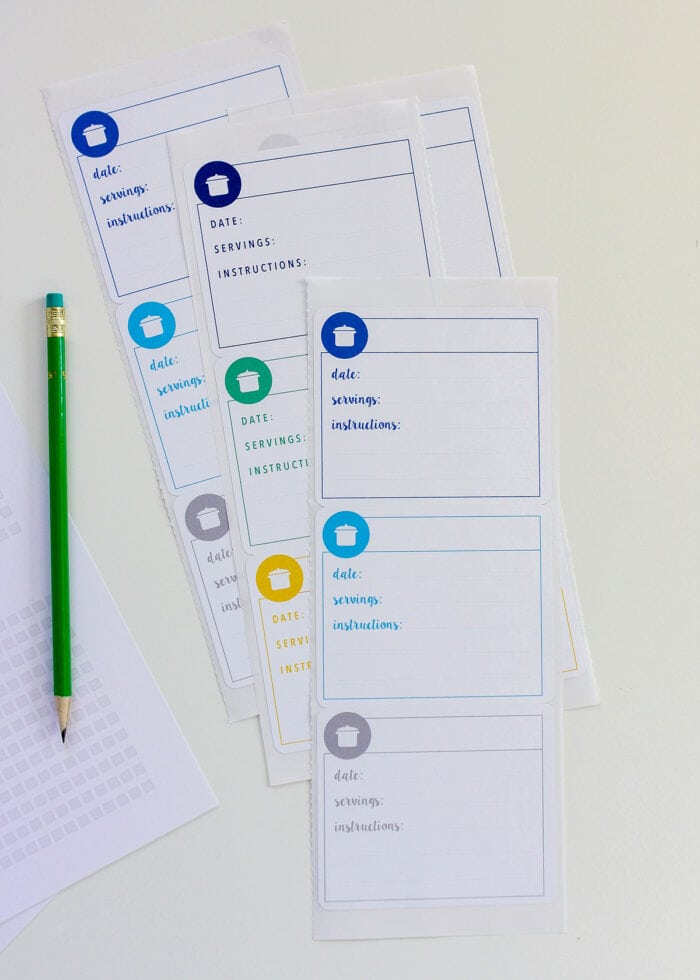
If you want/need to write/type up recipes that are hard to read or passed down by memory, you can type them into the included editable recipe cards.
Be sure to keep your category piles separate as you work to prevent having to re-sort them or accidentally taping unlike recipes onto the same pages. Post-It Notes work great as temporary dividers until you make them in the next step!
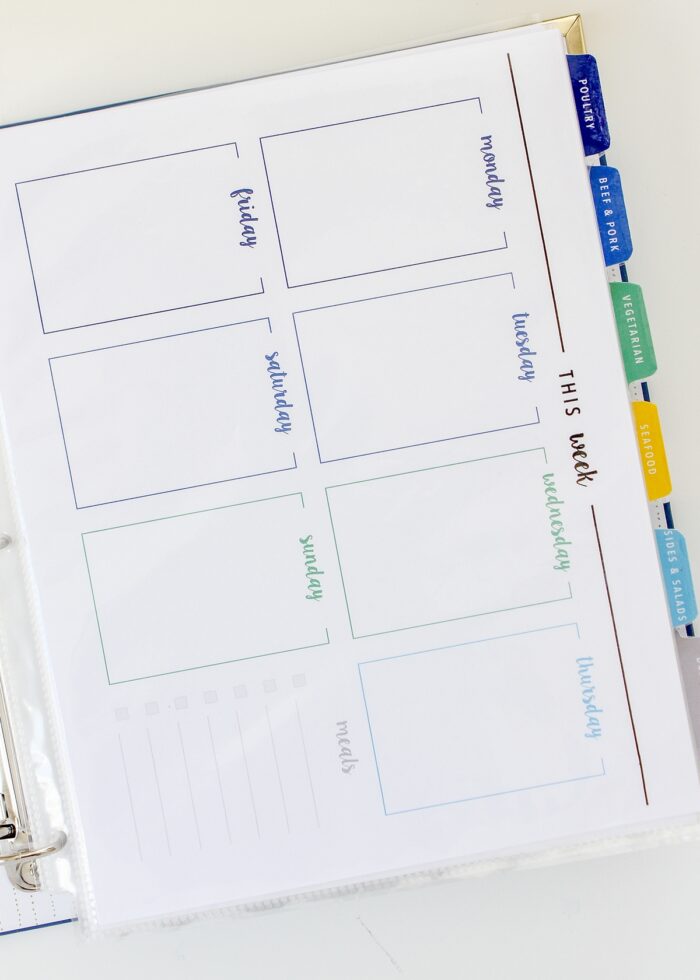
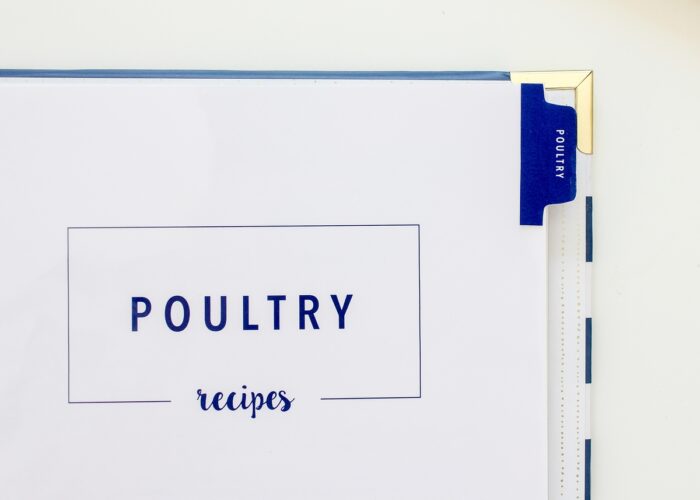
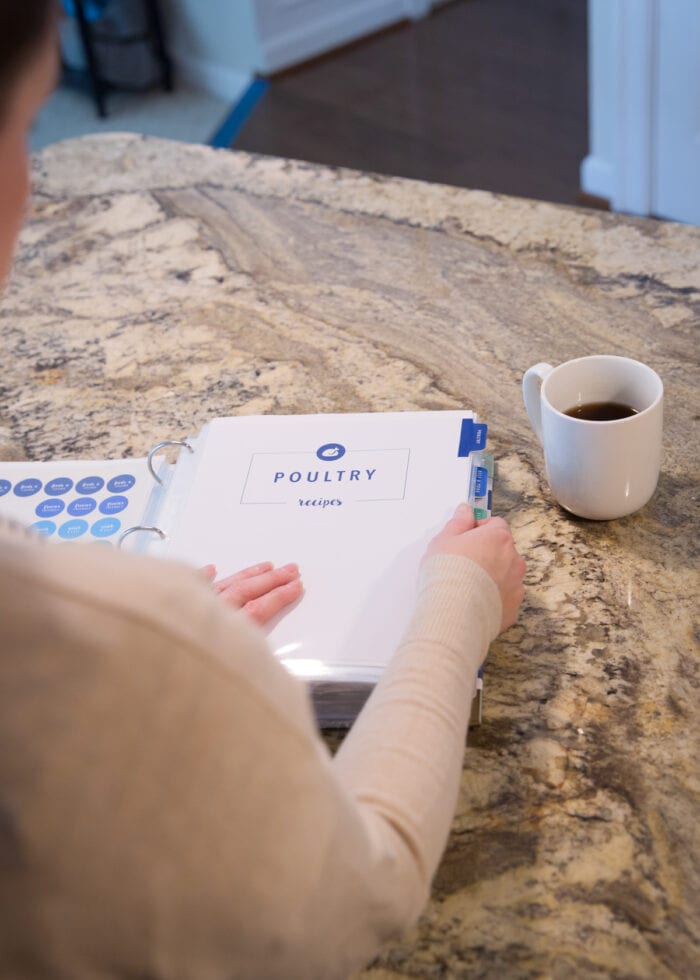
Step 5 – Make Tab Dividers
So that you can quickly and easily find the right recipe when you need it, it’s important to separate each category with tabbed dividers. While you can certainly use/make any tabbed dividers you want, here is how to edit, print, and assemble the versions from the Ultimate Kitchen Printable Pack.
1: Edit the Files
The Recipe Organization materials from the Ultimate Kitchen Printable Pack are 100% customizable, including the divider pages, tabs, recipe inventories, grocery lists, etc. Watch this short video tutorial to see how to type in your own categories onto the editable pages! (Video not loading for you? Watch it HERE.)
Need more than 6 category colors? The exact same Recipe Organization materials are available in additional colors HERE.
2: Print the Category Divider Pages and Tabs
Once you have all the divider and tab pages categorized as you want them, print them onto white card stock.
3: Assemble the Recipe Dividers
To assemble the color-coordinating dividers, start by sliding the divider sheets into page protectors.
Want to save this post?
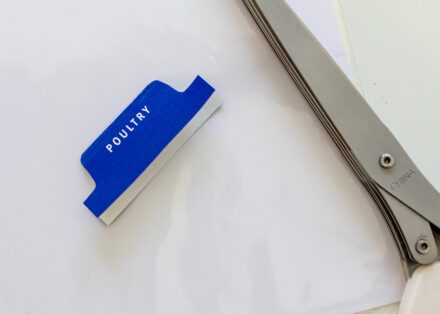
Next, cut and assemble the coordinating tab labels as follows:
-

- Trim down the coordinating tabs with a scissors and fold in half.
-
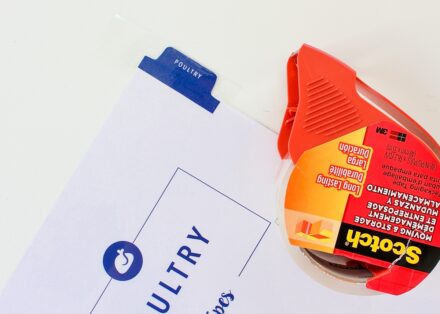
- Secure the tab to the edge of the corresponding divider (on the outside of the page protector) with roller adhesive.

-
- For added durability, fold clear packing tape (or clear contact paper) over the tab.
-
- Trim around the tab to cut away the excess tape.

Repeat with the remaining dividers to make a complete set for your Recipe Binder.
NOTE! This DIY process might seem a bit convoluted, but it is my absolute favorite way to make custom tabbed dividers for recipes (and any other binder system actually!) Here’s why:
- Traditional tabbed dividers will not be wide enough to stick out past page protectors. By adding the tab to the page protector itself, it is both seeable and usable within your recipes.
- Adding the clear packing tape makes these incredibly durable. I made mine over 5 years ago, and they are still going strong.
- Printing everything together is the only way to make sure everything truly color-coodinates. #priorities
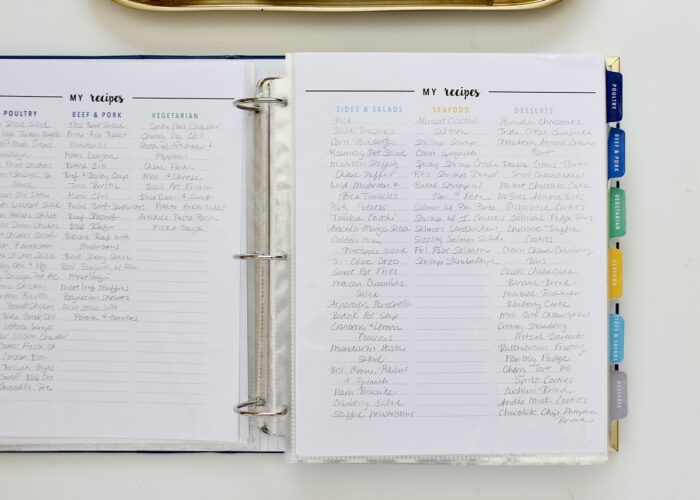
Step 6 – Load Up Your Recipe Binder
Now that your recipes are sorted and protected and your custom dividers are made, it’s time to load everything into one single binder. (This is the exciting part!)
Place your dividers into the binder with each set of corresponding recipes (in their page protectors) behind it.
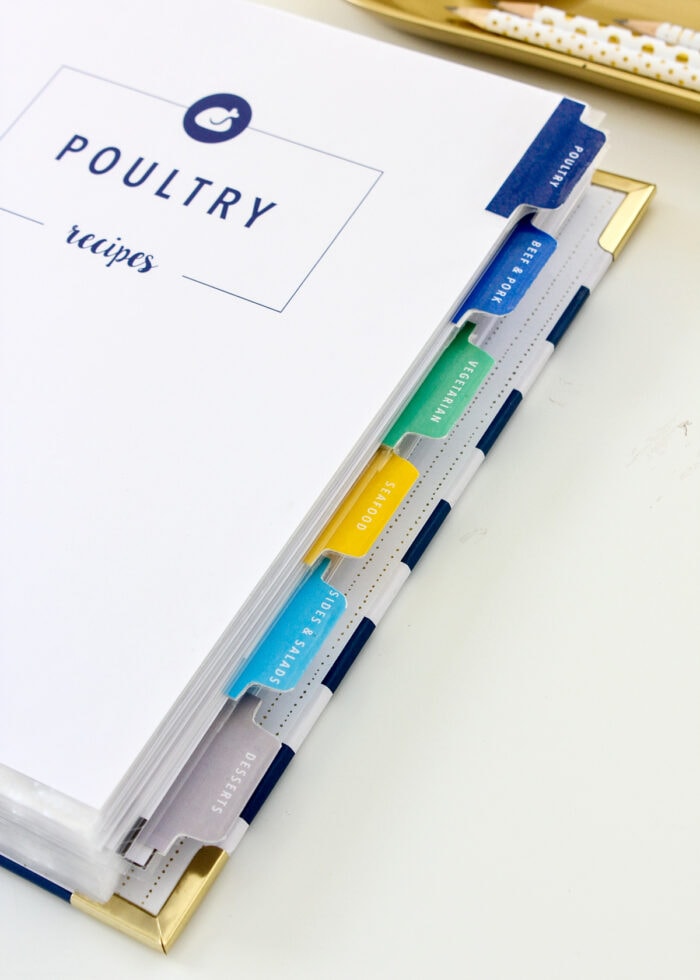
Flip through to make sure everything looks and works exactly as you want it to!
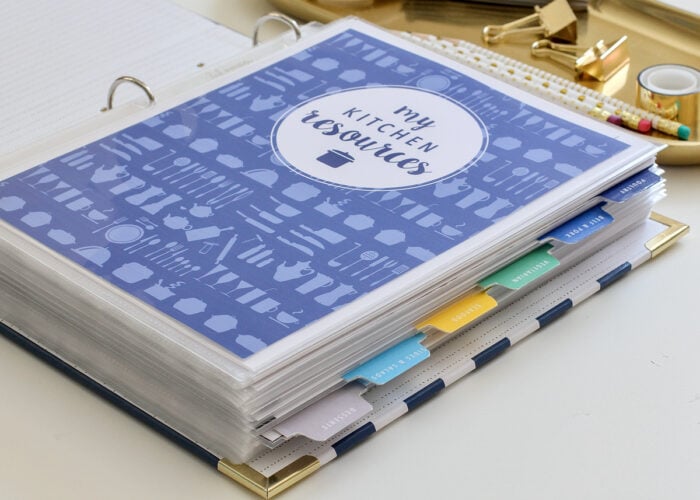
Step 7 – Add a Recipe Binder Cover
Your final step is to add a personalized cover so that 1) everyone knows what this big binder is, and 2) it’s fun to use day in and day out!
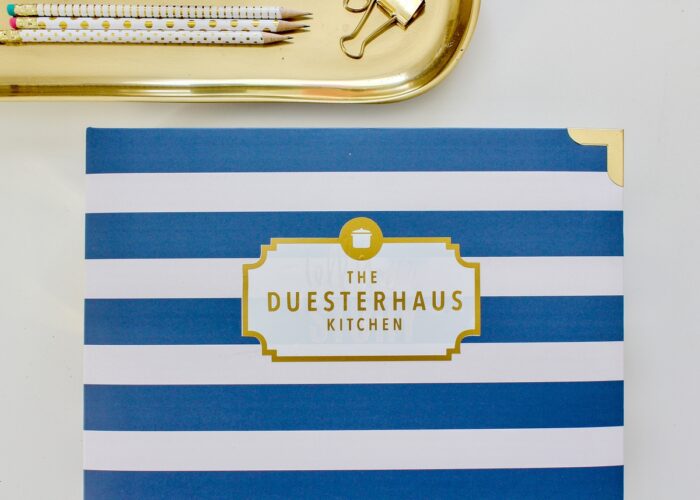
The Ultimate Kitchen Printable Pack includes 10 different (color-coordinating!) covers with spines. These pages are editable so you can type in your family name and whatever title you want. Once printed, slide the cover and spine into the pockets on a laminated cover binder!
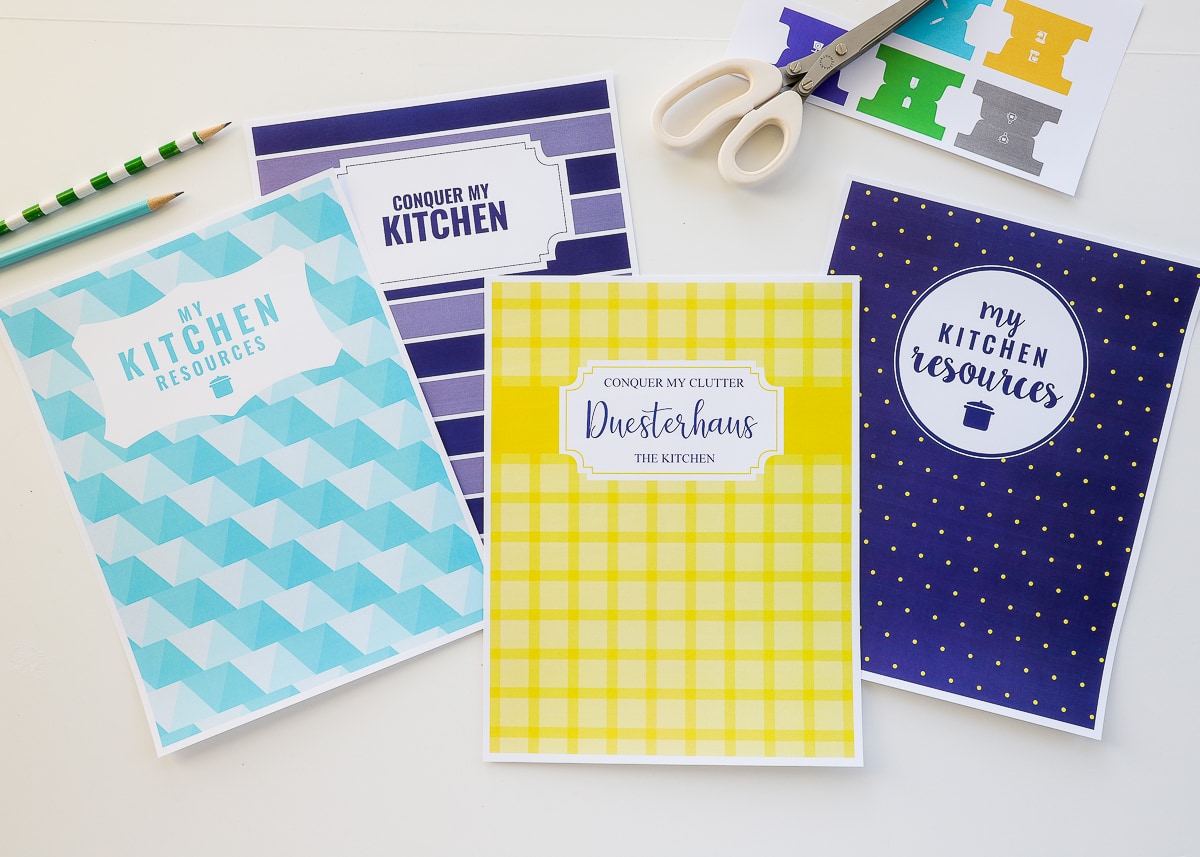
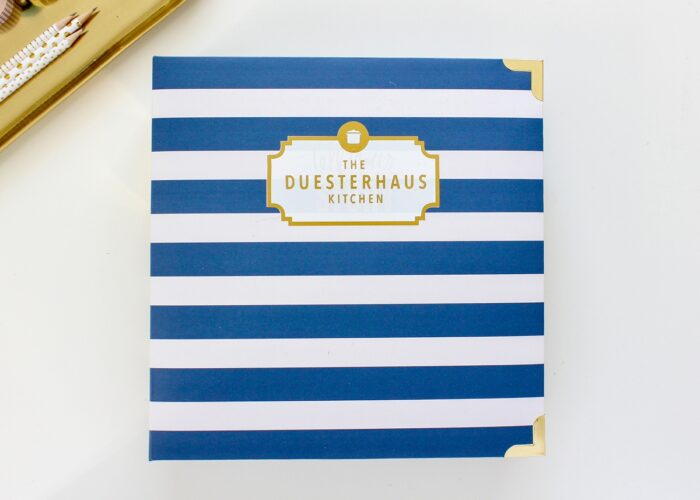
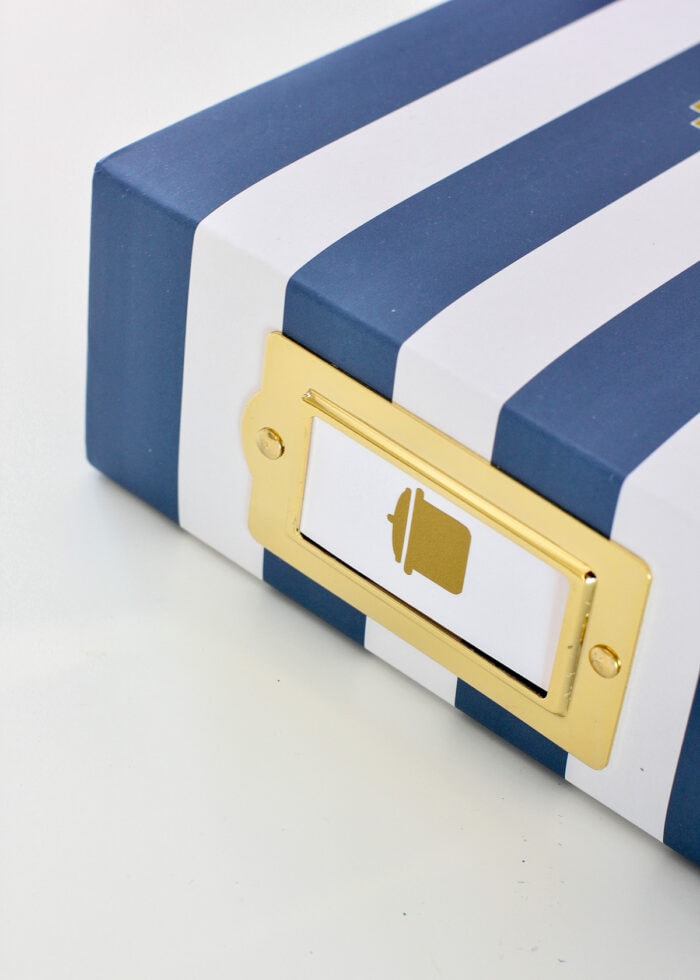
I decided to use a navy blue striped binder I found in the clearance section of Michaels. Since there was no clear pocket for a custom cover, I cut some vinyl labels with my Cricut. (See It: How to Make Custom Vinyl Labels with a Cricut.)
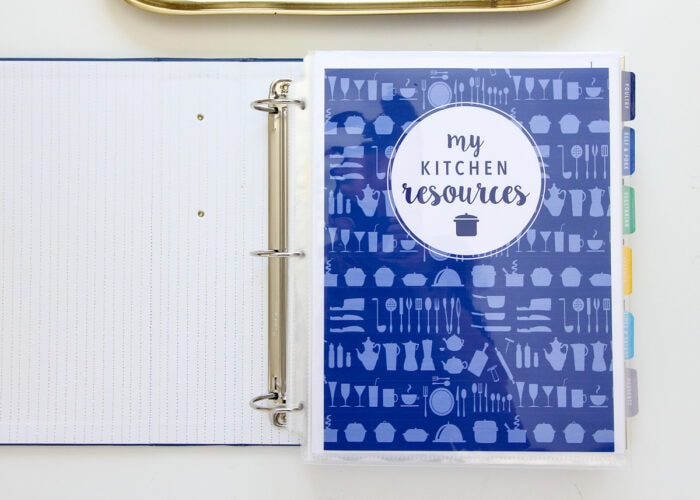
Step 8 – Create a Resource Section (Optional)
Technically, your Recipe Binder is complete and ready for use (hooray!) But there are some other (optional) things you might want to include in order to make it an even handier resource! I have most of these things (inside more page protectors) in the front of my Recipe Binder.
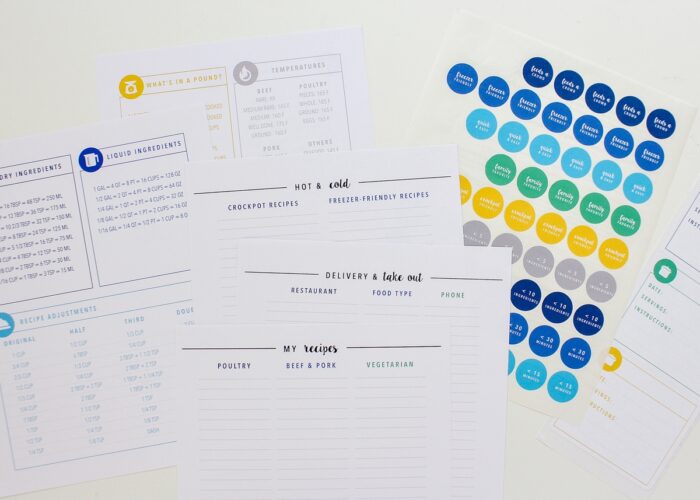
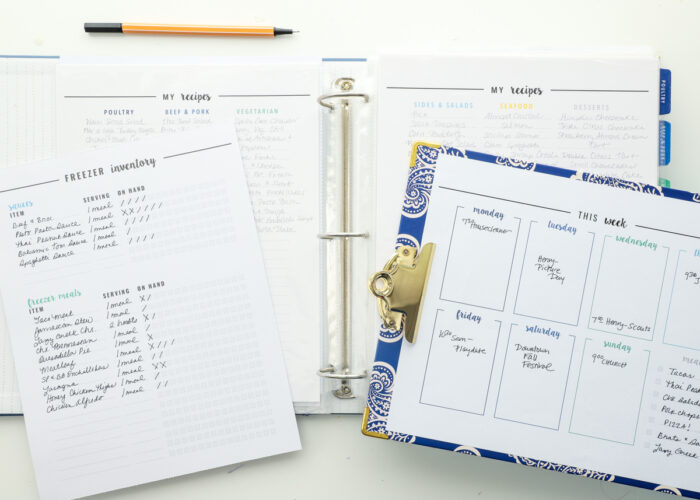
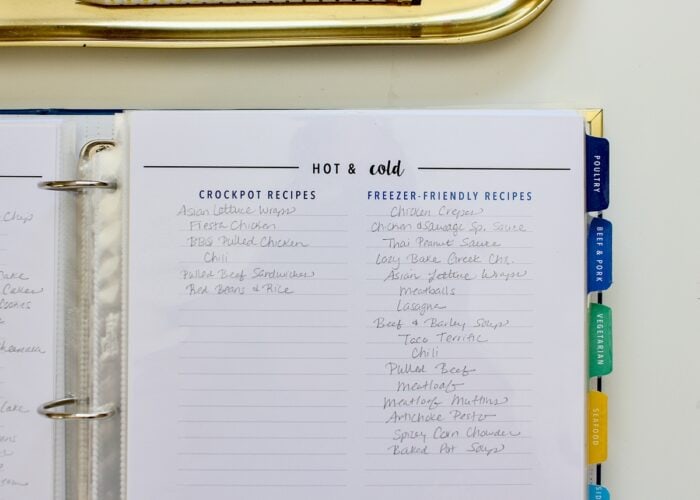
Recipe Inventory
A Recipe Inventory in the front of your Recipe Binder gives you an at-a-glance snapshot of all your recipes, which makes filling out meal plans so much easier. Instead of having to flip through pages and pages, these lists allow you see all your recipes at once and even remember ones you haven’t made in a while.
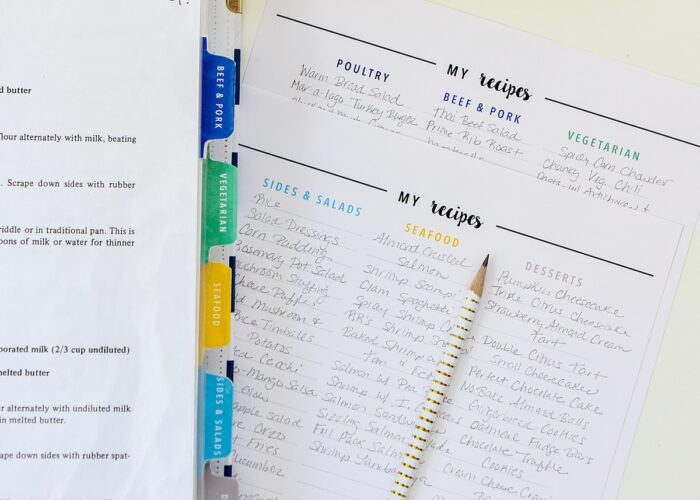
TIP! Either write in your recipes in pencil (above) or type into the editable fields and save (below) so you can easily add/remove recipes over time.
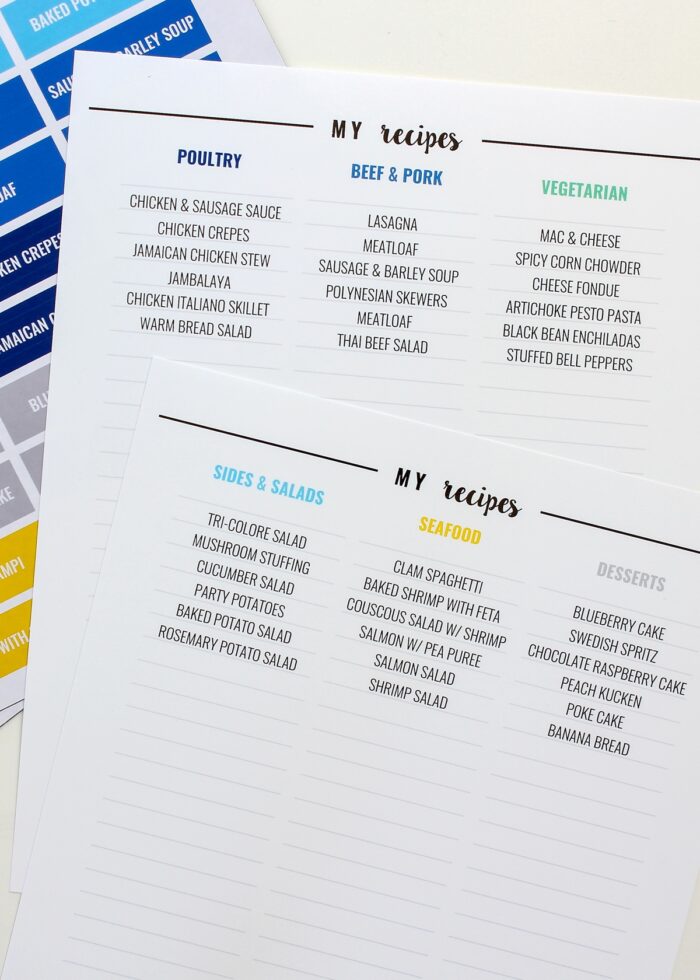
TIP! The 2-page Recipe Inventory spread makes it very easy to ensure you have a variety of meal types across your weekly meal plan…just pick a recipe from each column!
Specialty Inventories
In addition to all your recipes written out by categories, consider making separate lists of freezer-friendly, crock-pot, or even favorite recipes. Instead of trying to remember which recipes on your master list can be frozen or made in a crockpot, this allows you to quickly see options if/when you need them on your meal plan.
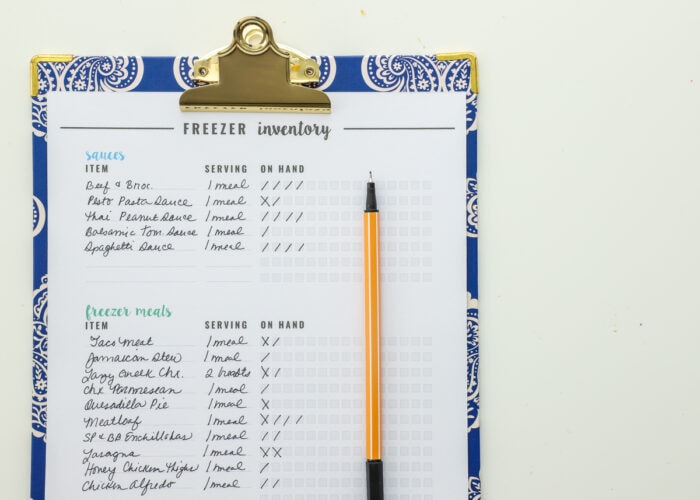
Freezer Inventory
If you like to prepare extra meals and keep a decent stock in the freezer, it can also be handy to have a dedicated Freezer Inventory. The key to successfully using a freezer inventory though, is keeping it updated. As you eat up meals, be sure to update the inventory so it accurately reflects what you have on-hand in the freezer.
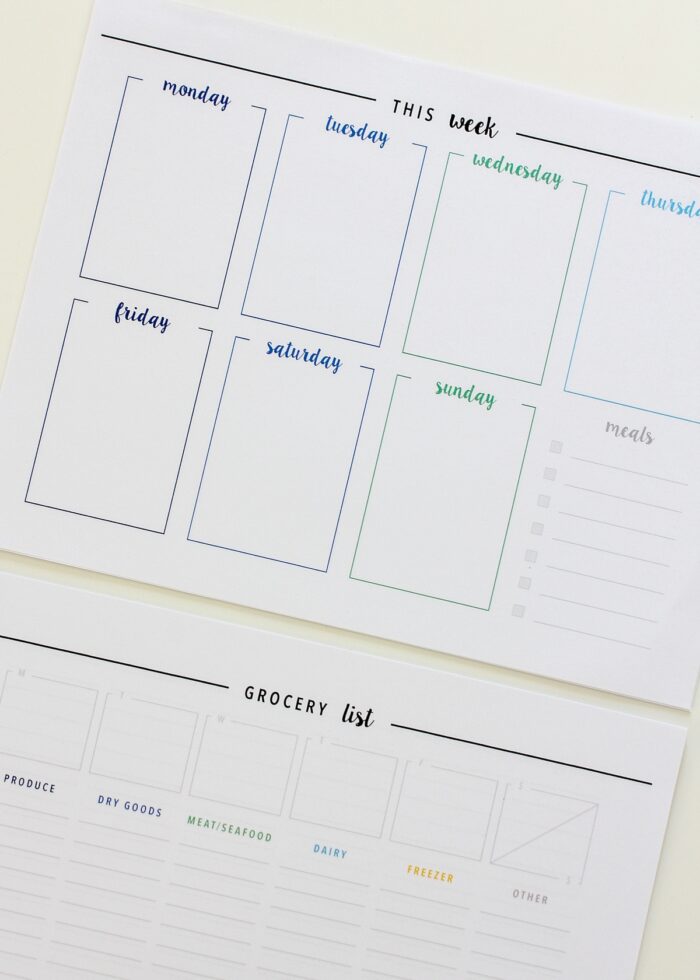
Blank Meal Plans & Grocery Lists
For me, the main reason to organize all my recipes into a recipe book is to make my meal planning quicker and easier. As such, I recommend printing stacks of meal planners and grocery lists and placing them in the front of your binder. When it’s time to meal plan, you’ll have everything you need instead of having to run to the computer each time!
TIP! I print my weekly meal planner and grocery list back-to-back so everything is on one handy sheet!
Recipe Labels
If you are a sticker/label lover and/or like big obvious cues on your recipes, consider printing out the coordinating recipe stickers. These are pre-formatted to fit Avery 6450 labels, making for print-and-go functionally. They really are a fun and quick way to add helpful descriptions to your recipes, and are quite handy when you are quickly surfing your recipes looking for something in particular.
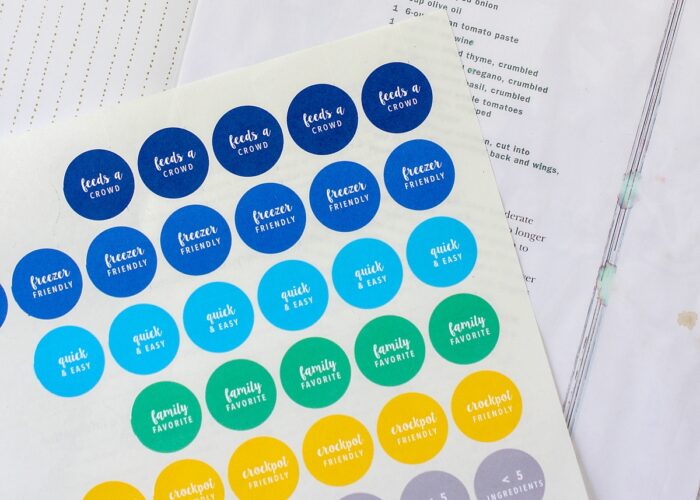
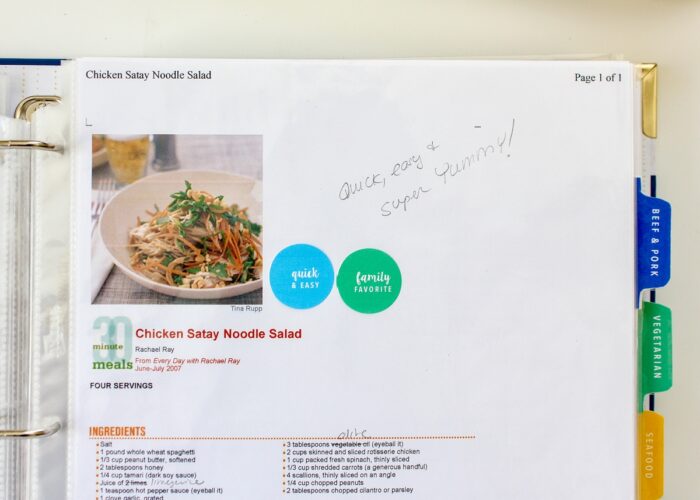
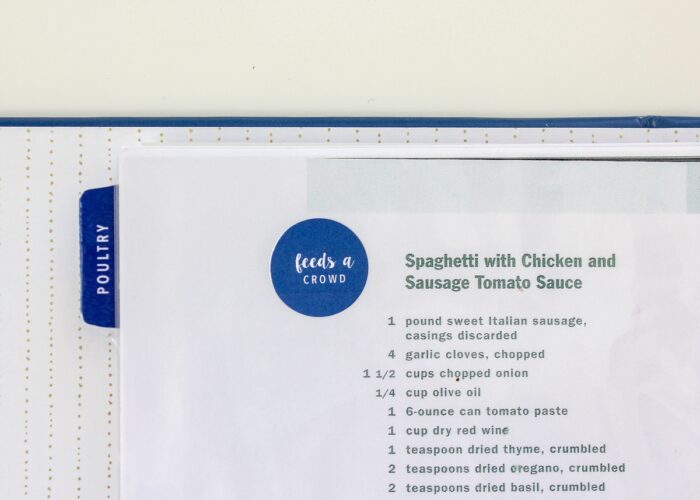
For example, if we are hosting a gathering, I can flip through my recipes and keep an eye out for any of these dark blue stickers (above).
TIP! Keep a sheet of pre-printed stickers in the front of your Recipe Binder so you can quickly and easily add sticker descriptions as you add/try new recipes.
Freezer Labels
If you prepare a lot of freezer meals, you might find it helpful to also have pre-printed Freezer Labels tucked into your Recipe Binder. These clear, concise labels help avoid confusion in the freezer and at defrost/prep time. They are pre-formatted to fit Avery 5264 labels and can be stuck right onto Ziplock bags or containers.
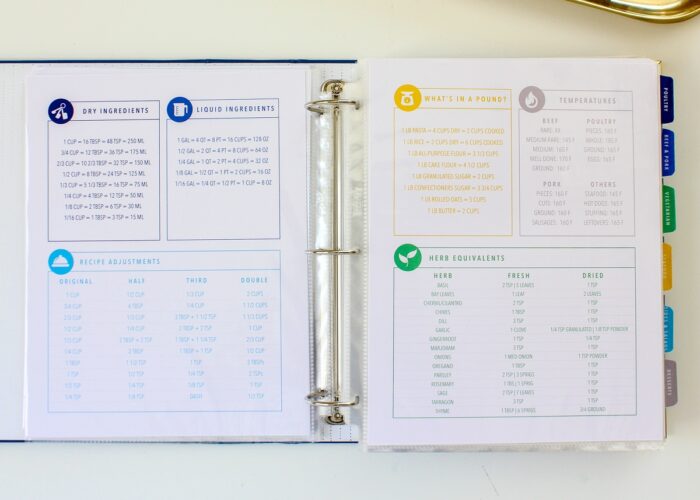
Measurement Cheat Sheets
Another element you may want to include in your Recipe Binder is a “kitchen cheat sheet.” Having measurement conversion equations to reference can help take a lot of brain power out of meal prep. My version includes conversations for liquids, dry ingredients, and herbs as well as quick conversions to half, third, or duplicate recipes.
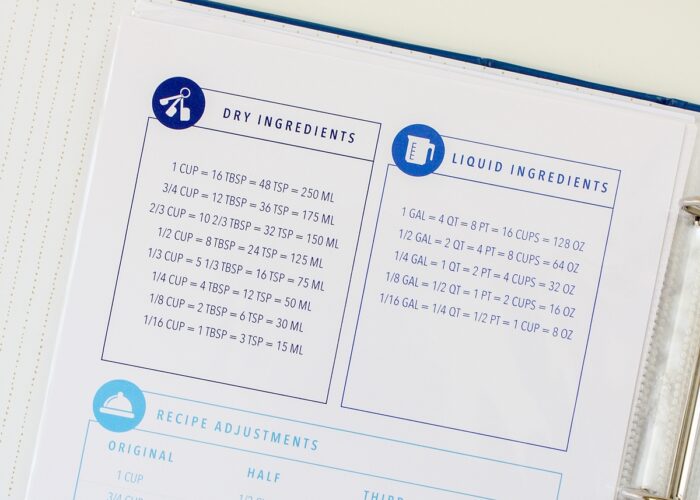
TIP! I recommend printing these pages on two separate sheets of cardstock and loading them into two facing page protectors to make a super helpful spread you can flip to in an instant.
“New Recipes” Tab
Last but not least, the final detail I recommend including is a tab for “New Recipes.” You are sorting and organizing all your recipes now…but that doesn’t mean you won’t add new recipes in the future. Having a dedicated “New” tab gives you a place to put recipes as you come across them. Once you determine a recipe is a keeper, then give it a page protector and add it into the correct section.
TIP! Put empty page protectors in the back of your Recipe Binder so you can quickly slide new recipes in for the long-term.
Step 9 – Revisit Regularly
Organization projects are rarely “one and done”; but this one gets pretty close. Although you likely won’t ever need to re-organize your recipes once you setup your Recipe Binder, you will need to revisit and purge your recipes on occasion.
It can be really easy for a binder to get so big that it’s un-usable. Paging through recipes you’ll never make again is a nuisance and wastes a lot of time. Every year or so, I recommend flipping through your Recipe Binder and pulling out any ones you no longer make. There really should be no reason to re-categorize, but eliminating the “extra noise” will create space for new recipes you love or still want to try!
I know I said it at the beginning of this post, but it’s worth repeating: organizing my recipes into a binder has been one of the most effective organizing projects I have done…ever. Not only does this system put 100% of my recipes into a single, easy-to-grab system that allows me to meal plan efficiently, but it’s also incredibly customizable and easily expandable. I’m fairly certain once you get your recipes sorted into your own Recipe Binder, you’ll never need to track down a recipe again and may even look forward to meal planning and dinner prep!
Megan

18 Comments on “How to Assemble a Recipe Binder (Using Printables!)”
Beautiful. I’m not ready to take the binder plunge, yet. I have found it helpful living overseas to have a butter conversion chart. Cup, Tbsp, grams and stick are the most common. Though at this point I know grandma’s pie recipe that calls for 2 sticks of butter equal 250 grams without having to look it up.
This is awesome!! I converted to a binder for all of my recipes a few months ago, but struggled with a few functionality things which your kit fixes!! I couldn’t find a set of binder tabs that stuck out far enough past the page protectors, and I never thought of making my own. I also will love the cover sheets and ‘make it pretty’ pages, because mine is not pretty now. And having the freezer inventory list included in the same binder makes so much sense – I never thought of that! This kit will take my existing system from “works pretty well” to “totally awesome”!! Thank you for your great ideas and making these creative ideas available to us!
I have a very similar system (the binder), but in the last two years or so I’ve switched to three binders: one is “Recipes to Try” where I dump all the recipes I find in magazines, on the internet, etc that I want to try, but still in the food group categories. The second is “Favorite Family Recipes” which are ones we’ve made at least once, but usually several times and have ‘past the test’ and been adjusted (also organized by food groups). I’ll often ask my husband, ‘what do you think of what I made on a scale of one to ten?’ and that tells me whether to put it in the binder or not! I’ve found it helps to have separation, and when I’m feeling in a rut then I go to the “Recipes to Try” binder to spice things up!
The third binder– Desserts to try! I seem to clip a lot of these and if I put them in the other binder they’d take up all the room! ;o)
PS- Okay, if you want to know how really nuts I am…when there’s a recipe I really love, I write it up on our computer and give it a number at the top of the page. My idea down the line is to teach the kids how to make our favorite family recipes and then print out (either online or myself) their own family recipe book when they move out. Also, I’ve made copies to bring down to Florida when we go for Thanksgiving so I can help make food but don’t have to bring my whole binder. One year all the recipes accidentally got wet and ruined, but it was no problem because I just looked up what numbers I needed and reprinted them. That being said, I’m about 8 months behind on writing up new recipes. ;o)
Thanks so much forshowing us this. It is going to be a game changer for me and my family.
What a great idea! It would also work as a gift of favorite recipes to a daughter or granddaughter just starting out on her own. Perhaps it could also include a list of emergency substitutions and a weights and measures page (ie: 4 Tbsp = 1/4 Cup), and such in the resources section. Love this!
Thanks so much! Glad to hear you like this idea! It’s been a lifesaver for our family. And just so you know, the Recipe Binder kit has a common weights/measures cheat sheet included!
Have a great night!
Megan
Can I edit the printables? I am looking to edit the 6 tab dividers so the categories are slightly different.
Thank you
Hi Rachel,
At this time, the PDFs do not have editable fields. However, if you had access to Adobe Pro, you would be able to use that program to go in and edit text boxes as desired. I do have plans to release an editable version before summer.
Hope that helps a bit!
Megan
Hi, Megan –
Where can I see the video where you showed exactly how you use your weekly meal planner worksheets?
Thanks,
Allison
Hi Allison,
Thanks for reaching out! Unfortunately, that was a “live” workshop and I think the replay was only available for a short time. I don’t even have a copy of it since I did it in partnership with Laura from I Heart Planners.
If you have a specific question about which printables I use and how, don’t hesitate to let me know and I’ll help out as best I can!
Thanks,
Megan
Hi Megan! I also did some recipe organizing several years ago. Your method is beautiful and mine much simpler. I have all mine in a large, plastic container with a carry handle that is getting quite heavy! Inside I have hanging files with a folder in each one labeled alphabetically: Appetizer, Breakfast, Beans, Bread/Rolls, Desserts, Dips/Dressing/Sauces, Drinks, Fondue, Lunch, Main: Beef, Main:Chicken:, Main: Seafood, Pasta, Quick Meals, Soups, Veggies/Sides, Try(recipes on hold)
One Christmas I gave my adult children and grandchildren a 3 ring binder with labeled divider tabs and the recipes (in a sheet protector) that are tried and worthy for each one section . They absolutely loved it. I suggested they add their own favorite recipes.
Thanks much for all your organization ideas.
Hola mi querida Megan… Desde que te encontré estoy encantadísima con absolutamente todo tu material
Me desborda todo lo que subís, porque era justo lo que hace tiempo estaba buscando, pero no lograba obtenerlo todo en un mismo lugar, claro y bien explicado!!
Tengo dos preguntitas : – como puedo hacer para ingresar a tus blogs?
– creo que te solicité la guía ” Como aprender a ORGANIZAR (CASI) CUALQUIER COSA”, pero no me da la opción de traducción del inglés y como verás lo necesito en español (castellano) puesto que soy originaria de Argerntina!
Sin más me despido con un fuerte abrazo y felicitándote por tus brillantes ideas!!
Espero que puedas recibir este comentario!! Muchas gracias!!
After 40 years I’ve had to split my recipes into 2 binders plus a binder for “To Try” recipes and 2 binders for all the recipes from 4-H projects I’ve led. And I have all my recipes in a cookbook program on the computer. Still like everything printed out on paper. I like the extra “helps” you have and might just try that.
Question: Why wouldn’t it be
quicker/easier to find the recipes on the Inventory Page “Colored Coded” for what you
are looking for instead of having to surf through the all the recipes in your binder looking for a recipe with a blue sticker marked ‘feeds a crowd’? Just asking? Like your recipe binder idea! Great job. I am on this like white on rice…(that ‘feeds a crowd’). 🙂
Hi MJ!
Using the front-page inventories can be a little quicker than flipping page after page, especially if your binder is big and you know a lot of recipe ingredients by heart. It can also remind you where you placed certain recipes should you have trouble finding it.
That said, if you’re trying to “browse” your recipes and feel out a grocery list, sometimes going page-by-page is just as efficient!
So yes – it’s somewhat of a personal preference and you might find the inventories unnecessary if flipping through is no big deal to you!
Hope that helps – be sure to let me know how it works out for you!Megan
I have several binders of recipes, sorted by meats, salads, baking, and more. Use it all the time. Don’t go into binder until made and approved with a smiley face sticker!!! Have a fun folder for new recipes to try.
Silly question but are you including generic items in your binder for meal planning like burgers, hotdogs, fries, etc.? Obviously if there is a specific recipe you want to use for those, but otherwise do you have them recorded somewhere?
I kept a binder for years when I was working full-time. I now keep my recipes on a site called CopyMeThat. I love it because I can copy recipes from online, add my own recipes, build a shopping list based on what I will be serving in the coming week, and carry it with me to the grocery store. When I find a special cut of meat on sale, I can access CopyMeThat on my phone to know immediately what else I need to buy to make the dish I have in mind. I can print all of the recipes I’ve saved so that I have paper backup, but I like the fact that I will always have my recipes in the cloud if something horrible happened to my house. I also keep track of my grocery inventory – bottled, cans, dry goods, freezer, and refrigerator – using MyPantryTracker. It tells me what I have in stock, what I need to buy, and it warns me when an item is about to expire.