Monster Party – Spotlight on Decor – Part II
HELLO!!
Today, I am continuing my decor spotlight from my son’s Monster First Birthday party! If you missed my first two posts, they are here:
Monster Party – Spotlight on Decor – Part I
I have a few more fun DIY party decoration ideas to show you! Here we go!
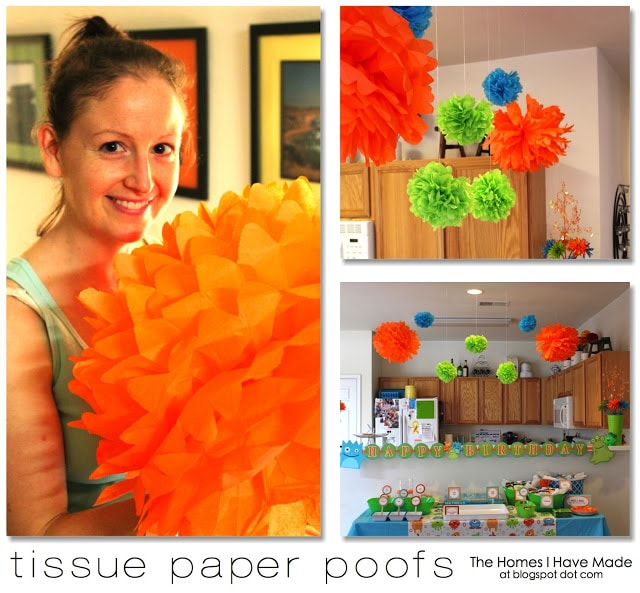
Tissue Paper Poofs!
Whenever I see pictures of gorgeous parties online, I notice there is usually some sort of backdrop or eye-catching feature to pull everything together. I’ve been seeing lots of tissue paper poofs on blogs and Pinterest lately, and knew they were just the ticket! Paper poofs seem to be pretty hot right now in general, not only in parties but also in bedrooms and nurseries! I understand why! They are SO eye-catching, and SUPER easy and cheep to make! They completely brought my party display to life. I can’t get myself to take them down…I just love them!
I don’t have a tutorial for you, but I can share with you the link I used to guide my cutting, folding, and hanging! Melissa from Sew Sweet Stitches does a really great job explaining how to cut your paper to get the different sizes (which really helped me determine how much tissue paper to buy!)
Just a note to readers out there who may not be uber crafty…”they” sell tissue paper poof “kits” – but really, these are SO incredibly simple – anyone can do them! Save yourself the money of the kit, buy a 99 cent package of tissue paper – I promise you can do these yourself!
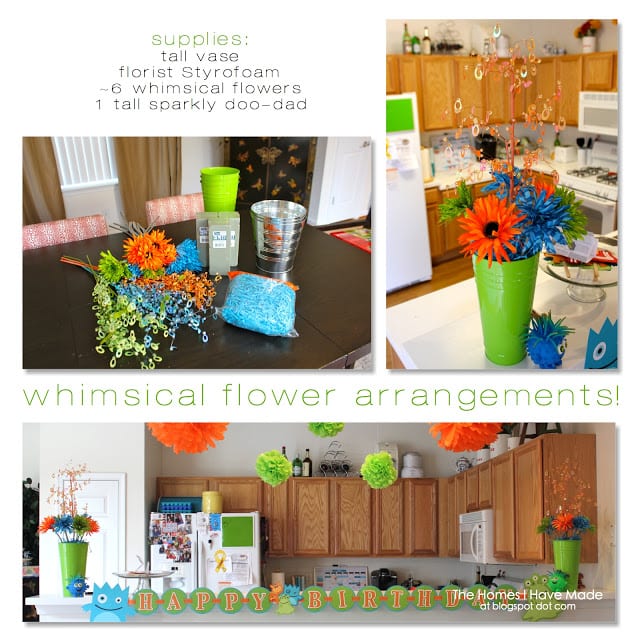
Whimsical Flower Arrangements Tutorial
I was recently at a party where the hostess had some adorable flower arrangements made out of a few dried flowers and sparkly doodads! I tucked the picture in the back of my brain, and was super excited to do something similar for this party! These were just as much fun to shop for as to make. In case you’re wondering, here’s where I got all my supplies!
Tall Green Metal Vases – Target Dollar Spot (but they were $2.50)
Striped Flowers (orange, blue, green) – Hobby Lobby ($2.00 a stem on sale)
Sparkly Doo-dads (orange, blue, green) – Hobby Lobby ($2.50 a stem on sale)
Florist Styrofoam – Dollar Store ($1 for a package of 3)
Paper Grass (blue) – Michaels (~$3)
(also pictured are some metal tin buckets from Target Dollar Spot [also $2.50]…was going to use them but changed my mind!)
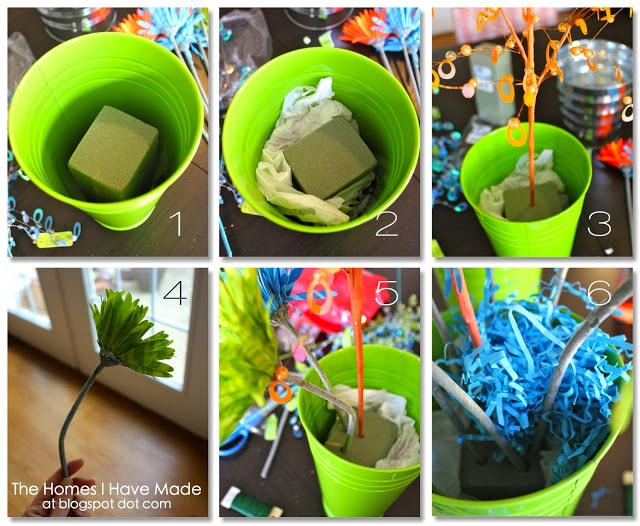
- Place styrofoam into the tall green vase.
- Stuff around styrofoam with plastic bags, tissue paper, or newspaper (to keep it from wobbling).
- Center and place the centerpiece (mine is my orange sparkly doodad!)
- Trim the flower stems to the right height and gently bend so they will face outward (not upward!).
- Place the flowers around the perimeter of the centerpiece.
- Cover the styrofoam and stems with paper grass!
EASY and super adorable, don’t you think?
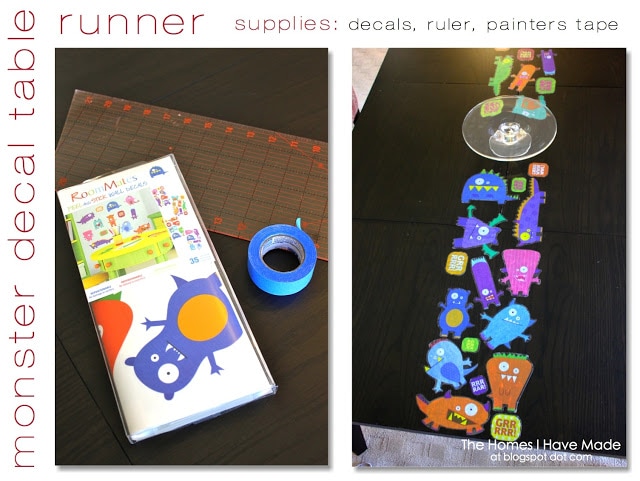
Monster Decal Table Runner Tutorial
I am pretty proud to say this idea was all my own – not inspired by a blog or picture on Pinterest (if it’s been done, then I haven’t seen it yet! Ha!). I got the idea when I found these adorable monster decals! I didn’t want to put them on windows or the wall, because I thought they’d look random and cheesy! I knew we were going to keep our dining room table clear so people could sit and eat and socialize. This was the perfect solution to tie it in with the party in a unique way!
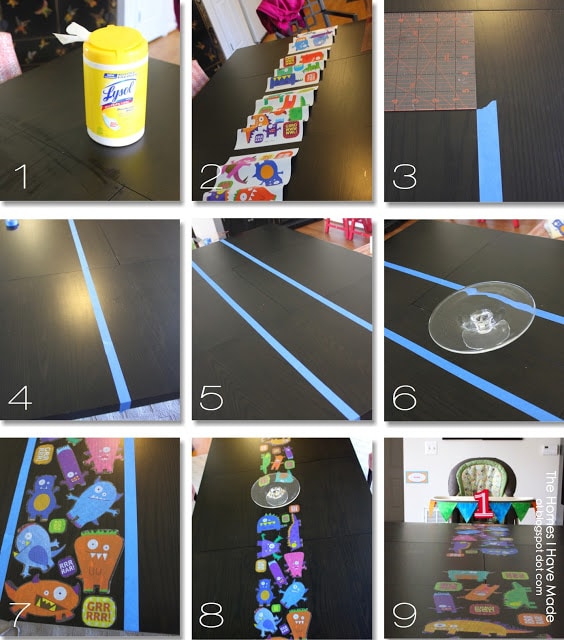
- Clear off your table/surface and clean up all the dust and grime so your decals will adhere nicely. Let dry.
- Assess your decals to determine how wide your “runner” needs to be. I decided to pretty much follower the shape/size of the paper the decals came on! I determined my runner would be 10″ wide.
- I first measured out my table and found center. From there, I determined that one side of my “runner” would be 15″ from the edge. Using a ruler and painters tape, I attached a line of tape at the right distance from the edge.
- I continued down the entire table, measuring as I went to ensure the line remained straight!
- I repeated the process on the other side of the table with a second line of painters tape!
- I knew I wanted to feature the birthday cake in the middle of the table, so I placed my cake plate in the center to work around.
- I then filled the space between my two lines with my monster decals. Placing them and fitting them together as I went. I didn’t plan this part out, just went with what fit where.
- Lastly, I pulled off my painters tape – and taaaa daaaa – a nifty monster table runner!
- A perfect addition to the table where baby would eat his first cake!
Those are all my decor projects for the party! Next up, I’m going to show you a close up of all my food projects, so stay tuned!
See you soon!
You can now catch up on all the Monster Party Posts here:
Megan




5 Comments on “Monster Party – Spotlight on Decor – Part II”
Great idea for the table runner! I haven't seen it anywhere else either — you're the inventor! Love the colors too!
It's all so adorable. Great work!
Cute monster party!! 🙂 Great job!!! Thank you for sharing. Newest follower! I would love for you to come on over to http://www.craftycagirl.blogspot.com
Have a great day!
-Heather
Hi Megan: I'm Connie at http://hotflashncraftn.blogspot.com/, your new GF friend. I would love if you stop by and be mine.
Nice job with the decorations. Eye-catching!
Thanks for sharing
I love the colours!!! This is a great party. 🙂