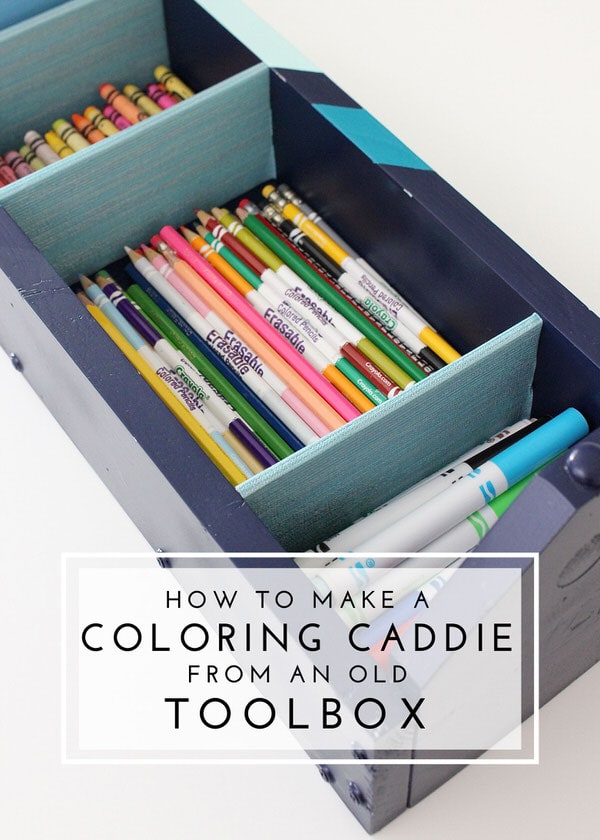
How to Make a Coloring Caddie from an Old Toolbox
As we get ready to take this house apart in preparation for our upcoming move, I’ve been running around taking pictures of all the “finished” spaces. And as I’ve been snapping every last detail for the final room reveal posts, I’ve come across a few projects that were supposed to be shared here on the blog but somehow slipped through the cracks! Today’s project is one of those…and since it’s been working SOO well for us this year, I wanted to make sure I shared the idea so you can try it too! Today I want to show you how easy (and functional!) it is to make a coloring caddie from an old toolbox!
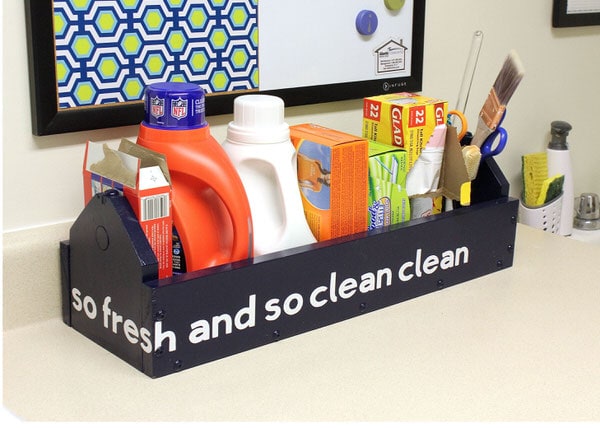
I love putzing through thrift and antique stores whenever I can…and without fail, I always come across old wooden toolboxes or caddies. I swear, I’ve found them in every size, shape and price point; and I always want to scoop them up because I can think of so many handy uses for them (besides tools!) A few years ago, I came across this long wooden toolbox in a local thrift store. The size was great, but the handle really prevented me using it for anything that wasn’t long and flat. So I could use it better, I simply sawed off the handle and gave it a few fresh coats of spray paint to create a countertop caddie…

In our last home, it was PERFECT for holding all of our laundry supplies! (You can see more of that laundry room here.)
When we moved into this house last summer though, we didn’t have a laundry room counter and therefor didn’t really need the caddie to hold our laundry supplies anymore. I did, however, really want to set up an art station for Henry in our playroom. I knew with a few quick cuts of foam and paper, this toolbox could easily be repurposed yet again into a coloring caddie!
If you would like to do a similar project, here is what you need:
*This post contains affiliate links, which means I make a small commission off the sales at no extra cost to you. You can read more about my policies here.
- An old wooden toolbox
- Primer and paint (optional)
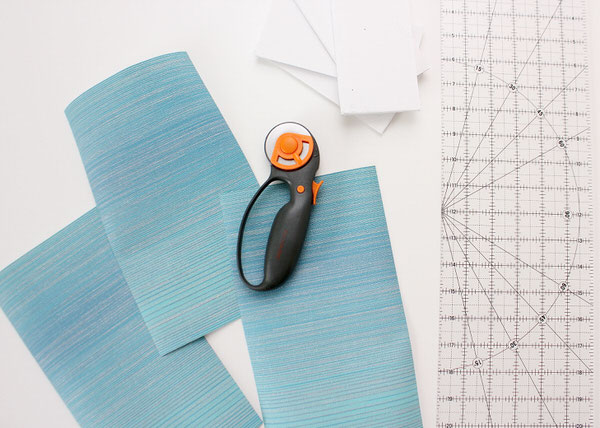
- Foam core board

- Decorative paper or tapes (wallpaper, scrapbook paper, wrapping paper, contact paper, washi tape, and Duck tape sheets would all work great)
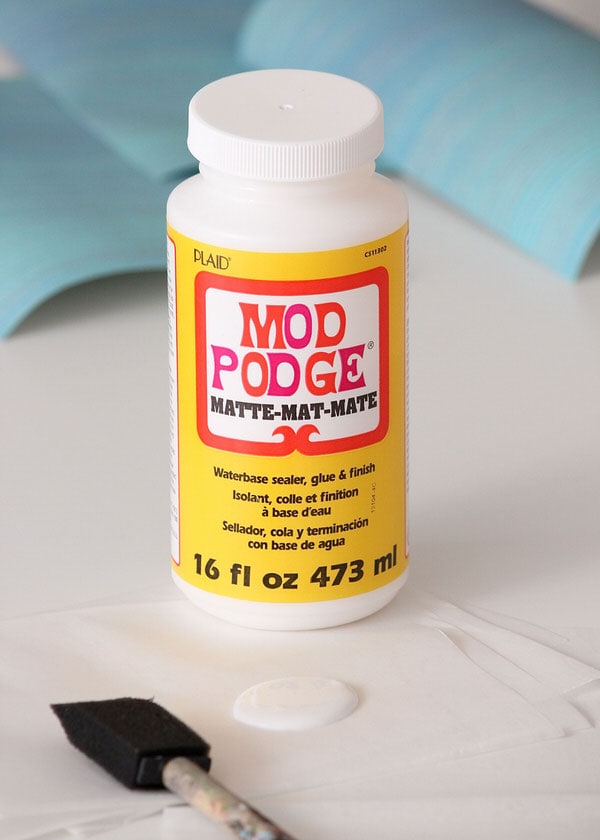
- Mod Podge (if using non-adhesive paper)
- Tools: Saw (if you need to remove the handle), Ruler , X-Acto Knife, Paint Brush, Rotary Cutter and Cutting Mat

 (if using non-adhesive paper)
 , Paint Brush,
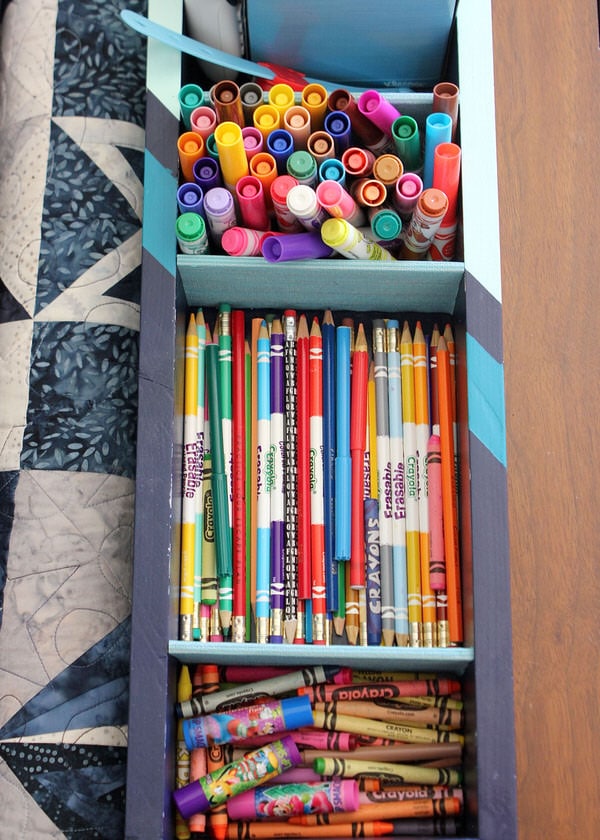
Start by measuring the width and depth of the INSIDE of your toolbox base. Then using a ruler and X-acto knife, trim a sheet of foam core down to the corresponding dimensions.
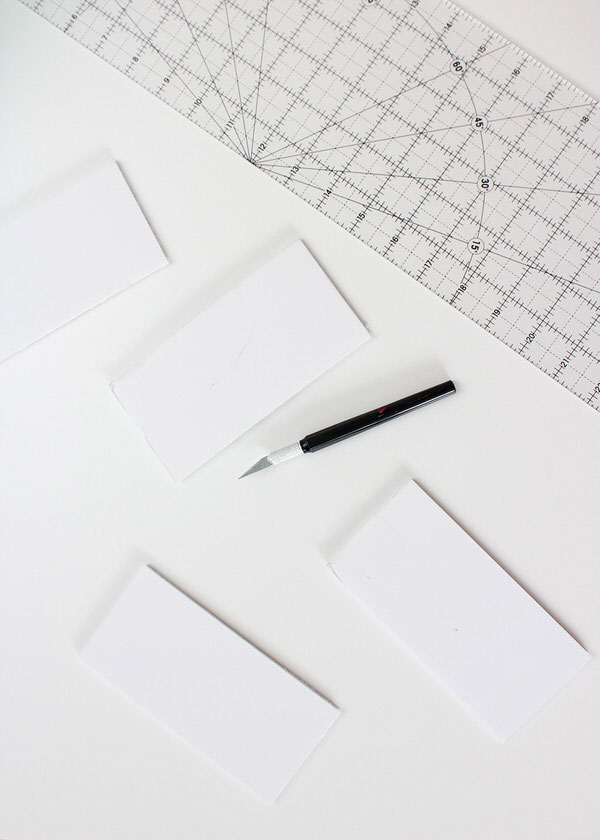
TIP: Because these foam core sheets will essentially stand up on their own against the sides of the toolbox, it helps to cut them just a smidge too big.
Before going on, test the dividers in your toolbox to ensure they are tight enough against the sides and will stand up on their own!
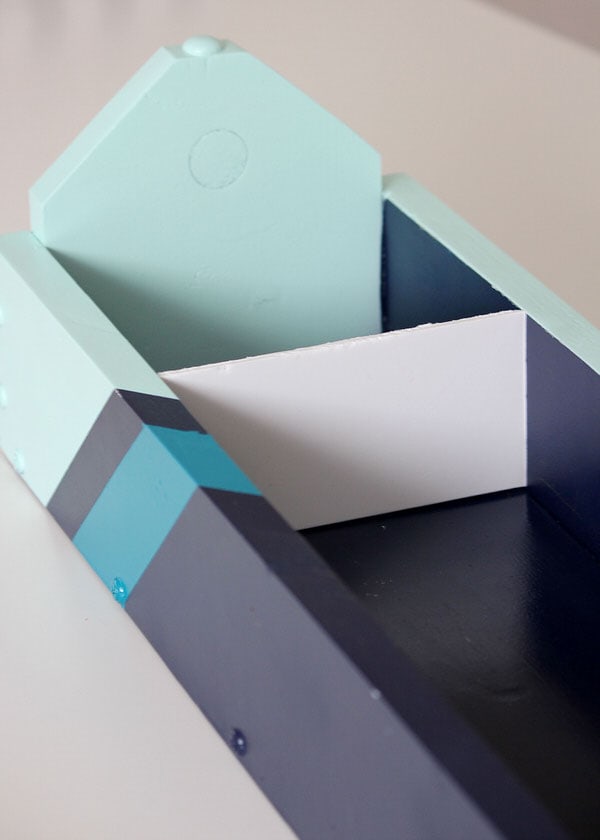
You can certainly leave your dividers plain, but to camouflage that they are foam core AND make them a little more durable, I wrapped mine in some leftover wallpaper I had on hand (from this project). Start by cutting strips of paper the exact same width as your foam dividers…but don’t worry too much about the length…
If your paper doesn’t already have adhesive on it, use some Mod Podge to coat the back of the paper strips…
Want to save this post?
Then place one of your foam dividers along the edge of one of the paper sheets and fold the foam divider down the paper so that the paper covers the both sides as well as the top edge of the divider.
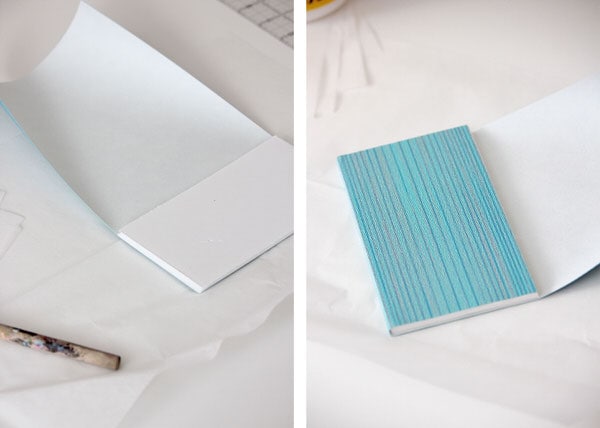
Use a craft knife or rotary cutter to trim away the excess paper along the bottom of the divider! Quick and easy without the hassle of a lot of measuring!

When the dividers are wrapped and dry, slide them into the toolbox to create compartments. Use your various coloring supplies to determine how big to make each section so that it’s perfectly tailored to what you need to store!
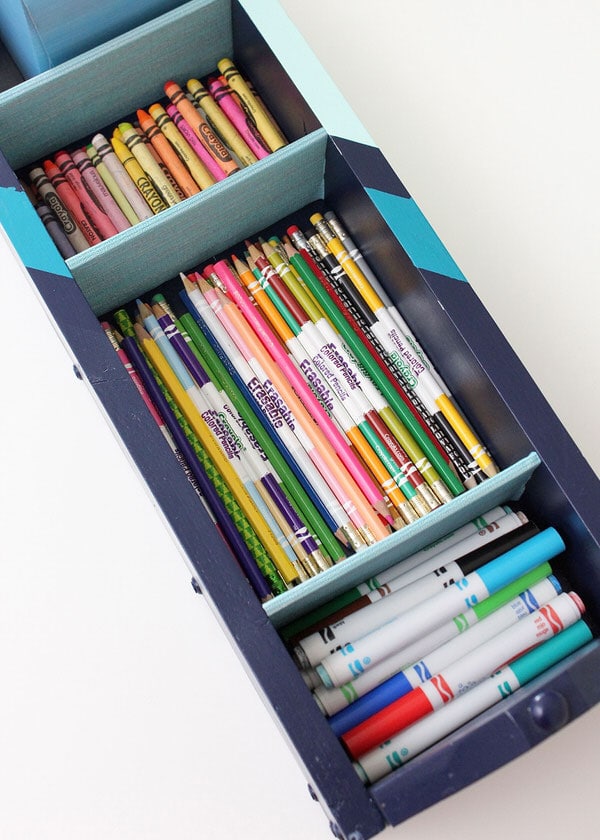
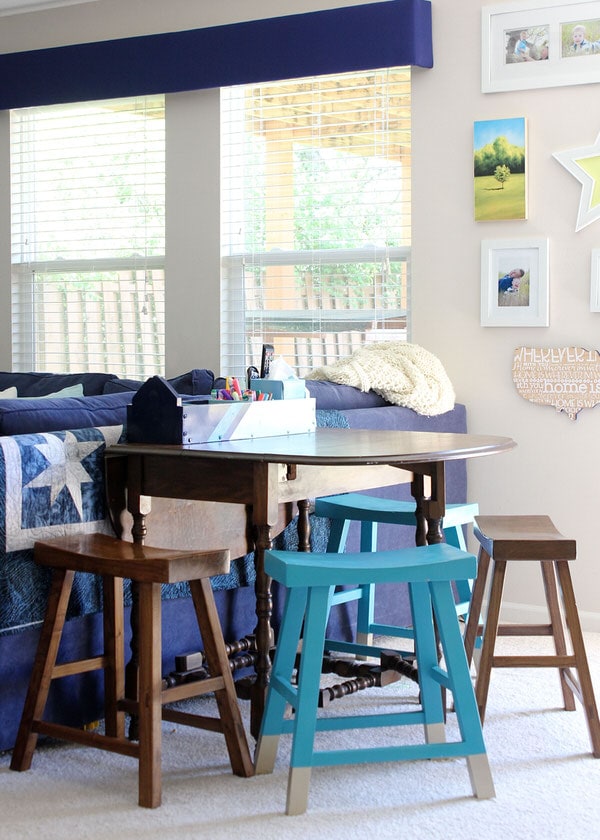
If your kiddos are big enough, place the caddie out in the open to encourage coloring and creativity! Ours’ was placed on a table right behind the sofa in our playroom. Not only does it keep all of our coloring tools easily accessible, but it also provides a place to catch remote controls and tissues!
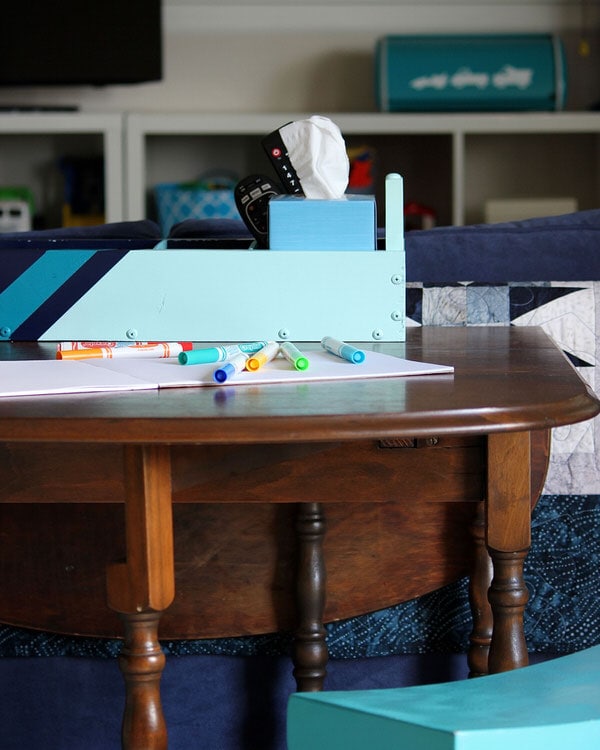
When I first made this caddie, I honestly wasn’t sure how well it would hold up or how much it would get used. My little Henry is not much of a colorer, but having these markers and crayons out in the open has really encouraged him to color more. Boy do I love coming down the stairs and seeing this…
What’s more…it’s been so great to have this for playdates and gatherings. Even though Henry isn’t an avid colorer, a lot of his friends are and it helps to have our supplies out and ready for use whenever they come over!
I’m always amazed at how well some of the simplest projects hold up and function over time! All these months later, this coloring caddie (including the foam dividers!) has held up perfectly. We’ve rearranged the caddie a few times to adjust to our always-fluctuating stash….but all in all…this was one inexpensive and successful repurposing project!
I’d love to know…do you have coloring supplies out in the open for your kids? What do you use to corral them? Have you repurposed an old toolbox into something really useful? I have a feeling this toolbox will continue to see different functions as we move from home to home. Next time you see one at your local junk store, grab it and experiment with different ways to use it!
I hope your week is off to a great start! I’ll see you back here on Thursday with my next Renter-Friendly walls post…see you then!

Megan
4 Comments on “How to Make a Coloring Caddie from an Old Toolbox”
I love this. I am thinking I should make one. I currently have all the kids “school” stuff in a old hardware store divider for nuts and bolts and while it is easy to slide out the drawer and use what they need, my kids are horrible about making sure everything gets put away where it belongs. I am getting tired of finding broken crayons and scissors and glue all over my living room.
It is funny to me that the most simplest projects are the most effective ones. Something simple gives the most use. Thanks for sharing your how to!
I have labeled pencil boxes (the hard plastic cases). I have a separate one for colored pencils, one for crayons, and one for markers (which stay up high unless there is parental supervision). I have all of their coloring books in a magazine rack and the little pencil boxes slip right in the rack next to the coloring books! We keep ours on the dining room floor since they do all of their crafting at the table.
love it!! another project on my list!
Hi Megan
What a nice idea to put in order and how easy it is to take the coloring pencils and more. I don’t have to display these things anymore with my daughters far from home but it could be useful for our pencils too. In fact, it makes me think about a nice wood box painted in a nice green that I could use, shopping in my own home as you often say, and I’m wondering if I could put the play cards in it, I must try so thank you for without this post I wouldn’t have thought about this solution. Have a nice week too. Michèle