DIY State Silhouette Artwork
Happy Friday, friends! I wasn’t sure if I’d be able to get this project done in time for the weekend, but I am so so so glad I squeezed in the time. Not only am I excited to share this tutorial with you guys today, but this is a project I’ve been wanting/need to knock off my To Do List from (seemingly) the moment we moved in! Today, I’m going to show you the quick, easy, and super inexpensive way I created state silhouette artwork!
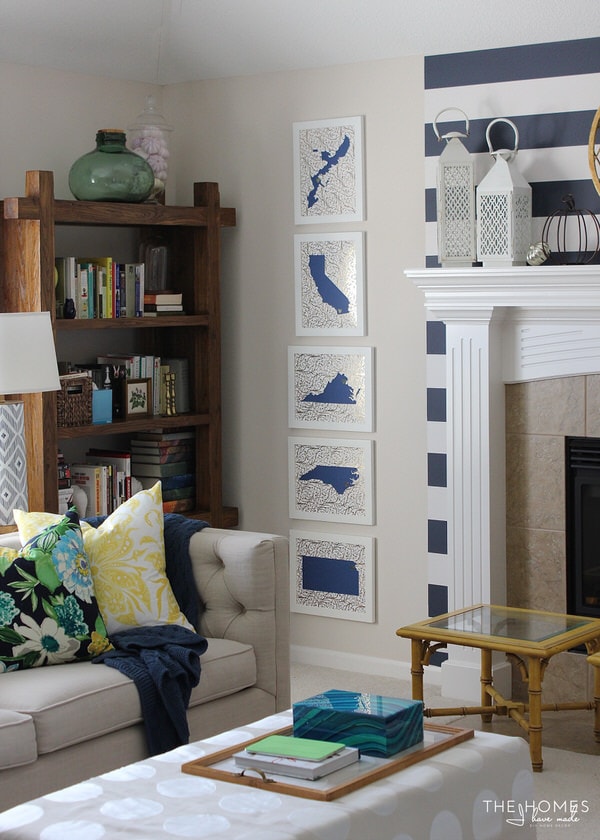
This project has a little back story. Before moving into our North Carolina house (a little over 3 years ago), I came across these awesome (and free!) state prints by Marci from The Vintage Lemon (sadly, it appears her blog is not up and running anymore). Not only did I love the color scheme of the different states and the grey stripes (of course!), but I fell hard in love with the idea of displaying all the places we’ve lived during our military experience. These prints actually inspired the entire color scheme for our last home, and we proudly displayed them the entire time we lived there. They were one of the very first things we hung all those years ago, and among the very last things we took down before moving this past Spring.

Greg and I were often surprised at how much people noticed and asked about the prints, and how frequently they (and the various places we’ve lived) became a conversation piece when visitors came over. We’re very proud of our journey and our story, and knew we wanted do something similar in each house we lived, adding to the collection of places as we go, of course! When we moved in to this home, I hung the frames in the best and most logical spot for them, but their colors and patterns weren’t working as well as they did in our last home. For months, I’ve been staring at them, not quite sure what I wanted to do. Did I want them colored or metallic? Solid or patterned? Several colors or all one color? Printed or cut from paper. I decided to let the project sit until inspiration struck…which it finally did last week at the craft store!
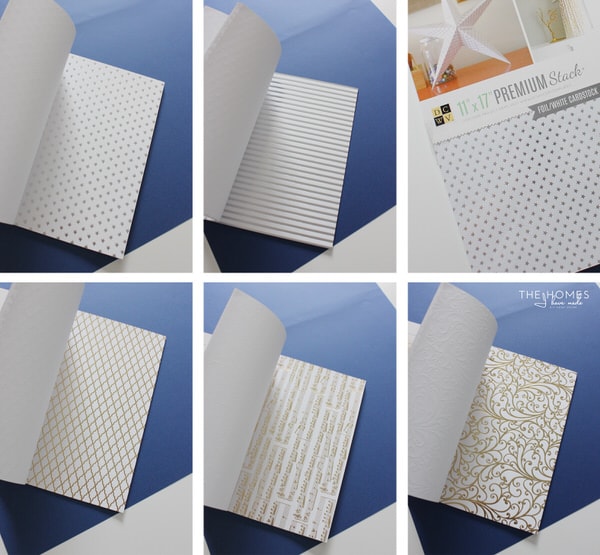
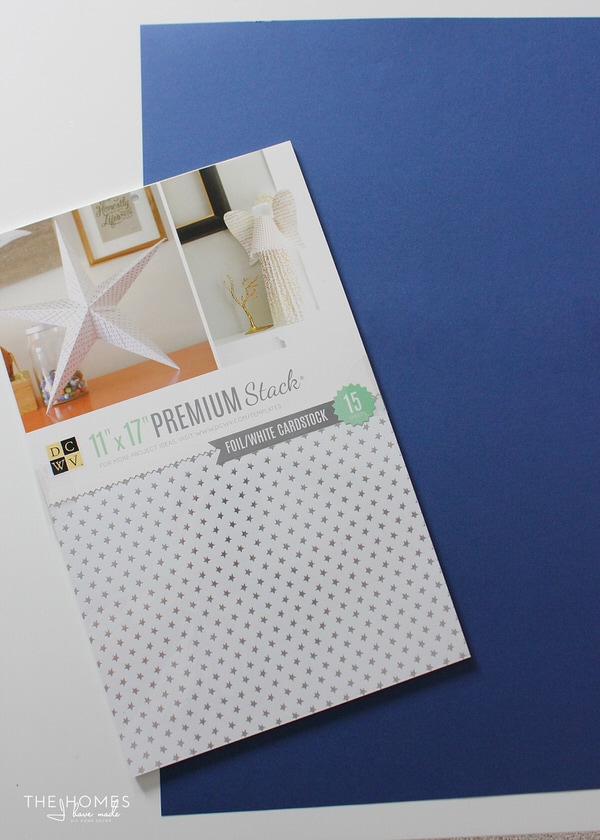
My frames are 11×14″, and I really liked their size and dimensions of the states within them. Every time I found patterned paper I loved, they always measured 12×12″ and I couldn’t quite figure out how I could bring my vision to life within those dimensions. Then I stumbled upon this amazing stack of 11×17″ foil/white cardstock at Joanns last week. The pack features three gold/white patterns and two silver/white patterns, all with three sheets in each pattern. I hemmed and hawed at first and ultimately left the store empty handed. Once home, I determined they were “the solution” and bought two packages online while they were 50% off (I bought two packages so I would be sure to have 5 sheets of whichever pattern I decided on!) Thanks to the find of this great paper, my vision came to life quicker and easier than I anticipated!
Here’s what you need to create similar artwork:
- Patterned cardstock in the size and colors of your choice (I used 11×17″ cardstock that could be easily trimmed to 11×14″ to fit my frames)
- Background paper in the size and color of your choice (I used two of the large 22×25″ sheets of colored paper, found in the art section of most craft stores)
- E-cutter (not 100% necessary, but it sure makes things quicker and easier!)
- Tape or vinyl in the color of your choice (for the hearts)
- Frames
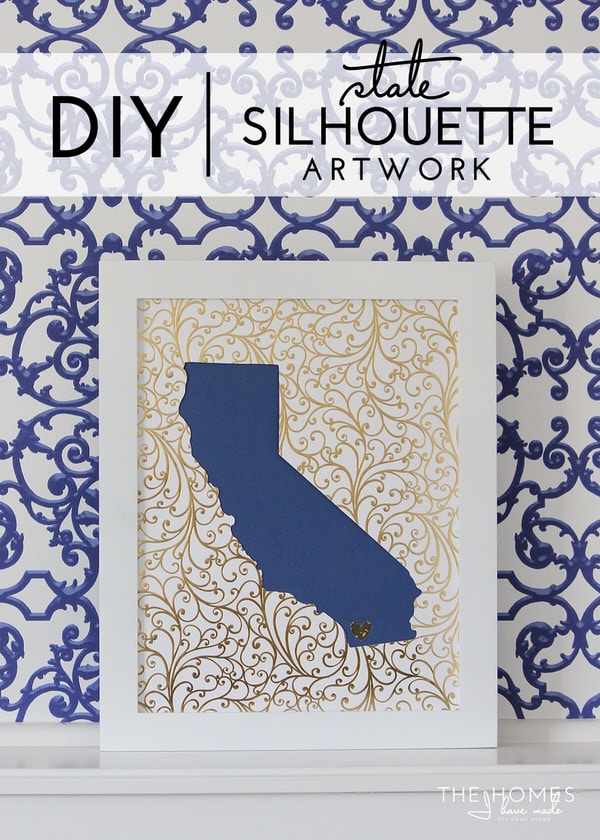
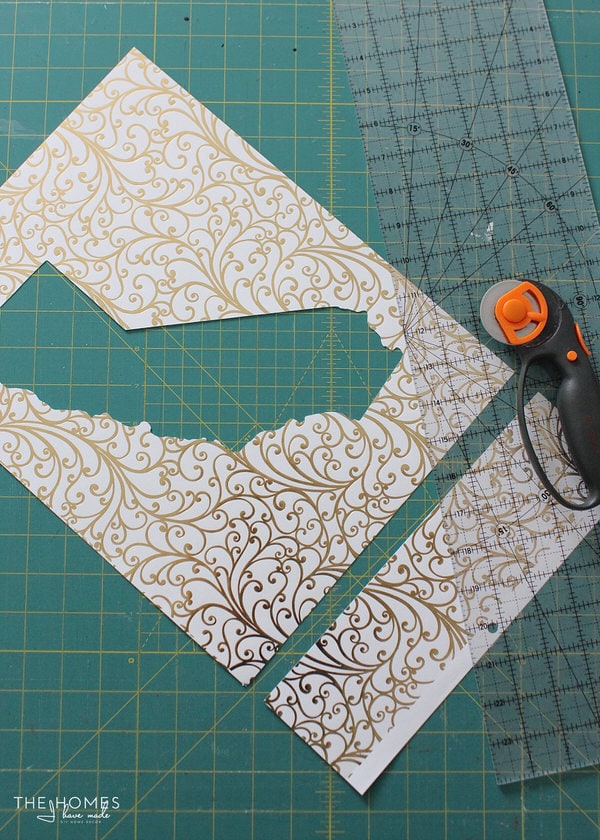
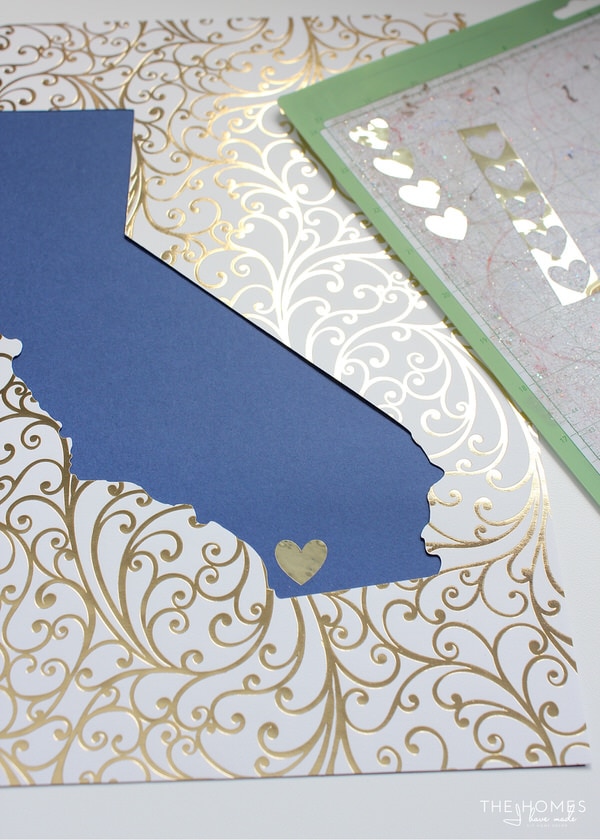
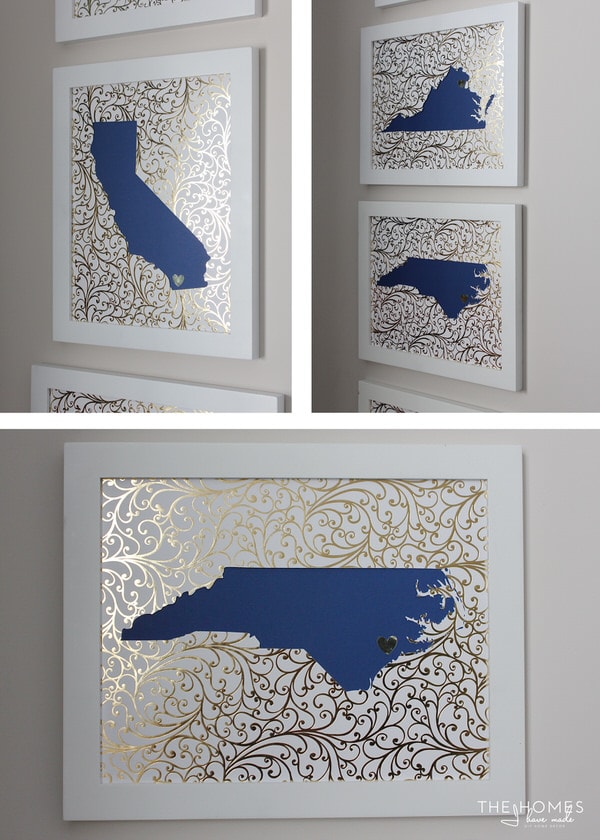
The first step is to find and cut out your state/country images. In my case, I used my Cricut Explore and Design Space software to import and cut the images for the five places we have lived. (If you don’t recognize the one island, it’s Okinawa, Japan!). To standardize how much of the frame each state filled, I set the longest length of each image to 10″.

To really make this process easy and efficient, I took time to center the image within an 11×14″ boundary on my cut mat preview BEFORE cutting it…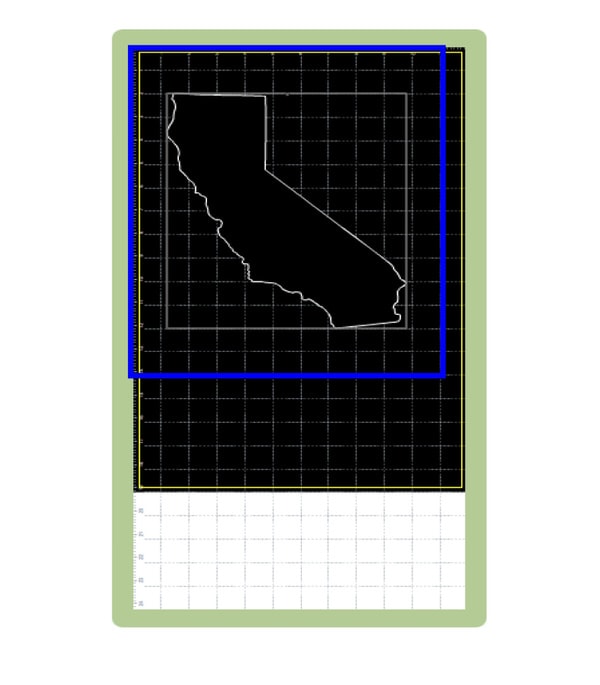
…so that once the image was cut, all I had to do was trim off the bottom three inches to get the right size for my frames!
With the image cut out, you are left with both the cut image and the relief/outline centered on the rectangle…
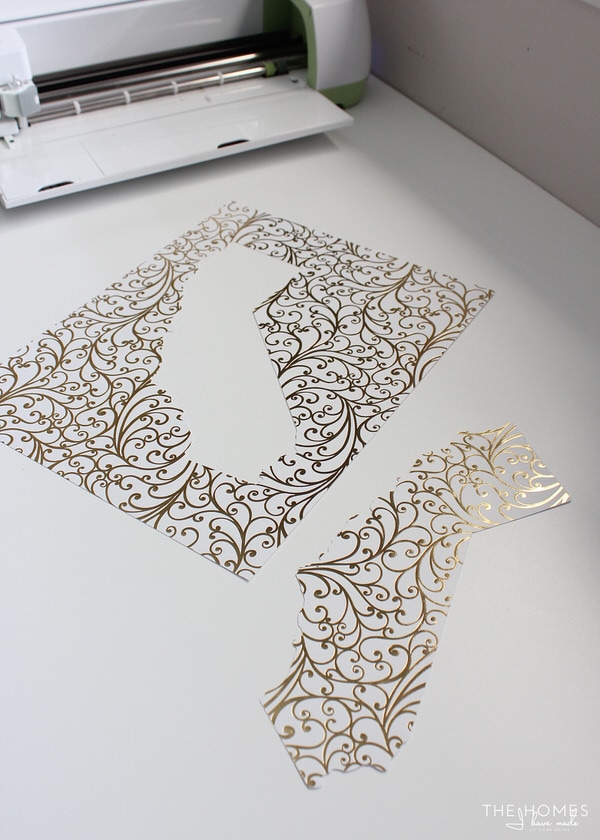
You can use either one to create artwork – both options look fantastic. I personally had the toughest time deciding which look I liked better and took my struggle to Instagram for opinions. The votes were pretty split, so I ended up framing up both options and looking at them all afternoon up on the wall.
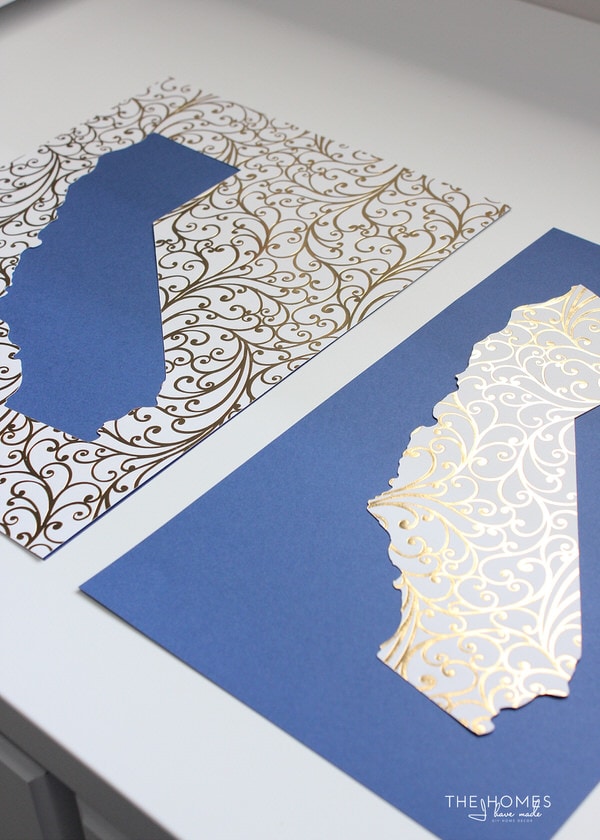
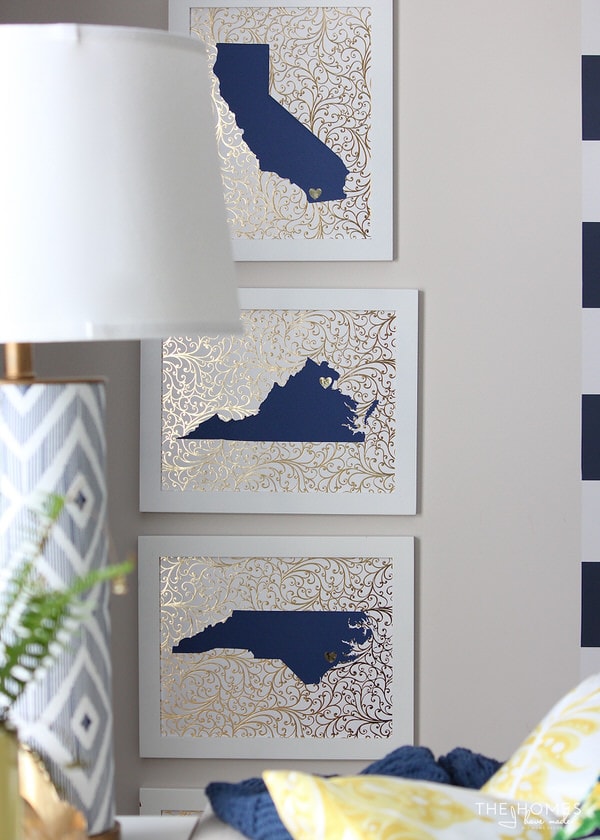
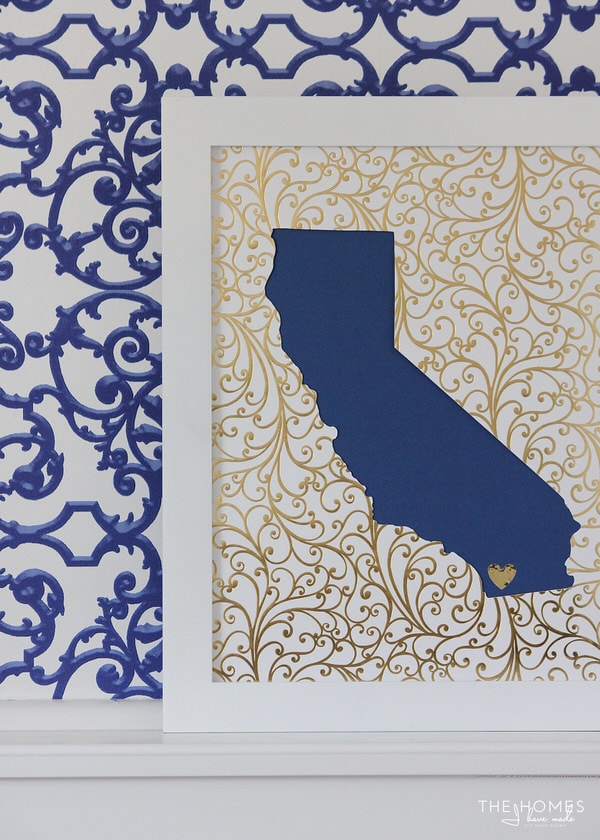
Both Greg and I ultimately decided on the white/gold background with the blue state. We liked that the images stood out a bit more and the gold/white paper blended with the frames better. I also loved how that gold/white paper shimmers in the sunlight and wanted to see more of it! I did consider alternating backgrounds, colors, and patterns among all five frames, but ultimately decided to keep the same recipe for the whole display.

Want to save this post?
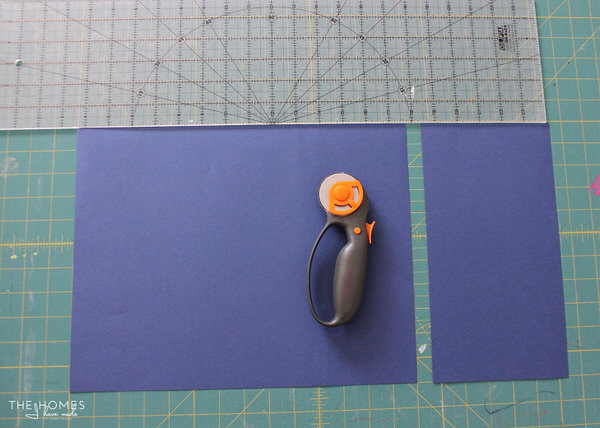
Once you decide how to layer your papers, the artwork comes together quite quickly. I used a rotary cutter and ruler to trim down my background paper to 11×14″ and essentially layered the cut cardstock on top of the solid. I didn’t bother glueing anything down since the frame keeps everything together and flat (plus, this allows me to easily swap out the background colors in our next home, should I want/need to!) If you choose to use the cut out version of the image, you will need to glue it in place onto the background paper.
I then cut some small hearts out of some gold metallic tape I had on hand. Boy, I deliberated like crazy between gold hearts (that fit with the color scheme better) and traditional red hearts (that stand out more), and ultimately went for gold. Honestly, verdict is still out, and you may see red hearts appear on our artwork eventually!
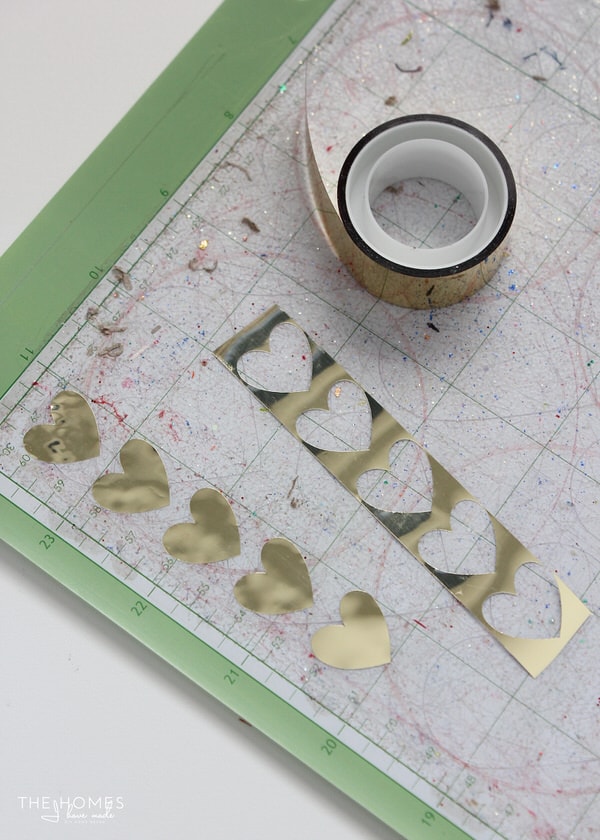
To finish the artwork, place the hearts in whichever spot holds the right/most meaning for you. Greg criticized that my hearts on our last set weren’t quite geographically correct, so I referenced maps this time around!
Load the layers into your frame and you’re all done!

Repeat for as many places you need! Within an hour, I had all five places (Okinawa, California, Virginia, North Carolina, and Kansas) cut and ready to go on the wall!
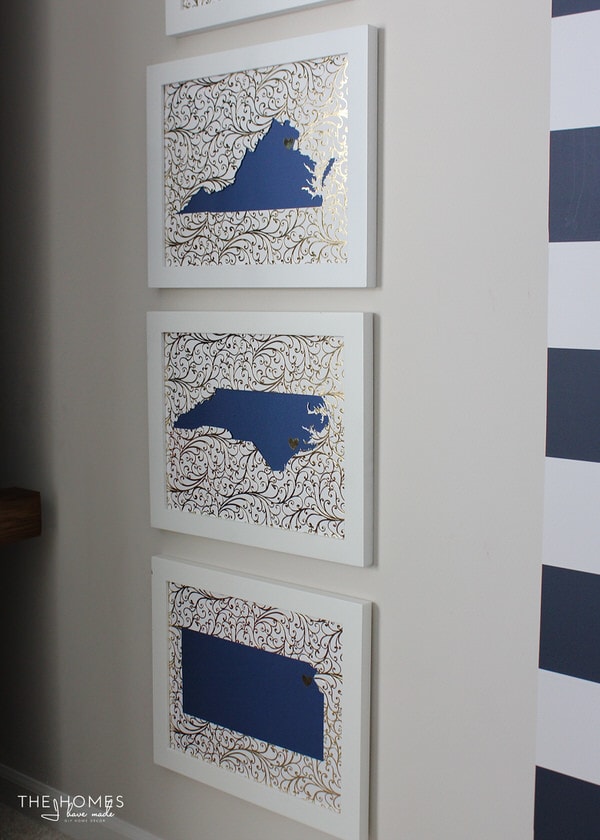
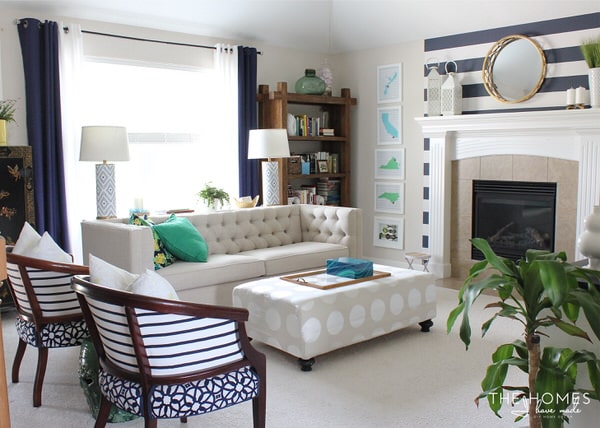
I really couldn’t be more thrilled with how these turned out. Not only am I glad to have our locations finally updated, but the contrast of the white/gold paper with the blue just fits so well with the art itself and the space in which they are hung.

From certain angles and in different lights, sometimes you can’t see the gold shimmer at all. But then you will catch a glimpse of it…and it’s just so, so good.
I deliberated more than usual over every single step of this project…I think because these frames mean a lot to us, and I wanted to be sure I loved them when all was said and done. It doesn’t get much better than gold and navy in my mind…so I am beyond thrilled with how this one came together!
All said and done, these five pieces of art cost me about $20 total ($15 for the two stacks of cardstock and $4 for the large blue paper). If you only count the sheets I used, each one cost about $1.50 – now that’s some bargain art!! I’m so glad I attempted a DIY version of these versus printing them. I love the vibrancy of the blue and the sparkle of the metallic paper…AND that fact that I can easily change them to work in other spaces as necessary is perfect for my design whimsies. With this project crossed off the list, this room is just one or two projects away from being done!
I’d love to know what you think of our new state artwork! Do you like my paper/color choices? Do you display where you’ve lived in your home? I love hearing/seeing how other families who move a lot tell their story, so if you do something similar, please share!
Have a great, great weekend friends. I have a ton to share next week, so be sure to come back frequently!
Megan
23 Comments on “DIY State Silhouette Artwork”
This project turned out so well! I really love the metallic paper! I need to do this in my house – we aren’t military but the 4 of us (mom, dad, 2 boys) were each born in a different state, and I’ve been thinking about doing something like this. Thanks for the inspiration!
So glad you like it Sarah!
Most of the time, I’m not sure how projects will turn out, and I must say, this one far surpassed my expectations! Keep me posted if you give it a try in your home!
Have a good rest of the weekend!
Megan
These turned out fabulous! I love them!! The metallic background looks great.
Thank you so much, Heidi!
Man I had such a tough time deciding between the blue background and the gold/white. I am SO glad I trusted my gut, because that metallic background makes me happy every time I walk into the room!
Have a great rest of the weekend,
Megan
So gorgeous! I love how it turned out. And thanks for sharing the process. I love the colors and how it works so well with your room.
I just need to say that I look forward to Mondays/Wednesdays/Fridays because you post those days. Thanks for all your hard work!
Hi again Kristie!
This comment totally made my day yesterday! I even told my husband how excited I was to have this awesome reader who looks forward to my new posts regularly 🙂 I’ve honestly been in a bit of a slump lately of how “small” my site is despite how hard I work. Thanks for helping me remember why it’s worth it.
Warms my heart to know I have a cheerleader out there…thank you!
Good night!
I think this is my favorite take on the state art idea! Love the color and foil accents. The best part is, thanks to the card stock link you shared, my Joanns shows they have 3 packs in stock! #weekendproject?
Hi Janet!
Yay – so glad to hear you love my take on this one…and that I actually inspired you to give it a try! You’ll have to let me know how it turns out!
Admittedly, I’m already thinking up other projects for the remaining paper in these stacks – it’s so thick and pretty, can’t wait to find other uses for it!
Thank you so much for your comment, and hope you have a good rest of the weekend!
I love these! Everything about them–the color, the gold, the frames. I wonder how many times I can do a print of Texas, since that’s the only state for us! 🙂
Hi Nikki!
Yay!!! Thank you so much! I have to admit, this is one of my more successful projects of late and they make me so so happy! Love hearing you love them too!
And for the record, I think you can hang up Texas as big and as much as you want 😉
Have a good rest of the weekend!
Hi Megan
What a lovely idea, I love your update too as the colors suit so much to your room. The blue is wonderful in order to make the state appear clearly in contrast with the background so cute too. My sentence is really too long ! You give me an idea to create something related to all the places we’ve been. Our “départements” in France are smaller than the majority of your states and with stranger shapes but I must think about something maybe different but which should have the same meaning. Enjoy your week-end !
Glad you found some inspiration in this project too, Michele! You could even do the same concept for your favorite countries/places you have visited? I’d love to know if you ever give it a try!
Hope you’re enjoying your weekend too!
Hi Megan
Yesterday I couldn’t see your comments on the blog, happily I could read them in my in box ! 🙂 I’m like Kristie waiting for the days you post with great joy and it’s so kind of you to answer to all of us, you do a marvellous job.What another lovely idea to do the same for our favorite places we travelled to,
I must think of it too as I appreciate a lot of places all around Europe ! Happy Monday ! Michèle
Fabulous, fabulous art, fabulous concept, fabulous colors. Love the whole project and I think it the gold & blue stands out a lot more then the opposite. Your right too, that it shimmers in the light. Love the little heart touch.
Lauren Baxter | Lovely Decor
xx
Hi Megan,
I’m in love with your blog. As a military wife (to a UK Royal Marine) we were lucky enough to spend a year in Quantico last year. I wish I had half your decorating talent and ability to complete projects. I always think, I’ll save it for the next hose but never get around to doing it! Perhaps that’s because we’ve had 6 houses in 5 years…
Anyway, I wanted to say make sure you buy lots of the JoAnn paper because you’re likely to have a lot more moves and need more state pictures!!
I’d love to figure out a way to do this without the circuit cutter as I don’t have one of those..way to expensive in the UK to purchase.
Thanks again for the inspiration!
Lynsey
Hi Lynsey!
Thank you so much for leaving such a nice comment! I LOVE connecting with other military spouses, and how fun that you’ve been able to experience a huge part of our life: Quantico! I am guessing you may have been there for school? We were there for EWS 4 years ago now…too bad our timing wasn’t better! I hope you enjoyed it…that area is pretty much our home town so we know it well. Lots of great things to do although I know the traffic is terrible 😉
You are so brilliant to stock up on more of that paper. I might just have to do that. Then again, I change my mind so much, that when we move again, I am sure I will do something different. I love these so much though, it might be safer to stock up on the paper now! As far as doing it without an e-cutter…you could always cut out the silhouette by hand onto cardboard (like a template), trace onto pretty paper and then cut by hand. It will surely take longer, but it can be done!
I am so glad you wrote a comment. Cheers to having a fellow “Marine” spouse in England 😉
Megan
Thank you so much for linking up at Create • Share • Inspire! This is a beautiful project and I love the navy against the gold paper. So pretty. We can’t wait to see what you link up this week!
Thank you so much, Alicia! Excited to have another party to link up to! Just recently found your blog…although our styles are so different, I just am loving all of your pretty spaces, you definitely have a knack for pulling spaces together! Excited to be following along!
Have a great night!
Megan
This is a great post! Thanks for sharing. Where did you get your state images?
Hi Amanda,
I actually had the state images from a digital kit I purchased years ago. However, you should be able to search Google Images for the states you need and clean them up in Cricut Design Space.
Hope that helps!
Megan
Megan, I just stumbled upon your blog too. I love all your ideas. We have a house built in1990’s and now that we are empty nesters it is time we spend it on our house and getting rid of clutter and doing some organization. Don’t get me wrong we spent a lot of time with our kids each doing travel soccer, I love that chapter of our life but now it’s time to get inspired with our house. You are an inspiration. Love your Cricut tutorials. You just make your house into a home. 🙂
Love this idea. My husband just retired from the Air Force (23 years) and we are getting ready to by our forever (I hope) home. This is something I’d love to put up in our house. Thank you to you and your spouse for serving.
Love this idea! Very creative and definitely a conversation starter! Thanks for the idea, Megan, really enjoy all your creative solutions!