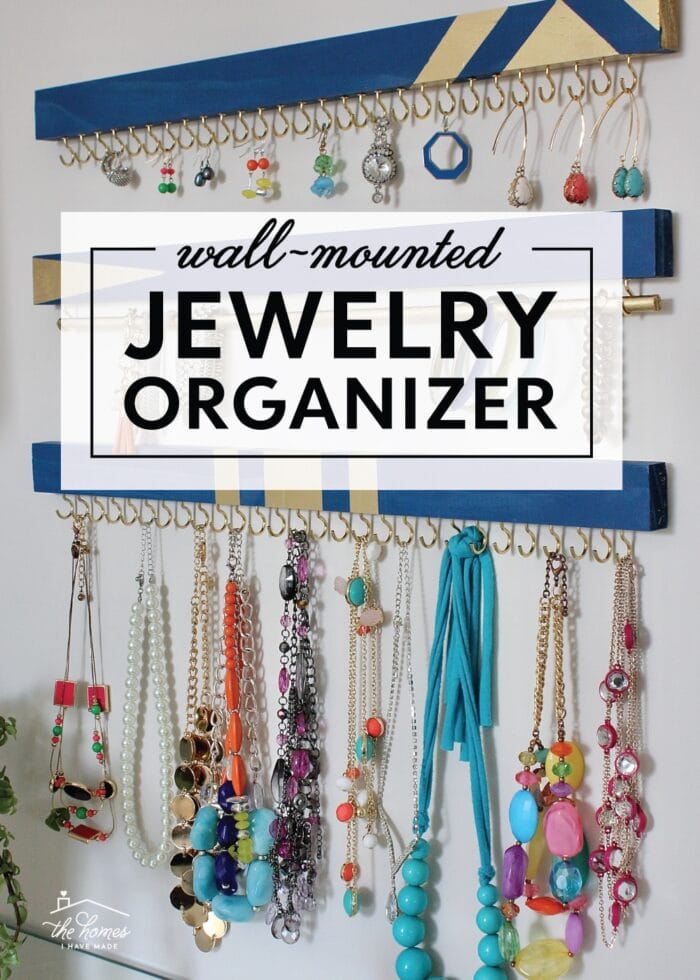
An Easy Wall-Mounted DIY Jewelry Organizer
Over the years, I have used all sorts of different solutions to store and organize my jewelry. From a jewelry cabinet and table-top box to mini Ziplock bags tucked into our safe (seriously!), I’ve tried everything from the really fancy to the really basic. By far, my favorite way to organize my jewelry (so that it remains tangle-free and easy to see AND wear) has been this wall-mounted DIY Jewelry Organizer. Not only is this a really fun (and easy!) DIY project, but its perfectly customizable to your specific jewelry collection. Let me show you how this unique jewelry holder comes together!
Lessons Learned
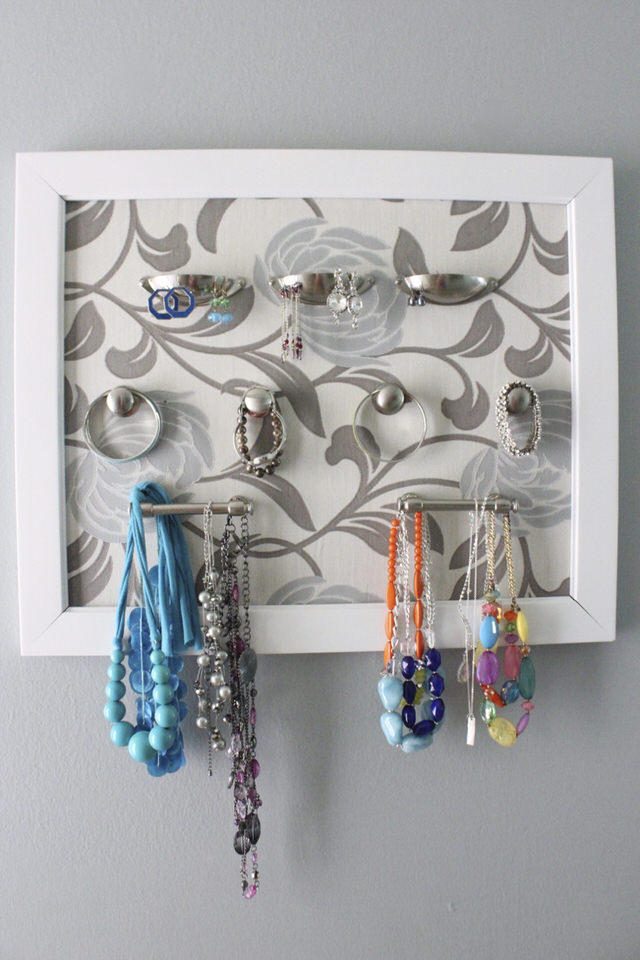
This jewelry storage project is actually my second attempt at making a wall-mounted organizer. Years ago, I followed a trend on Pinterest to use a bunch of drawer pulls and knobs (secured to a picture frame covered in fabric) to serve as earring, necklace, and bracelet holders. But over time, there were just some things I didn’t love about this setup:
- The cup pulls (which I originally intended to be earring storage) were too high to see into, so I easily lost sight/track of all my stud-type earrings.
- The knobs weren’t deep enough to hold bracelets securely (they fell off way too easily).
- I did like all my necklaces lined up on pretty drawer handles. But it was a nuisance to clasp/un-clasp the necklace every time I wanted to hang it up or take it down (since some can fit over my head without unhooking).
Why Store Jewelry On the Wall?
All that said, there were a few things I really did love about this first DIY wall jewelry organizer:
- Having my jewelry out in the open allowed me to see it all much easier (which then prompted me to actually wear it more!)
- Using the wall to store jewelry (instead of a cabinet) meant that I wasn’t lugging yet another piece of furniture from home to home (nor was I reliant on a particular bedroom layout to find space for it!)
- Having dedicated hooks for necklaces, bracelets, and earrings kept everything from becoming a tangled mess.
With these likes and dislikes in mind, I devised a system that not only stored my jewelry in a really functional way, but was also inexpensive, easy, and gorgeous!
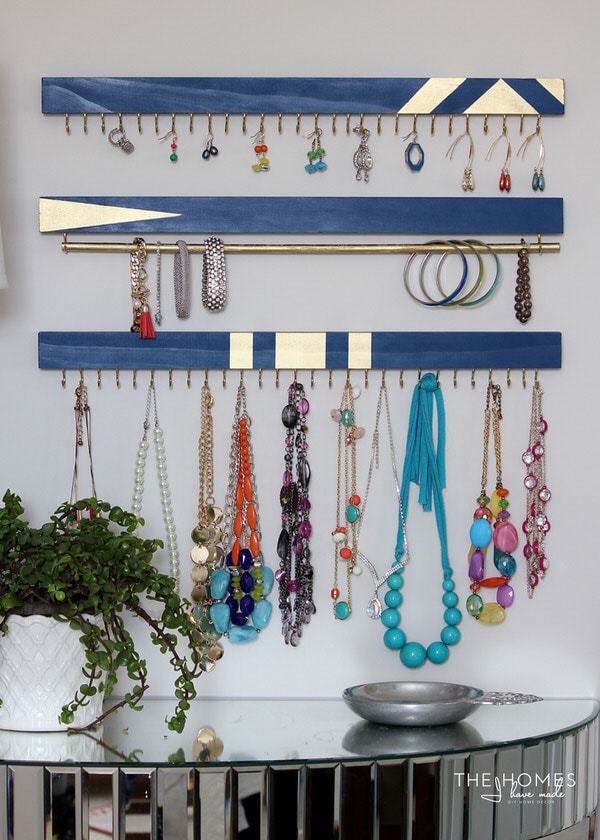
My New DIY Jewelry Organizer
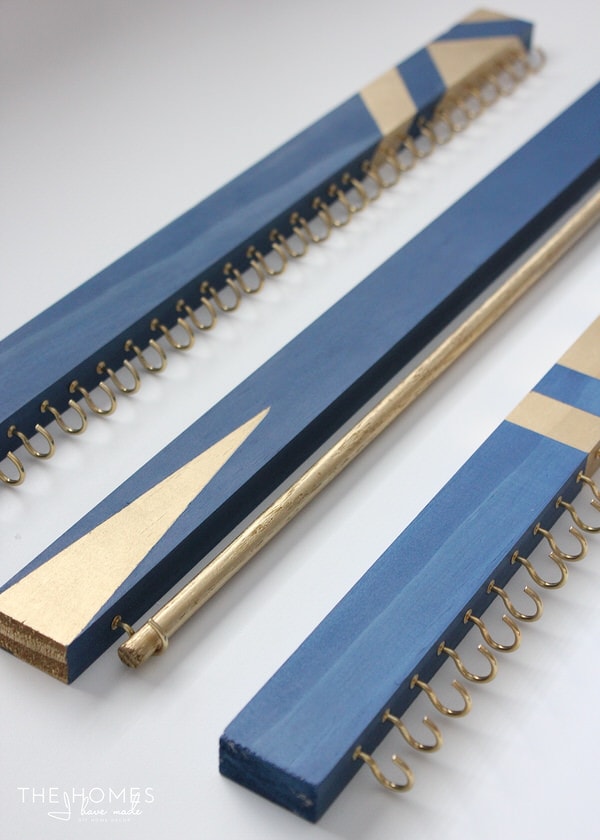
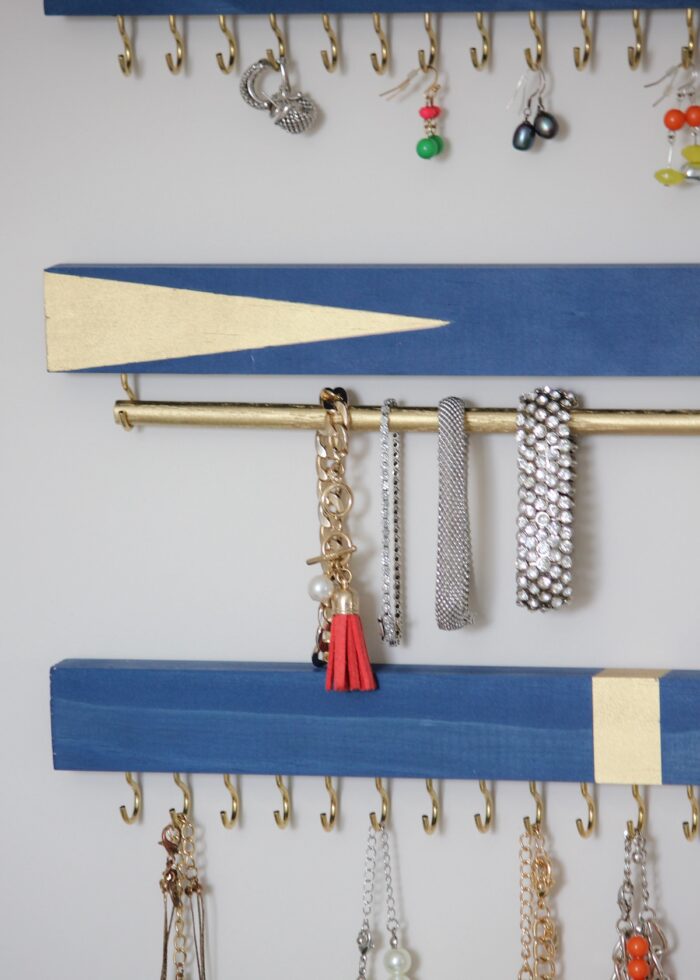
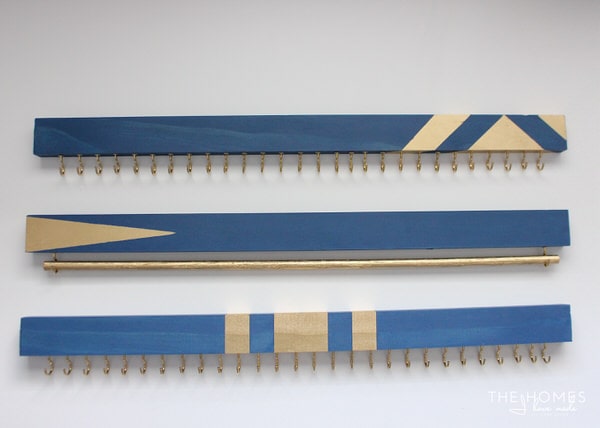
Instead of a single board, this time I used three scrap wood 1x2s and outfitted them with cup hooks arranged at specific intervals to hold various types of jewelry.
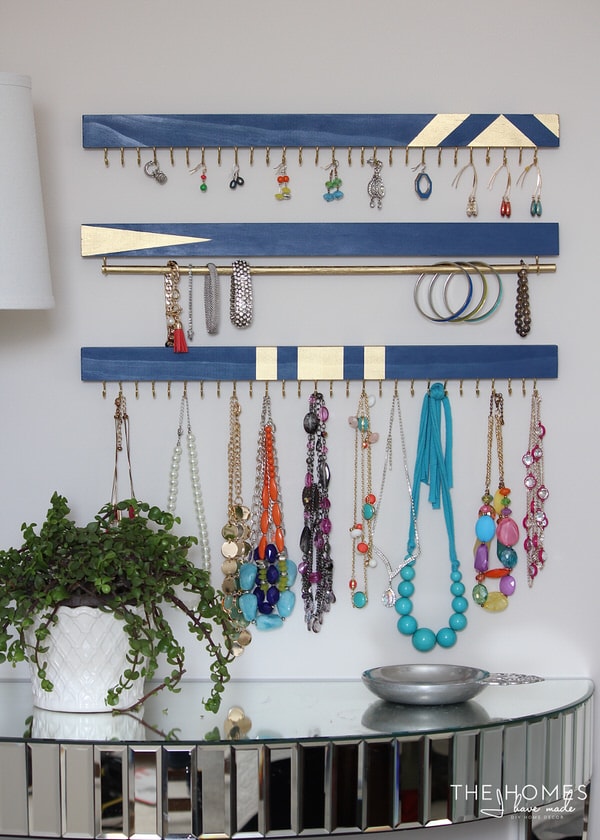
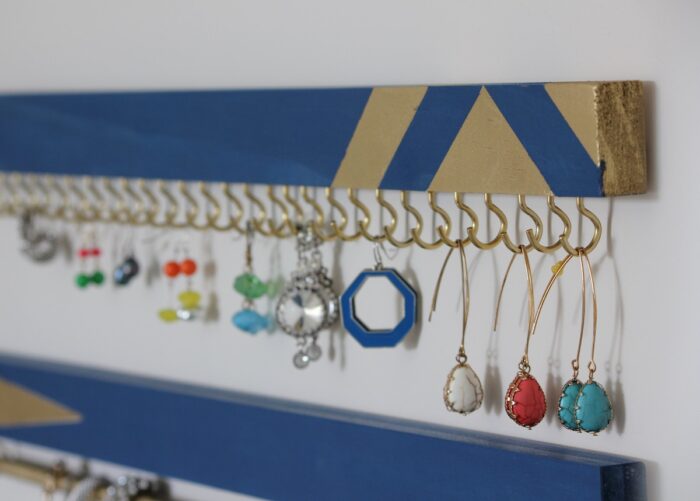
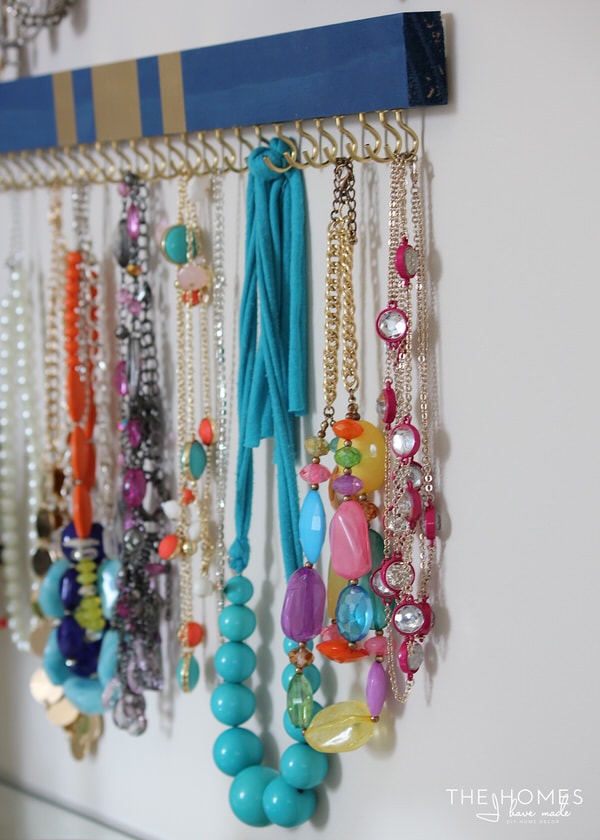
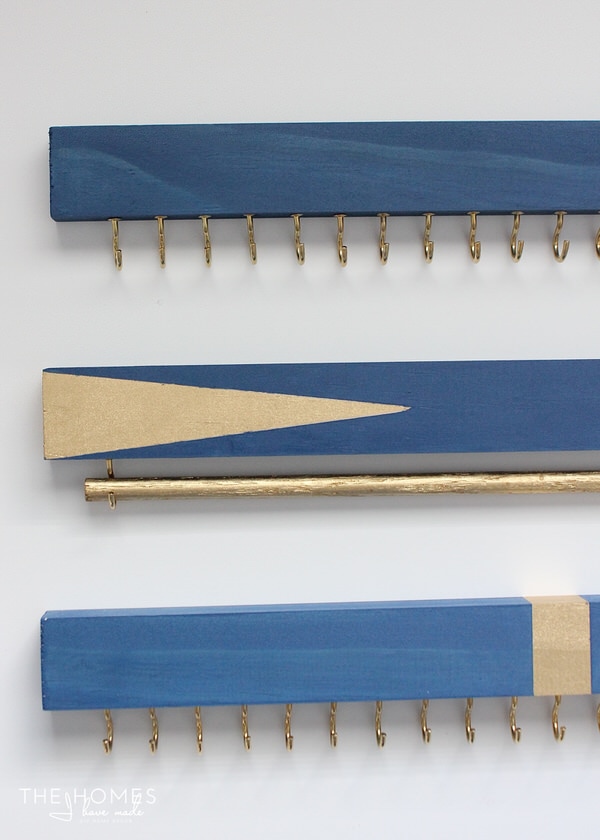
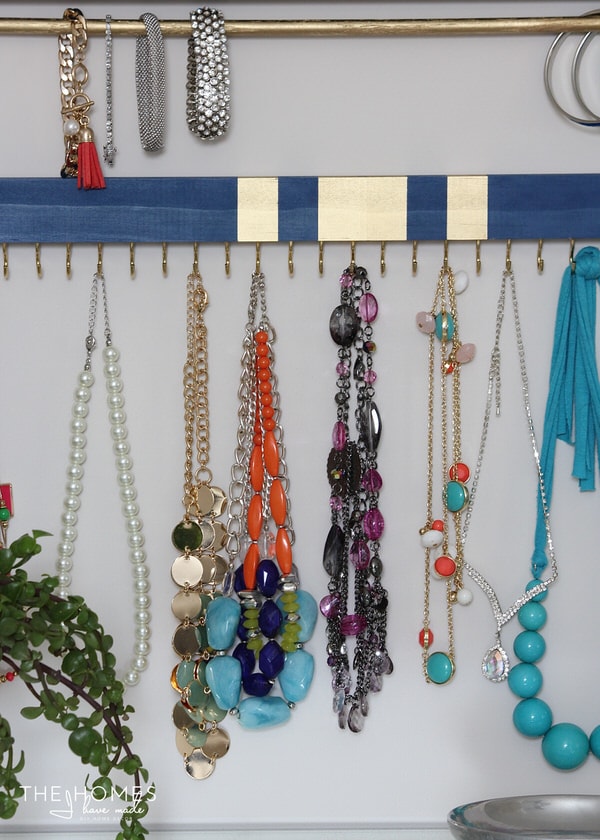
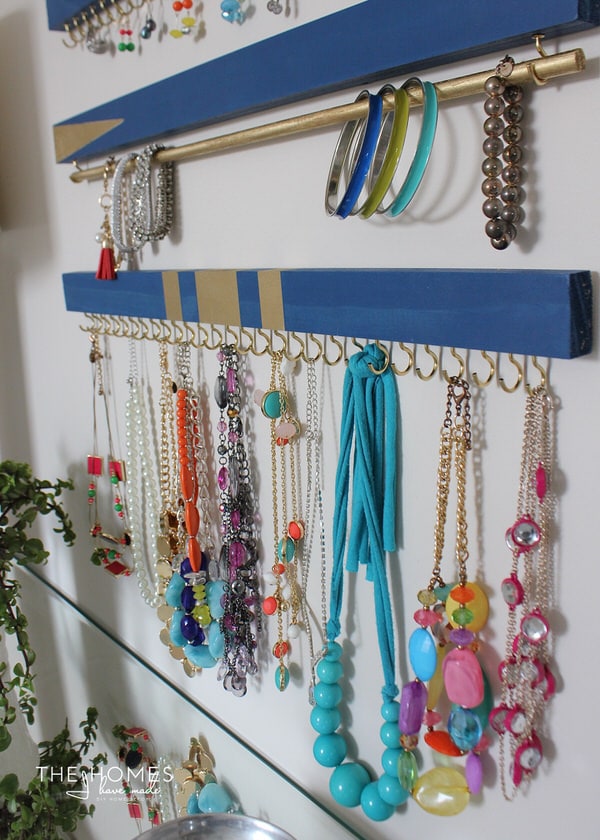
The top and bottom boards are essentially the same, with cup hooks all the way across. These two rows are ideal earring and necklace holders, since each individual item can be placed onto a single hook.
The middle board features just two hooks that hold a single wooden dowel. This makes a bracelet hanger, where any size and type bracelet can easily slide on/off when not in use.
Not only is this project super functional and fantastic to look at, but it really is a simple DIY project (I promise!) Let me break it down for you!
Supplies Needed
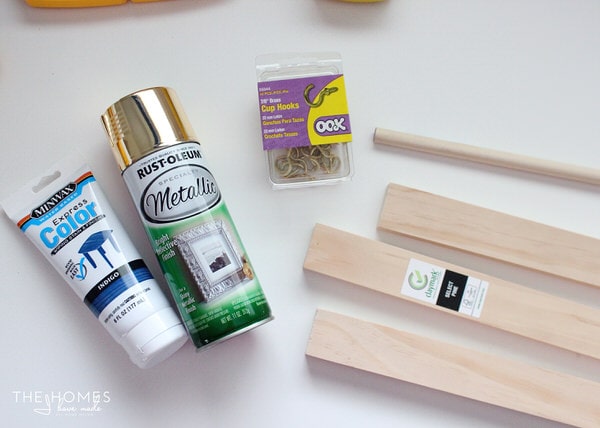
Here’s what you need to make this DIY Jewelry Organizer:
- Common Board or Plywood 1x2s cut down to your desired length (mine measure about 20″)
- Cup Hooks in your color choice (mine are brass)
- Wooden Dowel (be sure to pick a size that fits into your cup hooks)
- Paint and/or Stain for decorating the wood
- Tools
- Painters Tape
- Ruler/Tape Measure

- Pencil
- Drill and 1/16 Drill Bit
- Sanding Block
- Command Strips (or other hanging hardware)


Step 1 – Prep the Wood Boards
Start by cutting down the 1x2s to your desired lengths and then sanding off any rough edges with a sanding block. Although you can vary the lengths of the boards, all three of mine were cut to the same dimensions (20″).
While you are cutting, also trim down the wooden dowel to ~2″ less than your wood boards. My wooden dowel measures ~18″.
Step 2 – Paint & Stain the Wood Boards
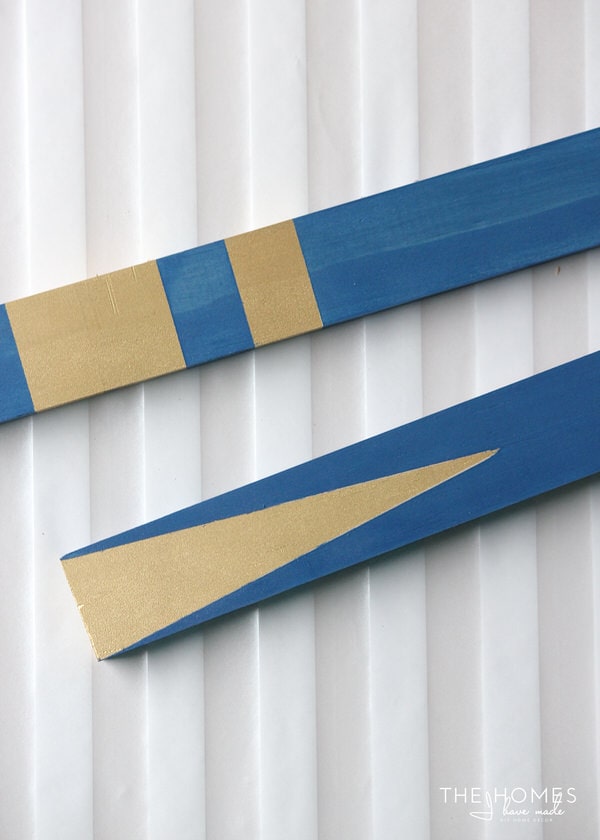
Next, you will want to stain or paint the 1x2s based on your design preferences. For some reason, I chose to paint the gold first then add the blue stain after, which resulted in tedious and unnecessary taping. If you’d like to do a two-tone design like mine, here is how to do it:
- Start by staining or painting the 1x2s in your base color (in my example: blue).
- Once dry, use painter’s tape to create patterns at various places across the boards. These patterns can be perpendicular or diagonal lines, and can be the same on each board or varied. If using spray paint, ensure you cover ALL parts of the board with tape that you DON’T want to get painted. Press down the edges of the tape to ensure no paint bleeds underneath.
- Use your contrasting color (in my example: gold spray paint) to paint the exposed areas of the wood board to create the pattern design.
- While your paint is still wet, carefully remove the tape to reveal your two-toned design!
While you have the paint out, give the wooden dowel a few coats in whatever color you want. I painted mine gold to match the cup hooks.
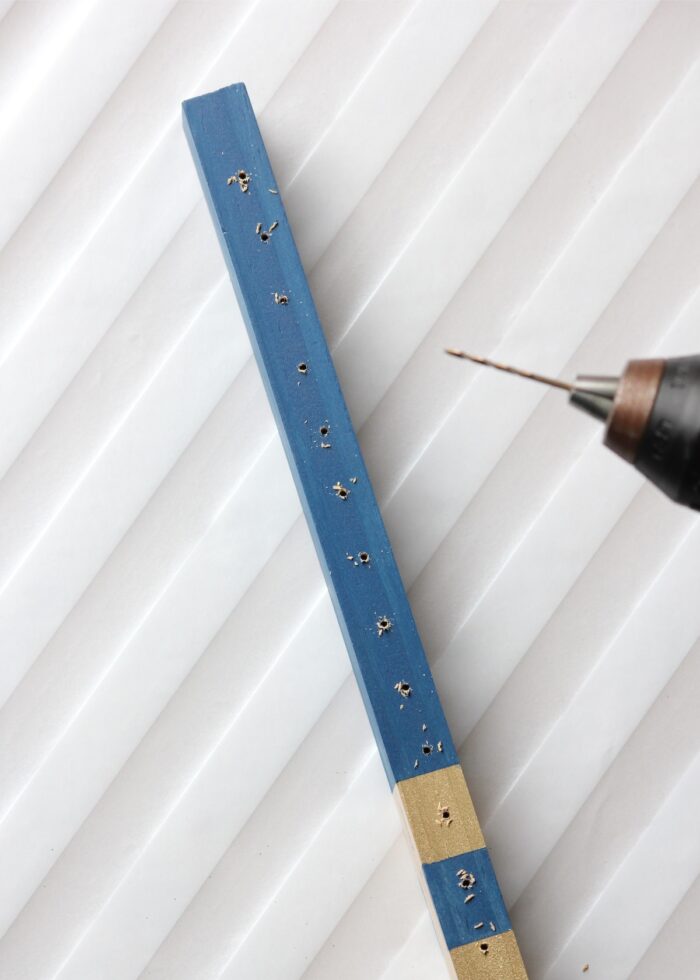
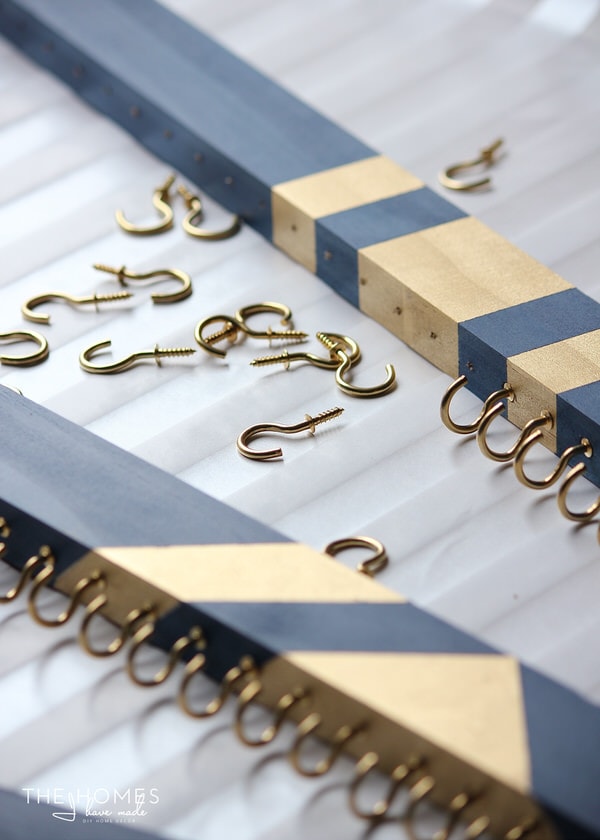
Step 3 – Measure & Pre-Drill Holes for the Hooks
With your boards fully painted and dry, it’s time to add all the hooks to hold your earrings, bracelets, and necklaces. I chose to dedicate one board to each type of jewelry; but you can decide what hook placement will work best for your specific collection (even combining different jewelry categories onto one board).
Want to save this post?
Hook Placement For Earrings & Necklaces
The single cup hooks are ideal for holding both earrings and necklaces; and since these items tend to be small and/or narrow, you can place these hooks fairly close together.
Before you start drilling pilot holes, first determine how far apart you want/need the hooks to accommodate your specific jewelry collection (for reference, my holes start 1″ from the end and then are 0.75″ apart).
Use a ruler and a pencil to mark the hole placement, and then use a drill and 1/16 drill bit to make each pilot hole. These holes don’t need to go deep, but they should be in a straight line down the center of your wood board.
Hook Placement for the Bracelets Rod
To create the rod-style bracelet holder, I used two cup hooks to hold the single wooden dowel. Determine the placement of the these two hooks by measuring in 1″ from each end of the board (or match the outermost hooks on your other boards).
Step 4 – Twist In the Cup Hooks
With all the holes pre-drilled, plop yourself down with a pile of hooks and get to work twisting them in. Keep twisting until each hook is snug against the wood board and they are uniformly pointing forward. Twisting in all the hooks will take some time and patience. Thankfully, the bracelet rod requires only 2 hooks, onto which you can place the painted wooden dowel.
Step 5 – Mount the DIY Jewelry Organizers to the Wall
With your DIY Jewelry Organizer finished, it’s time to mount the whole thing to your wall!
You can certainly use some sort of screws or mounting hardware, but I decided to give Command Strips a try since I wanted the organizers to sit perfectly flush against the wall. Sure enough, several Large Command Strips are more than strong enough to hold these organizers in place (even once they are loaded up with jewelry!) Renter-friendly hanging for the win!
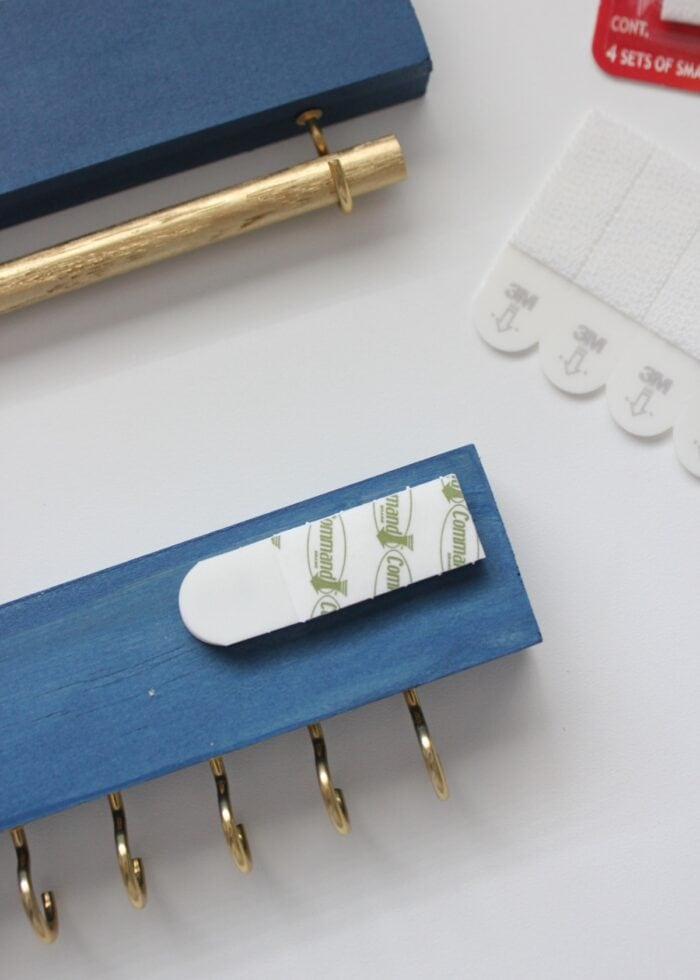
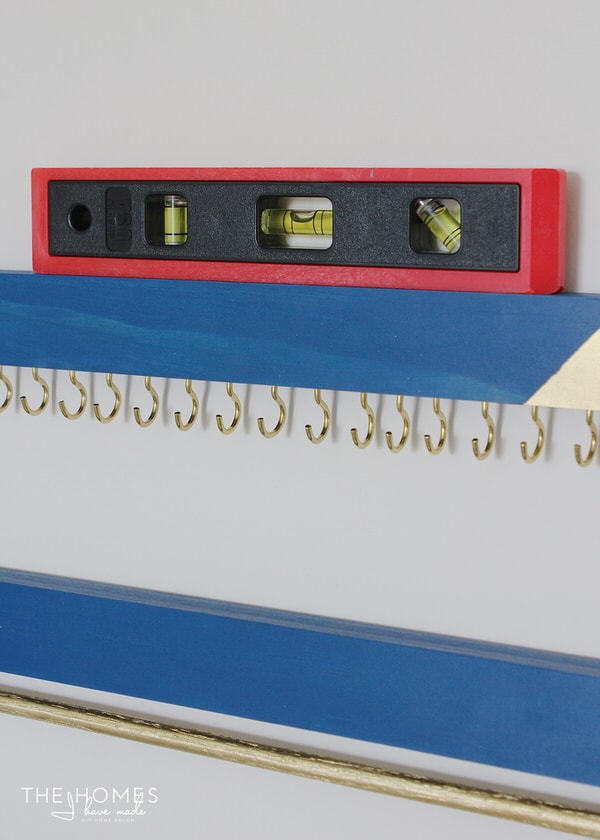
To hang the jewelry holders, place 2-3 Large Command Strips on the back of the wood board. Be sure to use a small level when securing each board to the wall.
TIP! In order to determine how far apart to vertically space the wood boards, hang your longest/biggest piece of jewelry on each one and use it to guide placement of the next one.
If you’re not sure how to hang items with Command Strips, see my tutorial HERE.
Step 6 – Hang Up All Your Jewelry!
Once the boards are fully secure to the wall (and you waited the “curing” time recommend with Command Strips), it’s time to load them up with your jewelry items! I hooked pairs of earrings and necklaces onto the single hooks, and then threaded each bracelet onto the wooden dowel.
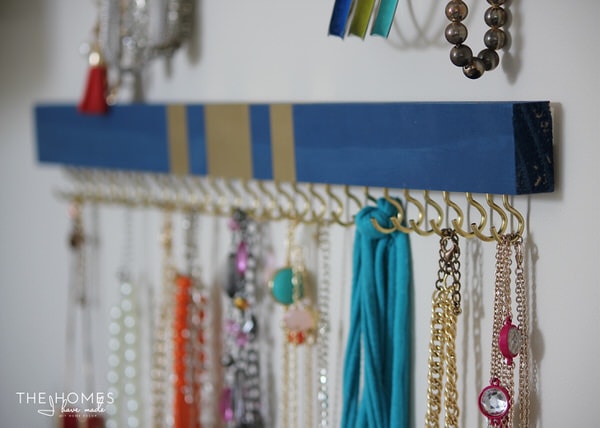
This DIY jewelry holder is an amazing solution. I really love that all my necklaces and earrings have individual/dedicated hooks, and that I no longer have to clasp/un-clasp necklaces just to get them on and off. The bracelet bar is easier than I expected to manipulate; and I love how it perfectly accommodates bracelets of all kinds. Oh – and if you’re curious about my stud earrings, I keep them in a little pewter bowl on my bedside table.
I can’t emphasize enough how much I love this easy DIY Jewelry Organizer. Besides preventing my jewelry from becoming a big mess, it is easily movable, totally renter-friendly, and super pretty to look at. If you just can’t find a jewelry box with compartments, shelf, or caddie that works for you, give this jewelry organizer DIY a try! I think you’ll love it too!
Megan
30 Comments on “An Easy Wall-Mounted DIY Jewelry Organizer”
I need something like this for my bracelets. They are shoved in a little 3 drawer thing and I can never find the one I am looking for. Although that said I usually wear the same 5 over and over so it just might be time to unload some of them. And my necklaces are in a pretty jewelry box that can hang some necklaces…but I think I have way too many. This is such a pretty idea. Worth sharing with my girls. If I teach them now….maybe they will be better than their mom! Thank you for sharing a sweet and easy diy.
Hi Megan
A really lovely and useful jewelry display ! Mine is deep in jewel bowes all mixed together and so you have to turn and turn everything to find or not the one you want and what a mess even if I don’t wear them so much, maybe because of the big stuff to take them from these places.
What I do love the more is that even for a one year stay in this house you do so many things, yes I know some will been used elsewhere. Have a nice week-end, ours is very rainy here. Michèle
Due to House of Turquoise I came across your blog and took a little journey tha made my morning worth while ( I hope I’m writting correctly). Loved your blog, your DIY ideas and specially your lemon-lime console :). I subscribed your news and won’t leave you ever. XOXO
Hi Maria!
I am so glad you found me and love my site! I am so happy to have you following along. Thank you for taking the time to leave this super kind comment. I’ve had somewhat of a rough week, so your dedicated and support really meant the world to me this week – thank you!
Have a great weekend!
Megan
Pingback: DIY Jewelry Organizers | The Budget Decorator
Pingback: 25 Ingenious Jewelry Organization Ideas - The Happy Housie
Pingback: 50+ DIY Jewelry Display Crafts
Pingback: DIY Jewelry Organizers • The Budget Decorator - HDWALLO
Great idea! A yardstick would work perfectly for this project and an added bonus is that it is already premarked for the cup holders! Just paint the unmarked sides and use the measurements from the other side. 😊
Pingback: 25 Clever and Out of the Ordinary Jewellery Organizer Ideas - Gravetics
Pingback: DIY Jewelry Organizer Ideas • The Budget Decorator - Pintagram Online
Pingback: 10 Best DIY Mother's Day Gifts - A Spruced Up Life
What about stud earings?
Hi Reta,
I don’t have a huge stud earning collection, so mine are just in a small bowl on my bedside table. Adding some sort of cork (https://www.pinterest.com/pin/209065607689946933/) or holes (https://www.pinterest.com/pin/184155072253013814/) or foam (https://www.pinterest.com/pin/671177150700879575/) could work!
Good luck with your project!Megan
Hi Megan! Pinterest made me end up here, I love your organizer and I plan to do it soon. Also, I really like some of your ideas, I’ll admit I was browsing and searching).
I do not know if you will read this comment, giving that it was posted five years ago, but I do think it will be more meaningful to take time and show you that your ideas are still appreciated and popular on Pinterest.
Sending you a big virtual hug from Guatemala, and wishing you the best in this terrifying, uncertain time.
Hi Gabriela!
Thanks for taking the time to leave such a kind comment – and yes, no matter when the post was written…the comments always come through!
This project is still a winner and I hope you do give it a try!
Thanks for writing and hope you’re staying home and healthy too!Megan
Pingback: organizing + displaying jewellery – peacock & lime – boho / free spirited jewelry
Hi. Do you remember what size wood dowel you used? Thanks!
Hi there!
I just went and measured it for you…it’s 3/8″!
Hope that helps!Megan
Pingback: 20 DIY Wall Jewelry Organizers - Gorgeous Ways to Display Your Jewelry!
Amazing idea!!
Can it the holder hold rings and necklace
Hi Megan,
I absolutely love this idea for organizing my daughter’s jewelry! It’s simplistic and elegant. Just like her. I plan on making it for her asa Christmas gift, with my own little spin on it of course. 🥰 I am just trying to figure out what size cup hooks you used. Would you mind letting me know? I’m sure there is some way to figure it out based on the information in your instructions but I can’t find it. 🤦🏼♀️ Exhausted mom here, can you help?!? Lol Thank you!
Did you use the command strips you linked? Because the ones shown are the velcro-like ones
Yep, I sure did! Worked great!
Good luck with your project!Megan
I love your ideas! It is so much easier to find, use or keep them in order to find them.
Thank you for your mind,
Ruth Turcotte
Lindo! E o que eu mais gostei foi saber que é prático e funcional. As vezes fica lindo mas na hora de usar não funciona.
🙂
I have a similar systems for my necklaces, though not as cute as yours. My problem is that they are mostly costume jewelry and they oxidize and tarnish. I need a way to cover them to protect them from oxidation. Do you have any ideas for a solution?
I’m sure many of your readers already know so I’ll ask. Is there a trick to screwing in the cup hooks so that when the flat end is flat against the wood, the hooks are facing same way. I tried something similar before and that was my bugaboo. However I had not pre drilled pilot holes. Maybe that’s the trick. If you, Megan, or anyone else knows this trick, please let me know as I want to make this. I’m A clumsy diy-er so I’m scared to even start.
This DIY Jewelry Organizer is brilliant! I have a small jewelry box and got tired of trying to find any particular pair of earrings because everything was tangled and jumbled. I made this Jewelry Organizer, following your easy instructions, and it turned out lovely! And it made me proud to say I made it myself! I got all my supplies from Home Depot. Everything was very inexpensive. I made different patterns with the masking tape. You can get so creative with the designs and the colors. My colors were blue and metallic silver. I used white cup hooks. Your design is easy, doable, and budget-friendly. Thank you so much for sharing! God bless you!