“On the Go” 2nd Birthday Party!
This past week, my Henry turned the big TWO! We threw an “On the Go”-themed birthday on Saturday to celebrate the occasion. It was such a great day, attended by lots of friends and family!

I tend to really get into party planning, and this venture was no different. The “On the Go” theme was lots of fun once I got moving (ha!), and ideas really started to fly. In the end, I was really just restricted by time (which was probably a good thing!). This party was so much fun to pull together; we had a gorgeous day to celebrate, and I am pretty sure the birthday boy and all of our guests had a great time!
I know I should space out all these photos over several posts, but I can’t help showing you everything today! Like last year (with the Monster Birthday Party), I’ll go back and give some details about different aspects of the party…but today, you are just going to get lots and lots and lots of photos (that’s your fair warning ;).
Okay, here we gooooooooo!!!

I’ll go into more detail later this week, but the theme was all things “on the go,” and the color scheme was blue, green, orange and black. The color scheme actually came together “accidentally,” but in the end I was really digging the combo!
A bunch of paper circles provided a striking backdrop to our table!

A few shots before all the food was put out…

Yes, I used mini cones as vases for some flower arrangements!

I even got to re-use the “Happy Birthday” banner from last year.

A few “stoplights” adorned the garden beds!

A quick snapshot of the porch as we were putting things out!


I really, really wanted to keep the food simple. It was a 3:30PM party, and I knew guests wouldn’t want to fill up too much between lunch and dinner. Light snacks coupled with some fun sweet treats were just the ticket!

No big cake this year, just cupcakes – perfect for toddler hands!

Toddler staples: gold fish and animal crackers.


We did have some veggie sticks and fruit to keep things a bit healthy! Everything was finger foods though, so no utensils required!

Two of my favorites of the day: the stoplight sugar cookies and green cake pops!

Fruit kabobs and pita chips with dip rounded out our offerings!

Am I the only one who gets all giddy at the site of a pretty party table??

Want to save this post?
We had just the right amount of food – almost everything was gone by the end of the afternoon!

Oh, and beer, lemonade and water were provided at the “Fuel Station”!


On another long table, we had room for gifts and favors!
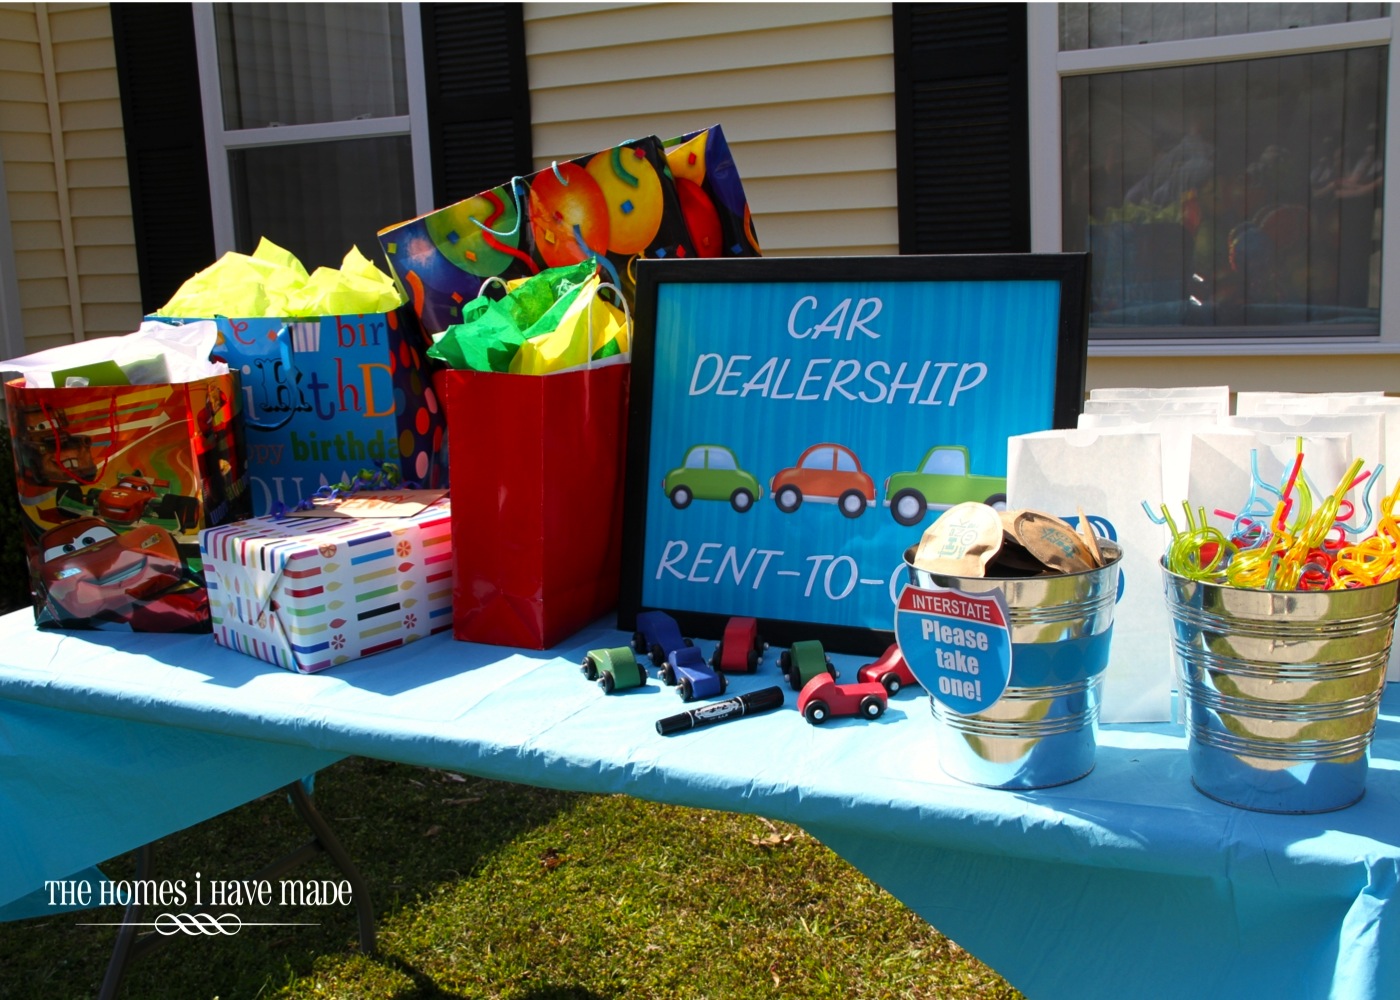
I didn’t have time to make favors this year, but found these adorable wooden cars on Etsy. Each child got to pick a car to play with at the party and take home with them!

Other favors included candy pouches and curly straws. Each child had a bag with their initial on it to fill with goodies!

The candy pouches were for adults and kids alike and were filled with M&Ms.


We had a lot of fun activities out to keep the little ones busy! A wooden race track (for those wooden cars), which I painted and Greg made (more on this project later this week), and the ball pit were huge hits!

Bubbles were the other big hit of the day!

We also pulled out the chalk…

…and other outdoor toys to keep the little ones busy!

For the adults, we had Corn Hole…

…and a lounging area to sit and snack and chat!

Oh, and would you like to see some snapshots of my big boy? He had such a great day playing with his friends and sampling all the treats!


Mom and Dad had a good day with their friends too!

It’s such fun to watch Henry turn into a little boy who can run and jump and talk and laugh and play! He’s such a great kid with such a happy personality. As I said last year, it’s amazing what a difference a year can make…

Phew! I was exhausted on Saturday after the party, and I’m exhausted from re-living it through all these photos! Nonetheless, it was such a great day, and I hope you enjoyed seeing all of it here! I will be back later this week and next with details about everything (well, most everything!) you see here!

Megan
11 Comments on ““On the Go” 2nd Birthday Party!”
Very cute boy party, I have three girls so its fun to see what boy parties look like 😉 Hope he had a special day!
Whew! I am exhausted seeing all the work you did! My goodness! What a wonderful mom your are for creating such fun and detailed pieces for his birthday! Adorable! 🙂
What a fun party!! You did an amazing job! The decorations were so fun and cute!!
What a great party! I love the theme and you always make things so unique and fun!
Cute party with so many great details. Looks like he had a great birthday.
Your friends and family must be amazed at all that you do. I know that I am!!! Everything thing you did for this party is so clever. I love all your ideas and how you created them. One day, your son, will look at the pictures and feel proud of his Mom. I hope my daughter does that about the parties I've made her. I haven't done a big theme party since she was 10 and she'll be 16 in November. Now a days she wants a slumber party and watch scary movies…oh wait..that is every weekend. She dragged her dad with her and her bff so they could see a scary movie and couldn't get in cause they were only 15.
So, so cute! Great job momma!
xo
Heather
What a fabulous party Megan! He looks like he LOVED it. The colors are amazing. Thank you for sharing at Monday Funday! Bonnie @ Uncommon Designs
Hi Megan, LOVE the round paper cut outs you used ofr the back drop. Can you please share how to make them?
Hi Megan, I LOVE the round cut outs you used for back drop. Can you please share how to make them?
I cut out 4 images (the bus, the taxi, the car, and the arrow…all with a circle around them from the Going Places Cricut cartridge) in each of my four colors. I cut the set twice, giving me 8 circles in each color. I then used the "relief" cut (what was left behind from the solid color cuts) and mounted those extra buses, taxis, cars, and arrows to white circles, giving me four more sets of 8 circles. Lastly, I did the same thing with the black #2s. I'm not sure that made sense…it wasn't a ton of cutting or a ton of paper because I used both the cutout and the circle image from each cut, does that make sense? I made my backdrop a perfect square: 8×8 since I had 8 circles in each color. I then laid out my circles so that the stripes ran diagonally. Each circle was hot glued to a string of ribbon (eight strings of ribbon for the eight vertical panels). Then each ribbon was looped at the top and bottom (with a glue gun), and wooden dowels from the craft store were inserted horizontally. The wooden dowels on the top were then nailed into the top of the window frame for hanging; the bottom dowels just provided weight to keep the whole backdrop straight and together.
You can read more about the decor here: http://widget6.linkwithin.com/redirect?url=http%3A//www.thehomesihavemade.com/2013/04/on-go-party-spotlight-on-decor.html&rtype=&vars=%5B%22http%3A//www.thehomesihavemade.com/2013/04/on-go-second-birthday-party.html%22%2C%201140445%2C%200%2C%20%22http%3A//www.thehomesihavemade.com/2013/04/on-go-second-birthday-party.html%22%2C%20298022401%2C%200%2C%20298704495%5D&ts=1395248681930