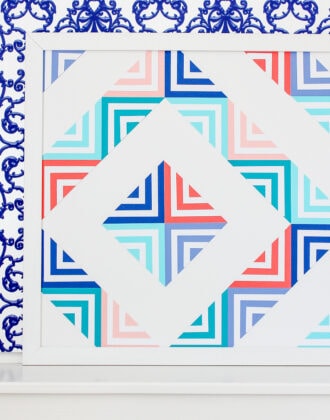
DIY Chevron Artwork Made with Paper
Putting artwork on your walls is one of the best and easiest ways to liven up a space and infuse some personality and style into your home. But as most of us know, finding just the right artwork can be both a time-consuming and costly endeavor. But don’t let those reasons keep you to bare and colorless walls. With just some basic cardstock found at any craft store and a few simple cutting techniques, you can make your own DIY chevron artwork that is both stunning and totally budget-friendly! Let me show you how easy and customizable this project is!
![]()
I love love love using basic paper to make custom artwork. Not only is paper super inexpensive, but it makes it so easy to customize the colors, pattern, and size/orientation of your artwork. Have a big wall to fill? Make this in super size! Filling up a gallery wall and don’t want to buy a ton of art? Make this in a smaller version in subtle colors! Need artwork to match a specific room scheme? Use those colored papers!
![]()
This chevron/herringbone pattern is really eye-catching and fun to look at, but don’t be overwhelmed by the intricacy. You’re seriously going to be amazed at how easy this whimsical pattern comes to life!
![]()
This project looks so much more complicated than it is! Are you ready to get started? Here is what you need:
- 1 sheet of white poster board (if making a larger version) or or 2-3 sheets of white cardstock (if making a smaller version)
- 1 sheet of white foam core (cut to the size of your frame)
- Cardstock in the colors of your choice (my 16×20” artwork used less than 9 sheets of 12×12 cardstock)
- Scrapbooking glue/adhesive
- Rotary cutter and cutting mat (not required but recommended)
- E-cutter such as a Cricut or Shilouette (not required but recommended)
Start by measuring the frame you will be using. These dimensions will help determine how big to cut your poster board as well as how many chevrons you need to make!
![]()
Next, cut out a bunch of identical chevrons from your colored cardstock. If you have an e-cutter, simply find/upload a chevron pattern, size it to your preference and cut. For reference, my chevrons are 11” wide; each diagonal section is 1,” but you can make these as wide/tall or skinny/short as you like.
If you do not have an e-cutter, I recommend finding a chevron pattern online and printing it onto white cardstock in the size of your choice. Then cut it out to use as a template by tracing it onto the colored cardstock; then cut out the chevrons by hand.
No matter how you cut them out, it is important that all your chevrons are exactly the same.
![]()
Continue cutting chevrons out of all your colored cardstock…
![]()
![]()
Next cut a sheet of poster board (or cardstock if you’re making a smaller version) down to the following dimensions:
- The width of your chevrons (in my case, 11”)
- The height of your total artwork + 2″ (in my case, 22”)
![]()
Then, using craft adhesive (made for paper), attach your chevrons to the rectangle. Try to make the color pattern as random as possible and make sure each chevron is perfectly lined up with the previous one (there should be no gaps in color.)
![]()
Continue working all the way up the rectangle, and then repeat on as many rectangles you’ll need to fill up your frame size. In my case, I needed to fill a 16” wide by 20” tall frame, so I made two 11×22″ wide rectangles filled with chevrons.
![]()
This is where things get really fun!
Next, trim apart the rectangle sheets into strips. To do this, use a rotary cutter and long ruler to slice the chevrons apart at each intersecting point.
![]()
To make your completed artwork, you will then glue the long strips onto another piece of cardboard or foam core (recommended for larger frames). Before gluing the strips on, cut down the foam core into the size that will fit into your frame just right.
![]()
Then glue the cut-down strips onto your foam core/poster board sheet. Instead of re-building the chevrons exactly as they were however, change up the orientation of the strips to create a mismatched, off-set pattern. Be as random as you can while still maintaining the overall chevron scheme.
![]()
Once you have placed all the strips onto the backing, use a rotary cutter to trim down all the strips to uniformly match the backing’s size and create a clean edge.
![]()
Your artwork is now complete, and all you have to do is load it into your frame and display it in your favorite spot!
![]()
This is such a fun art project to make, and is even easy enough for kids to do. Don’t let all the colors and cutting intimidate you; once you start, you’ll be amazed at how quickly it comes together! For just dollars and a few hours time, you can have a stunning new piece of art for your home!
I’m actually giving this project an updated look for our downstairs half-bathroom makeover that I’m working on right now! Keep your eyes out for that (and a few coordinating art ideas)!
Megan
