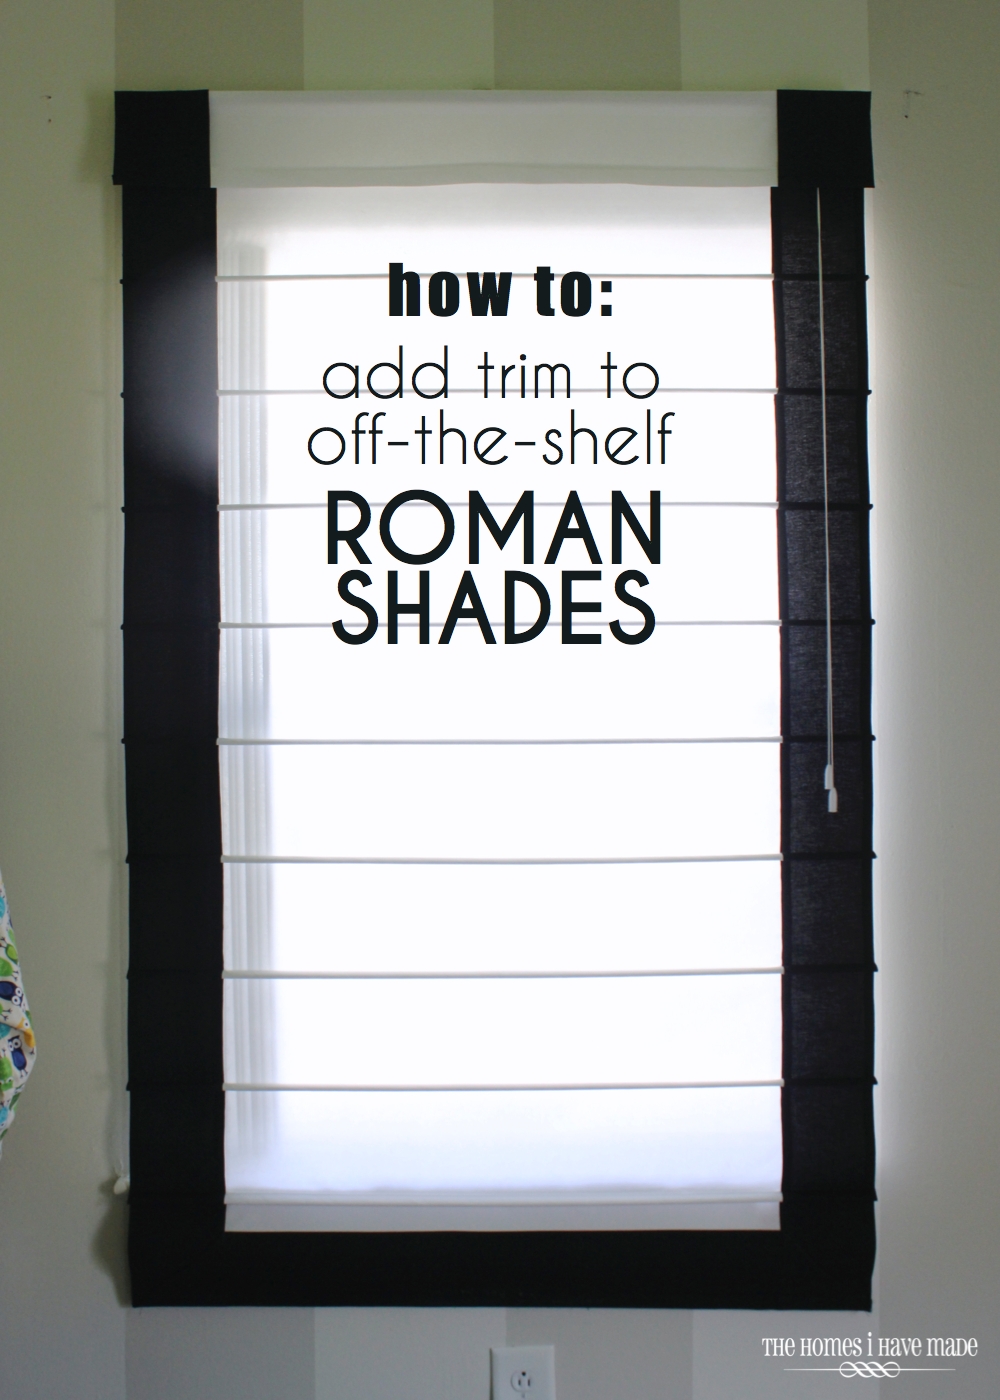
Customizing Off-the-Shelf Roman Shades
Roman shades are my absolute favorite window treatment! I love their clean, tailored look, their function, and their relatively low demand of fabric (compared to drapes, at least!). As I was working with the floor plan in Henry’s new-ish “big boy” room, I realized that drapes were not going to work with my furniture placement (too much furniture in front of or near the windows); and I wanted something other than valences (which we’ve had in there for 2 years). I had my heart set on roman shades in this space, and I also wanted them to have some personality!
However…have you seen the price tag that comes with most roman shades??? Ouch! Making roman shades myself has always scared me. Even though I consider myself a “try anything” DIYer, I always convince myself I can do it, and then I always chicken out. I think it’s the combination of sewing and all the stringing and hardware that scare me away. I know there are tons of “no sew” roman shade projects out there, but I really wanted these to look and work like the real deal, but I didn’t want to pay a fortune or have it become a huge, complicated project. So, I decided to do the next best thing to making my own: customizing off-the-shelf roman shades!
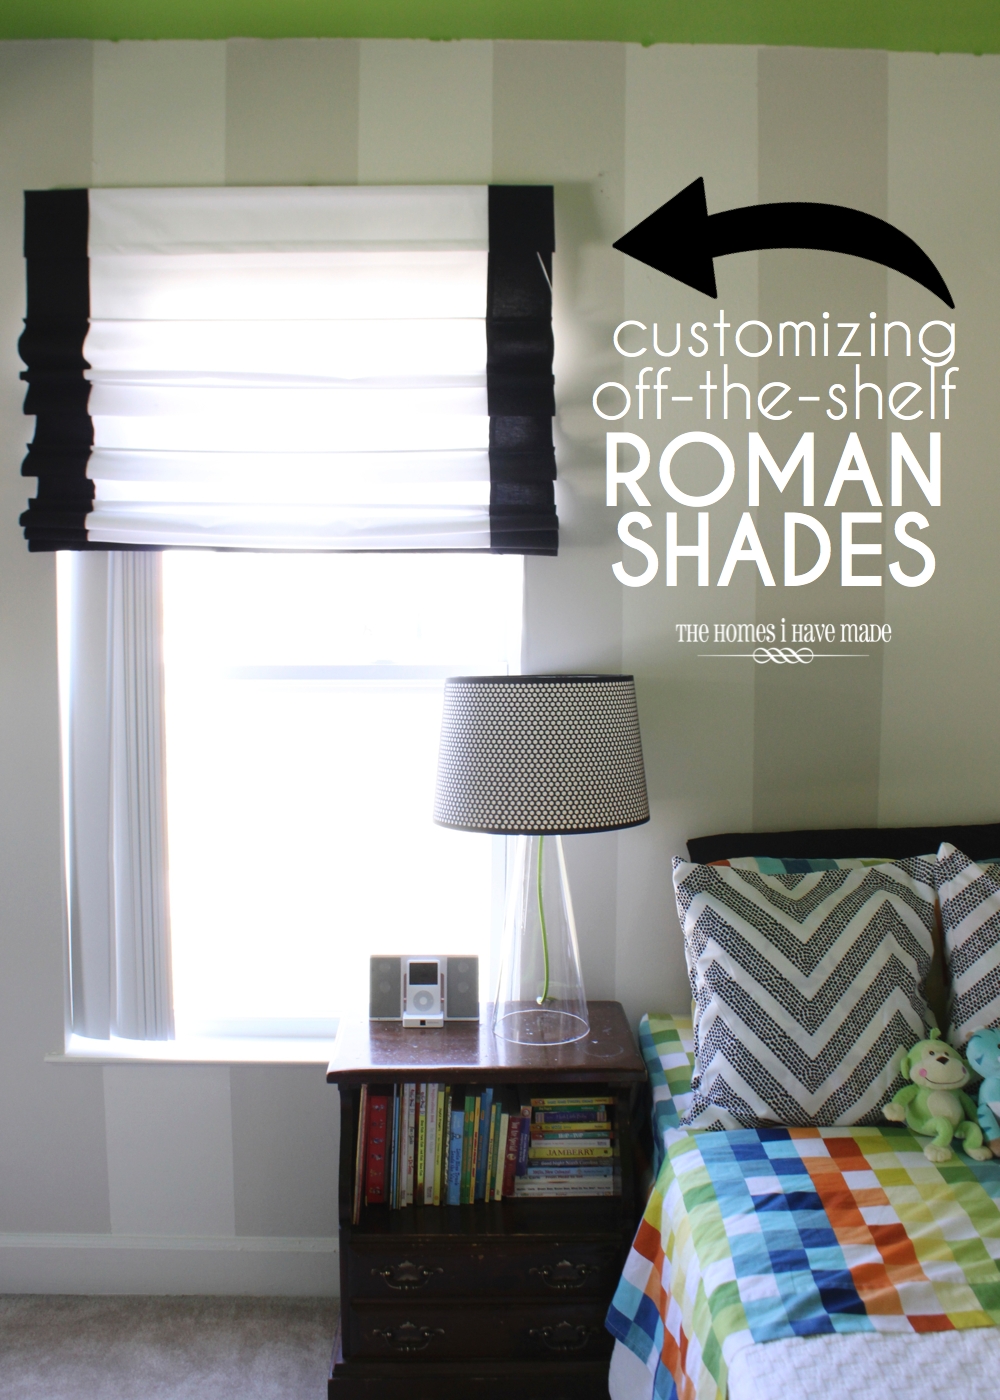
If you peak back at my inspiration boards for this room, you’ll notice I picked out white shades with black trim from the very beginning. This combination is sleek and simple, but also adds a graphic punch to the somewhat neutral walls. I like that they are both modern and classic in the same breath, and I’m hoping I’ll be able to use them over and over as Henry’s room changes over the years (fingers crossed!).
This was absolutely one of those “I can’t believe it worked exactly as I thought it would”-type projects! Adding the black trim was completely a no-sew addition; and while a little tedious, it was pretty simple to do. So, grab your iron, get comfortable at your ironing board, and let me show you what I did!
I shopped around a bit for my white roman shades. Our local hardware stores didn’t carry shades wide enough for our windows, so I ended up ordering these from JCPenny. One sale and with a coupon, they came out to ~$32/each. I was pretty happy with $64 for window treatments, considering the fabric for drapes would cost me a lot more!

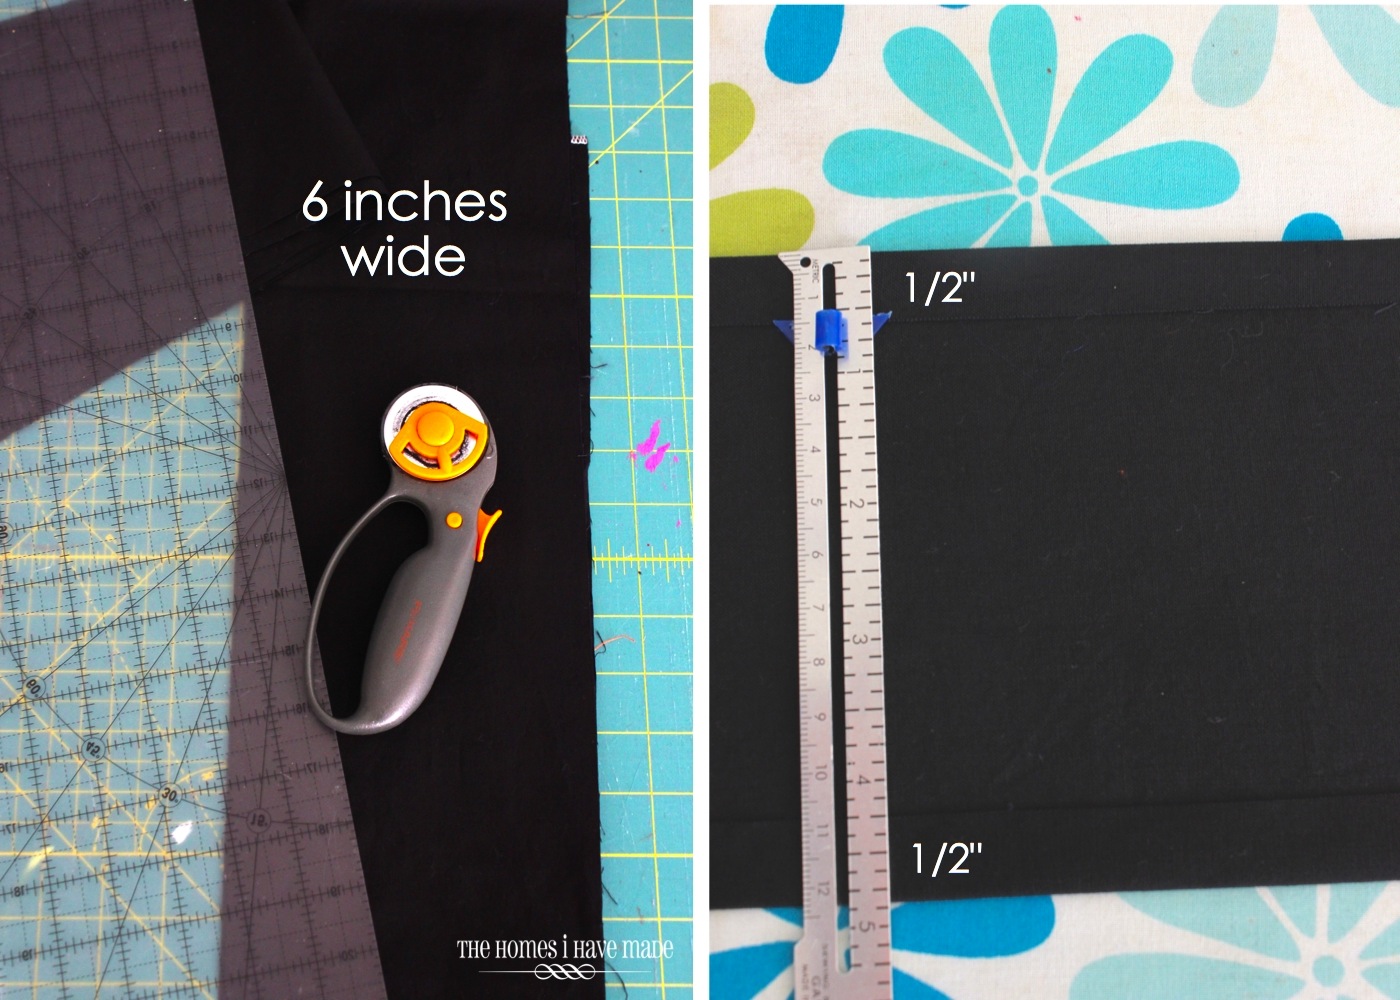
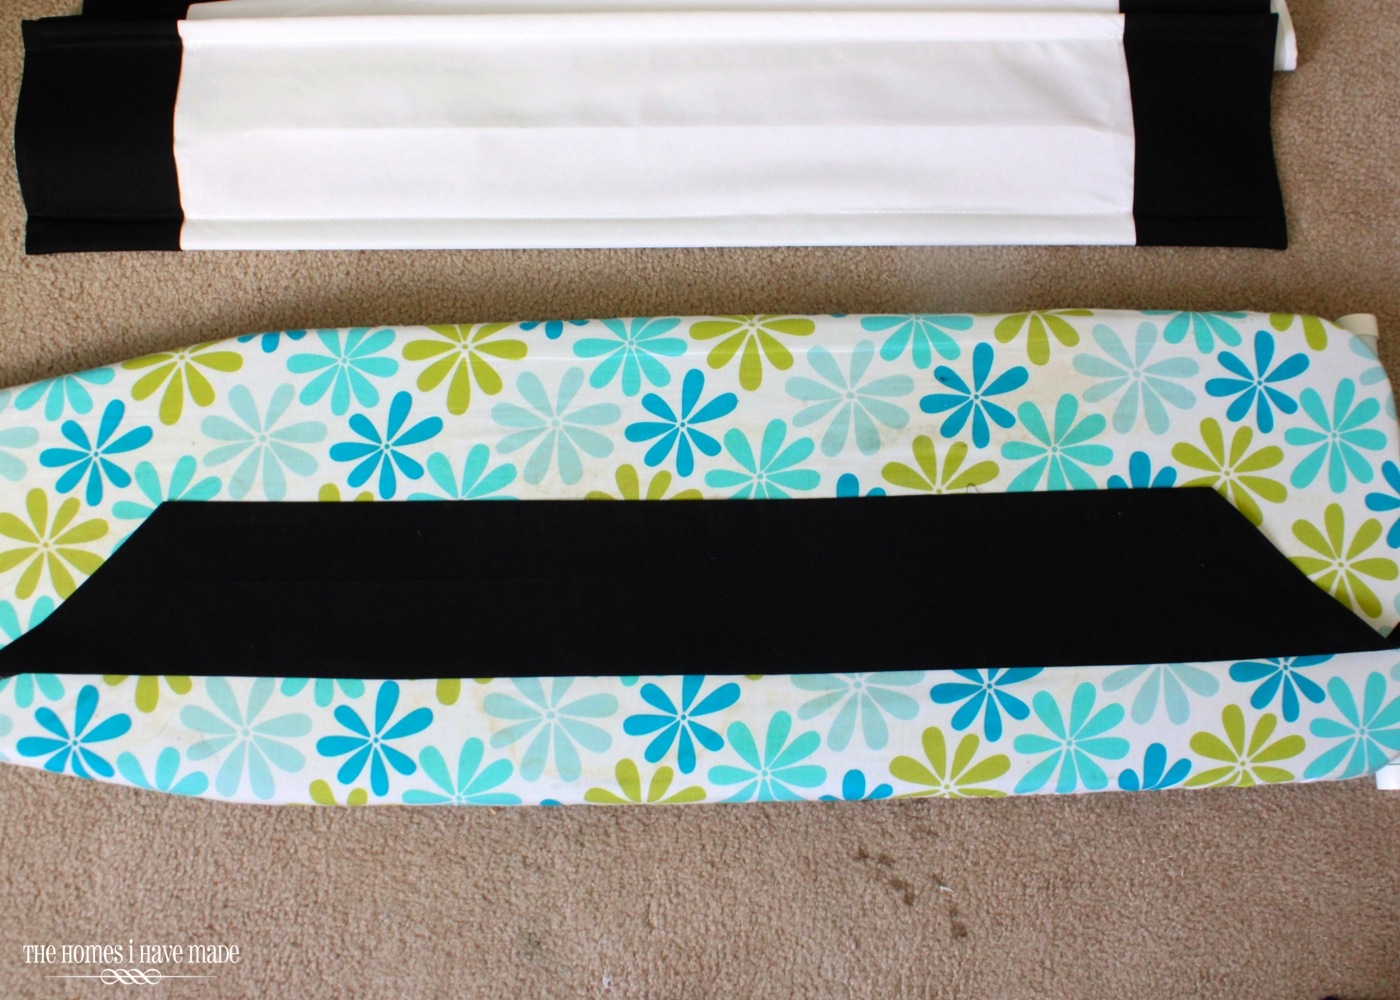
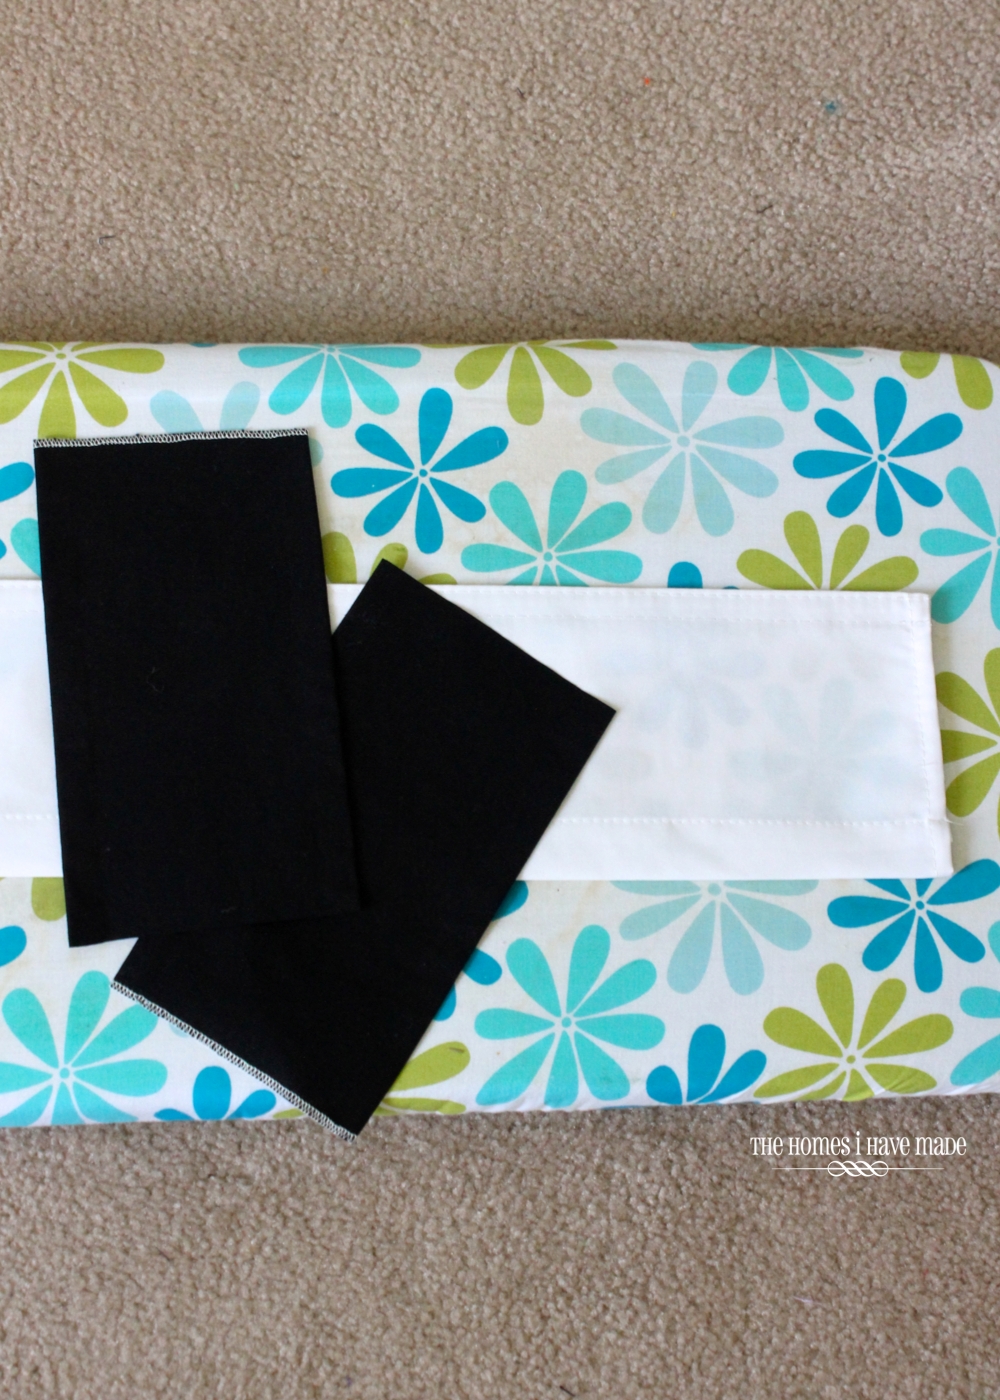
I went to my fabric stash and found some good black cotton quilting fabric. I made sure I had enough length to stretch the length of my roman shade so that I didn’t have to worry about sewing strips together. In my case, 2 yards was plenty for both of these shades.
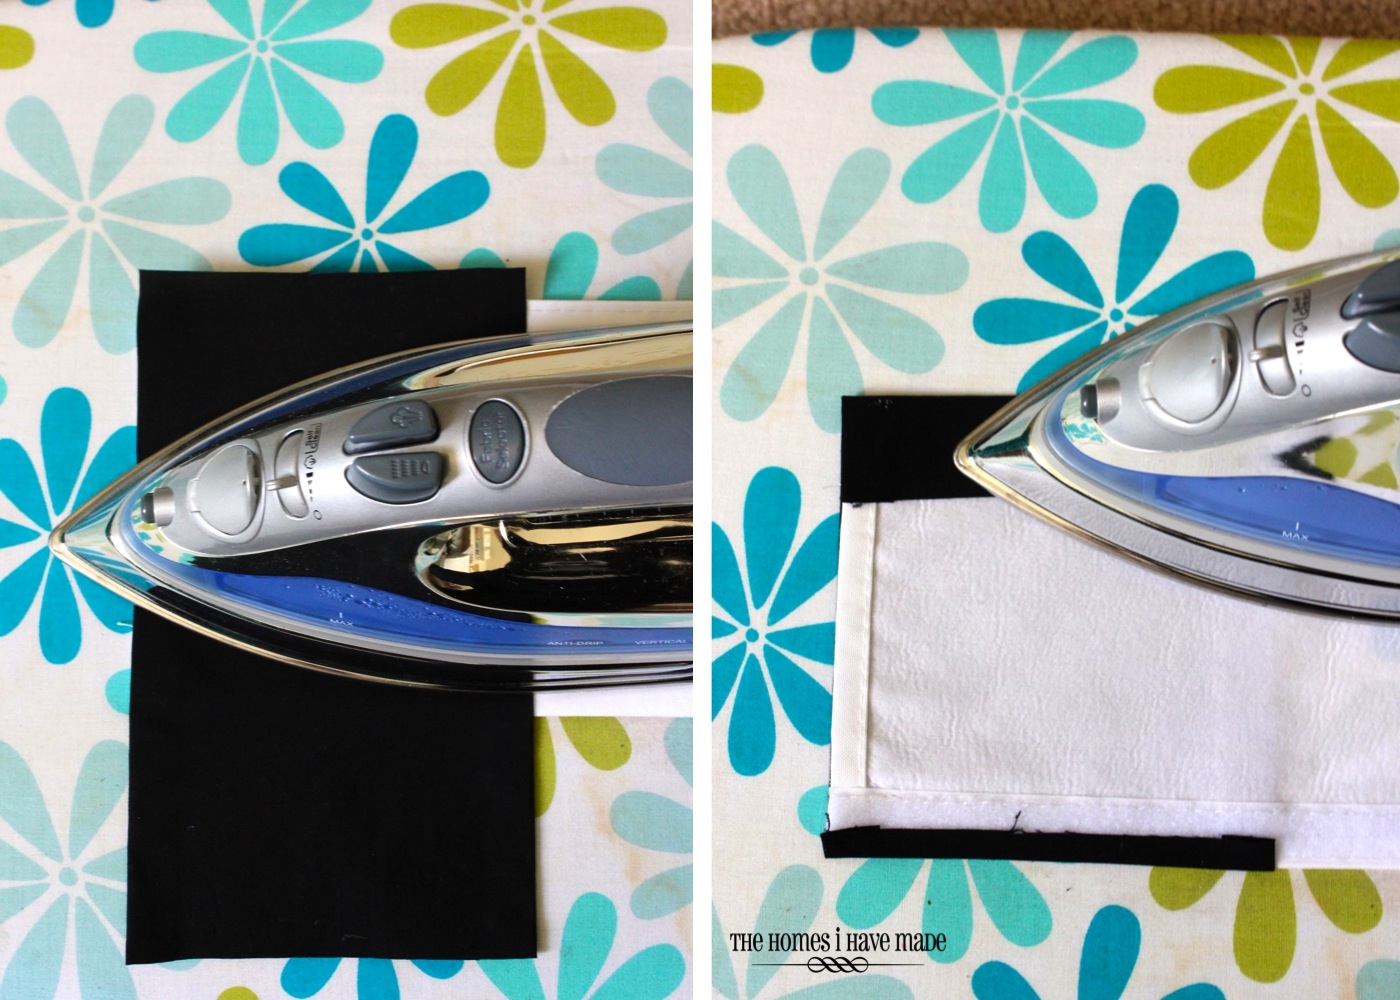
I started by cutting my black fabric down to 6″ strips – NOTE – cut the strips lengthwise – my strips are 72″x6″. I cut a total of 6 strips, 3 for each shade. Next, (the most tedious part), iron over a half inch down BOTH lengths of each and every black strip. Yep – it’ll take a while…I suggest turning on a movie 🙂 With your fabric ironed under, your strips should now be 5″ wide.
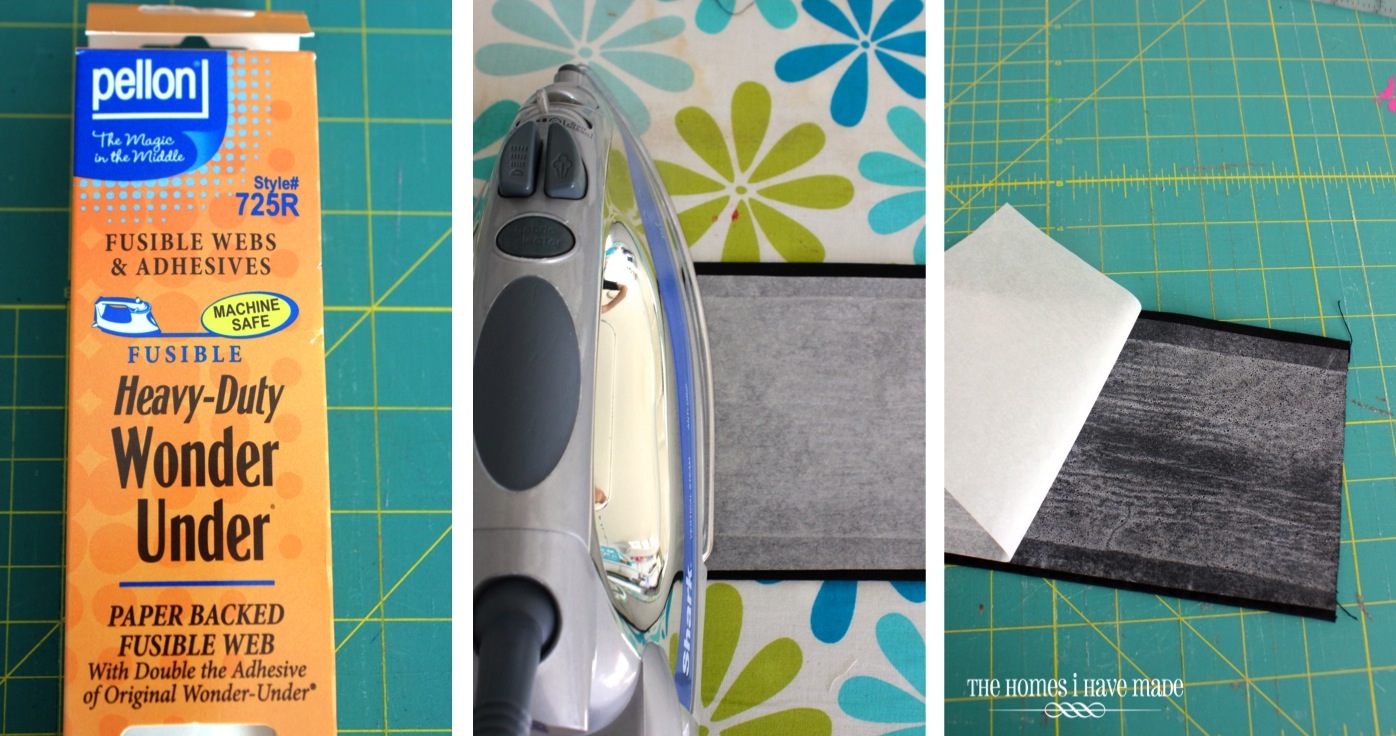
Next, you need some sort of fusible web. I prefer Heat’n’Bond, but I had a few rolls of Wonder Under in my stash so I used that. Cut your fusible web down to 4.75″ strips. I had 5 yards of Wonder Under, so I was able to cut long 72″x4.75″ inch strips to stretch the length of my black strips.
Next, iron the fusible web on the WRONG side of your black strips, OVER the folded edges you just ironed down. This will ensure you have nice clean edges when you secure the black strips to the roman shade. With fusible web adhered to the black strips, remove the paper backing.
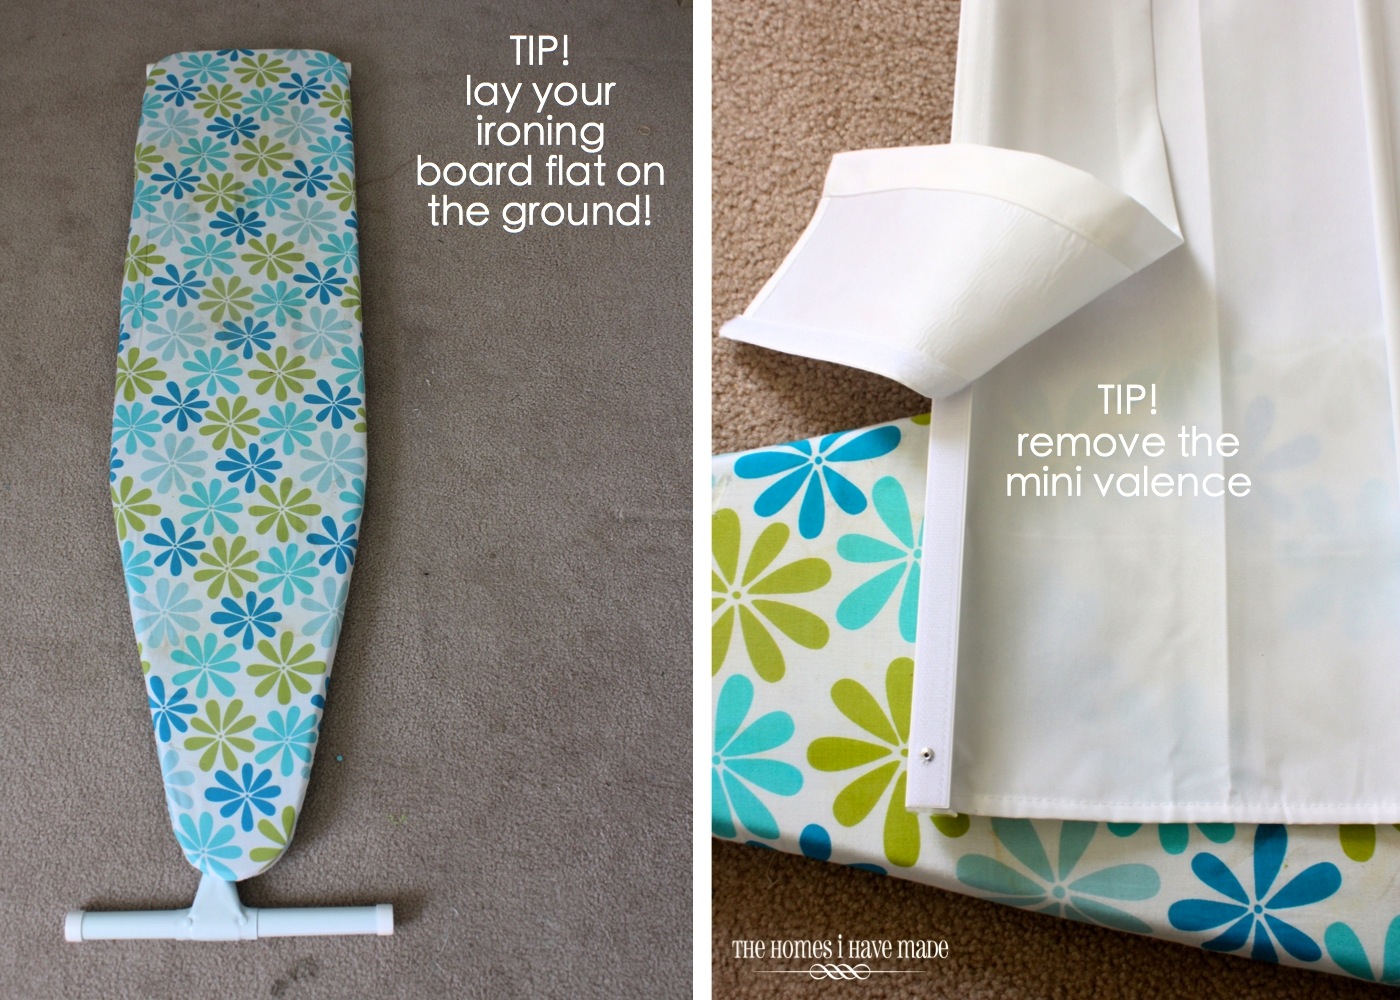
Before getting started, I have two quick tips!
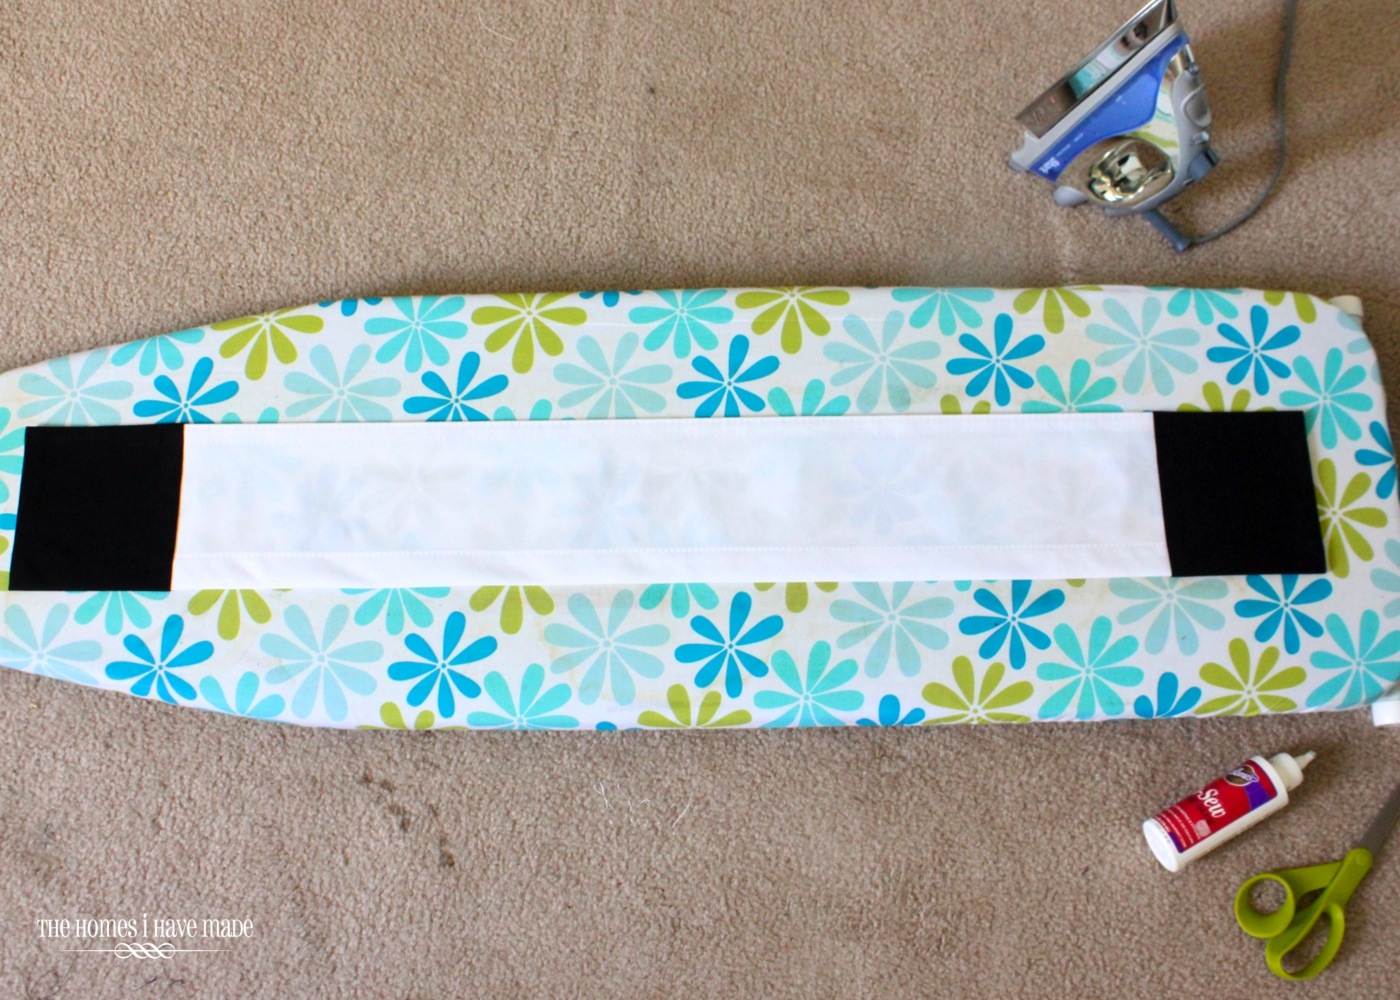
- Put your ironing board on the floor without opening up the legs. The roman shade is wide and you only need the edge on your ironing board. Putting the ironing board down on the floor helps support the roman shade while you iron.
- Just to make things a little easier, remove the mini valence along the top of the roman shade (if there is one). It’s most usually held on with just Velcro.
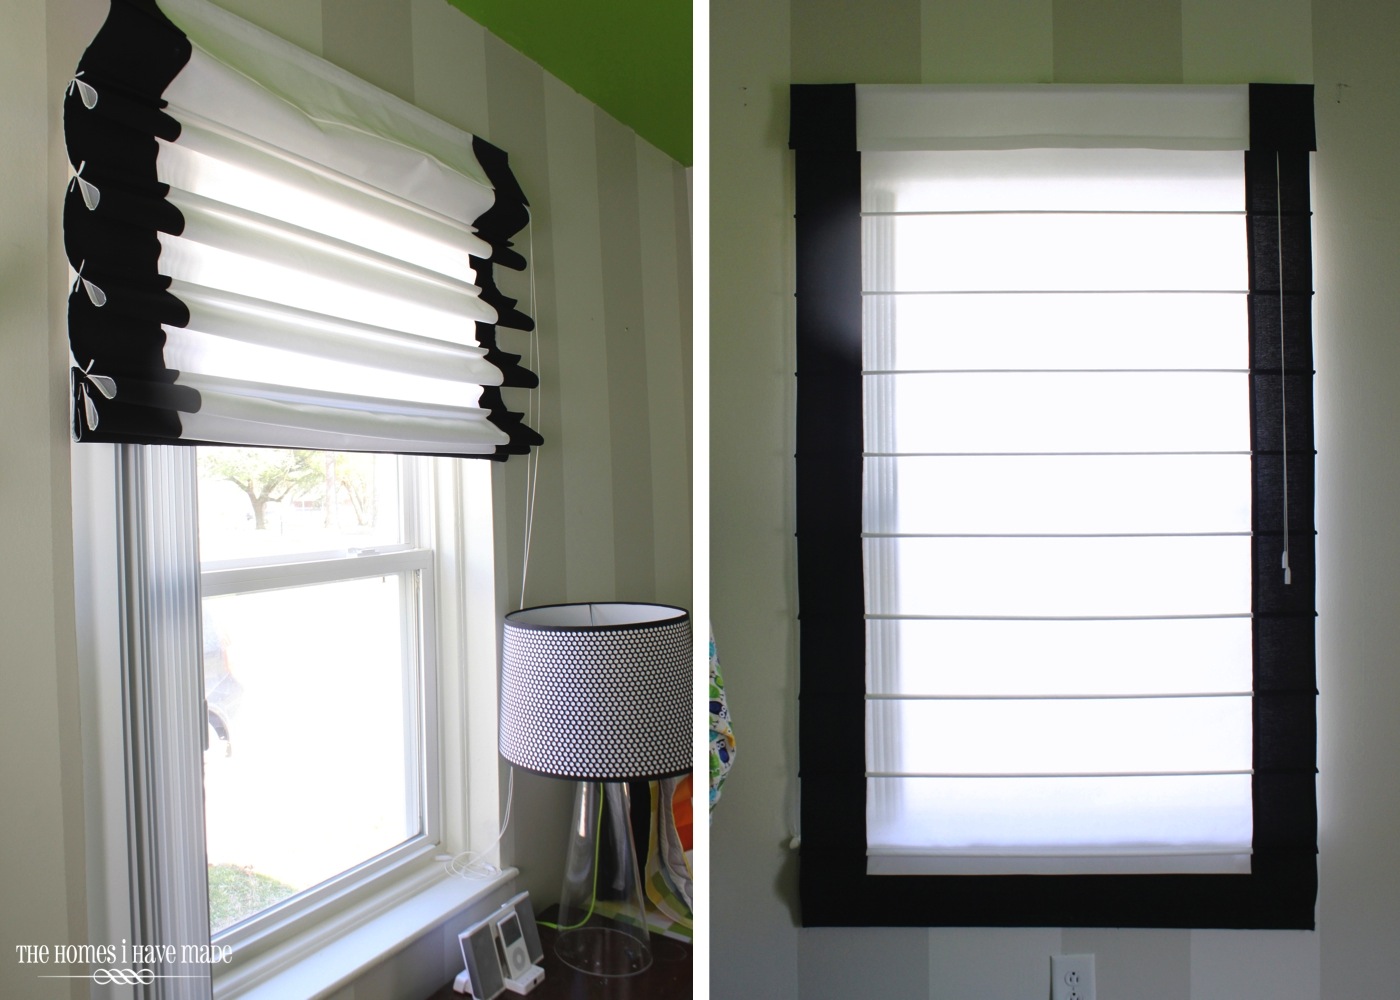
Essentially, you are going to iron on your black edging to the roman shade. If you work slow and steady, this is what it will look like when you’re done:
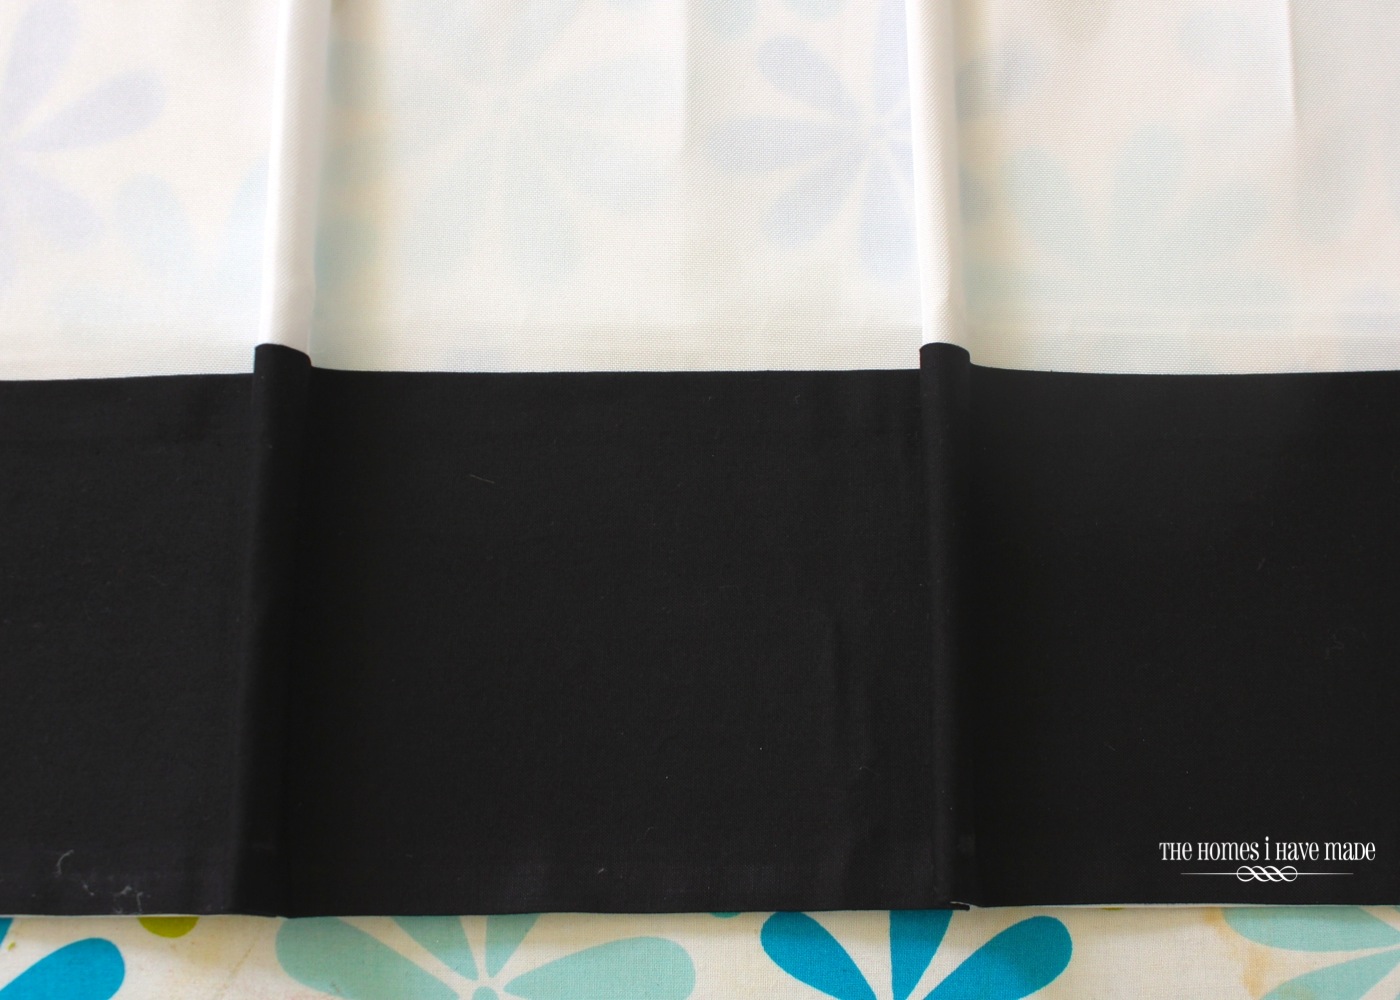
Work slowly 🙂 I started by placing the black strip up along the top edge and side edge of one side of the shade, making sure my edges perfectly lined up. I ironed every few inches making sure the fabric was securing to the shade. As I got to a wooden “bone,” I would iron the fabric to one side, then carefully flip the bone, re-align the fabric, pull it taught and continue working down the shade. As you iron the strip in place, just make sure your outside edges are always flush and your fabric is laying flat. Make sure every inch is ironed down so it doesn’t pucker when you hang and fold up your shade. At the end, I trimmed the black strip and ironed the last 2″ under the bottom of the shade (toward the back). Repeat on the other side.
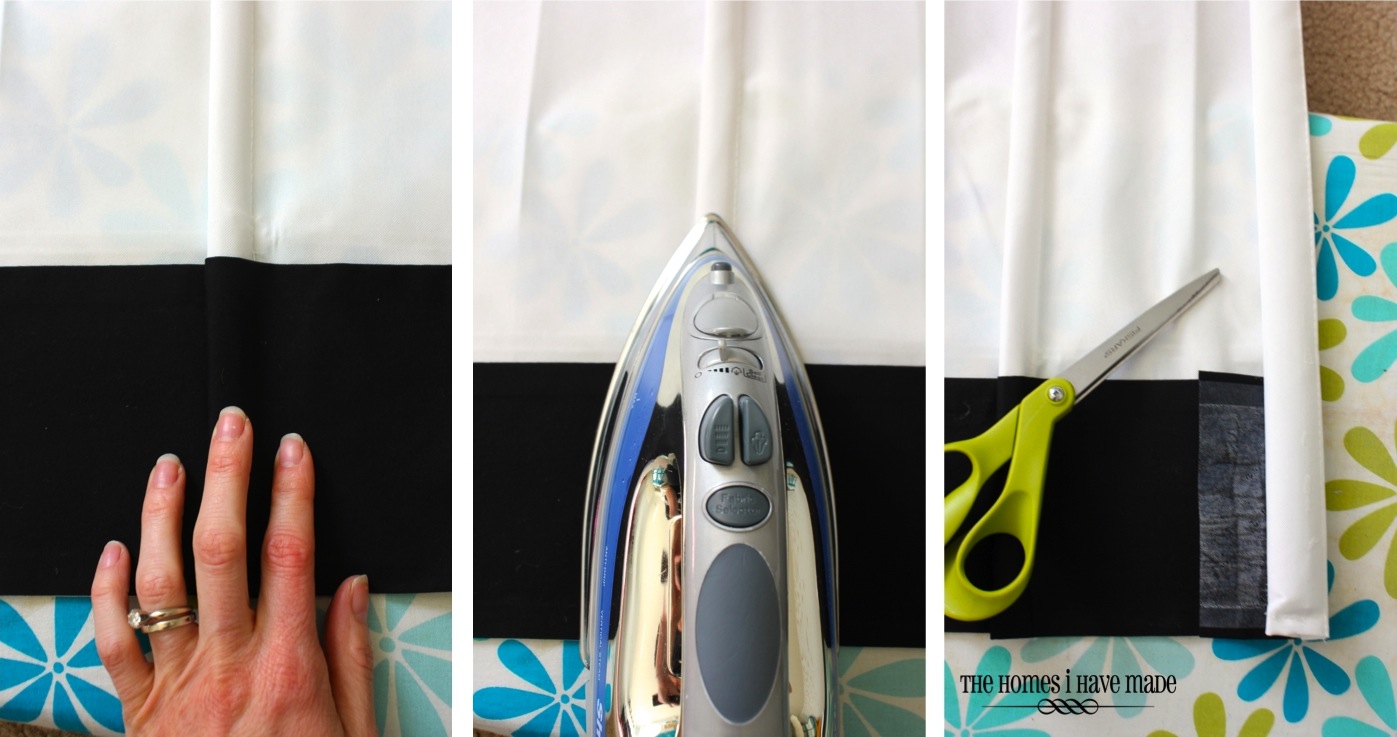
With both sides done, it’s time to attach the bottom black edge. If you prefer just side edging, you can skip this part! To start, grab another one of your black strips, make sure it is a few inches wider than your shade width.
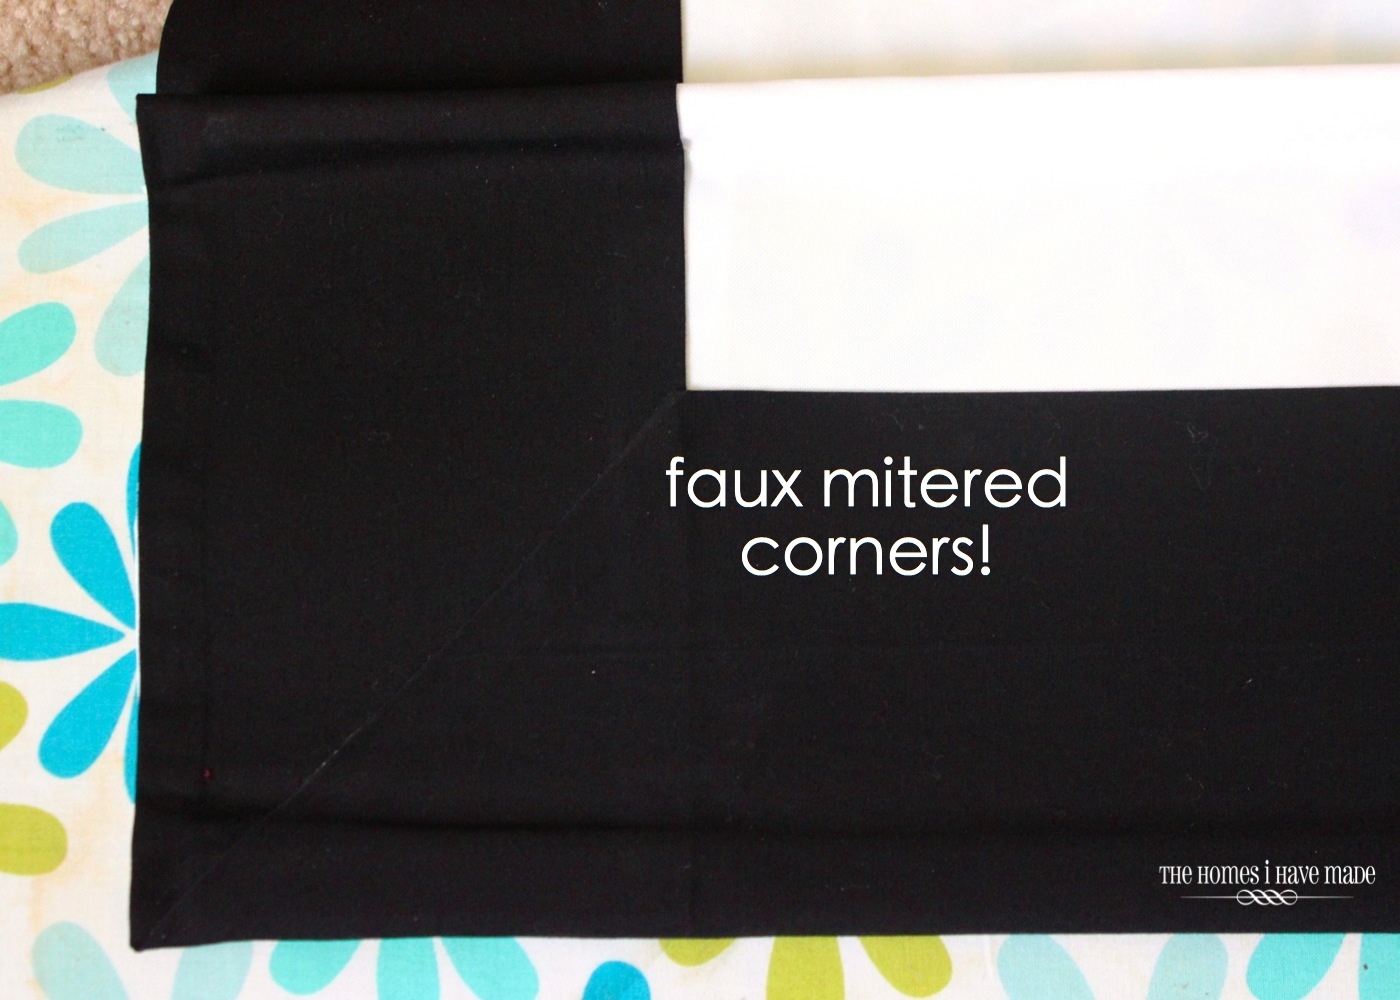
I wanted my shades to have the appearance of mitered corners…since this whole treatment is no-sew, these were easier than you might think!
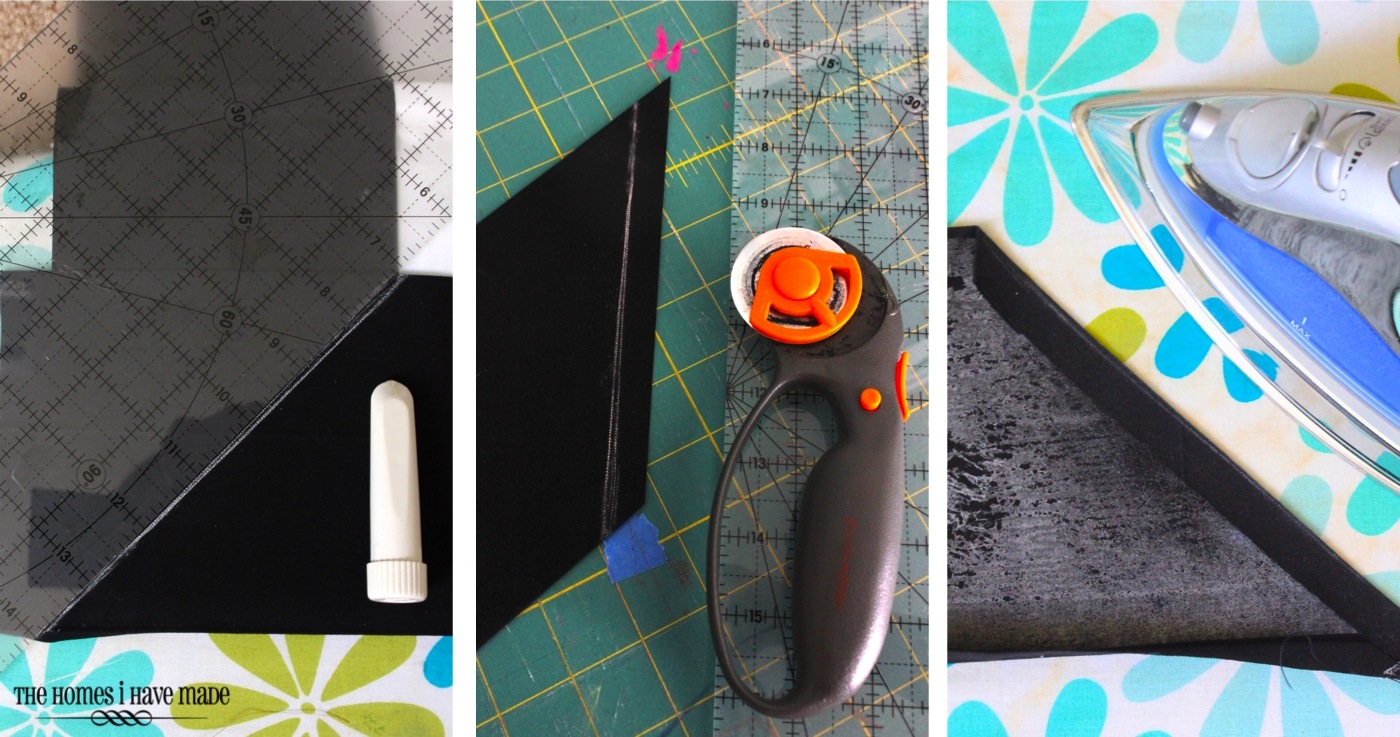
NOT PICTURED: Start as you did before, iron over the edges of your 6″ wide black strip 1/2″ on each long edge (making your strips 5″ wide). Cut down your fusible web to 4.75″. This time however, place the fusible web OVER only ONE of the 1/2″ folds, leave the bottom 1/2″ fold free from the fusible web (so it can be folded under the bottom of the shade).
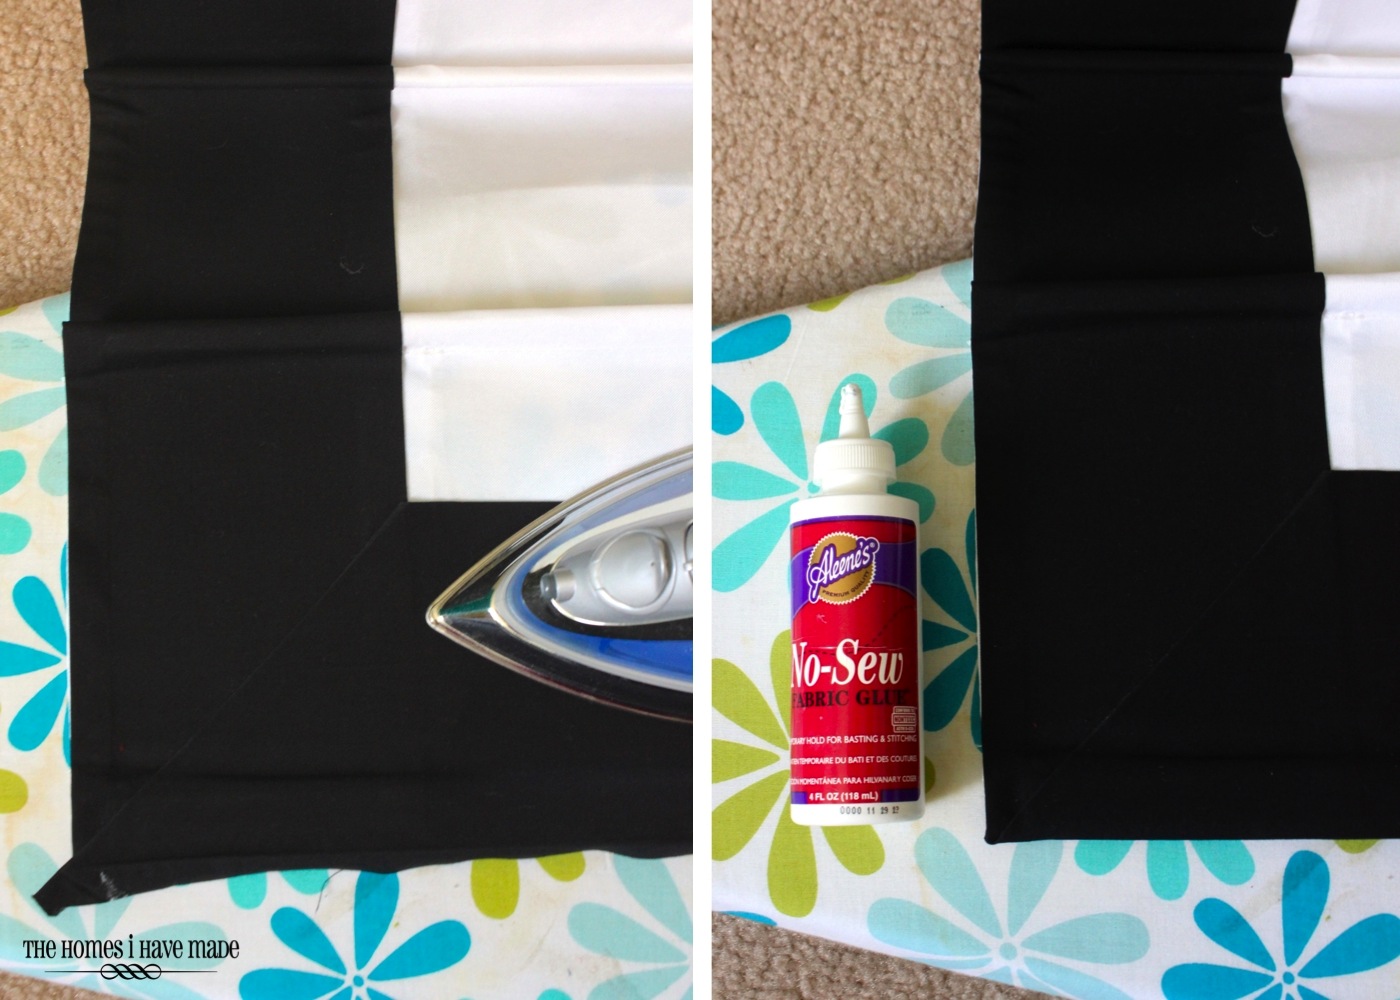
Next, place your black strip along the bottom of your shade, on top of your side strips, making sure it is even/level across the bottom. At the corner, draw a chalk line from the corner of the side/bottom black strips to the outside bottom corner. Make the same markings on the other corner. (bottom left photo)
Remove your black strip from the shade and cut down your black strip 1/2″ (TO THE OUTSIDE) of your chalk line (bottom middle photo). Fold the diagonal right on your chalk line and iron the fabric to the back (where your fusible webbing should be!) (bottom right photo)
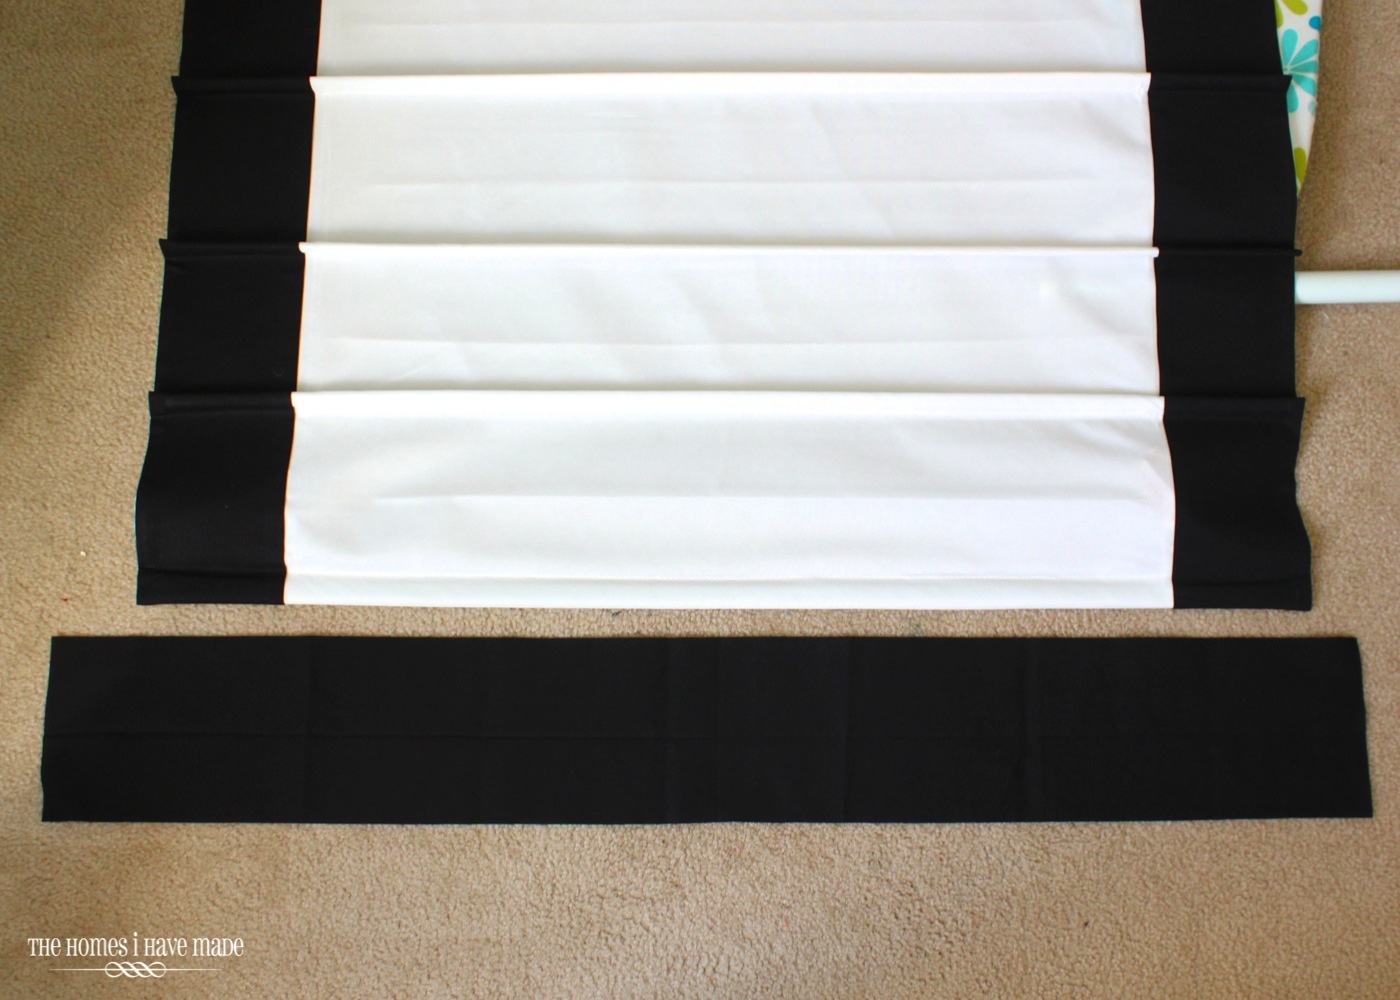
With both corners measured, cut, and folded, it should look like the photo below. It’s a little hard to tell, but note that the bottom fold is not bonded down like the top or diagonal folds.
Secure the black band to the bottom of the shade by ironing first, making sure your corners line up to form a perfect miter. Use fabric glue to secure the corner seams a little more AND secure the bottom fold of fabric under the bottom of the shade toward the back.
The last step is to add the black banding to that mini valence we removed in the very beginning! Thankfully, I had enough black leftover from my bottom strip to cover each side. Repeat the very first few steps of ironing over the black strips a 1/2″ on each long edge and adhering fusible bond to the back of the black band (covering both 1/2″ folds).
Start by securing the black band to the front of the valence piece, making sure the outside edges line up. Flip the valence over and secure the edging to the back with the iron.
And that’s it! Time to put the valence back onto the roman shade, and you’re done!
Hanging these on the wall took a little bit of brain and muscle (as my walls are seemingly made of concrete), but once they were up, I was so so so thrilled with the final result! You’ll notice my shades are mounted on the outside of the window frame…I did this for two reasons. One, these two windows are slightly different widths and are at different heights. By using the same width shade hung at the same height, it gives the allusion that the two windows are the same. Second, as you can see, our housing unit “comes with” vertical blinds – yuck. At the time of ordering, I was on the fence about taking the blinds out or just permanently pushing them to the side (as you see here). Plus, I wasn’t sure how well the roman shades would darken the room during the day (not to well as it turns out) and wanted the option to keep the blinds if I needed them for sun blocking during the day. While I much prefer inside mount shades, outside mount was a better option this time around!
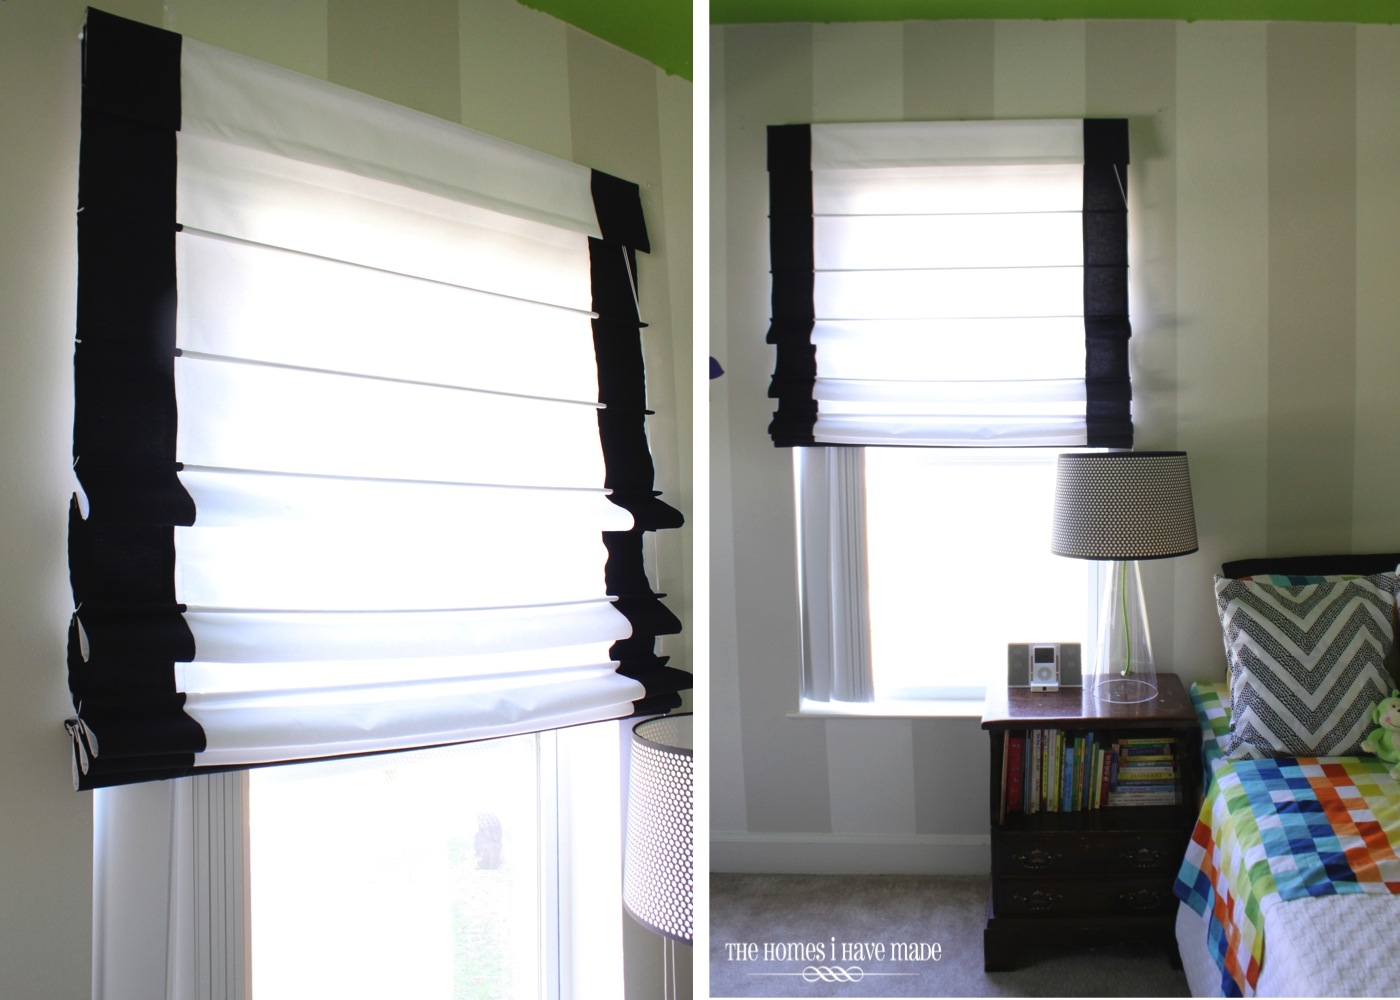
I am so excited how well this project turned out. As I’m sure many of you crafters/DIYers out there know, good ideas can turn out all wrong pretty easily. While these do take a bit of time (much of it with an iron in your hand!), it’s a relatively easy and cost-effective way to get a high-end roman shade look!
So you may or may not have noticed that my blogging schedule has been a bit erratic of late (if you haven’t noticed, I sure have!!!). I keep saying “on Friday, I’ll show you…” and then I don’t show up again until another few days pass by, and I hate that. I wish I had some great secret project I was working on that’s keeping me from my computer, but the honest truth is that my toddler has dropped his nap (cue the high pitched “nooooooooo!!!!!” coming from me curled up in the fetal position rocking myself back to calm!). Never in a million years would I have guessed this transition would be so traumatic for both of Henry and I. In addition to his moodiness (and mine!), it also means that I’ve now lost about 14 hours of solid productive blog/project time during the week. Major ouch. We’re working hard on establishing a new rhythm to our day; and with that, I’m trying to find a new rhythm to my projects and blog.
We’re not quite there yet, so for now, I will just say…next up on the docket: a fun sewing project to keep little pieces in order. You’ll see it here soon 😉
Have a good start to your week, friends!
Megan

6 Comments on “Customizing Off-the-Shelf Roman Shades”
They look amazing!! I can't believe you did it. I love how they turned out. I'm so sorry about Henry not taking naps anymore. It is definitely a sad day for you. I was so sad when my girls stopped naps, but I still made them have quiet time in their room where they could read or watch a movie that way I still got some time to do what I needed to do. Thanks for the tutorial!! Love the shades!!
I absolutely love how finished this room looks with those shades! And such a simple touch that really went a long way 🙂
I can simpathize with you on the loss of nap time. My little guy, also named Henry, recently went from 2 naps to 1. I really miss my extra blogging time! By the way, I love the room so far.
Good morning Megan, from Perth, Western Australia…!
I just came across from I HEART ORGANISING and this is my first visit to your page. I'm a lifelong "renter"…(a Senior woman) and am always looking for good DIY ideas to make my rented home more comfortable, so your blog caught my attention. I've been thinking for some time about tackling new blinds such as you've done here, because the curtains I've had up for some years are getting on my nerves now and I need to make changes…! Thanks for the details and the photographs that have given me hope that I might be able to DO IT MYSELF because to pay a company to install them would be too expensive for me. Looking forward to other ideas for renters from you…… Cheers, Nadia in Perth.
Thank you for your great tutorial ..what a labor of love! It appears we both have the same Roman Shades from JCP called Savannah shades. I needed to apply a trim to my JCP shades due to my cat’s face staining my white blinds. The dark trim will cover her stain and hide any other future face staining marks.
Pingback: 5 Home Decoration Solutions For Renters - The Ana Mum Diary